bluesmart SN Series User manual
User Manual-SN Series
All In One Solar Street light
Using Instructions:
How to activate the lamp after receiving the goods?
Clean surface of solar panel regular such as dirty leaves, oil, ect,
ensure high photoelectric conversion efficiency.
Set suitable angle towards sun. (≈local latitude)
Recharge battery every 3 month at least if it is idled.
Clean snow on solar panel surface timely in winter.
Please avoid solar panel being shielded by buildings, trees, antenna
mast or other obstructions, otherwise it will reduce working efficiency
of solar panel , resulting in lower system efficiency.
Charge temperature of Lithium battery is from 0°C to 55°C, the discharging
temperature is from -20°C to 60 °C, make sure that ambient temperature
is in this range when used, avoid damage to lithium battery.
1
2
3
4
5
6
If you receive the goods in the daytime, connect the waterproof cable
between solar panel and lamp body, press the remote " ON" button, the
lamp will turn on for one minute and then turn off, that's activate the
lamp successful (no matter the solar panel receiving sunlight or not)
If you receive the goods in the daytime, connect the waterproof cable
between solar panel and lamp body, take whole set lamp out for absorb
the sunlight and wait for 3 minutes. When the sensor indicator light
appear red flash, the activation is successful.
If you receive the goods at night, connect the waterproof cable between
solar panel and lamp body, press the remote " ON" button, the lamp will
turn on for 12hrs, you can press “OFF” button if you want it turn off.
4.
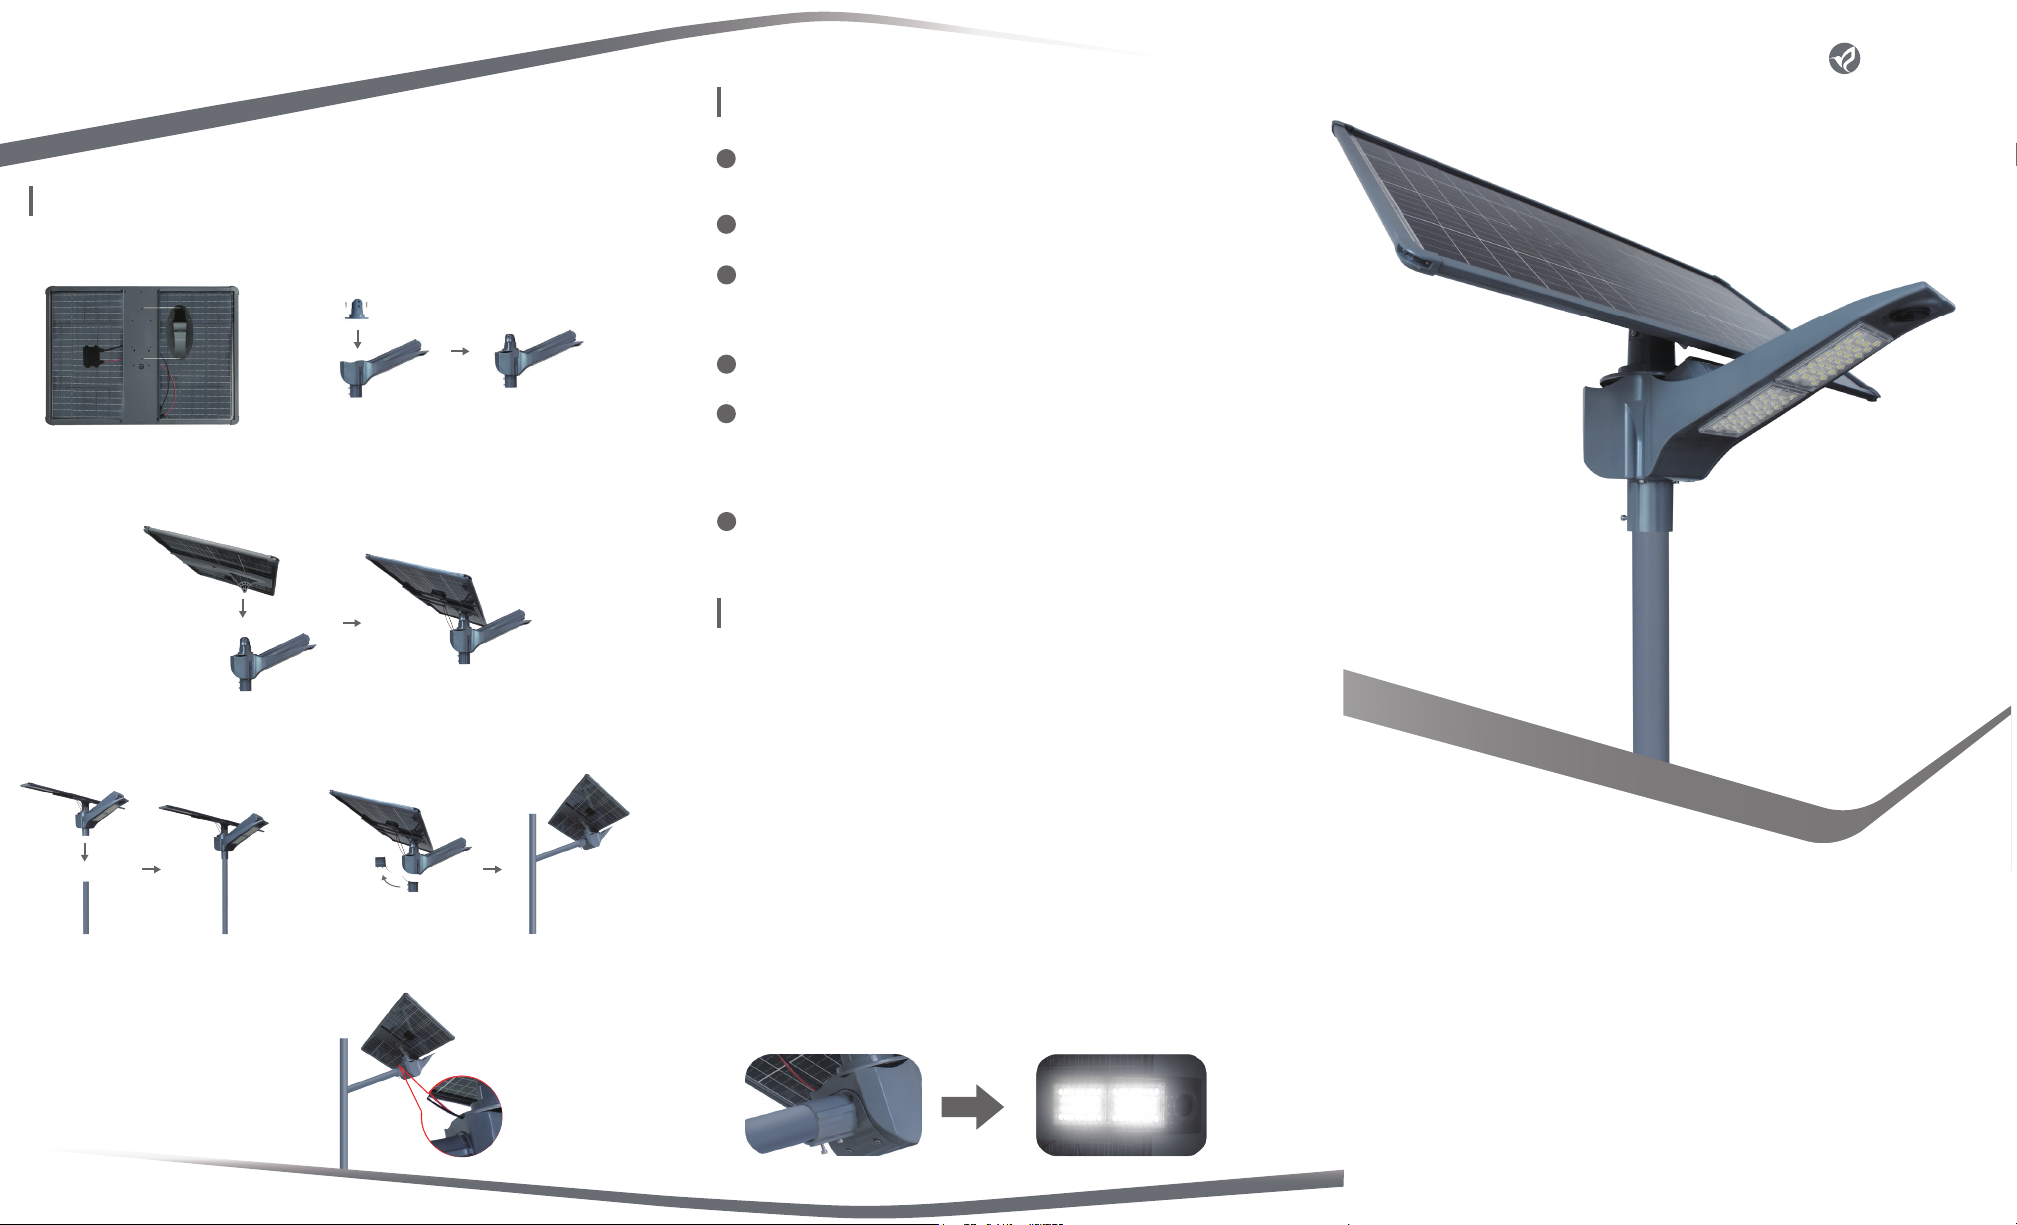
Install the light:
Use Φ6mm wrench to loosen the 6pcs screws, install the lamp into the pole and fix screws
(Horizontal installation: Use
Φ
6mm wrench loosen the screws of universal wheel and then turn to Horizontal 90°
angle, after that fix it.)
5.
Connection:
Last step just connect the
waterproof cable from solar panel to lamp
body.
Installation
1. Elliptical bracket: Use
Φ
5mm wrench
and 6pcs M6x16 screws to fix the elliptical
bracket on the solar panel.
3. Combination: Use
Φ
6mm wrench and 1set M8x100 screws and 2pcs M8x30 screws to fix the multi-angle
bracket buckles after adjust the suitable angle, make sure the solar panel will absorb max sunshine.
Horizontal installationVertictal installation
*
*
*
bluesmart
slight differences.
φ76mm 90°
Use 5mm wrench to loosen
6 screws, fix the 360° rotating platform on the lamp
according to the direction of the road, and fix the
screws
2. Rotating platform:
Installation Height and Distance
SN-50
SN-60
SN-80
SN-100
SN-120
5-7m
6-8m
7-9m
8-10m
9-11m
25-28m
28-30m
30-35m
35-40m
40-45m
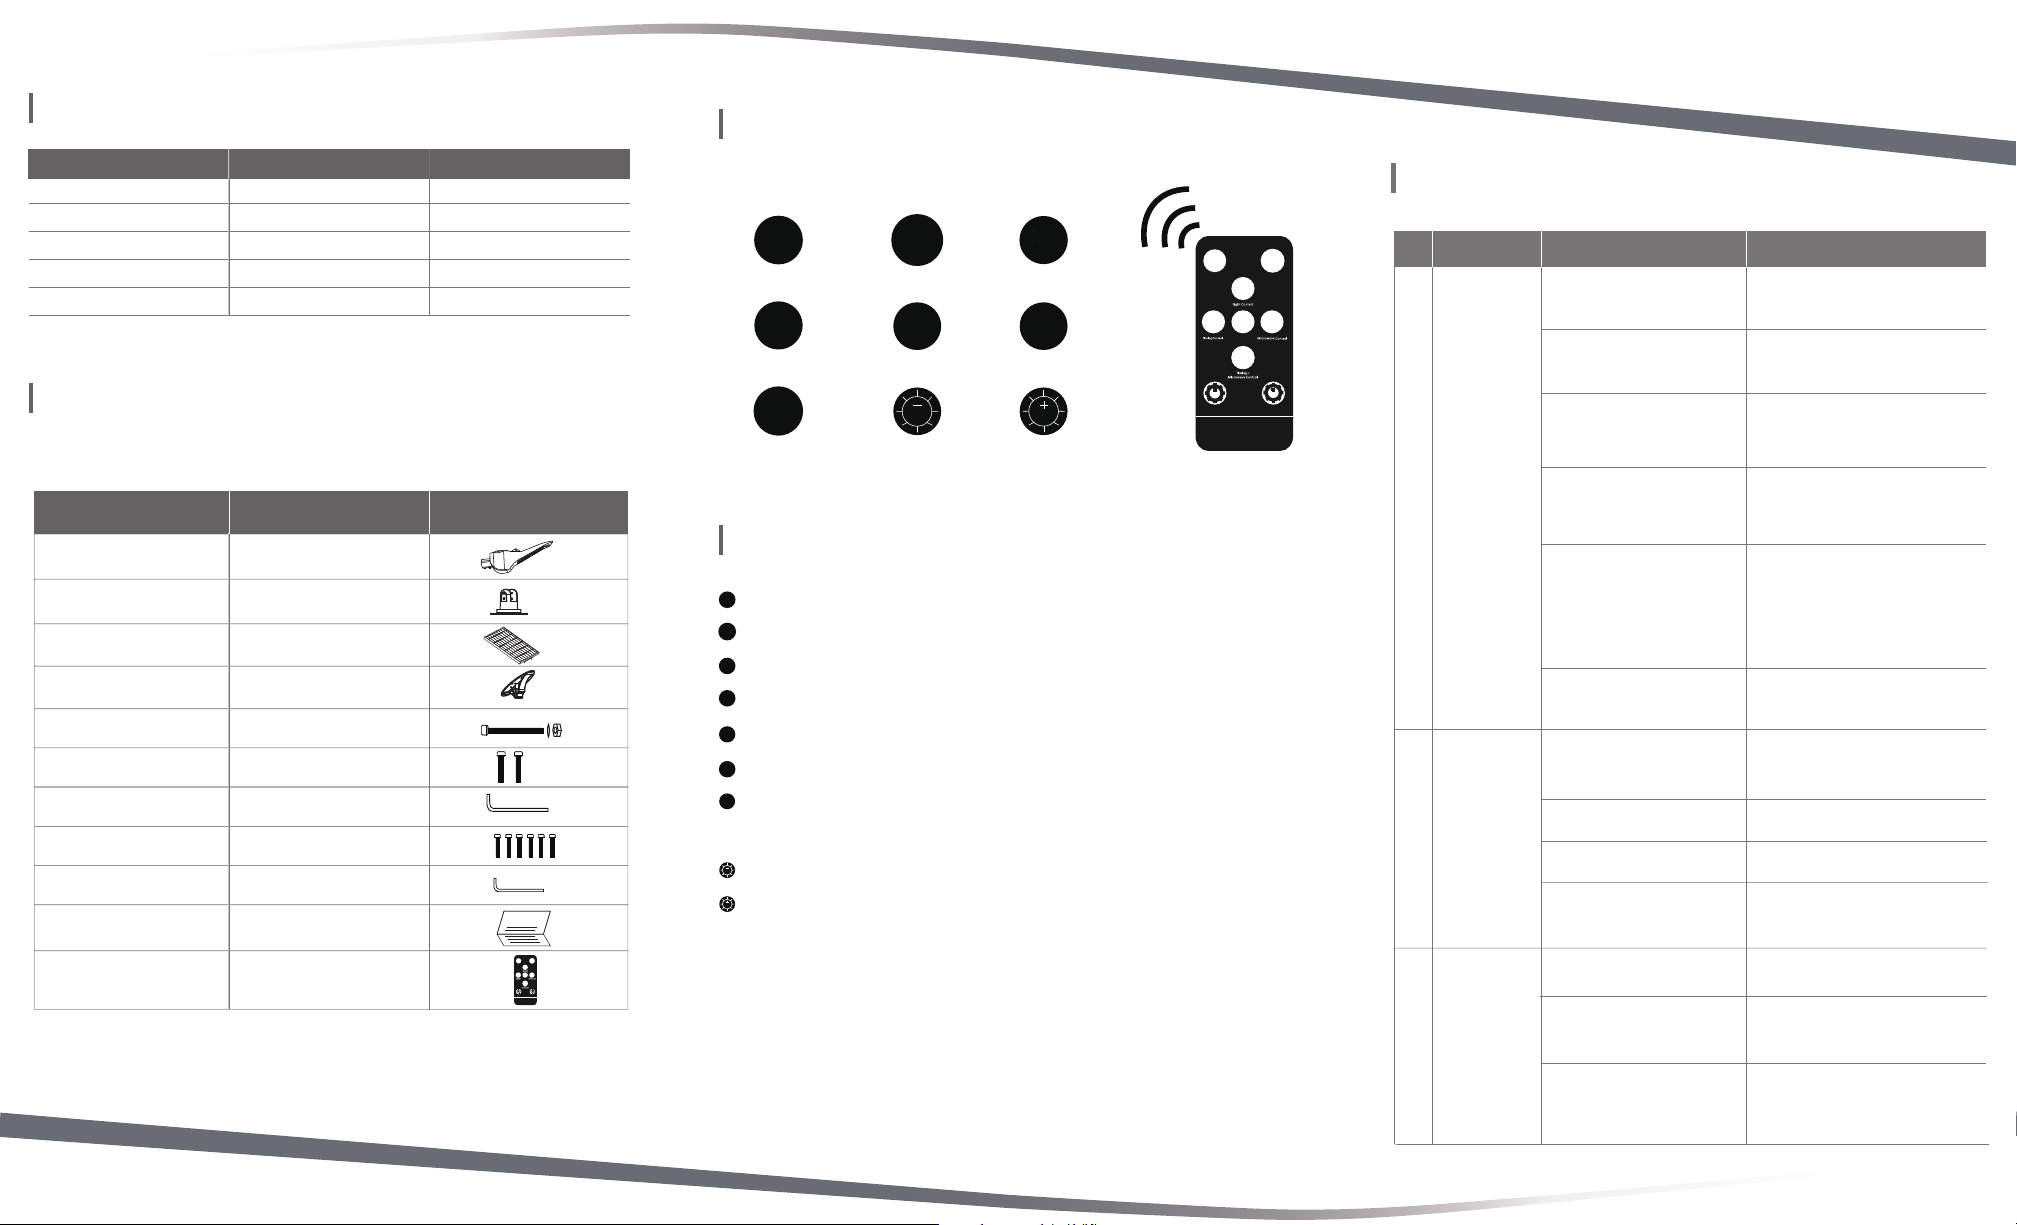
Humanize Intelligent Remote Control
Technology
Working Modes
Trouble Shooting
1 No light at night
Check if the solar panel is blocked
from the sunlight by houses, trees
and other obstacles
Clear obstructions or change installation
location
Check if there is any artificial light
source(s) illuminate on the
solar panel at the night
Remove the artificial light source(s) of
interference or change the installation
location
No.Situation Trouble shooting steps Solution
Check the battery have power or
not( There will be a green light
flashing on microwave sensor if
the battery have power)
If all step above have no problem
Test solar panel voltage
Test solar panel voltage at sunshine.if the
volatge of solar panel lower than 10v,
please replaced damaged battery
If the battery voltage is lower than 11 V, the
battery has been protected automatically.
Please use solar panel charge the battery
directly (do not through solar charge
controller), after full charged, battery voltage
shows 14V or above 14V, then observe the
lighting situation at night
Test battery voltage
Disconnect the cable between the
solar panel and lamp, then connect it again,
then press M button working mode, then
wait for 1 min, lamp will be lighting again
Put the solar lamp in strong sunshine
charging 4-6 hours,then observe the
lights at night
2
A serious
shortageof
working time
Clear obstructions or change installation
location
Check if the surface of the
solar panelis dusty or covered
Clean the surface of solar panels as
detailed above
Use the remote control to readjust the
working mode to M
Under normal circumstances, sunny day
after charging the solar panel to observe
the lights at night
Check if the solar panel is blocked
fromthe sunlight by houses, trees
and other obstacles
Confirm the working mode is
correct or not
Lighting installation area is a long
time cloudy and rainy days (more
than 5 days)
3
Check the working mode is corret
or not
Check if the air temperature close
to human body temperature
It is out of motion sensor detection range
when installation height exceeds 10m.
It is recommend to reduce the height or
use other operating modes
Lights fail to turn
on properly when
humans approach
adjust working mode to M or U
when the air temperature us close to
human temperature, motion detection
may slow down. It will return to normal
after the air temperature changes
Check if the installation height is
too high
Packing List
When open the package please confirm that all parts are received, the parts are
listed below:
Height of pole Distance between pole
Model
Remark:
The lamp will turn on at night automatically after installation and
activation, turn off automatically when it receive sunshine.
Default is M mode, you can choose the best mode according to
different sunshine condition.
*
*
U
M
s
T
L
20%
20%
OFF
ON
ON: Turn on the light
OFF: Turn off the light
L: 2hrs-100%, 2hrs-70%, 8hrs-20%
T: 1hrs-50%, 4hrs-100%, 3hr-50%, 4hr-25%
S: 6hrs-100%, 6hrs-50%
M: 100% when detect any movement, 30% no movement
U: 2hrs-100%, 2hrs-70%, 2hr-50%; sensor start working, when detect
movement 50% , 20% no movement.
-20%: decrease 20% brightness based on original working mode
+ 20%: increase 20% brightness based on original working mode
ON
Solar Street Light Remote
20%
20%
Supper Brightness
OFF
L
TSM
U
T
L
20%
20%
OFF
ON
LIGHT CONTROL
TIMING CONTROL SUPPER BRIGHTNESS MICRNWAVE CONTROL
TIMING+MICROWAVE -20% +20%
M
U
s
TURN ON THE LIGHT TURN OFF THE LIGHT
4
Components
Light body
Multi-angel bracket buckles
Rotating Platform
Solar panel
Bracket support
M6x16 screws
1pc
1pc
1pc
1pc
6pcs
Quantity Images
M8x100 screw 1set
M8x30 screw 2pcs
User Manual
Φ5mm Allen key
Φ6mm Allen key 1pc
1pc
1pc
Remote control 1pc
User Manual
ON
SolarStreet Light Remote
20%
20%
SupperBrightness
OFF
L
TSM
U
This manual suits for next models
5
Other bluesmart Outdoor Light manuals

Popular Outdoor Light manuals by other brands

Sunlight Supply
Sunlight Supply SUN SYSTEM DIAMOND LEC 315 Technical information guide

ML Accessories
ML Accessories Knightsbridge WGULED Installation & maintenance manual

LIGMAN
LIGMAN ABERDEEN 1 installation manual

Safavieh
Safavieh FLL4046 quick start guide

GT-Lite
GT-Lite GT-LTP-3 Assembly & installation

iqonic
iqonic ZJ-SLT266 user manual


