BlueTees Ringer User manual

USER MANUAL
MAGNETIC TOUCH GPS DISPLAY

FEATURES 3
GENERAL 4
Get to know the Ringer 4
Built-In Magnetic Strip 4
What’s in the Box? 5
Charging the Device 5
RINGER SET UP 6
ABOUT DEVICE/SETTINGS 7
ACTION BUTTON 9
Auto Lock 10
Shot Tracking 10
HOW TO USE THE RINGER 11
Navigating Golf Screens 11
Main Golf GPS 12
Green View 13
Dynamic Hazards 13
Shot Tracking 14
Scoring 14
Round Summary 15
Navigating Utility Screens 16
Music Control 17
Battery/Settings 17
Time Display 18
Idle Mode 18
1ENGLISH
TABLE OF CONTENTS

CONNECT YOUR RINGER 19
Connect/Register Device 19
Subscribe to the Mobile App 19
Save/Upload Round Statistics 19
MOBILE APP DEVICE SETTINGS 20
TROUBLESHOOTING 22
PRODUCT SPECIFICATIONS 23
IMPORTANT SAFETY INFORMATION 24
WARNING 25
LEGAL DISCLAIMER 25
COMPLIANCE 26
ISED STATEMENT 28
ENHANCED WARRANTY 29
2ENGLISH
TABLE OF CONTENTS
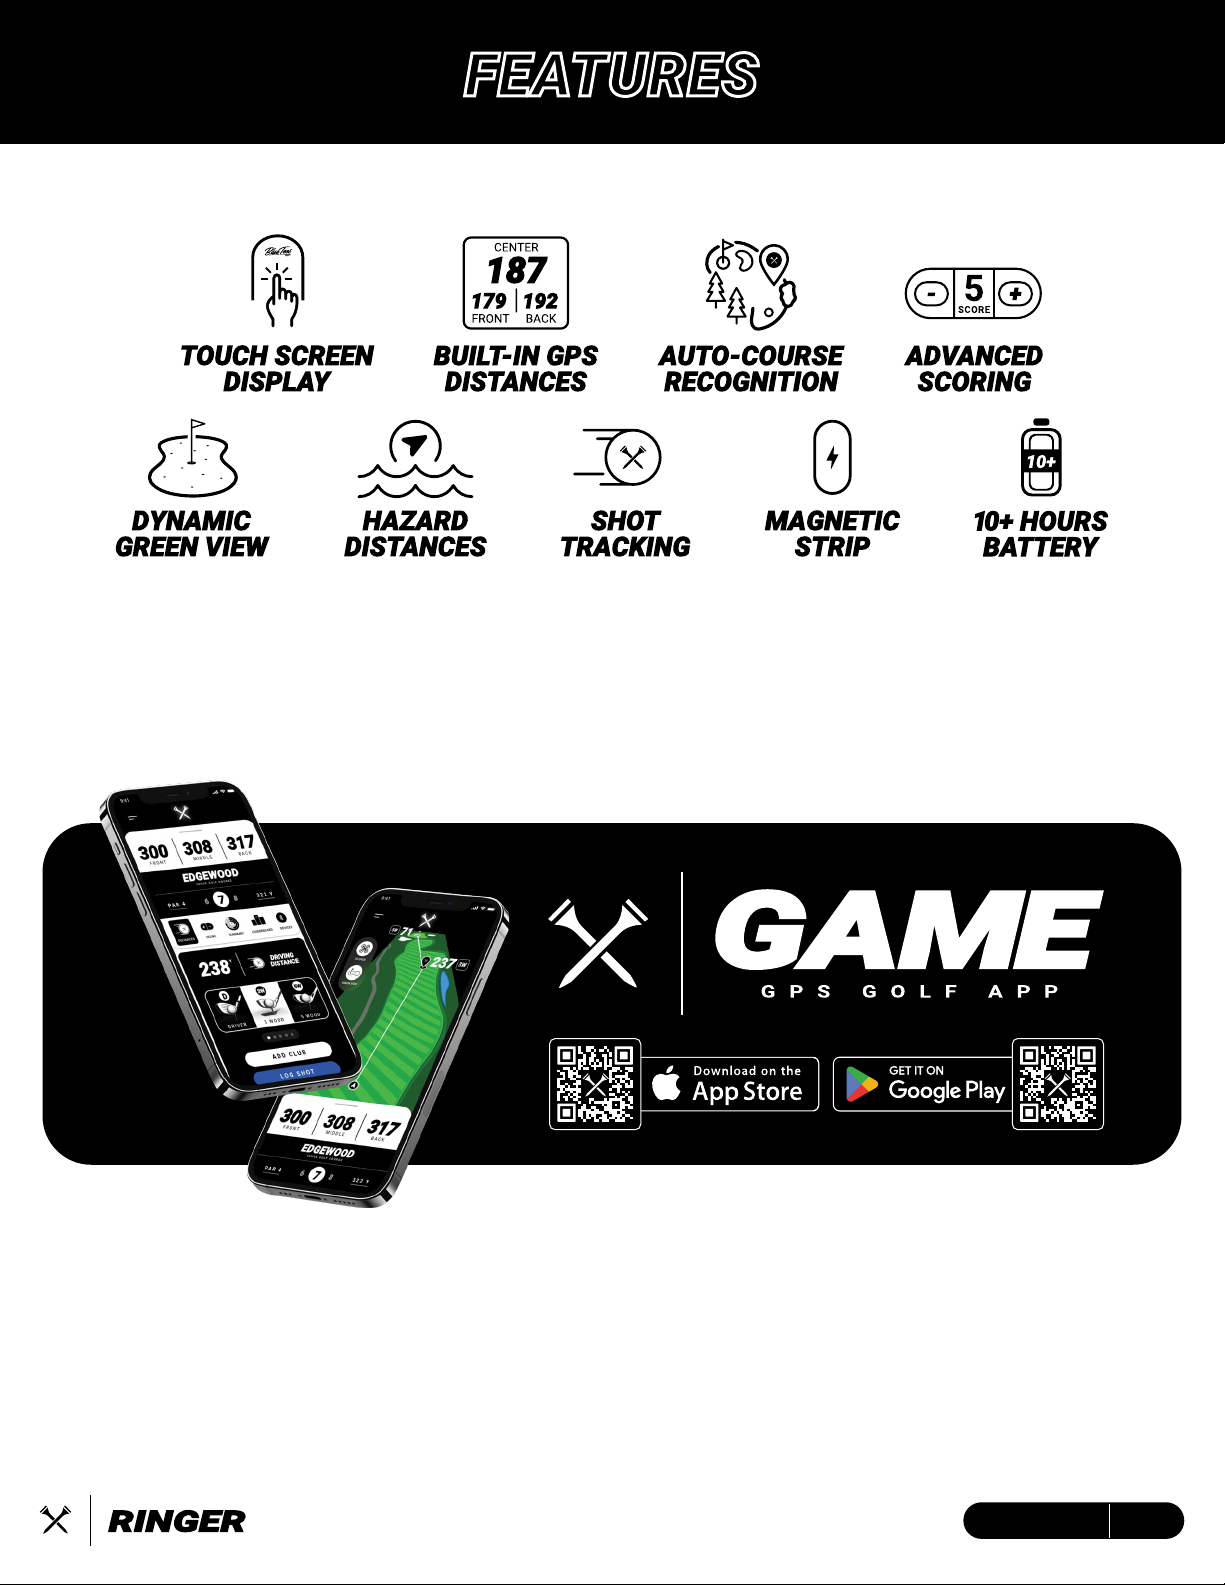
FEATURES
SUPPORTED BY
Get access to 40K global course maps, track your shots, analyze
your stats and unlock new features in your Ringer
to take your game to the next level.
3ENGLISH

GET TO KNOW THE RINGER
4ENGLISH
Power/Action Button
Touch Screen Display
Cover Glass
Magnetic Strip
USB-C Charge/Data Port (Input/Output)
1
1
2 2
3
3
4
4
5
5
SUPER STRONG MAGNET
BUILT-IN MAGNETIC STRIP
ATTACHES TO THE CART OR ANY MAGNETIC SURFACES
• The magnetic strip on the RINGER is specifically designed to only fit on the vertical pole of
the golf cart.
• Ensure the magnetic strip is securely flat, aligned, and free of debris when magnetically
attaching to a surface.
WARNING: Use caution when using the built-in magnetic strip to attach the Ringer to the golf
cart. Be careful driving over rough terrain, heavy bumps, potholes and/or curbs as this can
cause the device to fall off, incurring damage that is not covered under the two-year limited
warranty.

Blue Tees
Cleaning Cloth
USB-C to USB-A
Charging/Data Cable
Blue Tees Golf
Crossed Tees Sticker
Quick-Start
Guide
Ringer
Magnetic Touch
GPS Display
WHAT’S IN THE BOX?
CHARGING THE DEVICE
BAT TERY
25
BAT TERY
10
BAT TERY
LOW
BAT TERY
100
75
BAT TERY
50
BAT TERY
This device is powered by a built-in lithium-ion battery that can be charged using any standard
USB port on your laptop/computer or an AC adapter.
Note: This device will not charge/operate outside of the approved temperature range (page XX)
1. Locate the USB-C charging port on the device.
2. Insert the small end (USB-C) of the provided charging cable into the USB-C input port.
3. Insert the large end (USB-A) of the provided charging cable into an external power source,
such as a USB port on your laptop/computer or an AC adapter (min. 5V/2A).
4. Remain inserted for 2-3 hours or until device is fully charged.
5ENGLISH

RINGER SET UP
6ENGLISH
HOW TO START / SETTINGS
1. Press and hold the Crossed Tees Action/Power Button to Power ON.
2. Once powered on, allow up to 60s for the device to locate a GPS satellite connection.
• GPS satellite connectivity requires you to be OUTSIDE, at least 15 meters away from the
nearest building/tree.
3. While waiting for a satellite connection, use this time to navigate through your device
settings for a customized experience.
4. After satellite connection has been acquired, select the desired golf course of play and then
tap ‘Start Round”.

ABOUT DEVICE / SETTINGS
7ENGLISH
HOW TO START / SETTINGS
Tap the ‘i’ icon at the top of the screen for detailed information
about your Ringer GPS Handheld device.
Tap Reset to factory reset all device settings.
Create a fully customized experience within your device settings by turning on/off your desired
golf features, selecting your favorite color mode and brightness, choose your specific device
language, unit of measurement, and more. From the Main GPS Screen, swipe up/down to the
battery screen, tap ‘Settings’.
HOW TO START / SETTINGS
DARK is Default: Choose color mode
BLUETOOTH
Connect to the Blue Tees Game Mobile App
BRIGHTNESS
100 is Default: Select device screen brightness
25 50 75 100
LANGUAGE
ENGLISH is Default: Select device language
ENGLISH
SPANISH
ITALIAN
FRENCH
PORTUGUESE
FRENCH CANADIAN
SWEDISH
KOREAN JAPANESE CHINESE (SIMPLIFIED)
GERMAN
DUTCH
DARK LIGHT
ON OFF
AUTO LOCK
SHOT TRACKING
GPS SCREEN
MUSIC CONTROL
ENTER SCORE
ROUND SUMMARY
8ENGLISH
UNITS
YARDS is Default: Choose the unit of measurement
YARDS (Imperial) METERS (Metric)
STANDARD DST
12 HOUR 24 HOUR
TIME CHANGE
STANDARD is Default: Select between Standard Time or Daylight Savings Time (USA)
DISPLAYED TIME
12 HOUR is Default: Choose either 12 HOUR or 24 HOUR time display
CENTER ONLY
OFF is Default: Select an option for center distance only past 250 yards (Front/Center/Back
under 250 yards), center distance always, or Front/Center/Back always (OFF)
PAST 250 ALWAYS OFF
SIMPLE ADVANCED OFF
IDLE MODE
OFF is Default: After 5 seconds of inactivity, the numbers, data, and images/icons will enlarge
for an easier viewing experience.
ON OFF
ON OFF
ON OFF
SHOT TRACKING
OFF is Default: Track the distances of up to 4 shots, consecutively, on each hole.
HAZARD
ON is Default: View up to 4 of the most important hazards on each hole.
SCORING
XXX is Default: Select an option for simple scoring (score/putts), advanced scoring (fair-
way/green in regulation + score/putts), or scoring OFF.
ACTION BUTTON
AUTO LOCK is Default: See next page for more details
ABOUT DEVICE / SETTINGS
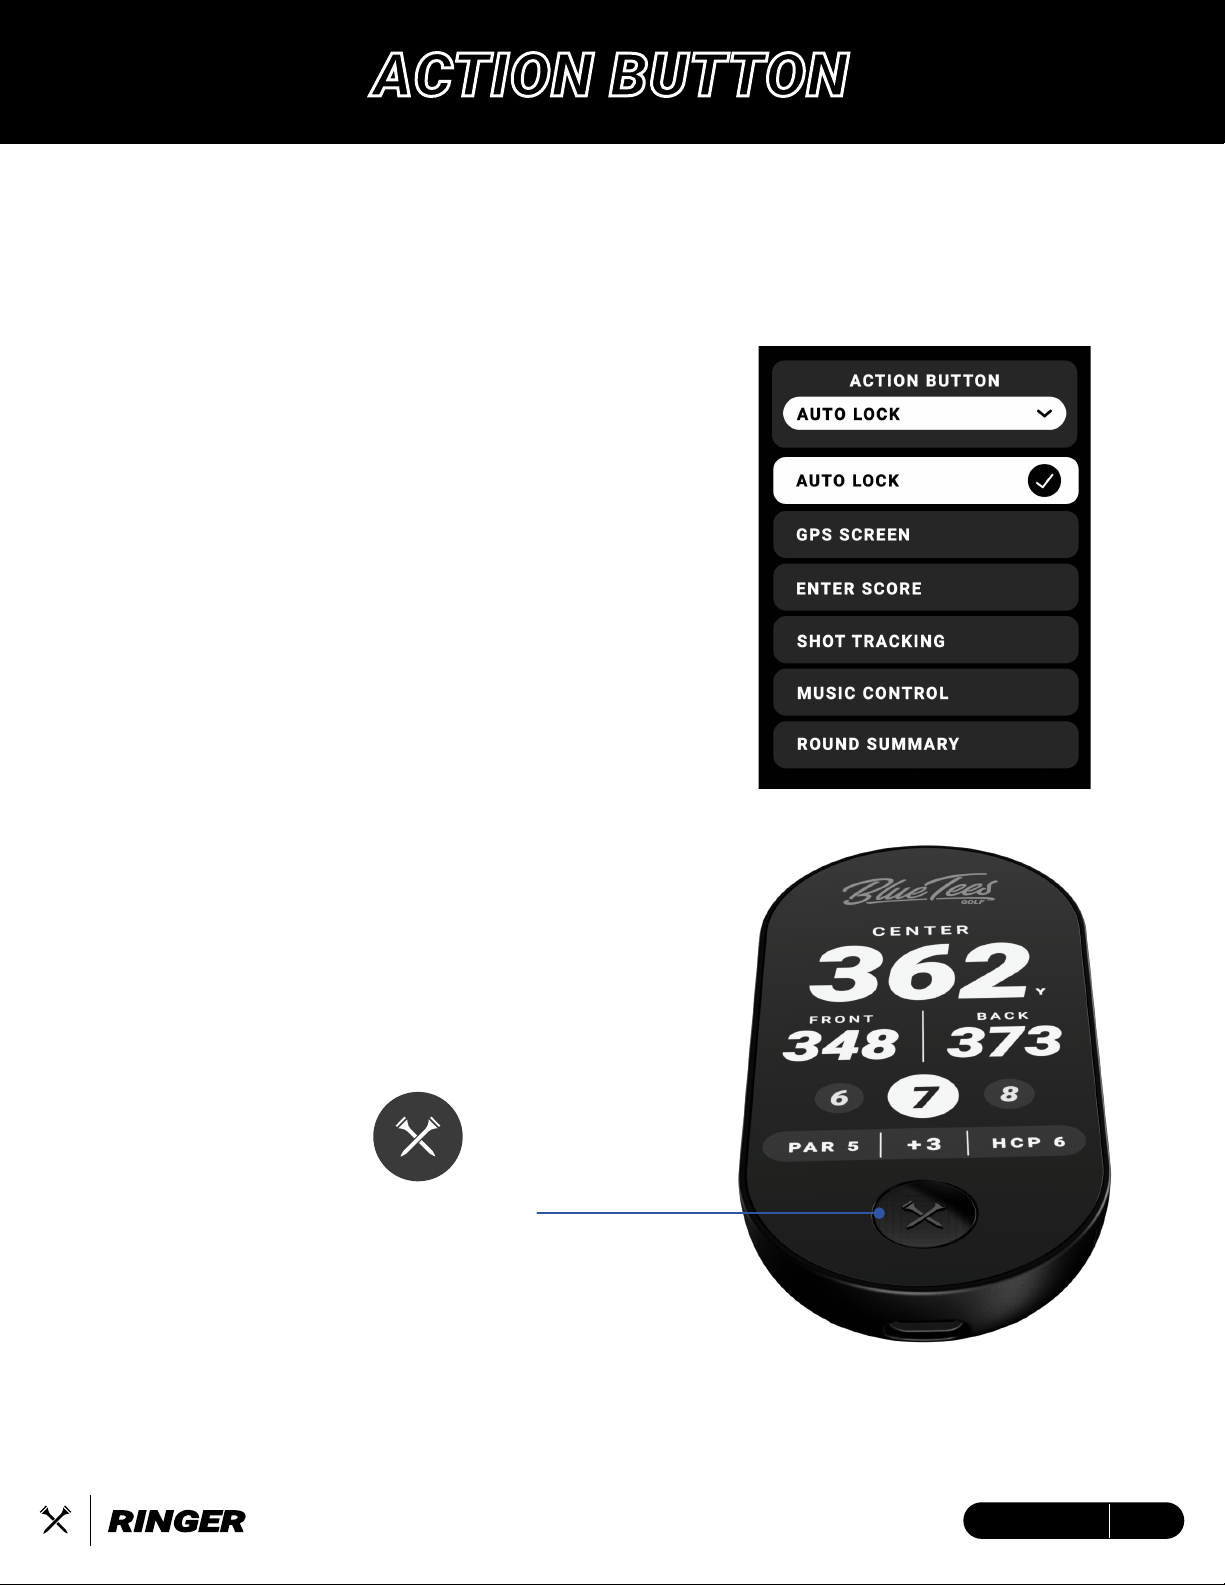
ACTION BUTTON
The Action Button creates a completely customizable, multi-functional experience in Ringer.
Press and hold the button for 3s to Power ON/OFF the device.
Customize a single-press shortcut for golf mode in your settings.
1. AUTO LOCK – Lock/Unlock the touchscreen display
• Ideal for pocket users
2. GPS SCREEN – Switches display to the Main GPS
Distance Screen
• Quick navigation to your main display
3. ENTER SCORE – Switches display to the Scoring
Screen (if turned ON in device settings)
• After each hole, easily enter your score with a
few taps
4. SHOT TRACKING – Press to activate shot tracking
from current location, press again to log shot and
start tracking next shot
• Track each shot distance by the press of a button
5. MUSIC CONTROL – Play/Pause/Skip/Last/Volume
controls for Player+ (sold separately)
• Requires Ringer & Player+ devices to be connect-
ed to the Blue Tees Game mobile app
6. ROUND SUMMARY – Review your current scorecard
and round statistics
• Evaluate your in-round progress of
fairways/greens in regulation, putts, and total
score
ACTION BUTTON
9ENGLISH
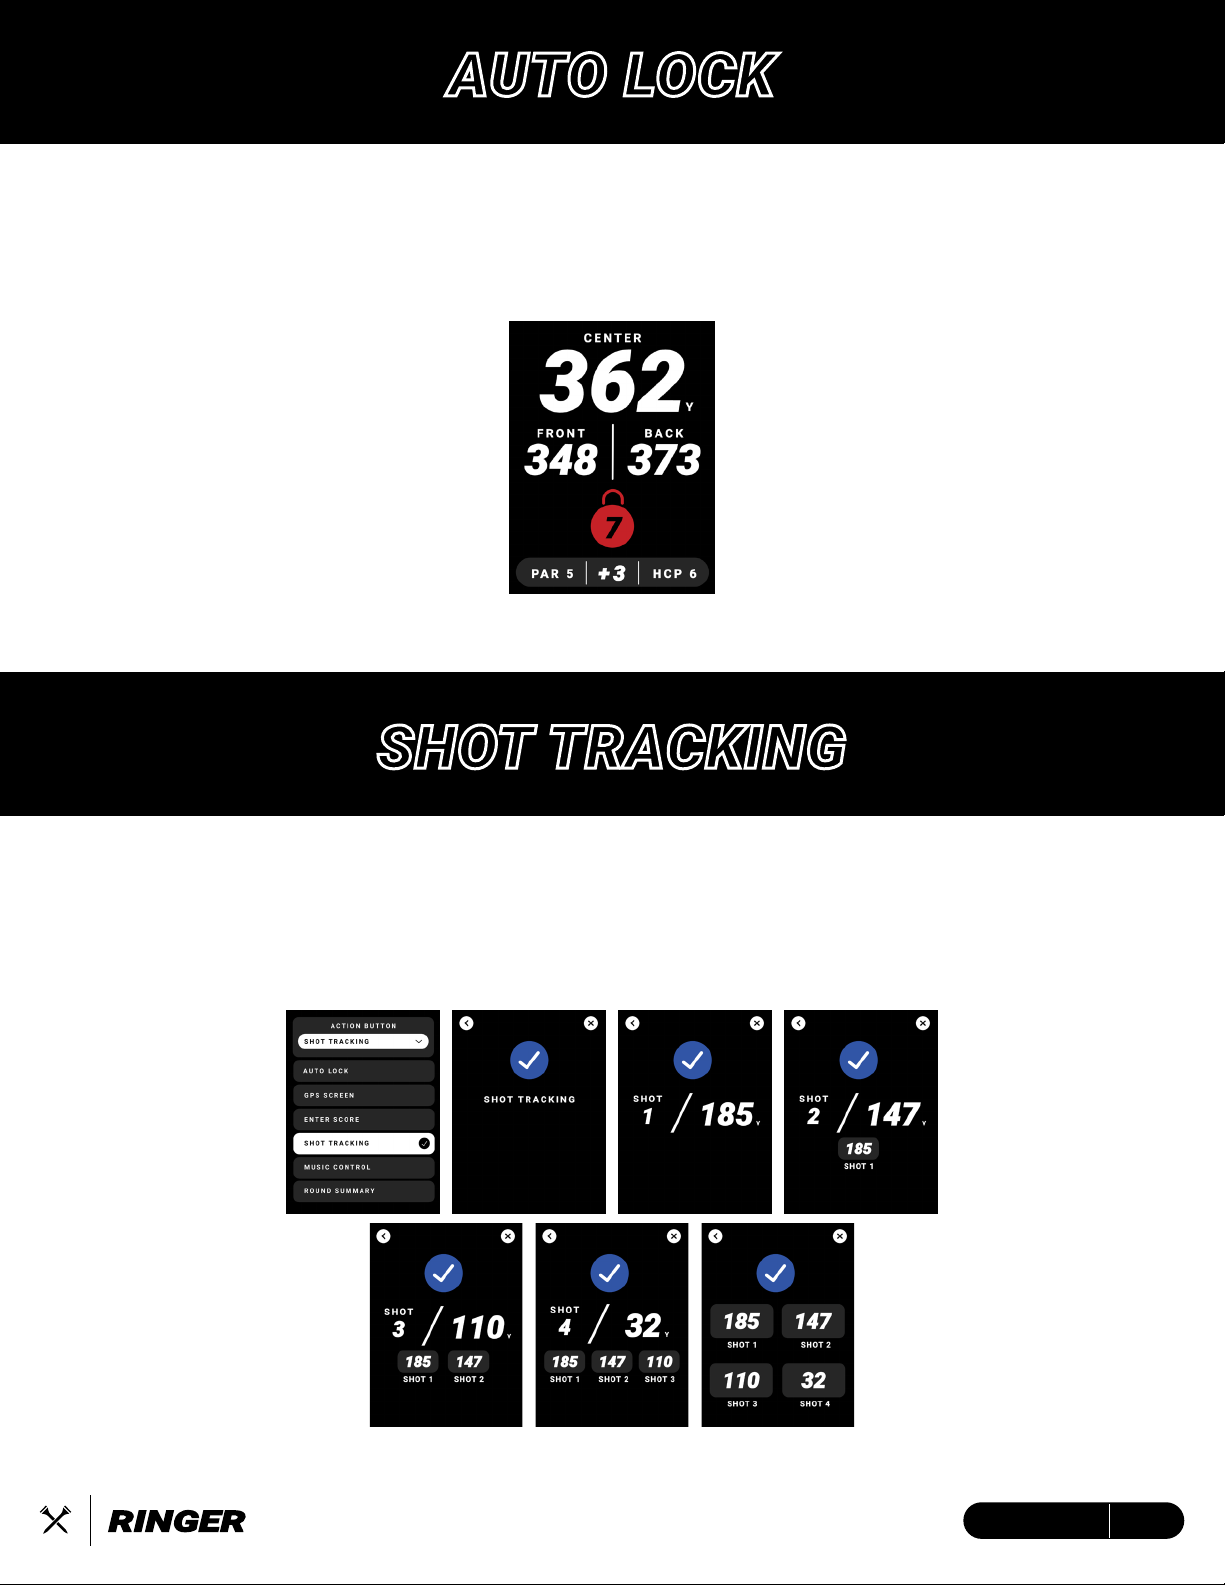
AUTO LOCK
10ENGLISH
Auto Lock is a pocket-friendly feature that enhances the usability of the touchscreen display by
locking the screen in place. Save your device’s Action Button as ‘Auto Lock’ to lock/unlock your
touchscreen with the single press of the ‘Crossed Tees Action Button’
Screen will appear when LOCKED
Shot Tracking Pop-Up
SHOT TRACKING
• Press to activate shot tracking from current location.
• Press again to log shot and start tracking next shot.
• Tap the X to exit Shot Tracking Pop-Up (disappears after 3 seconds)
• Tap the < to undo action.
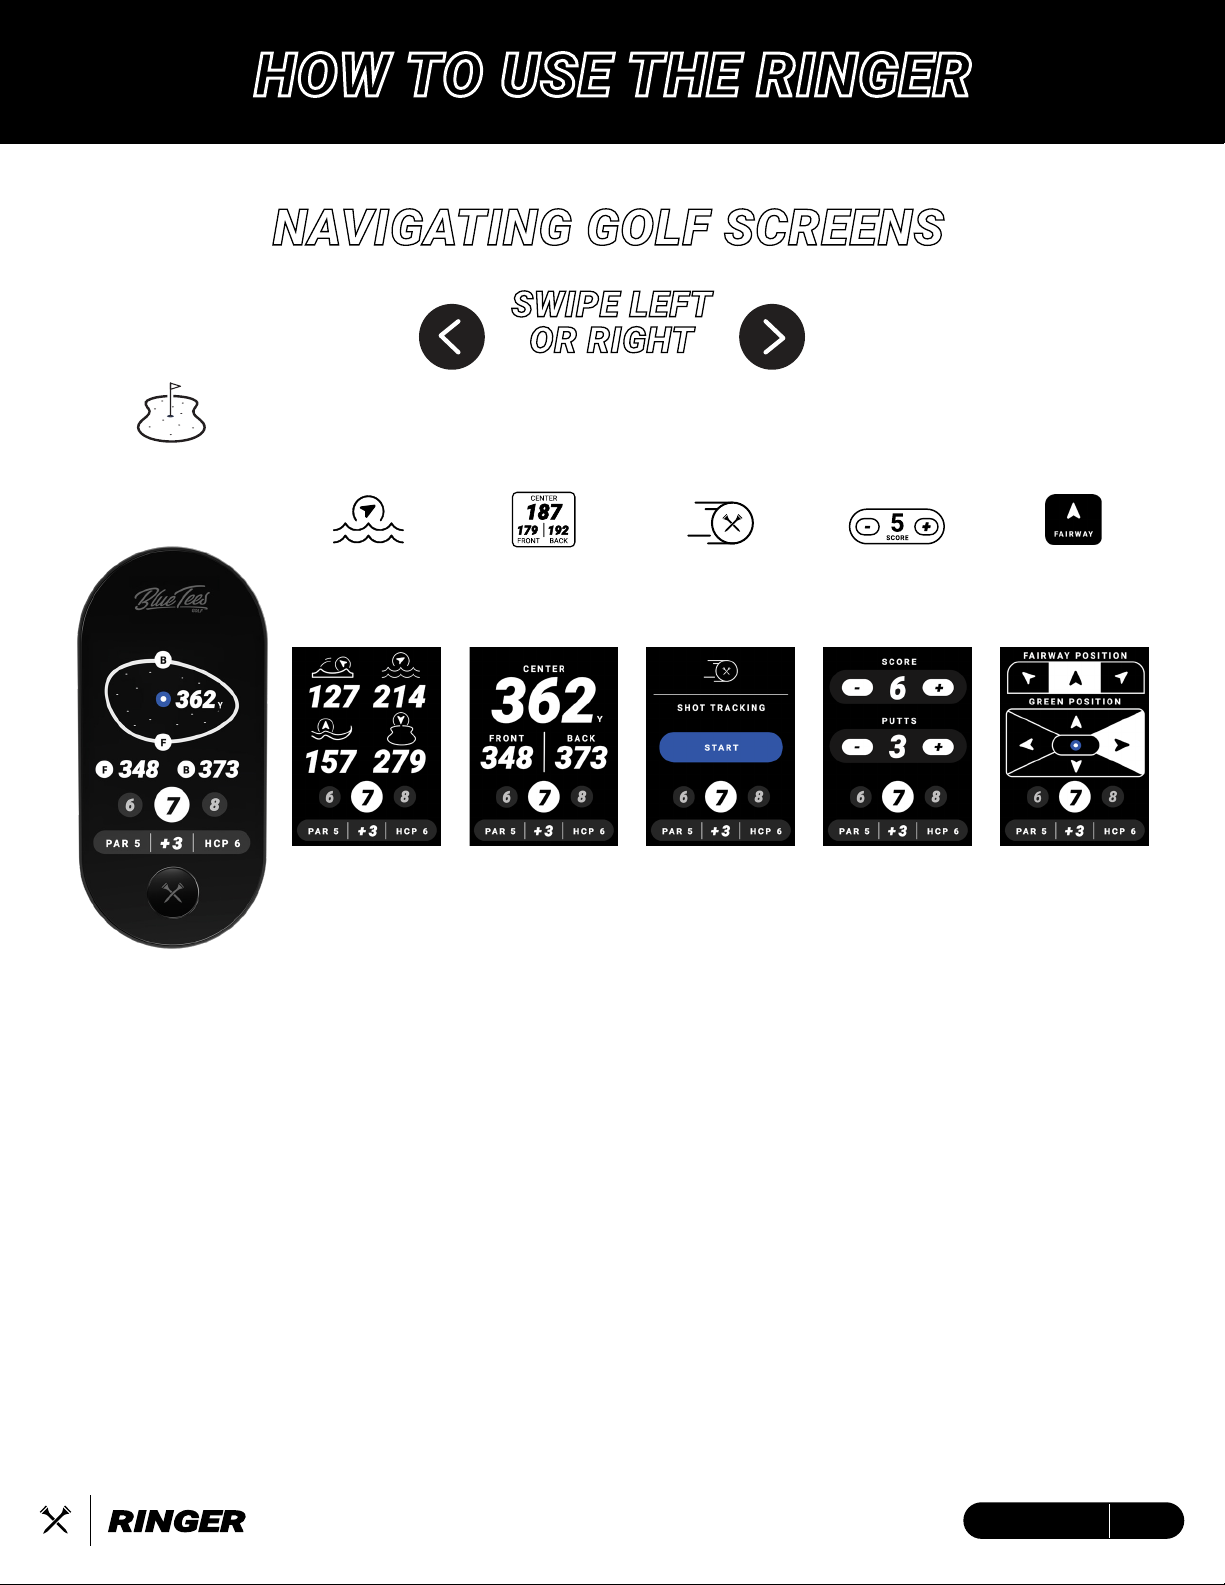
NAVIGATING GOLF SCREENS
SWIPE LEFT
OR RIGHT
TO CHANGE SCREEN
GOLF SCREEN FUNCTIONS:
• GREEN VIEW – Tap the green pin-placement for a more precise yardage
• DYNAMIC HAZARD – Displays up to 4 of the most relative hazards
• GPS DISTANCES – Front / Center / Back GPS Distances
•SHOT TRACKING – Track the distance of up to 4 shots on each hole
• ADVANCED SCORING – Save your fairway and green in regulation data
• SIMPLE SCORING – Record your score and putts on each hole
GREEN
VIEW
DYNAMIC
HAZARD
GPS
DISTANCES
SHOT
TRACKING
SIMPLE
SCORING
ADVANCED
SCORING
HOW TO USE THE RINGER
11ENGLISH

PREVIOUS
HOLE
ROUND
SCORE
HOLE
PAR
HOLE
HANDICAP
NEXT
HOLE
CURRENT
HOLE
SUMMARY
BAR
Easily change holes by selecting the next/previous hole number on screen
Hole Menu - Tap the current highlighted hole button for a complete list of Front/Back 9
Score Menu – Tap the round summary bar to view current scorecard
FRONT 9
HOLE CHANGE
BACK 9
HOLE CHANGE
MAIN GOLF GPS
12ENGLISH

GREEN VIEW
13ENGLISH
LEFT
HAZARD
RIGHT
HAZARD
CARRY
HAZARD
TO
HAZARD
WATER HAZARD
END FAIRWAY
HAZARD
CREEK HAZARD
BUNKER HAZARD
DYNAMIC HAZARDS
Dynamic Hazards will display up to four (4) hazard distances to give you a quick glance on
areas to avoid on the course. The hazards will scale dynamically to one (1) distance. There are
four (4) unique icons with dynamic arrows to indicate where the hazards are on the course.
Dynamic Green View will provide an accurate
shape of the green, Front & Back GPS distances,
as well as a tap-to-lock pin positioning system.
Tap anywhere on the green (as seen below) for
more precise distances of various pin locations
throughout your round of golf.

14ENGLISH
SCORING
There are two (2) scoring modes that can be adjusted for in device settings. Simple Scoring will
allow you to record your score and putts per hole by pressing (+) button to increase or (-) button
to decrease. Advanced Scoring gives your more analytics to save with Fairway Position and
Green Position.
Track up to 4 shots per hole using the Ringer. When you step on the tee box, tap the “TEE OFF”
button to indicate where you are on the tee box and hit your tee shot. Once you located your tee
shot, tap the “TRACK” button to log your first distance. The distances will reset into your second
shot while keeping track of previous distances. You will repeat this process until you’ve logged 4
shots, where you will see a summary of your logged shots.
1. In your device settings, turn “Shot-Tracking” ON
2. To start shot tracking, select “START” to indicate your current location and once arrived at
shot location, tap “TRACK” to record the distance
3. Repeat Step 3 for remainder of desired shots.
SHOT TRACKING
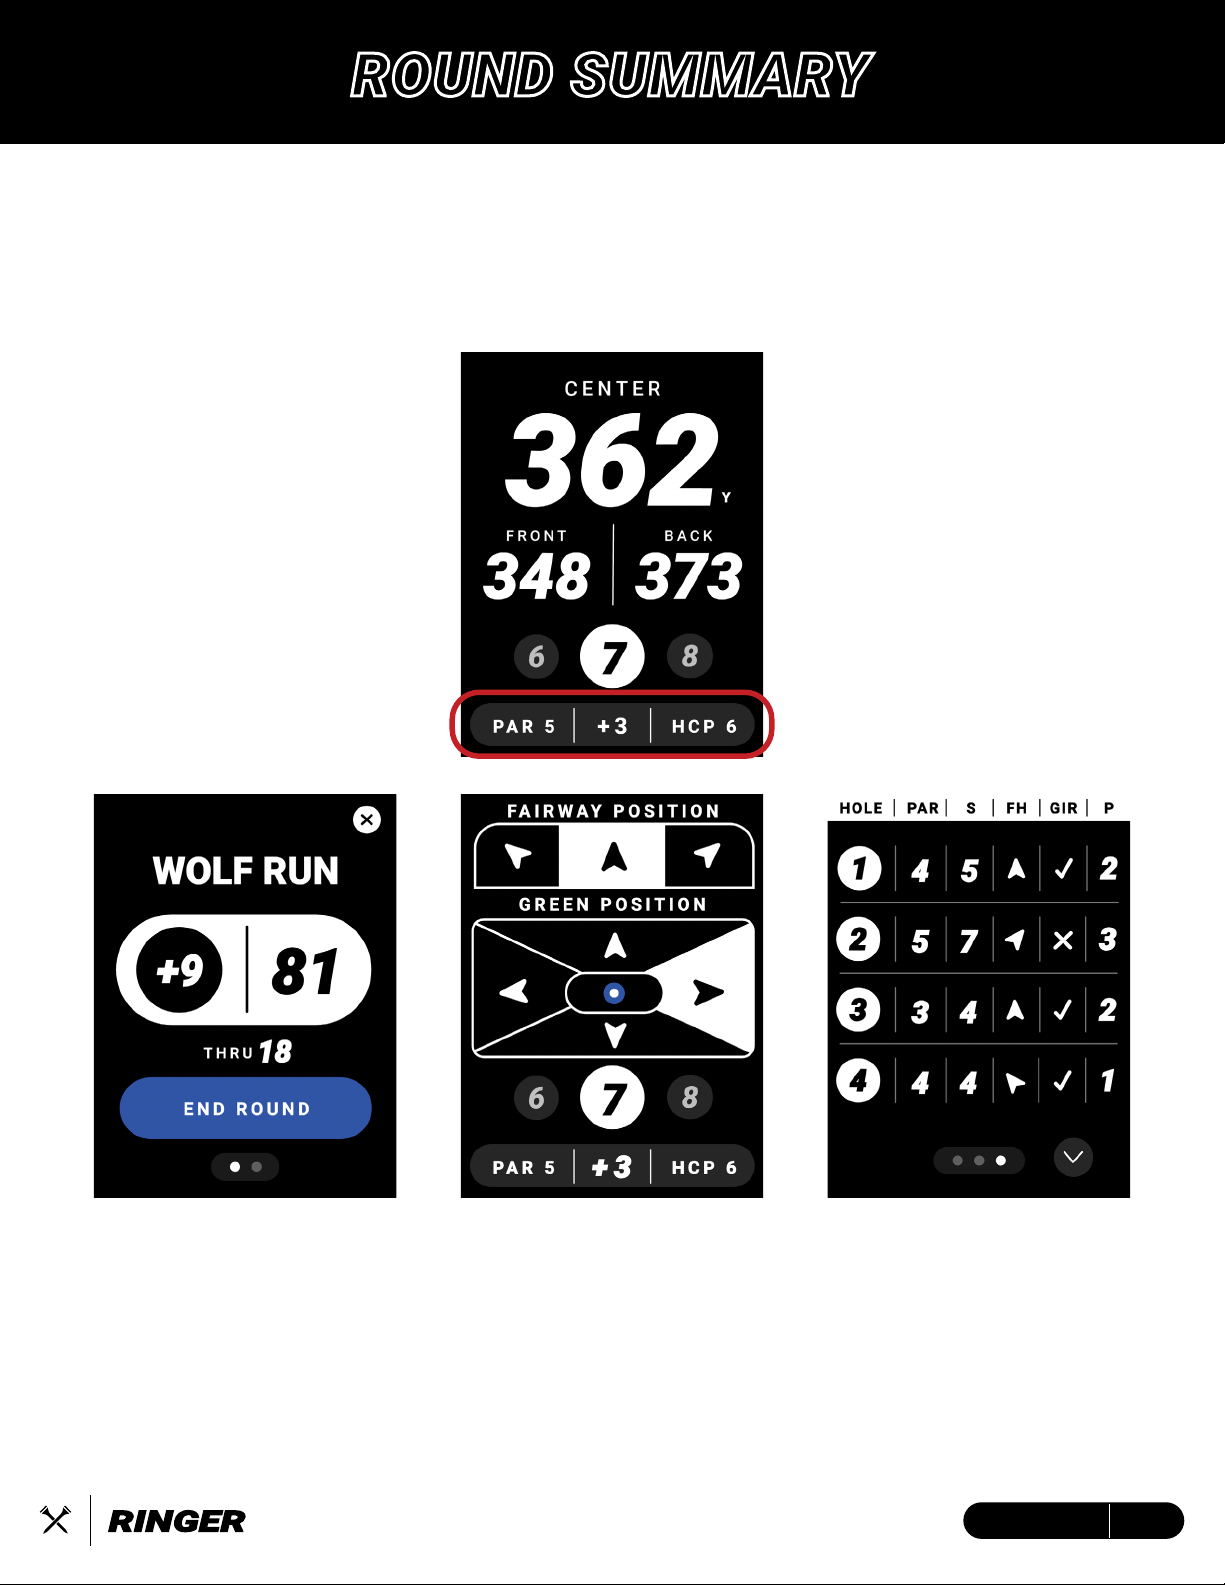
ROUND SUMMARY
15ENGLISH
During your round, tap the Round Summary Bar (highlighted below) on any golf screen to view
your scorecard, current statistics, or end round. Round Summary provides a dynamic experi-
ence, allowing for simple and/or advanced scoring statistics depending on your preferences.
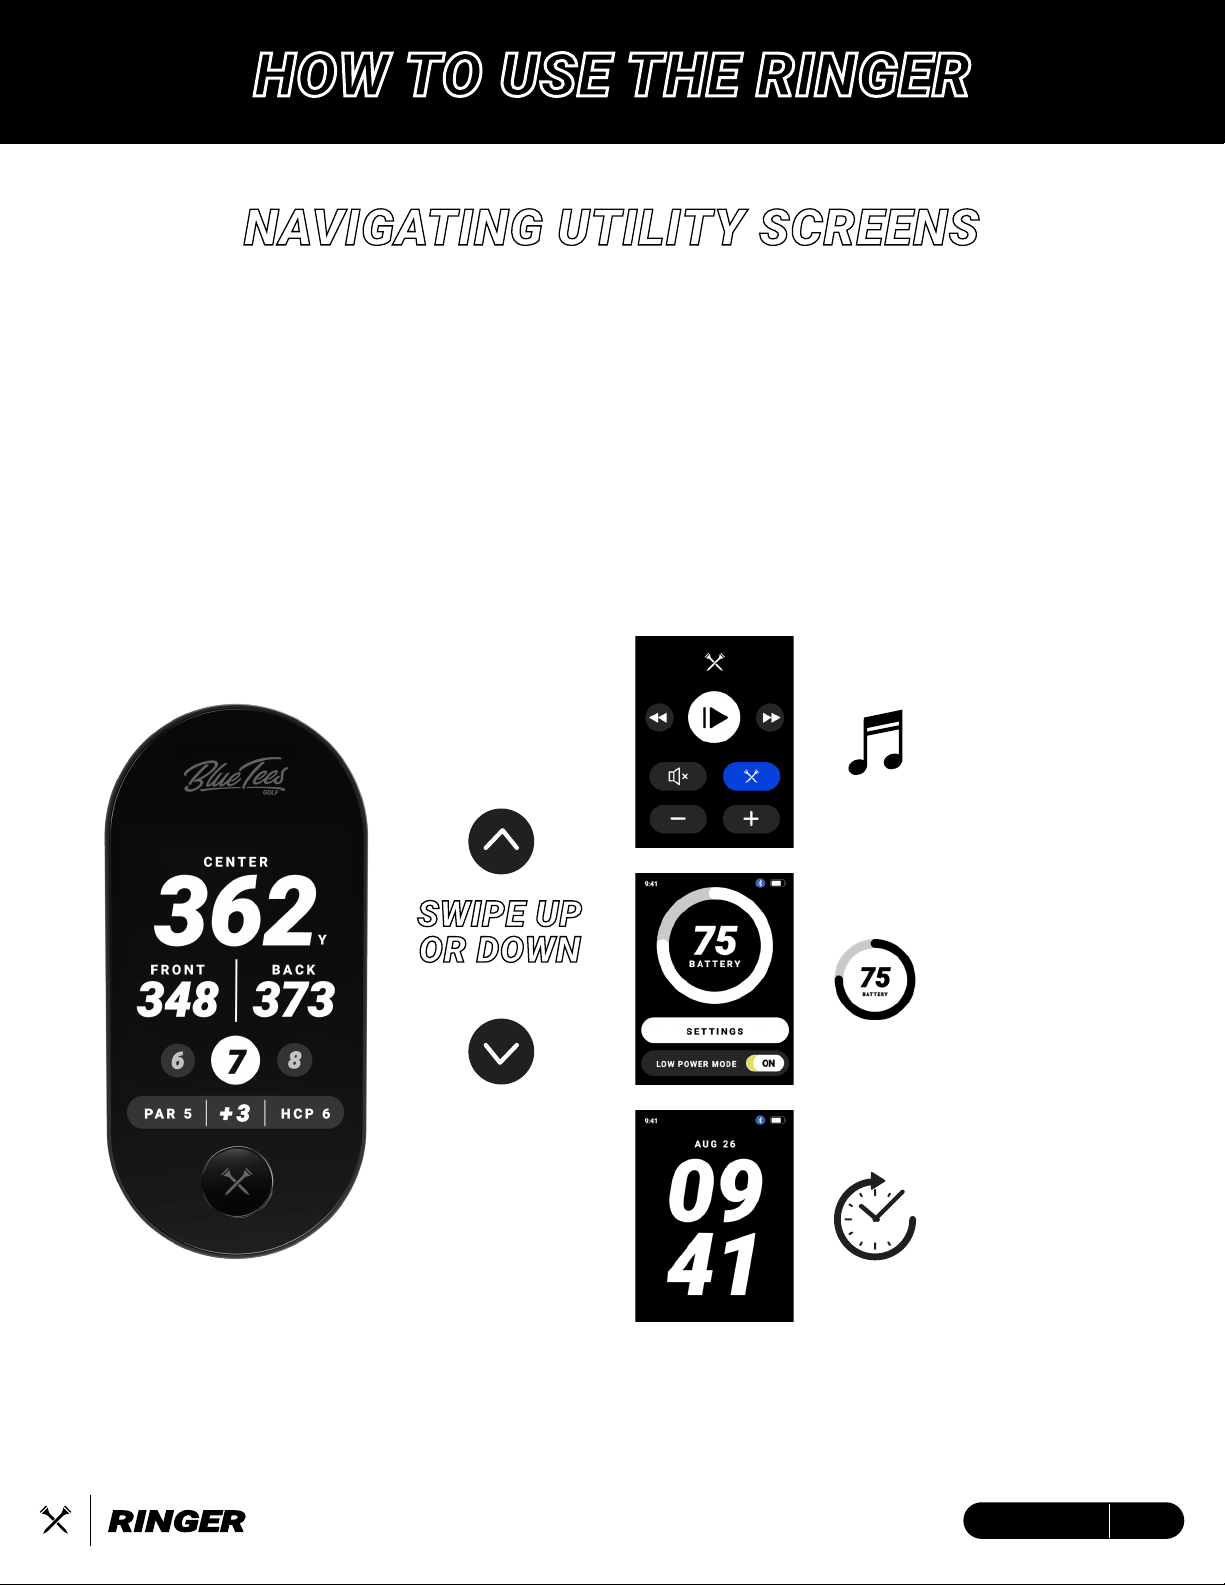
NAVIGATING UTILITY SCREENS
SWIPE UP
OR DOWN
TO CHANGE SCREEN
UTILITY SCREEN FUNCTIONS:
• MUSIC REMOTE* – Control the volume and music on your Player+ speaker
• BATTERY DISPLAY / SETTINGS – View your current battery life and customize your
experience
• TIME & DATE DISPLAY – Current time/date based on your device settings
* The Music Remote will only display when your Ringer device and Player+ speaker are connected to the Blue Tees Game mobile app
MUSIC
REMOTE
BATTERY
DISPLAY
TIME
DISPLAY
HOW TO USE THE RINGER
16ENGLISH
17ENGLISH
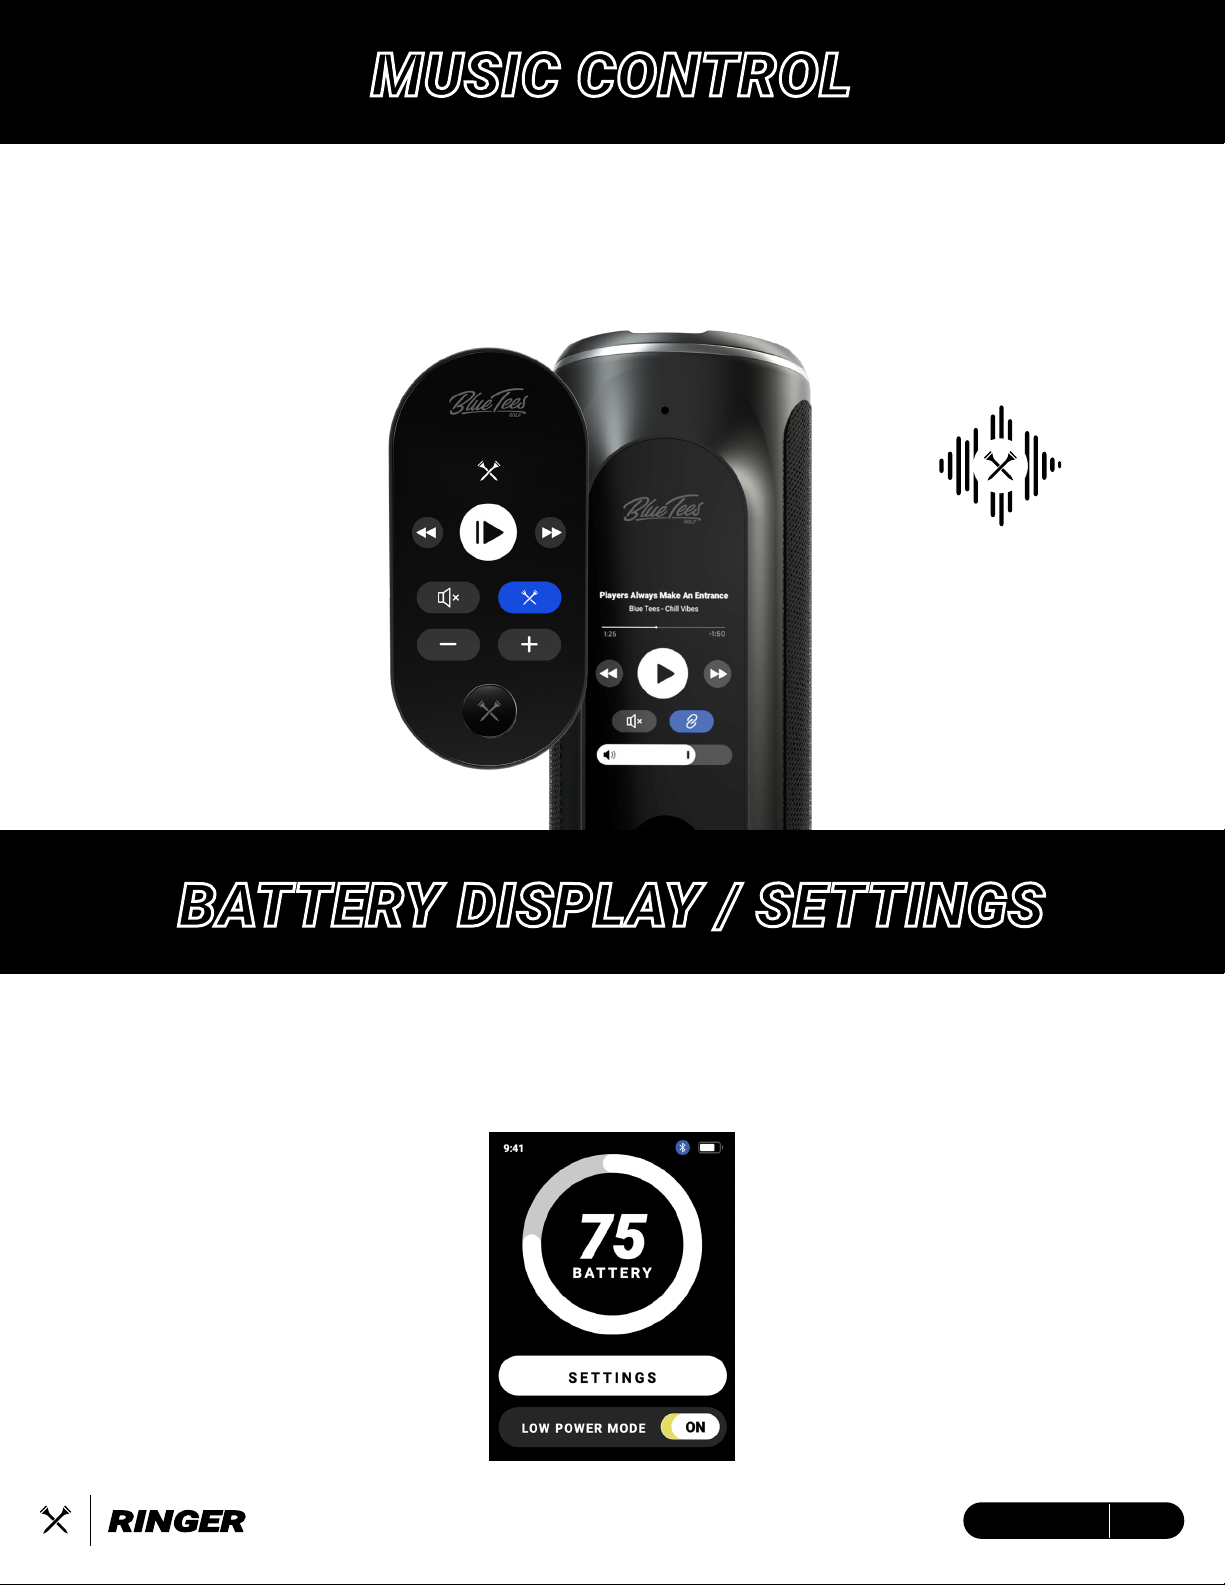
MUSIC CONTROL
When you connect Ringer and Player+ to the Blue Tees Game App, the Music Control screen will
display as an up and down swipe in the Utility screens. Play/Pause or mute your music, as well
as change from previous to the next song. When you tap the blue Crossed Tees button, this will
activate audible Front/Center/Back GPS distances on the Player+ speaker.
“Front 187,
Center 205 Yards
Back 212”
BATTERY DISPLAY / SETTINGS
The Ringer device will support at least 10 hours of battery on a full charge.
See page 5 for more information on charging the device.
Low Power Mode -
When toggled ON:
1. After five (5) seconds, device
screen will dim to 75%
2. After 10 more seconds, device
screen will sleep
3. Tap screen to wake
See page 7 for more information
on device settings

18ENGLISH
TIME DISPLAY
IDLE MODE
Idle Mode allows for increased viewing access by enlarging the data being displayed on the LCD
touchscreen. After 10 seconds of inactivity, the device will switch to Idle Mode, simply tap the
touchscreen to wake up for Active Mode
ACTIVE MODE
IDLE MODE
Navigate to device settings
(page 8) to select.
CURRENT DATE
24-HOUR12-HOUR
TIME DISPLAY
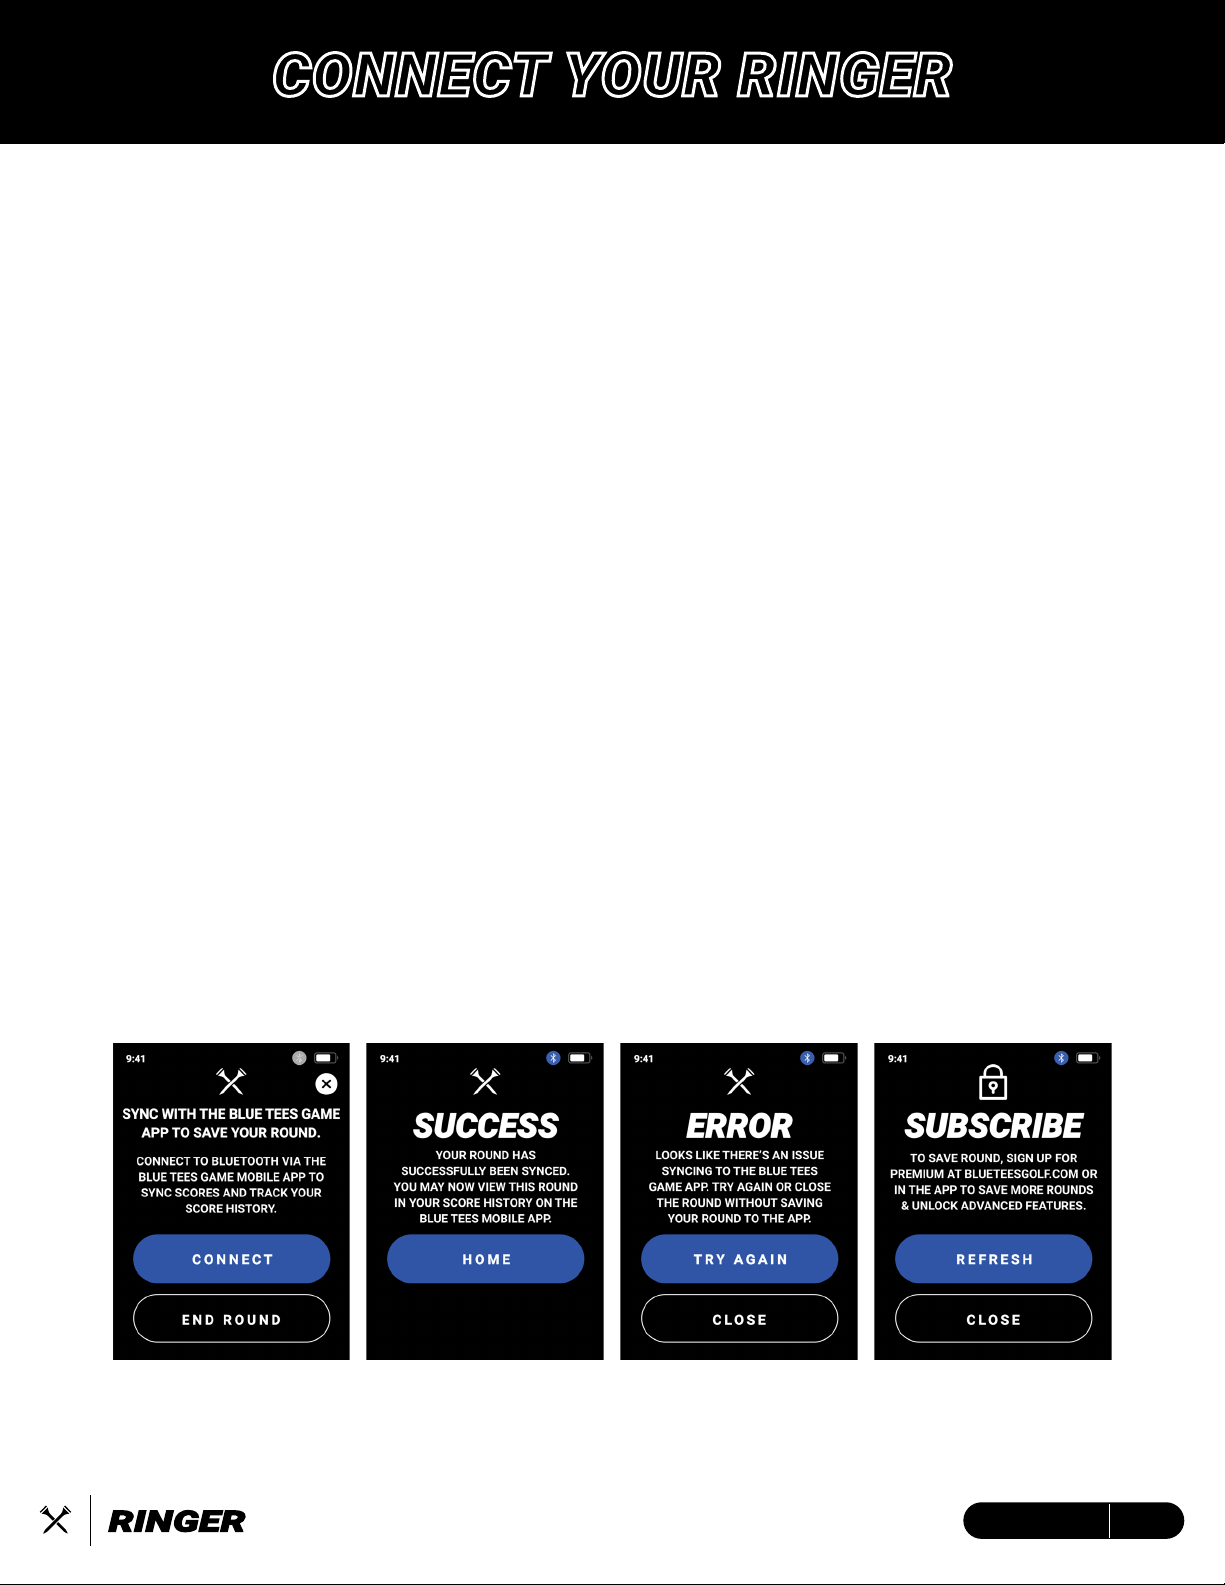
CONNECT YOUR RINGER
19ENGLISH
Save and view your logged scores from the Blue Tees Game app, log in to your account to
subscribe and unlock the premium golf features.
Connect/Register device to your Blue Tees Game account:
1. Open/Download the Blue Tees Game mobile app, Create an Account or Login
2. Navigate to the ‘Devices’ section and select ‘Connect’
3. Confirm the six-digit code on your Ringer LCD screen
Subscribe to the Blue Tees Game app
1. Navigate to blueteesgolf.com and select ‘MEMBERSHIP’
2. Choose your select Premium Membership plan and checkout
3. Connect the email used during checkout to your Blue Tees Game account
Save/Upload your round score and statistics:
1. If not already connected, at the end of your round, connect the Ringer device to your Blue
Tees Game account
2. Auto-save and score upload will be initiated once successfully connected and synced.
Note: If round sync is unsuccessful, the Ringer device internal memory will store this data until
next round sync attempt.
Update Firmware:
1. Open/Download the Blue Tees Game mobile app, Create an Account or Login
2. Connect your Ringer device via Bluetooth to the Blue Tees Game mobile app
3. After connecting your device, navigate to the device settings screen and search for the
firmware update (if available).
4. Follow on-screen instructions to complete firmware update
Table of contents


