Bluevua RO100ROPOT User manual
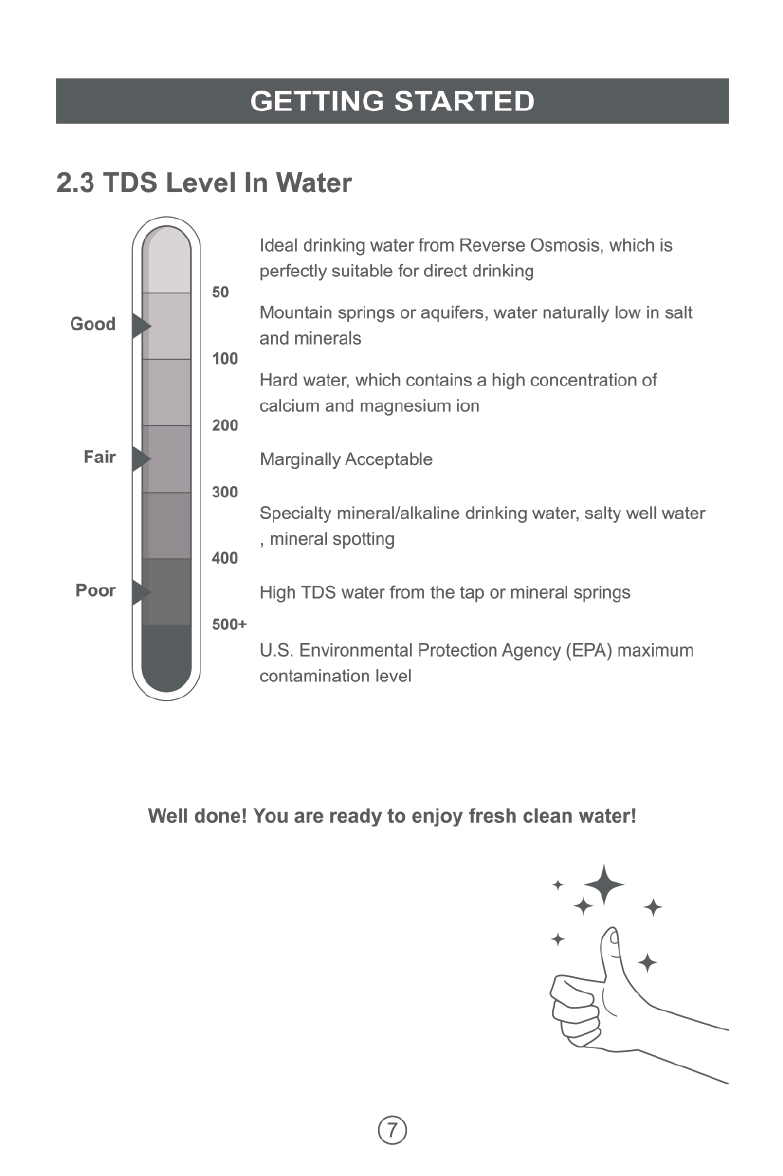
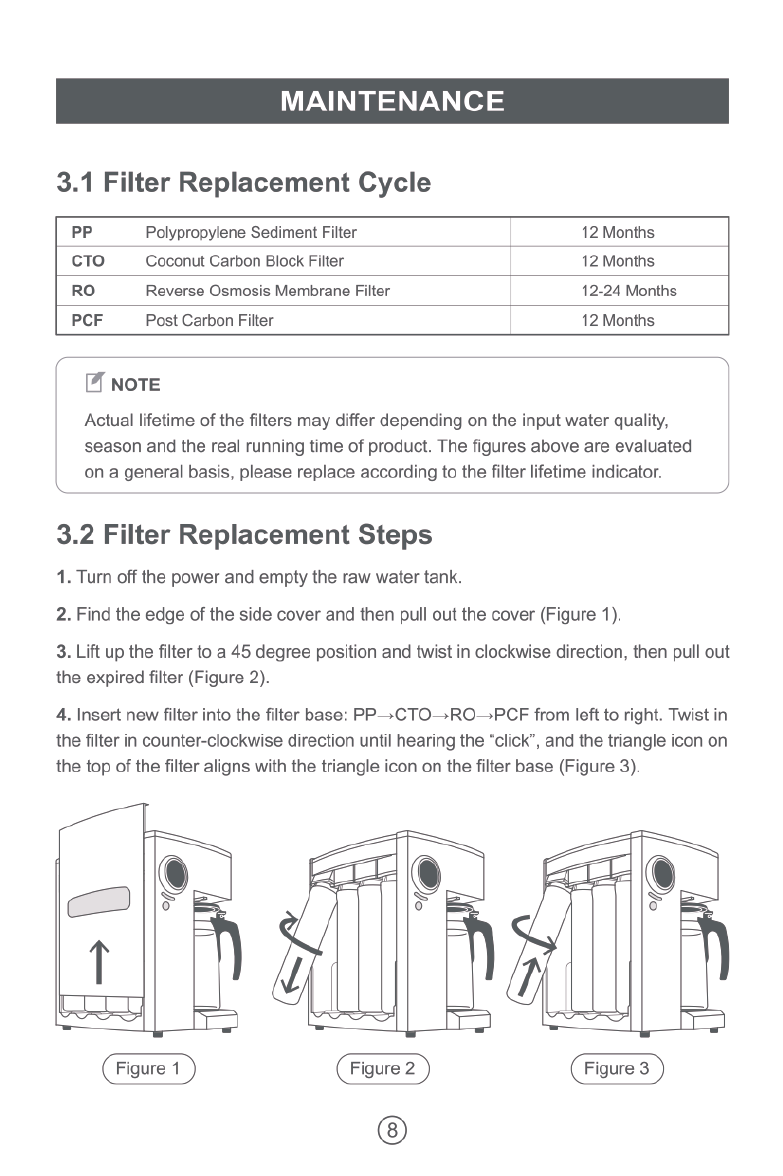
Blusvua
Reverse
Osmosis
Drinking
Water
System

Thank
you
for
choosing
Bluevua!
Every
product
sold
allows
us
to
bring
more
people
to
a
healthier
lifestyle
with
clean
water,
and
to
a
more
sustainable
future
with less
plastic
waste.

TEN
1.
Preparation
1.1
Precautions
1.2
Before
Using
1.3
Required
Tools
-
1.4
Product
Specifications
-
1.5
Filter
Specifications
2
1.6
Product
&
Accessories
List
-
3
1.7
Product
Overview
-
3
2.
Installation
2.1
Step
1:
Setting
Up
ROPOT
-+
-
4
2.2
Step
2:
OSD
Function
-
6
2.3
Step
3:
TDS
Level
In
Water
-
-
7
3.
Maintenance
3.1
Filter
Replacement
Cycle
-
8
3.2
Filter
Replacement
Steps
-
8
3.3
Automatic
Backflushing
3.4
Manual
Backflushing
-+
3.5
How
to
descale
your
ROPOT
-
5.
Troubleshooting
6.
Warranty
-

PREPARATIO
1.1
Precautions
Note:
All
contents
in
this
chapter
are
related
to
safety,
users
must
comply
with
it.
All
contents
in
this
chapter
are
only
for
the
correct
use
of
this
product.
)
Prohibition
Do
not
store
flammable
items
near
the
machine
Avoid
installing
under
direct
sunlight
and
outdoor
places
Do
not
expose
to
an
environment
below
oec
@
Warning
When
the
machine
breaks
down,
please
cut
off
the
water
and
power
supply
quickly
Keep
out
of
reach
of
children
Please
do
not
let
children
operate
the
machine
/\
Attention
Do
not
disassemble
the
machine
by
yourself
as
to
prevent
water
leakage
and
damage
to
the
machine
A\
Please
make
sure
the
temperature
of
water
source
is
5-38
°C
When
the
machine
will
be
inactive
for
more
than
24
hours,
please
shut
down
its
water
source
and
turn
off
its
power
supply
In
order
to
run the
machine
smoothly,
please
use
accessories
and
filter
cartridges
from
Bluevua
®

PREPARATIO
1.2
Before
Using
Open
the
packaging
and
take
out
the
entire
machine,
as
well
as
all
the
accessories.
Confirm them
in
accordance
with
the
list
to
ensure
that
nothing
is
missing
or
damaged
during
the
shipping.
If
there
is
any
part
broken
or
cracked,
please
contact
Bluevua
Support
Team
instead.
To
ensure
a
better
using
experience,
please
watch
the
guiding
video
from
our
website:
www.bluevua.com
Tel:
1-888-637-0009
Mon-Fri
9:00
AM-5:00
PM
PST
Email:
1.3
Required
Tools
*
Towel
©
Happy
mood
1.4
Product
Specifications
Product
Model
RO100ROPOT-Bluevua
Product
Size
(L'W*H)
L276°W362°H392mm
Feed
Water
Pressure
0-02
MPa
Feed
Water
Temperature
41~100F
/
5~38°C
Feed
Water
Requirement
Tap
Water
Pure
Water
Rate
0.26L
Per
Minute
/
100
Gallon
Per
Day
Power
Specifications
Input
100-240
AC
Output
24V
DC;
1.5A
Note:
The
pure
water
rate
is
affected
by
water
pressure
and
water
temperature.
The
feed
water
is
measured
under
0.2
MPa
water
pressure
and
25°C
water
temperature.
‘When
water
pressure
and
water
temperature
fluctuate,
the
water
rate
also
fluctuates.
1.5
Filter
Specifications
PP
5
Micrometers
RO
0.0001
Micrometers
cTO
0.5
Micrometers
PCF
0.1
Micrometers
@

PREPARATION
1.6
Product
&
Accessories
List
Bluévua
1
I
N
|
—
\
RO
Water
System
With
High
Borosilicate
Power
Adapter
User
Guide
PP+CTO+RO+PCF
Filters
Glass
Carafex
1
x1Set
x1
1.7
Product
Overview
Side
Cover
Water
Tank
Cover
LED
Display
[
|
Raw
Water
Tank
Water
Volume
Button
@
1
Water-Making
Button
High
Borosilicate
Glass
Carafe

GETTING
STARTED
2.1
Setting Up
ROPOT
1.
Please
wash
the
water
tank
and
the
glass
carafe
for
the
first
time
use.
2.
Place
the
machine
on
a
flat
and
stable
surface,
and
make
sure
there
are
available
power
outlets
nearby.
3.
Plug
the
power
adapter
into
the
power
outlet.
Connect
the
DC
cable
to
the
power
port
on
the
back
of
the
machine,
then
turn
on
the
switch.
4.
Fill
the
water
to
the
MAX
volume
line
on
the
water
tank,
and
make
sure
the
water
tank
and
glass
carafe
are
both
stably
placed.
[ NOTE
To
extend
service
life
and
maintenance
intervals,
please
discard
the
RO
reject
water
left
in
the
tank.
DO
NOT
reuse
it
for
another
round
of
filtering.
Y
N

GETTING
STARTED
5.
Gently
press
the
banana-shaped
water
volume
button
to
choose
preferred
volume
between
0.5L,
1L,
and
1.5L
(full),
the
carafe
icons
on
the
bottom
of
the
display
panel
will
flash
to
indicate
the
selected
volume.
6.
After
selecting
volume,
press
the
round
water-making
button
to
begin
filtering.
7.
Repeat
steps
4
through
6
five
times
to
flush
out the
protective
liquid
in
the
filters
before
drinking.
Be
aware
the
water
is
NOT
drinkable
during
the
flushing
process.
Ie
\
[
NOTE
«
During
the
first
1 -
2
rounds
the
raw
water
in
the
tank
will
automatically
fill
the
filters,
and
there
may
be no
clean
water
produced
during
the
first
two
rounds.
-
For
the
first
3
-
5
rounds,
it
is
normal
for
the
pure
water
made
to
turn
black
or
grey
due
to
the
activated
carbon
particles
as
the
filters
are
flushed
clean.
-+
The
system
automatically
enters
power
saving
mode
when
left
unused
over
5
minutes.
Press
the
round
water-making
button
to
boot
up
the
system
again.
Press
to
choose
volume
Press
to
start/stop
water
making

GETTING
STARTED
2.2
OSD
Function
ROPOT
Real
Time
Raw
Water
Real
Time
Pure
Water
Quality
Indicator
Quality
Indicator
Filter
Life
Indicator
Water
Volume
Indicator
Indicator
Operating
Status
Display
When
power
is
on,
the
buzzer
plays
power-on
|
Al
the
indicators
lights
up
Power-On
|
sound,
all
button
lights
and
digital
function
under
the
auto-flushing
and
menus
is
on.
pure
water-making
process.
Total
dissolved
solids
(TDS)
stands
for
total
dissolved
solids,
and
represents
the
total
concentration
of
dissolved
substances
in
water.
IN
indicates
the
TDS
level
of
the
raw
water.
OUT
indicates
the
TDS
level
of
the
pure
water.
Note
]
that
during
the
water-making
process,
the
TDS
level
usually
fluctuates
at
the
start
before
gradually
becoming
stable.
The
real
time
water
quality
indicators
are
on
during
the
water-making.
It
continuously
displays
the
water
quality
based
on
the
TDS
level.
The
indicator
remains
off
during
the
power
saving
mode.
The
filter
indicator
reminds
you
when
is
the
time
|
When
the
filter
expires,
the
to
change
the
filter.
When
one
or
more
filters
indicator
flashes
repeatedly
expire,
the
indicators
must
be
reset
to
restart
the
|
until
the
replacement
and
filter
life
reminder
after the
filter
replacement.
|
reset
process
are
completed.
The
default
volume
is
1.5L.
Gently
press
the
Al
three
indicators
are
on
water
volume
button
to
enter
volume
selecting
|
during
operation.
Only
the
@
@
@
mode,
then
press again
the
button
to
switch
selected
volume
indicator
between
3
different
volume:
0.5L,
1L
and
flashes
every
second
under
1.5L(full)
from
left
to
right.
volume
selecting
mode.
®

GETTING
STARTED
2.3
TDS
Level
In
Water
/-\
Ideal
drinking
water
from
Reverse
Osmosis,
which
is
perfectly suitable
for
direct
drinking
50
Good
Mountain
springs
or
aquifers,
water
naturally
low
in
salt
and
minerals
100
Hard
water,
which contains
a
high
concentration
of
calcium
and
magnesium
ion
200
Fair
Marginally
Acceptable
300
Specialty
mineral/alkaline
drinking
water,
salty
well
water
,
mineral
spotting
400
Poor
High
TDS
water
from
the tap
or
mineral springs
500+
U.S.
Environmental
Protection
Agency
(EPA)
maximum
\/
contamination
level
Well
done!
You
are
ready
to
enjoy
fresh
clean
water!

MAINTENANCE
3.1
Filter
Replacement
Cycle
PP
Polypropylene
Sediment
Filter
12
Months
cTO
Coconut
Carbon
Block
Filter
12
Months
RO
Reverse
Osmosis
Membrane
Filter
12-24
Months
PCF
Post
Carbon
Filter
12
Months
[ NOTE
Actual
lifetime
of
the
filters
may
differ
depending
on
the
input
water
quality,
season
and
the
real
running
time
of
product.
The
figures
above
are
evaluated
L
on
a
general
basis,
please
replace
according
to
the
filter
lifetime
indicator.
)
3.2
Filter
Replacement
Steps
1.
Turn
off
the
power
and
empty
the
raw
water
tank.
2.
Find
the
edge
of
the
side
cover
and
then
pull
out the
cover
(Figure
1).
3.
Lift
up
the
filter
to
a
45
degree
position
and
twist
in
clockwise
direction,
then
pull
out
the
expired
filter
(Figure
2).
4.
Insert
new
filter
into
the
filter
base:
PP—CTO—RO—PCF
from
left
to
right.
Twist
in
the
filter
in
counter-clockwise
direction
until
hearing
the
“click”,
and
the
triangle
icon
on
the
top
of
the
filter
aligns
with
the
triangle
icon
on
the
filter
base
(Figure
3).

MAINTENANCE
5.
Turn
on
the
power,
find
and
pull
the
reset
toggle
switch
behind
the
panel
for
3
seconds
to
enter
filter
selection
mode.
The
No.1
filter
indicator
will
then
flash.
Press
the
banana-shaped
water
volume
button
to
switch
between
different
filters,
then
pull
the
reset
toggle
switch
again
to
complete
the
reset
process.
6.
Restart
the
system.
To flush
out the
protective
liquid
in
the
brand
new
filter,
please
repeat
the
pure
water-making
process
for
3
times
before
drinking
the
water.

MAINTENANCE
3.3
Automatic
Backflushing
The
system
automatically
enters
flushing
mode
under
the
circumstances
below:
1.
For
The
First
Time
Using
When
the
power
is
on,
the
system
will
automatically
switch
to
auto-flushing
mode
and
start
back-flushing
for
18
seconds.
2.
Everytime
Before
a
Filtration
Cycle
The
system
will
be
forced
to
have
auto
back-flushing
for
18
seconds
before
a
filtration
cycle
starts.
3.
For
Restored
Power
When
the
power
is
restored
from
an
outage,
the
system
will
be
forced
to
have
auto
back-flushing
for
18
seconds.
3.4
Manual
Backflushing
Press
the
banana-shaped
water
volume
button
and
the
round
water-making
button
simultaneously
to
trigger
the
1
minute
backflushing.
When
you see
these
two
buttons
flashing
together,
please
follow
the
reminder
and
press
them
simultaneously
to
start
the
6
minutes
self-cleaning
to
flush
out
the
remaining
contaminants.
[ NOTE
If
you
are
using
an
earlier
version
that
does
not
have
a
manual
backflushing
function,
please
turn
off
and
turn
on
the
unit
to
start
the
auto
backflushing.

MAINTENANCE
3.5
How
to
descale
your
ROPOT
Limescale
can
clog
up
the
machine
and
disrupt
water
flow.
If
you
start
experiencing
slow
water
flow,
it
is
time
to
take
proper
care
of
it.
Use
a
commercial
descaling
solution
or
make
one
of
these
DIY
solutions.
Com
&
&
50/50
white
50/50
lemon
juice
2
tablespoons
of
citric
vinegar
and
water
and
water
acid
per
quart
of
water
1.
Mix
up
the
descaling
solution
in
the
water
tank,
then
place
it
back
onto
the
base.
2.
Select
the
1.5L
total
volum
and
start
a
filtration
cycle.
3.
Turn
off
the
system
midway
through
the
cycle,
and
let
it
sit
and
soak
for
an
hour.
4.
Pour
out
the
descaling
solution.
7 NOTE
Repeat
steps
1
through
4
if
your
ROPOT
system
has
a
heavy
buildup
or
if
you
use
lemon
juice
or
vinegar.
L J
5.
Run
three
filtration
cycles
with
tap
water
to
rinse
the
system
and
remove
the
odor
or
taste
of
the
descaling
solution.
If
the
sour
taste
remains,
please repeat
for
a
few
more
rounds
until
the
water
tastes
clean.
@)

FAQ
Why
there
are
droplets
on
a
new
unit
after
opening
the
package?
v
All
the
Bluevua
RO
products
have
been
through
complete
Quality
Control
(QC)inspection
before
being
packaged.
While
each
filter
is
independently
examined
by
air
pressure
for
its
filtration
reliability,
the
filtration
system
is
also
inspected
with
sterile
water
to
ensure
the
most
ideal
performance.
Droplets
that
remained
may
run out
during
the
shipping.
No
worries,
they
are
harmless.
What
is
considered
a
typical
TDS
output
from
the
ROPOT
system?
v
ROPOQT
features
the
reverse-osmosis
technique,
which
typically
ensures
the
reduction
of
90-95%
of
TDS.
There
is
no
typical
TDS
output
from
the
ROPOQOT
system
since
the
TDS
output
is
highly
subject
to
different
water
sources
and
qualities
across
different
states
or
regions.
Other
factors
like
weather
and
temperature
can
also
affect
the
TDS
output.
For
instance,
with
raw
water
that
has
a
TDS
of
300,
the
TDS
of
filtered
water
will
have
an
OUT
TDS
of
around
15-30.
Is
it
common
to
see
a
spike
in
output
TDS
after
a
period
of
no
use?
v
Yes,
this
is
commonly
referred
to
as
TDS
creep
-
when
an
RO
system
sits
idle
and
there
is
no
active
pressure
being
applied
to
the
raw
water
side
of
the
membrane,
the
appearance
of
salt
can
creep
into
the
treated
side
of
the
membrane
and
lead
to
a
higher
TDS.
If
this
happens,
you can
either
press
the
water
volume
and
water-making
button
simultaneously
or
turn
off/on
the
unit
to
start
the
back-flushing
before
filtering.
What
is
the
pH
of
Reverse
Osmosis
water?
v
With
chemical
reaction:
H20
+
CO2
=
H2CO3.
The
more
pure
the
water
is,
the
more
CO2
it
can
absorb,
and
the
more
acidic
it
will
get.
The
filtered
water
from
ROPOT
can
drop from
a
PH
of
7
down
to
a
PH
of
6.2.
®

FAQ
Q
A
Can
|
use
the
remaining
water
in
the
tank
for
the
next
filtration?
NO,
the
remaining
water
in
the
water
tank
after
a
filtration
cycle
is
NOT
unused
or
non-filtered
water
but the
RO
reject
water
that
holds
all
the
containments
removed
from
the
raw
water.
To
control
the
concentration
of
the
RO
reject
water,
once
the
water
level
goes
below
the
designed
white
cylinder
in
the
tank,
the
filtering
process
will
immediately
stop.
From
the
principles
of
Reverse
Osmosis,
the
RO
system
gets
rid
of
the
dissolved
solids
(such
as
dust,
heavy
metals,
microbes,
etc.)
to
produce
pure
drinking
water.
To
ensure
that
the
dissolved
solids
do
not
stay
or
creep
back
and
contaminate
the
drinking
water,
the
RO
process
naturally
diverts
poor-quality
reject
water
to
the
drain.
To
put
it
short:
An
RO
water
purifier
NEEDS
to
produce
wastewater
to
flush
the
dissolved
particles
and
serve
pure,
clean
drinking
water.
And
in
the
case
of
the
ROPOT
unit,
since
it
is
a
countertop
system
and
is
not
connected
to
the
drainpipe,
the
well-filtered
water
goes
into
the
glass
carafe
while
the
RO
reject
water
with
contaminants
goes
to
the
water
tank
at
the
back.
The
remaining
water
should
be
considered
contaminated,
and
we
highly
recommend
following
the
instruction
of
discarding
those
water
each
time
instead
of
reusing
them
for
the
next
cycle.
Reusing
the
RO
reject
water
will
cause
an
accumulation
of
contaminants
that
damage
the
machine
and
filters.
v
Q
A
What
should
|
do
if
|
am going
to
leave
the
unit
unused
for
a
while?
To
prevent
the
potential
microbial
growth,
you
can
hang
the
pre-filters
PP,
CTO,
and
post-filter
PCF
filter
upside
down
for
30
seconds
and
drain
out
the
water,
then
twist
them
back
into
the
filter
base.
The
RO
filter
needs
to
keep
moist
so just
leave
it
as
it
is;
no
need
to
do
anything
to
the
RO
filter.
And
please
do
not
drink
the
first
round
of
filtered
water
after
you
return.
®

TROUBLESHOOTING
Problem
Possible
Reason
What
to
do?
The
system
does
not
work
after
pressing
the
water-making
button
After
some
amount
of
use,
the
water
volume
button
and
the
water-making
button
may
flashing
together
as
a
reminder
to
flush
out
the
remained
contaminants
Follow
the
reminder
and press
these
two
buttons
simultaneously
to
trigger
the
6
minutes
self-cleaning
procedure
Filters
are
expired,
or
the
filter
lifespans
have
not
been
reset
after
replacing
the
filters
The
system
enters
a
lock
mode
if
it
detects
that
the
water
tank
has
not
been
removed
for
input
water-changing
Refer
back
to
the
steps
on
pages
8and
9
to
see
how
to
replace
the
filters
and
reset
the
filter
lifespans
Lift
up
the
water
tank,
and
place
it
back
onto
the
base
after
pouring
out
the
RO
reject
water
and
refilling
it
with
new
tap
water
Check
the
bottom
of
the
tank
to
see
if
the
small
round
magnet
is
missing
and
need
a
spare
part
replacement
Once
the
water
level
goes
below
the
designed
white cylinder
in
the
tank,
the
filtering
process
will
immediately
stop
to
control
the
concentration
of
the
RO
reject
water
Discard
the
remaining
water
left
in
the
tank
and
refill
it
to
the
MAX
line for
the
next
cycle
The
raw
water
in
the
tank
will
fill
into
the
new
filters,
so
there
may
be no
water
coming
out
during
the
first
two
rounds
The
system
enters
a
lock
mode
when
not
using
the
matching
carafe
or
not
correctly
inserting
the
carafe
into
the
system
Refill
the
raw
water
tank,
then
repeat
the
filtration
cycle
Make
sure
that
the
glass
carafe
is
placed
correctly
and
its
cover
is
closed
and
connected
to
the
system
The
OUT
TDS
number
is
out
of
the
90%
TDS
reduction
range
or
continuously
increasing
The
remaining
water
in
the
water
tank
from
the
previous
filtration
cycle
is
not
discarded,
causing
the
contaminants
to
accumulate
and
lead
to
higher
numbers
for
both
the
IN
and
OUT
TDS
value
Pour
out the
RO
reject
water
left
in
the
tank
and
refil
it
with
new
tap
water
every
time
you
intend
to
make
another
cycle
of
pure
water

TROUBLESHOOTING
Problem
Possible
Reason
What
to
do?
RO
water
flow
is
unstable
or
slow
Clogged
filters
are
the
most
ccommon
reason
for
the
slow
flow
rate
of
water
Refer
back
to
the
steps
on
page
8
to
see
how
to
replace
the
filters
as
per
schedule
Limescale
build-up
in
your
machine
can
reduce
the
RO
water
flow
Refer
back
to
the
steps
on
page
9
to
see
how
to
descale
your
machine
Water
leakage
occurs
The
leftover
water
inside
the
bottom
spring
switch
runs
out
when
detaching
the
water
tank
Lift
up
the
water
tank
slowly
and
gently
Filters
are
not
tightly
connected
to
the
filter
base
on
the
system
The
black
sealing
rings
on
the
top
of
filters
are
distorted
or
loosened
Refer
back
to
the
steps
on
page
8
to
see
how
to
detach
and
re-insert
the
filters.
Make
sure
all
filters
are
fully
inserted
with
no
gap
between
the
filter
base
Use
the
spare
sealing
rings
in
the
packet
to
replace
the
original
ones
Water
volume
is
not
accurate
Booster
pump makes
noise
Air
bubbles
get
trapped
inside
the
system
Refer
back
to
the
steps
on
page
10
to
backflush
and
rid
the
system
of
air
bubbles

WARRANTY
Scan
me
to
register
for
1
YEAR
WARRANTY
Please
scan
the
QR
code
above
or
visit
website
https://www.bluevua.com/warranty
for
1
year
manufacturer
warranty
registration.
Please
also
feel
free
to
reach
out
to
us
if
you
have
any
questions
or
concerns
about
your
RO
drinking
water
system.
Your
health
iis
our
priority!
We
sincerely
hope
our
product
will
bring
health
to
you
and
your
family!

e
BLUEVUA
WEBSITE
D
1-888-637-0009
(Mon-Fri
9:00-17:00
PST)
£
https:/iwww.bluevua.com
W
hitps:/itwitter.com/Bluevua
@
https/www.facebook.com/Bluevua
https://www.instagram.com/bluevua/
Table of contents
Other Bluevua Water Filtration System manuals