Bluevua RO600X7 User manual
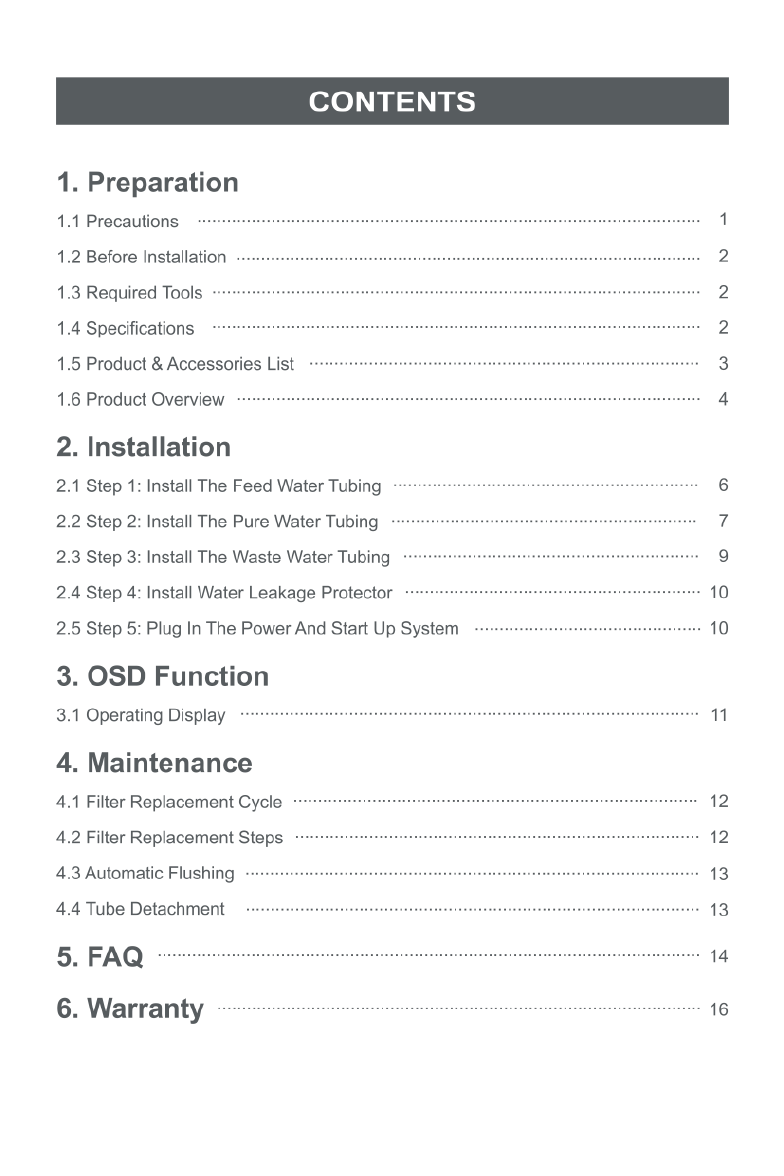
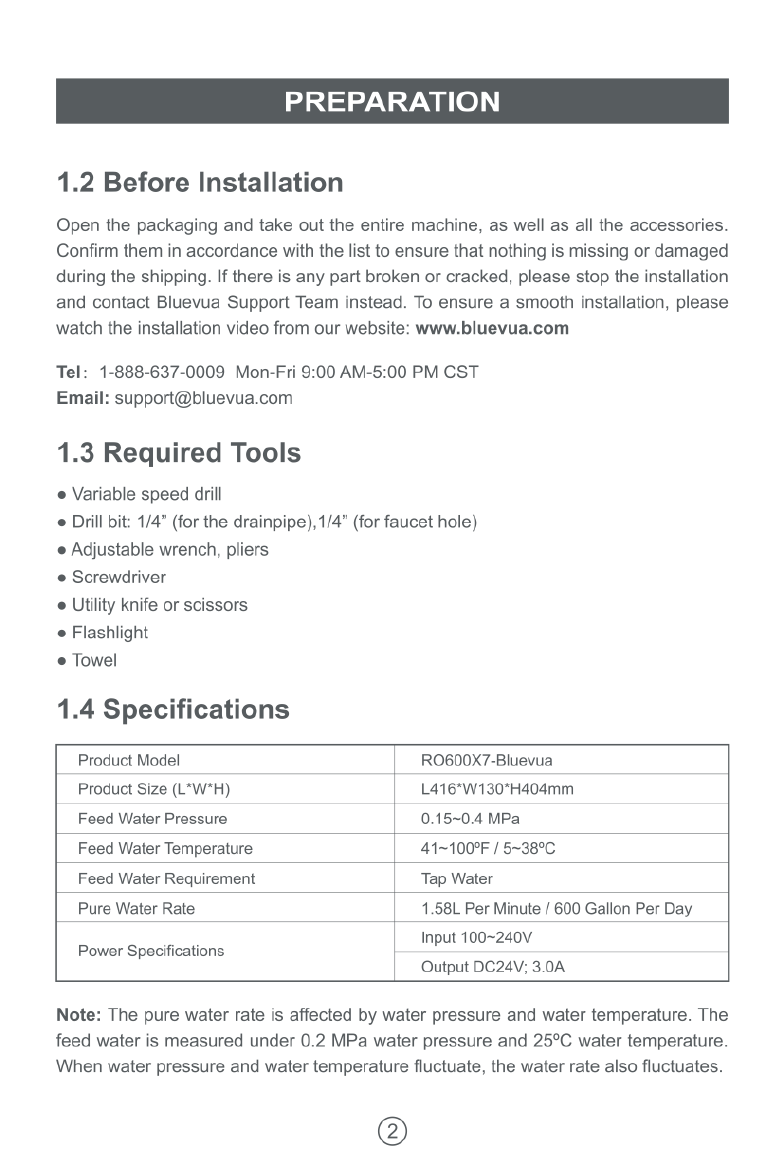
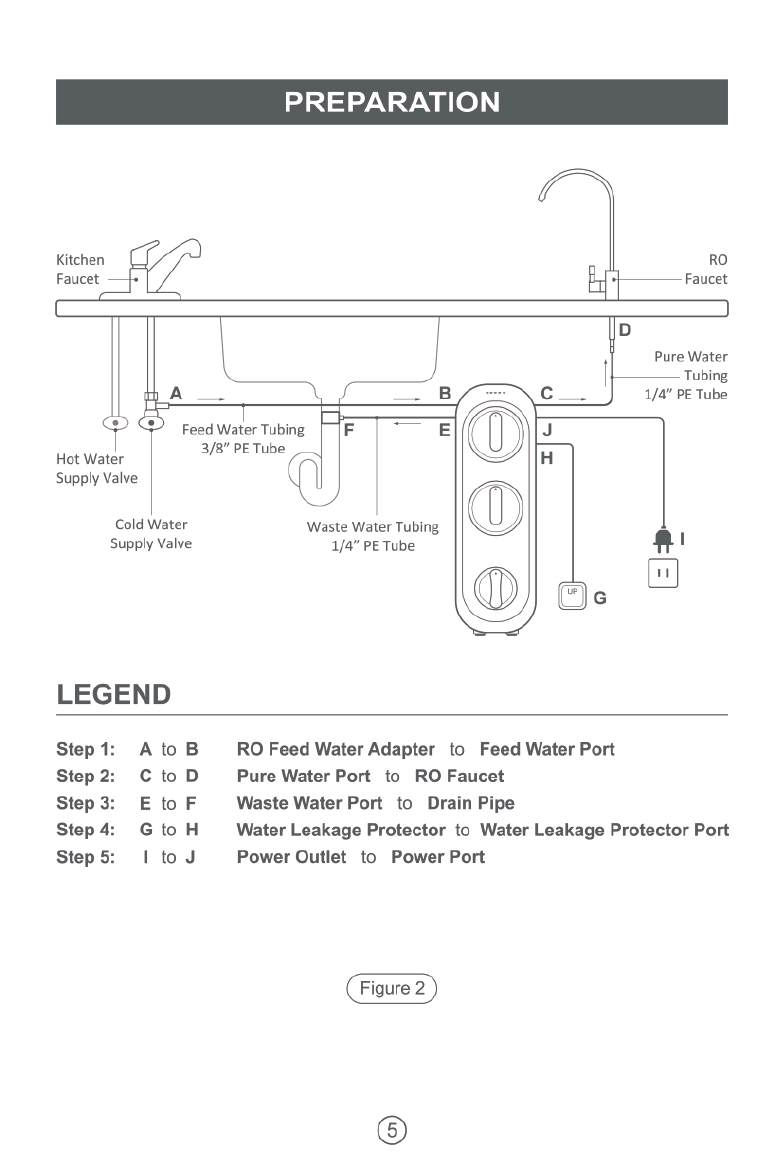
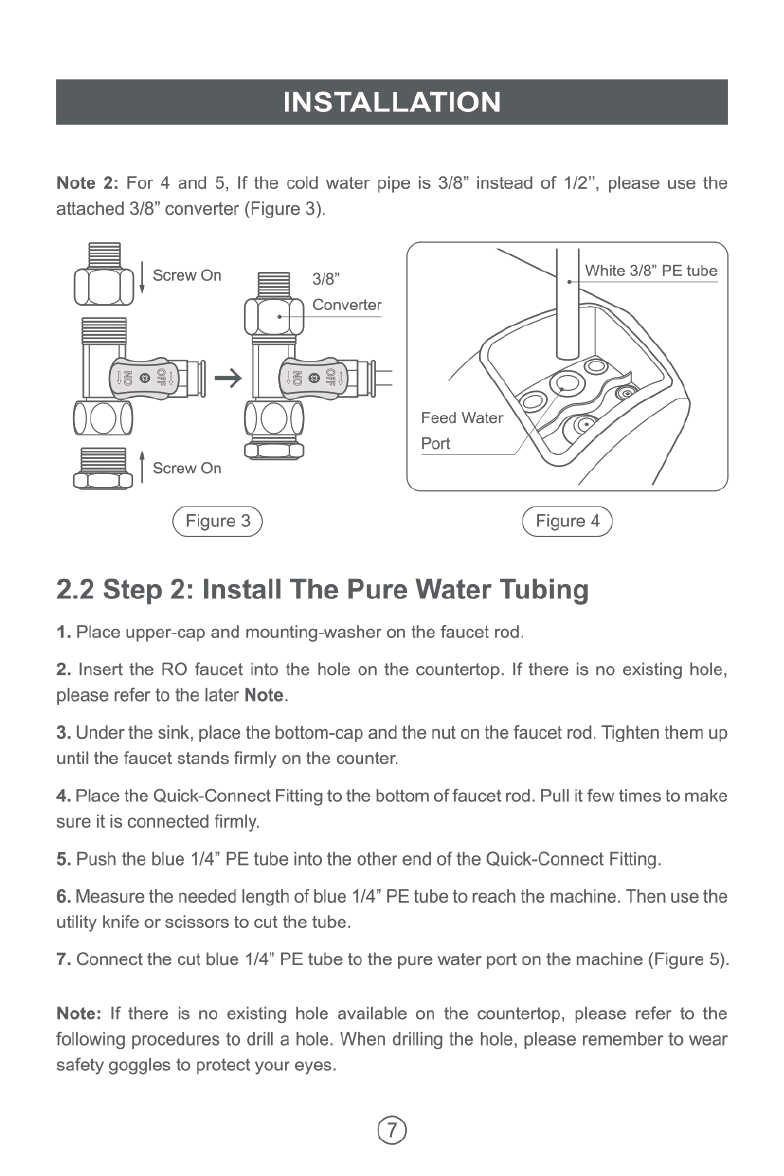
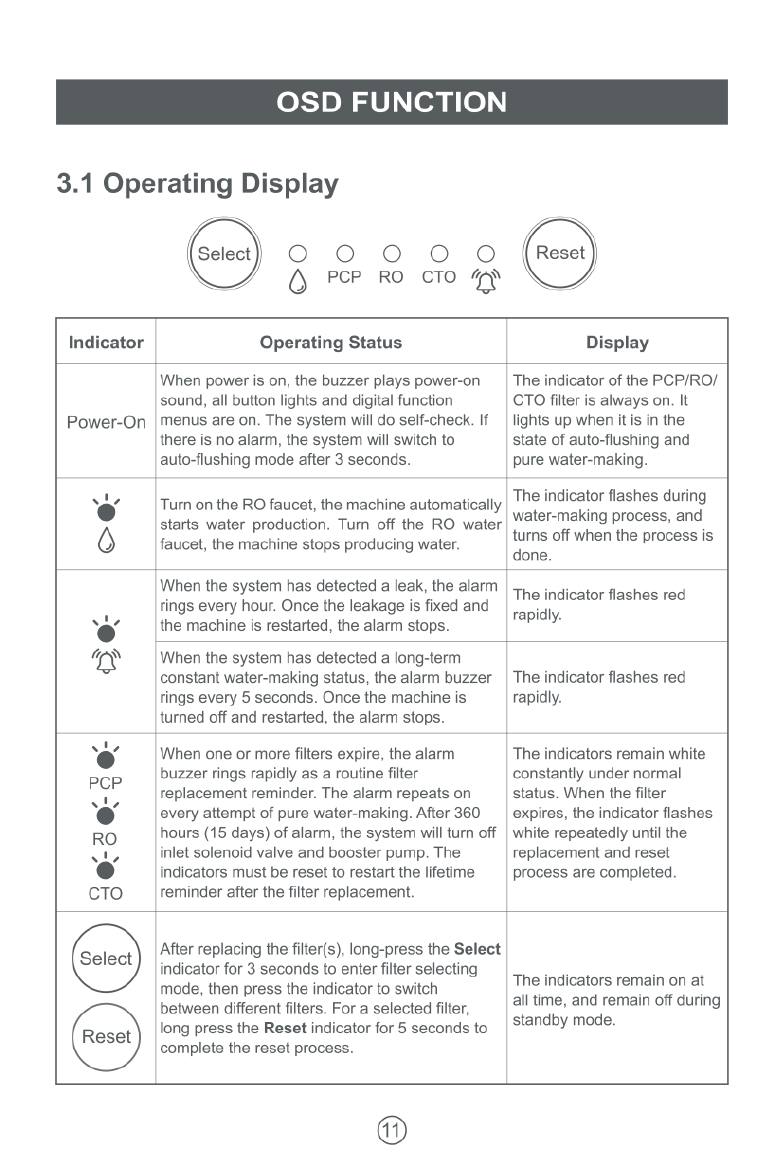
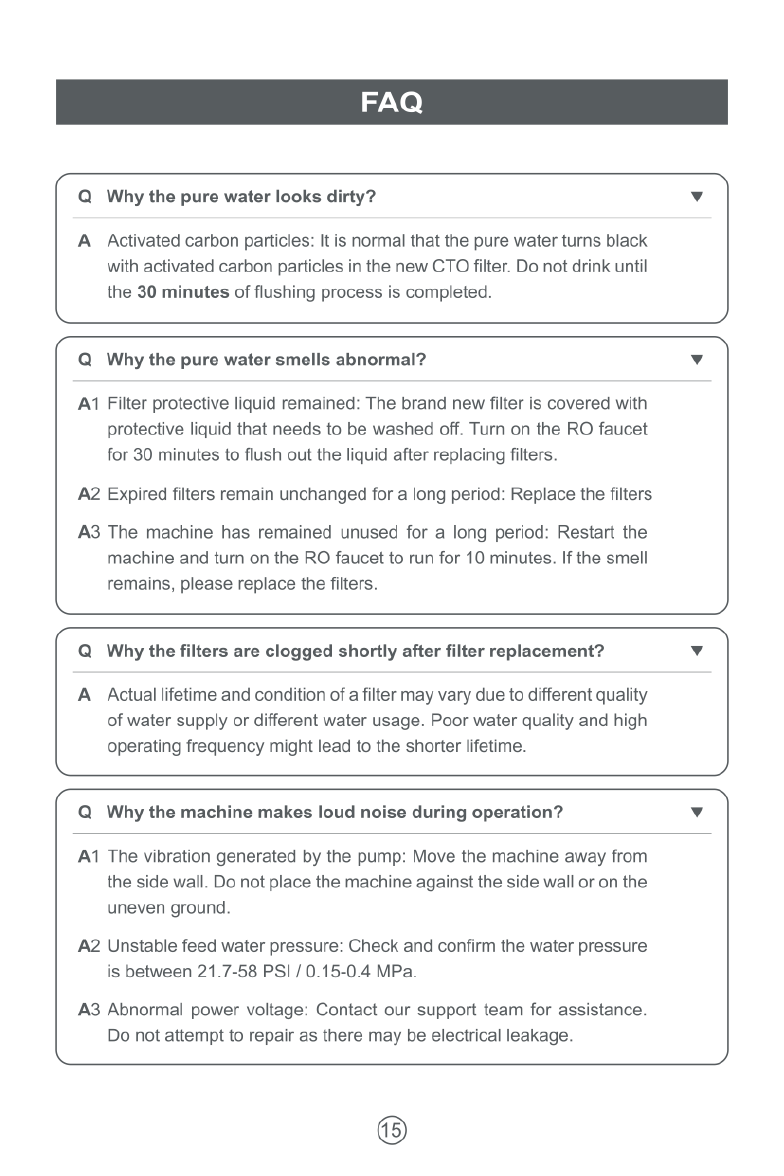
it
BLUEVUA
WEBSITE
D
1-888-637-0009
(24/7
Customer
Service)
&
nttps/iwww
bluevua.com
S
https:/itwitter.com/Bluevua
@
hitps/www.facebook.com/Bluevua
https://www.instagram.com/bluevua/
Blusvua
Reverse
Osmosis
Drinking
Water
System

Thank
you
for
choosing
Bluevua!
Every
product
sold
allows
us
to
bring
more
people
to
a
healthier
lifestyle
with
clean
water,
and
to
a
more
sustainable
future
with
less
plastic
waste.
CONTE
1.
Preparation
1.1
Precautions
1.2
Before
Installation
1.3
Required
Tools
-
1.4
Specifications
1.5
Product
&
Accessories
List
-
1.6
Product
Overview
-
2.
Installation
2.1
Step
1:
Install
The
Feed
Water
Tubing
6
2.2
Step
2:
Install
The
Pure
Water
Tubing
-
7
2.3
Step
3:
Install
The
Waste
Water
Tubing
9
2.4
Step
4:
Install
Water
Leakage
Protector
-
2.5
Step
5:
Plug
In
The
Power
And
Start
Up
System
3.
OSD
Function
3.1
Operating
Display
4.
Maintenance
4.1
Filter
Replacement
Cycle
-
4.2
Filter
Replacement
Steps
4.3
Automatic
Flushing
-~
4.4
Tube
Detachment
6.
Warranty
-

PREPARATION
1.1
Precautions
Note:
All
contents
in
this
chapter
are
related
to
safety,
users
must
comply
with
it.
All
contents
in
this
chapter
are
only
for
the
correct
use
of
this
product.
)
Prohibition
Avoid
installing
Do
not
expose
to
an
Do
not
store
(A=)
under
direct
sunlight
environment
below
{‘)
flammable
items
and
outdoor
places
0°c
near
the
machine
@
Warning
Keep
out
of
reach
of
children
Please
do
not
let
children
operate
the
machine
When
the
machine
breaks
down,
please
cut
off
the
water
and
power
supply
quickly
/\
Attention
PREPARATION
1.2
Before
Installation
Open
the
packaging
and
take
out
the
entire
machine,
as
well
as
all
the
accessories.
Confirm them
in
accordance
with
the
list
to
ensure
that
nothing
is
missing
or
damaged
during
the
shipping.
If
there
is
any
part
broken
or
cracked,
please
stop
the
installation
and
contact
Bluevua Support
Team
instead.
To
ensure
a
smooth
installation,
please
watch
the
installation
video
from
our
website:
www.bluevua.com
Tel:
1-888-637-0009
Mon-Fri
9:00
AM-5:00
PM
CST
Email:
1.3
Required
Tools
®
Variable
speed
drill
©
Drill
bit:
1/4”
(for
the
drainpipe),1/4”
(for
faucet
hole)
©
Adjustable
wrench,
pliers
®
Screwdriver
e
Utility
knife
or
scissors
®
Flashlight
®
Towel
1.4
Specifications
Product
Model
ROB00X7-Bluevua
Product
Size
(L*W*H)
L416*W130*H404mm
Feed
Water
Pressure
0.15~0.4
MPa
Do
not
disassemble
the
machine
by
Please
make
sure
the
temperature
yourself
as
to
prevent
water
leakage
i
of
water
source
is
5-38
°C
and
damage
to
the
machine
When
the
machine
will
be
inactive
.
In
order
to
run the
machine
for
more
than
24
hours,
please
shut
By
smoothly,
please
use
accessories
down
its
water
source
and
turn
off
its
N
and
filter
cartridges
from
Bluevua
power
supply
®
Feed
Water
Temperature
41~100°F
/
5~38°C
Feed
Water
Requirement
Tap
Water
1.58L
Per
Minute
/
600
Gallon
Per
Day
Input
100~240V
Output
DC24V;
3.0A
Pure
Water
Rate
Power
Specifications
Note:
The
pure
water
rate
is
affected
by
water
pressure
and
water
temperature.
The
feed
water
is
measured
under
0.2
MPa
water
pressure
and
25°C
water
temperature.
When
water
pressure
and
water
temperature
fluctuate,
the
water
rate
also
fluctuates.
®

PREPARATION
1.1
Precautions
Note:
All
contents
in
this
chapter
are
related
to
safety,
users
must
comply
with
it.
All
contents
in
this
chapter
are
only
for
the
correct
use
of
this
product.
)
Prohibition
Avoid
installing
Do
not
expose
to
an
Do
not
store
(A=)
under
direct
sunlight
environment
below
{‘)
flammable
items
and
outdoor
places
0°c
near
the
machine
@
Warning
Keep
out
of
reach
of
children
Please
do
not
let
children
operate
the
machine
When
the
machine
breaks
down,
please
cut
off
the
water
and
power
supply
quickly
/\
Attention
PREPARATION
1.2
Before
Installation
Open
the
packaging
and
take
out
the
entire
machine,
as
well
as
all
the
accessories.
Confirm them
in
accordance
with
the
list
to
ensure
that
nothing
is
missing
or
damaged
during
the
shipping.
If
there
is
any
part
broken
or
cracked,
please
stop
the
installation
and
contact
Bluevua Support
Team
instead.
To
ensure
a
smooth
installation,
please
watch
the
installation
video
from
our
website:
www.bluevua.com
Tel:
1-888-637-0009
Mon-Fri
9:00
AM-5:00
PM
CST
Email:
1.3
Required
Tools
®
Variable
speed
drill
©
Drill
bit:
1/4”
(for
the
drainpipe),1/4”
(for
faucet
hole)
©
Adjustable
wrench,
pliers
®
Screwdriver
e
Utility
knife
or
scissors
®
Flashlight
®
Towel
1.4
Specifications
Product
Model
ROB00X7-Bluevua
Product
Size
(L*W*H)
L416*W130*H404mm
Feed
Water
Pressure
0.15~0.4
MPa
Do
not
disassemble
the
machine
by
Please
make
sure
the
temperature
yourself
as
to
prevent
water
leakage
i
of
water
source
is
5-38
°C
and
damage
to
the
machine
When
the
machine
will
be
inactive
.
In
order
to
run the
machine
for
more
than
24
hours,
please
shut
By
smoothly,
please
use
accessories
down
its
water
source
and
turn
off
its
N
and
filter
cartridges
from
Bluevua
power
supply
®
Feed
Water
Temperature
41~100°F
/
5~38°C
Feed
Water
Requirement
Tap
Water
1.58L
Per
Minute
/
600
Gallon
Per
Day
Input
100~240V
Output
DC24V;
3.0A
Pure
Water
Rate
Power
Specifications
Note:
The
pure
water
rate
is
affected
by
water
pressure
and
water
temperature.
The
feed
water
is
measured
under
0.2
MPa
water
pressure
and
25°C
water
temperature.
When
water
pressure
and
water
temperature
fluctuate,
the
water
rate
also
fluctuates.
®

PREPARATION PREPARATION
1.5
Product
&
Accessories
List
1.6
Product
Overview
The
accessories
are
installed
and
connected
as
shown
in
the
following
(Figure
2).
For
a
more
efficient
installation,
please
check
and
be
familiar
with
the
corresponding
location
(Figure
1),
and
remember
to
press
the
unlocking
ring
(Figure
12)
to
remove
(o)
the
trumpet-shaped
cap
from
the
port
before
the
installation.
—
H
/(////9\\\\
°
Water
Leakage
Protector
Port
()]
W)
@)
|
o
-
Polypropylene
RO
Water
System
With
Water
Leakage
RO Feed
Water
Adapter
RO
Faucet
Activated
RQ
Y
PCP+ROGOO+CTO
Filters
x
1
Protector
x
1
3/8"-1/2"
x
1
Set
x1Set
Carbon
Fiter
(PCP)
Pure
Water
Port
Feed
Water
Port
)
Waste
Water
Port
Reverse
Osmosis
e
Membrane
Filter
(RO)
Water-making
Indicators
Power
Adapter
White
3/8”
PE
Blue 1/4”
PE
Black
1/4”
PE
Coconut
Carbon
Block
C
Hree
Tubex60 Tubex60 Tubex60
Fiter
(CTO)
7
‘
Filter
Life
Indicators
Function
Button
Obee.
Bluévua
= =
fl
Front
View
Top
View
i
TR
Drain
Saddle
1/4”
Quick-Connect
Fitting
Adjustable
Wrench
User
Guide
*x1Set
x1
+Teflon
Tape
x1
®
®

PREPARATION
Kitchen
Faucet
RO
Faucet
( )
D
Pure
Water
Tubing
- -
c_
.
1/4”
PE
Tube
J
A
Feed
WaJer
Tubing
F
|~
Hot
Watar
3/8"
PE
Tube
Supply
Valve
Cold
Water
Waste Water
Tubing
Supply
Valve
1/4”
PE
Tube
A
LEGEND
Step1:
Ato
B
RO
Feed
Water
Adapter
to
Feed
Water
Port
Step
CtoD
Pure
Water
Port
to
RO
Faucet
Step3:
E to
F
Waste
Water
Port
to
Drain
Pipe
Step4:
GtoH
Water
Leakage
Protector
to
Water
Leakage
Protector
Port
Step5:
|
toJ
Power
Outlet
to
Power
Port
INSTALLATION
2.1
Step
1:
Install
The
Feed
Water
Tubing
1.
Close
the
cold
water
supply
valve.
Turn
on
the
kitchen
faucet
to
release
the
water
pressure.
Please
make
sure
the
kitchen
faucet
has
remained
open
without
any
water
coming
out,
then
proceed
to
the
next
step.
2.
Unscrew
the
cold
water
pipe
from
the
cold
water
supply
valve.
3.
Insert
the
white
3/8”
PE
tube
into
the
side
with
pull
buckle
on
the
RO
feed
water
adapter.
Please
make
sure
the
tube
is
fully
inserted
and
locked.
4.
Screw
the
cold
water
pipe
onto
the
RO
feed
water
adapter
with
the
original
washer
in
between.
Then
tighten
the
pipe
firmly
with
an
adjustable
wrench.
5.
Screw
your
RO
feed
water
adapter
onto
the
cold
water
supply
valve
with
washer
in
between.
Then
tighten
the
adapter
firmly
with
an
adjustable
wrench.
6.
Connect
the
white
3/8”
PE
tube
to
the
feed
water
port
on
the
machine
(Figure
4).
Note
1:
DO
NOT
turn
on
the
cold
water
supply
valve
and
the
RO
feed
water
adapter
before
starting
up
the
system.
2.
Unscrew
from
the
cold
water
supply
valve
4.
Screw
onto
the
adapter
with
washer
betweer
1/2"
Cold
Water
Pipe
3.
Insert
the
white
3/8”
PE
tube
to
the
adapter
Original
Washer
———
=
/
ECED
Feed
Water
Tubing
RO
Feed
Water
Adapter
Washer
1.
Close
the
cold
water
supply
valve.
5.
Screw
onto
the
adapter
with
washer
betweer
Water
Supply
Valve
®

INSTALLATION
Note
2:
For
4
and
5,
If
the
cold
water
pipe
is
3/8”
instead
of
1/2",
please
use
the
attached
3/8”
converter
(Figure
3).
fi
1
Screw
On
2
Converter
White
3/8"
PE
tube
2.2
Step
2:
Install
The
Pure
Water
Tubing
1.
Place
upper-cap
and
mounting-washer
on
the
faucet
rod.
2.
Insert
the
RO
faucet
into
the
hole
on
the
countertop.
If
there
is
no
existing
hole,
please
refer
to
the
later
Note.
3.
Under
the
sink,
place
the
bottom-cap
and
the nut
on
the
faucet
rod.
Tighten
them
up
until
the
faucet
stands
firmly
on
the
counter.
4.
Place
the
Quick-Connect
Fitting
to
the
bottom
of
faucet
rod.
Pull
it
few
times
to
make
sure
it
is
connected
firmly.
5.
Push
the
blue
1/4”
PE
tube
into
the
other
end
of
the
Quick-Connect
Fitting.
6.
Measure
the
needed
length
of
blue
1/4”
PE
tube
to
reach
the
machine.
Then
use
the
utility
knife
or
scissors
to
cut
the
tube.
7.
Connect
the
cut
blue
1/4”
PE
tube
to
the
pure
water
port
on
the
machine
(Figure
5).
Note:
If
there
is
no
existing
hole
available
on
the
countertop,
please
refer
to
the
following
procedures
to
drill
a
hole.
When
drilling
the
hole,
please
remember
to
wear
safety
goggles
to
protect
your
eyes.
O]
INSTALLATION
1.
Choose
matching
drill
bits
for
the
material
of
the
counter:
use
diamond
core
for
granite,
and use
a
carbide
drill
bit
for
stainless
steel.
Avoiding
using
a
hammer
drill
on
natural
stone,
glass
or
ceramic.
2.
Stick
the
bottom
of
the
faucet
rod
on
the
sink
or
countertop.
Start
drilling
at
the
lowest
speed,
and
hold
the
drill
straight
with
firm
pressure
to
prevent
the
bit
from
slipping.
3.
Drill
a
suitable
hole
according
to
the
size
(1%4")
of
the
faucet
rod.
a
4.
Once
the
drill
bit
breaks
through
the
surface,
slightly
swirl
the
drill
to
apply
pressure
in
a
circle
evenly.
Upper-Cap
Mounting
Washer
Counter
?
Bottom-Cap
m—
——
Nut
1<
Quick-Connect
Fitting
Hi
Blue
1/4”
PE
tube

INSTALLATION
2.3
Step
3:
Install
The
Waste
Water
Tubing
1.
Choose
a
preferred
location
on
the
drainpipe
to
install
the
drain
saddle.
We
highly
suggest
to
install
the
drain
saddle
on
the
vertical-directed
drainpipe.
2.
Drill
a
1/4”
hole
on
the
side
of
the
drainpipe.
Be
careful
not
to
penetrate
the
other
side
of
the
drainpipe.
3.
Place
the
front
plate
on
the
end
of
the
remaining
black
1/4”
PE
tube,
and
insert
the
tube
into
the
drilled
hole
for
about
1”
deep
(Figure
6).
4.
Place
the
back
plate
on
the
other
side
of
the
drainpipe
to
combine
to
the
front
plate.
Use
the
adjustable
wrench
to
tighten
the
plates
with
screws
and
nuts
evenly.
5.
Connect
the
black
1/4”
PE
tube
to
the
waste
water
port
on
the
machine
(Figure
7).
Back
Plate
\
a
Front
Plate
INSTALLATION
2.4
Step
4:
Install
The
Water
Leakage
Protector
1.
Plug
the
water
leakage
protector
into
the
water
leakage
protector
port
on
the
machine
(Figure
8).
2.
Tear
off
the
double-sided
tape
on
the
water
leakage
protector;
then
stick
the
water
leakage
protector
near
the
machine.
Note:
If
the
leakage
protector
is
correctly
installed,
no
further
settings
are
needed.
When
a
leak
occurs,
the
leakage
protector
will
sound
and
pause
the
system.
Please
contact
Bluevua
Support
Team
for
technical
support.
If
the
leakage
protection
is
triggered
by
humidity
or
water
from
outside,
please
clean
the
water
on
and
in
the
leakage
protector.
After
cleaning,
press
the
RESET
button
to
start
again.
2.5
Step
5:
Plug
In
The
Power
and
Start
Up
System
1.
Plug
the
power
adapter
into
the
power
outlet,
then
connect
the
DC
cable
to
the
power
port
on
the
machine
(Figure
9).
2.
The
machine
will
automatically
start
flushing
for
45
seconds.
Turn
on
the
RO
faucet.
Let the
faucet
runs
for
30
minutes
to
flush out
the
protective
liquid
in
the
RO
filter.
Pay
close attention
to
each
joint
of
the
system
during
the
flushing
process.
Make
sure
all
tubing
is
installed
correctly
and
there
is
no
leakage
at
any
joint,
fitting,
valve,
or
PE
tube
connection.
Be
aware
that
a
slow
water
flow
is
normal
when
the
RO
faucet
is
turned
on,
and
the
water
is
NOT
drinkable
during
the
flushing
process.
Black
Waste
Water
1/4”
PE
tube
Water
Leakage
Protector
Tubing
Drainpipe
|
waste
Water
Port
4
Leakage
Protector
Port
Ny

INSTALLATION
2.3
Step
3:
Install
The
Waste
Water
Tubing
1.
Choose
a
preferred
location
on
the
drainpipe
to
install
the
drain
saddle.
We
highly
suggest
to
install
the
drain
saddle
on
the
vertical-directed
drainpipe.
2.
Drill
a
1/4”
hole
on
the
side
of
the
drainpipe.
Be
careful
not
to
penetrate
the
other
side
of
the
drainpipe.
3.
Place
the
front
plate
on
the
end
of
the
remaining
black
1/4”
PE
tube,
and
insert
the
tube
into
the
drilled
hole
for
about
1”
deep
(Figure
6).
4.
Place
the
back
plate
on
the
other
side
of
the
drainpipe
to
combine
to
the
front
plate.
Use
the
adjustable
wrench
to
tighten
the
plates
with
screws
and
nuts
evenly.
5.
Connect
the
black
1/4”
PE
tube
to
the
waste
water
port
on
the
machine
(Figure
7).
Back
Plate
\
a
Front
Plate
INSTALLATION
2.4
Step
4:
Install
The
Water
Leakage
Protector
1.
Plug
the
water
leakage
protector
into
the
water
leakage
protector
port
on
the
machine
(Figure
8).
2.
Tear
off
the
double-sided
tape
on
the
water
leakage
protector;
then
stick
the
water
leakage
protector
near
the
machine.
Note:
If
the
leakage
protector
is
correctly
installed,
no
further
settings
are
needed.
When
a
leak
occurs,
the
leakage
protector
will
sound
and
pause
the
system.
Please
contact
Bluevua
Support
Team
for
technical
support.
If
the
leakage
protection
is
triggered
by
humidity
or
water
from
outside,
please
clean
the
water
on
and
in
the
leakage
protector.
After
cleaning,
press
the
RESET
button
to
start
again.
2.5
Step
5:
Plug
In
The
Power
and
Start
Up
System
1.
Plug
the
power
adapter
into
the
power
outlet,
then
connect
the
DC
cable
to
the
power
port
on
the
machine
(Figure
9).
2.
The
machine
will
automatically
start
flushing
for
45
seconds.
Turn
on
the
RO
faucet.
Let the
faucet
runs
for
30
minutes
to
flush out
the
protective
liquid
in
the
RO
filter.
Pay
close attention
to
each
joint
of
the
system
during
the
flushing
process.
Make
sure
all
tubing
is
installed
correctly
and
there
is
no
leakage
at
any
joint,
fitting,
valve,
or
PE
tube
connection.
Be
aware
that
a
slow
water
flow
is
normal
when
the
RO
faucet
is
turned
on,
and
the
water
is
NOT
drinkable
during
the
flushing
process.
Black
Waste
Water
1/4”
PE
tube
Water
Leakage
Protector
Tubing
Drainpipe
|
waste
Water
Port
4
Leakage
Protector
Port
Ny

OSD
FUNCTION
3.1
Operating
Display
)
0
0
0
0
O
Indicator
Operating
Status
Display
When
power
is
on,
the
buzzer
plays
power-on
sound,
all
button
lights
and
digital
function
Power-On
|menus
are on.
The
system
will
do
self-check.
If
there
i
no
alarm,
the
system
will
switch
to
auto-flushing
mode
after
3
seconds.
Turn
on
the
RO
faucet,
the
machine
automatically
starts
water
production.
Tum
off
the
RO
water
faucet,
the
machine
stops
producing
water.
The
indicator
of
the
PCP/RO/
CTO
filter
is
always
on.
It
lights
up
when
it
is in
the
state
of
auto-flushing
and
pure
water-making.
The
indicator
flashes
during
water-making
process,
and
turns
off
when
the
process
is
done.
When
the
system
has
detected
a
leak,
the
alarm
rings
every
hour.
Once
the
leakage
is
fixed
and
the
machine
is
restarted,
the
alarm
stops.
The
indicator
flashes
red
rapidly.
When
the
system
has
detected
a
long-term
constant
water-making
status,
the
alarm
buzzer
rings
every
5
seconds.
Once
the
machine
is
turned
off
and
restarted,
the
alarm
stops.
When
one
or
more
filters
expire,
the
alarm
buzzer
rings
rapidly
as
a
routine
filter
replacement
reminder.
The
alarm
repeats
on
every
attempt
of
pure
water-making.
After
360
hours
(15
days)
of
alarm,
the
system
will
turn
off
inlet
solenoid
valve
and
booster
pump.
The
indicators
must
be
reset
to
restart
the
lifetime
reminder
after the
filter
replacement
The
indicator
flashes
red
rapidly.
The
indicators
remain
white
constantly
under normal
status.
When
the
fiter
expires,
the
indicator
flashes
white
repeatedly
until
the
replacement
and
reset
process
are
completed.
After
replacing
the
filter(s),
long-press
the
Select
indicator
for
3
seconds
to
enter
filter
selecting
mode,
then
press
the
indicator
to
switch
between
different
filters.
For
a
selected
filter,
long
press
the
Reset
indicator
for
5
seconds
to
complete
the
reset
process.
The
indicators
remain
on
at
all
time,
and
remain
off
during
standby
mode
@
MAINTENANCE
4.1
Filter
Replacement
Cycle
PCP
Polypropylene
Activated
Carbon
Filter
12
Months
RO
Reverse
Osmosis
Membrane
Filter
24
Months
CTO
Coconut
Carbon
Block
Filter
12
Months
Note:
1.
Actual
lifetime
of
the
filters
varies
from
different
regions,
water
quality,
season
and
usage.
Please
replace
the
filters
according
to
the
reminder
from
the
filter
lifetime
indicator.
2.
If
the
filters
expire,
please
purchase
and
replace
the
filters
as
soon
as
possible.
Otherwise,
the
filtration
efficiency
will
be
greatly
reduced
and
affect
performance.
4.2
Filter
Replacement
Steps
1.
Turn
off
the
power
and
water
supply.
2.
Locate
the
side
edge
of
the
front
cover and
then
remove
the
cover.
3.
Hold
the
handle
and
twist
in
counter-clockwise
direction,
then
pull
out the
expired
filter.
4.
Insert
new
filter
into
the
corresponding
hole;
make
sure
the
triangle
icon
on
the
handle
aligns
with
the
triangle
icon
on
the
machine
(Figure
10).
Follow
the
direction
of
the
arrow
to
twist
the
filter
until
the
triangle
icon
on
the
handle
aligns
with
the
lock icon
on
the
machine
(Figure
11).
5.
Long
press
the
Select
indicator
for
3
seconds
to
enter
filter
selecting
mode,
then
press
the
indicator
to
switch
between
different
filters.
For
a
selected
filter,
long
press
the
Reset
indicator
for
5
seconds
to
complete
the
reset
process.
6.
Restart
the
system.
Turn
on
the
RO
faucet
to
flush
out the
protective
liquid
on
the
filters.
Do
not
drink
until
the
30
minutes
of
flushing
process
is
completed.
®

MAINTENANCE
4.3
Automatic
Flushing
The
system
automatically
enters
flushing
mode
under
the
circumstances
below:
1.
For
The
First
Time
Using
When
the
power
is
on,
the
system
will
automatically
switch
to
auto-flushing
mode
and
start
back-flushing
for
18
seconds.
2.
For
Accumulative
Working
Time Over
24
Hours
To
maintain
and
extend
the
lifetime
of
the
filters,
the
system
will
do
auto
back-flushing
for
18
seconds
when
it
accumulatively
works
up
to
24
hours.
3.
For
No
Usage
Over
48
Hours
To
secure
fresh
and
healthy
drinking
water,
the
system
will
do
auto
back-flushing
for
18
seconds
if
there
is
no
pure
water-making
for
more
than
48
hours.
4.
For
Restored
Power
When
the
power
is
restored
from
an
outage,
the
system
will
be
forced
to
have
auto
back-flushing
for
18
seconds.
4.4
Tube
Detachment
To
detach
the
PE
tube
from
the
machine,
use
the
adjustable
wrench
to
press
the
circle
unlocking
ring
of
the
quick-connect
fitting
then
pull
out the
tube.
P
N
®
Q
Why
the
system
does
not
function?
v
A1
Power-saving
mode:
Reset
the
power
or
touch
the
button
several
times
quickly
to
leave
the
mode.
A2
Power
failure:
Check
if
there
is
power
outage.
Check
if
the
power
adapter
is
properly
connected
to
the
machine
and
power
outlet.
Or
simply
disconnect
the
system
and
try
another
power
outlet.
A3
Power
adapter
failure:
Replace
the
power
adapter.
If
you
are
unsure
about
the
model
of
adapter,
please
contact
our
Customer
Service
for
further
assistance
A4
Leakage
alarm
activated:
The
system
automatically
shuts
down
when
the
leakage
protector
detects
a
leak.
Check
and
make
sure
all
tube
joints
and
filters
are
tightened,
and
check
if
the
protector
is
accidently
triggered
by
moisture/liquid
near
the
machine.
Either
way,
unplug
the
water
leakage
protector
and
clean
up
the
water.
After
cleaning,
press
the
RESET
button
to
start
again.
Q
Why
there
is
no
water
dispensing
from
the
RO
faucet
or
the
water
v
output
becomes
weaker?
A1
Excessive
bending
of
water
tube:
Check
and
straighten
out
the
tube.
A2
RO
feed
water
adapter
is
being
turned
off:
Check
and
make
sure
the
RO
feed
water
adapter
switch
is
being
turned
on.
A3
Water
outage
occurred:
Check
if
there
are
any
water
outage
in
the
area.
If
yes,
please
wait
for
the local
water
supply
to
be
fixed.
A4
Filters
clogged:
Check
filters
to
see
if
they
are
properly
inserted.
Make
sure
all
the
filters
are
replaced
and
have
not
expired
yet.
A5
Feed
water
pressure
lower
than
rated
value:
Check
and
make
sure
the
tubing
is
properly
connected
and
no
leakage
on
the
pipe(s).
A6
Temperature
of
feed
water
is
low:
Check
and
make
sure
the
system
runs
at
water
temperature
between
41-100°F.

Q
Why
the
pure
water
looks
dirty?
v
A
Activated
carbon
particles:
It
is
normal
that
the
pure
water
turns
black
.
with
activated
carbon
particles
in
the
new
CTO
filter.
Do
not
drink
until
Scan
me
to
register
for
the
30
minutes
of
flushing
process
is
completed.
1
YEAR
WARRANTY
Q
Why
the
pure
water
smells
abnormal?
v
A
Filter
protective
liquid
remained:
The
brand
new
filter
is
covered
with
protective
liquid
that
needs
to
be
washed
off.
Turn
on
the
RO
faucet
for
30
minutes
to
flush
out the
liquid
after
replacing
filters.
A2
Expired
filters
remain
unchanged
for
a
long
period:
Replace
the
filters
A3
The
machine
has
remained
unused
for
a
long
period:
Restart
the
machine
and
turn
on
the
RO
faucet
to
run
for
10
minutes.
If
the
smell
remains,
please
replace
the
filters.
Q
Why
the
filters
are
clogged
shortly
after
filter
replacement?
v
A
Actual
lifetime
and
condition
of
a
filter
may
vary
due
to
different
quality
of
water
supply
or
different
water
usage.
Poor
water
quality
and
high
operating
frequency
might
lead
to
the
shorter
lifetime.
Q
Why
the
machine
makes
loud
noise
during
operation?
v
A1
The
vibration
generated
by
the
pump:
Move
the
machine
away
from
Please
scan
the
QR
code
above
or
visit
website
https://www.bluevua.com/warranty
the
side
wall.
Do
not
place
the
machine
against
the
side
wall
or
on
the
for
1
year
manufacturer
warranty
registration.
Please
also
feel
free
to
reach
out
to
us
if
uneven
ground.
you
have
any
questions
or
concerns
about
your
RO
drinking
water
system.
Your
health
:
ol
.
-
)
A2
Unstable
feed
water
pressure:
Check
and
confirm
the
water
pressure
is
our
priority!
We
sincerely
hope
our
product
will
bring
health
to
you
and
your
family!
is
between
21.7-58
PSI/
0.15-0.4
MPa.
A3
Abnormal
power
voltage:
Contact
our
support
team
for
assistance.
Do
not
attempt
to
repair
as
there
may
be
electrical
leakage.
®

Q
Why
the
pure
water
looks
dirty?
v
A
Activated
carbon
particles:
It
is
normal
that
the
pure
water
turns
black
.
with
activated
carbon
particles
in
the
new
CTO
filter.
Do
not
drink
until
Scan
me
to
register
for
the
30
minutes
of
flushing
process
is
completed.
1
YEAR
WARRANTY
Q
Why
the
pure
water
smells
abnormal?
v
A
Filter
protective
liquid
remained:
The
brand
new
filter
is
covered
with
protective
liquid
that
needs
to
be
washed
off.
Turn
on
the
RO
faucet
for
30
minutes
to
flush
out the
liquid
after
replacing
filters.
A2
Expired
filters
remain
unchanged
for
a
long
period:
Replace
the
filters
A3
The
machine
has
remained
unused
for
a
long
period:
Restart
the
machine
and
turn
on
the
RO
faucet
to
run
for
10
minutes.
If
the
smell
remains,
please
replace
the
filters.
Q
Why
the
filters
are
clogged
shortly
after
filter
replacement?
v
A
Actual
lifetime
and
condition
of
a
filter
may
vary
due
to
different
quality
of
water
supply
or
different
water
usage.
Poor
water
quality
and
high
operating
frequency
might
lead
to
the
shorter
lifetime.
Q
Why
the
machine
makes
loud
noise
during
operation?
v
A1
The
vibration
generated
by
the
pump:
Move
the
machine
away
from
Please
scan
the
QR
code
above
or
visit
website
https://www.bluevua.com/warranty
the
side
wall.
Do
not
place
the
machine
against
the
side
wall
or
on
the
for
1
year
manufacturer
warranty
registration.
Please
also
feel
free
to
reach
out
to
us
if
uneven
ground.
you
have
any
questions
or
concerns
about
your
RO
drinking
water
system.
Your
health
:
ol
.
-
)
A2
Unstable
feed
water
pressure:
Check
and
confirm
the
water
pressure
is
our
priority!
We
sincerely
hope
our
product
will
bring
health
to
you
and
your
family!
is
between
21.7-58
PSI/
0.15-0.4
MPa.
A3
Abnormal
power
voltage:
Contact
our
support
team
for
assistance.
Do
not
attempt
to
repair
as
there
may
be
electrical
leakage.
®

it
BLUEVUA
WEBSITE
D
1-888-637-0009
(24/7
Customer
Service)
&
nttps/iwww
bluevua.com
S
https:/itwitter.com/Bluevua
@
hitps/www.facebook.com/Bluevua
https://www.instagram.com/bluevua/
Blusvua
Reverse
Osmosis
Drinking
Water
System
Table of contents
Other Bluevua Water Filtration System manuals
Popular Water Filtration System manuals by other brands

Eastwood
Eastwood 31633 instructions

Clack
Clack CB1054/EN Installation, operation & maintenance manual

Miele professional
Miele professional A 800 operating instructions

SuperFish
SuperFish Pond Clear Pro 18000 user manual

Sera
Sera Precision bioactive IF 400 + UV manual

Pentair
Pentair PRF-RO Installation and maintenance manual

Scanomat
Scanomat TopBrewer Cleaning manual

Brita
Brita On tap Instructions for use

Bestway
Bestway 58496E owner's manual

Netafim
Netafim Arkal 2" Spin-Klin Compact Stand Alone... Installation and operation instructions

Royal Prestige
Royal Prestige FP6000CT Use & care manual

Pontec
Pontec PondoRell 3000 operating instructions