BLUGARDA BluFeeder User manual

BluFeeder
AUTOMATIC FISH FEEDER
VISVOEDERAUTOMAAT
FISHFUTTER AUTOMAT
DISTRIBUTEUR DE NOURRITURE

LANGUAGES
English � � � � � � � � � � � � � � � � � � � � � � � � � � � � � � � � � � � 4
Nederlands � � � � � � � � � � � � � � � � � � � � � � � � � � � � � � � 11
Deutsch � � � � � � � � � � � � � � � � � � � � � � � � � � � � � � � � � 18
Français � � � � � � � � � � � � � � � � � � � � � � � � � � � � � � � � � 26
Over 30 years of experience in pond equipment
With over 30 years of experience, we know all about pond equipment. Our mis-
sion is to help pond lovers with buying the best equipment for their pond in the
most sustainable way possible. We trust in the quality of our products and give 3
year warranty* on all our pond products.
Enjoying your pond
A pond is to be enjoyed. Let us help you with the difficulties of the technical sys-
tems around your pond, so you have more time to enjoy your pond with its beau-
tiful fish and plants. No more worries.
From starter to professional
Starting a pond and taking care of it can be complicated at first. There are many
factors to take into account. We help you with making the right choices for your
pond in terms of setup, equipment and maintenance. We will help you with all
the answers regarding your pond. From small to large ponds. From starter to
professional.
Want to know more or get in touch? Visit www.BluGarda.shop.
ABOUT
Quick delivery &
service
Customer service
available to help
Reliable & easy to
use products

1� Unpacking � � � � � � � � � � � � � � � � � � � � � � � � � � � � � � � 5
1.A Contents . . . . . . . . . . . . . . . . . . . . . . . . . . . . . . . . . . . . . . . . . . . . . . . . . . . . . 5
1.B Checking technical data . . . . . . . . . . . . . . . . . . . . . . . . . . . . . . . . . . . . . . . 5
1.C Technical data . . . . . . . . . . . . . . . . . . . . . . . . . . . . . . . . . . . . . . . . . . . . . . . 6
2� Installation � � � � � � � � � � � � � � � � � � � � � � � � � � � � � � � 6
3� Setting it up � � � � � � � � � � � � � � � � � � � � � � � � � � � � � � � 7
3.A Explanation of display . . . . . . . . . . . . . . . . . . . . . . . . . . . . . . . . . . . . . . . . . 7
3.B Setting up for use . . . . . . . . . . . . . . . . . . . . . . . . . . . . . . . . . . . . . . . . . . . . 8
4� Parts � � � � � � � � � � � � � � � � � � � � � � � � � � � � � � � � � � � 9
5� Troubleshooting � � � � � � � � � � � � � � � � � � � � � � � � � � � � 9
6� Maintenance and winter preparation � � � � � � � � � � � � � � � 10
7� Warranty conditions � � � � � � � � � � � � � � � � � � � � � � � � � 10
7.A What does warranty include . . . . . . . . . . . . . . . . . . . . . . . . . . . . . . . . . . 10
TABLE OF CONTENTS
English
5
EN
BluFeeder manual
People who cannot follow these instructions must not use the
device!
This device is not intended for use by persons and children with physical, senso-
ry or mental impairment, or lack of experience and/or knowledge.
Unless they are accompanied by a person responsible for their safety, or by be-
ing instructed how to use the device.
Care must be taken to ensure that children cannot play with the device.
1. UNPACKING
Getting started!
Check the device for possible damage, if so, do not use the device. Take
pictures and contact BluGarda.
1.A CONTENTS
1x BGFS-6 fish feeder
4x Ground pins
4x Screws
1x Pellet spreader
1x Instruction manual
1x Bag of Silica Gel (desiccant against moisture during transport/storage, can be
disposed of with chemical waste after putting the device into operation)
If everything is fine, follow further instructions in the manual.
Read these instructions carefully and follow them!
1.B CHECKING TECHNICAL DATA
Check the data on the rating plate.
The rating plate lists all important technical data.

EN
6BluFeeder manual
Defective electrical appliances that have been used in the household
should be disposed of according to EU directives. This product should
not be disposed of with normal household waste but should be col-
lected separately.
More information on local waste collection points can be found at your home-
town council.
1.C TECHNICAL DATA
Model BluFeeder BGSF-6
Fish food pellets ø 3-8 mm
Tank content 6 L
Feeding frequency per day 1 to 6 x, adjustable
Battery Lithium,2200 mAh, Operable for up to 3 months without recharg-
ing.
Horizontaal 120°
Spreading angle Horizontal 120°
Charging mode Solar cell or adapter (please note! Adapter is not included and not
required for use, but can be ordered optionally)
2. INSTALLATION
The BluFeeder fish feeder can be installed in two ways. Ensure that the outlet of
the BluFeeder is directed towards the pond and is sufficiently close to the pond
so that the feed pellets are properly scattered over the water surface. When in-
stalling, take the throw distance of the pellets into account (adjustable, see 3.2).
Prevent the dispenser from falling into the water!
Battery Battery capacity and power
Container Contents of feed container
IP 44 Protection class IP 44 = Splash-proof
Pellets Permissible diameter of feed pallets in mm
Max. 35° Maximum permissible (ambient) temperature of the device
CE Indicates that the product complies with European legislation.

7
EN
BluFeeder manual
1. Anchoring in the ground 2. Screwing to the ground
Use the included ground pins to anchor the
BluFeeder firmly in the ground.
Fix the BluFeeder to the ground with screws.
3. SETTING IT UP
3.A EXPLANATION OF DISPLAY
Settings Press an dhold SET button briefly to change the menu
Curren ttime Briefly activate to adjust the clock
Feeding time Set he desired feeding start time
Feeding stage Feeding cycle up to 6 cycles per day
Charging sign Flashes during charging. Constantly visible when battery is charged
Battery indicator Indicates battery level
Feeding time length Set the duration of feeding between 0 and 20 seconds. 0 seconds means
there will be no feeding in tis cycle
Feeding distance Horizontal ejection distance pellets. Selection menu:
• S: Short (feeding range up to 1 meter)
• M: Medium (feeding range up to 2 meters)
• L: Long (feeding range up to 3 meters)
Manual feeding Manual feeding: press and hold the RUN button for 3 seconds and the
feeder will start feeding for 3 seconds

EN
8BluFeeder manual
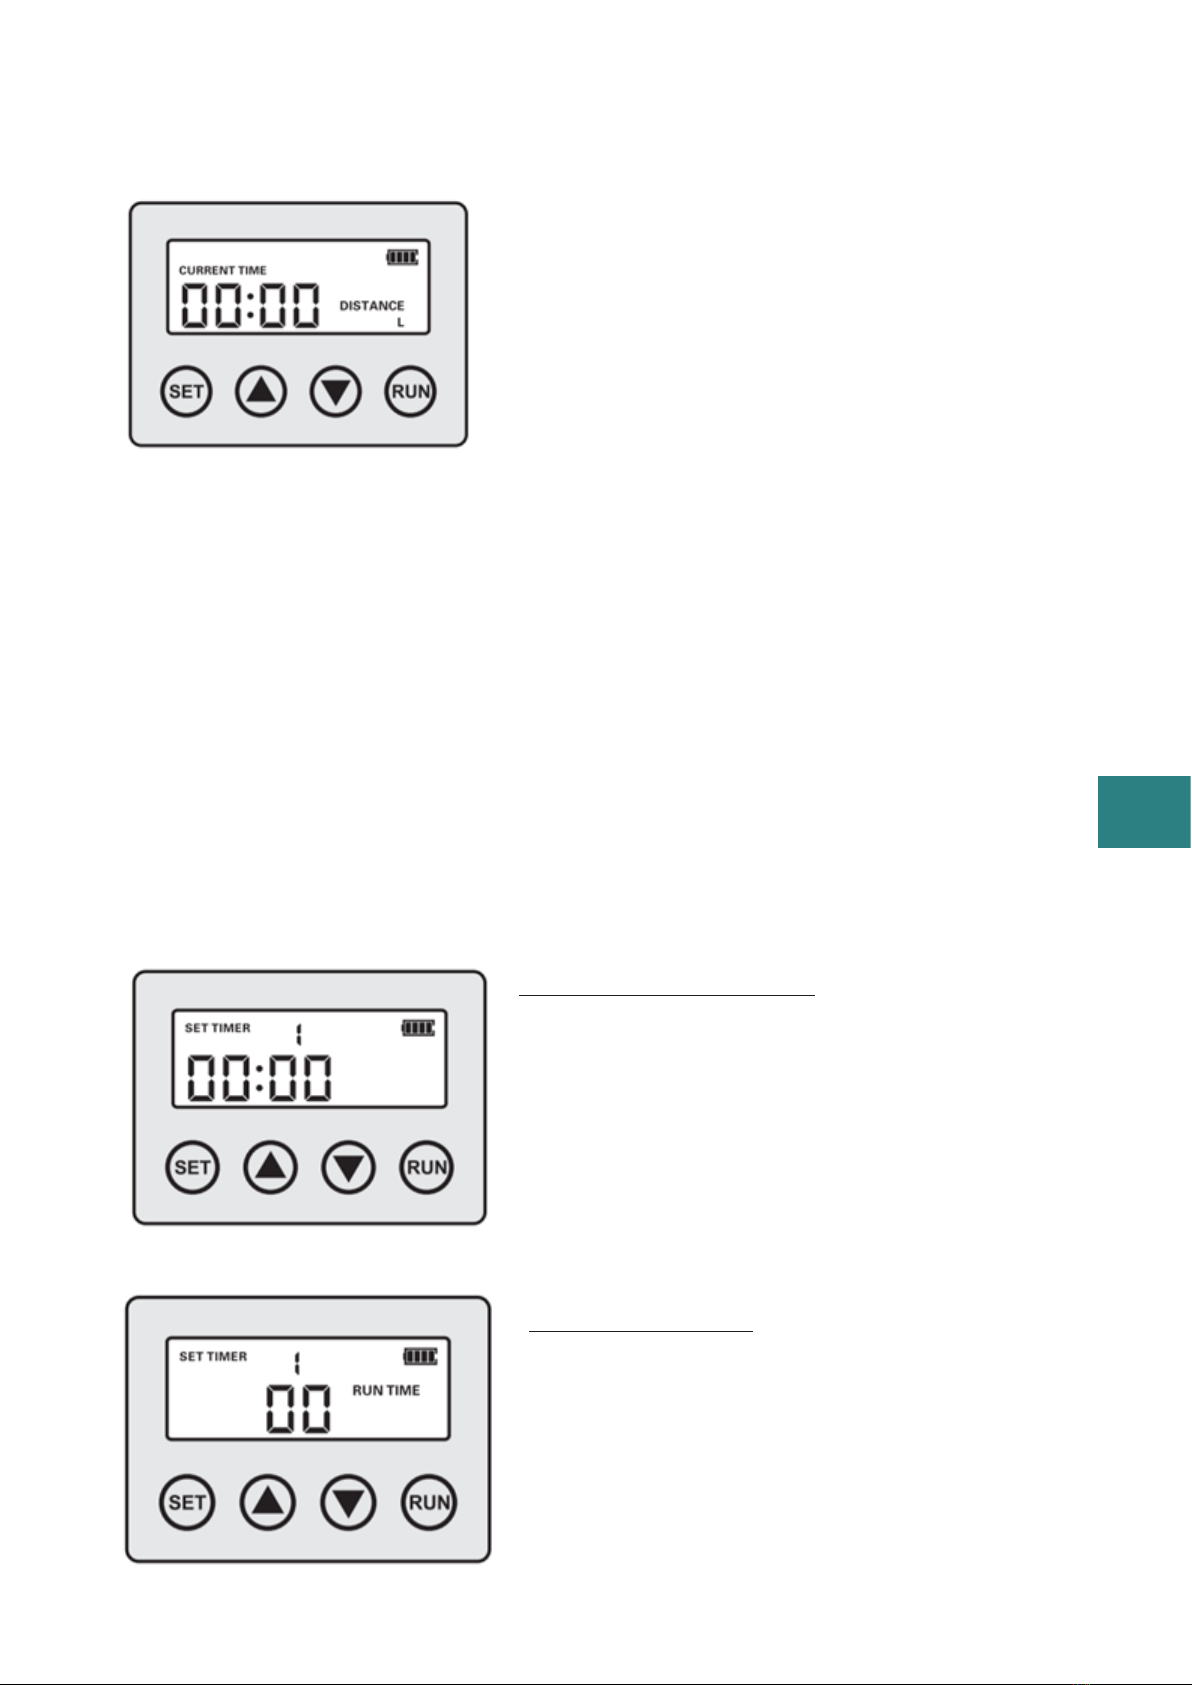
3.B SETTING UP FOR USE
1. Setting the current time
Switch the on/off switch on the side of the de-
vice to on(I).
The display will become visible, as shown in the
picture opposite.
Briefly press the SET button to set the current
time, starting with hour. Set it to the correct hour
using the UP or DOWN button.
Briefly press the SET button again to move to minute and set it to the current
minute using the up or down button.
2. Setting the feeding distance
Briefly press SET again to set the feed distance. The letter L starts to flash. Use
the UP and DOWN buttons to set the feed distance as desired.
S - Short feeding range up to approx. 1 metre. Motor speed runs at 60%.
M - Medium feeding range up to approx. 2 metres. The motor speed runs at 80%.
L – Long feeding range up to approx. 3 metres. Motor speed runs at 100%.
3. SETTING THE FEEDING CYCLE
3.1 Setting the feeding frequency
Set the desired number of feeding frequencies
as shown in the figure opposite. The SET TIM-
ER indicates that you are setting the time of a
feeding cycle. The number next to it indicates
the feeding cycle selected. There are 6 cycles
per day to set. Hold down the SET button brief-
ly and set the cycle time by pressing the UP
and DOWN buttons.
3.2 Setting the feeding time
Set the desired feeding time during the cycle
as shown in the figure opposite.
Use the UP and DOWN button to set the feed-
ing time. A time can be set between 0 and 20
seconds. A time of 0 means there will be no
feeding during this cycle.

9
EN
BluFeeder manual
4. PARTS
5. TROUBLESHOOTING
Probleem Oorzaak Oplossing
No working display
Loose connector cable Unscrew underside and check
connector cables
Battery is empty Place in sunlight so the battery
charges
On/off switch not in correct po-
sition
Switch to I (on)
Display visible, but device does
not work
The paddle is stuck Clean the paddle and remove
unwanted materials
The paddle rotates, but no feed
is thrown
Feed is clumped Removing feed lumps
Are you unable to solve the problem? Contact our customer service at www.blu-
garda.shop and we wwill help you further.
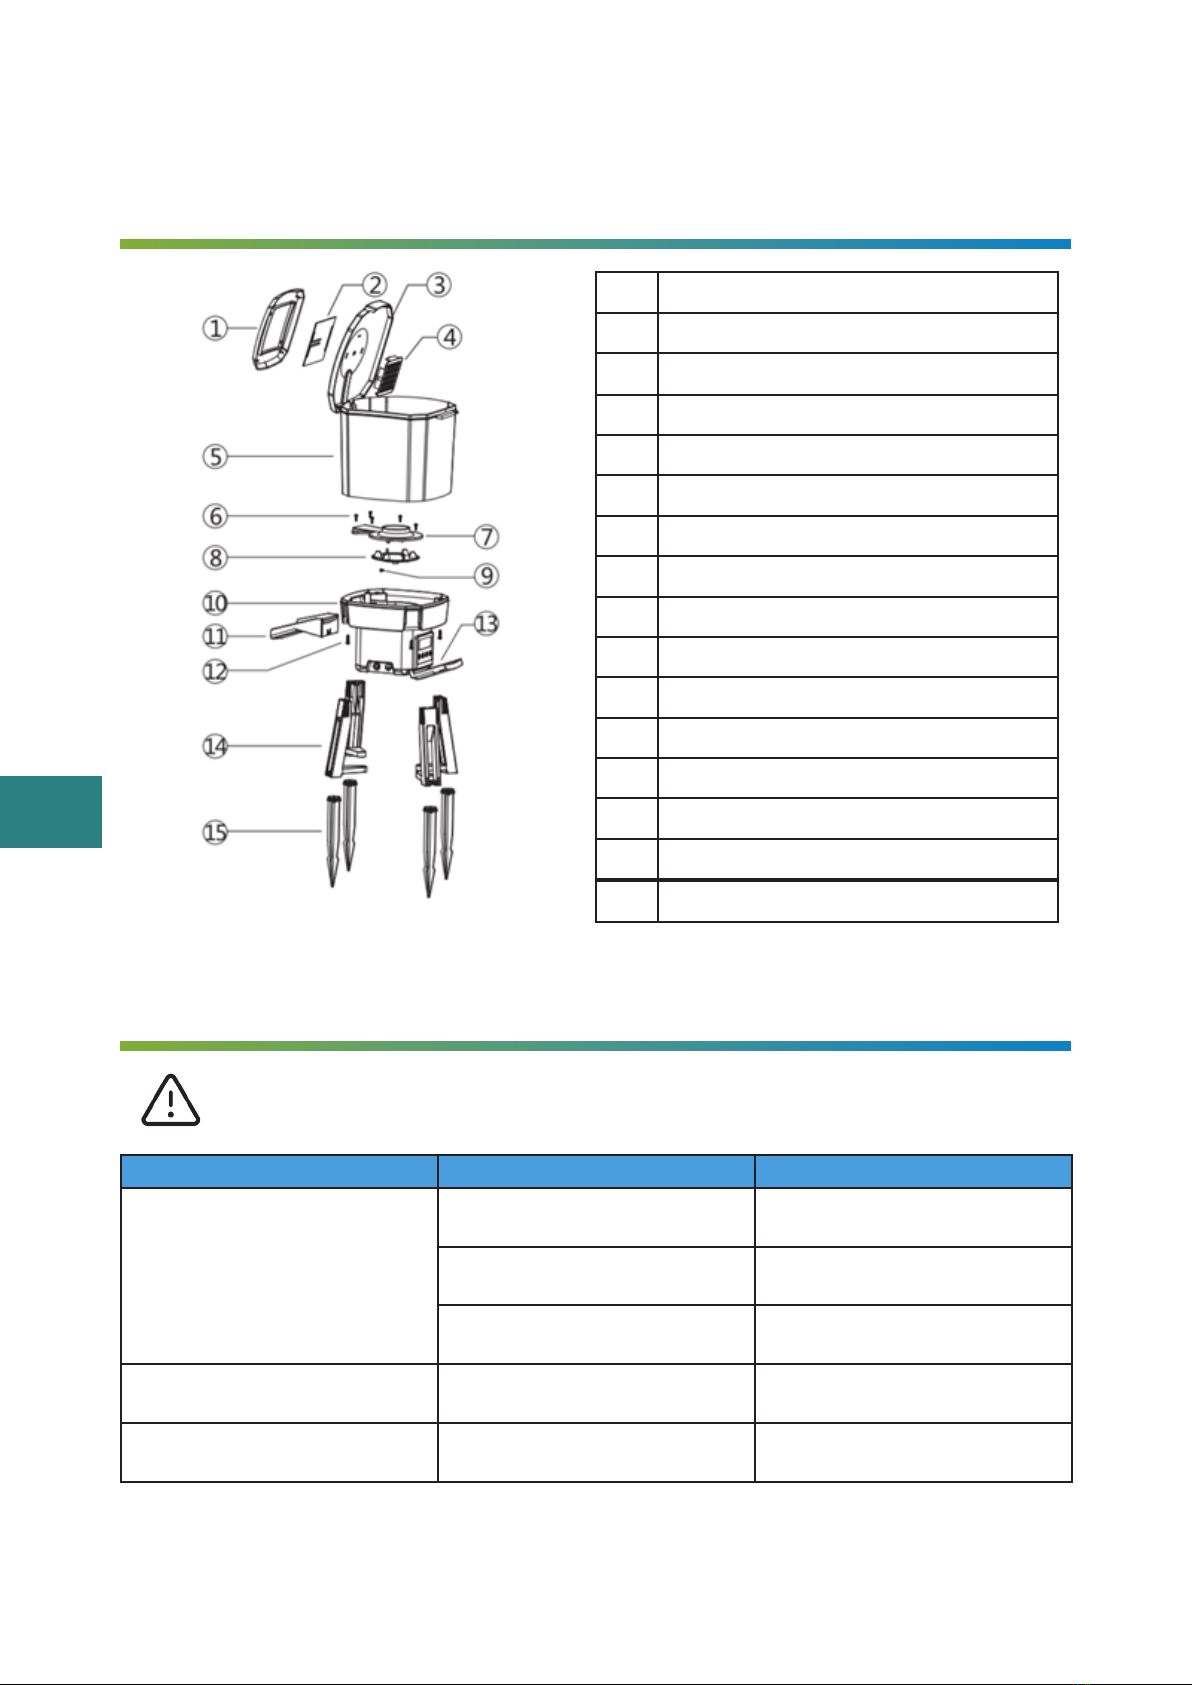
No. Part
1 Transparent protective cover
2 Solar panel
3 Reservoir cover
4 Protection grid
5 Reservoir for pellets
6 Screw
7 Blade cover
8 Blade paddle
9 Screw
10 Housing
11 Pellet spout
12 Screw
13 Control panel cover
14 Foot rests
15 Anchor pins

EN
10 BluFeeder manual
6. MAINTENANCE AND WINTER PREPARATION
With decreasing temperatures, fish need less food.
If the temperature starts to drop below 8°C in autumn/winter, the dispenser may
be removed.
Clean with a clean cloth, without aggressive detergents and store dry/frost-free.
The fish may be fed manually periodically, consult with your fish supplier for
proper feeding behaviour.
7. WARRANTY CONDITIONS
The BluFeeder is covered by a 24-month manufacturer’s warranty, effective from
the time of purchase. The date on the purchase invoice counts as the effective
date. Keep the invoice, you will need it if you want to claim warranty. The supplied
battery is excluded from warranty.
7.A WHAT DOES WARRANTY INCLUDE
Warranty is granted on material and/or construction faults and will be repaired
or replaced free of charge within the warranty period.
During a warranty assessment, we check whether your product has been prop-
erly maintained. If there is poor maintenance, damage caused by improper use,
damages, we have the right to exclude warranty claims. In that case, a cost pro-
posal will follow for repair or replacement.
If changes are made to the device, the warranty claim becomes null and void.
Consequential damage caused by failure or misuse of the device is beyond Blu-
Garda’s liability.
Misprints and technical changes reserved.

1� Uitpakken � � � � � � � � � � � � � � � � � � � � � � � � � � � � � � � 12
1.A Inhoud . . . . . . . . . . . . . . . . . . . . . . . . . . . . . . . . . . . . . . . . . . . . . . . . . . . . . 12
1.B Technische gegevens controleren . . . . . . . . . . . . . . . . . . . . . . . . . . . . . 12
1.C Technische gegevens . . . . . . . . . . . . . . . . . . . . . . . . . . . . . . . . . . . . . . . . 13
2� Installatie � � � � � � � � � � � � � � � � � � � � � � � � � � � � � � � 13
3� Instellen � � � � � � � � � � � � � � � � � � � � � � � � � � � � � � � 14
3.A Verklaring display . . . . . . . . . . . . . . . . . . . . . . . . . . . . . . . . . . . . . . . . . . . 14
3.B Instellen voor gebruik . . . . . . . . . . . . . . . . . . . . . . . . . . . . . . . . . . . . . . . . 15
4� Onderdelen � � � � � � � � � � � � � � � � � � � � � � � � � � � � � � 16
5� Kleine storingen zelf verhelpen � � � � � � � � � � � � � � � � � � 16
6� Onderhoud en wintervoorbereiding � � � � � � � � � � � � � � � � 17
7� Garantievoorwaarden � � � � � � � � � � � � � � � � � � � � � � � � 17
7.A Wat houdt garantie in . . . . . . . . . . . . . . . . . . . . . . . . . . . . . . . . . . . . . . . . 17
INHOUDSOPGAVE
Nederlands

NL
12 BluFeeder manual
Personen, die deze handleiding niet kunnen opvolgen, mogen
het apparaat niet gebruiken!
Dit apparaat is niet bestemd voor gebruik door personen en kinderen meteen
lichamelijke, zintuiglijke of geestelijke vermogensbeperking, of gebrek aan er-
varing en/of kennis.
Tenzij ze worden begeleid door een persoon die verantwoordelijk is voor hun
veiligheid, of door het krijgen van een instructie hoe het apparaat te gebruiken.
Er moet op worden toegezien dat kinderen niet met het apparaat kunnen spelen.
1. UITPAKKEN
Aan de slag!
Controleer het apparaat op mogelijke beschadigingen, mocht dat het geval
zijn, neem het apparaat dan niet in gebruik. Maak foto’s en neem contact
op met BluGarda.
1.A INHOUD
1x Visvoederautomaat BGFS-6
4x Grondpennen
4x Schroeven
1x Pellet uitstrooier
1x Instructievoorschrift
1x zakje Silica Gel (droogmiddel tegen vocht tijdens transport/opslag, kan na in-
gebruikname apparaat bij chemisch afval)
Als alles in orde is, volg dan de verdere instructies van de handleiding.
Lees deze voorschriften aandachtig door en volg ze op!
1.B TECHNISCHE GEGEVENS CONTROLEREN
Controleer de gegevens op het typeplaatje.
Het typeplaatje vermeldt alle belangrijke technische gegevens.
13
NL
BluFeeder manual
Defecte elektrische apparaten die in het huishouden zijn gebruikt, di-
enen volgens EU-richtlijnen verwijderd te worden. Dit product mag
niet met het normale huisvuil worden afgevoerd, maar dient apart te
worden verzameld.
Meer informatie over lokale afvalverzamelpunten vind je bij de gemeente van je
woonplaats.
1.C TECHNISCHE GEGEVENS
Model BluFeeder BGSF-6
Visvoerpellets ø 3-8 mm
Inhoud reservoir 6 L
Voederfrequentie per dag 1 tot 6 x, instelbaar
Batterij Lithium,2200 mAh, Werkzaam tot max. 3 maanden zonder op-
laden.
Strooihoek Horizontaal 120°
Oplaadwijze Zonnecel of adapter (let op! Adapter is niet meegeleverd en is voor
gebruik ook niet nodig, maar optioneel te bestellen)
Afmetingen 275x252x420mm
2. INSTALLATIE
De BluFeeder visvoederautomaat kan op twee manieren worden geïnstalleerd.
Zorg ervoor dat de uitmonding van de BluFeeder richting de vijver is gericht en
voldoende dichtbij de vijver staat, zodat de voerpellets goed over het waterop-
pervlak verstrooid worden. Houd bij plaatsing rekening met de werpafstand van
de pellets (instelbaar, zie 3.2).
Batterij De capaciteit en het vermogen van de batterij
Container Inhoud van de voedercontainer
IP 44 Beschermingsklasse IP 44 = Spatwaterdicht
Pellets De toegestane diameter van voederpallets in mm
Max. 35° Maximum toelaatbare (omgevings)temperatuur van het apparaat
CE Geeft aan dat het product in overeenstemming is met de Europese wetgeving.

NL
14 BluFeeder manual
Voorkom dat de automaat in het water kan vallen!
1. Verankeren in de grond 2. Vastschroeven aan ondergrond
Gebruik de meegeleverde grondpennen om de
BluFeeder stevig in de grond te verankeren.
Fixeer de BluFeeder met schroeven aan de on-
dergrond.
3. INSTELLEN
3.A VERKLARING DISPLAY
Settings Houd SET knop kort ingedrukt het menu te wijzigen
Curren ttime Kort activeren om de klok aan te passen
Feeding time Stel de gewenste starttijd voor voeren in
Feeding stage Voedingscyclus tot 6 cycli per dag
Charging sign Knippert tijdens opladen. Constant zichbaar als batterij opgeladen is
Battery indicator Geeft het niveau van de batterij aan
Feeding time length Stel de duur van het voeren in tussen 0 en 20 seconden. 0 seconden
betekent dat er in deze cyclus niet gevoerd zal worden
Feeding distance Horizontale uitwerpafstand pallets, met keuzemenu:
• S: Small/kort (bereik tot 1 meter)
• M: Medium/middellang (bereik tot 2 meter)
• L: Long/lang (bereik tot 3 meter)
Manual feeding Manueel voeren. Houdt de RUN knop 3 seconden ingedrukt en de voed-
erautomaat zal 3 seconden gaan voeren.
15
NL
BluFeeder manual
3.B INSTELLEN VOOR GEBRUIK
1. Huidige tijd instellen
Schakel de aan/uit schakelaar aan de zijkant
van het apparaat op aan(I).
Het display zal zichtbaar worden, zoals op de af-
beelding hiernaast weergegeven.
Druk kort op de SET toets om de huidige tijd in
te stellen, beginnend met uur. Stel deze in op het
juiste uur met de OMHOOG of OMLAAG knop.
Druk nogmaals kort op de SET toets om naar minuut te gaan en stel deze in op
de huidige minuut met de omhoog of omlaag knop.
2. Voederafstand instellen
Druk nogmaals kort op SET om de voerafstand in te stellen. De letter L begint te
knipperen. Gebruik de knoppen OMHOOG en OMLAAG om de voerafstand naar
wens in te stellen.
S– Small: voerbereik tot ca. 1 meter. De motorsnelheid draait op 60%.
M– Medium: voerbereik tot ca. 2 meter. De motorsnelheid draait op 80%.
L– Long: voerbereik tot ca. 3 meter. De motorsnelheid draait op 100%
3. Voedercyclus instellen
3.1 Voederfrequentie instellen
Stel het gewenste aantal voederfrequenties in
zoals in de afbeelding hiernaast. De SET TIM-
ER geeft aan dat je de tijd van een voedercy-
clus instelt. Het getal ernaast geeft de gekozen
voedingscyclus weer. Er zijn 6 cycli per dag om
in te stellen. Houdt de SET knop kort ingedrukt
en zet de cyclustijd door de OMHOOG en OM-
LAAG knop in te drukken.
3.2 Voedertijd instellen
Stel de gewenste voedertijdsduur in tijdens
de cyclus zoals in de afbeelding hiernaast
weergegeven. Gebruik de OMHOOG en OM-
LAAG knop om de voedertijd in te stellen. Er
kan een tijd worden ingesteld tussen de 0 en
20 seconden. Een tijd van 0 betekent dat er
NL
16 BluFeeder manual
tijdens deze cyclus niet gevoerd zal worden.
4. ONDERDELEN
5. KLEINE STORINGEN ZELF VERHELPEN
Veiligheidsvoorschriften in acht nemen!
Probleem Oorzaak Oplossing
Geen werkend display
Losse connector kabel Schroef onderkant open en con-
troleer connectorkabels
Batterij is leeg Plaats in zonlicht zodat de bat-
terij oplaadt
Aan/uit schakelaar niet in juiste
stand
Schakel in op I ( aan)
Display zichtbaar, maar appa-
raat werkt niet
De schoep zit vast Maak de schoep schoon en ver-
wijder ongewenste materialen
De schoep draait, maar er
wordt geen voer geworpen
Voer is geklonterd Voerklonten verwijderen
Kun je het probleem zelf niet oplossen? Neem contact op met onze helpdesk, we
Nr. Onderdeel
1 Transparante beschermkap
2 Zonnepaneel
3 Deksel reservoir
4 Beschermingsrooster
5 Reservoir voor pellets
6 Schroef
7 Beschermkap schoep
8 Schoep
9 Schroef
10 Behuizing
11 Pelletuitloop
12 Schoef
13 Beschermkap bedieningspaneel
14 Voetsteunen
15 Verankeringspennen

17
NL
BluFeeder manual
helpen je graag verder. www.BluGarda.nl
6. ONDERHOUD EN WINTERVOORBEREIDING
Bij dalende temperaturen hebben vissen minder voer nodig.
Als de temperatuur in het najaar/winter gaat zakken tot onder 8°C, mag de au-
tomaat verwijderd worden.
Reinigen met een schone doek, zonder agressieve schoonmaalmiddelen en
droog/vorstvrij opslaan.
De vissen mogen handmatig periodiek gevoerd worden, overleg voor het juiste
voergedrag met uw leverancier van de vissen.
7. GARANTIEVOORWAARDEN
Op de BluFeeder wordt 24 maanden fabrieksgarantie verleend, die ingaat op het
moment van aankoop. De datum op de aankoopfactuur geldt als ingangsdatum.
Bewaar de factuur, je hebt deze nodig als je aanspraak op garantie wilt maken.
De meegeleverde batterij is van garantie uitgesloten.
7.A WAT HOUDT GARANTIE IN
Garantie wordt verleend op materiaal en/of constructiefouten en worden binnen
de garantietermijn kosteloos hersteld of vervangen.
Bij een garantiebeoordeling checken we of je product goed is onderhouden. Als
er sprake is van slecht onderhoud, schade ontstaan door onjuist gebruik, bes-
chadigingen, hebben we het recht om garantieaanspraak uit te sluiten. In dat
geval zal een kostenvoorstel volgen voor reparatie of vervanging.
Bij veranderingen aan het apparaat, vervalt de garantieaanspraak.
Gevolgschade ontstaan door het uitvallen of verkeerd gebruik van het apparaat
valt buiten de aansprakelijkheid van BluGarda.
Drukfouten en technische wijzigingen voorbehouden.

1� Auspacken � � � � � � � � � � � � � � � � � � � � � � � � � � � � � � 19
1.A Inhalt . . . . . . . . . . . . . . . . . . . . . . . . . . . . . . . . . . . . . . . . . . . . . . . . . . . . . . 19
1.B Überprüfung der technischen daten . . . . . . . . . . . . . . . . . . . . . . . . . . . 19
1.C Technische daten . . . . . . . . . . . . . . . . . . . . . . . . . . . . . . . . . . . . . . . . . . . . 20
2� Installation � � � � � � � � � � � � � � � � � � � � � � � � � � � � � � 20
3� Einstellen � � � � � � � � � � � � � � � � � � � � � � � � � � � � � � � 21
3.A Erläuterung der Anzeige . . . . . . . . . . . . . . . . . . . . . . . . . . . . . . . . . . . . . 21
3.B Einstellen für den Gebrauch . . . . . . . . . . . . . . . . . . . . . . . . . . . . . . . . . . 22
4� Teile � � � � � � � � � � � � � � � � � � � � � � � � � � � � � � � � � � 23
5� Problemlösung � � � � � � � � � � � � � � � � � � � � � � � � � � � � 24
6� Wartung und wintervorbereitung � � � � � � � � � � � � � � � � � 24
7� Garantiebedingungen � � � � � � � � � � � � � � � � � � � � � � � � 24
7.A Was beinhaltet die Garantie . . . . . . . . . . . . . . . . . . . . . . . . . . . . . . . . . . . 24
INHALTSVERZEICHNIS
Deutsch

19
DE
BluFeeder manual
Personen, die diese Anweisungen nicht befolgen können, dürfen
das Gerät nicht benutzen!
Dieses Gerät ist nicht für die Verwendung durch Personen und Kinder mit körper-
lichen, sensorischen oder geistigen Beeinträchtigungen oder mangelnder Er-
fahrung und/oder Wissen bestimmt.
Es sei denn, sie werden von einer Person begleitet, die für ihre Sicherheit verant-
wortlich ist, oder sie erhalten eine Einweisung in die Benutzung des Geräts.
Sorgen Sie dafür, dass Kinder nicht mit dem Gerät spielen können.
1. AUSPACKEN
Los geht’s!
Überprüfen Sie das Gerät auf eventuelle Schäden, verwenden Sie es in
diesem Fall nicht. Machen Sie Fotos und kontaktieren Sie BluGarda.
1.A INHALT
1x BGFS-6 Fischfutterautomat
4x Erdungsstifte
4x Schrauben
1x Pelletstreuer
1x Gebrauchsanweisung
1x Beutel Silica Gel (Trockenmittel gegen Feuchtigkeit bei Transport/Lagerung,
kann nach Inbetriebnahme des Geräts mit dem Chemieabfall entsorgt werden)
Wenn alles in Ordnung ist, folgen Sie den weiteren Anweisungen im Handbuch.
Lesen Sie diese Anweisungen sorgfältig und befolgen Sie sie!
1.B ÜBERPRÜFUNG DER TECHNISCHEN DATEN
Prüfen Sie die Angaben auf dem Typenschild.
Auf dem Typenschild sind alle wichtigen technischen Daten aufgeführt.

DE
20 BluFeeder manual
Defekte Elektrogeräte, die im Haushalt verwendet wurden, sollten
gemäß den EU-Richtlinien entsorgt werden. Dieses Produkt darf nicht
mit dem normalen Hausmüll entsorgt werden, sondern muss separat
gesammelt werden.
Weitere Informationen über die örtlichen Müllsammelstellen erhalten Sie bei
Ihrer Stadtverwaltung.
1.C TECHNISCHE DATEN
Modell BluFeeder BGSF-6
Fischfutterpellets ø 3-8 mm
Inhalt des Tanks 6 L
Fütterungshäufigkeit pro Tag 1 bis 6 x, einstellbar
Batterie Lithium, 2200 mAh, Betriebsdauer bis zu 3 Monate ohne Aufladen.
Spreizwinkel Horizontal 120°
Auflade-Modus Solarzelle oder Adapter (bitte beachten Sie! Der Adapter ist nicht
im Lieferumfang enthalten und für die Verwendung nicht er-
forderlich, kann aber optional bestellt werden)
Abmessungen 275x252x420mm
2. INSTALLATION
Der BluFeeder Fischfutterautomat kann auf zwei Arten installiert werden. Stel-
len Sie sicher, dass der Auslass des BluFeeders auf den Teich gerichtet ist und
sich nahe genug am Teich befindet, damit die Futterpellets richtig über die Was-
seroberfläche verteilt werden. Berücksichtigen Sie bei der Installation die Wurf-
weite der Pellets (einstellbar, siehe 3.2).
Verhindern Sie, dass der Spender ins Wasser fällt!
Batterie Batteriekapazität und Leistung
Container Inhalt des Futterbehälters
IP 44 Schutzart IP 44 = Spritzwassergeschützt
Pellets Zulässiger Durchmesser der Futterpaletten in mm
Max. 35° Maximal zulässige (Umgebungs-)Temperatur des Geräts
CE Zeigt an, dass das Produkt der europäischen Gesetzgebung entspricht.
Table of contents
Languages:


