Fluval Roma Aquarium LED User manual

Instruction manual: LED Strip Light and Aquarium
Mode d’emploi : Rampe d’éclairage à DEL et bac d’aquarium
Manual de instrucciones: Tanque de acuario con luminaria LED
Gebrauchsanleitung: LED-Strip-Light und Aquarium
Roma Aquarium LED
Vicenza Aquarium LED
Venezia Aquarium LED

Table of Contents
FLUVAL AQUARIUM LED: PARTS_______________________________________________________________ 4
IMPORTANT SAFETY INSTRUCTIONS __________________________________________________________ 4
AQUARIUM GLASS TANK INSTRUCTIONS _______________________________________________________6
SETTING UP YOUR FLUVAL AQUARIUM _________________________________________________________6
AQUARIUM CABINET INSTALLATION AND PREPARATION _________________________________________7
Placing the aquarium with its cabinet in the nal location .........................................................................................7
EASY CONNECTION SYSTEM INSTALLATION ____________________________________________________ 8
Installing water intake/output with “EasyConnect” system.....................................................................................8
Output system installation........................................................................................................................................................8
Intake system installation ......................................................................................................................................................... 9
EXTERNAL/INTERNAL FLUVAL FILTER INSTALLATION, USE AND MAINTENANCE ___________________ 10
FLUVAL HEATER INSTALLATION AND PREPARATION, USE AND MAINTENANCE ____________________ 10
LED STRIP LIGHT INSTALLATION INSTRUCTIONS ________________________________________________ 10
Features and tips..........................................................................................................................................................................10
Initial start-up.................................................................................................................................................................................10
LED STRIP LIGHT AND TANK MAINTENANCE_____________________________________________________ 11
Cleaning the LED Strip Light......................................................................................................................................................11
Saltwater aquariums ....................................................................................................................................................................11
REPLACEMENT PARTS ________________________________________________________________________ 11
RECYCLING __________________________________________________________________________________ 12
2 YEAR LIMITED WARRANTY _________________________________________________________________ 12
For authorized guarantee repair service........................................................................................................................... 12
CUSTOMER SERVICE ________________________________________________________________________ 40
Table des matières
PIÈCES DE L’AQUARIUM FLUVAL AVEC ÉCLAIRAGE À DEL________________________________________ 13
MESURES DE SÉCURITÉ IMPORTANTES _______________________________________________________ 13
INSTRUCTIONS RELATIVES AU BAC EN VERRE DE L’AQUARIUM __________________________________ 15
INSTALLATION DE L’AQUARIUM FLUVAL ________________________________________________________ 15
INSTALLATION ET PRÉPARATION DU MEUBLE DE L’AQUARIUM ___________________________________ 16
Mise en place du meuble et de l’aquarium à l’emplacement nal.............................................................................16
INSTALLATION DU SYSTÈME DE FILTRATION À CONNEXION RAPIDE ______________________________ 17
Installation des tubes d’entrée et de sortie d’eau avec le système à connexion rapide ............................... 17
Installation du système de sortie d’eau.............................................................................................................................. 17
Installation du système d’entrée d’eau................................................................................................................................18
INSTALLATION, UTILISATION ET ENTRETIEN DES FILTRES EXTÉRIEUR ET SUBMERSIBLE FLUVAL ___ 19
INSTALLATION, UTILISATION ET ENTRETIEN DU CHAUFFE-EAU FLUVAL ___________________________ 19
INSTALLATION DE LA RAMPE D’ÉCLAIRAGE À DEL ______________________________________________ 19
Caractéristiques et conseils.....................................................................................................................................................19
Démarrage initial...........................................................................................................................................................................19
ENTRETIEN DE LA RAMPE D’ÉCLAIRAGE À DEL ET DU BAC _____________________________________ 20
Nettoyage de la rampe d’éclairage à DEL........................................................................................................................ 20
Aquariums d’eau de mer..........................................................................................................................................................20
PIÈCES DE RECHANGE________________________________________________________________________ 21
RECYCLAGE _________________________________________________________________________________ 21
GARANTIE LIMITÉE DE DEUX (2) ANS__________________________________________________________ 21
Pour le service de réparations autorisé sous garantie............................................................................................... 21
SERVICE À LA CLIENTÈLE ____________________________________________________________________ 40
EN
FR
Índice
LUZ LED PARA ACUARIOS FLUVAL: PIEZAS____________________________________________________ 22
INSTRUCCIONES DE SEGURIDAD IMPORTANTES_______________________________________________ 22
INSTRUCCIONES PARA EL TANQUE DE VIDRIO PARA ACUARIOS ________________________________ 24
MONTAJE DEL ACUARIO FLUVAL _____________________________________________________________ 24
INSTALACIÓN Y PREPARACIÓN DEL MUEBLE DEL ACUARIO _____________________________________ 25
Ubicación denitiva del acuario con su mueble ............................................................................................................ 25
INSTALACIÓN DEL SISTEMA DE CONEXIÓN FÁCIL ______________________________________________ 26
Instalación de la entrada y salida de agua con el sistema “Easy Connect” .................................................... 26
Instalación del sistema de salida......................................................................................................................................... 26
Instalación del sistema de entrada......................................................................................................................................27
INSTALACIÓN, USO Y MANTENIMIENTO DEL FILTRO FLUVAL EXTERNO E INTERNO________________ 28
INSTALACIÓN Y PREPARACIÓN, USO Y MANTENIMIENTO DEL CALENTADOR FLUVAL______________ 28
INSTRUCCIONES PARA LA INSTALACIÓN DE LUZ LED EN HILERA ________________________________ 28
Características y consejos..................................................................................................................................................... 28
Puesta en marcha inicial ......................................................................................................................................................... 28
MANTENIMIENTO DE LAS LUCES LED EN HILERA Y EL TANQUE _________________________________ 29
Limpieza de las luces LED en hilera .................................................................................................................................... 29
Acuarios de agua salada ........................................................................................................................................................ 29
PIEZAS DE REPUESTO ______________________________________________________________________ 30
RECICLAJE _________________________________________________________________________________ 30
GARANTÍA LIMITADA DE 2 AÑOS _____________________________________________________________ 30
Para obtener el servicio de reparación autorizado con garantía ........................................................................ 30
SERVICIO A LA CLIENTELA ___________________________________________________________________ 40
Inhaltsverzeichnis
FLUVAL AQUARIUM LED: TEILE ________________________________________________________________ 31
WICHTIGE SICHERHEITSHINWEISE_____________________________________________________________ 31
ANLEITUNGEN ZUM GLASBECKEN____________________________________________________________ 33
AUFSTELLUNG IHRES FLUVAL AQUARIUMS ___________________________________________________ 33
VORBEREITUNG UND INSTALLATION DES AQUARIENSCHRANKES_______________________________ 34
Positionierung des Aquariums mit Schrank am Bestimmungsort ...................................................................... 34
ANLEITUNGEN ZUM VERBINDUNGSSYSTEM __________________________________________________ 35
Installation des Wassereinlasses/-auslasses mit dem „EasyConnect“ System............................................35
Installation des Auslasssystems .........................................................................................................................................35
Installation des Einlasssystems.......................................................................................................................................... 36
INSTALLATION, BETRIEB UND WARTUNG DES FLUVAL AUSSEN-/INNENFILTERS__________________ 37
INSTALLATION, VORBEREITUNG, BETRIEB UND WARTUNG DES FLUVAL HEIZERS ________________ 37
INSTALLATION DER LED-STRIP-LIGHT _________________________________________________________ 37
Besonderheiten und Tipps .......................................................................................................................................................37
Erste Inbetriebnahme.................................................................................................................................................................37
WARTUNG DER LED-STRIP-LIGHT UND DES AQUARIUMS _______________________________________ 38
Reinigung der LED-Strip-Light .............................................................................................................................................. 38
Meerwasseraquarien................................................................................................................................................................ 38
ERSATZTEILE _______________________________________________________________________________ 39
RECYCLING _________________________________________________________________________________ 39
GEWÄHRLEISTUNG__________________________________________________________________________ 39
Kundendienst ................................................................................................................................................................................ 39
KUNDENDIENST ____________________________________________________________________________ 40
SP
DE
2

3
Índice
LUZ LED PARA ACUARIOS FLUVAL: PIEZAS____________________________________________________ 22
INSTRUCCIONES DE SEGURIDAD IMPORTANTES_______________________________________________ 22
INSTRUCCIONES PARA EL TANQUE DE VIDRIO PARA ACUARIOS ________________________________ 24
MONTAJE DEL ACUARIO FLUVAL _____________________________________________________________ 24
INSTALACIÓN Y PREPARACIÓN DEL MUEBLE DEL ACUARIO _____________________________________ 25
Ubicación denitiva del acuario con su mueble ............................................................................................................ 25
INSTALACIÓN DEL SISTEMA DE CONEXIÓN FÁCIL ______________________________________________ 26
Instalación de la entrada y salida de agua con el sistema “Easy Connect” .................................................... 26
Instalación del sistema de salida......................................................................................................................................... 26
Instalación del sistema de entrada......................................................................................................................................27
INSTALACIÓN, USO Y MANTENIMIENTO DEL FILTRO FLUVAL EXTERNO E INTERNO________________ 28
INSTALACIÓN Y PREPARACIÓN, USO Y MANTENIMIENTO DEL CALENTADOR FLUVAL______________ 28
INSTRUCCIONES PARA LA INSTALACIÓN DE LUZ LED EN HILERA ________________________________ 28
Características y consejos..................................................................................................................................................... 28
Puesta en marcha inicial ......................................................................................................................................................... 28
MANTENIMIENTO DE LAS LUCES LED EN HILERA Y EL TANQUE _________________________________ 29
Limpieza de las luces LED en hilera .................................................................................................................................... 29
Acuarios de agua salada ........................................................................................................................................................ 29
PIEZAS DE REPUESTO ______________________________________________________________________ 30
RECICLAJE _________________________________________________________________________________ 30
GARANTÍA LIMITADA DE 2 AÑOS _____________________________________________________________ 30
Para obtener el servicio de reparación autorizado con garantía ........................................................................ 30
SERVICIO A LA CLIENTELA ___________________________________________________________________ 40
Inhaltsverzeichnis
FLUVAL AQUARIUM LED: TEILE ________________________________________________________________ 31
WICHTIGE SICHERHEITSHINWEISE_____________________________________________________________ 31
ANLEITUNGEN ZUM GLASBECKEN____________________________________________________________ 33
AUFSTELLUNG IHRES FLUVAL AQUARIUMS ___________________________________________________ 33
VORBEREITUNG UND INSTALLATION DES AQUARIENSCHRANKES_______________________________ 34
Positionierung des Aquariums mit Schrank am Bestimmungsort ...................................................................... 34
ANLEITUNGEN ZUM VERBINDUNGSSYSTEM __________________________________________________ 35
Installation des Wassereinlasses/-auslasses mit dem „EasyConnect“ System............................................35
Installation des Auslasssystems .........................................................................................................................................35
Installation des Einlasssystems.......................................................................................................................................... 36
INSTALLATION, BETRIEB UND WARTUNG DES FLUVAL AUSSEN-/INNENFILTERS__________________ 37
INSTALLATION, VORBEREITUNG, BETRIEB UND WARTUNG DES FLUVAL HEIZERS ________________ 37
INSTALLATION DER LED-STRIP-LIGHT _________________________________________________________ 37
Besonderheiten und Tipps .......................................................................................................................................................37
Erste Inbetriebnahme.................................................................................................................................................................37
WARTUNG DER LED-STRIP-LIGHT UND DES AQUARIUMS _______________________________________ 38
Reinigung der LED-Strip-Light .............................................................................................................................................. 38
Meerwasseraquarien................................................................................................................................................................ 38
ERSATZTEILE _______________________________________________________________________________ 39
RECYCLING _________________________________________________________________________________ 39
GEWÄHRLEISTUNG__________________________________________________________________________ 39
Kundendienst ................................................................................................................................................................................ 39
KUNDENDIENST ____________________________________________________________________________ 40
SP
DE

4
READ THOROUGHLY PRIOR TO INSTALLATION
AND OPERATION
FLUVAL AQUARIUM LED: PARTS
A) 1 x TOP FRAME attached to the aquarium
B) CANOPY
• 2 x LIDS for opening and closing the aquarium (B1); 3 x LIDS for Venezia 350
• 1 x black aluminium beam (B2); 2 x Black Aluminium beam for Venezia 350
C) 1 x LED Strip Light + LED driver; 2 x LED Strip Light + LED drivers for Venezia 350
D) GLASS TANK
IMPORTANT SAFETY INSTRUCTIONS
WARNING: To guard against injury, basic safety precautions should be observed when handling the LED Strip
Light, including the following:
1. For the complete enjoyment, use and understanding of this product, READ AND FOLLOW
ALL SAFETY INSTRUCTIONS and all important notices on the appliance before
using. Failure to do so may result in loss of life and/or injury or damage to the unit.
2. DANGER – To avoid possible electrical shock, special care should be taken due to the close proximity of
the LED Strip Light to water. For each of the following situations, do not attempt repairs yourself; return
the appliance to an authorized service facility for service or discard the appliance. (See Customer Service
information at the end of this manual).
If the unit falls into the water, DON’T reach for it! First unplug it and then retrieve it. If the electrical
components of the appliance get wet, unplug the appliance immediately.
A
B1
C
B2
DRoma series
A
B1
C
B2
D
Venezia 350
A
B1
C
B2
DVicenza 180 and 260
A
B1
C
B2
D
Venezia 190

ENGLISH
5
Carefully examine the appliance after installation. It should not be plugged in if there is water on parts
not intended to be wet.
Do not operate any appliance if it has a damaged cord or plug, or if it is malfunctioning or if it is
dropped or damaged in any manner. The power cord of this appliance cannot be replaced; if the cord
is damaged, the appliance should be discarded. Never cut the cord.
To avoid the possibility of the appliance plug or wall socket getting wet, position the
unit to one side of a wall mounted wall socket to prevent water from dripping onto
the socket or plug. A “drip loop” (see illustration) should be arranged to the socket.
The “drip loop” is that part of the cord below the level of the socket (or the connector
if an extension cord is used), to prevent water travelling along the cord and coming
into contact with the wall socket. If the plug or socket does get wet, DON’T unplug
the cord. Disconnect the fuse or circuit breaker that supplies power to the appliance.
Then unplug and examine for presence of water in the wall socket.
3. Close supervision is necessary when any appliance is used by or near children. This appliance can be used
by children aged from 8 years and above and persons with reduced physical, sensory or mental capabilities
or lack of experience and knowledge if they have been given supervision or instruction concerning use of
the appliance in a safe way and understand the hazards involved. Children shall not play with the appliance.
Cleaning and user maintenance shall not be made by children without supervision. This product is not a toy.
4. To avoid injury, do not come into contact with moving parts or hot parts such as heaters, LED device, etc.
5. CAUTION – Always unplug or disconnect all appliances in the aquarium from electricity supply before
placing hands in water, before putting on or taking off parts and whilst this LED Strip Light is being installed,
maintained or handled. Never yank cord to pull plug from outlet. Grasp the plug and pull to disconnect.
Always unplug an appliance from an outlet when not in use.
WARNING: Be sure you unplug the LED driver from the power outlet; just switching off the
lights with the APP is NOT enough because it does not stop the power supply.
Do not use an appliance for other than intended use (i.e. don’t use on swimming pools, garden ponds,
bathrooms, etc.). The use of attachments not recommended or sold by the appliance manufacturer may
result in a dangerous situation. Do not try to repair any product component: in case of damage replace
the damaged component with original spare parts.
6. IMPORTANT: This LED Strip Light is a non-submersible AQUARIUM LUMINAIRE suitable FOR INDOOR
USE ONLY designed to be assembled onto FLUVAL Roma, Vicenza and Venezia Top Cover Frames only.
For fresh and salt water ornamental aquariums with max 35 °C water temperature. Do not install or store the
appliance anywhere where temperatures may drop below freezing.
7. IMPORTANT: Make sure that the LED Strip Light is securely and correctly installed before operating it and
that the minimum distance of water from the LED Strip Light is 15 mm. This LED Strip Light must never
operate in water.
Fill the aquarium up to level indicated on the label situated on the
inside of the aquarium’s top frame. IMPORTANT: Do not over ll.
Overlling the aquarium can cause water to pass under the
top frame which then runs down the outside of the aquarium.
WARNING: Do not plug in the LED Strip Light if there is
water on parts not intended to be wet.
WARNING: Do not place any object(s) on the LED Strip Light (C) or on the Canopy (B). Ensure sufcient
air space around the LED Strip Light. The safety of this appliance is only ensured provided that it has
been properly installed.
8. Read and observe all the important notices on the appliance.
9. If an extension cord is necessary, a cord with a proper rating should be used. A cord rated for less amperes
or watts than the appliance rating may overheat. Care should be taken to arrange the cord so that it will not
be tripped over or pulled.
10. SAVE THESE INSTRUCTIONS
DRIP LOOP
max water level - maximum niveau de
l’eau - maximales Wasserniveau - nivel
del agua máximo - nível de água máximo
massimo livello dell’acqua
6
AQUARIUM GLASS TANK INSTRUCTIONS
Read thoroughly prior to installation
The Fluval Aquarium glass tank comes complete with bottom and top plastic frames glued to it. Do not try to
remove top and bottom frames.
Although the glass tank was manufactured with the maximum care and the most advanced techniques, we still
recommend making a simple inspection prior to the installation to verify that unexpected events during handling
and transportation have not damaged the tank or impaired its water-tightness.
1. Make an initial visual inspection of the glass tank to check for damage or cracks.
2. If the visual inspection does not show any damage, ll the tank with 5cm (2”) of water, wait 10 minutes and
check for leaks.
3. Add another 5cm (2”) and repeat this process until you are sure there is no sign of any leak.
4. If no leak is detected, proceed with the normal aquarium set up.
The tank is made of glass, always handle it with the utmost care. Make sure to lift it by the base, never
by the top frame.
Never attempt to move or transport the tank if it is not completely empty of water or any other material.
Before handling the Aquarium tank and cabinet, ensure you have sufcient manpower to move them
without any risk.
Always take care not to damage the seals at the edges of the glass panels while maintaining your
aquarium, ie; with planters or algae scrapers.
Never use toxic or aggressive substances to clean your aquarium, such as household detergents.
SETTING UP YOUR FLUVAL AQUARIUM
For proper installation and start-up of your aquarium, please follow these
guidelines, after thoroughly reading this manual and the ones supplied with
the other products included in this aquarium kit:
A. PREPARING THE AQUARIUM KIT FOR START-UP
1Assemble the aquarium cabinet refer to pag. 7of this instruction manual
and to the separate instruction manual which is
found in the cabinet box.
2After verication, place the cabinet and the aquarium
tank in their nal location
refer to pag. 7of this instruction manual
3Install the water intake/output systems (where
applicable)
refer to pag. 8of this instruction manual
4Set up the lter unit and install it to the aquarium refer to the Fluval lter instruction manual
5Position the heater in the tank refer to the Fluval heater instruction manual
6Decorate your aquarium with backgrounds, rocks,
gravel and plants
7Fill the aquarium with water up to “max water level”
line
8Prepare the LED Strip Light for start-up and place the
canopy on the aquarium top
refer to pag. 10 of this instruction manual
B. AQUARIUM START-UP
9Plug in the lter refer to the Fluval lter instruction manual
10 Plug in the heater refer to the Fluval heater instruction manual
11 Plug in the LED Strip Light refer to pag. 10 of this instruction manual
12 Add the sh after the aquarium has matured

ENGLISH
7
Maintenance
For LED Strip Light and tank, refer to LED Strip Light and tank maintenance on page 11. For any maintenance
of the other devices, please refer to their respective manuals.
AQUARIUM CABINET INSTALLATION AND
PREPARATION
Placing the aquarium with its cabinet in the nal location
Please refer to the instruction manual of the aquarium cabinet. Do not attempt to set up the cabinet without
reading and following the instruction manual. If it is missing or unusable, contact the store or Hagen Customer
Service.
Location of the aquarium is very important. Place the aquarium away from direct sunlight. This will reduce
the risks of excessive algae build-up and avoid overheating the aquarium by the sun’s rays. Keep your Fluval
Aquarium away from other sources of heat (air ducts, radiators, etc.) for proper temperature maintenance. Drafts
should also be avoided. Do not locate your Fluval Aquarium where water spills will cause damage.
You MUST place the Fluval aquarium on the appropriate Fluval cabinet which was designed with the
correct dimensions and structure to bear the weight of the aquarium full of water. The use of different
cabinets, articles of furniture, TV stands, etc. WILL invalidate your guarantee and will compromise the
product safety.
IMPORTANT: Fluval cabinets are designed to support the total weight of the aquarium. The table below shows
the approx. height of lling of the tank and approx. weight of the aquarium full of water (rocks, decorations or
gravel have not been considered).
FLUVAL ROMA LED
MODEL TANK DIMENSIONS HEIGHT OF FILLING (up to the
max water level line)
WEIGHT OF AQUARIUM
FULL WITH WATER
Fluval Roma 90 60 x 35 x 45 cm (23.6 x 13.8 x 17.7”) 41.5 cm (16.3”) 105 kg (231 lb)
Fluval Roma 125 80 x 35 x 45 cm (31.5 x 13.8 x 17.7”) 41.5 cm (16.3”) 138 kg (304 lb)
Fluval Roma 200 100 x 40 x 50 cm (39.4 x 15.7 x 19.7”) 46 cm (18.1”) 222 kg (489 lb)
Fluval Roma 240 120 x 40 x 50 cm (47.2 x 15.7 x 19.7”) 46 cm (18.1”) 265 kg (584 lb)
FLUVAL VICENZA and VENEZIA LED
MODEL TANK DIMENSIONS HEIGHT OF FILLING (up to the
max water level line)
WEIGHT OF AQUARIUM
FULL WITH WATER
Fluval Vicenza 180 92 x 41 x 55 cm (36.2 x 16.1 x 21.6”) 45 cm (17.7”) 225 kg (495 lb)
Fluval Vicenza 260 121 x 46 x 64 cm (47.6 x 18.1 x 25.1”) 54 cm (21.2”) 370 kg (815 lb)
Fluval Venezia 190 98 x 70 x 60 cm (38.5 x 27.5 x 23.6”) 50 cm (19.6”) 265 kg (584 lb)
Fluval Venezia 350 122 x 87 x 65 cm (48 x 34.2 x 25.5”) 55 cm (21.6”) 440 kg (970 lb)
WARNING: Assure that the selected position has an even and level surface which is able to support the
total weight of the aquarium full of water and the cabinet. Place your new Fluval Aquarium and cabinet
close to an electrical outlet. After placing the cabinet, assure that it is perfectly level by using an adequate
level.
IMPORTANT:Place the aquarium tank directly on the cabinet without any additional support or damper
in between. NEVER insert any lining (e.g. Polystyrene) between cabinet and aquarium.
Never attempt to move or transport the cabinet with the glass tank or any
other load on top of it.
Peel off the protective lm on the decor strip (only applies to gloss black decor
strips).

8
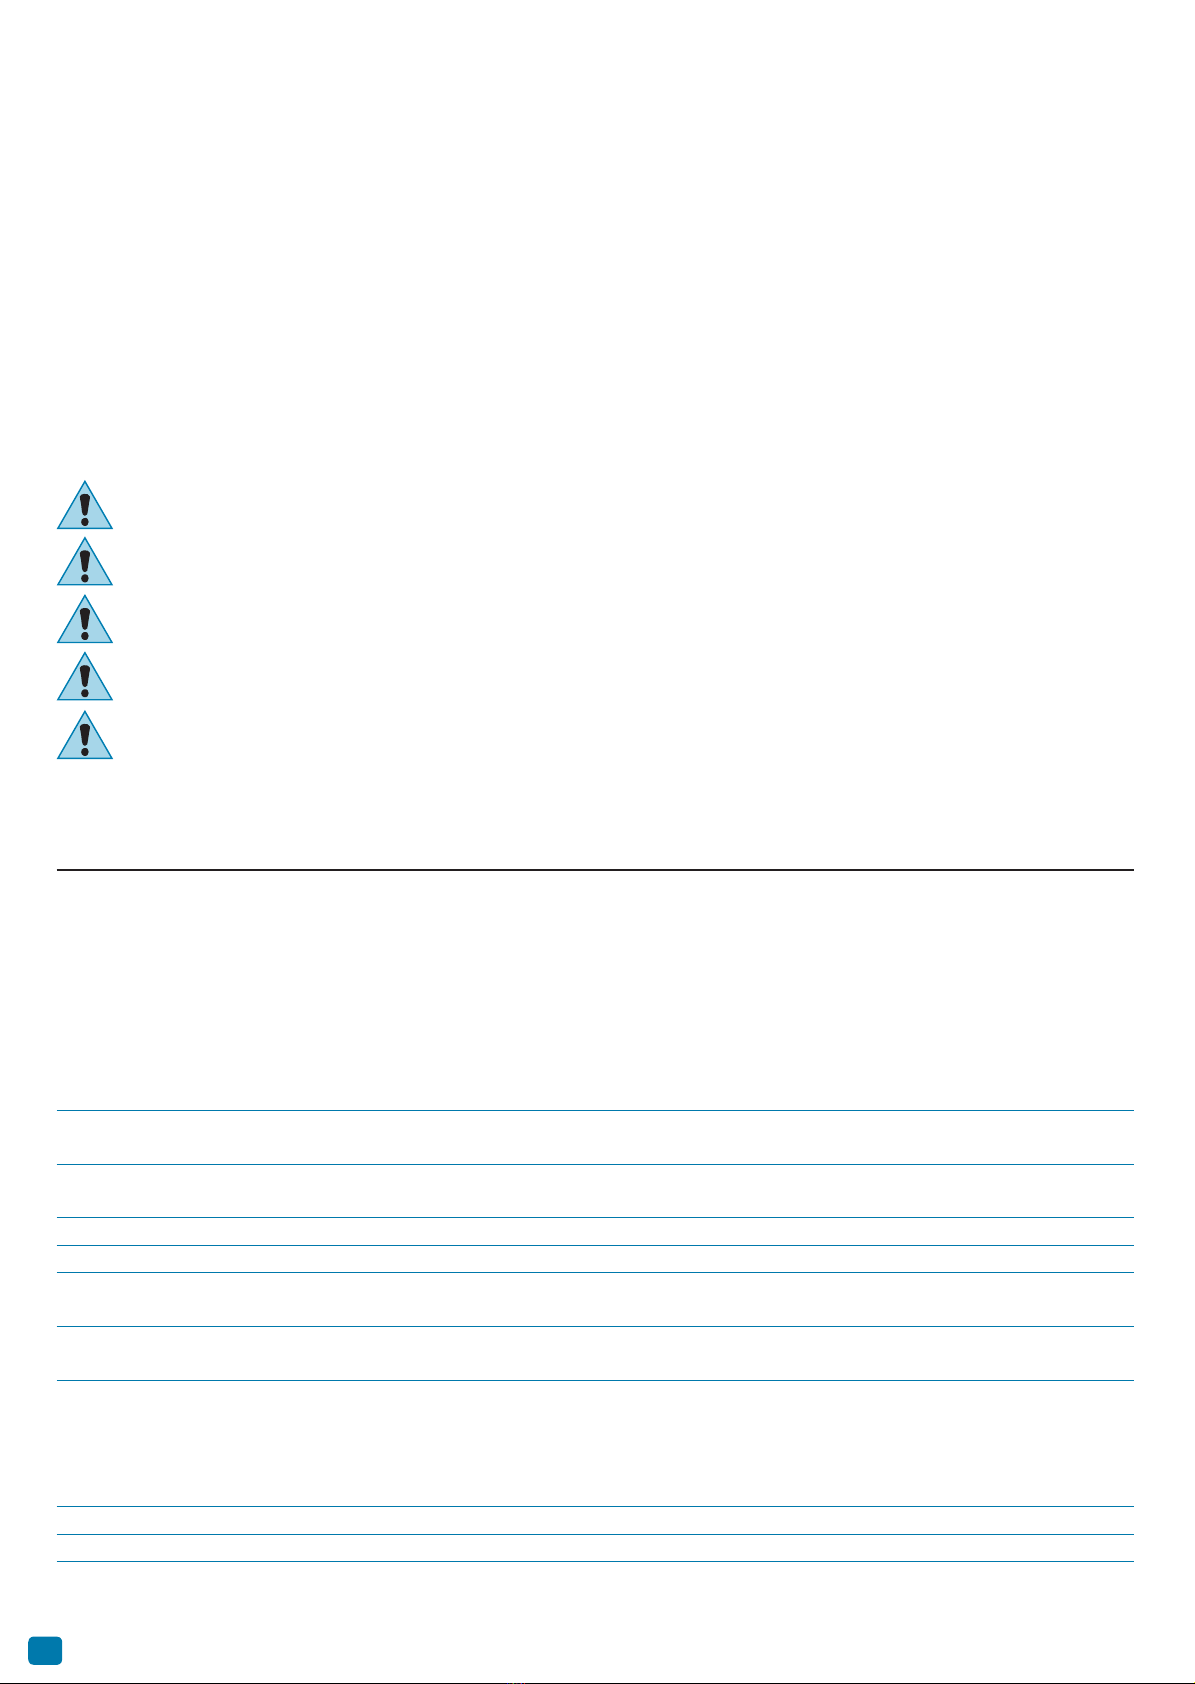
EASY CONNECTION SYSTEM INSTALLATION
This section only applies to Fluval Aquariums with Fluval External lter and “EasyConnect” System.
If your Aquarium Kit is equipped with a Fluval Internal lter, go directly to “Fluval Filter installation”
chapter.
Installing water intake/output with “EasyConnect”
system
(Intake/output ttings are included in the lter packaging)
Some Fluval Aquarium models feature the new and innovative “EasyConnect”
system, which allows the direct connection of the tank to the external lter
through the bottom glass by means of special ttings. Normally, the same
type of connection is achieved through specially-made devices, which are
complex and require the intervention of expert technicians. On the contrary,
in a few minutes the “EasyConnect” system can be easily and safely installed,
giving your aquarium the most professional and clean solution.
Before proceeding, identify and count all parts required by referring
to the exploded view in the side illustration. If any part is missing, do
not proceed with the installation and contact your local supplier.
Before proceeding, check stems (A) for the presence of all 3 rubber
rings (C). Do not proceed with the installation if one of the rubber
rings (C) is missing and contact your local supplier.
Locate the 2 openings in the tank bottom glass and assure that the
corresponding openings in the cabinet are aligned with them. The 2 openings
in the tank bottom glass are complete with factory installed special plastic
ttings, which must never be removed, turned or loosened and with two
sealing plugs (P) and (Q). The
output group should be installed in
the opening (O), whereas the
intake group should be installed in
the opening (I).
Once the output/intake
groups are installed, do
not shift the tank with
respect to the cabinet as this
may damage the output/intake
devices and the glass tank.
Do not force, loosen or turn the
factory-installed special ttings
on tank openings (I) and (O).
Output system installation
1. Manually unscrew plug (P) and remove plug (Q) from opening (O) (Pict. 1).
IMPORTANT: keep plugs (P) and (Q) for any future use.
2. Slip connector stem (A) fully through opening (O) until it stops (Pict. 2).
3. Open the cabinet. Screw and tighten the ring nut (R) onto the bottom end of stem (A) (Pict. 3).
4. Insert the ouput nozzle (N) into one end of output stem (B).
5. Insert output stem (B) onto connector stem (A) (Pict. 4).
6. Regulate the height of output nozzles according to your requirement by sliding outlet stem
(B) along connector stem (A).
INTAKE
GROUP
OUTPUT
GROUP
Output
Nozzle (N)
Output
Stem (B)
Intake
Strainer (S)
Connector
Stem (A)
Ring Nut
(R)
TANK BOTTOM SEALING PLUGS
P
Q
Plugs
Connector Stem’s
Rubber Rings (C)
IO
Locate the 2 openings (I) and (O) in the
tank bottom glass and the corresponding
holes in the cabinet
Pict. 1
Q
P
ENGLISH
9
7. The output nozzles (N) can be easily rotated to divert the water ow where desired.
Direct water jets so as not to let water overow from the tank. Avoid directing the water jets against the
LED Strip Light(s).
Intake system installation
1. Manually unscrew plug (P) and remove plug (Q) from opening (I) (Pict. 1).
Important: keep plugs (P) and (Q) for any future use.
2. Slip the second connector stem (A) fully through opening (I) until it stops (Pict. 2).
3. Open the cabinet. Screw and tighten the nut ring (R) onto the bottom end of the
second stem (A) (Pict. 3).
4. Insert the intake strainer (S) onto connector stem (A) (Pict. 5). The assembly end
result is shown on Pict. 6 and Pict. 7.
The height of the intake strainer is high enough to suit the most standard
aquarium decorations. When decorating the aquarium, ensure it remains at
least 5 cm from the gravel bottom at all times to prevent it from sucking gravel
or sand and ensure that no decorations block the passage of water. Ornaments and rocks should be
positioned while the aquarium is still dry.
CAUTION!: Never force Connector Stems (A) sideways, as this may damage the output/intake systems
and the glass tank. If in the event a different ltration system is used, which does not require the Intake/
Output systems supplied with this unit (e.g. an internal lter), restore the initial conditions by removing
the 2 connector stems (A) and closing openings (O) and (I) with plugs (P) and (Q). Plug (Q) ensures a
watertight seal and has to be inserted into its seat by pressing it. Plug (P) is designed to protect plug
(Q) and ensure that plug (Q) remains in its seat properly. Screw plug (P) by hand only until it will go
without forcing it. DO NOT USE ANY TOOLS, AS DOING SO MAY DAMAGE THE UNIT.
Pict. 2
Connector
Stem (A)
Ring Nut
(R)
Pict. 3 Pict. 4
Output
Nozzle (N)
Output
Stem (B)
Pict. 5
Intake
Strainer (S)
Pict. 6 Pict. 7
10
EXTERNAL/INTERNAL FLUVAL FILTER INSTALLATION,
USE AND MAINTENANCE
Please refer to the instruction manual of the Fluval lter. Do not attempt to set up the Fluval lter without reading and
following the instruction manual. If it is missing or unusable, contact the store or Hagen Customer Service.
FLUVAL HEATER INSTALLATION AND PREPARATION,
USE AND MAINTENANCE
Please refer to the instruction manual of the Fluval heater. Do not attempt to set up the Fluval heater without
reading and following the instruction manual. If it is missing or unusable, contact the store or Hagen Customer
Service.
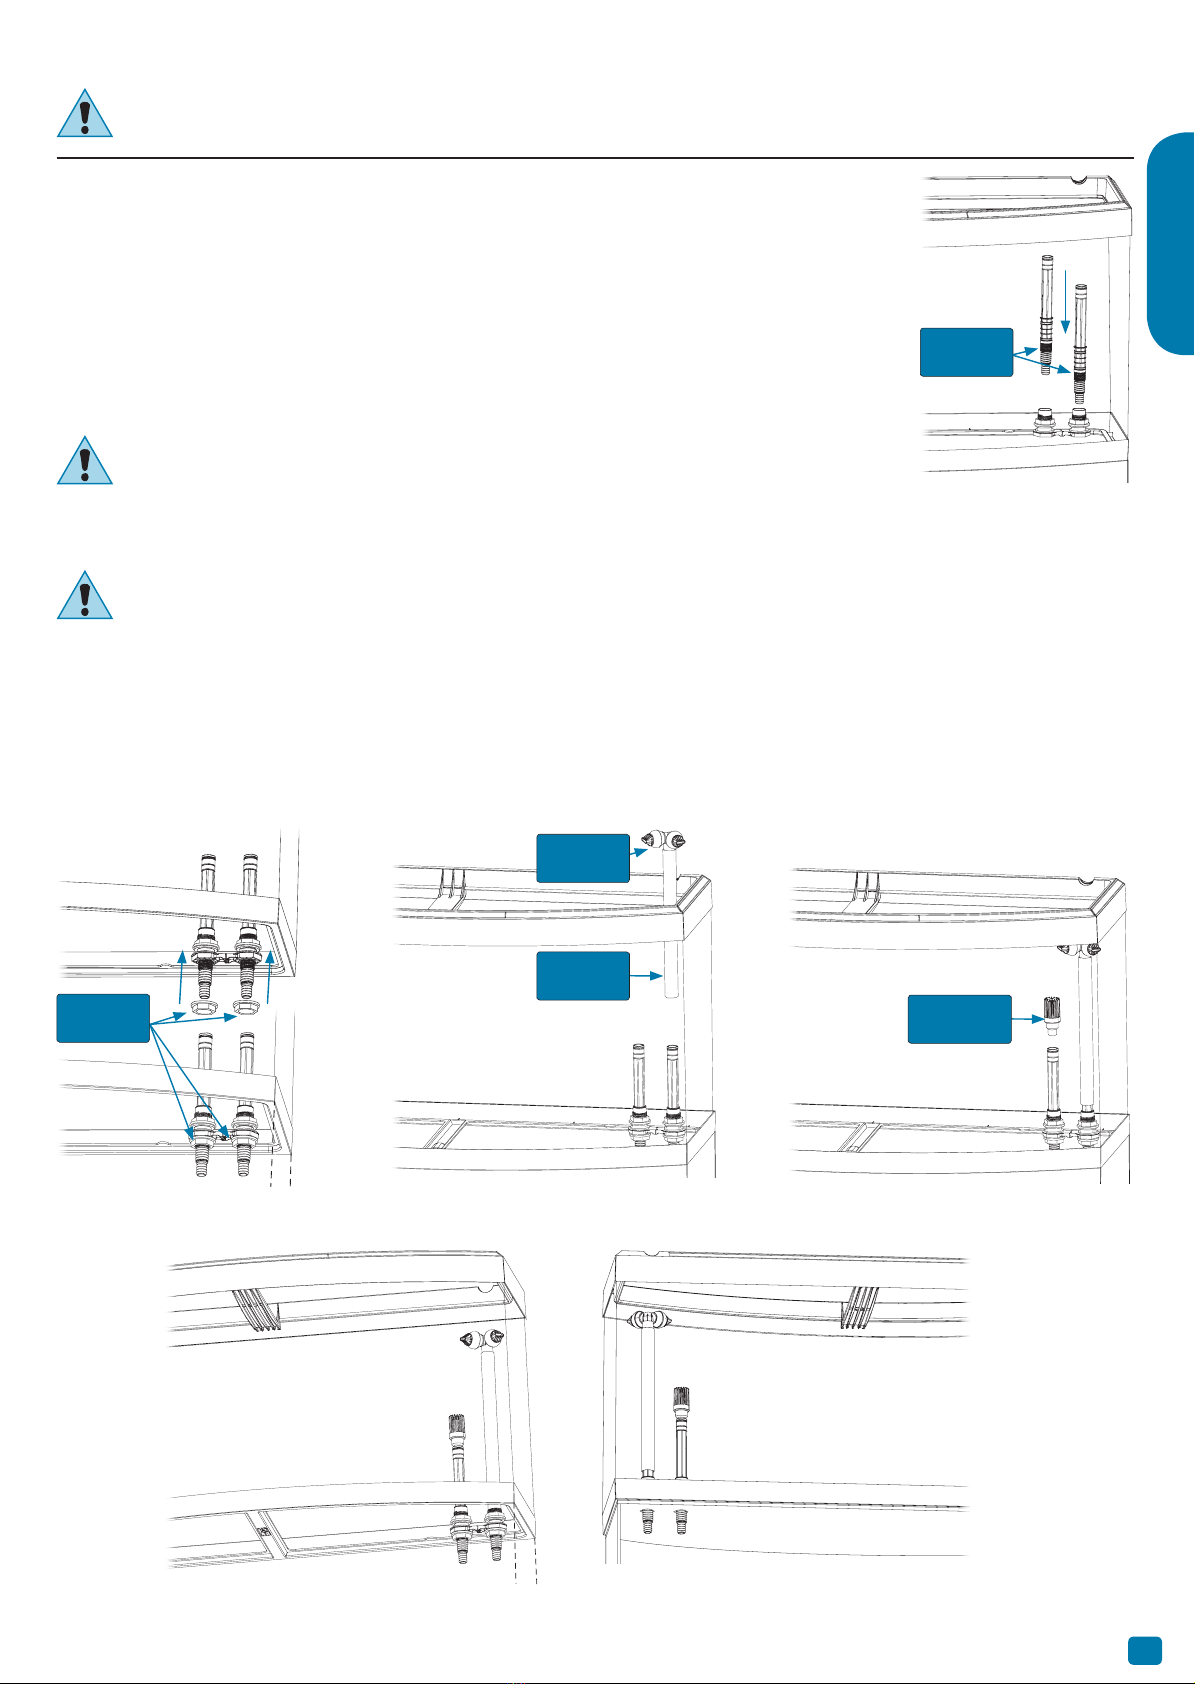
LED STRIP LIGHT INSTALLATION INSTRUCTIONS
WARNING: Disconnect the plug of all electrical equipment used for the aquarium, before placing your
hands in aquarium water and/or performing any maintenance of any kind.
Features and tips
Access Lids
The canopies are equipped with 2 Access Lids (3 for Venezia 350). This allows easy access to your aquarium.
Optional Extra for Roma Aquariums: Opening for the Fluval PF2 Automatic feeder
A replacement canopy rear lid is available including an opening for the use of a Fluval PF2 Automatic feeder.
Pull to remove the plastic plug and access the compartment. To close, press the plastic plug in its place. (Visit
the replacement parts section on www.uvalaquatics.com for order codes).
Initial start-up
1. Carefully place the LED Strip Light (C) on the runner of the top frame in the nal position (Pict. 8)
2. Hook up the lighting unit to the LED driver with its connector. Pict. 9 also shows the connection of 2 lighting units on a
Venezia 350. Only use the supplied drivers for these light units.
3. Place the aluminium beam (B2) and the front and rear access lids (B1) on the aquarium top frame (Pict. 10). Venezia
350 features 2 aluminium beams and 3 access lids. Ensure that the electrical cord and plug does not get wet.
WARNING: Do not plug in the LED Strip Light if there is water on parts not intended to be wet.
SCAN HERE to learn more and
download the free Fluval Smart
app or search ‘Fluvalsmart’ in
app store.
For full instruction manual and video on set up of
Bluetooth® application, visit:
fluvalaquatics.com/aquaskybluetooth
Fig. 10
Pict. 8
V
E
N
E
Z
I
A
3
5
0
Pict. 9
Switching the LED Strip Light On
Plug in the unit and use a smartphone or tablet with the Fluvalsmart app
downloaded to connect to it. Use exclusively the LED driver supplied with
the LED Strip Light. In all cases make sure that LED driver specications
conform to LED driver specs indicated in the Roma, Vicenza and Venezia
LED Strip Light identication codes tables below.
Maintenance:
For maximum LED performance, it is recommended that the xture and
the LED lens be cleaned on a weekly basis. Unplug the LED driver prior
to cleaning the light xture. Use both hands when manipulating this appliance. Wipe exposed surfaces carefully with a
damp cloth to remove any dust or mineral deposits that may collect over time. Do not use detergents or harsh cleaners
as it can damage the light xture. Use Fluval LED Lens Cleaning Non-Aerosol Spray (A3969) to clean the LED portion
of the light xture. Make sure all surfaces are dry before re-connecting the LED driver to the power source.
ENGLISH
11
Troubleshooting
If the LED Strip Light does not turn on, please proceed as follows:
PROBLEM CAUSE SOLUTION
The lighting is
not working
Missing connection of the LED Driver to the power outlet Connect the LED Driver to the power outlet
Missing connection of the lighting unit to the LED Driver Connect the lighting unit to the LED Driver with its con-
nector
If the problem is not solved after following the above, please contact your Hagen retailer.
ROMA LED STRIP LIGHT IDENTIFICATION CODES
AQUARIUM MODEL ROMA 90 ROMA 125 ROMA 200 ROMA 240
LED STRIP LIGHT UNIT BT Led Unit Roma 90 BT Led Unit Roma 125 BT Led Unit Roma 200 BT Led Unit Roma 240
LED STRIP LIGHT MODEL A13291 A13292 A13293 A13294
LUMINAIRE WATTAGE 12.5W 16.5W 21W 24W
LUMENS 1000lm 1300lm 1600lm 1950lm
LUMINAIRE OPERATING VOLTS 24Vdc 24Vdc 24Vdc 24Vdc
LED DRIVER TYPE S012BE [X] 2400050 S018BA[X] 2400063 S024AM[X] 2400100 S024AM[X] 2400100
LED DRIVER INPUT VOLTS 100-240 Vac 100-240 Vac 100-240 Vac 100-240 Vac
X = B FOR UK PLUG X = V FOR EU PLUG X = U FOR US PLUG
VICENZA and VENEZIA LED STRIP LIGHT IDENTIFICATION CODES
AQUARIUM MODEL VICENZA 180 VICENZA 260 VENEZIA 190 VENEZIA 350
LED STRIP LIGHT UNIT BT Led Unit Vicenza 90 BT Led Unit Vicenza 260 BT Led Unit Venezia 190 BT Led Unit Venezia 350
LED STRIP LIGHT MODEL A13296 A13297 A13298 A13299 + A13300
LUMINAIRE WATTAGE 26W 48W 26W 16.5W+37W
LUMENS 2200lm 4000lm 2200lm 1300lm + 3100lm
LUMINAIRE OPERATING VOLTS 24Vdc 24Vdc 24Vdc 24 Vdc
LED DRIVER TYPE S024AM[X] 2400100 S050F[X] 2400200 S024AM[X] 2400100
S018BA[X]2400063 (A13299) +
S040Q[X] 2400150 (A13300)
LED DRIVER INPUT VOLTS 100-240Vac 100-240Vac 100-240Vac 100-240Vac
X = B FOR UK PLUG X = V FOR EU PLUG X = U FOR US PLUG
LED STRIP LIGHT AND TANK MAINTENANCE
Cleaning the LED Strip Light
Disconnect the Strip Light from power supply before any maintenance operation.
WARNING: Be sure you unplug the LED driver from the power outlet; just switching off the
lights with the APP is NOT enough because it does not stop the power supply. Never place the
LED Strip Light under water jets or submerge in water.
No special maintenance is required for the Fluval LED Strip Light and Canopy, other than periodic cleaning with a damp
cloth (never use harsh chemical products or detergents). To remove calcareous deposits, it is recommended to use a mild
acid such as lemon juice, followed by a thorough wipe down with a damp cloth to remove any residue.
Saltwater aquariums
It is commonly known that salt water is far more corrosive, conductive (of electricity) and generally degrades both plastic
and metal parts at an accelerated rate versus fresh water. To minimize salt accumulations on the Fluval Canopy and on the
LED Strip Light, it is recommended to take note of the following helpful tips:
1. Make sure lter outputs do not spray above the water surface, position them below the water surface with a slight
downward angle, but still allow for surface movement (contributes to oxygenation).
2. If an air pump must be used, frequent removal of salt deposits will be necessary.
3. Keep the water level as constant as possible (regular top-ups due to evaporation). This is benecial in providing stable
salinity and will help protect the canopy.
4. It is recommended to regularly clean all LED Strip Light components and the Canopies that come into contact with salt
water at least every 15 days. The cleaning should be carried out with a wet cloth (never use harsh chemical products
or detergents). Simple lemon juice may be used to take away salt accumulation. Afterwards rinse carefully to eliminate
every residue of acid.
REPLACEMENT PARTS
Always use genuine Fluval Spare Parts to guarantee continued performance and safety.
For a full listing of replacement parts please visit www.uvalaquatics.com.

12
RECYCLING
This symbol bears the selective sorting symbol for waste electrical and electronic equipment
(WEEE). This means that this product must be handled pursuant to European Directive 2012/19/
EU in order to be recycled or dismantled to minimize its impact on the environment. For further
information, please contact your local or regional Authorities. Electronic products not included in the
selective sorting process are potentially dangerous for the environment and human health due to
the presence of hazardous substances.
2 YEAR LIMITED WARRANTY
Your Fluval aquarium and LED Strip Light are guaranteed for defective parts and workmanship for a period of
two years from the date of purchase. This guarantee is valid with proof of purchase only. The guarantee is limited
to repair or replacement only and does not cover consequential loss or damage to animate or inanimate objects.
This guarantee is valid provided the aquarium is placed in a suitable location that is at and level and has been
installed in accordance with the installation instructions and care guide. This guarantee excludes aquarium
breakage due to misuse, chips, stress cracks caused by improper support or other breakage. This guarantee is
valid only under normal operating conditions for which the unit is intended. It excludes any damage caused by
unreasonable use, negligence, improper installation, tampering, abuse or commercial use. The warranty does
not cover wear and tear or parts which have not been adequately or correctly maintained.
Failure of less than 5% of the total number of LEDs shall not be considered a defect under the terms of this
warranty.
THIS DOES NOT AFFECT YOUR STATUTORY RIGHTS.
If at sometime in the future you have cause to claim under this guarantee, you will need to provide proof and date
of purchase. We recommend that you retain your receipt for this purpose. Rolf C. Hagen Inc. wishes you many
hours of enjoyment with your Fluval aquarium.
For authorized guarantee repair service
For Authorized Guarantee Service please return (well packaged and by registered post) to the address
listed on the last page enclosing dated receipt and reason for return. If you have any queries or comments
about the operation of this product, please let us try to help you before you return the product to your
retailer. Most queries can be handled promptly with a phone call. When you call (or write), please have
all relevant information such as model number, age of product, details of aquarium set-up, as well as
the nature of the problem.
If you have any queries or comments about the operation of this product, please contact your Specialist
Aquatic Retailer in the rst instance. Most queries can be handled easily at store level. In the unlikely
event that it cannot, please return the item to the retailer, with your valid proof of purchase, for repair or
replacement under the two year warranty terms.

Distributed by/Distribué par :
Canada: Rolf C. Hagen Inc. Baie-D’Urfé (Quebec) H9X 0A2
USA: Rolf C. Hagen (USA) Corp, 305 Forbes Blvd, Manseld, MA 02048
UK: Rolf C. Hagen (UK) Ltd. Castleford, W. Yorkshire WF10 5QH
Germany: HAGEN Deutschland GmbH & Co. KG, 25488 Holm
Spain: Rolf C. Hagen España S.A, Av. de Beniparrel, 11 y 13 – P.I L’Alteró, 46460 Silla - Valencia
09612004 11M16
CUSTOMER SERVICE
CANADA:
Customer Services: Rolf C. Hagen Inc., 20500, Trans Canada Hwy, Baie-D’Urfé (Quebec) H9X 0A2
Help Line Number: 1 800 55HAGEN (1 800 554-2436), between 09:00 and 16:30 (EST), Monday to Friday.
USA:
For authorized guarantee repair service return with dated receipt and $4.00 for postage and handling to:
Consumer Repairs, Rolf C. Hagen (USA) Corp, 305 Forbes Blvd, Manseld, MA 02048
Toll-free Helpline: 1-800-724-2436 between 8:30 a.m. and 4:00 p.m. Eastern Standard Time. Ask for Customer Service.
UK:
Customer Services: Rolf C. Hagen (UK) Ltd., California Drive, Whitwood Ind Est., Castleford, West Yorkshire, WF10 5QH.
Help Line Number: 01977 521015 between 9:00am and 5:00pm, Monday to Thursday and 9am and 4pm on Friday (excluding Bank Holidays).
SERVICE À LA CLIENTÈLE
CANADA :
Service à la clientèle : Rolf C. Hagen inc., 20500, aut. Transcanadienne, Baie-D’Urfé (Québec) H9X 0A2
Numéro sans frais : 1 800 55HAGEN (1 800 554-2436), entre 9 h et 16 h 30 (HNE), du lundi au vendredi.
SERVICIO A LA CLIENTELA
ESPAÑA:
Servicio a la clientela: Rolf C. Hagen España S.A, Av. de Beniparrel, 11 y 13 – P.I L’Alteró, 46460 Silla - Valencia
Número de ayuda: 961-200-945, de 9.00 a 12.00 y de 14.00 a 17.00 h. De lunes a viernes, de lunes a viernes (excepto los días feriados)
KUNDENDIENST
DEUTSCHLAND:
Kundendienst: HAGEN Deutschland GmbH & Co. KG, Lehmweg 99-105, 25488 Holm
Service-Telefon:+49 4103 960-2000 Montag – Freitag von 9:00 – 16:00 Uhr
E-Mail an: [email protected]
This manual suits for next models
2
Table of contents
Other Fluval Aquarium manuals

Fluval
Fluval AquaVAC+ User manual

Fluval
Fluval A3980 User manual

Fluval
Fluval FLEX User manual

Fluval
Fluval Shaker 168 User manual

Fluval
Fluval SIENA 332 User manual

Fluval
Fluval PF2 User manual

Fluval
Fluval accent User manual

Fluval
Fluval 10943 User manual

Fluval
Fluval FLEX User manual

Fluval
Fluval T Series User manual


Popular Aquarium manuals by other brands


Aqua Exclusive
Aqua Exclusive C-30 PRO owner's manual

M.J. MALLIS GROUP
M.J. MALLIS GROUP Paklet Manual and spare parts list

Hagen
Hagen Marina Instructions for use

Kollercraft
Kollercraft Betta Bowl Aquarium How to set up

Aquatic Fundamentals
Aquatic Fundamentals 16261 Assembly instructions and parts list

Dupla
Dupla 80215 quick start guide


