BM e-POC Series User manual

e-POC Range
Operating Manual
DELIVERING ULTRASOUND SOLUTIONS
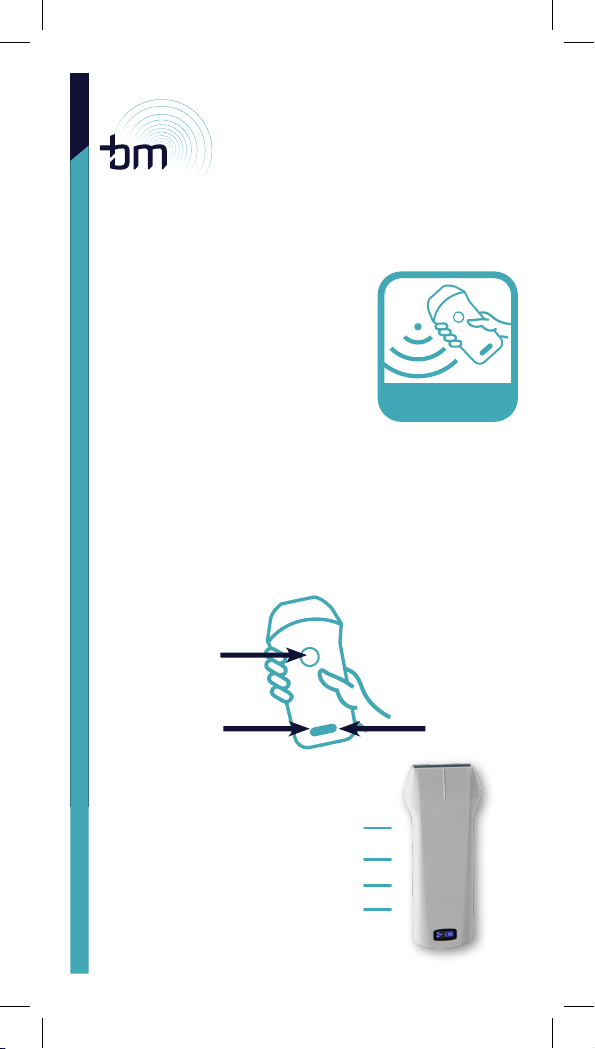
Power On O /
Freeze Button
Depth Adjustment
Gain -
Gain +
INSTALLING THE APP
1. Go to our website
www.ballatermedical.com.
Alternatively go to your
App store and search
WirelessUSG (no spaces)
2. Download the App
3. Open the WirelessUSG or
WirelessUSG ash App on
your phone/ipad
e-POC Range
ULTRASOUND
1. On/O
& Live/
Freeze
2. Battery
3. Wireless
connection
POWER BUTTON
1. A short press on the power button
will turn the probe on
2. A long press will turn the probe o
3. After the probe is connected to the App,
a short press will freeze/unfreeze the screen.

CONNECTING THE PROBE TO YOUR DEVICE
1. Turn the probe on
2. On your phone/device, go to settings
3. Go to Wi
4. Look for/select the LAN Wi signal. The probe’s
signal always starts with SS or SL followed by the
probe’s serial number.
5. Click/select Wi
6. Enter the password at the back of the probe.
Please note that the password is all in lower case.
7. Once the probe is connected, the Wi ashing
indicator will disappear. Please open wirelessUSG
App and you will see the screen illustrated
below. The screen is frozen.
8. To unfreeze the screen you can pulse the
on button once or press the freeze button
on the screen.
TURN ON
1. Press the Power button on the probe; When
the probe is on, you will see the battery charge
indicator on the LED screen; You will also see
the WiFi indicator ashing searching for a probe
with which to connect.
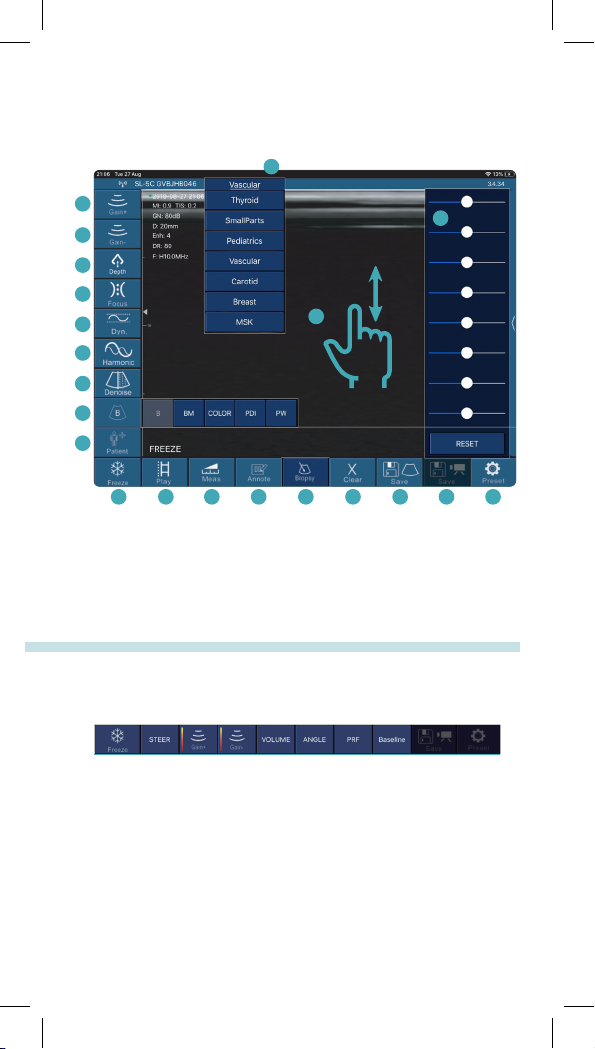
Screen 1

INTERFACE AND FUNCTIONS
1Gain increase -
2Gain decrease -
3Depth increase and decrease
4 Focus: Adjusts the focus of the image
5 Adjust the dynamic range of the image
6 Harmonic imaging: increase/adjust the harmony
imaging eect.
7 Noise reduction: Eliminates low-level echoes / smoothes the
image by reducing /eliminating speckle noise in the ultrasound
8 B/M mode: Image in B and M mode.
9 Patient information: Enter patient information.
10 Freeze/Live Image: select frozen or live image.
11 Play Back: Playback image after the image has been frozen
12 Measurement: select to measure distance between two points,
a selected area or obstetric measurement.
13 Annote: Enter a text box into an image.
14 Biopsy: Draws a line for biopsy guidance Ultrasound guided
core biopsy / for tissue sampling
15 Clear: Erase/clear measurements/notes from the image.
16 Save image: Save a single picture/image on your device´s
photos.
17 Save Video: save a video.
18 Settings: Select the appropriate WiFi.
19 Scroll to change depth
20 Wireless connection status: Displays whether the probe is
connected to the device or not.
21 Optional Function Menu: click < on the top of your screen
and the optional menu will pop up.
22 Subsection TGC: Slide to reset the reduced gain.
In the Colour Doppler Flow Imaging and Energy Doppler Imaging
modes the menu changes to the following image:
1 Deection angle: change the direction of the colour
sample frame.
2 Gain+ Increase colour blood ow gain.
3 Gain-: Decrease colour blood ow gain.
4 Move/Zoom (Click to switch between dierent functions),
change the position and size of the colour sampling
frame by clicking and moving with your nger.
In the Pulse Wave Doppler Imaging mode the function menu
changes to the following image:
1 Deection angle: real-time scanning state used to change
the spectrum sampling line angle.
2Gain+: Increase the pulse gain.
3Gain-: Decrease the pulse gain.
4 Sampling volume: change the size of the sampling volume.
5 In BM mode, you can adjust the position of the M sampling
line by moving the following marks with your nger.
6PRF: Adjust colour pulse repetition frequency (colour range)
7 Wall ller: a device for adjusting the ltering frequency of a
pulse wave or continuous wave Doppler low frequency signal.
22
21
18
19
1716151413121110
9
8
7
6
5
4
3
2
1

MEASURING FUNCTION
When measuring if you need to ne-tune the location of the
measuring point, click the measuring point to make it turn green.
The following buttons will appear on the lower right corner.
Click the arrow to adjust and conrm by pressing the middle
square button.
After measuring, press the delete button to delete all
the measurement results. If you want to delete a certain
measurement, click on the X number to the right of the
result on the result.
The puncturing function includes two types of in-plane and
out-of-plane puncturing. The in-plane puncturing can adjust the
angle by the arrow button in the lower right corner of the image.
The out-of-plane puncturing can adjust the depth and size of the
blood vessel and automatically prompt the blood vessel depth
and radius in the lower right corner of the image.

WIFI INTERFERENCE
When the system is used in exhibitions and other hot spots which
are more Wi crowded or have a strong source of interference
environment, this may aect the rate of transmission and cause
the image to be glitchy. If this happens press the Settings button,
you will see a list of Wi channels. Click to select a dierent
channel and restart the probe for the channel selection to take
eect. You will also need to reconnect the probe Wi in the
WiFi management of the smart terminal (need to re-enter Wi
password).
In the same menu you can change the playback frame number
from 100 upwards. You can also clear the screen removing all text.
MAINTENANCE
CHARGE THE PROBE
Charge the probe when the battery is low.
Remove the cover from the charging port at the bottom of the
probe Connect microUSB cable to port and USB to charging
plug. When charging, the battery indicator will ash and bars
will indicate the battery charge level.
Full battery is indicated by four bars not ashing.
Once charged, unplug carefully the micro-USB cable.
Replace the rubber cover to protect the port from water/dust
The probe also has a wireless charging function. The probe
can be charged by placing it on a wireless charging pad.
The dual probe can only be charged using the wireless
charging function.
CLEANING
Clean the probe after use. The front of the probe can be rinsed
directly with water or wiped with a damp cloth/soft paper towel.
Although the probe is water-proof it should not be immersed
directly in water. To sterilise the probe, it can be wiped or
sprayed with specialized cleaning products.
If used outdoors or near water the probe should be protected,
especially the USB port.
STORAGE
When not in use place the probe in a suitable package to avoid
sharp impact. Avoid storage in extreme temperatures.

DELIVERING ULTRASOUND SOLUTIONS
For more information
please contact us
www.ballatermedical.com
33 Fountainhall Road,
Edinburgh EH9 2LN
+44 7595 062835
+44 7803 013890
This manual suits for next models
1
Table of contents
Other BM Medical Equipment manuals


