berlinger Fridge-tag 3 User manual
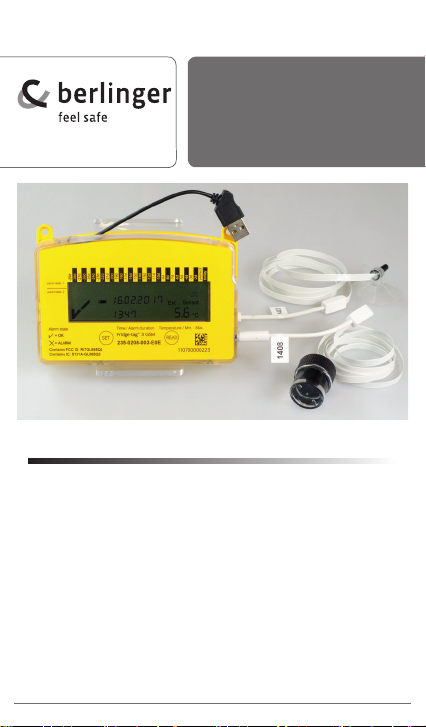
Fridge-tag®3
US version only
with external sensor
OPERATION MANUAL
ENGLISH PAGE 1-34
1

1) Display explanations ____________________ 4
2) State of delivery/Sleep Mode _____________ 5
3) Devicecustomprole ___________________ 6
4) Quality check prior to activation __________ 8
5) GPRSConguration ___________________ 10
6) Placing the sensor of the
Fridge-tag®3___________________________11
7) Activation process_____________________ 12
7.1) Overview sequences of activation 12
7.2) Activation 12
7.3) Setting the calendar format 13
7.4) Connection error 14
8) READ and change settings/
How to correct setting mistakes__________ 15
8.1) Overview menu 15
8.2) Menu entry 16
9) Display indication during measurement ___ 18
10) Warning symbol _______________________ 19
11) Daten auslesen________________________ 19
11.1) Option 1:
READ out day-per-day (30 day history) 20
11.2) Option 2:
READ out alarms (Alarm-Super-Jump function) 22
READ out audio Alarm 24
11.3) Option 3: READ out history via computer 24
11.4) Temperature record duration 28
11.5) Verycation process 29
12) Explanation of terms ___________________ 30
Content Seite
2

English
13) Expiry code explanation ________________ 30
14) Technicalspecications ________________ 30
15) Important information __________________ 31
16) Regulatory information _________________ 32
What is in the box
• and warranty card.
• Download the full user manual
from www.berlingerusa.com
USB cable with
two female
connectors
US power supply
Quick Info Set Up and
User Guide
external sensor
in glycol bottle
2 magnets
cable canal
2 velcro closures
Fridge-tag®3 device
3

1. OK ( ) or ALARM (X) indicator
2. Daily HIGH/LOW alarm indicator
(showing history of the last 30 days)
3. Power on indicator (double point is ashing)
4. Battery power. This icon indicates the remaining
capacity of the battery
5. Additional warning symbol
6. Time, duration and text indicator
7. Date and text display
8. Indicator of measured minimum/maximum
temperature
9. Temperature display
10. Indicator of the temperature measurement
unit (°F/°C)
11. Indicator of activated sensor:
Int. = internal sensor (inside the Fridge-tag®3)
Ext. = external sensor
(cable with temperature sensor)
12. Cellular signal strength
13. SIM card
14. Data transfer
1) Display explanations
!
1-888
8808 2888
8888
min.
max. °F
°C
Int.SensorSensor
Ext.
11
1
2
4
3
5
6
7
89
10
12
13 14
3G
Fig. 1.1.0
4
back to menu

English
2) State of delivery/Sleep Mode
Temperature / Min. - Max
parameter 2
parameter 1
110700000223
-27d
-25d
-23d
-21d
-19d
-17d
-15d
-13d
-11d
-9d
-7d
-5d
-3d
yesterd.
-29d
-28d
-26d
-24d
-22d
-20d
-18d
-16d
-14d
-12d
-10d
-8d
-6d
-4d
-2d
today
-28d
Time / Alarm duration
Alarm state
= OK
= ALARM
Fridge-tag 3
®
Fridge-tag®3 is ext. sensor shipped in its so called
„Sleep Mode“.
Note: due to transport regulations the Fridge-tag®3 is
shipped with empty batteries and needs to be charged
before use.
The display (LCD) is blank.
Fig. 2.1.1
5back to menu

3.1) Fill out your Fridge-tag 3®device
customprole
3) Complete device activation
We have made activating your device very easy. First
determine the custom temperature monitoring settings
for your device(s). Once you have determined your
settings, submit them to our team for us to update your
device prole for you. You can use the PDF to collect
your settings.
If you have any questions about your settings, please
don’t hesitate to call us at 1 (508) 366 – 0084.
Submit your device prole settings by going to: www.
berlingerusa.com/deviceprole
Once you have lled on the form on the webpage
linked above, Berlinger USA will notify you when your
device settings have been updated.
3.2. Complete device installation instructions
1. When you receive the shipment, the rst thing you
should do is place the glycol bottle containing the
external sensor probe in the respective refrigerator and
freezer units. (Page 11 placing the sensor).
2. Attach the Fridge-tag®3 device with LCD on the
outside of the cabinet either on the door near the hinge
or the side near the hinge using the supplied Velcro
strips.
6
back to menu

English
3.3 Turn on and activate your device
1. Wait to receive an email from BerlingerUSA conr-
ming that the data plan has been activated and the de-
vice settings are ready to be delivered to each device.
2. To get the settings updated from the Berlinger ser-
ver, hold down the SET button until nEt ConF appears
on the LCD.
3.It will be blinking. Once the settings are updated, it
will stop blinking and a check mark will appear momen-
tarily. After about a minute the screen will go blank. You
can then proceed to the next step.
4. To activate the Fridge-tag®3, attach the external
sensor and then hold down both the SET and READ
buttons for 3 seconds until information is displayed on
the LCD. You then press the SET button twice.
The rst time to choose SET DATE (the date is au-
tomatically set based on the time zone chosen in the
settings prole), and the second time is to accept the
date/time and return the device to the STATUS screen.
The activation is now complete. For more details see
chapter 7.2 Activation of the device, on page 13.
3. Plug the power adapter into an electrical outlet and
connect one end of the USB cable into the power
adapter and the other end into the USB connector on
the Fridge-Tag 3 and leave it connected to continually
charge the batteries.
4. Wait two hours before connecting the Fridge-tag®3
device to the sensor to allow the temperature to equi-
librate.
Temperature / Min. - Max
parameter 2
parameter 1
110700000223
-27d
-25d
-23d
-21d
-19d
-17d
-15d
-13d
-11d
-9d
-7d
-5d
-3d
yesterd.
-29d
-28d
-26d
-24d
-22d
-20d
-18d
-16d
-14d
-12d
-10d
-8d
-6d
-4d
-2d
today
-28d
Time / Alarm duration
Alarm state
= OK
= ALARM
Fridge-tag 3
®
3G
Fig. 3.1.1
7back to menu

4) Quality check prior to activation
(in Sleep Mode)
The following chart shows which information will be
indicated on the LCD screen upon successive READ
button pressing while in Sleep Mode.
After approx. 60 seconds without any button pressing
the Fridge-tag®3 ext. sensor goes back into Sleep
Mode; the display is blank again.
Temperature / Min. - Max
parameter 2
parameter 1
110700000223
-27d
-25d
-23d
-21d
-19d
-17d
-15d
-13d
-11d
-9d
-7d
-5d
-3d
yesterd.
-29d
-28d
-26d
-24d
-22d
-20d
-18d
-16d
-14d
-12d
-10d
-8d
-6d
-4d
-2d
today
-28d
Time / Alarm duration
Alarm state
= OK
= ALARM
Fridge-tag 3
®Press succesively
READ to readout
information
Fig. 4.1.1
5. Provide the phone number of each device to each
of the users along with an assigned name for each of
the storage units. Each user should create a contact in
their smart phone for each of the storage units using
the name that you have given to it.
6.Send a test SMS to each of the storage units. Open
your messaging app, select the storage cabinet and
type „STATUS“ and push send. You should get a reply
in about minute.
Fridge-tag®3 is in
the ALARM state, the
current temperature is
1.5°C.
Conversation with +31 123456789 Thu., 09:26
status
STATUS=ALARM, 1.5C
Fig. 3.1.2
Fridge-tag®3 is in the
OK state, the current
temperature is 6.5°C.
Conversation with +31 123456789 Thu., 09:26
status
STATUS=OK, 6.5C
Fig. 3.1.1
8
back to menu

English
Indication of date and production test
result: 17. September 2016/PASS
Pressing the
READ-button
Displayed
Information
Display test:
all segments activated
Indication of the current temperature
and which sensor is activated (--.-°C if
ext. sensor is not connected)
Indicaton of the Network conguration
Status: ( ) congured
( ) not congured
*Indication of upper alarm settings.
Example shows duration and tempera-
ture limits: 30 minutes, >+8°C, high
Indication of conguration ID number
(e.g. 1234)
*Indication lower alarm settings.
Example shows duration and tempera-
ture limits: 15 min., <2+°C, low
The display is blank again.
*(only indicated if factory preset, otherwise skipped)
80
1H
d r
u
0 300
°C
1st press of READ:
!
1-888
8808 2888
8888
min.
max.
°F
°C
Int.SensorSensor
Ext.
3G
Battery power:
3 bar = full (>70%)
2 bar = half-full (30-70%)
1 bar = low (0-30%), device should be
recharged immediately.
6101 2097
P SS4n
2nd press of READ:
258
°C
Sensor
Ext.
4th press of READ:
C1d
0000 0 0
1 342
5th press of READ:
6th press of READ:
20
0L
d r
u
0 150
°C
7th press of READ:
8th press of READ:
11th press of READ:
9th press of READ:
0484 13
0051
PCb
0500 00
3491
S
Serial number of the device
PCb number
(manufacturer information only)
10th press of READ:
CP
4
n
100.0
3rd press of READ:
9back to menu

5)Automaticinitialdeviceconguration
(only with server version)
Make sure that the Network signal strength is dis-
played in the top right. The nEt ConF display ashes
while the congurations les are downloading. This
process can take several minutes.
Note:
Without signal reception no conguration takes place.
After successful conguration, the display shows an OK
symbol for 30 seconds then the display goes blank and the
screen is left empty. The initial conguration is complete.
Error 2 and Error 3 appear if an error occurs during
conguration. Pressing the SET button for 3 seconds
restarts the conguration. Device has a 1 hour cool
down period before you can restatart the cong.
Note: Error 2 or Error 3 depend on data transfer, i.e.
the SIM card has no data plan. If the error persists,
please contact our support team.
Temperature / Min. - Max
parameter 2
parameter 1
110700000223
-27d
-25d
-23d
-21d
-19d
-17d
-15d
-13d
-11d
-9d
-7d
-5d
-3d
yesterd.
-29d
-28d
-26d
-24d
-22d
-20d
-18d
-16d
-14d
-12d
-10d
-8d
-6d
-4d
-2d
today
-28d
Time / Alarm duration
Alarm state
= OK
= ALARM
Fridge-tag 3
®
3G
Fig. 5.1.1
3G
Display for correct conguration
Fig. 5.1.2
Display for failed conguration
Fig. 5.1.3
Fig. 5.1.4
10
back to menu

English
6) Placing the sensor of the Fridge-tag®3
Fridge-tag®3 with an external sensor
Two hours before activating the Fridge-tag®3 the
external sensor must be placed in its predetermined
location. It is recommended and important to place the
external sensor in the center of the refrigerator for a
perfect temperature observation.
For the right positioning of the ext. sensor within the
fridge, please follow the instructions of WHO, CDC or
any other governmental requirements of your country
(for more information visit www.berlinger.com).
External Sensor
Flat cable
Fridge-tag®3
Fig. 6.1.1
1
1
2
2
3
3
11 back to menu

7.2) Activation of the device
To activate the device press the SET and the READ
button simultaneously for more than 3 seconds. The
display is blank.
7) Activation process
7.1) Overview sequences of activation
NOTE: If the activation process has not been com-
pleted - after approx. 60 seconds without any button
operation - the device will go back into sleep mode.
The activation starts from the beginning.
If you want to read or change settings (e.g. change °F
to °C) after the activation has been completed, proceed
as described in chapter „Read and Change settings/
How to correct setting mistakes“
7.2) Activation
7.3) Setting the calendar format
State of delivery
7.4) Connection error
Temperature / Min. - Max
parameter 2
parameter 1
110700000223
-27d
-25d
-23d
-21d
-19d
-17d
-15d
-13d
-11d
-9d
-7d
-5d
-3d
yesterd.
-29d
-28d
-26d
-24d
-22d
-20d
-18d
-16d
-14d
-12d
-10d
-8d
-6d
-4d
-2d
today
-28d
Time / Alarm duration
Alarm state
= OK
= ALARM
Fridge-tag 3
®
Fig. 7.2.1
12
back to menu

English
Successful activation is visible when the following
screen appears: mm.dd.yyyy (US format).
Note: The time will be autmatically adjusted for the
start and end of daylight savings.
Temperature / Min. - Max
parameter 2
parameter 1
110700000223
-27d
-25d
-23d
-21d
-19d
-17d
-15d
-13d
-11d
-9d
-7d
-5d
-3d
yesterd.
-29d
-28d
-26d
-24d
-22d
-20d
-18d
-16d
-14d
-12d
-10d
-8d
-6d
-4d
-2d
today
-28d
Time / Alarm duration
Alarm state
= OK
= ALARM
Fridge-tag 3
®
yyy_ ydd_
7.3. Accepting the US the date format:
Change the calender format to: dd.mm.yyy (EU)
1
Press SET to save the
calendar format
Then press SET to
save the calendar
format
Press READ to change the
calendar format
Temperature / Min. - Max
parameter 2
parameter 1
110700000223
-27d
-25d
-23d
-21d
-19d
-17d
-15d
-13d
-11d
-9d
-7d
-5d
-3d
yesterd.
-29d
-28d
-26d
-24d
-22d
-20d
-18d
-16d
-14d
-12d
-10d
-8d
-6d
-4d
-2d
today
-28d
Time / Alarm duration
Alarm state
= OK
= ALARM
Fridge-tag 3
®
yyy_ ydd_
Temperature / Min. - Max
parameter 2
parameter 1
110700000223
-27d
-25d
-23d
-21d
-19d
-17d
-15d
-13d
-11d
-9d
-7d
-5d
-3d
yesterd.
-29d
-28d
-26d
-24d
-22d
-20d
-18d
-16d
-14d
-12d
-10d
-8d
-6d
-4d
-2d
today
-28d
Time / Alarm duration
Alarm state
= OK
= ALARM
Fridge-tag 3
®
yyyd y__d
2
Fig. 7.3.1Fig. 7.3.2 Fig. 7.2.2
1
13 back to menu

7.4) Connection error
After 10 minutes without a connection between the de-
vice and the sensor, the following alarm will be shown
on the display.
Please check the following two points:
If the sensor of the Fridge-tag®3 is properly connec-
ted with the device. Be sure to rmly press and twist
the connector until you hear it „click“ into place.
If the sensor cable of the Fridge-tag®3 has any
defects.
Only if both mentioned points above are OK, the
display shows the current temperature again and the
measuring will now continue.
Note: During max. 1 minute after the connection no
temperature is displayed on the screen.
Temperature / Min. - Max
parameter 2
parameter 1
110700000223
-27d
-25d
-23d
-21d
-19d
-17d
-15d
-13d
-11d
-9d
-7d
-5d
-3d
yesterd.
-29d
-28d
-26d
-24d
-22d
-20d
-18d
-16d
-14d
-12d
-10d
-8d
-6d
-4d
-2d
today
-28d
Time / Alarm duration
Alarm state
= OK
= ALARM
Fridge-tag 3
®
!
7101 2026
--.-
°C
1 218
Fig. 7..4.1
Temperature / Min. - Max
parameter 2
parameter 1
110700000223
-27d
-25d
-23d
-21d
-19d
-17d
-15d
-13d
-11d
-9d
-7d
-5d
-3d
yesterd.
-29d
-28d
-26d
-24d
-22d
-20d
-18d
-16d
-14d
-12d
-10d
-8d
-6d
-4d
-2d
today
-28d
Time / Alarm duration
Alarm state
= OK
= ALARM
Fridge-tag 3
®
7101 2026
056
1 278
°C
Fig. 7.4.2
14
back to menu

English
8.1) Overview menu
8) Read and change settings/
How to correct setting mistakes
NOTE: If you scroll through the menu and you reach
the display of the measuring mode again you need to
restart from the begining by accessing the menu.
In order to adjust more than one setting (e.g. time &
°C/°F) you must complete each change and return to
menu mode for the 2nd change.
READ
SET
READ
READ READ
READ
READ
READ
READ
READ
READ
READ
READ
READ (exit)
SET
(exit)
SET
(exit)
SET
(exit)
SET
store and exit
SET
store and exit
SET
store and exit
SET
store and exit
SET, READ
(exit)
SET
(exit)
SET
Separate chart
Separate chart
SET
SET
SET
Menu mode
!
1-
8
8
8
8
8
0
8
2
8
8
8
8
8
8
8
min.
max.
°F
°C
Int.
Sensor
Ext.
°C
!
1-
8
8
8
8
8
0
8
2
8
8
8
8
8
8
8
min.
max.
°F
°C
Int.
Sensor
Ext.
!
1-
8
8
8
8
8
0
8
2
8
8
8
8
8
8
8
min.
max.
°F
°C
Int.
Sensor
Ext.
!
1-888
8808 2888
8888
min.
max. °F
°C
Int.Sensor
Ext.
!
1-
8
8
8
8
8
0
8
2
8
8
8
8
8
8
8
min.
max.
°F
°C
Int.
Sensor
Ext.
!
1-
8
8
8
8
8
0
8
2
8
8
8
8
8
8
8
min.
max.
°F
°C
Int.
Sensor
Ext.
°C
!
1-
8
8
8
8
8
0
8
2
8
8
8
8
8
8
8
min.
max.
°F
°C
Int.
Sensor
Ext.
°C
!
1-
8
8
8
8
8
0
8
2
8
8
8
8
8
8
8
min.
max.
°F
°C
Int.
Sensor
Ext.
°C
!
1-
8
8
8
8
8
0
8
2
8
8
8
8
8
8
8
min.
max.
°F
°C
Int.
Sensor
Ext.
°F
!
1-
8
8
8
8
8
0
8
2
8
8
8
8
8
8
8
min.
max.
°F
°C
Int.
Sensor
Ext.
!
1-
8
8
8
8
8
0
8
2
8
8
8
8
8
8
8
min.
max.
°F
°C
Int.
Sensor
Ext.
!
1-
8
8
8
8
8
0
8
2
8
8
8
8
8
8
8
min.
max.
°F
°C
Int.
Sensor
Ext.
!
1-
8
8
8
8
8
0
8
2
8
8
8
8
8
8
8
min.
max.
°F
°C
Int.
Sensor
Ext.
!
1-
8
8
8
8
8
0
8
2
8
8
8
8
8
8
8
min.
max.
°F
°C
Int.
Sensor
Ext.
15 back to menu

Press SET und READ Button simultaneously,
then release both buttons at the same time.
To change the date format and the temperature
measurement unit or to READ the pre-SET alarm limits
please proceed as follows:
„OUT SIDE“ is now displayed on the screen.
You have now entered the change mode, you may
choose now which item you want to change.
You can access the following 4 menus:
„OUT SIDE“ - rst screen, shows the temperature
measured with the int. sensor of the Fridge-tag®3
(ambient temperature)
SET DATE - change date format settings
READ CONF - read the alarm settings
CELS FAHR - change to Celsius or Fahrenheit
SET CONN - De-/Activate Flight Mode
Use the READ button to scroll through the menu.
Use the SET button to access the corresponding menu.
8.2.1) Access the menu „SET DATE“
The display shows the menu „OUT SIDE“. Press
READ until the display shows „SET DATE“. Now you
can adjust the date format.
8.2) Entry Menu
Temperature / Min. - Max
parameter 2
parameter 1
110700000223
-27d
-25d
-23d
-21d
-19d
-17d
-15d
-13d
-11d
-9d
-7d
-5d
-3d
yesterd.
-29d
-28d
-26d
-24d
-22d
-20d
-18d
-16d
-14d
-12d
-10d
-8d
-6d
-4d
-2d
today
-28d
Time / Alarm duration
Alarm state
= OK
= ALARM
Fridge-tag 3
®
Fig. 8.2.1
16
back to menu

English
Information:
• Date format adjustments have no eect on the
alarm records.
• Once the device is activated, it cannot be stopped
anymore.
8.2.2) Access the menu „READ CONF“
The display shows the menu „OUT SIDE“. Press
READ until the display shows „READ CONF“. Then
Press SET to access the menu to read the current
alarm congurations. First the display check appears.
Then continuously press READ to scroll through the
pre-set alarm parameters.
8.2.3) Access the menu „CELS FAHR“
The display shows the menu „OUT SIDE“. Press
READ until the display shows „CELS FAHR“. Then
Press SET to access the menu to change the tempera-
ture measurement unit. To change the measurement
unit (Celsius/Fahrenheit) press READ until the display
shows the desired sign (°C/°F). Press SET to conrm
the mesurement unit.
8.2.4) Open the „SET CONN“ menu
The display shows „OUT SIDE“. Press READ until the
display shows „SET CONN“. Press SET to get to the
ight mode status menu (active/inactive). To change
the ight mode (active/inactive), press READ until the
desired unit active/inactive appears on the display and
then press SET to conrm this.
17 back to menu

Example of OK Display - during measurement
Once the device is fully activated the ( ) OK symbol,
the current temperature reading, the time and the date
will be displayed on the screen. The Fridge-tag®3 with
external sensor will also indicate that the measuring is
made with an external sensor.
A ( ) (OK symbol) is indicated during normal operation
as long as no alarms have been recorded. The tempe-
rature and time conditions were within the preset alarm
parameters.
Example of ALARM Display - during measu-
rement
If the temperature and time conditions are outside the
preset alarm parameters the following will be displayed
on the screen (Fig. 11.1.3.)
9) Display indication during
measurement mode
For max. 1 minute after completing the settings or after
connecting the device with the sensor, the following
display will appear.
During a maximum of 1 mi-
nute no current temperature
is displayed on the screen,
indicated by (--.-).
Temperature / Min. - Max
parameter 2
parameter 1
110700000223
-27d
-25d
-23d
-21d
-19d
-17d
-15d
-13d
-11d
-9d
-7d
-5d
-3d
yesterd.
-29d
-28d
-26d
-24d
-22d
-20d
-18d
-16d
-14d
-12d
-10d
-8d
-6d
-4d
-2d
today
-28d
Time / Alarm duration
Alarm state
= OK
= ALARM
Fridge-tag 3
®
max.
°C
Fig. 9.1.1
Temperature / Min. - Max
parameter 2
parameter 1
110700000223
-27d
-25d
-23d
-21d
-19d
-17d
-15d
-13d
-11d
-9d
-7d
-5d
-3d
yesterd.
-29d
-28d
-26d
-24d
-22d
-20d
-18d
-16d
-14d
-12d
-10d
-8d
-6d
-4d
-2d
today
-28d
Time / Alarm duration
Alarm state
= OK
= ALARM
Fridge-tag 3
®
7101 2026
056
1 473
°C
Fig. 9.1.2
18
back to menu

English
• The ( ) OK symbol will be replaced by (X)
• The additional arrow will be indicated in the upper
display area to show which ALARM limit has been
violated and on which day.
10) Warning symbol
Option 1: The warning symbol will remain visible until
the user reads the details of the triggered alarm/s from
the display. After that it will disappear. ALARM indica-
tions cannot be cancelled nor reset.
Option 2: The warning and ALARM symbol (X) will
remain visible until the user reads the details of the
triggered alarm/s from the display. After that both
symbols will disappear and the display will go back to
the OK Symbol ( ).
Note: How the ALARM symbol (X) and the warning
symbol react is specied in the conguration of the
device and can not be changed.
11) Reading the History
The information of the temperature excursions can
either be viewed directly on the device for the past
30 days or on the generated les (PDF/ASCII) for 56
days.
Note:The external sensor of the Fridge-tag®3 can
remain at it‘s location for the READ out process. Please
consider, that a connection error will occur if the sensor
is disconnected from the Fridge-tag®3 for more than
10 minutes. This alarm can be cleared - see how in
chapter 7.4.
!
1-888
8808 2888
8888
min.
max.
°F
°C
Int.SensorSensor
Ext.
Temperature / Min. - Max
parameter 2
parameter 1
110700000223
-27d
-25d
-23d
-21d
-19d
-17d
-15d
-13d
-11d
-9d
-7d
-5d
-3d
yesterd.
-29d
-28d
-26d
-24d
-22d
-20d
-18d
-16d
-14d
-12d
-10d
-8d
-6d
-4d
-2d
today
-28d
Time / Alarm duration
Alarm state
= OK
= ALARM
Fridge-tag 3
®
!
7101 2026
088
1 425
°C
Fig. 9.1.3
In addition to the (X)
(ALARM symbol) the war-
ning symbol (!) will appear
beside the (X).
19 back to menu

11.1) Option 1:
READ out day-per-day
directly on the device (30 day history)
Example of an OK display -
during read out of the history
• The OK symbol
• The corresponding arrow
(Example: high arrow of „today“)
• Highest recorded temperature (example:+10.5˚C)
• The time duration outside of the preset temperature
high limit (example 00:32; h: min).
• The OK symbol
• The corresponding arrow (example: low arrow of
„today“)
• Lowest recorded temperature (example: +2.9˚C)
• The time duration out of the preset temperature low
limit (example 00:00; h: min).
Temperature / Min. - Max
parameter 2
parameter 1
110700000223
-27d
-25d
-23d
-21d
-19d
-17d
-15d
-13d
-11d
-9d
-7d
-5d
-3d
yesterd.
-29d
-28d
-26d
-24d
-22d
-20d
-18d
-16d
-14d
-12d
-10d
-8d
-6d
-4d
-2d
today
-28d
Time / Alarm duration
Alarm state
= OK
= ALARM
Fridge-tag 3
®
d r
u
105
0 320
max.
°C
Int.Sensor
Press READ once
The following informa-
tion is indicated on the
screen:
Fig. 11.1.1
The following informa-
tion is indicated on the
screen:
Press READ a second
time
Temperature / Min. - Max
parameter 2
parameter 1
110700000223
-27d
-25d
-23d
-21d
-19d
-17d
-15d
-13d
-11d
-9d
-7d
-5d
-3d
yesterd.
-29d
-28d
-26d
-24d
-22d
-20d
-18d
-16d
-14d
-12d
-10d
-8d
-6d
-4d
-2d
today
-28d
Time / Alarm duration
Alarm state
= OK
= ALARM
Fridge-tag 3
®
d r
u
029
0 000
min. °C
Sensor
Int.Sensor
Fig. 11.1.2
20
back to menu
Other manuals for Fridge-tag 3
4
Table of contents
Other berlinger Medical Equipment manuals