Bmobile Z01 User manual

- 1 -
GSM/GPRS Digital Phone
User Manual

- 2 -
Contents
1The Basic ........................................................................................................................................5
1.1 Introduction ...............................................................................................................................5
1.2 Safety Notice...............................................................................................................................5
1.3 For Your Safety .........................................................................................................................5
1.3.1General matters .......................................................................................................................5
1.3.2 Phone Safety............................................................................................................................6
1.3.3 Battery Safety..........................................................................................................................7
1.3.4 Charger Safety ........................................................................................................................8
1.3.5 Cleaning and Maintenance ....................................................................................................9
2 Before Use......................................................................................................................................9
2.1 The Names and Explanation of Each Part ..............................................................................9
2.1.1 Appearance..............................................................................................................................9
2.1.2 Keypad Instructions ...............................................................................................................9
2.1.3 Icon.........................................................................................................................................10
2.2 Insertion of the SIM Card and Memory Card......................................................................10
2.2.1 Insertion of SIM Card..........................................................................................................10
2.2.2 Insertion of Memory Card...................................................................................................10
2.3 Battery ......................................................................................................................................10
2.3.1 Removal and Installation of the Battery.............................................................................11
2.3.2 Battery charging ...................................................................................................................11
2.4 Safely password........................................................................................................................11
3 Fleetly User manual....................................................................................................................12
3.1 Function hotkey .......................................................................................................................12
3.2 Dialing.......................................................................................................................................12
3.3 Rejecting calls ..........................................................................................................................12
3.4 Receiving calls..........................................................................................................................12
3.5 Ending a call.............................................................................................................................12
3.6 Emergency calls .......................................................................................................................13
3.7 Extension dialing......................................................................................................................13
3.8 Call history ...............................................................................................................................13
3.9 Call divert.................................................................................................................................13
3.10 Call waiting ............................................................................................................................13
3.11 Call barring ............................................................................................................................13
3.12 Turning the Phone On and Off ............................................................................................13
4 Function Menu............................................................................................................................13
4.1 How to Use the Function Menu ..............................................................................................13
4.1.1 Scroll to select Function .......................................................................................................13
4.1.2 Speedily to select function....................................................................................................14
4.1.3 Exit Menu ..............................................................................................................................14
4.2 File manager.............................................................................................................................14
4.3 Phonebook ................................................................................................................................15

- 3 -
4.4 Fun & Games ...........................................................................................................................15
4.4.1 Java ........................................................................................................................................15
4.4.2 Java settings ..........................................................................................................................15
4.4.3 Java default security.............................................................................................................15
4.4.4 Java network .........................................................................................................................16
4.5 Call center ................................................................................................................................16
4.5.1 Call history ............................................................................................................................16
4.5.2 Call settings ...........................................................................................................................16
4.6 Messaging .................................................................................................................................16
4.6.1 Write message .......................................................................................................................16
4.6.2 Inbox ......................................................................................................................................17
4.6.3 Drafts .....................................................................................................................................19
4.6.4 Outtbox ..................................................................................................................................19
4.6.5 Sent messages ........................................................................................................................19
4.6.6 Delete messages .....................................................................................................................19
4.6.7 Broadcast message................................................................................................................19
4.6.8 Templates ..............................................................................................................................19
4.6.9 Message settings....................................................................................................................19
4.7 Multimedia ...............................................................................................................................21
4.7.1 Mobile TV..............................................................................................................................21
4.7.2 Camera ..................................................................................................................................21
4.7.3 Image viewer .........................................................................................................................21
4.7.4 Video recorder ......................................................................................................................22
4.7.5 Media player .........................................................................................................................22
4.7.6 Sound recorder .....................................................................................................................22
4.7.7 FM radio................................................................................................................................23
4.8 Organizer..................................................................................................................................23
4.8.1 Calendar ................................................................................................................................23
4.8.2 Tasks ......................................................................................................................................23
4.8.3 Alarm .....................................................................................................................................23
4.8.4 World clock ...........................................................................................................................24
4.8.5 Notes.......................................................................................................................................24
4.9 Settings......................................................................................................................................24
4.9.1 Dual SIM switch....................................................................................................................24
4.9.2 Dual SIM settings..................................................................................................................24
4.9.3 Pen calibration ......................................................................................................................24
4.9.4 Phone settings........................................................................................................................24
4.9.5 Network settings ...................................................................................................................24
4.9.6 Security settings ....................................................................................................................24
4.9.7 Restore factory setting..........................................................................................................24
4.9.8Sound effects ..........................................................................................................................24
4.10 User profiles ...........................................................................................................................24
4.11 Extra .......................................................................................................................................25
4.11.1 Calculator ............................................................................................................................25

- 4 -
4.11.2 Unit Converter ....................................................................................................................25
4.11.3 Currency converter ............................................................................................................25
4.11.4 Stopwatch ............................................................................................................................25
4.12 Services ...................................................................................................................................25
4.12.1 STK* ....................................................................................................................................25
4.12.2 Internet service ...................................................................................................................26
4.12.3 MSN .....................................................................................................................................28
4.13 Connectivuty ..........................................................................................................................28
4.13.1 Bluetooth..............................................................................................................................28
4.13.2 Data account........................................................................................................................28
5 Input Method ..............................................................................................................................28
5.1 General Outline........................................................................................................................29

- 5 -
1The Basic
1.1 Introduction
Thank you for choosing the Z01 GSM/GPRS digital mobile phone. After reading
this guide you will be able to fully master the use of your Z01 mobile phone and
appreciate all its functions and ease of use.
The Z01 mobile phone is designed for use on the GSM/GPRS networks. Not only
the Z01 provides you with basic calling functions, but also with many practical
functions such as a name card style phonebook, personalized 64 chord ring tones and
pictures, clock, alarm, camera, video player, video recorder, audio player, T-Flash
card support, sound recorder, calculator, calendar, GPRS surfing, MMS,and H-Free
etc, to improve the time you spend on working and playing. Moreover, the Z01 uses a
personalized man-machine interface and the perfect functional design to satisfy all
your needs. The Z01 mobile phone is compatible with GSM/GPRS technology and
has been approved by certification authorities both domestically and abroad.
All rights reserved.
1.2 Safety Notice
!If your mobile phone is lost or stolen, please contact the telecommunications
authorities or a sales agent immediately to have a hold put on the SIM card.
This will prevent economic loss caused by unauthorized calls made from your
mobile phone.
!When you contact the telecommunications authorities or a sales agent, they
will need to know the IMEI number of your mobile phone (remove battery to
expose number located on the label on back of phone). Please copy this
number and keep in a safe place for future use.
!In order to avoid the misuse of your mobile phone please take the following
preventative measures:
-Set the PIN number of your mobile phone’s SIM card and change this
number immediately if it becomes known to a third party.
-Please keep the phone out of sight when leaving it in a vehicle. It is best to
keep the phone on your person, or locked in the trunk.
-Set call restrictions.
1.3 For Your Safety
Please read these safety guidelines before using your mobile phone to assure the
safe and proper use of the phone.
1.3.1General matters
!Please turn off your mobile phone on an airplane, hospital or any locations
where may restrict mobile phone using, otherwise the normal operation of
electrical equipment and medical instruments will be affected. Please obey
local regulations when using your mobile phone.
!While driving please obey local laws and regulations about mobile phone

- 6 -
using. When you pick up the phone while driving, please obey the following
rules: Concentrate on driving and be aware of traffic conditions; if your
mobile phone has a hands-free function, please set your phone to this mode.
Under poor driving conditions, please stop the car before you -using your
phone.
!Please obey laws, regulations and signs when near an area storing fuel,
chemicals, or volatile materials.
!Please keep mobile phones, batteries and chargers out of reach of children。
!To prevent the damage to your mobile phone, do not use other type of
batteries or chargers. Otherwise it could cause battery leakage, overheating,
cracking, fire or other dangers.
!Please do not use your mobile phone near low signal or precision electronic
equipment. Radio wave interference may cause the malfunctioning of such
electronic equipment and other problems. Special attention must be paid near
the following equipment: hearing aids, pacemakers and other electronic
medical equipment, smoke detectors, automatic doors and other automatic
control installations. To find out the effect of mobile phones on a pacemaker
or other piece of electronic medical equipment please contact the
manufacturers or local sales agents of the equipment.
!This mobile phone has an auto power on function. Please refer to the mobile
phone’s clock setting to assure that the mobile phone will not automatically
turn on during a plane flight.
!To avoid the mobile phone malfunctioning, or catching fire, please do not
violently impact, jolt or throw your mobile phone.
!Please do not place the batteries, mobile phone or charger in a microwave
oven or high-pressure equipment. Otherwise it could lead to unexpected
accidents such as damage to the circuitry or fire.
!Please do not use your mobile phone near flammable or volatile gases,
otherwise it may cause malfunctioning or fire.
!Please do not subject your mobile phone to high temperatures, high humidity
or dusty places; otherwise it may lead the malfunction of your mobile phone.
!To avoid your mobile phone falling and malfunctioning or being damaged,
please do not place your phone on uneven or unstable surfaces.
1.3.2 Phone Safety
!Do not disassemble or modify the mobile phone, as it will lead to damage to
the phone such as battery leakage or circuitry failure.
!Please do not subject the LCD to impact or use the screen to strike things, as
this will damage the LCD board and cause leakage of the liquid crystal.
There is a risk of blindness if the liquid crystal substance gets into the eyes. If
this occurs rinse eyes immediately with clear water (under no circumstances
rub your eyes) and go immediately to a hospital for treatment.
!Under very rare circumstances using the mobile phone in certain model cars
may negatively effect the internal electronic equipment. In order to assure
your safety under such circumstances please do not use the mobile phone. If

- 7 -
your car is equipped with an airbag, please do not place your phone on top of
it, or within the contact area of the airbag in order to avoid seriously harming
the driver or passenger when the airbag inflates.
!Please do not use needles, pen tips, or other sharp objects on the keypad as
this may damage the mobile phone or cause it to malfunction.
!Avoid letting the phone come into close contact with magnetic objects such
as magnetic cards as the radiation waves of the mobile phone may erase the
information stored on floppy disks, pay cards and credit cards.
!Please keep small metal objects, such as thumbtacks, far away from the
receiver. When the receiver is in use it becomes magnetic and may attract
these small metal objects and thus these may cause injury or damage the
mobile phone.
!Do not expose the mobile phone to humidity, water or other liquid. If liquids
enter the phone, this could cause a short circuit, battery leak or other
malfunction.
!Please use the mobile phone in a place away from landline telephones,
televisions, radios, and automated office equipment in order to avoid
affecting both the equipment and the mobile phone
1.3.3 Battery Safety
!Do not disassemble or modify the battery, as this will cause the battery to
leak, overheat, crack and catch fire.
!Do not dispose of old batteries with everyday domestic garbage. Please
dispose of old batteries at the directed places with specific rules for their
disposal.
!Please do not put/throw batteries into a fire, as this will cause the battery to
catch fire and explode.
!When installing the battery, do not use force or pressure, as this will cause
the battery to leak, overheat, crack and catch fire.
!Please do not use wires, needles or other metal objects to short-circuit the
battery. Also, do not put the battery near necklaces or other metal objects, as
this will cause the battery to leak, overheat, crack and catch fire.
!Please do not solder the contact points of the battery, as this will cause the
battery to leak, overheat, crack and catch fire.
!If the liquid in the batteries goes into the eyes, there is a risk of blindness. If
this occurs do not rub the eyes, but immediately rinse eyes with clear water
and go to the hospital for treatment.
!Please do not use or place the batteries near high temperature places such as
near a fire or heating vessel, as this will cause the battery to leak, overheat,
crack and catch fire.
!If the battery overheats, changes color, or becomes distorted during use,
charging, or storage, please stop using and replace it with a new battery.
!If the liquid from the battery touches skin or clothing, this may cause burning
of the skin. Immediately use clear water to rinse and seek medical attention if
necessary.

- 8 -
!If the battery leaks or gives off a strange odour, please remove the battery
from the vicinity of the open fire to avoid a fire or explosion.
!Please do not let the battery become wet as this will cause the battery
overheat, smoke and corrode.
!Please do not use or expose batteries in high temperature such as direct
sunlight, as this will cause the battery to leak and overheat, lower
performance, and shorten the battery’s life.
!Please do not continuously charge for more than 24 hours.
!Please place the battery in a cool, shady and well-ventilated place out of
direct sunlight.
!The life of all mobile phone batteries is limited. The usable time of batteries
decreases with frequent charging. When charging becomes ineffective this
means that the battery is out of service and the battery should be replaced
with a new one of the designated type.
1.3.4 Charger Safety
!Please do not disassemble or modify the charger, as it will lead bodily harm,
electrical shock, fire or damage to the charger.
!Please use AC 110 to 220 volts. The use of any other voltage will cause
battery leakage, fire and even damage to the mobile phone and charger.
!It is forbidden to short circuit the charger, as this will cause electrical shock,
smoking and damage to the charger.
!Please do not use the charger if the power cord is damaged, as this will cause
fire or electrical shock.
!Please immediately clean any dust gathered on the electrical outlet.
!Please do not place vessels with water near the charger in order to avoid
water splashing onto the charger and causing an electrical shortage, leakage
or other malfunction.
!If the charger comes in contact with water or other liquid the power must
immediately be switched off to avoid an electrical short or shock, fire or
malfunction of the charger.
!Please do not use the charger in bathroom or other excessive moist areas, as
this will cause electrical shock, fire or damage to the charger.
!Please do not touch the charger with wet hands, as this will cause electrical
shock.
!Do not modify or place heavy objects on the power cord, as this will cause
electrical shock or fire.
!Before cleaning or maintenance please unplug the charger from the electrical
outlet.
!When unplugging charger, do not pull on the cord directly, hold on to the
body of the charger to pull the charger out of outlet, as pulling on the cord
will damage the cord and lead electrical shock or fire.
!Please do not charge in the following places: moist or humid places, dusty
places or places with excessive vibration (this will cause malfunctioning); or
near televisions, radios, electronic products (this will effect the picture and
- 9 -
sound)
1.3.5 Cleaning and Maintenance
!The mobile phone, battery and charger are not water resistant. Please do not
use them in bathroom or other excessively moist areas and likewise avoid
allowing them to get wet in the rain.
!Use a soft, dry cloth to clean the mobile phone, battery and charger.
!Please do not use alcohol, thinner, benzene or other solvents to wipe the
mobile phone.
A dirty outlet will cause poor electrical contact, lose of power and even inability to
recharge. Please clean regularly
2 Before Use
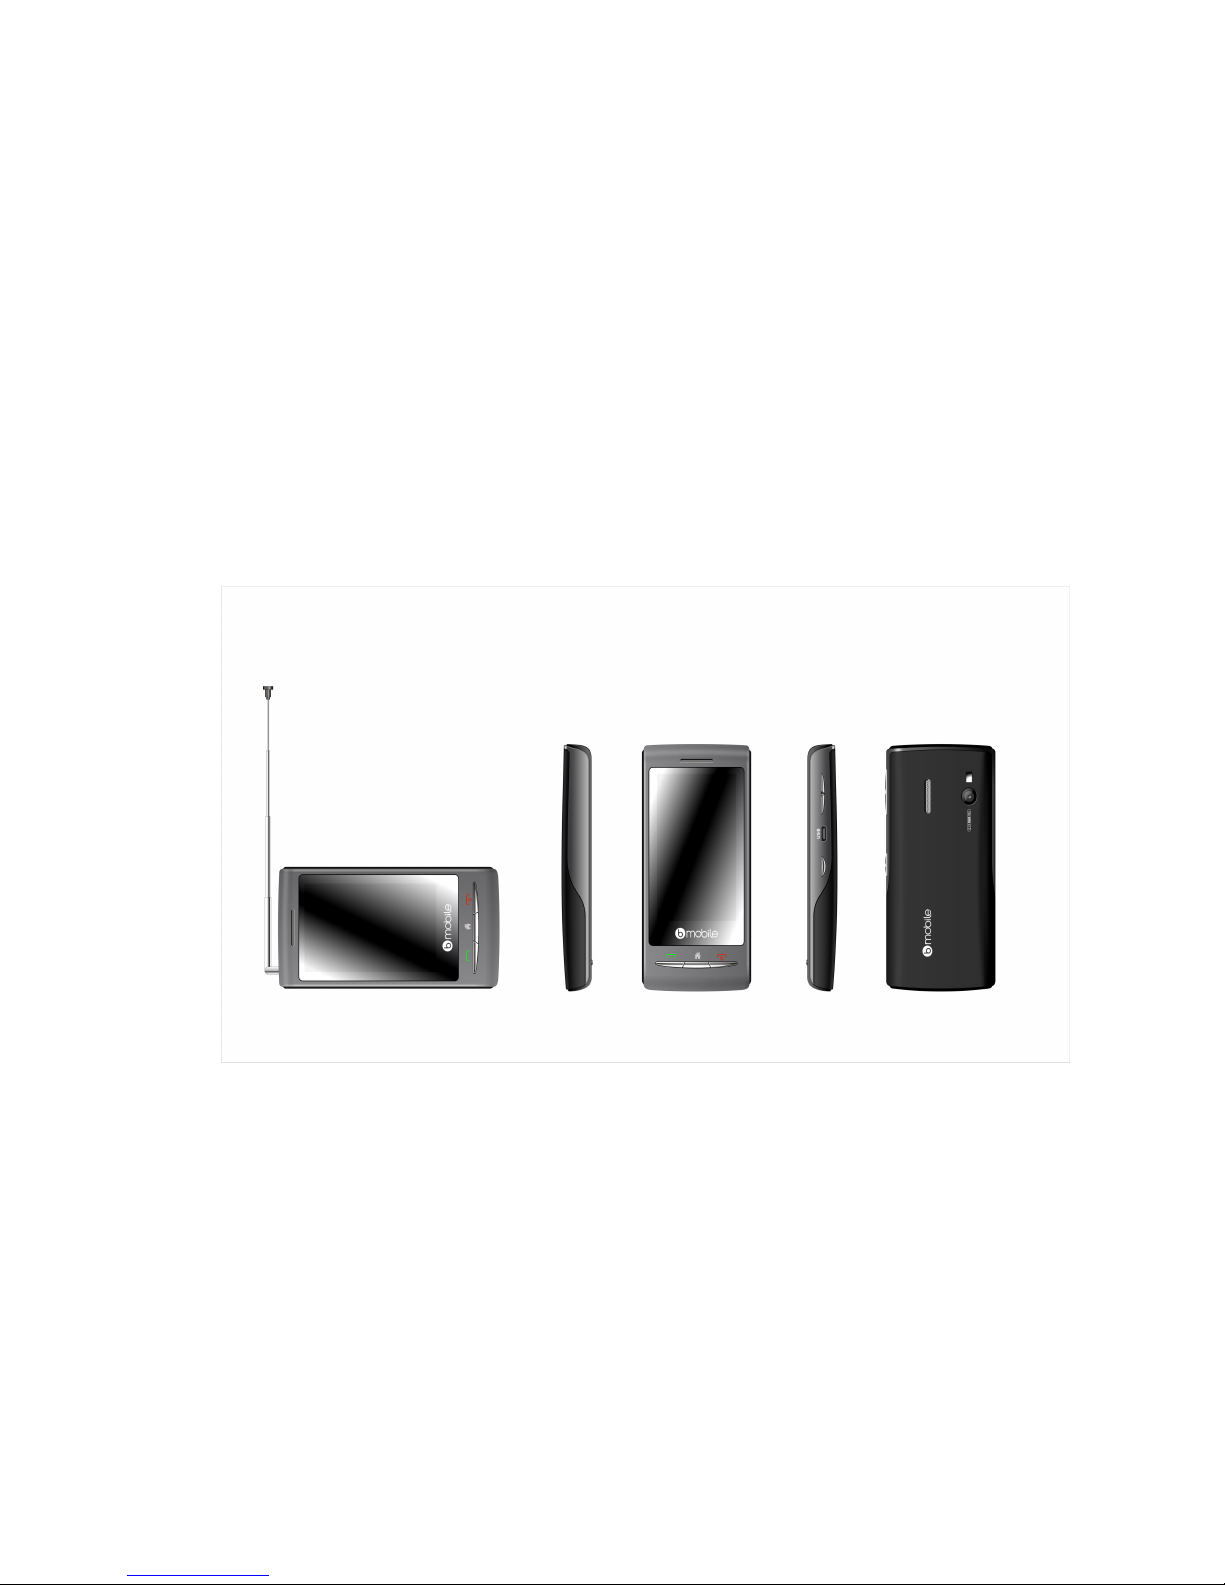
2.1 The Names and Explanation of Each Part
2.1.1 Appearance
2.1.2 Keypad Instructions
1. OK key:OK key function is same with the left soft key.
2. Menu key : press this key into the main menu.
3. Back key: to perform the function of the prompt displayed in lower right
corner of the screen.
4. Dial key: to dial and pick up calls; on standby, to see the all calls record list.
5. Hang-up key: to end a call or reject incoming calls, to return to the idle screen,
long press to power on/off the handset.
6. Camera key: press the camera key to enter “Camera” menu.
- 10 -
7. Side volume keys: Press to adjust the volume when playing music, video, FM
and TV.
Attention: In this handbook, the phrase “press the key” refers to pressing and
thereafter releasing a key; “Long press a key” refers to pressing a key and
keeping it pressed for 2 seconds or longer.
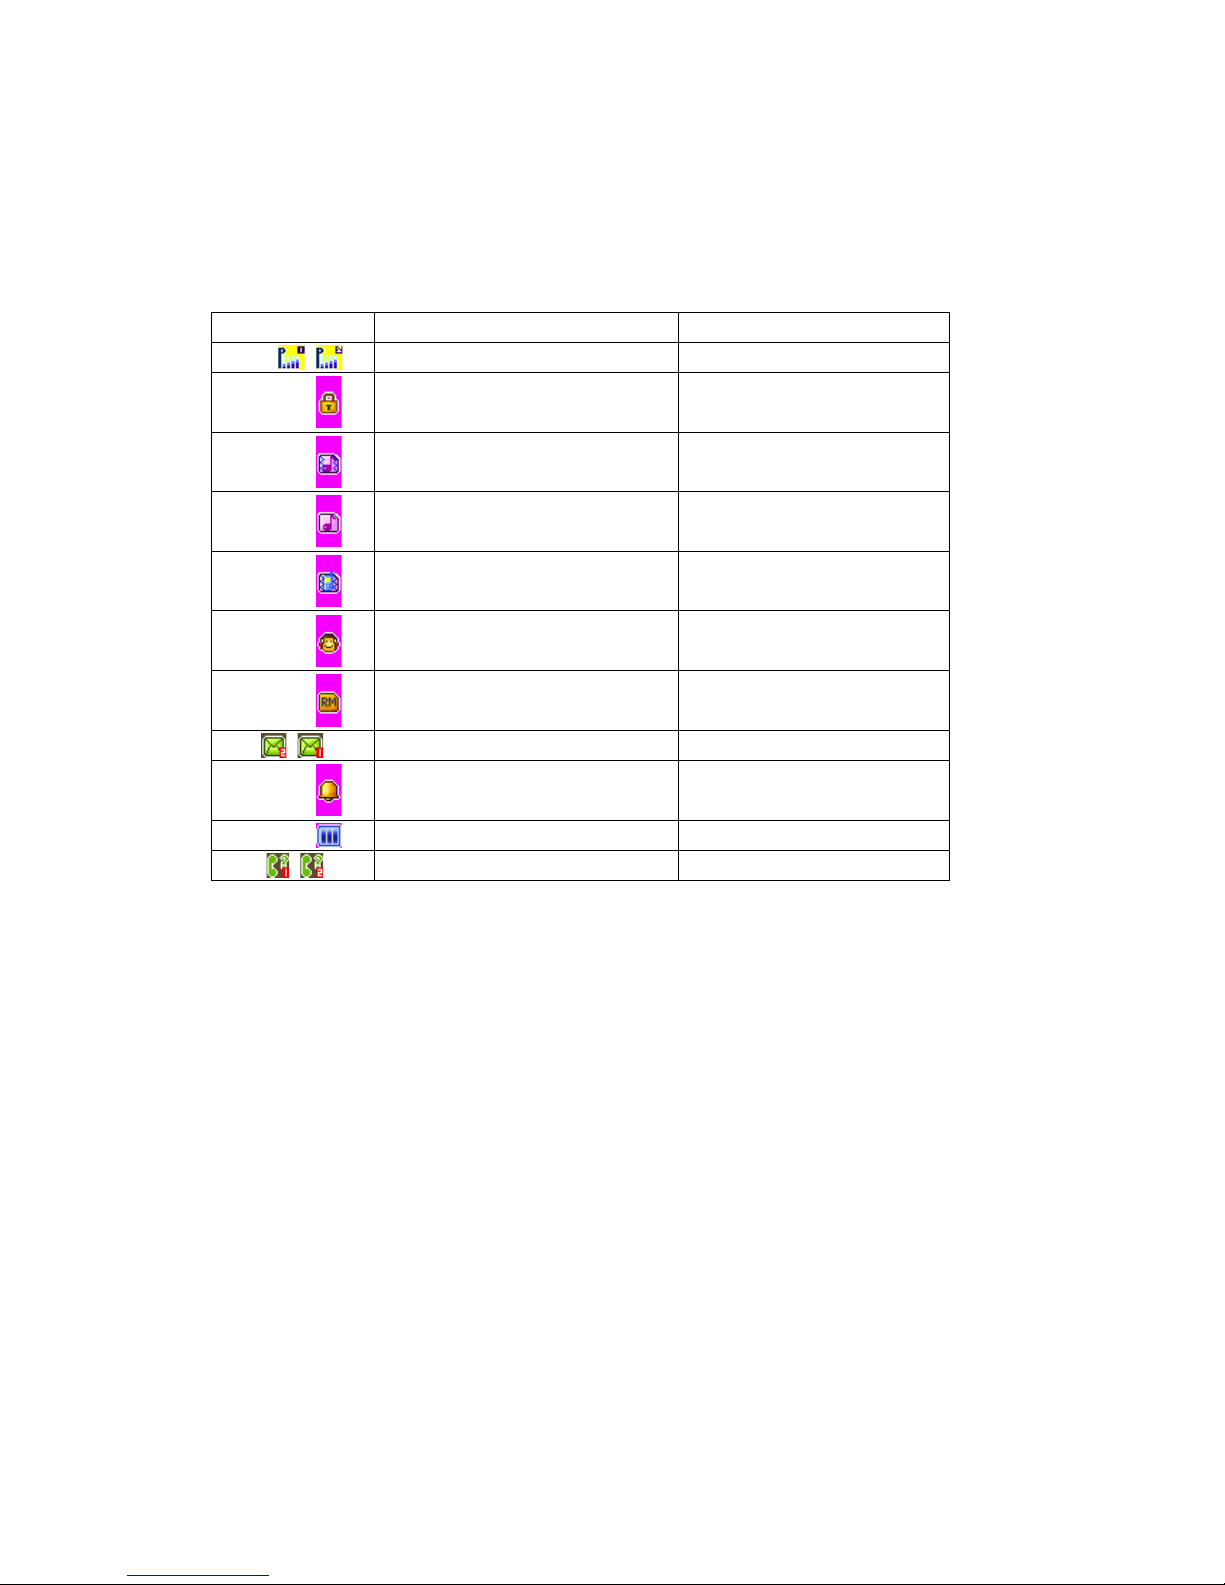
2.1.3 Icon
Icon
explain
Display place
Signal intensity of network
At the top of screen
Keyboard is locked
At the top of screen
Vibration and sound
At the top of screen
Ring
At the top of screen
Vibration and silent
At the top of screen
Earphone is inserted
At the top of screen
Mobile-phone is ramble estate
At the top of screen
Receive Text message
At the top of screen
Startup alarm
At the top of screen
Display batteries energy
At the top of screen
Missed calls
At the top of screen
2.2 Insertion of the SIM Card and Memory Card
2.2.1 Insertion of SIM Card
Metal interface of SIM card is very easy scrape. Before inserting into the phone
you must carefully remove it.
!Turn off the phone; remove the battery and unplug other external power sources.
!Insert the SIM card into the SIM slot.
!When you need to remove the SIM card, please first turn off the phone, remove
the battery, then remove the SIM card.
2.2.2 Insertion of Memory Card
!Turn off the phone; remove the battery and unplug other external power sources.
!Put the Memory Card into the Memory Card trough.
!When you need to remove the Memory Card, please first turn off the phone,
remove the battery, then remove the Memory Card.
2.3 Battery
The battery is initially charged with 50%of its total capacity, you can unpack
and use it. Please recharge the battery to full after it's exhausted for the first 3 times,

- 11 -
so as to make the best of your battery.
2.3.1 Removal and Installation of the Battery
!When removing the battery follow the following steps:
①Push the battery cover towards bottom;
②Raise the battery bottom, break out the battery from the mobile-phone.
Warning: You must turn off your mobile phone before removing the battery.
Under no circumstances should you remove the battery when the mobile phone
is on as this may damage the SIM card and your mobile phone.
!When installing the battery follow the following steps:
①According to arrowhead direction, push the battery to inset mobile-phone.
②Cover with the battery cover.
③Push the battery cover towards top.
2.3.2 Battery charging
!The charger connector with the bottom of the phone (with the arrow pointing
upward).
!The charger connector with the electrical source.
!The battery capacity indicator in Icon Area will then flash periodically; when
charging at power-off status, charging indicator on the screen means the phone is
charging now. If you are using a phone in low battery, it may need certain time
for charging indicator to appear on the screen after starting to charge.
!When the Capacity Indicator in Icon Area is full and doesn't flash any more, the
charging process is complete. If your phone is charged in power off status,
charging complete screen will also display. Charging process usually takes
1-2.5 hours. Battery, phone and charger normally turns hot during charging
process.
!When charging process complete, disconnect connections between AC power
outlet, your phone and the charger.
Attention:
!Be sure to charge in ventilated place with the temperature ranging from -10℃to
+45℃, and always use the charger provided by original manufacturer. Using
unauthorized charger may cause danger, and also violates warranty coverage of
the manufacturer.
!Charge your battery in time when the phone automatically powers off or displays
low battery warning. The phone will automatically decrease charging time when
the battery is not exhausted before charging.
2.4 Safely password
PIN code
The PIN code (individual identification number) prevents your SIM card by the
illegal use. The PIN code provides together generally with the SIM card. If continual
three times loses the wrong PIN code, should input the PUK code unlocking. The
details ask you to relate with the network operation company. (PIN code default is
1234)
PIN2 code

- 12 -
Enter certain functions (for example telephone conversation cost) when needs to
input the PIN2 code, if continual three times inputs the wrong PIN2 code, should
input the PUK2 code unlocking. The details ask you to relate with the network
operation company.
PUK code
If your phone is locked when PIN code input several times, you needs to input
the PUK code to unlock it. The PUK code provides together along with the SIM card.
If has not provided, please relate with yours service supplier. If continual ten times
inputs the wrong PUK code, then this SIM card cannot use again. Please relate with
yours service supplier purchases the new card. You cannot modify the PUK code. If
loses this code, please relate with yours service supplier
PUK2 code
If your phone is locked after you input wrong PIN2 code several times, you need
to input the correct PUK2 code to unlock it. If you input wrong PUK2 code ten times
continuously, the SIM card of your phone will be locked. Please contact with your
service supplier. You cannot modify the PUK2 code. If you lose this code, please
contact with your service supplier.
3 Fleetly User manual
3.1 Function hotkey
Function
Hotkey
State description
Power on/off
Long press the Hang-up key
All screen
Control receiver volume
Press Side volume keys
Calling screen
Enter the main menu
Press the Menu key
Idle screen
Silent/Normal mode
Long click the # key
Idle screen
3.2 Dialing
You may dial and receive calls on your phone when the symbol of your network
provider appears on the screen. The information bar on the upper left corner of the
screen indicates network strength (the signal is strongest when there are four lines
visible).
3.3 Rejecting calls
You can press the hang up key to reject any incoming call.
3.4 Receiving calls
You can choose different modes to receive calls. If the earphones are already
plugged in, you can use the button located on the earphones to pick up the phone. If it
is inconvenient to press the button, then you can set the“Auto” as “On”, with the
earphones plugged in, and the phone will automatically pick up after ringing or
vibrating for 5 seconds. If you have set the “Any Key”, you can pick up the call by
pressing any key other than the hang up key.
3.5 Ending a call

- 13 -
During a call you can press the hang up key to end a call. You can also cancel a
call you have just dialled by pressing the hang up key.
3.6 Emergency calls
If you are located within the network area (you can find this out by referring to the
network strength indicator located on the upper left-hand corner of your mobile phone
screen), you should be able to make emergency calls. If your network provider does
not provide roaming where you are, “Emergency” will appear on the screen. If you
are located within a network area, even if you do not have a SIM card, you will be
able to transmit emergency calls.
3.7 Extension dialing
Some fixed phone extensions cannot be called directly. You need to input a “P”
before the extension number. The “P” can be input at the dial screen by long clicking
the * key and switch to it.
3.8 Call history
Get in this menu to view the missed/received/dialed calls.
3.9 Call divert
After activating this function, the network will notify you that you have a new
incoming call when you are talking on the phone. For details of how to use this
function you can contact your network operator.
3.10 Call waiting
The call diversion network service permits you to divert, under certain preset
situations, certain incoming calls to a telephone number designated by you. This
service requires network support. Please contact your network provider to activate this
service. You can set and cancel the incoming call diversion function of your mobile
phone.
3.11 Call barring
The Call Barring allows the user to prevent incoming or outgoing calls based on
user-defined conditions. The network provider provides you with a 4 digit Barring
PW to allow you to activate the “Call Barring” service. When you use this function,
please contact your network provider
3.12 Turning the Phone On and Off
To turn on or off the phone please long press the Hang-up key.
4 Function Menu
4.1 How to Use the Function Menu
4.1.1 Scroll to select Function

- 14 -
!On standby, press the ok keyto enter the main function menu. During a call
click“Options” to enter the call option menu, then use Touch-screen slide to
scroll to the desired item on the menu and press the ok key to select the
function.
!In all the menu and submenu, use Touch-screen slide to scroll to the desired
function and press the left soft key to enter the function item.
4.1.2 Speedily to select function
Most main menus and submenus have speed numbers. This speed number
is the function’s corresponding index number.
!On standby, press the OK key to enter the main menu, Touch-screen slide to
scroll to the desired item on the menu.
!Enter the main menu’s speed number to enter the corresponding option. Enter
the submenu’s speed number to select the corresponding option.
4.1.3 Exit Menu
Usually, you can exit the current menu by click the “Back”. You can also press
the hang-up key to return to the idle screen.
4.2 File manager
Click "Ok" to enter this submenu, menu display “Phone” and "Memory Card"
( if the Memory card have been inserted into the mobile-phone).
!Open to display all the files and folders in the root.
!New Folder to create a new folder.
!Format to format the Phone or Memory Card, it will delete all of the
data and file.
!Rename to rename your Phone or Memory Card.
!Details to show the Name/Total size/Free size of your Phone or
Memory Card.
Open the root, it will display the file or folder list, select a folder and
press the left soft key “Options”:
!Open to display the content in the current folder.
!New Folder to create a new folder.
!Rename to change the current file or folder name.
!Delete to delete the current file or folder.
!Sort by to select sort the folders By Name, By Type, By Time and By
Size, or not array to select None.
Select one file and press the left soft key “Options”. It may show
different items according to the different file format:
!View to view the image file.
!Play to play multimedia file.
!Use to use the different file in different usage. The music file can be
used in User Profile as ringtone. The image file can be used in
Power On/Off Display,Wallpaper and Screen Saver.
!Send to send the file by MMS.
!Detail to display detail information about Date and Size.

- 15 -
!Rename to change the file name.
!Copy to copy the current file to other place. Press OK to start, press
Select to copy the file in current position, press Open to enter the
folder, press New Folder to set up a new folder.
!Move to move the current file to other place, same as Copy.
!Delete to delete the current file (Note: if the file attribute is Read Only,
it can not be deleted.).
!Delete all files to delete all files in the current folder.
!Mark several to multi-select several files to copy/delete/move.
Sort to sort the files By Name, By Type, By Time and By Size, or None.
4.3 Phonebook
You can use the phonebook function “To Phone” to save name card information
such as Name, Number, Caller ringtone and Caller Group.
Note: This phone is able to save up to 500 phone book records, and the record
storage of SIM card is decided by the capacity of the SIM card.
The options of this result by the ok key are following:
!View : view the details of entry
!Send text message : to send text message to the current phone entry
!Send multimedia message : to send the multimedia message to the current entry.
!Call : to make a call directly.
!IP dial : activate the IP dial-up of numbers in the phonebook.
!Edit : edit the entry.
!Delete : delete the entry.
!Copy : copy the entry.
!Move : move the entry.
!Send contact : send the entry of “as text message”.”as multimedia message” and
“via Bluetooth”.
!Add to blacklist : add the entry to blacklist.
!Caller groups : he phone is programmed with 5 caller groups. You can make
some individual settings for each group, such as rename, ring type, incoming call
picture and each group member’s personal setting.
Phonebook settings: set the phonebook in nine categories:Preferred
storage ,Speed dial, My number, vCard version , Extra numbers,Memory status, Copy
contacts, Move contacts and Delete all contacts
4.4 Fun & Games
4.4.1 Java
Show the JAVA applications list installed. You can install the Java programs
through file manage. At this list, you can launch or delete them by option menus
4.4.2 Java settings
JAVA settings include JAVA audio, JAVA backlight, Network setting, etc.
4.4.3 Java default security
In this menu you can set Third party、Untrusted domain、Restore settings and

- 16 -
domain options
4.4.4 Java network
In this menu you can set network for java.
4.5 Call center
4.5.1 Call history
In this menu you can view all call records, including missed calls, received calls,
dialed calls; click on the above have been received, missed, dialed the phone icon,
enter the corresponding call log list. In the call log list, select records, click on the
options for the following operations:
"View : to view the current record.
"Call : to call the current record.
"Save to phonebook :to save the current number to phonebook.
"Add to blacklist : to add the current record to blacklist.
"Edite before call : to edit the current record before call.
"Delete : to delete the current record.
"Delete all : to delete all call log records.
"Advanced : to set call timers, call cost, text msg.counter and GPRS
counter.
4.5.2 Call settings
In this menu you can set Caller ID, Call waiting, Call divert, Call barring, Line
switching ,Cloaed user group and Advance settings.
In the Advance settings you can set Blacklist, Auto redial, IP dial, Call time
display, Call time reminder ,Auto quick end, Reject by SMS and Emergency &
Service call.
4.6 Messaging
This feature allows you to send, receive, store and edit all kinds of information,
and its network must support a variety of features, please contact the company with
the network operator.
4.6.1 Write message
Text message
Before writing a text message, please confirm that you have set the short message
service centre number.
You can edit your short message by entering the” Text Message” submenu.
Click the “option” to enter the “Option” menu:
!Send to : click ok key to enter number,insert the number then click the ok key
can select “send”,”edit recipient”,”remove recipient” and “remove all
recipients” .
!Input Method: to offer 8 kinds of input methods.
!Insert template : to insert character information of prearranging at the
currently cursor place.
!Advanced : in this menu you can set “insert object” ,”insert number” ,”insert
name”,”insert bookmart” and ”text fomat”.

- 17 -
!Save to Drafts: save this message to Drafts.
Multimedia message
When you select “Multimedia message”, click the “ok” to wirte message
interface, you can input content. After finishing it, click the“Options”, have options
as follows:
!Send to Complete editing of the current MMS.
!Input Method to choose one kind as acquiescence characters editor.
!Text options
!Add picture to select a picture from [File Manager] submenu or take picture
and insert into the current page .
!Add sound to select a audio from [File Manager] submenu or record sound and
insert into the current page.
!Add Video to select a video from [File Manager] submenu or record video and
insert into the current page.
!Add subject to edite the subject for this meaage.
!Preview MMS to preview the current MMS.
!Slide options in this menu you can set “add slide behind”, “add slide
before” or “slide timing”.
!Advanced in this menu you can select “insert text template”,”insert
attachment”,”insert contact number”, “insert contact name” or “insert bookmark”.
!Save to Drafts to save the message to Drafts.
!Save as template to save as template
!Details in this menu you can
Note:Some of the options above only appear under certain circumstances, for
example, "Delete Slide" only appears when the current MMS exceeds one page.
Each page of a MMS can only contain one picture and one sound. When the
current page contains a sound or picture, "Edit image" or "Edit Audio" will
appear. When editing an MMS, the status information line bar at the top of the
screen will display the following: the current page/total pages; and the entire size
of the MMS.
4.6.2 Inbox
Text message
Enter the “Inbox” submenu to view received messages. When you receive a short
message, your mobile phone will vibrate (if Alert Type set to the Vibration) and ring
(if Alert Type set to the Ring), display the prompt information. If you do not wish to
read it immediately, after you exit this interface, the envelope icon appears at the top
of the screen on standby and the short message will automatically be saved on the
SIM card. The amount of short messages that can be saved (this includes received
messages as well as saved messages) is based on the memory size of the SIM card.
!When viewing the short message list in “Inbox”, the sender’s phone number or
name (if the name has already been saved in the phonebook) will be displayed,
and show that receives the date of short messages by floating item.
!When looking at the short message list, you can use the Touch-screen slide to
select the short message. When the “Inbox” short message list appears, you can

- 18 -
click the “Ok” to read the detailed contents of a message, the date and time of
receipt and the name (if the name has already been saved in the phonebook) or
telephone number of the sender. At this time you can also click the“Option” to
perform the following operations:
View view the message.
Reply by SMS to send the text message to the sender of the current
message.
Reply by MMS to send the multimedia message to the sender of the
current message.
Call sender to call the sender of the current message.
Forward to edit the current message Send.
Delete to delete the current short message
Delete all to delete all message of the inbox.
Save to phonebook save the sender to the phonrbook.
In view the message interface you can also click the “Options” to perform the
following operations:
Reply to send a short message to the sender of the current message.
Call sender to call the sender of the current message.
Forward to edit the current message Send.
Delete to delete the current short message.
Advanced to use number , URL and USSD.
Multimedia message
Enter the "Inbox" submenu. Your mobile phone will display a list of the MMS in
the "Inbox" (include download prompt). Use the Touch-screen slide to scroll to the
MMS, you wish to read, by clicking the "Options", you can carry out the following
operations on the current MMS.
!Download: to download the current MMS content (if the MMS is not download to
the phone).
!View: to look over the current MMS content.
!Reply: to edit the MMS to reply sender, at the same time, subject change to
"Re:" and old subject.
!Reply by SMS: to edit the SMS to reply sender
!Reply all: to edit the MMS to reply all, at the same time, subject change to
"Re:" and old subject.
!Forward: to edit the correlative message to forward the current MMS, at the
same time, subject change to "Fw:" and old subject.
!Delete: to delete the current MMS.
!Delete All: to delete all the MMS in the inbox.
!Properties: to can look over the sender's number, subject, and sent time and
date, MMS Size and so on.
!Use Details: to pick up the number of sender and the bookmarks of content. you
can Dial the number or Save To Phone Book, also you can Goto the bookmarks or
add bookmarks.

- 19 -
4.6.3 Drafts
Text message
In the Outbox list interface, select a message, Click the “option”, you can make
the following operation.
!View to view the current message
!Send to send the current message
!Edit to edit the current message.
!Delete to delete the current message.
!Delete all to delete all message in “Drafts”
Multimedia message
Boxes in the Outbox list interface, select an MMS, Click the “option ,you can
make the following operation.
!Send: Send the article MMS.
!Play: Play the article MMS.
!Editor: enter the MMS editing interface, you can edit the MMS.
!Delete: Delete the clause MMS.
!Delete all: Delete the mailbox has not made all of the information.
4.6.4 Outtbox
Enter the “Outbox” submenu to view the short messages (saved in the SIM card
and owner phone) in the mobile phone. After the “Outbox” short message list appears,
you can use the Touch-screen slide to select the short message; click the“Ok” to read
the detailed contents of the selected short messages. At this time you may also click
“Options” to perform the following functions:
!View to view the current message
!Resend to send the current message.
!Edit to edit the current message.
!Delete to delete the current short message.
!Delete All to delete all the messages in “Outbox”
4.6.5 Sent messages
This mailbox store has send a message
4.6.6 Delete messages
Can be removed separately Inbox, Outbox, Sent messages, drafts or all of the
information to remove all of the information.
4.6.7 Broadcast message
In this menu you can use the broadcast message.
4.6.8 Templates
Text message
Click the “ok” to enter information template list, can edit or remove the template
message or Write Message.
Multimedia message
Click the "Ok" to enter information template list, can View it , Properties and
Write Message
4.6.9 Message settings

- 20 -
Text message
When using the short message function you must first make the necessary
settings.
Enter the “Message Settings” submenu to select operate as follows:
!Profile Setting Please contact your network provider to get the SC
Address. Profile list have one profile, two profiles and four
profiles because the different network supports and SIM card.
Select one Profile, press the left soft key “Edit”, can set the
Profile Name, SC Address, Valid Period and Message Type.
During Valid Period, the short message service centre will
continuously resend a message until it is received. The message
Valid Period is applicable for all sent messages. You can set the
message Valid Period as any of the following: “1 hour”, “6
hours”, “12 hours”, “1 day”, “3 days”,“1 Week” or “maximum”.
The network operators must support this function for it to be
available. Message Type can select the Text, Fax, Page, E-mail
by the left/right keys.
Note: Message Valid Perid, Fax, Page and E-mail need support by the
network operator.
!Common Setting to set On/Off to the Delivery Report. If you set it as
“On”, then when the recipient receives your short message, or if
the short message is not received for some reason, the short
message centre will send a status report so that you can see whether
the message has been delivered.
Note: The network operator must support this function for it to be
available.
!Memory Status to display the memory by n/m form in the SIM card
and phone, thereinto, “n” denote the current memory message, “m”
denote the most message capability in the SIM card or phone. Your
mobile-phone can save 200 items( include Inbox and Outbox) SMS
at most. SMS numbers are decided with SIM card capability in
the SIM card.
!Preferred Storage to select to save the messages to “SIM” or “Phone”.
Multimedia message
The user must make the necessary settings in order to use the multimedia
message.
Enter the "MMS Settings" submenu and make the following settings:
Profiles
You can Activate profile and View profile.
Common settings
Enter the “common setting”submenu and make the following settings:
"Compose: include Creation Mode, Image Resizing and Auto
Signature.
"Sending: include Validity period, Delivery report, Read report,
Table of contents
Other Bmobile Cell Phone manuals

Bmobile
Bmobile AX1015 User manual

Bmobile
Bmobile K340 User manual

Bmobile
Bmobile AX1045e User manual

Bmobile
Bmobile AX Series User manual

Bmobile
Bmobile AX Series User manual

Bmobile
Bmobile AX922 User manual

Bmobile
Bmobile AX Series User manual

Bmobile
Bmobile TV350 User manual

Bmobile
Bmobile K373 User manual

Bmobile
Bmobile QS720 User manual

Bmobile
Bmobile W125K User manual

Bmobile
Bmobile FUN4 User manual

Bmobile
Bmobile AX series User manual

Bmobile
Bmobile AX1070 User manual

Bmobile
Bmobile AX Series User manual

Bmobile
Bmobile AX Series User manual

Bmobile
Bmobile QW125 User manual

Bmobile
Bmobile AX705 User manual

Bmobile
Bmobile A5005 User manual

Bmobile
Bmobile C450 User manual


