Boahaus 1609 User manual
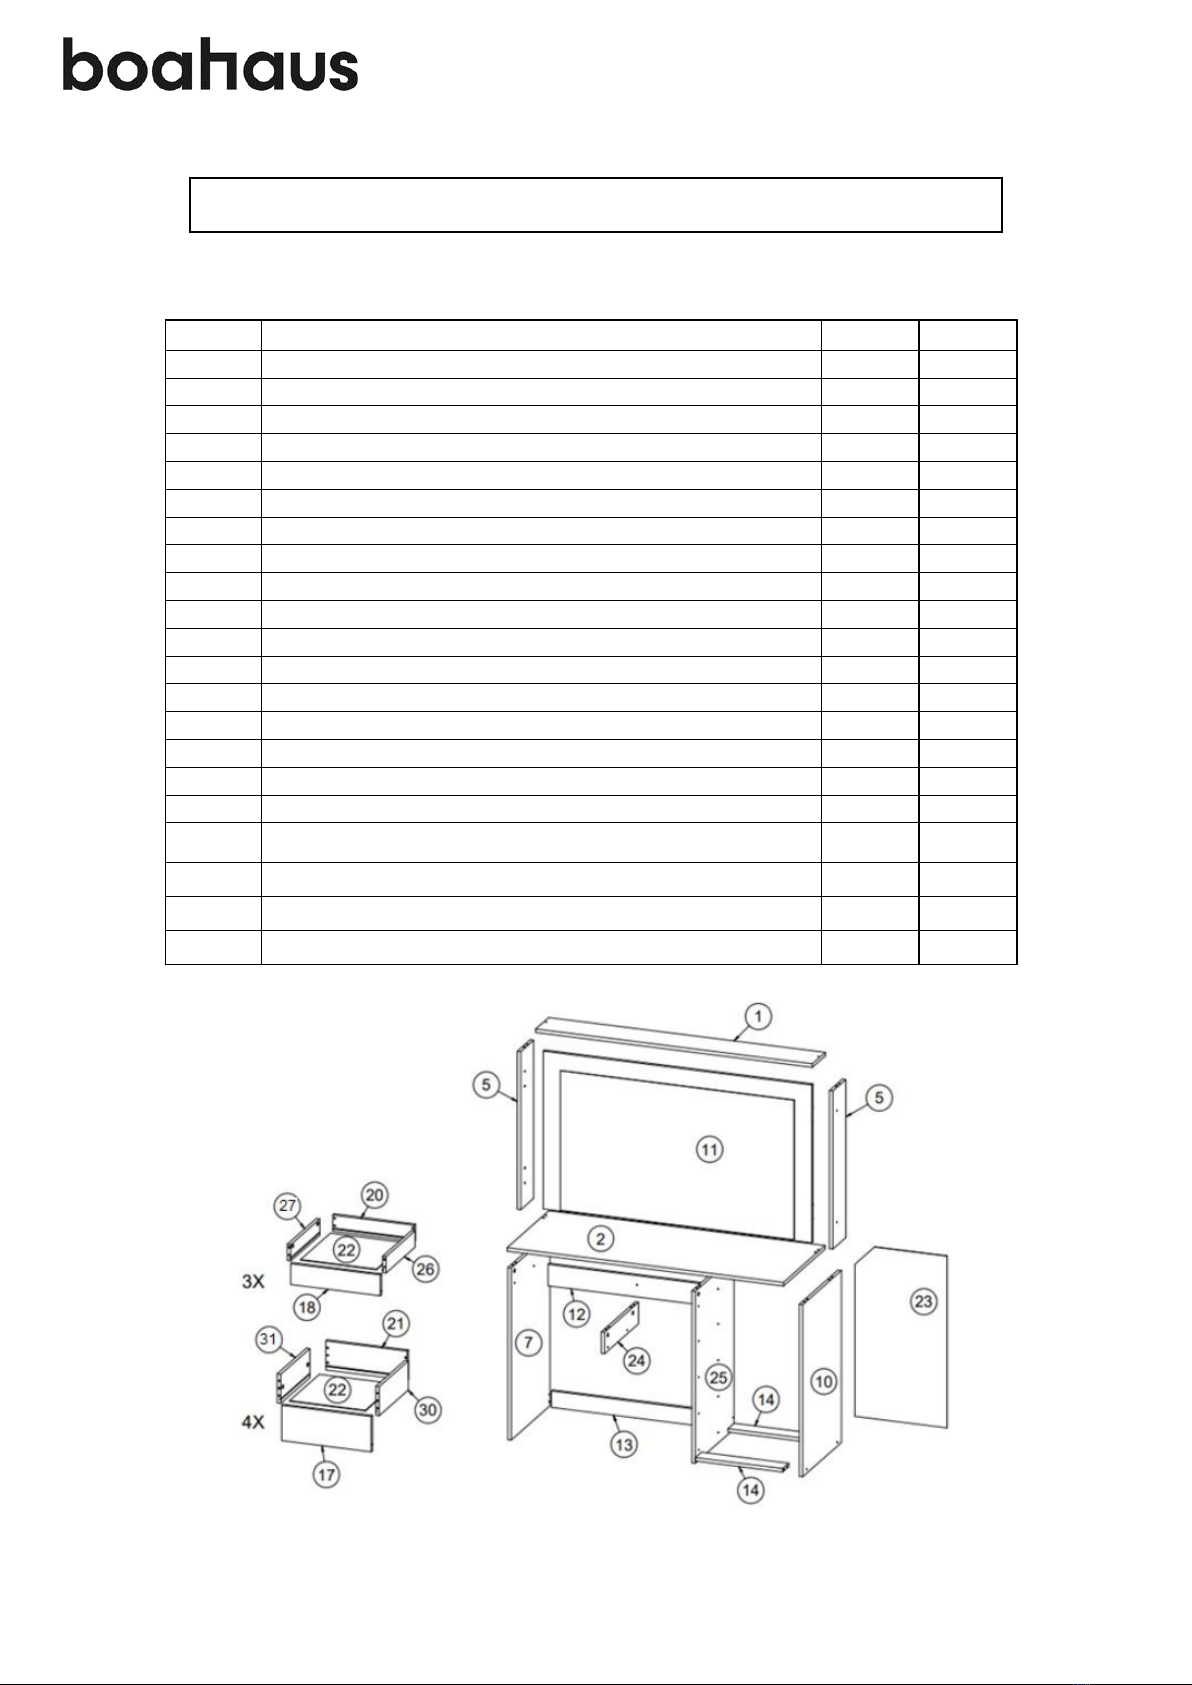
MODEL 1609
www.boahaus.com
2
ASSEMBLY INSTRUCTIONS
INSTRUCCIONES DE ARMADO
MODEL #: 1609
DRESSING TABLE WITH MIRROR
Tocador con Espejo
Aprox. product weight 105.02 lbs. / 47,71 Kg. *
You can see the ASSEMBLY VIDEO scanning this QR code.
Or enter the following link:
https://youtu.be/pOrLatP8j3U
THIS INFORMATION BOOKLET CONTAINS IMPORTANT SAFETY INFORMATION. PLEASE READ AND KEEP FOR FUTURE REFERENCE.
ESTE FOLLETO CONTIENE INFORMACIÓN DE SEGURIDAD IMPORTANTE. POR FAVOR, LEA Y GUÁRDELO PARA REFERENCIA FUTURA.

MODEL 1609
www.boahaus.com
3
GENERAL SAFETY INFORMATION
1. Please read the Assembly Instructions prior to assembling this product.
2. Remove all the hardware from the box and sort by type.
3. Check to see that all the hardware and parts are present BEFORE assembling.
4. To avoid damage, assemble the product on a sturdy, level, and protective surface.
5. Please wait until all steps are completed before fully tightening bolts.
6. Make sure all bolts are tightly fastened before the unit is used.
7. To move the product, you must lift it. DO NOT drag it, if you drag it can cause overturning.
8. This product is sold with a hardware kit to be fixed on the wall. You must install this kit to prevent
any accidents or damages. When properly installed, this restrain can provide protection against
the unexpected tipping of the unit due to smalls tremors, bumps or climbing. The restrain is only
a deterrent and is not a substitute for proper adult supervision. Use of tip-over restraints may
only reduce, but not eliminate, the risk of tip-over
INFORMACIÓN GENERAL DE SEGURIDAD
1. Lea las instrucciones de armado antes de ensamblar este producto.
2. Extraiga todo el hardware de la caja y ordene por tipo.
3. Verifique que todo el hardware y las piezas están presentes ANTES de ensamblar.
4. Para evitar daños, ensamble el producto sobre una superficie resistente, nivelada y conprotección.
5. Espere hasta que todos los pasos se hayan completado antes de apretar completamente los
tornillos y accesorios.
6. Asegúrese de que todos los tornillos y accesorios estén bien apretados antes de usar la unidad.
7. Para mover el producto debe levantarlo. NO lo arrastre, si lo arrastra puede causar volcamiento.
8. Este producto se vende con un kit de accesorios para ser fijado en la pared. Debe instalar este kit
para evitar accidentes o daños. Cuando se instala correctamente, esta restricción puede
proporcionar protección contra la inclinación inesperada de la unidad debido a temblores
pequeños, golpes o al treparse. La restricción es solo un elemento disuasivo y no es un sustituto
de la supervisión adecuada de un adulto. El uso de restricciones de vuelco solo puede reducir,
pero no eliminar, el riesgo de volcarse.

MODEL 1609
www.boahaus.com
4
Note: Place a carpet or blanket in the assembly area to avoid damage to the parts during the process.
Nota: Colocar una alfombra o manta en el area de armado para evitar daños en las piezas durante el proceso.
General Dimensions / Dimensiones Generales
You will need / usted necesitará:
Tools not included / herramientas no incluidas
2 people
2 personas
Recommended space for assemble
Espacio recomendado para el armado
Maximum weight supported
Peso máximo soportado
Weight in pounds. / Peso en libras.
Note: weight must be evenly distributed.
Nota: el peso debe estar distribuido
uniformemente.

MODEL 1609
www.boahaus.com
5
Nº
DESCRIPTION - DESCRIPCIÓN
QTY.
BOX
1
Top tray / Travesaño superior
1
2/2
2
Top base / Base superior
1
2/2
5
Side tray / Travesaño lateral
2
1/2
7
Left side / Lateral izquierdo
1
1/2
10
Right side / Lateral derecho
1
1/2
11
Mirror / Espejo
1
2/2
12
Crossbeam / Travesaño
1
1/2
13
Large footer / Zócalo grande
1
1/2
14
Small footer / Zócalo pequeño
2
1/2
17
Front of large drawer / Frontal de cajón grande
4
1/2
18
Front of small drawer / Frontal de cajón pequeño
3
2/2
20
Rear of small drawer / Posterior de cajón pequeño
3
1/2
21
Rear of large drawer / Posterior de cajón grande
4
1/2
22
Bottom of drawer / Fondo de cajón
7
1/2
23
Backboard / Fondo
1
1/2
24
Drawer divide support / Divisoria soporte cajón
1
1/2
25
Division / División
1
1/2
26
Side of the small right drawer / Lateral de cajón pequeño derecha
3
1/2
27
Side of the small left drawer / Lateral de cajón pequeño izquierda
3
1/2
30
Right side of large drawer / Lateral derecho de cajón grande
4
1/2
31
Left side of large drawer / Lateral izquierdo de cajón grande
4
1/2
PARTS IDENTIFICATION / IDENTIFICACION DE PARTES

MODEL 1609
www.boahaus.com
6
Note: the separation of the accessories before starting the assembly will facilitate it.
Nota: la separación de los accesorios antes de empezar el armado facilitará el mismo.
IDENTIFICATION OF ACCESSORIES / IDENTIFICACION DE ACCESORIOS
NUMBER
DESCRIPTION
QTY
A
Wooden dowel / Pin (6 x 30 mm)
64
AS
Wooden dowel / Pin (6 x 50 mm)
2
AZ
Allen key / Llave allen
1
B
Simple minifix screw / Tornillo minifix simple
22
C
Drum lock / Tambor minifix
22
CR1
Metallic left slide 350mm / corredera lateral izquierda
350mm
7
CR2
Metallic right slide 350 mm / Corredera lateral derecha
350mm
7
CR3
Left drawer slide 350mm / Corredera cajón izquierda
350mm
7
CR4
Right drawer slide 350 mm/ Corredera cajón derecha
350 mm
7
D
Flat head screw / Tornillo cabeza plana (3,5 x 14 mm)
78
DE
Screw / Tornillo cabeza plana (4,5 x 50 mm)
2
DZ
Structural screw / Tornillo estructural (5 x 50 mm)
31
EN
Nail / Clavo
23
FM
Adhesive bore patch / Tapón adhesivo
31
L
Drywall Anchor / Anclaje de pared
2
PX
Handle / Tirador
7
Q
Metallic angle plates / Soporte de metal
2

MODEL 1609
www.boahaus.com
9
1Fix wooden dowel (A) to crossbeam (12) and large footer (13).
Fijar pin (A) a travesaño (12) y zócalo grande (13).
2Fix wooden dowel (A) to small footer (14) x2.
Fijar pin (A) a zócalo pequeño (14) x2.
PRE-ASSEMBLY / PRE- ARMADO
Note: this hole IS NOT
PRE-DRILLED and must
be made with the
hammer and the nail.
Nota: este agujero NO
ESTÁ PRE-HECHO y
deben hacerse con el
martillo y el clavo
correspondiente.

MODEL 1609
www.boahaus.com
10
3Fix simple minifix screw (B) to top base (2).
Fijar tornillo minifix simple (B) a base superior (2).
4Fix wooden dowel (A), metallic left slide (CR1) and plastic foot (X) to left side (7).
Fijar pin (A), corredera lateral izquierda (CR1) y pie plástico (X) a lateral izquierdo(7).

MODEL 1609
www.boahaus.com
11
5Fix wooden dowel (A) to sides of drawer (30/31) x4 and side drawer (26/27) x3
Fije pin (A) al lateral del cajón grande (30/31) x4 y al lateral del cajón pequeño (26/27) x3
6Fix wooden dowel (A) to rear of large drawer (21)x4 and rear of small drawer (20)x3
Fije el pin (A) al posterior de cajón grande (21)x4 y al posterior de cajón pequeño (20)x3

MODEL 1609
www.boahaus.com
12
7Fix simple minifix screw (B) to front of large drawer (17) x4 and front of small drawer (18) x3.
Fijar tornillo minifix simple (B) a frente de cajón grande (17) x4 y frente de cajón pequeño (18)x3
8Fix wooden dowel (A), metallic right slide (CR2) to drawer divide support (24). Flip drawer divide
support (24) and fix metallic left slide (CR1).
Fijar pin (A), corredera lateral derecha (CR2) a divisoria soporte cajón (24). Voltear divisoria
soporte cajón (24) y fijar corredera lateral izquierda (CR1).

MODEL 1609
www.boahaus.com
14
11Fix wooden dowel (A), metallic left slide (CR1) to division (25). Flip division (25) and fix metallic
right slide (CR2) and plastic foot (X).
Fijar pin (A), corredera lateral izquierda (CR1) a división (25). Voltear división (25) y fijar corredera
lateral derecha (CR2) y pie plástico (X).

MODEL 1609
www.boahaus.com
18
17Fix crossbeam (12) and large footer (13) to left side (7) and division (25).
Fijar travesaño (12) y zócalo grande (13) a lateral izquierdo (7) y división (25).
18Fix small footer (14) x2 and right side (10) to previous assembly.
Fijar zócalo pequeño (14) x2 y lateral derecho (10) a ensamble previo.

MODEL 1609
www.boahaus.com
19
19 Fix both previous assemblies (16 and 18).
Fijar ambos ensambles previos (16 y 18).
20 Fix backboard (23) and metallic angle plates (Q) to previous assembly.
Fijar fondo (23) y soporte de metal (Q) a ensamble previo.
EN D Q
x8 x2
Note: these holes
ARE NOT PRE-
DRILLED and must
be made with the
screwdriver and the
corresponding
screw.
Nota: estos agujeros
NO ESTAN PRE-
HECHOS y deben
hacerse con el
destornillador y el
tornillo
correspondiente.

MODEL 1609
www.boahaus.com
20
21 Fix side of drawer (30/31) and bottom of drawer (22) to rear of drawer (21)
Fijar lateral de cajón central (30/31) y fondo de cajón (22) a trasero de cajón (21)
22Fix front large drawer (17) x4 and handle (PX) x4 to previous assembly.
Fijar frente del cajón grande (17) x4 y tirador (PX) x4 a ensambleprevio.
C PX
x8
D
x4 x8
DZ
AZ
Table of contents
Other Boahaus Indoor Furnishing manuals

Boahaus
Boahaus 2204 User manual

Boahaus
Boahaus 1612 User manual

Boahaus
Boahaus 4203 User manual

Boahaus
Boahaus 1617 User manual

Boahaus
Boahaus Oregon User manual

Boahaus
Boahaus 1623 User manual

Boahaus
Boahaus 1619 User manual

Boahaus
Boahaus 1609-L User manual

Boahaus
Boahaus 3108 User manual

Boahaus
Boahaus 1643 User manual

Boahaus
Boahaus 2105 User manual

Boahaus
Boahaus 3101 User manual

Boahaus
Boahaus 2505 User manual

Boahaus
Boahaus 2305 User manual

Boahaus
Boahaus 1603 User manual

Boahaus
Boahaus 1601 User manual

Boahaus
Boahaus 1605 User manual

Boahaus
Boahaus 4207 User manual

Boahaus
Boahaus 1606 User manual

Boahaus
Boahaus 1631 User manual