Body Armor 4x4 GM-19340 User manual

ECO-SERIES FRONT WINCH BUMPER
2015-2016 SILVERADO 2500/3500
# GM-19340
Body Armor 4x4
272 Corporate Terrace St.
Corona, CA 92879
951-808-0750
Customer Service hours:
M-TH: 7:30am to 4:30 PM Pacific Time
Friday: 8 AM –Noon Pacific Time

ECO-SERIES FRONT WINCH BUMPER
2015-2016 SILVERADO 2500/3500
Page 1 of 6 10/31/16 (DP)
PARTS LIST:
1
HD Front bumper
6
10mm x 30mm x 2.5mm Flat Washers
1
Winch Tray/Bracket Assembly
6
10mm Lock Washers
2
LH Lower Support Brackets
6
10mm Hex Nuts
2
RH Lower Support Brackets
2
8-1.25mm x 16mm Hex Bolts
1
License Plate bracket
2
8-1.25mm x 25mm Hex Bolts
2
Plastic Plugs for License Plate
2
8mm Hex Nut
4
Rubber Sensor Hole Block Offs
4
8mm Lock Washer
10
Nylon Cable Ties 200mm
6
8mm x 24mm x 2mm Flat Washers
1
“L” Light bracket driver side
2
6mm x 20mm Button Head Screw
1
“L” Light bracket passenger side
2
6mm Nylon Lock Nuts
2
12-1.75mmx130mm Hex Bolts
4
6mm x 12mm x 1.2mm Flat Washers
4
12-1.75mm x 35mm Hex Bolts
1
6mm Allen Wrench
12
12mm x 24mm OD x 2.5mm Flat Washers
8
4mm x 10mm Button Head Screws
6
12mm Lock Washers
1
4mm Allen Wrench
6
12mm Hex Nuts
PROCEDURE:
REMOVE CONTENTS FROM BOX. VERIFY ALL PARTS ARE PRESENT. READ INSTRUCTIONS
CAREFULLY BEFORE STARTING INSTALLATION. BUMPER IS HEAVY, ASSISTANCE IS
HIGHLY RECOMMENDED TO AVOID POSSIBLE INJURY OR DAMAGE TO THE VEHICLE.
1. Open the hood and remove the plastic cover on top of the radiator and the grille, (Figure 1).
Temporarily remove the plastic grille.
2. Remove the license plate and bracket. On models with factory fog lights, unplug both lights.
On models with bumper mounted sensors, unplug all sensors. Release the wiring harnesses
from the clips attached to the back of the bumper and move all wiring harnesses away from
bumper.
License Plate Bracket
(2) D Rings
(2) License
Plate Plugs
(4) Sensor Plugs
Left and Right Bar
Light “L” Brackets
Left and Right
Support Brackets
Left and Right
Support Brackets

ECO-SERIES FRONT WINCH BUMPER
2015-2016 SILVERADO 2500/3500
Page 2 of 6 10/31/16 (DP)
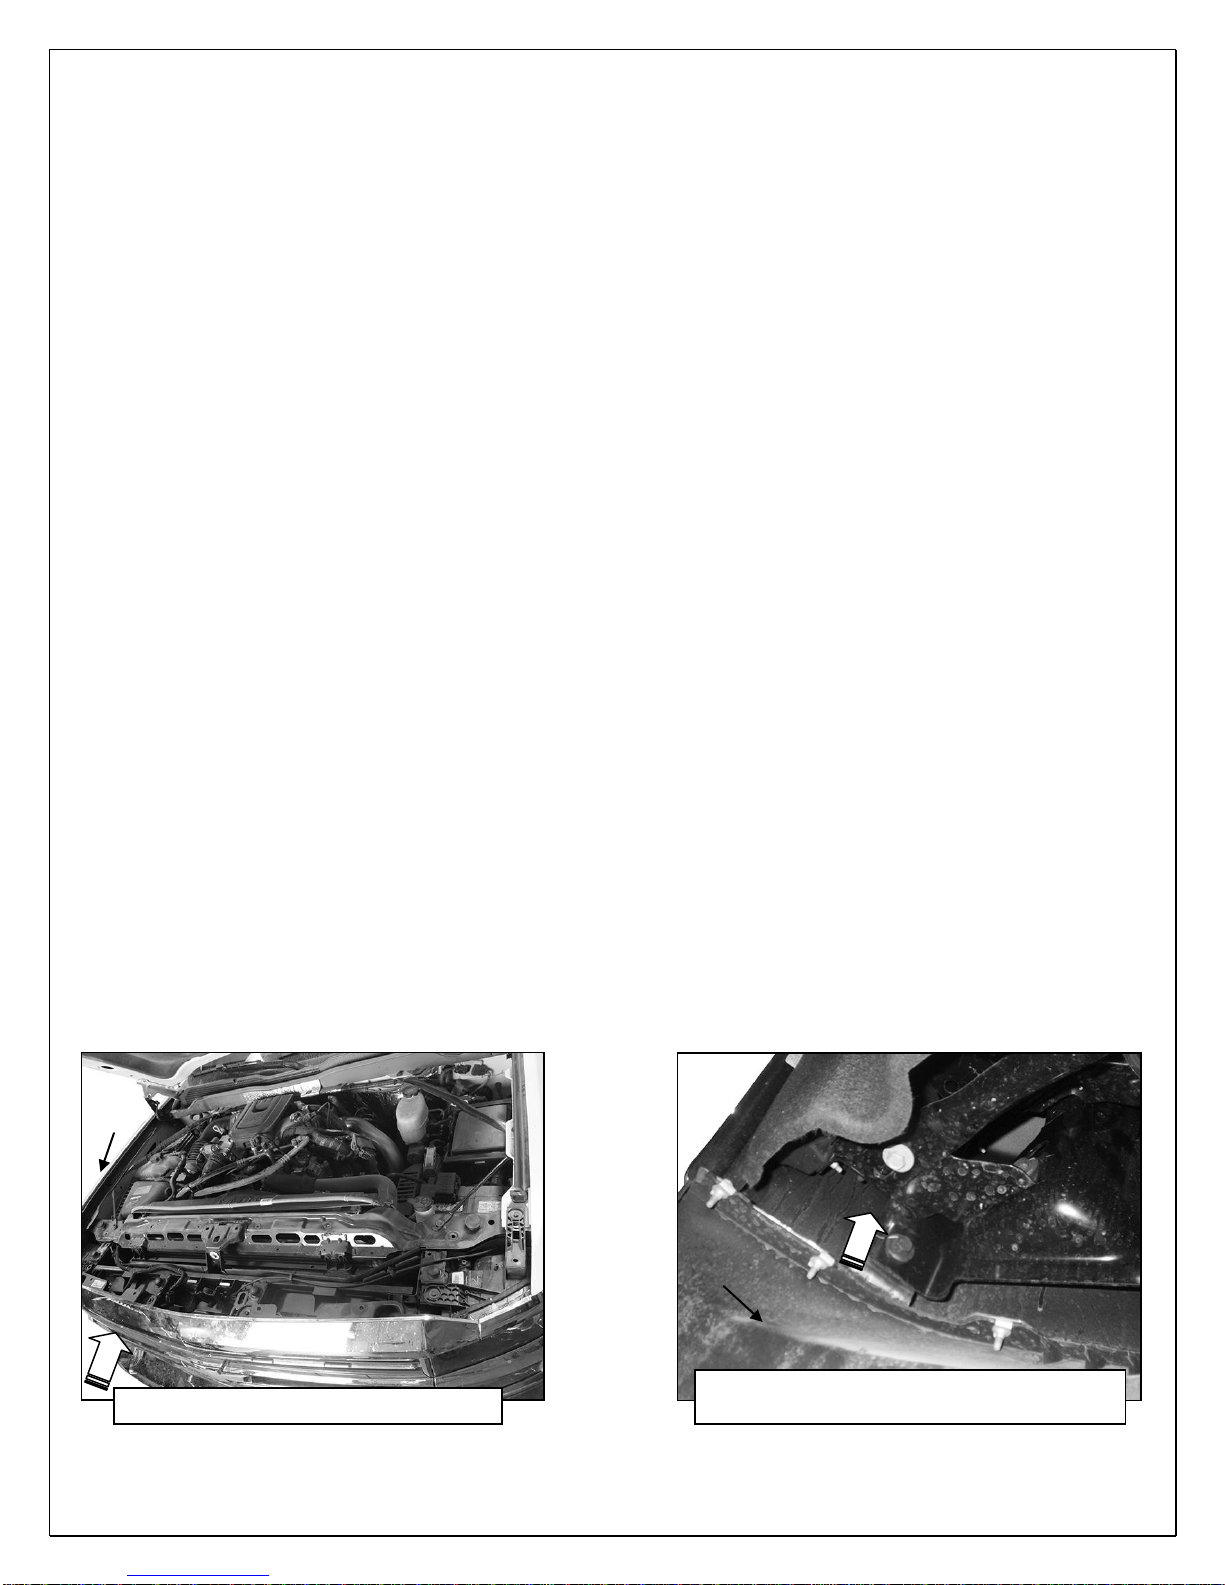
3. Release the rubber air deflector from the back of the bumper, if equipped, and remove it from
vehicle. Next, remove the hardware at each end of the bumper attaching the bumper supports
to each side of the frame, (Figure 2).
4. Place blocks or jack stands under the front bumper to support it during mounting bolt removal.
Once the bumper has been supported, remove the lower bumper bolts attaching the inner
bumper bracket to the frame bracket. Next, from above the bumper, remove the (2) bumper
bolts from each side, (Figure 3).WARNING! Assistance is required to hold the bumper in
place during bolt removal to prevent the bumper from falling. Remove the bumper assembly.
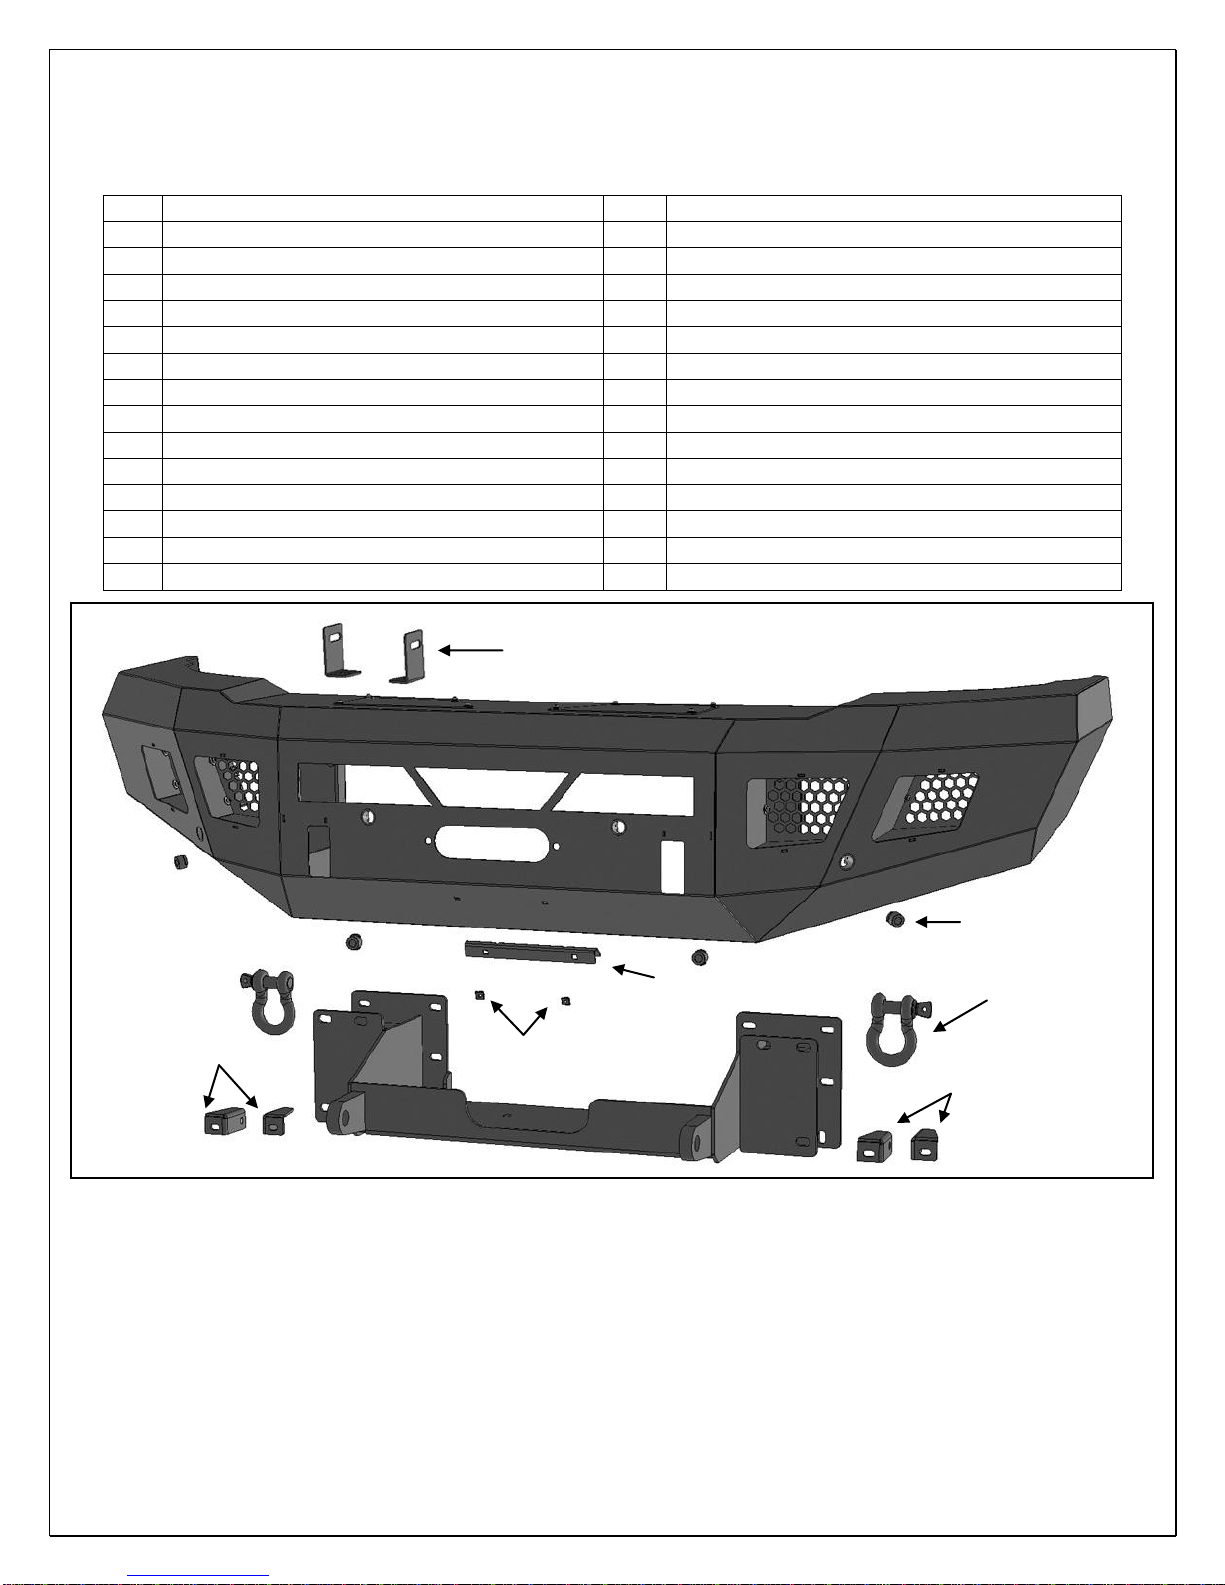
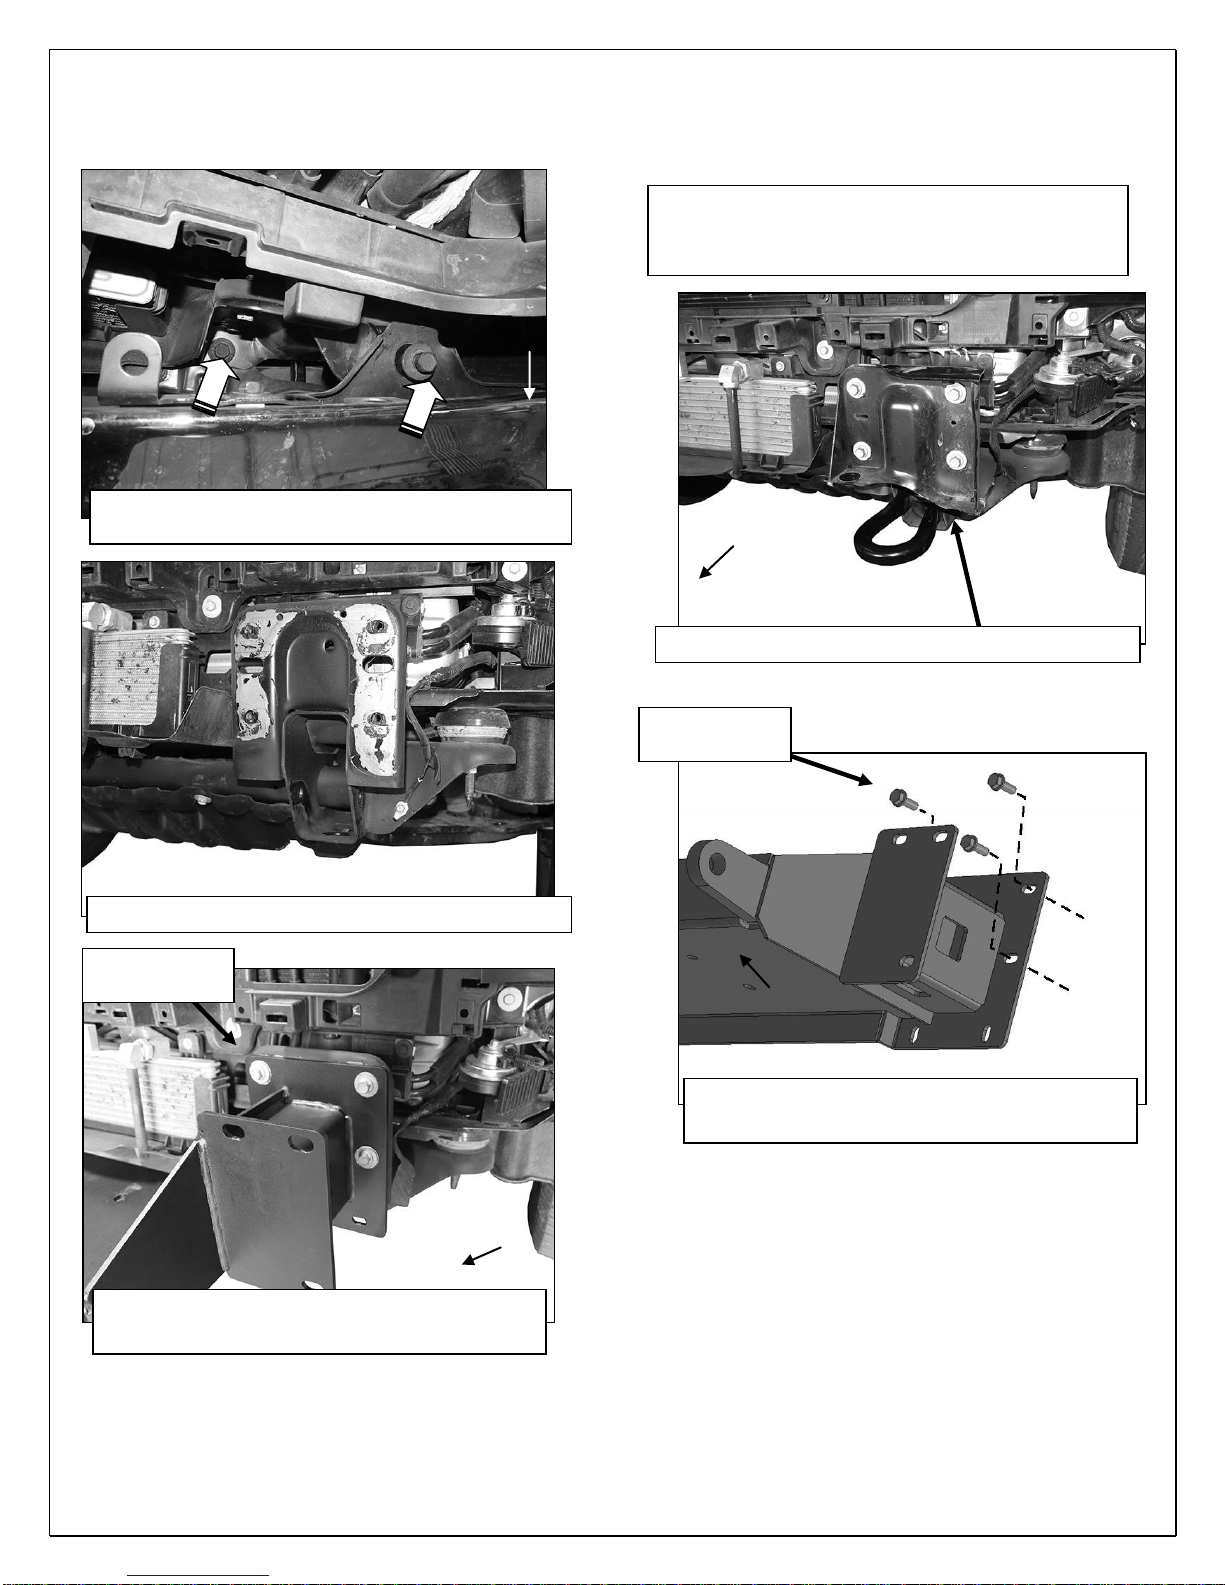
5. Remove the factory bumper brackets from the ends of frame, (Figure 4). Save the (8) hex
bolts for reuse. Remove both tow hooks, (Figure 5). NOTE: Tow hooks cannot be reinstalled.
6. Select the Winch Plate/Bracket assembly. Reuse the (8) factory bumper bracket bolts to attach
the Winch Tray assembly to the ends of the frame, (Figures 6 & 7). Snug but do not fully
tighten hardware at this time.
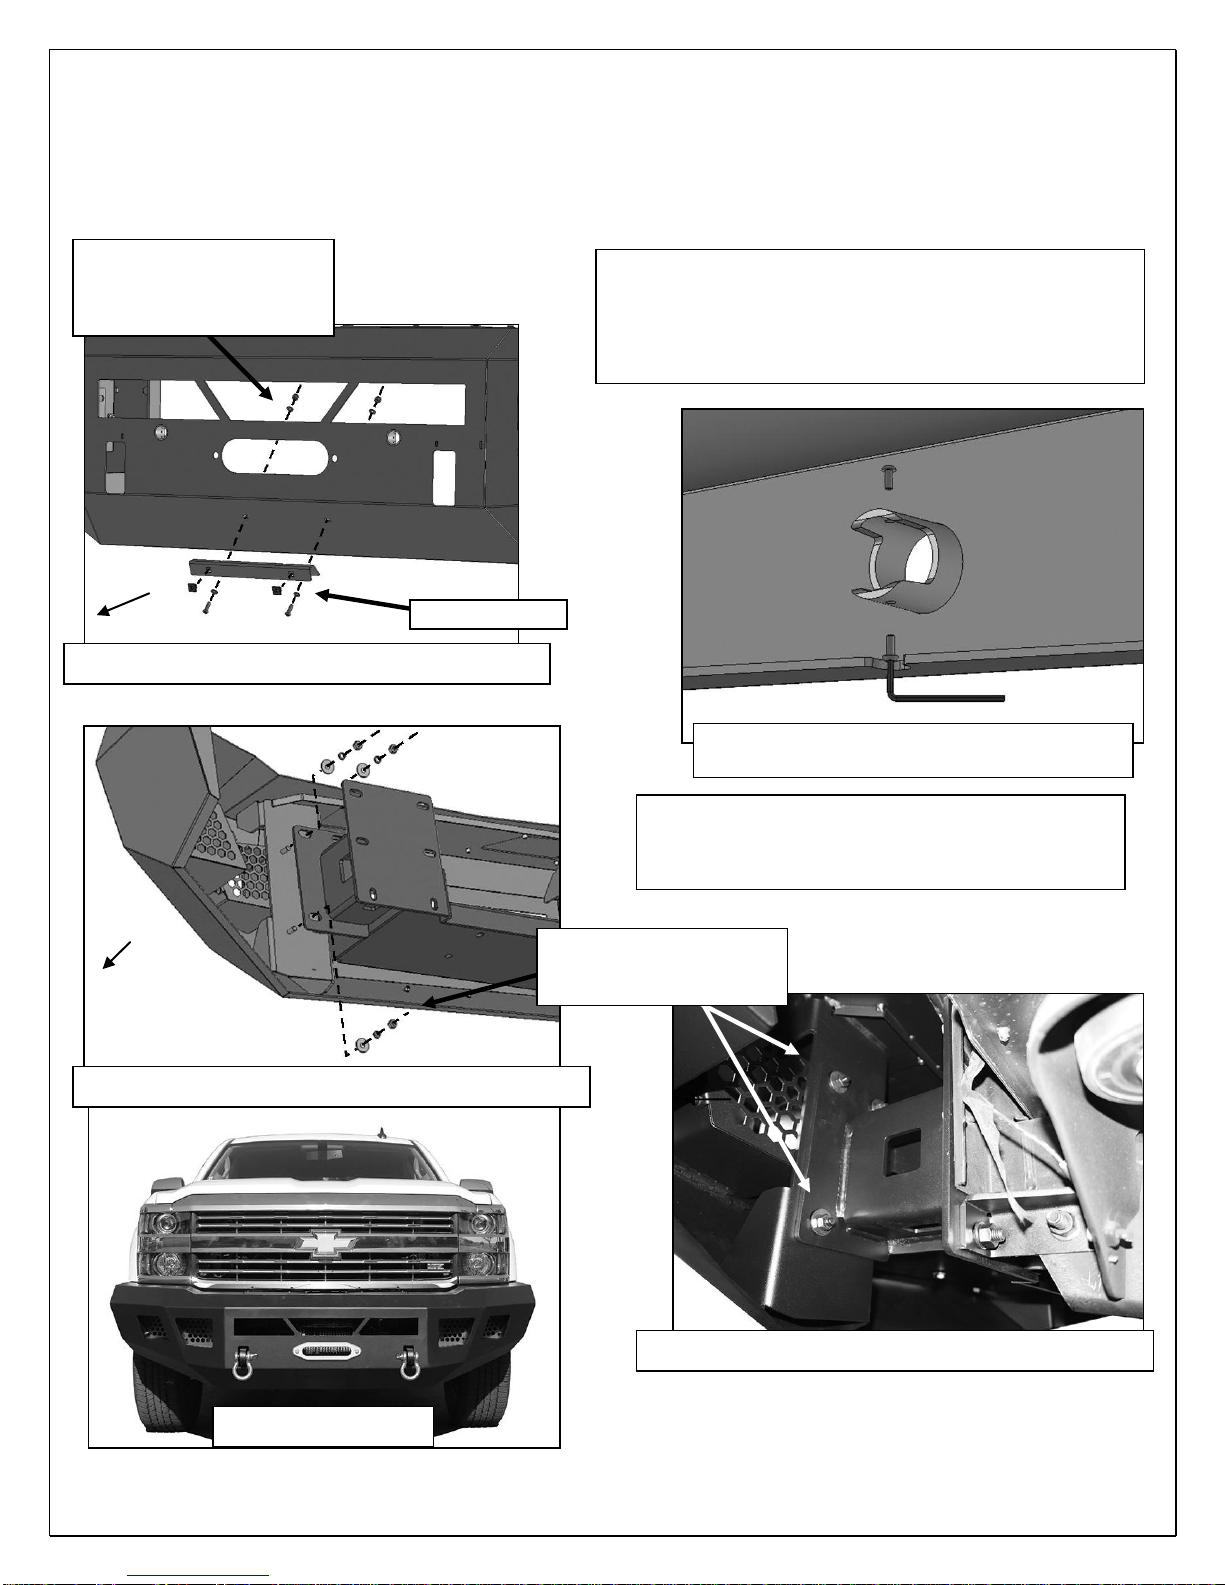
7. Next, select (1) Inner and (1) outer lower support bracket. Attach the Support Brackets to the
bottom mounting holes in the mounting plate on the Winch Tray with (2) 12mm x 35mm Hex
Bolts, (4) 12mm Flat Washers, (2) 12mm Lock Washers and (2) 12mm Hex Nuts, (Figure 8).
Do not fully tighten hardware at this time.
8. Line up the holes in the Support Brackets with the hole through the frame for the tow hook bolt.
Insert (1) 12mm x 130mm Long Hex Bolt with (1) 12mm Flat Washer through the outer support
bracket, the frame and inner support bracket. Secure the Brackets to the frame with (1) 12mm
Flat Washer, (1) 12mm Lock Washer and (1) 12mm Hex Nut, (Figures 8—10). Snug but do
not fully tighten hardware at this time.
9. Repeat Steps 7 & 8 to install the passenger side Inner and Outer Support Brackets.
10.If installing winch, (not included), attach the winch to the Winch Tray at this time. Winch must
be installed before Bumper is placed in position against Brackets. NOTE: It also may be easier
to attach winch cable guide to Bumper assembly at this time. Follow manufacturer’s
instructions to properly attach the winch to the vehicle’s electrical system.
11.Optional Center LED light installation, (sold separately). NOTE: Light must be installed in
Bumper before Bumper Assembly is attached to the Winch Tray and Brackets. IMPORTANT:
Clearance between the bar style LED light and the winch and/or winch tray must be
determined before installing Bumper assembly.
a. Select the L/R “L” Brackets, (Figure11). NOTE: “L” Brackets are offset for universal fitment
for most LED bar style lights. Attach the LED light assembly to the “L” Brackets with the
included (2) 8mm x 16mm Hex Bolts, (2) 8mm Lock Washers and (2) 8mm Flat Washers,
(Figure 11). Do not fully tighten hardware at this time. NOTE: “L” Brackets may require
modification for hardware larger than 8mm or use brackets supplied with light if possible.
b. Attach the light and brackets to the top of the (2) tabs on the back of the Bumper with the
included 8mm x 25mm Hex Bolts, (4) 8mm Flat Washers, (2) 8mm Lock Washers and (2)
8mm Hex Nuts, (Figure 11). Adjust light position and tighten hardware.
c. Follow light manufacturer’s instructions to wire the light to the vehicle’s electrical system
once Bumper has been fully installed.
12.LED light installation at ends of bumper (sold separately.
a. Insert light into opening and up to mounting slots. Check for clearance between front and
back of light. If necessary, remove the screens from the back of the openings, (Figure 12).
NOTE: Screens must be removed before Bumper is installed.
b. Follow the light manufacturer’s instructions to attach each light to slot in the top of the light
opening. NOTE: On two light systems, attach the flood light to the outer slot and the spot
light to the inner slot.
c. Repeat the above steps for passenger side light installation.

ECO-SERIES FRONT WINCH BUMPER
2015-2016 SILVERADO 2500/3500
Page 3 of 6 10/31/16 (DP)
d. Follow light manufacturer’s instructions to adjust and properly wire the light to the vehicle
electrical system.
13.If front license plate is required, attach the License Plate Bracket to the holes in the bumper
with the included (2) 6mm x 20mm Button Head Screws, (4) 6mm Flat Washers and (2) 6mm
Nylon Lock Nuts, (Figure 13). Insert (2) Plastic Plugs into the square holes in the Bracket.
Reuse the factory screws to attach the license plate to the plastic plugs.
14.NOTE: It may also be easier to install sensors, (if equipped), before installing the Bumper.
Models without bumper sensors:
a. Select the included (4) Rubber Plugs.
b. From behind bumper, push plugs into sensor mounting holes, (Figure 14).
Models with bumper mounted sensors:
a. Push the sensor into the mounting socket in the back of the bumper.
b. Secure each sensor to the socket with (2) 4mm x 10mm Button Head Screws, (Figure 14).
IMPORTANT: Sensors fit snug in sockets. The 4mm Screws are used to apply slight
pressure to lock the sensors in place. Tighten both screws evenly until they touch the
sensor body only. Do not overtighten screws or damage to sensors will result.
15.With assistance, position the Bumper Assembly up to the mounting plate on the Winch Tray.
Temporarily support the weight of the Bumper. WARNING: To avoid possible injury or damage
to the vehicle, do not proceed until the Bumper is fully and safely supported.
16.Line up the (3) studs in the driver side mounting plate on the inside of the Bumper with the (3)
slots in the Frame Bracket. Attach the Bumper to the Bracket with the included (3) 10mm Flat
Washers, (3) 10mm Lock Washers and (3) 10mm Hex Nuts, (Figures 15 & 16). Do not fully
tighten hardware at this time. Repeat this Step to attach the passenger side mounting plate to
the Frame Bracket.
17.Level and adjust the bumper and fully tighten all hardware. NOTE: It may be necessary to
temporarily remove the outer bumper assembly to shift the inner Winch Tray/Bracket assembly
left or right for more adjustment. Once properly adjusted, fully tighten the Winch Tray/Bracket
assembly hardware first, then reinstall the outer Bumper assembly and fully tighten the
Bumper mounting hardware.
18.Do periodic inspections to the installation to make sure that all hardware is secure and tight.
To protect your investment, wax this product after installing. Regular waxing is recommended to add a
protective layer over the finish. Do not use any type of polish or wax that may contain abrasives that could
damage the finish. Mild soap may be used to clean the HD Front Bumper assembly.
Driver Side Installation Pictured
Front
(Fig 2) Remove bumper supports attaching
outer end of bumper to frame (arrow)
Front
(Fig 1) Remove plastic cover and grille

ECO-SERIES FRONT WINCH BUMPER
2015-2016 SILVERADO 2500/3500
Page 4 of 6 10/31/16 (DP)
Driver Side Installation Pictured
(Fig 6) Reuse factory bumper bolts to attach
Winch Tray Bracket Assembly to end of frame
Front
WARNING! Do not remove bumper bolts
unless the bumper is properly supported on
blocks or stands or the bumper may fall.
(Fig 4) Remove bumper brackets and tow hooks
(4) Factory
bumper bolts
Front
(Fig 3) Remove bumper bolts (arrows) to remove
bumper (driver side pictured from above)
Front
(Fig 5) Remove bumper brackets and tow hooks
(4) Factory
bumper bolts
Front
(Fig 7) Reuse factory bumper bolts to attach
Winch Tray Bracket Assembly to end of frame

ECO-SERIES FRONT WINCH BUMPER
2015-2016 SILVERADO 2500/3500
Page 5 of 6 10/31/16 (DP)
Driver side installation pictured
12mm x 130mm Hex Bolt
(2) 12mm Flat Washers
12mm Lock Washer
12mm Hex Nut
(Fig 9) Slide12mm x 130mm Hex Bolt with Flat
Washer through the Support Brackets and frame
(2) 12mm x 35mm Hex Bolts
(4) 12mm Flat Washers
(2) 12mm Lock Washers
(2) 12mm Hex Nuts
(Fig 8) Attach inner and outer driver side Support
Brackets to back of Winch Tray mounting Bracket
(Fig 10) Driver/left side of Winch tray
bracket attached to end of frame
Front
Front
Front
(2) 8mm x 16mm Hex Bolts
(2) 8mm Lock Washers
(2) 8mm Flat Washers
(Fig 11) Example of
center light installation
Front
(2) 8mm x 25mm Hex Bolts
(4) 8mm Flat Washers
(2) 8mm Lock Washers
(2) 8mm Hex Nuts
Right “L”
Bracket
Left “L”
Bracket
(Fig 12) Remove screens if necessary for
clearance/access to outer light mounts

ECO-SERIES FRONT WINCH BUMPER
2015-2016 SILVERADO 2500/3500
Page 6 of 6 10/31/16 (DP)
IMPORTANT: Sensors fit snug in sockets. The 4mm
Screws are only used to apply slight pressure to lock
the sensors in place. Tighten both screws evenly until
they touch the sensor body only. Do not overtighten
screws or damage to sensors will result.
Driver side installation pictured
(Fig 14) Push sensor into mounting sleeve.
Use 4mm Screws to lock sensor in place.
WARNING! Do not crawl under bumper
unless the bumper is properly supported on
blocks or stands or the bumper may fall.
(3) 10mm Flat Washers
(3) 10mm Lock Washers
(3) 10mm Hex Nuts
(Fig 16) Attach Bumper assembly to Frame Brackets
Front
(Fig 13) Attach License Plate Bracket to Bumper
(2) 6mm x 20mm Button
Head Screws
(4) 6mm Flat Washers
(2) 6mm Nylon Lock Nuts
(2) Nylon Nuts
Front
(Fig 15) Attach Bumper assembly to Frame Brackets
Front
Complete Installation
Table of contents
Other Body Armor 4x4 Other manuals
Popular Other manuals by other brands

GHL
GHL KH Director instruction manual

Barco
Barco Encore supplementary guide

Oase
Oase HighLine Classic LED daylight 70 operating instructions

Aquatronica
Aquatronica SMS Module instruction manual

Aquatlantis
Aquatlantis Aquarium operating manual

BW Technologies
BW Technologies GasAlert Extreme Quick reference guide