boho office EASYDESK LINE Quick start guide

5
YEAR
WARRANTY
0.1W
STANDBY
CONSUMPTION
APP
CONTROL
PLUG
AND
PLAY
ASSEMBLY CUSTOMER
SUPPORT
EASYDESK LINEEASYDESK LINE
ASSEMBLY INSTRUCTIONS

2
Dear Customer,
Thank you very much for choosing our product. To make the assembly as easy as pos-
sible for you, you will find information about our assembly video on page 15.
The Easydesk Line table frame is characterised by a modern, well designed frame con-
cept built around a new top frame called a crossbeam. The crossbeam contains all the
electronics, including the motor and all the cables.
The Easydesk Line table frame can be assembled quickly and intuitively because the
few parts have been carefully designed and can either be “clicked together” or fixed
with just a few screws. It has a clear, uncluttered design.
The lifting columns have no visible sliders and no holes in the profile.
Due to the internal cabling and the pre-installed motor in the carrier, only the mains
cable and the connection cable to the control unit are visible.
The table frame quality and performance, resembles other three-part lifting columns.
It is equipped as standard with the new Desk Sensor™ anti-collision technology, which
ensures that the furniture is not damaged in the event of collisions with obstacles.
Contents
Checking the contents .............................................................................
Fixing the crossbeam .............................................................................
Assembly of the upper supports ............................................................
Assembly of the lifting columns..............................................................
Assembly of the control unit ...................................................................
attaching the power supply......................................................................
Assembly of the feet ................................................................................
The control unit .........................................................................................
Wichtige Informationen / Sicherheitshinweise ......................................
App Download Information .....................................................................
Assembly video information ...................................................................
3
3
4
5
6
6
7
8
12
14
15

3
The crossbeam must not be pulled completely apart in order not to pull the drive
shaft apart.
The minimum setting at the connection end is 100 mm (to keep the power supply
and the RJ45 sockets accessible), otherwise adjustable in steps of 50 mm.
Fixing the crossbeam
Extend the crossbeam to the desired length
(width from 1.150 to 1.750 mm) extensionable in 50 mm steps
Checking the contents
Have all parts for the desk ready, including the desktop
4
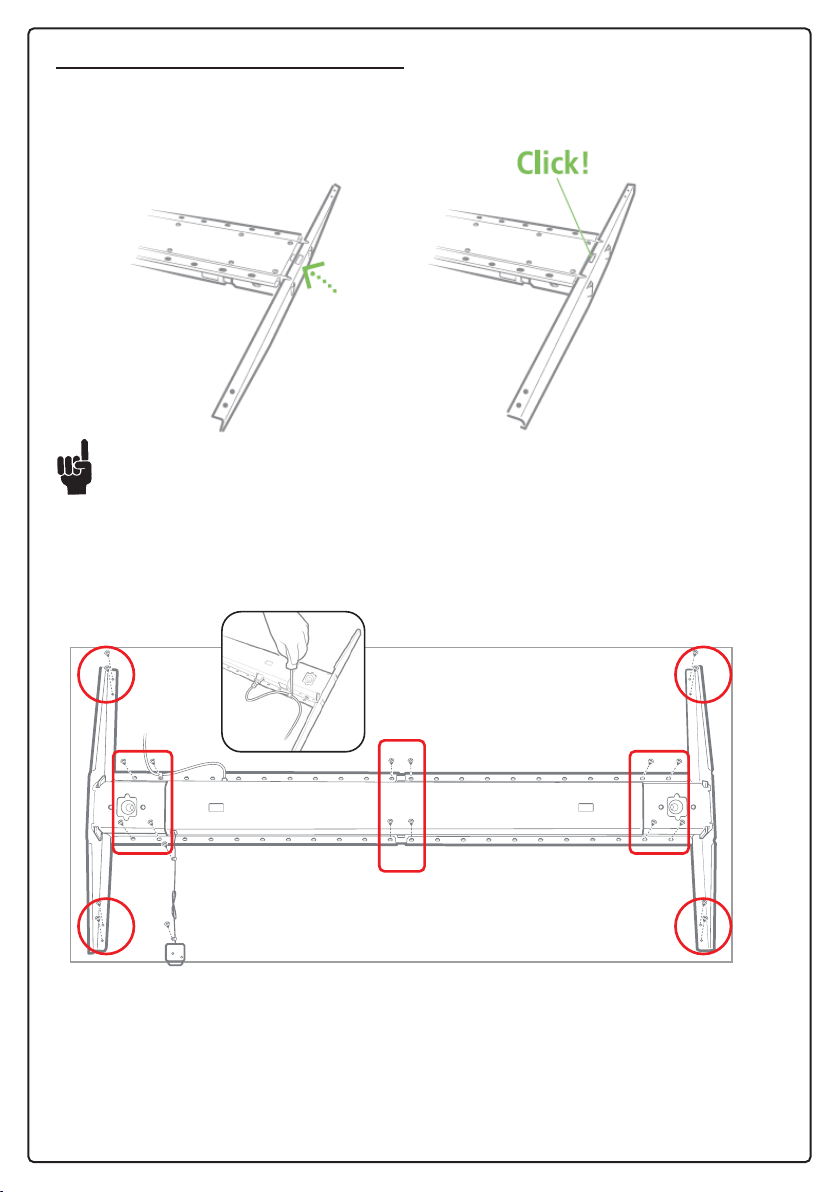
Assembly of the upper supports
Place a slightly inclined upper support at the end of the crossbeam.
Press the plate carrier into position until a click is heard.
Make sure that the upper supports are correctly positioned and cannot be twisted
by the DF2 support.
Fix the DF2 frame to the desktop with 20 screws:
8 screws at the ends of the support (A)
Use one of these screws to fix the mains cable to the support with the cable clamp to
provide strain relief for the cable, see sketch 1.
12 screws in the crossbeam (B)
a
c
cc
c
ba
Place the assembled DF2 frame in the correct position.
Use a tape measure to measure the central position of the DF2 frame on the
desktop.
A A
A A
B B B
1

5
Assembly of the lifting coloumns
Make sure that the columns are fully retracted.
If the column is pulled out while turning it over, push it by hand to the
fully retracted position.
Attach the column to the crossbeam by pushing it down until a click is heard and both
claws lock the column in the correct position.
After assembling the columns, check that both claws are visible.

6
Assembly of the the operating unit / collision detection
Insert the control unit and the collision sensor into one of the
RJ45 jacks, it doesn’t matter which.
Fix the operating unit to the desktop with the screws supplied
Make sure that you use the cable clamp to relieve the strain on the cable when
attaching the cable to the desktop (see step 4)
Connecting the power cable
Plug the mains cable into the socket

7
Assembly of the feet
Fix the feet to the columns with eight M6 fixing screws. (4 each side)
The DF2L06 columns are supplied with four M6 and two M8 threaded holes.
Always use four M6 or two M8 screws with the following specifications to mount
the runners: Quality: min. class 8.8 Length: min. 10 mm (plus feet thickness); max.
16 mm (plus feet thickness)
Turn the desk over (2 people please!)
Connect to the mains.
Your desk is ready for use.
Fit the adjustment glides.
Plug the mains cable into the socket
8
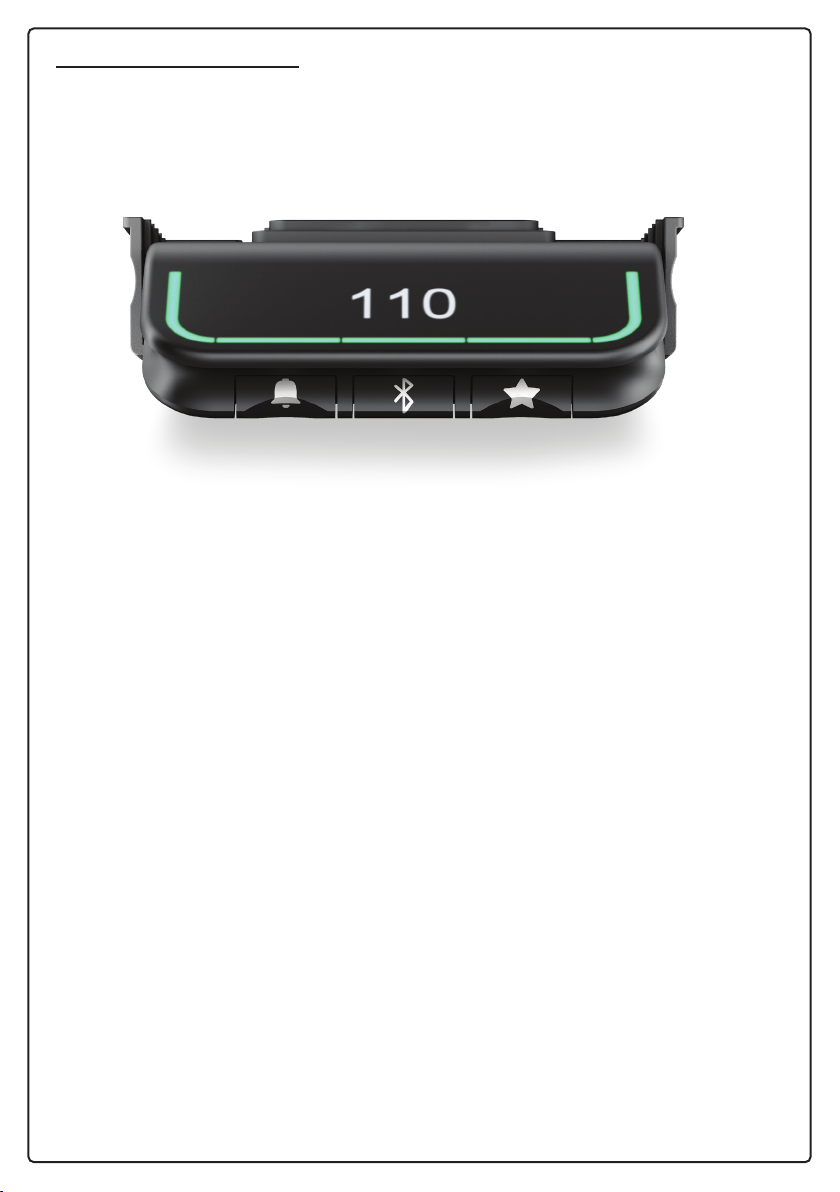
The control unit (DPG)
How to use the memory function
To save a memory position, first move the table to the desired position. Press and hold
the “star” key for 2 seconds. The light strip starts flashing white. The position has been
saved when it is permanently lit.
To move the table to a memory position, press and hold the panel.
If the DPG offers the automatic procedure, briefly press the DPG twice in the direction
in which you want to move the table. The DPG stops at the first stored position in the
selected direction.
How to save up to 4 memory positions and reset the memory
The DPG with display can store up to 4 memory positions.
Move the table to the required height and press the “star” key until the display shows
either “star 3” or “star 4”. Release the key again.
To save a position, press the “star” key and hold it down for 2 seconds. The light strip
starts flashing white. The position has been saved when it is permanently lit.
To reset all memory positions, press the “star” key and hold it for 8 seconds until the
light strip flashes red.

9
Control panel information
Reset Options
There are three reset options:
Resetting the memory positions
To reset all memory positions, press the “star” key and hold it down for 8 seconds until
the light strip flashes red.
Resetting the light strip reminder function
To reset the light strip reminder function, press and hold the “bell” key for 8 seconds
until the light strip flashes red.
Reset to factory defaults
To reset the unit to the factory settings, press the “bell” key and the “star” key and hold
them down for 8 seconds until the light strip flashes red.
How to use the memory function
To save a memory position, first move the table to the desired position. Press and hold
the “star” key for 2 seconds. The light strip starts flashing white. The position has been
saved when it is permanently lit.
To move the table to a memory position, press and hold the panel.
Automatic movement between two memory positions
Activate the “Automatic procedure” function in the Desk Control™ App.
Briefly press the Desk Panel twice in the direction you wish to move the desk, the desk
will automatically move to the position you have saved.
Reminder function
Reminder through illuminated stripes
The illuminated strip reminds you when it is time to get up.
Green = o.k.
Orange = time to get up
The default setting is 55 minutes sitting.
Press the “bell” key to display the interval.
Change interval or switch off the function with “OFF
You can change your interval by switching between the four settings.
Interval 1: Reminder after 55 minutes of sitting
Interval 2: Reminder after 50 minutes of sitting
Interval 3: Reminder after 45 minutes of sitting
Interval 4: OFF Deactivates the function

10
How to connect to the app
Press and hold the Bluetooth® key for 2 seconds. The light strip starts flashing blue.
The display shows the table ID.
Open the app you downloaded earlier and connect to the table. To do this, find the cor-
responding ID from the “Tables nearby” list.
Follow the instructions in the app.
The table can neither be moved up nor down.
Possible problem: The control unit is not connected to the power supply.
Try the following/solution: Try connecting a lamp or similar device to the power supply
to check that the required supply voltage is available.
Possible problem: Are the plugs correctly plugged into the control unit or table leg?
Try the following: Check all connections.
Possible problem: Do cables, controls, control unit or deskframe legs
show visible damage?
Solution: Damaged parts must be replaced. Please contact us!
Setting the correct table height - Switching between inches and centimetres
Setting the correct table height:
If the height shown on the display does not correspond to the actual height of the table,
it can be corrected.
Measure the height of the table from the floor to the desktop. Press and hold the “bell”
key and the Bluetooth® key for 5 seconds. When the display starts flashing, press the
panel up if the displayed number is too low or down if the displayed number is too high.
Switching between centimetres and inches:
You can switch between centimetres and inches by pressing and holding the “star” key
and the Bluetooth® key for 5 seconds. When the display starts flashing, press the panel
up or down and the unit changes.
Control panel information

11
IMPORTANT INFORMATION
General Safety Instructions
The system can only be used safely if the assembly instructions have been read completely
and the instructions contained therein are strictly followed.
Everyone who connects, installs and uses the system must have access to these
assembly instructions. Please follow the instructions. Non-observance of the above
instructions can lead to accidents with serious personal injury
The application is not intended for use by small children or weakened persons without
supervision. If the product is visibly damaged, it must not be installed.
During the installation of the actuator in the construction , make sure that situations are
avoided in which personal injury can occur, e.g. by crushing fingers or arms.
Make sure that the application can move freely in both directions to avoid blockages.
This device complies with Part 15 of the FCC Rules.
Operation is subject to the following two conditions:
1) This device may not cause harmful interference, and
2) this equipment must accept any radio interference received and any interference that may
cause.
- Deliberate and unintentional malfunctions of electrical equipment:
Changes or modifications not expressly approved by the party responsible for compliance
could void the user’s authority to operate the equipment.
- Declaration for Class B digital devices:
NOTE: This equipment has been tested and found to comply with the limits for a Class B digi-
tal device, pursuant to Part 15 of the FCC Rules. These limits are designed to provide reason-
able protection against harmful interference in a residential installation.
This equipment generates, uses and can radiate radio frequency energy and, if not installed
and used in accordance with the instructions, may cause harmful interference to radio com-
munications. This equipment generates, uses and can radiate radio frequency energy and, if
not installed and used in accordance with the manufacturer’s instructions, may cause harmful
interference to radio communications. However, in exceptional cases, certain installations
may cause interference.
If this equipment does cause harmful interference to radio or television reception, which can
be determined by turning the equipment off and on, the user is encouraged to try to correct
the interference by one or more of the following measures:
- Reorient or relocate the receiving antenna.
- Increase the separation between the equipment and receiver.
- Insert the mains plug of the machine into another mains socket so that the machine and
receiver are connected to different electric circuits.
- Consult your dealer or an experienced radio or television technician for help.

12
IMPORTANT INFORMATION
This device contains royalty-free transmitters/receivers that comply with the royalty-free
RSS news feeds of Innovation, Science and Economic Development Canada.
Operation is subject to the following two conditions:
1) This device may not cause harmful interference.
2) This device must accept any interference received, including interference that may
cause undesired operation of the device.
Labelling requirements:
This Class B digital apparatus complies with Canadian standard ICES-003
This device can be used by children from 8 years up and physically or mentally handi-
capped persons.
Provided they are supervised or have had a thorough explanation in the use of the
equipment and understood its safe use and possible risks.
Children must not play with the appliance. Cleaning and maintenance should not be car-
ried out by children.
Persons who do not have the necessary experience or sufficient knowledge of the pro-
duct(s) must not use them. Physically and mentally disabled persons may not use the
product unless they are supervised or have received thorough instruction in the use of
the equipment from a person responsible for the safety of such persons.
Children must be supervised to ensure that they do not play with the appliance.
The drives must not be overloaded - this can lead to personal injury or damage to the
system. Do not use the drive system to lift people. Do not sit or stand on the system
during operation (risk of injury). Please use the system indoors only.
Repairs
To avoid malfunctions, all repairs must only be carried out by authorised workshops or
service personnel, as special tools must be used and seals must be adapted. Drive sys-
tems in warranty must be sent to authorised workshops.
Attention!
If the product is opened, there is a risk of subsequent malfunctions.
Attention!
The system does not tolerate cutting oil.
13
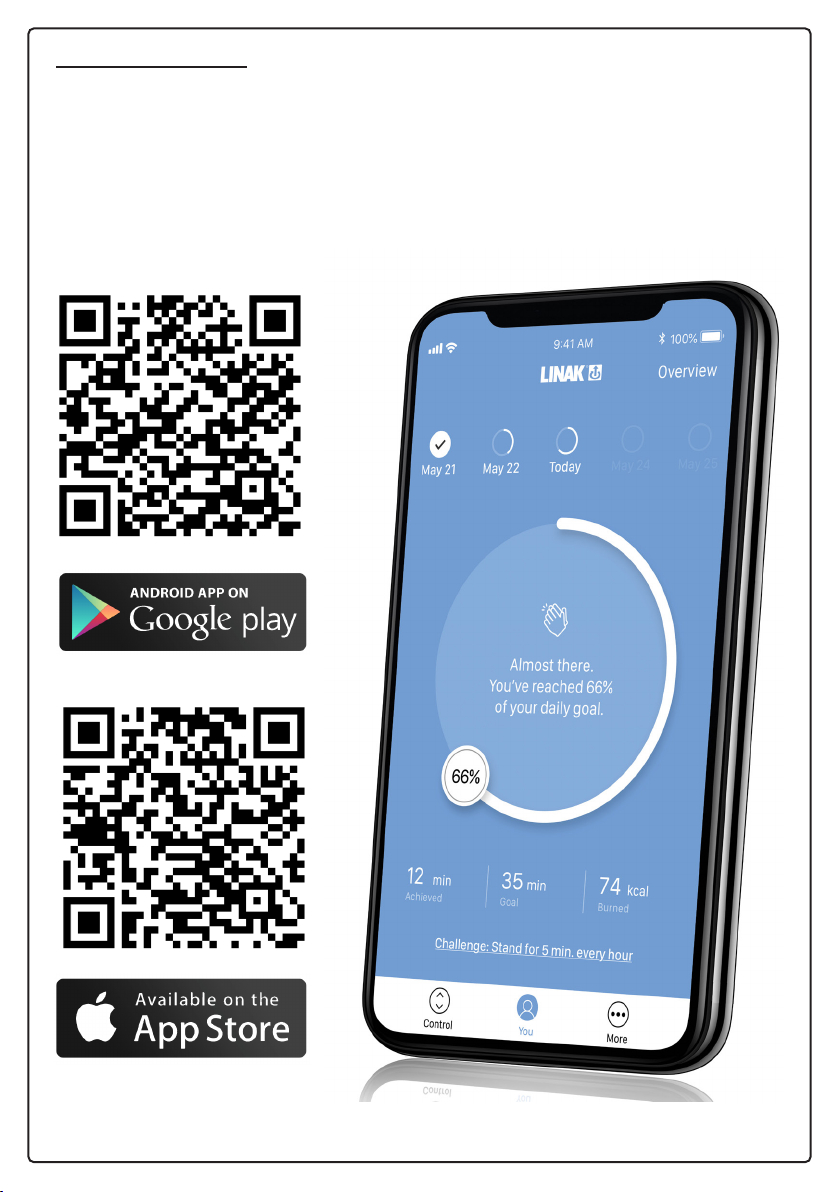
APP DOWNLOAD
The App Desk Control is provided by the manufacturer Linak, it is available in the Apple
and the Google App Store. You can either install the app using the QR Codes below
or search for the “Desk Control” app in the respective App Store. For installation and
connection please follow the steps in the app.
ANDROID
APPLE

14
ASSEMBLY VIDEO
Follow our Youtube channel - here you will find the latest information and
the assembly video for Easydesk Line frame, scan the QR Code and start or search for
“Assembly Easydesk Line” on Youtube.
Customer Service
boho office is a registered trade mark of the boho möbelwerkstatt GmbH.
Our customer service can be reached on 05244 / 9789030 Mo-Fr from 08.00 - 17.00
Table of contents
Other boho office Indoor Furnishing manuals


Popular Indoor Furnishing manuals by other brands

BLACK RED WHITE
BLACK RED WHITE NIKA NKD-40/82 Assembly manual

Heart of House
Heart of House 413/6633 Assembly instructions

DURAVIT
DURAVIT LM 7822 Mounting instructions

BLACK RED WHITE
BLACK RED WHITE KENTAKI S320-POL/155 Assembly

Furniture of America
Furniture of America CM4144-3PK Assembly instructions

Serene Furnishings
Serene Furnishings Esther instructions


