bolid S2000R User manual

Orion ISS
Addressable Radio Link System
S2000R
User’s Manual

Addressable Radio Link System
www.bolid.ru
2
This User’s Manual is intended to help for studying operability principles and maintenance of the
devices of S2000R Addressable Radio Link Fire and Intrusion Alarm System based on S2000R-
ARR32 Addressable Input and Output Module.
Please read the instructions completely before connecting, operating, adjusting or
maintaining this product
The following terms are used throughout the Manual:
AMR system: Automatic Meter Reading system, a system for collecting consumption and status data
from water meters or energy metering devices and transferring these data to a central
database for handling.
AMI: Advanced Metering Infrastructure.
Polling Loop (PL): The two-wire multiplex addressable polling loop of an S2000-KDL through which
the controller communicates data with and supplies power to connected addressable devices.
Long press: pressing a button down and holding it for a time of one to three seconds.
Short press: pressing a button down and holding it for less than one second.

S2000R
3
www.bolid.ru
Contents
1.
GENERAL.........................................................................................................................5
2.
SPECIFICATIONS............................................................................................................7
3.
S2000R-ARR32 PC BOARD ............................................................................................9
4.
POWERING S2000R-ARR32 .........................................................................................10
5.
INDICATION ...................................................................................................................11
6.
PROGRAMMING............................................................................................................13
Preparation for Programming......................................................................................................13
Selecting RF Channels ...............................................................................................................13
Programming ..............................................................................................................................15
Connecting Radio Link Devices to and Deleting Them from the ARR32......................................16
Restoring Communication between the Devices and the ARR32................................................18
Resetting the ARR32 ..................................................................................................................19
7.
S2000R CONFIGURATOR.............................................................................................20
Program Interface.......................................................................................................................21
Connecting Radio Link Devices to and Deleting Them from the ARR32......................................24
Assigning Polling Loop Addresses..............................................................................................24
Setting Radio Link Device Properties..........................................................................................25
Starting the Procedure of Analysis of the Radio Link Channels...................................................28
Disabling Prog Button .................................................................................................................28
Monitoring for Device Output Parameters ...................................................................................29
Updating Firmware of the S2000R-ARR32 and Radio Link Devices............................................29
Testing Link Quality and Radio Communication Statistics...........................................................30
Setting Device Poll Interval .........................................................................................................31
Access Control............................................................................................................................32
Backup Configuration Files for ARR32........................................................................................34
8.
PROGRAMMING THE POLLING LOOP CONTROLLER..............................................35
Inputs..........................................................................................................................................35
Outputs.......................................................................................................................................36
Device Indication Control............................................................................................................36
Setting Addresses.......................................................................................................................36
Defeat Protection for S2000R-SMK.............................................................................................37
Power Saving Mode for S2000R-IK, S2000R-IK Rev.02, and S2000R-SHIK ..............................37
Counting Threshold for S2000R-ASR2 and S2000R-ASR1.........................................................37
9.
DESIGN AND MOUNTING .............................................................................................38
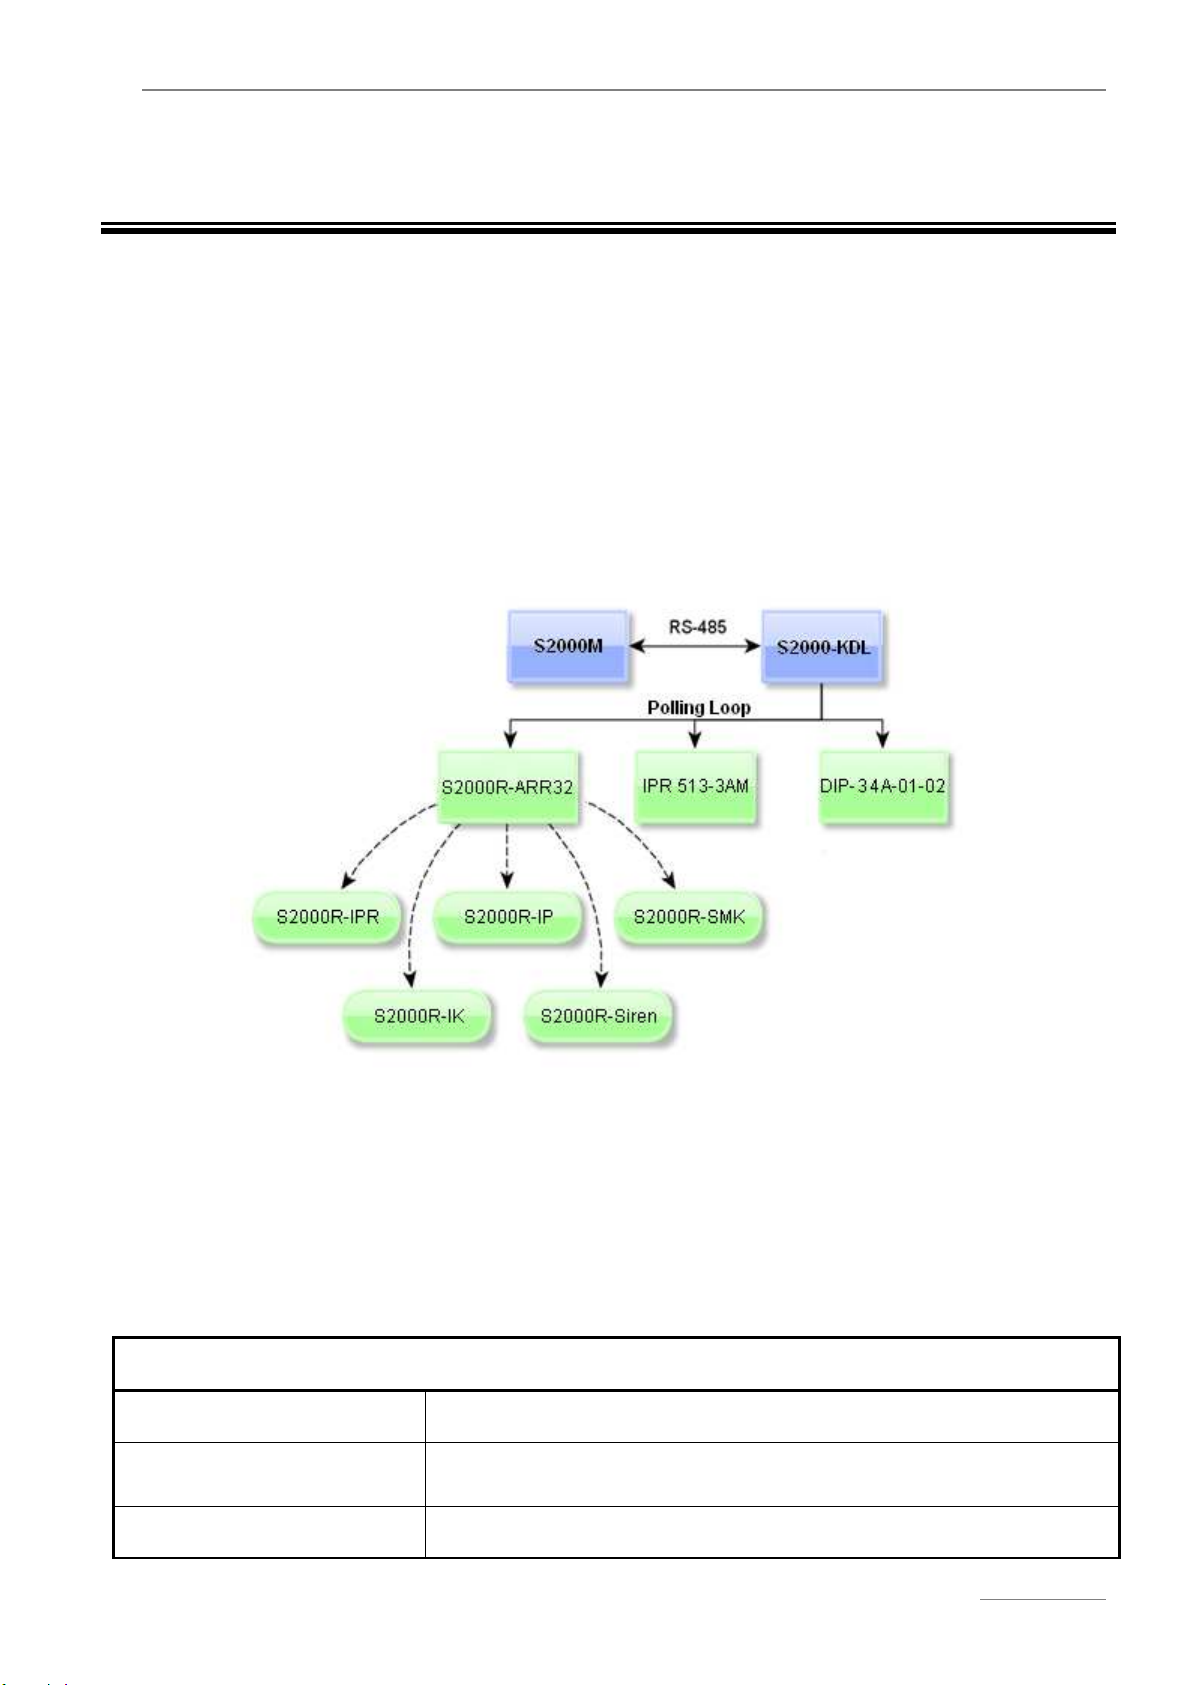
Designing a System based on S2000R-ARR32 ..........................................................................38
Mounting the ARR32 and Radio Link Devices.............................................................................39
10.
RADIO DEVICES OF THE S2000R SERIES..................................................................43

Addressable Radio Link System
www.bolid.ru
4
S2000R-IP..................................................................................................................................43
S2000R-DIP...............................................................................................................................49
S2000R-IPR...............................................................................................................................55
S2000R-SMK .............................................................................................................................59
S2000R-IK..................................................................................................................................66
S2000R-ASR2............................................................................................................................71
S2000R-Siren.............................................................................................................................77
S2000R-RM................................................................................................................................81
S2000R-RM rev.01.....................................................................................................................87
S2000R-OST..............................................................................................................................94
S2000R-SHIK.............................................................................................................................97
S2000R-IK REV.02...................................................................................................................102
Water Meters SHV-15D, SHV-20D, SGV-15D, SGV-20D.........................................................107
APPENDIX A. BATTERIES.................................................................................................112
APPENDIX B. TROUBLESHOOTING.................................................................................113
APPENDIX C. RADIO DEVICE-TO-ARR32 COMPATIBILITY ...........................................117

S2000R
5
www.bolid.ru
1. GENERAL
This Manual describes specifications and principles of design, mounting, and operation of radio link
fire alarm systems, intrusion alarm systems, and AMR&AMI systems based on S2000R-ARR32 Radio
Link Input / Output Modules and radio link devices of the S2000R series.
S2000R-ARR32 Radio Link Input / Output Module (hereinafter referred to as the ARR32) is used with
a polling loop controller such as an S2000-KDL of version 2.20+ or S2000-KDL-2I of version 1.15+
(hereinafter referred to as the PLC) within an Orion Integrated Security System (ISS). The ARR32 is
intended to connect radio link devices of S2000R series into the multiplex addressable polling loop of
a PLC. The PLC operates with the radio link devices as with their wired versions.
Figure 1-1. Schematic Diagram of S2000R Radio Link System
A single S2000R-ARR32 provides connecting up to the 32 radio link devices into a polling loop. The
list of radio link devices supported by the S2000R-ARR32 is represented in Table 1-1.
Table 1-1. The Radio Link Devices Supported by S2000R-ARR32
Input Devices
S2000R-DIP Radio link analog addressable photoelectric smoke detector
S2000R-IP Radio link analog addressable rate-of-rise and fixed temperature
heat detector
S2000R-IPR Radio link manual call point

Addressable Radio Link System
www.bolid.ru
6
Input Devices
S2000R-SMK Radio link magnetic contact detector
S2000R-IK Radio link volumetric PIR motion detector
S2000R-IK rev.02* Radio link volumetric PIR motion detector
S2000R-SHIK* Radio link curtain PIR motion detector
Output Devices
S2000R-Siren Radio link light and sound alarm
S2000R-RM Radio link relay module
S2000R-RM rev.01 Radio link relay module (220V)
S2000R-OST* Radio link LED emergency sign board
Pulse Adapters
S2000R-ASR2 Radio link pulse adapter
SHV-15D*, SHV-20D*,
SGV-15D*, SGV-20D*
Cold/hot water pulse meter with integrated radio link pulse adapter
S2000R-ASR1
* - Devices are compatible with an ARR32 of hardware version 8 and higher.

S2000R
7
www.bolid.ru
2. SPECIFICATIONS
Table 2-1. Common Radio Link Characteristics
Bandwidth, MHz 868.0—868.2,
868.7—869.2
Transmitting Power 10 mW max
Encryption AES128
Radio Channels 4
Radio link devices per a single S2000R-ARR32 Up to 32
Effective range in free space 300 m*
* - If the radio system is installed within premises its effective range depends on the number and the material of
walls and floors on the radio signal path.
Table 2-2. S2000R-ARR32 Specifications
Device Poll Interval:
-Programmable within the range of
-By default
10 to 300 s
30 s
ARR32 modules per a single radio channel Interval / 10
Loss Detection Time 3 Intervals
Input Voltage 9 —28 V
Current consumption while powering via the polling loop:
–Maximum consumption, the transceiver is on,
–Maximum consumption, the transceiver is off,
Current consumption while powering by a 12 V DC power supply:
–Average consumption in quiescent mode
22.5 mA
5.7 mA
21 mA
Ingress Protection Rating IP20
Operating Temperature -30 to +50°С
Transportation and Storage Temperature -30 to +55°С
Weight 0.130 kg
Overall Dimensions 102 x 107 x 39 mm

Addressable Radio Link System
www.bolid.ru
8
More Information:
The components of an S2000R system are linked over the two-way radio communication
channel.
An ARR32 automatically monitors radio channel operability and in case of an excessive
noise on the current channel it can automatically select an alternate channel to operate on.
The data are transmitted within the S2000R radio link system encrypted with dynamically
changed encryption keys.
S2000R devices dynamically control radio signal strength.
An ARR32 provides regular monitoring for proper communication with connected radio link
devices and conditions of their power supplies.

S2000R
9
www.bolid.ru
3. S2000R-ARR32 PC BOARD
Figure 3-1. S2000R-ARR32 PC Board
LEDs:
POWER: Indicates conditions of power supplies;
LOOP: Indicates polling loop communication conditions;
RADIO: Indicates radio communication conditions.
Controls:
S1: Tamper Switch;
S2: Prog (Program) Button;
S3: Switches:
S3.1: Selects power supply mode;
S3.2 and S3.3: Provide assigning RF channel manually;
S3.4: Switches between auto and manual modes of channel arrangement.

Addressable Radio Link System
www.bolid.ru
10
4. POWERING S2000R-ARR32
The S2000R-ARR32 is powered in one of the following ways:
1. Via the polling loop of the connected polling loop controller;
2. By external DC power supplies;
3. Via the USB port when the S2000R-ARR32 is connected to a personal computer for
configuring.
The S2000R-ARR32 can be in one of the two power modes defined by current position of the DIP
switch S3.1 (see Figure 3-1) as shown in Table 4-1.
Table 4-1. Power Modes of the S2000R-ARR32
Power Mode Current Consumed via Polling Loop S3.1 Switch Position
Via the polling loop Up to 22.5 mA Off
By external power supplies
0 mA under normal conditions
On
5.7 mA max in case of a failure of the
external power supplies
Being powered via the polling loop the ARR32 consumes up to 22.5 mA from the polling loop
regardless of the number of radio link devices connected to this one. When the ARR32 is operated in
this power mode, external power supplies typically are not in use, their voltage values are not
monitored, and their conditions are not indicated.
If you select powering the ARR32 via the polling loop please be sure that total current
consumption of the devices brought in the polling loop doesn’t exceed the allowed value
(see S2000-KDL Manual)
Being powered by external power supplies connected to the Х2 terminals (see Figure 3-1)
normally the ARR32 is not powered via the polling loop. In this power mode the ARR32 monitors for
voltage of the external power supplies which should be in the range of 9 to 28 V.
If no power is applied to the main or backup power input or when the power voltage is out of the
acceptable range, the S2000R-ARR32 indicates a power failure (see Section 5).
When both external power supplies fail the S2000R-ARR32 switches to a power failure mode. In this
mode the S2000R-ARR32 sends the polling loop controller a power failure message and remains
functional consuming up to 5.7 mA via the polling loop, with the transceiver being off and
communications with the radio link devices being stopped.

S2000R
11
www.bolid.ru
5. INDICATION
The S2000R-ARR32 is equipped with three two-color LEDs on its front panel (see Figure 3-1):
•POWER: Indicates condition of the power supplies;
•LOOP: Indicates data communication over the polling loop;
•RADIO: Indicates data communication with the connected radio link devices.
Table 5-1. Operating Indication
LED Performance Condition
POWER
Off The mode of powering via the polling loop is
selected
Illuminates with green Normal power
Flashes with amber every second Power failure
LOOP
Flashes with green every 4 s Data is being communicated
Flashes with amber every 4 s No data is communicated
Illuminates with amber Zero voltage is detected at the polling loop terminals
RADIO
Flashes with green every 4 s Normal communication with all connected radio link
devices
Flashes with amber twice per
second
No communications with one or more connected
radio link devices for more than three Poll Intervals
Flashes with amber four times per
second
No communications with all the radio link devices for
more than three Poll Intervals
Off The transceiver is disabled, the ARR32 doesn’t
communicate with the radio link devices
Table 5-2. Software Error Indication*
Condition LED Performance
Radio Firmware Error POWER illuminates with amber while LOOP and RADIO flashes
simultaneously with amber two times per second
Core Firmware Error POWER, LOOP, and RADIO illuminate with amber
Radio and Core Link Error RADIO illuminates with amber
* - Potential causes of faulty operation and troubleshooting practice are discussed in Appendix B.

Addressable Radio Link System
www.bolid.ru
12
Table 5-3. Operating Mode Indication
Operating Mode Indicator Performance
Programming Address LOOP flashes four times with amber every four seconds; POWER
and RADIO are off.
Device Connecting RADIO flashes with green twice per second; POWER and LOOP
are off.
Connecting Inhibited
(no vacant addresses)
RADIO flashes with amber twice per second within 3 seconds;
POWER and LOOP are off.
Unsupported Device
(while connecting)
POWER, LOOP, and RADIO illuminate with amber within a half of
a second
Device Deleting
POWER and LOOP alternately flash with amber twice per second;
RADIO is off. On exiting the mode all LEDs illuminate
simultaneously with amber for a half of a second.
Reset POWER flashes with green and amber alternately six times per
second; LOOP and RADIO are off.
Updating Core Firmware POWER illuminates with amber; LOOP and RADIO flash one by
one with amber four times per second.
Updating Radio Firmware POWER shows amber light; LOOP and RADIO flash one by one
with green four times per second.
Testing Radio Frequency
Channels
POWER and LOOP are off; RADIO flashes with green and amber
alternately four times per second.

S2000R
13
www.bolid.ru
6. PROGRAMMING
The system should be preliminary programmed prior to installing the devices at the place
of operation
PREPARATION FOR PROGRAMMING
1. Remove the ARR32 cover;
2. Connect the antenna supplied to the antenna port on the PCB (see Figure 3-1);
3. Select the power mode of the module (see Section 4);
4. Select the radio frequency channel (see below);
5. Connect the ARR32 to a personal computer by a cable USB A(m) – USB B(m);
6. If necessary, install the driver
http://bolid.ru/files/373/566/usb_rs_exar.zip
.
SELECTING RF CHANNELS
A radio link system based on ARR32 can operate on one of four radio frequency channels as shown
in Table 6-1.
Table 6-1. RF Channels
Channel Number Frequency Band, MHz
Channel 0 868.0 - 868.2
Channel 1 868.75 - 868.9
Channel 2 868.9 - 869.0
Channel 3 869.0 - 869.2
RF channels can be selected by means of switches S3.2—S3.4 (see Figure 3-1) or automatically.
After a channel is selected the ARR32 and all connected radio link devices start operating on the
selected channel within 90 s.

Addressable Radio Link System
www.bolid.ru
14
Table 6-2. Channel Selection
Channel DIP Switch Positions
S3.2 S3.3 S3.4
Auto selected Off Off On
Dynamically selected On On On
Channel 0 Off Off Off
Channel 1 Off On Off
Channel 2 On Off Off
Channel 3 On On Off
Auto Channel Selection
Place the ARR32 and a radio device where they are supposed to be installed;
Set the switch S3.4 on;
Start the procedure of analysis of radio link channels.
Radio Link Channel Analysis Procedure
The procedure of analysis of radio link channels is to be run by pressing the combination “two
short presses and one long press” on the program button S2 (see Figure 3-1). The analysis
procedure takes four minutes, ARR32 indication being as follows: POWER and LOOP are off, RADIO
flashes with green and amber alternately four times per second.
The procedure of analysis of radio channels can be run from a personal computer using S2000R
Configurator (see Section 7).
In the process of analysis the ARR32 selects the RF channel with the least load. When the procedure
has been completed the ARR32 automatically starts operating on the selected channel and saves this
channel as a default channel for auto mode.
If the analysis procedure was not employed, the Channel 0 is considered to be a default auto channel.
If necessary, the analysis procedure can be aborted by short simultaneously presses on the program
button S2 and the tamper switch S1.
While analyzing the radio frequency channels the ARR32 stops communicating with
radio link devices.

S2000R
15
www.bolid.ru
Auto Mode with Dynamic Channel Selection
Set the switches S3.2, S3.3, and S3.4 (see Figure 3-1) into «On» position.
In this mode the ARR32 uses the default auto channel selected during the procedure of analysis of
RF channels (or the Channel 0 if the procedure was not performed). In case of excessive noise on the
automatically selected channel the ARR32 automatically changes this channel for a redundant one
(which is far from the current channel in the radio range) in order to keep robust communication with
radio link devices.
On restarting the ARR32 which operates in the Auto Mode with Dynamic Channel Selection, this
ARR32 returns to operating on the default auto channel.
Selecting RF Channels Manually
Set the switch S3.4 off.
Assign the relevant channel using the switches S3.2 and S3.3 as shown in Table 6-2.
The maximum number of the ARR32 modules operating in a radio coverage zone on a
single channel shouldn’t be more than Device Poll Interval in seconds divided by ten.
Device Poll Interval is defined with the help of S2000R Configurator (see Section 7). By
default Device Poll Interval is equal to 30 s, so the number of ARR32 which can operate
on a single radio channel is three.
The number of the current RF channel in any mode can be monitored by means of S2000R
Configurator (see Section 7).
PROGRAMMING
Programming the radio link system is implemented as the following operations:
1. Connecting radio link devices to the ARR32;
2. Programming radio link devices;
3. Assigning the ARR32 and connected radio link devices to addresses within the polling loop of the
polling loop controller;
4. Programming the devices in the configuration of the polling loop controller (selecting Device Type
parameters, arranging links between the devices, and selecting control programs).
The ARR32 and radio link devices of the S2000R series are to be programmed using the personal
computer, by means of the software utility “S2000R Configurator” (see Section 7).

Addressable Radio Link System
www.bolid.ru
16
Programming the devices in the configuration of the polling loop controller is implemented using the
personal computer, by means of UProg Configuration Tool (see Section 8).
The software utilities can be free download from the
http://bolid.ru
(see the relevant sections of this
Manual).
CONNECTING RADIO LINK DEVICES TO AND DELETING THEM FROM THE ARR32
Installing and Replacing Batteries in the Radio Link Devices
Starting operating a radio link device, first of all install batteries into it, both the main battery and the
backup battery, if applicable. For the devices with pre-installed batteries, remove the insulating
spacers from the battery holders.
Integrated Radio Link Pulse Adapter S2000R-ASR1 is equipped with a built-in non-detachable power
supply (see the section of this Manual for the relevant device).
After applying power to a radio link device powered by ER14505 or ER14250 battery/batteries a
process of activating batteries (depassivation) is started. Indication of the radio link device during
depassivation is shown in Table 6-3.
For S2000R-Siren Radio Link Light and Sound Alarm devices, the depassivation procedure can be
started only after connecting these ones to the ARR32.
Table 6-3. Light Indication of Battery Depassivation Process
Condition Indicated by a Radio Link Device As
Depassivation in progress… Flashes with amber four times per second
Depassivation completed successively,
device is starting
Solid green light within 1 second
If depassivation has failed then the radio link device after starting sends ARR32 a message about
power supply discharge (see the manual for the relevant device).
Connecting the Radio Link Devices
To add a new S2000R radio link device to the system do the following:
1. Switch the ARR32 to the Device Connecting mode as describe below:
Open the ARR32 casing and activate Device Connecting mode by a brief press on the
program button S2 followed by a long press on this button (see Figure 3-1);
The ARR32 shall indicate Device Connecting mode by the following way: RADIO flashes with
green twice per second while POWER and LOOP are off;

S2000R
17
www.bolid.ru
If address space of the ARR32 is full (32 radio link devices has already been connected), the
ARR32 indicates its inability to enter the Device Connecting mode: RADIO flashes with
amber twice per second while POWER and LOOP are off. This condition is indicated for 3
seconds;
The ARR32 exits Device Connecting mode automatically, upon the expiry of 3 minutes since
last connecting a device or manually, by pressing on the program button S2 and the tamper
switch S1 simultaneously. In case of the manual operation the ARR32 LEDs perform as
follows: all the indicators POWER, LOOP, and RADIO show amber light within a second.
You can control operation of connecting devices from the personal computer using S2000R
Configurator (see Section 7).
2. For all radio link devices (apart from S2000R-ASR1 which is connected using a service magnet)
make a long press on the Prog button of the device (see the relevant Manual for the radio link
device) until light indication appears:
Indication of the radio link device:
oThe device has been connected successfully: the LED shows solid green light for 2 s;
oConnecting failed: the LED shows solid red light for 2 s.
Indication of the ARR32:
oIf the device has been connected successfully, all the LEDs POWER, LOOP, and
RADIO show solid green light simultaneously for a second.
When the radio link device is connected it is by default assigned to a polling loop address of
«127».
If the attempt to connect the radio link device has failed please be sure that the ARR32 is
switched to the Device Connecting mode and try again. If the problem persists refer to Appendix
B (Troubleshooting).
3. To connect another radio link device, repeat Step 2.
If more than one radio link device are being connected to the ARR32 before their polling loop
addresses are assigned then the first connected device will be assigned to the address 127 while
all other devices will be in the mode of waiting for assigning address.
While connecting radio link devices, if a device indicates successful connection but the
ARR32 doesn’t indicate the relevant condition ensure that there are no another ARR32
in the Device Connecting mode in the radio coverage of the first ARR32.

Addressable Radio Link System
www.bolid.ru
18
Deleting Radio Link Devices from the Memory of the ARR32
There are two following ways to delete radio link device descriptors from the memory of the ARR32:
1. Deleting individually or by group using S2000R Configurator (see Section 7);
2. Manual deleting of all the radio link devices for which communications are lost:
To delete device descriptors manually:
Switch the ARR32 to the mode of deleting non-active radio link devices using a combination
“three short presses and one long press” on the program button S2. In the Device
Deleting mode POWER and LOOP LEDs of the ARR32 flash with amber one by one twice
per second while RADIO LED is off;
Confirm deleting by pressing the tamper button S1. Deleting is indicated in the following way:
POWER, LOOP, and RADIO synchronously illuminate with green for a half of a second.
Then the ARR32 is restarted automatically;
The ARR32 exits the Device Deleting mode automatically upon expiry of 3 seconds or
manually by pressing down the program button S2 and tamper button S1 simultaneously.
The indication of the ARR32 is as follows: POWER, LOOP, and RADIO synchronously
illuminate with amber for a half of a second.
RESTORING COMMUNICATION BETWEEN THE DEVICES AND THE ARR32
If radio communication between a radio link device and the ARR32 is lost for a short time then
communication can be re-established within a single Device Poll Interval.
In case of a long-term loss of communication (for example, if the ARR32 is de-energized for a long
time), in order to save power of the radio link devices the radio communication period increases with
each polling loop interval and can reach 60 minutes. So, after a long-term failure communication can
be restored in an hour.
If it is necessary to restore communication after a long-term failure immediately, run the Link Quality
Test procedure for all the radio link devices by short presses on their Prog buttons (apart from
S2000R-ASR1 for which the service magnet is used ) (see sections of this Manual for the relevant
devices).
Communication with a device is considered to be lost if the device doesn’t respond
within three Poll Intervals.

S2000R
19
www.bolid.ru
RESETTING THE ARR32
When the ARR32 is reset, all connected radio link devices and the polling loop address of the ARR32
are erased from its memory and the access password for programming the ARR32 by means of
Configurator (if set) is unset:
Switch the ARR32 to the Reset mode by pressing and holding the program button S2 (Figure
3-1) for ten seconds. The Reset mode is indicated in the following way: POWER LED flashes
with amber and green alternately six times per second while LOOP LED and RADIO LED are
off.
Confirm resetting by pressing the tamper switch S1. Resetting is indicated by the following
way: all the LEDs - POWER, LOOP, and RADIO – simultaneously show solid green light
within a half of a second. Then the ARR32 is reset automatically.
The ARR32 exits the Reset mode automatically upon the expiry of 15 seconds or manually
by pressing down the program button S2 and tamper button S1 simultaneously. On exiting
the Reset mode the indication of the ARR32 is as follows: POWER, LOOP, and RADIO
synchronously illuminates with amber for a half of a second.

Addressable Radio Link System
www.bolid.ru
20
7. S2000R CONFIGURATOR
The ARR32 and radio link devices are configured using a special software utility “S2000R
Configurator” (hereinafter referred to as Configurator) installed on a PC. This utility provides:
Connecting radio link devices to the ARR32 and removing them from the radio system;
Assigning polling loop addresses to the ARR32 and connected radio link devices;
Adjusting individual properties of the radio link devices;
Starting the procedure of analysis of radio channels (see Section 6);
Disabling the program button of the ARR32;
Monitoring for output parameters of the radio link devices;
Updating firmware of the ARR32 and radio link devices;
Testing link quality and reading statistics of radio communication with every individual radio
link device;
Setting Device Poll Interval;
Setting and deleting passwords to control the ARR32 by means of Configurator;
Generating backup configuration files for the ARR32.
The latest version of Configurator is available for free download at
http://bolid.ru
: in the Section
PRODUCTS → Orion Integrated Security System → Software → Configuring →
S2000R_Configurator
:
https://bolid.ru/production/orion/po-orion/po-config/config_s2000r.html#download
After connecting the ARR32 to the PC via a USB cable, run Configurator. The first window that opens
is Device Search window which displays all the ARR32 currently connected to the PC. Select the
device you need and click Open.
If a single ARR32 is connected, it opens automatically.
If there is no descriptor of the connected ARR32 in the Device Search window, click Rescan. If the
problem persists, ensure that the USB cable is connected properly and the relevant driver is installed
on the PC.
Table of contents
Other bolid Media Converter manuals