Bondtech DDG Ultimaker V2.0 Setup guide


Installation manual Bondtech DDG Ultimaker V2.0
Acknowledgements 1
Introduction 2
Compatibility 2
What’s in the box? 2
Ultimaker 2+ and Ultimaker 2 Extended + Upgrade Kit 2
Ultimaker 3 2
Mechanical Installation 2
What you need 2
Ultimaker 2+ and Ultimaker 2 Extended + 3
Ultimaker 3 5
Software Configuration 6
Ultimaker 2+ and Ultimaker 2 Extended + 6
Ultimaker 3 7
PC 7
MAC and Linux 13
General usage advice 14
Acknowledgements
Special thanks to Uta Fröhner for the help with the photos used in this manual.

Installation manual Bondtech DDG Ultimaker V2.0
Thanks to all the beta testers for the valuable feedback.
Introduction
The Bondtech DDG Ultimaker V1.0, which was developed by Bondtech and
Christopher Matthes, is the simplest way to increase the performance of your
Ultimaker machine in a matter of minutes.
This new revolution in design utilizes the proven Bondtech Dual Drive Technology
with precision CNC-manufactured parts. This gives the market’s best feeder
performance and reliability.
The Upgrade allows you to prototype even faster and print with peace of mind.
Compatibility
The upgrade is compatible with the following machines:
- Ultimaker 2 with Extrusion Upgrade Kit
- Ultimaker 2 Extended with Extrusion Upgrade Kit
- Ultimaker 2+
- Ultimaker 2 Extended +
- Ultimaker 3
- Ultimaker 3 Extended
What’s in the box?
Ultimaker 2+ and Ultimaker 2 Extended + Upgrade Kit
1x Bondtech DDG Righthand extruder kit
Ultimaker 3
1x Bondtech DDG Righthand extruder kit
1x Bondtech DDG Lefthand extruder kit
Mechanical Installation
What you need
To install the upgrade you are only going to need a M2.0- Hex Wrench.

Installation manual Bondtech DDG Ultimaker V2.0
Ultimaker 2+ and Ultimaker 2 Extended +
This guide shows the installation on an Ultimaker 2 with Extrusion Upgrade Kit.
Start by removing the material from your
printer(https://ultimaker.com/en/resources/18013-removing-the-filament). After the
filament is removed, power off the printer.
●Rotate the printer so you can
access the rear side.
●Remove the collet clip, which
locks the bowden tube into place.
●Unplug the bowden tube.
Installation manual Bondtech DDG Ultimaker V2.0
●Unscrew the 2 x M3 screws that
hold the original geared Ultimaker
feeder into place.
●Remove the feeder.
Place the Bondtech feeder assembly
against the rear back plate.
Insert the remaining 2 x M3 screws and
tighten down.
Installation manual Bondtech DDG Ultimaker V2.0
●Insert the bowden tube.
●Add the blue collet clip to lock the
the bowden tube into place.
You successfully upgraded your feeder!
●Now you just need to configure
the software of your 3d printer to
start printing again.
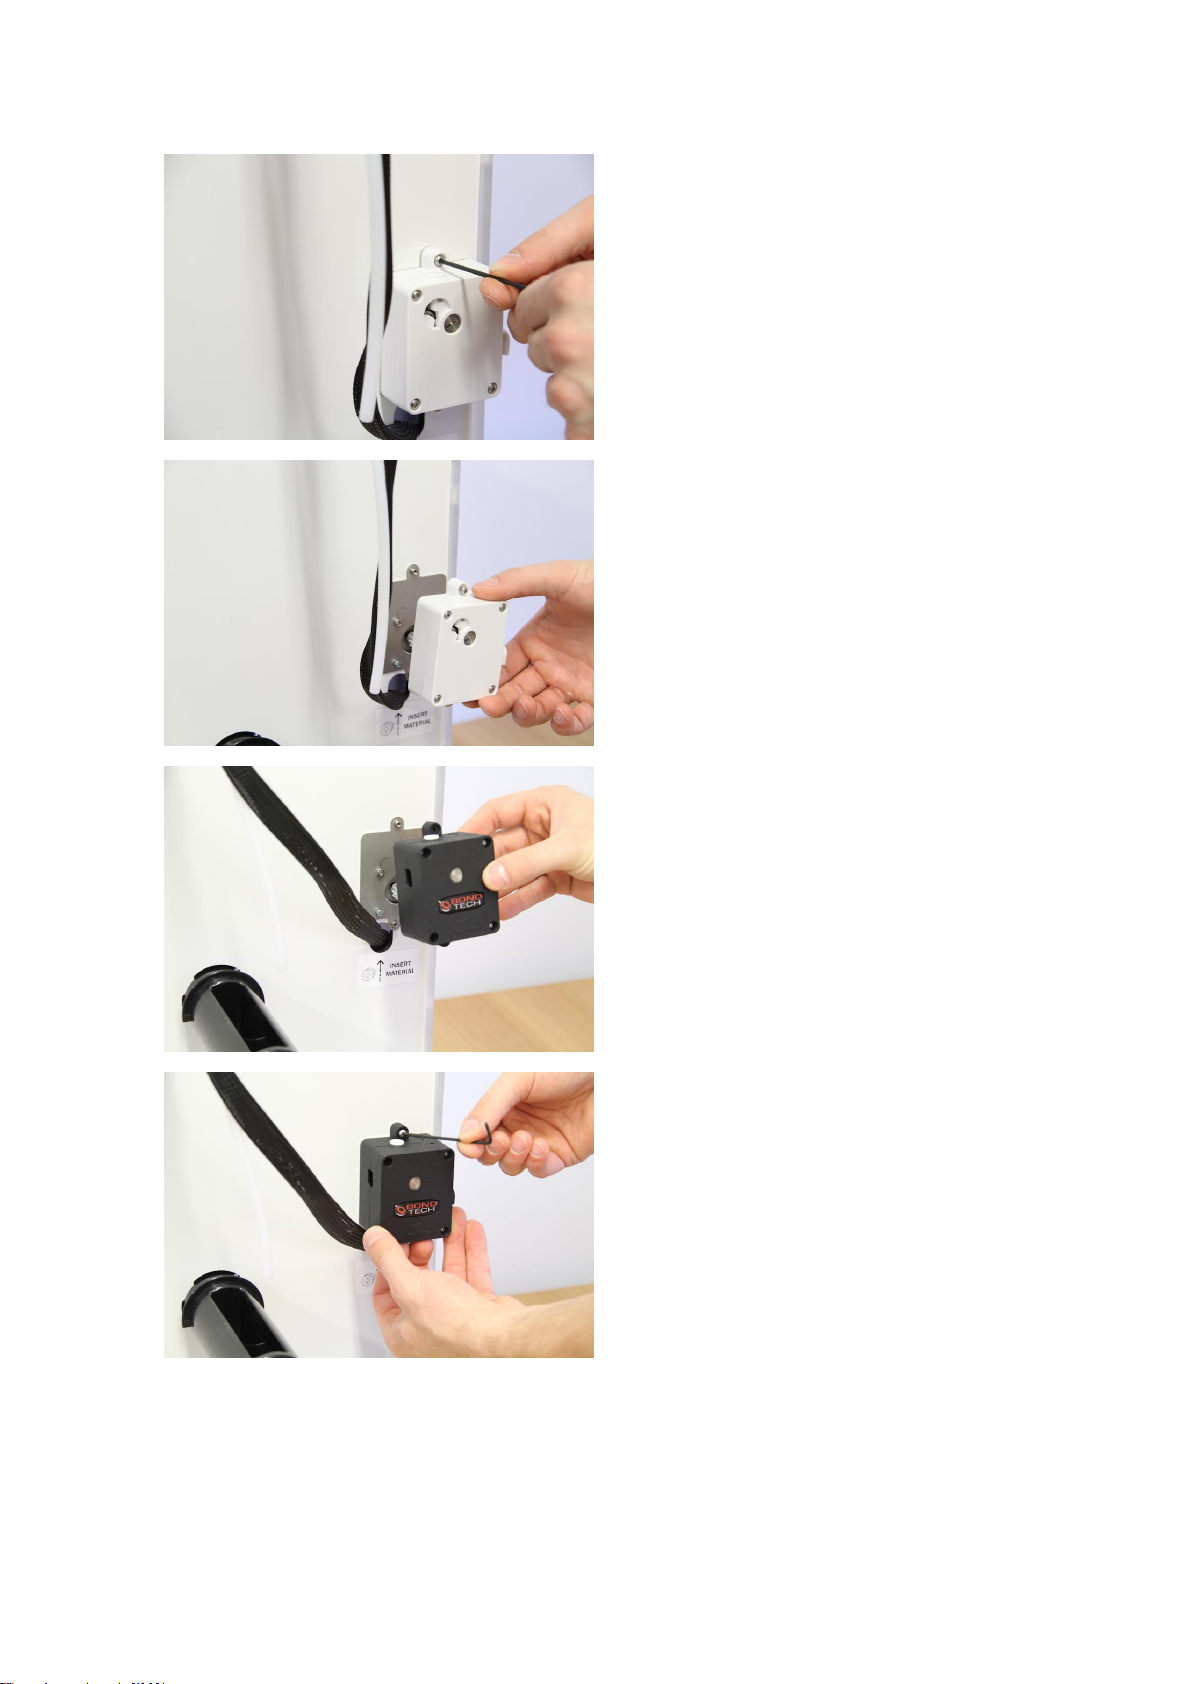
Ultimaker 3
Follow the guide for the Ultimaker 2+ and Ultimaker 2 Extended + twice. Use the
feeder labeled 2 the second time you follow the guide.

Installation manual Bondtech DDG Ultimaker V2.0
Software Configuration
Ultimaker 2+ and Ultimaker 2 Extended +
The Ultimaker’s firmware needs to be changed since the new feeder uses another E-
step value and also the speed for loading/unloading material needs to be lowered in
order not to stall the stepper motor. The reason for this is that the Bondtech Dual
Drive system has a different drive gear diameter and needs a bit more torque while
loading due to gripping the filament on both sides. The additional grip allows to push
the material with higher force and reliability.
Below you will find links to the latest firmware that is based on original Ultimaker 2.1
firmware.
The following is changed when compared to the original:
E-step is now 311 and Loading speed is 50 mm/sec
Attention!
Please make sure that you use the correct version for Ultimaker 2+ or Ultimaker 2
Extended +, if you load the firmware for Ultimaker 2 Extended + into a Ultimaker 2+
you will crash the head into the printing surface.
Ultimaker 2+ Firmware: Link
Ultimaker 2+ Firmware with reveresed rotation direction: Link
Ultimaker 2 Extended + Firmware: Link
Once you have downloaded the firmware use Cura to install the new custom
firmware on your printer.
After the firmware has been installed you need to perform a “Factory reset” on the
printer to ensure that the printer uses the new values in the firmware.
After the restore to factory settings is complete you will have to level your build plate
and load material (the same procedure as when the printer was new).

Installation manual Bondtech DDG Ultimaker V2.0
Ultimaker 3
PC
Start the printer.
We recommend to download and install the latest firmware as it fixes problems and
adds extra functionality. Please read the Ultimaker guide
(https://ultimaker.com/en/resources/20500-upgrade-firmware) on how to update the
firmware if you are not sure how to install the latest firmware.
Once firmware is installed enable the developer mode.
●System -> Maintenance -> Diagnostics -> Developer mode
Your Ultimaker 3 will reboot.
Download a SSH/Telnet client like Putty (http://www.putty.org) and install it on your
computer.
Locate the IP number of your Ultimaker 3. The IP address is shown on the main
screen of the printer on the first line as well as in System -> Network on the last line.
For this example we use the following IP address: 192.168.1.133
Please read the whole guide from this point at least once before changing the values
on your own machine.
Open Putty and enter the IP-address in the Host Name field and click on Open.
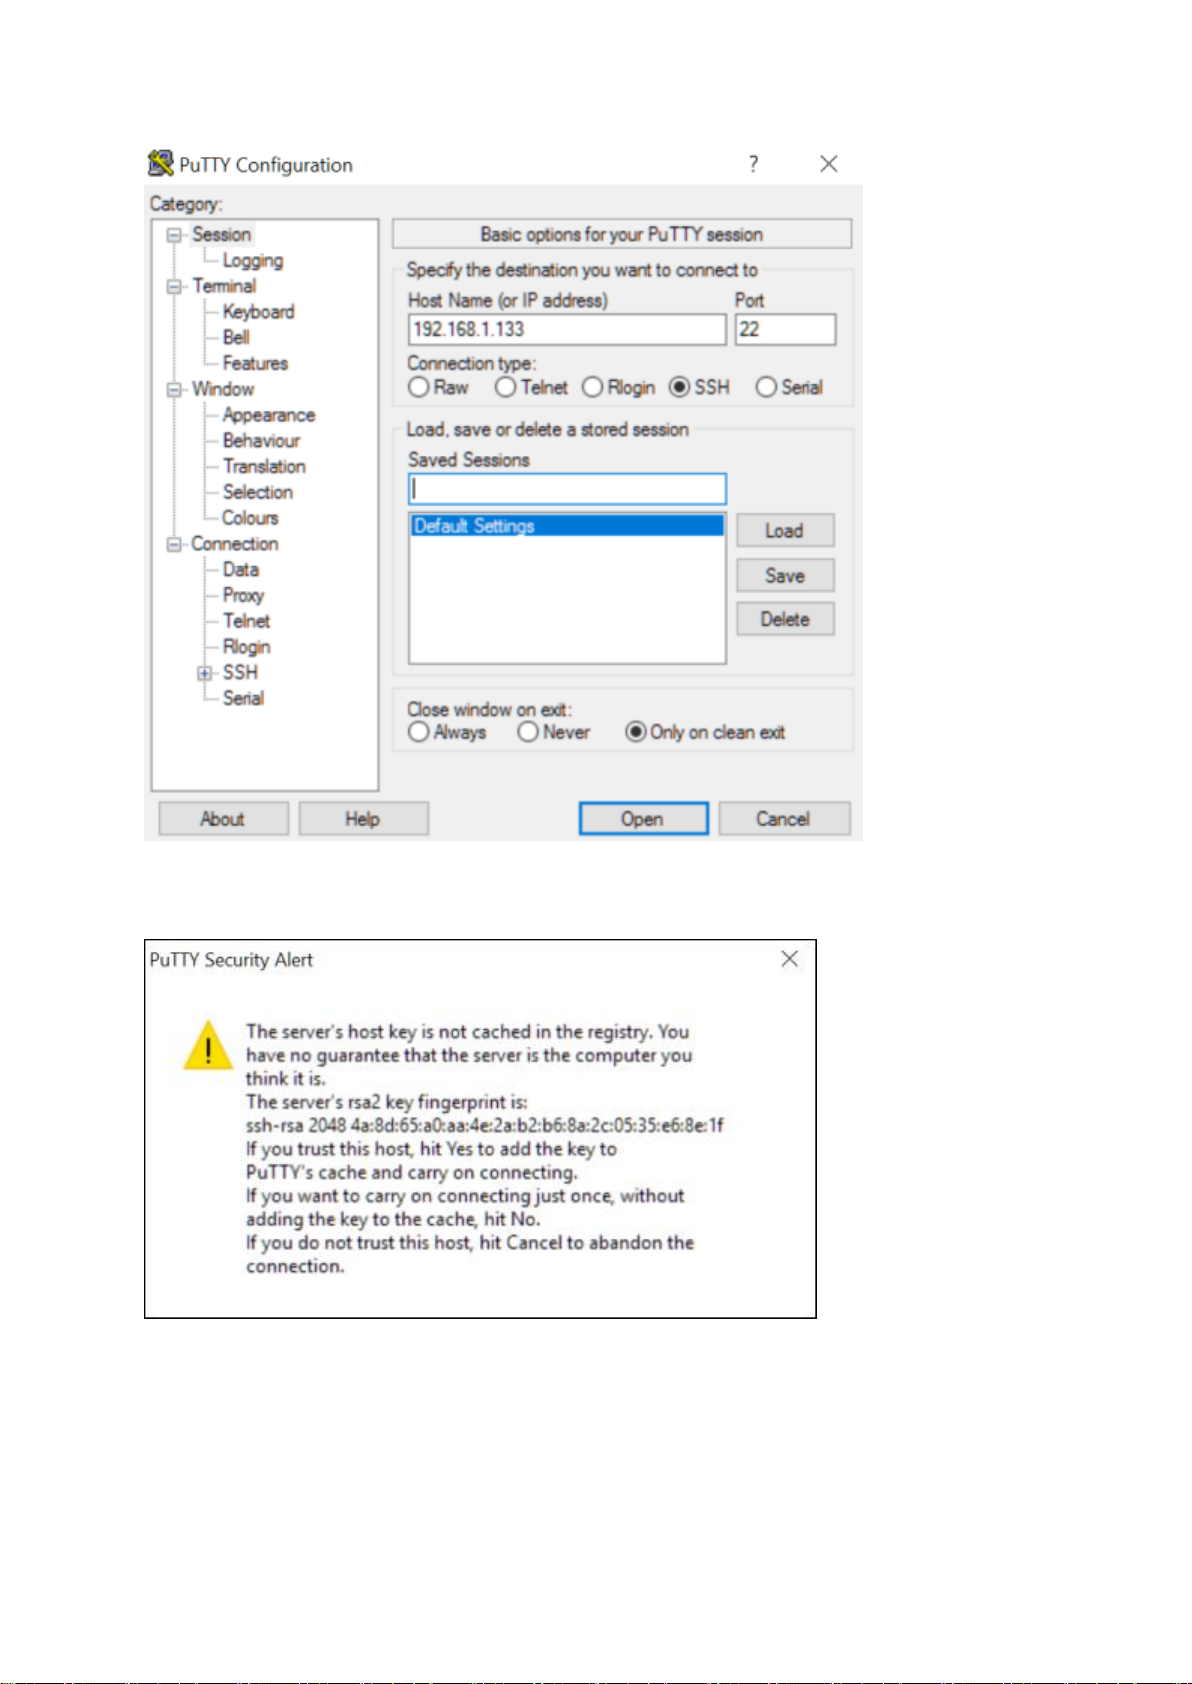
Installation manual Bondtech DDG Ultimaker V2.0
The first time this Alert will pop-up and you need to click OK to accept the
connection.
The connection window opens up. Enter root as the username and ultimaker as the
password.

Installation manual Bondtech DDG Ultimaker V2.0
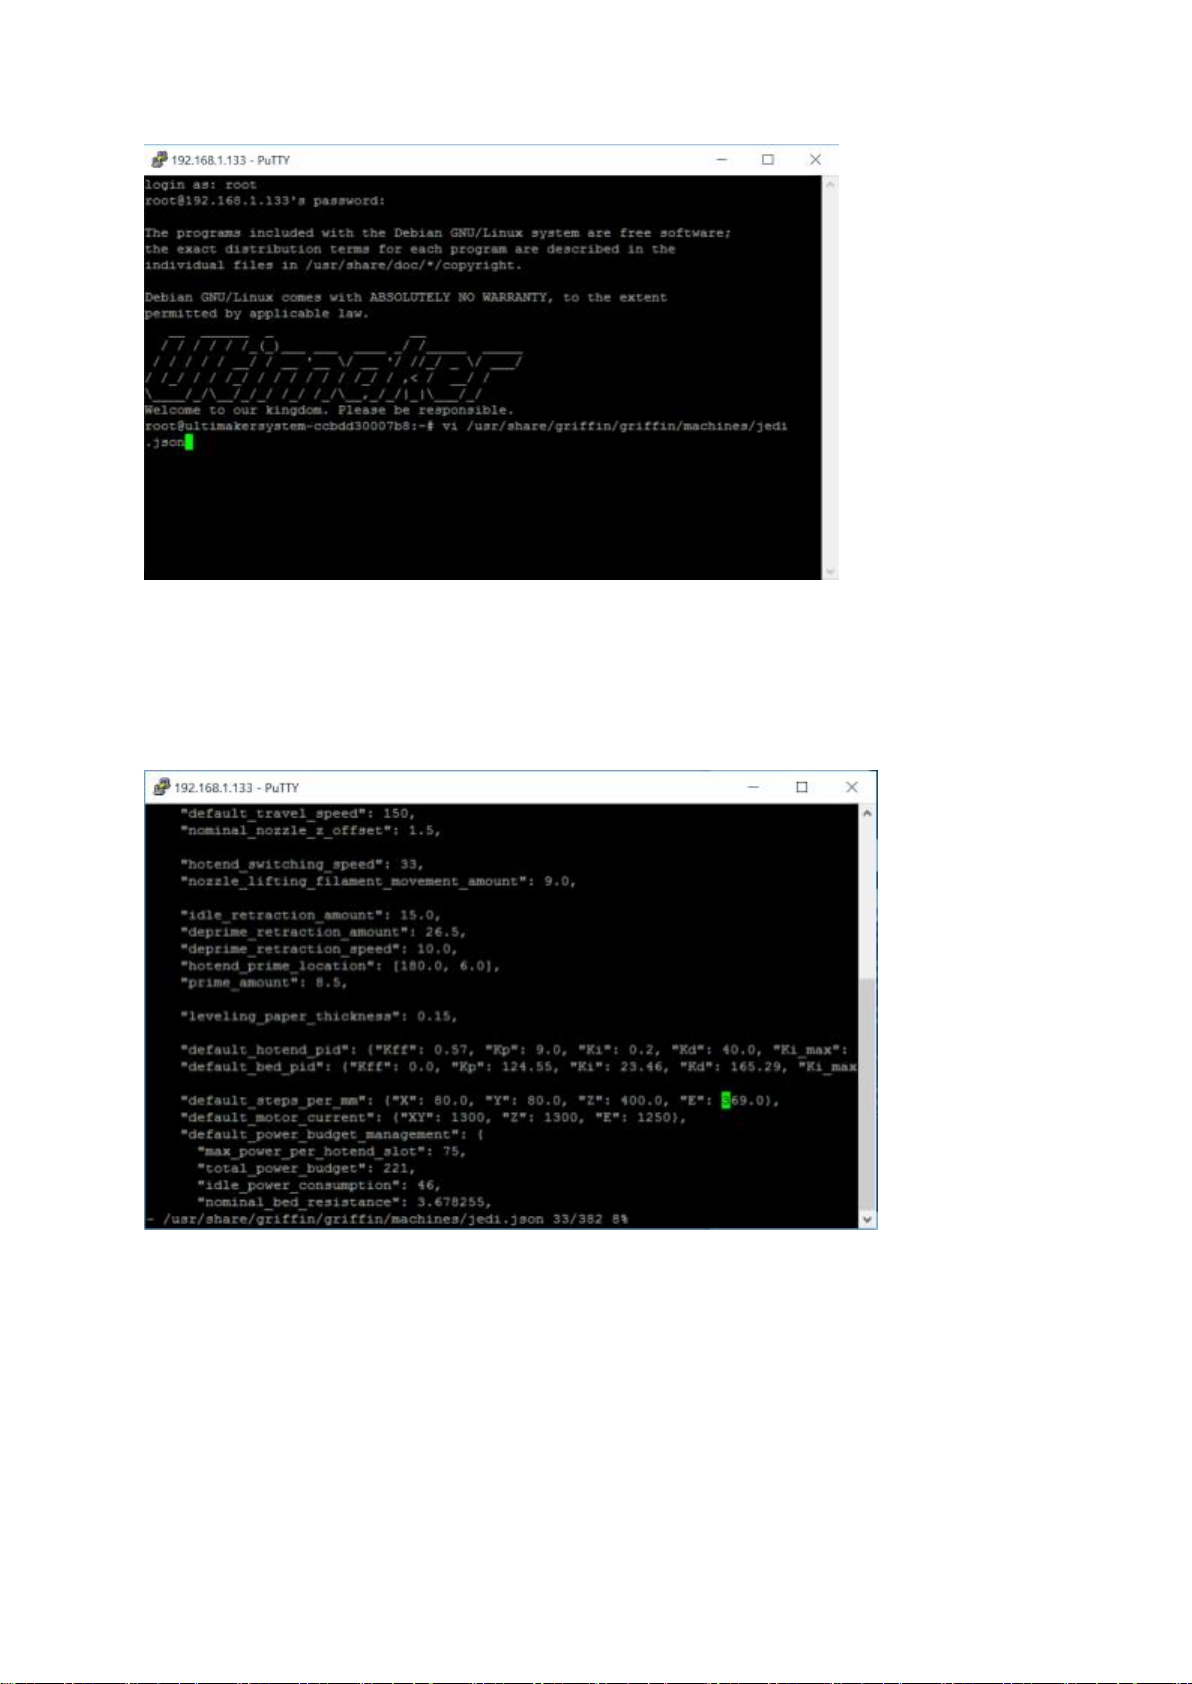
Type in the command matching the firmware version of your Ultimaker 3 and press
enter.
Firmware Version
Command
3.6
vi /usr/share/griffin/griffin/machines/jedi.json
3.7 –4.2.5
vi /usr/share/griffin/griffin/machines/um3.json
Tip! If you copy the command above you can paste it directly into Putty console by pressing
right mouse-button in the window.
Installation manual Bondtech DDG Ultimaker V2.0
The editor opens the configuration file. Scroll down using the arrow keys until you
find
“default_steps_per_mm” row and use the arrow key to move the cursor to the value
for the extruder “369.0”, then press the “I” key to go into edit mode and update the
value to “311.0”.

Installation manual Bondtech DDG Ultimaker V2.0
Press the Escape key to go back to command mode and then enter “:x” and press
enter to save the file and exit the editor.
If you make a mistake you can use ctrl+z to exit without saving and start again.
To change the lenght that the material feeds during a material change you can edit
the parameter Bowden_tube_lenght, as default it is 700, if you want it to feed 30 mm
more edit the value to 730.The parameter is located at row 23.
Installation manual Bondtech DDG Ultimaker V2.0
We also need to change the value for the speed used when loading/unloading
material.
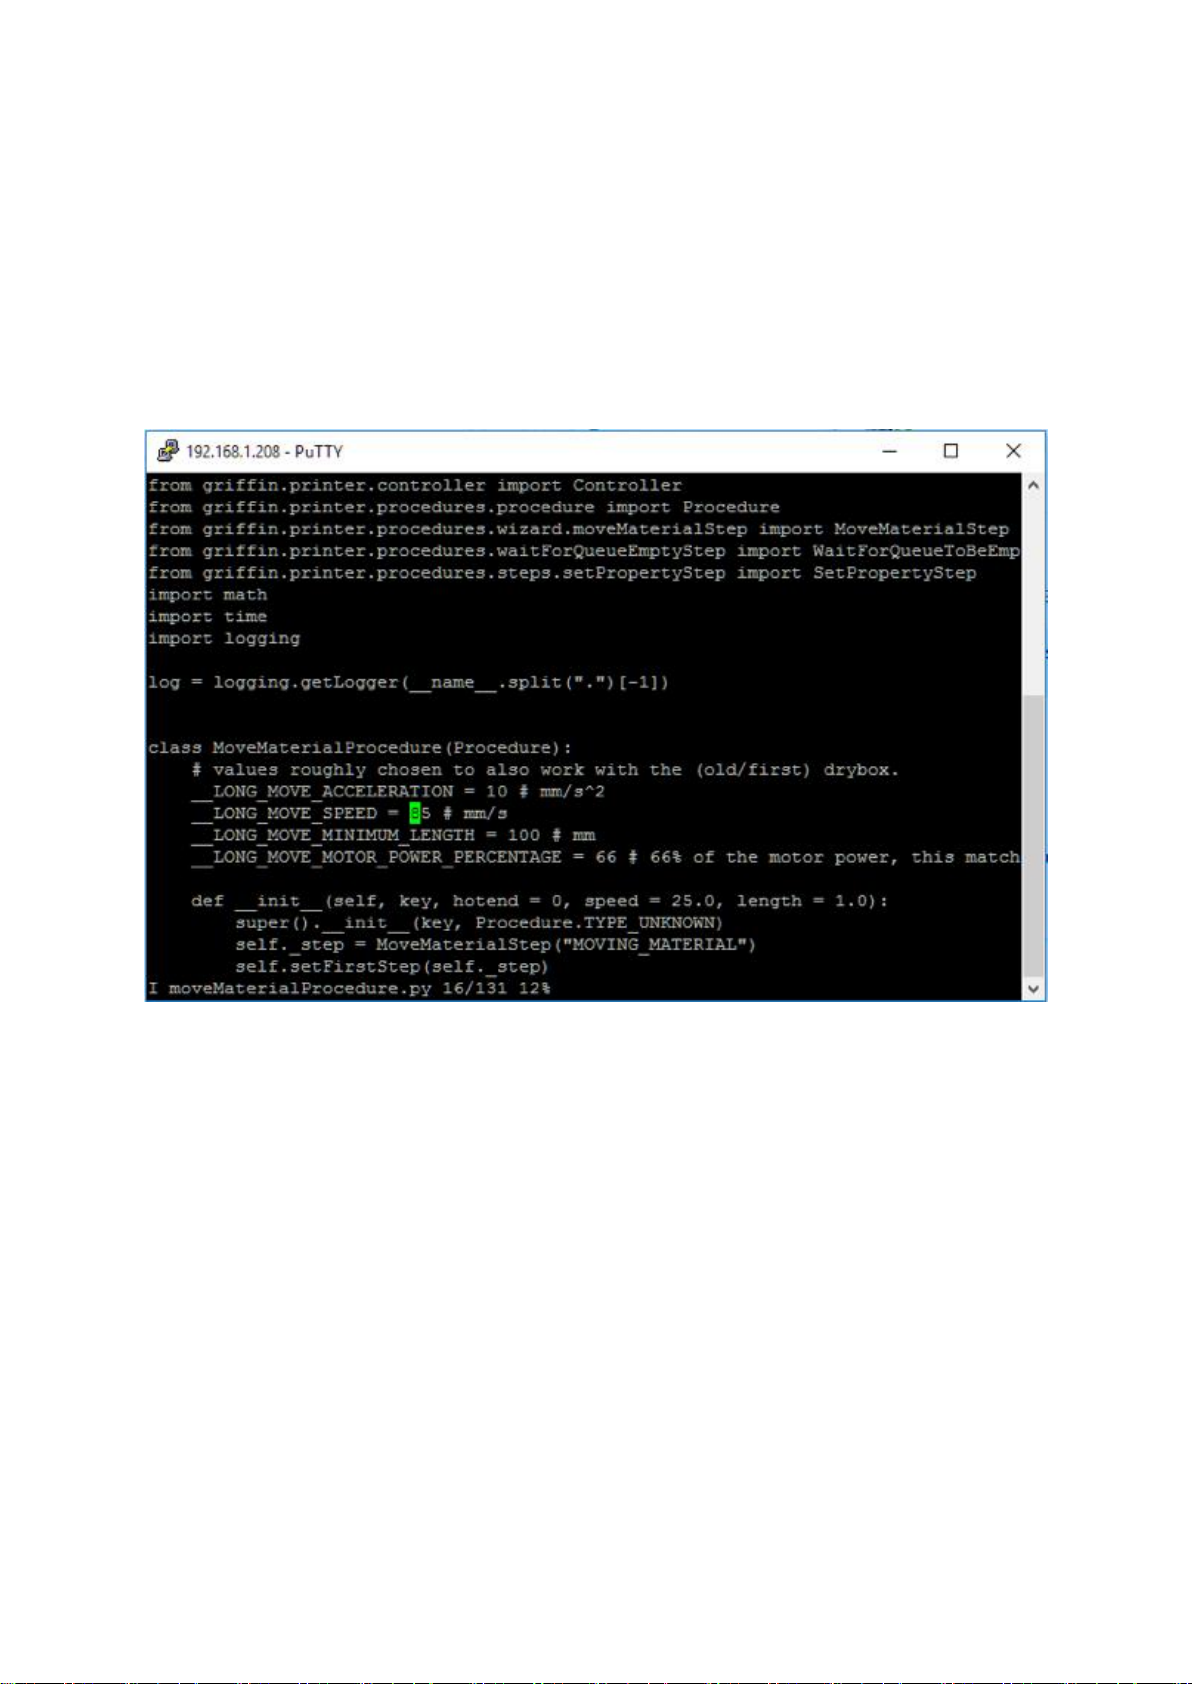
Type “vi
/usr/share/griffin/griffin/printer/procedures/wizard/moveMaterialProcedure.py” and
press enter.
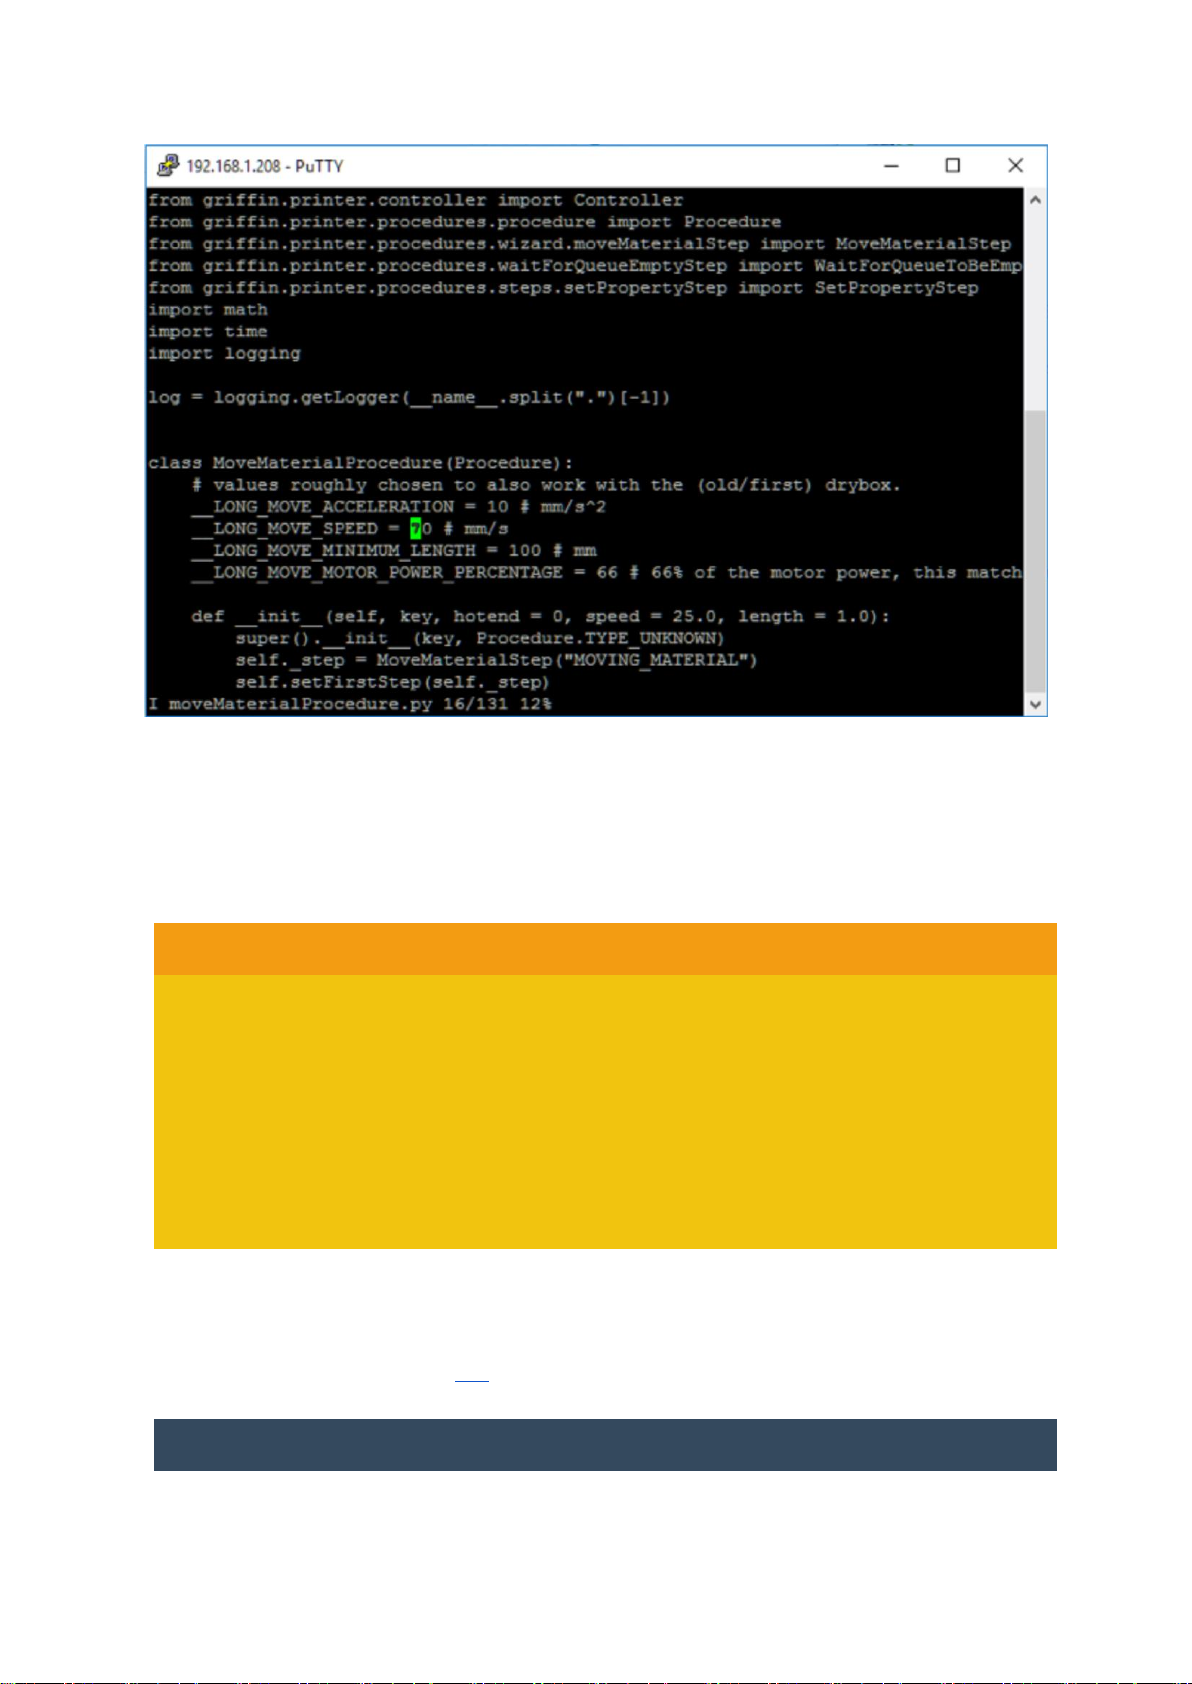
Change the speed on line 16 from 85/u to 70/u. Press the Escape key to go back to
command mode and then enter “:x” to save the file. Press enter and reboot your
printer. To reboot your printer type “reboot” and press enter. Wait until the printer has
rebooted. Do not shutdown the printer by turning of the power!!
Installation manual Bondtech DDG Ultimaker V2.0
Important notes:
1. after changing the settings you can disable dev mode
2. after a firmware update, you must enable dev mode and change the settings
again!
3. in vi, there is command mode and type mode. You start in command mode.
Move your cursor to where you want to edit, then press “I”. change the
value, then use the escape key to go back into command mode. In
command mode use “:x” to save and exit. If you make a mistake you can
use ctrl+z to exit without saving and start again.
MAC and Linux
Follow the instructions of the PC guide, but use the terminal instead of Putty.
Connect to your Ultimaker 3 via the terminal with the following command:
ssh root@your_ip_adress

Installation manual Bondtech DDG Ultimaker V2.0
General usage advice
While testing the upgrade we got great printing results by setting the tension halfway
of the scale. Due to the difference between materials you may want to adjust the
tension of the spring. Flexible filament for example does not need as much tension.
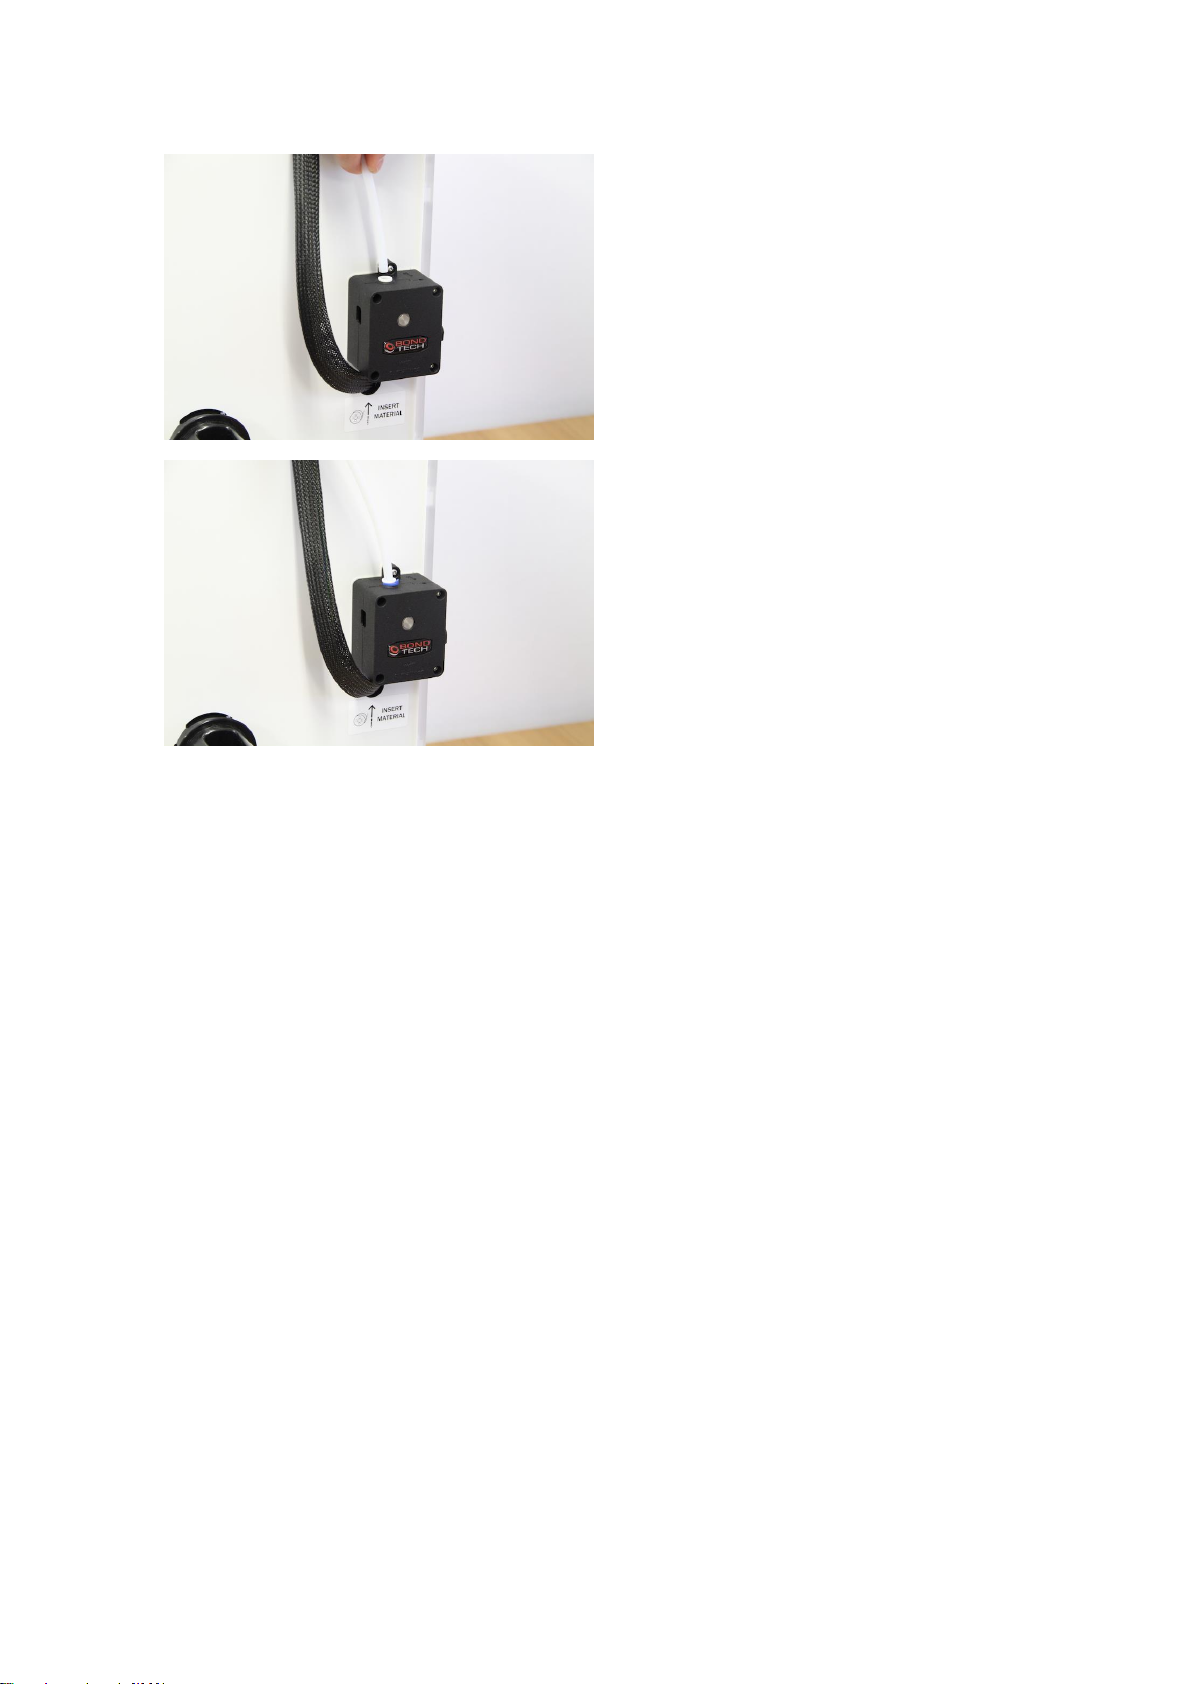
Filament loading gets even easier with this upgrade. Insert the filament and wait until
the filament is gripped by the Bondtech Dual Drive system. Confirm and you are
done. The Bondtech Dual Drive system will automatically guide the filament into the
PTFE tube.
If you want to push or pull the filament out of the PTFE tubing you can pull the lever
up to release the firm grip of the Bondtech Dual Drive system. Releasing the grip will
allow you to move the filament through the tube by hand.
Good luck with your Bondtech feeder!
If you have any questions please first read the FAQ
(http://www.bondtech.se/en/faq/). If the question still hasn’t been answered feel free
to contact us by email or telephone.
Repslagarvägen 3
33153 Värnamo
Sweden
e-mail: [email protected]
phone: +46702220193
web: www.bondtech.se
VAT-registration number: SE556995564301
Christopher Matthes
Twitter: https://twitter.com/cj_matthes
Table of contents
Other Bondtech Industrial Equipment manuals


