Slee MCS I User manual


2 Manual_MCS_I_2021-10-002.00_EN.docx

Manual_MCS_I_2021-10-002.00_EN.docx 3
CONTENTS
1. Safety 5
1.1 Introduction 5
1.2 Used symbols 5
1.3 Intended use 5
1.4 Emissions 6
1.5 Sources of danger 6
1.6 Authorized user / Operator 6
1.7 Personal protective equipment 6
1.8 Safety instructions on installation site 6
1.9 Safety equipment 7
1.10. Case of emergency 7
2. Transport / Installation 8
2.1 Technical data 8
2.2 Transport / Storage 8
2.3 Unpacking 8
2.4 Setup and connection 9
2.5 Operation conditions 9
2.6 Functional components 10
3. Operation / Before Operation 11
3.1 Initial Fill Up 11
3.2 Lubrication of the pumping system 11
3.3 Switch On / Check / Initialization 12
3.4 Flushing the unit with Xylene 14
3.5 Fill Up with mounting media (Pertex®) 15
3.6 Evacuation of the system 15
3.7 Mounting media volume, cover glass size, etc. 16
3.7.1 Mounting Media Volume, Cover Glass Size etc. 16
3.7.2 Setup “Arm”(speed and pressure) 17
3.7.3 Programs 17
3.8 Coverglass 18
3.8.1 Filling up coverglass 18
3.8.2 Coverglass positioning 19
3.8.3 Coverglass quality and separation adjustment 21
3.9 Storage 23
4. Regular cleaning and maintenance 24
4.1 Cleaning Instructions 24
4.2 Timing of cleaning and maintenance 25

4 Manual_MCS_I_2021-10-002.00_EN.docx
5. Routine Basics 26
5.1 Direction of specimen on the slides 26
5.2 Short introduction 27
6. Troubleshooting 29
6.1 Changing the fuses 29
6.2 Troubleshooting 30
6.3 Error Messages 30
7. Abandonment/Recycling 32
8. Greasing 32
.

Manual_MCS_I_2021-10-002.00_EN.docx 5
1. SAFETY
1.1 INTRODUCTION
By purchasing this MCS I coverslipping machine, you decided for a quality product of
SLEE medical GmbH, Germany. Intention of this manual is to help you, working with
your unit. Please read it carefully and completely and follow its advices.
1.2 USED SYMBOLS
This symbol warns you of risks for the life or health of
person. Pay attention!
This symbol warns you of risks for machine, material or
environment. Pay attention!
This symbol stands for areas of information. Pay attention!
1.3 INTENDED USE
The exclusive application of the coverslipping machine MCS I is, to bring mounting
media and cover glass on slides with histological or pathological tissue samples or
cytological smears to save working time of laboratory personal and also have less tiring
work and impairment of health by harmful solvent fumes. A use in food industries and
similar facilities is strictly prohibited. Unauthorized rebuilding or changing to this
laboratory instrument is strictly prohibited due to safety reasons. Use only original SLEE
medical GmbH spare parts in case of replacement issues. Operation, maintenance or
service conditions mentioned in this manual have to be kept strictly
6 Manual_MCS_I_2021-10-002.00_EN.docx
1.4 EMISSIONS
The emissions of solvent steams due to the use of reagents and chemical glue inside the
MCS I are reduced by the powerful fans and the charcoal filter (to be exchanged
regularly) of the MCS I exhaust system. A connector to your central exhaust system is
integrated, so the machine can also be run without filter.
1.5 SOURCES OF DANGER
The work with reagents and medias, as they are used in laboratories to coverslip slides,
is always a danger for health and life. So also by using the MCS I be sure to follow the
common rules and regulations for work with these medias. Further danger can be
caused by the moving mechanical parts (step motor axes) inside the MCS I. For this
reason the safety covers normally prevent of touching moving parts. If one of the covers
are open, the software is not starting the process and an electronic safety board cuts the
power of the motors to offer a double safety.
1.6 AUTHORIZED USER / OPERATOR
Users, working with the MCS I, may only be those, who have been instructed by the
operator. The operator is responsible to third persons on the operating site. The
operator has to provide this instruction manual to the users and to make sure, the users
have read and understood it.
1.7 PERSONAL PROTECTIVE EQUIPMENT
Slides and baskets taken out of the MCS I after coverslipping may still be contaminated
by reagents or colours from the staining machine. So by taking out or by cleaning the
machine you may have direct contact. According to common safety regulations, it is
necessary to wear gloves to prevent contact with your skin.
1.8 SAFETY INSTRUCTIONS ON INSTALLATION SITE
The MCS I has to be installed only on a stable, even and solid basis to be sure, it stands
and works safely. A falling instrument means a big accident risk! Installation has to be
done by trained and certified Slee personal.

Manual_MCS_I_2021-10-002.00_EN.docx 7
1.9 SAFETY EQUIPMENT
The MCS I can be stopped safe by just pressing „break“ which will lead to put on the
last necessary coverglass so nothing will dry out during this break and then releasing the
cover. In this case a restart is offered by the MCS I. For some reason it can be necessary
to have the unit stopped immediately. In this case you have to push the “ON/OFF”
button, which will directly stop the running process, release the cover and cut the power
of the motors. The MCS I confirms this “Emergency Stop” by an Alarm and a message
on the screen. Pushing „ON/OFF“ again will switch the unit into stand-by mode. During
normal process the safety covers prevent users from being hit by moving parts inside.
1.10 CASE OF EMERGENCY
For an instant emergency stop just push the „ON/OFF“ switch, as mentioned in point
1.9 „Safety Equipment“. This will directly stop the running process, release the cover
and cut the power of the motors. The MCS I confirms this “Emergency Stop” by an
Alarm and a message on the screen. Pushing „ON/OFF“ again will switch the unit into
stand-by mode. For cutting the complete Power supply, just switch the main switch on
the right side of the unit or pull out the cable.

8 Manual_MCS_I_2021-10-002.00_EN.docx
2. TRANSPORT / INSTALLATION
2.1 TECHNICAL DATA
Coverslipping time: 6 – 11 sec. per slide
Mounting media volume: 30 - 150 µl
Volume of mounting media container: 500 ml
Slide specifications:
Size: 26 x 76 mm
Thickness: 0,9 - 1,2 mm
Capacity: 150 pieces, continuously in special
Slee 30 pcs. slide baskets
Coverglass specifications:
Sizes: 24 x 50, 55, 60 mm
Thickness: 0,12 - 0,19 mm
Capacity: 250-300 pieces (anti-adhesive automat coverglass)
Exhaust connection:
Diameter of round connector: 100 mm
Max. air throughput: 195 m³/h
Max. static pressure: 50 Pa
Size (L/D/H): 630 x 670 x 640 mm
Weight: 65 kg
Power supply: 100-240V / 50/60Hz / 85 VA
Operating temperature range +10 to +35 °C
Operating humidity max. rel. 80 % non-condensing
Storage temperature range +5 to +55 °C
Storage humidity max. rel. 80 % non-condensing
2.2 TRANSPORT / STORAGE
The coverslipping machine MCS I is delivered in a protection box. Please move it only
upright and avoid shocks.
2.3 UNPACKING
Put the machine on a flat and stable underground and remove the packing. You should
keep the material for safety in cases of later transports, if possible. Check the integrity of
the delivery. The MCS I comes with the parts, notified on a separate packing list.

Manual_MCS_I_2021-10-002.00_EN.docx 9
2.4 SETUP AND CONNECTION
Before initially switching on the MCS I, leave the unit on the designated workspace for
at least 2 hours or more, to adjust to room temperature. Installing and initial adjusting
only may be operated by engineers specially trained by Slee. Before connecting the
instrument to the power supply, make sure the unit is adequate to your local electrical
power line. The unit is delivered “ready to start”. For the connection to your grounded
laboratory power supply use the delivered cable.
The MCS I can be used with a charcoal filter and has two powerful exhaust fans and so
it can be used even in laboratories without separate central exhaust-system. The filters
have to be exchanged at least once a year, depending on frequency of use. Fitting
replacement filters can be ordered at Slee. If you have an existing central exhaust-
system, you can connect the machine to this unit of course.
Leave space of at least 10cm from a wall or other units to all sides of
the MCS I, to guarantee an optimized air circulation.
For detailed information ask your local SLEE medical GmbH sales
representative.
Don’t put or store inflammable things to the direct neighbourhood of
the MCS I.
2.5 OPERATING CONDITIONS
•The MCS I is concepted for use in combination with Slee´s
multistainer MAS, but may also be operated as stand-alone by
installing a separate loading station.
•Operating of the MCS II is only intended within closed premises.
•Field temperatures may differ from + 15°C to + 40°C (no big oscillations).
•Max. allowed height over sea: 2000 m (EN 61010-1:2001).
•Vibration free and weight-adequate work ground required.
•Relative air humidity max. 80%, not condensing for temperatures up to 31°C,
Linearly decreasing to 50% relative humidity at 40°C.
•No exposure to direct sunlight.
•No variations of electrical power supply more than to 10%.
10 Manual_MCS_I_2021-10-002.00_EN.docx
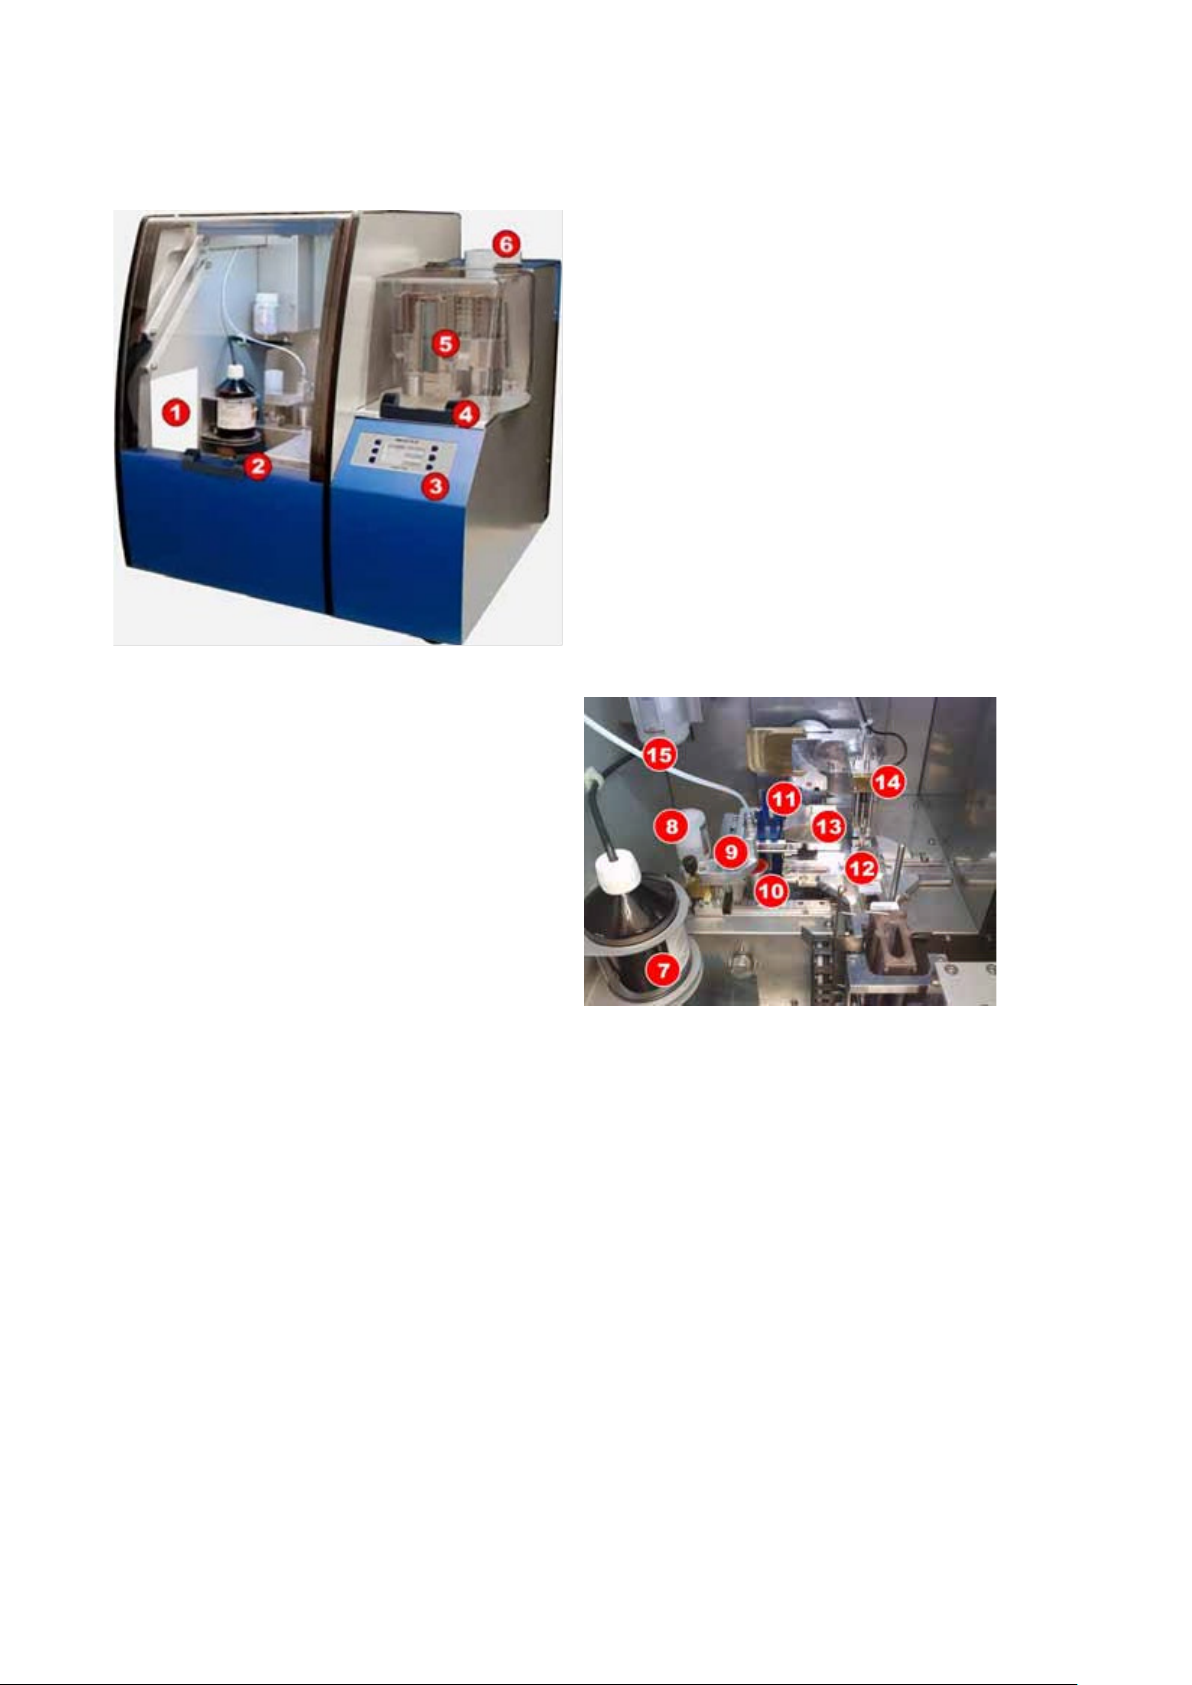
2.6 FUNCTIONAL COMPONENTS
1 – Area of transfer unit
2 – Safety hood
3 – Display / Operator panel
4 – Storage
5 – Storage cover
6 – Exhaust connector
7 – Mounting media bottle (Pertex)
8 – Xylene reservoir for dispenser needle
9 – Dispenser needle
10 – Waste container
11 – Coverglass box
12 – Turntable / Disk
13 – Coverglass waste box
14 – Arm / CG-head
15 – Xylene reservoir for media pump

Manual_MCS_I_2021-10-002.00_EN.docx 11
3. BEFORE OPERATION
Attention! Use only baskets, that are signed with the Slee logo
inside your MCS I!
3.1 INITIAL FILL UP
After installation the machine needs at first a bottle of mounting media. Slee is strictly
recommending Pertex®. Using other mounting media types can cause damage due to
wrong viscosity and different dry-out processes! Before fill up, Slee recommends to have
a system flush with suitable solvent (when using Pertex® this is xylene).
Especially reagents based on orange substances are known for
sticking mechanical parts within a short time.
Slee does not assume any liability when using other mounting media types and suitable
solvents!!
Insert a bottle, glass or container with xylene into the mounting media holder on the left
inside wall of the unit and put the end of the tubing into this container. The unit is now
prepared for the next steps. Follow step 3.2
3.2 LUBRICATION OF THE PUMPING SYSTEM
To ensure the lubrication of the complete pumping system, it is necessary to keep all
mechanical parts clean and smooth with suitable solvent to protect it from dry out and
sticking. (For best control and least possible fume emission of used solvents, Slee created
refillable cartridges (reservoirs), which easily show the fill level all the time. To refill the
cartridges, you may open the MCS I, after it took in its refill position and opens the
hood after switching on, or anytime during operation, by pressing the “BREAK” button).
Go on with step 3.3.

12 Manual_MCS_I_2021-10-002.00_EN.docx
3.3 SWITCH ON / CHECK / INITIALIZATION
Connection and main switch “ON”
Connect the MCS I with your laboratory power supply.
Turn on the main switch (at the power connector on the
right side) and close both covers if open.
Press “ON/OFF” key at the display
With connected power cable the unit now is in standby
and can be switched to operation with the power key on
the display (left side, upper button).Press this power
switch and hold it for 2 seconds.
Eventually „power failure“
Quit the „power failure“ if shown. (This means, the unit
was not correctly shut down after last time running,
maybe due to a power blackout).
Check and confirm filling levels
Now check the levels of xylene cartridges and the
mounting media bottle. The machine has released the
hood locking now, so it's easy for you to open it and
have a closer look at cartridges and the bottle, and to
refill them, if necessary. Also check for the cover glass
waste container and the purge cap (mounting media
waste, which has to be replaced and emptied regularly).
The purge caps are available as consumables at Slee.
The MCS I asks you to confirm your check by pressing
“OK”.

Manual_MCS_I_2021-10-002.00_EN.docx 13
Refill, clean, take out
Refill, clean, take out
The needle cartridge on the left (preventing of
needle dry out) is always free for taking out, while
check function at start-up and when hood is
released anytime you use the “BREAK” function.
It can be taken out by pulling it up.
Now you can refill the cartridge outside the unit
(best is to use a wash bottle).
If level is below the mark, it is time to refill the
cartridge. Please keep the cartridge clean – as
mounting media off course will leave remains that
can dry out. See on the right, how to check / take
out the parts.
Cartridge for system lubrication
The upper cartridge (for lubrication of the media
pump system) also has to be kept at correct level.
After pressing the „OK“ button now, the unit will
execute its initialisation run and turn to the
“operation screen“.
Initialization
While initialization, a % line shows you the actual
progress.

14 Manual_MCS_I_2021-10-002.00_EN.docx
3.4 FLUSHING THE UNIT WITH XYLENE
If needed, (before a longer period of non-use of the instrument, a transport and re-
installation on a new site and similar situations) you should start a system flush with
xylene. (At initial setup after receiving a new MCS I, after re-installation on a new site
and transports it is also strictly necessary to ensure, no remaining mounting media can
get hardened out and stick inside the mounting media system!)
From the operation screen you can press „Setup“, and then „Arm&Disp“ and then
„Dispenser“ to get into the needed pump menu.
Be sure, you emptied and replaced the purge cap before operating.
Put a container / glass with xylene into the mounting media bottle position, insert the
tube, put an empty purge cap (for mounting media waste) and start the system flush
with the key “Cleaning“. The unit now starts pumping xylene from your xylene
container to fill and clean the complete system. You will have to exchange / empty the
purge cap after the MCS I asks you to check xylene and Pertex® 3 times during this
cycle. You should restart the “Cleaning“ run perhaps for a second and third time after it
has finished. In cases of system cleaning after longer non-use of the MCS I, be sure to
have 3-4 runs before changing to Pertex® again and then start 2 runs with Pertex®
(Point 3.4). (To ensure a clean and primed unit, you should have a system flush in
intervals of every 2nd or 3rd mounting media exchange).
After a system flush the MCS I is prepared for filling up with Pertex®! (step 3.5)

Manual_MCS_I_2021-10-002.00_EN.docx 15
3.5 FILL UP WITH MOUNTING MEDIA (PERTEX ®)
Open a bottle of Pertex® and put it into the designated position at
the left inside wall of the MCS I. The end of the tube has to be
placed into the bottle. With a special adaptor it can be secured
against falling out as shown on the left picture. Be sure, the end of
the tube is positioned nearly at the ground of the bottle, to ensure
an optimized gain per bottle. Before each start of operation, you
need to check the fill level of Pertex®. You should never run the
bottle completely empty, because this will bring up air into the
system, which may make the mounting media dry out and stick
inside the tubes or at least may cause air bubbles on your slides.
To prevent upcoming cleaning and flushing time or service calls
because of this, you should exchange the bottles already a while
before the level reached the critical mark. Pertex®, which has been
left in a bottle, should be kept to put into the next bottle after there
is enough space again after some time of use and to consume it
completely by this way. The fill level of the Slee Pertex® bottles is
easy visible.
3.6 EVACUATION OF THE SYSTEM
From normal operation screen change to the setup menu by pressing the „Setup“ key
and then go on into “Arm&Disp” and then “Dispenser”. This menu offers a „Cleaning“
function and a „Bubble free“ function. „Cleaning“ gives you the possibility to flush the
system with xylene. For a fill up with mounting media, you should only run “Bubble
free”, as this runs slower, to prevent the media from gas bubbles due to vacuum in the
tubing. „Bubble free“ operates a special gentle and slow fill up process and also
removes already existing air bubbles from the system by this way. While all these
functions, again make sure to have an empty „purge cap“ in the correct place!

16 Manual_MCS_I_2021-10-002.00_EN.docx
3.7 SETUP DATA
3.7.1 MOUNTING MEDIA VOLUME, COVER GLASS SIZE, ETC
To set the position of the start and end points of the mounting media line and the
volume of the media, Slee specially focused on simplicity for users. The volume of
Pertex® can be changed in 5µl steps anytime during the process using the two upper
keys on the right side of the display between 30 and 150µl. (In operation screen) For
more elementary settings, you may go to the „Setup“ menu by pushing the „Setup”
key, where all possibilities for an individual setting are open.
By entering „Arm&Disp“ you go on with “Dispenser” into the setting functions for the
„mounting media“. Here, you can choose between „Position“ and the cleaning or
bubble free functions.
By choosing „Position“ you will get the possibility, to set the start and end positions of
the mounting media – according to your used cover glass and type of samples. You can
change the distance from the left slide edge to the start point of the line (X1) with the
left two upper keys at the display and the length of the mounting media line (X2) with
the right upper keys at the display in 1mm steps.
Because the media spreads after cover glass is applied, it normally is sufficient, to enter a
value for X1 from left slide edge to cover glass edge and add about +5mm and for X2
of about cover glass length minus 10mm. Otherwise too much media might be pressed
out to the sides.
The “delay” time should only be changed, if you have problems with the start point of
the line.(~150ms).
For first tests Slee recommends to set the volume to the lowest value (30µl) and to
increase this volume during the test runs till results are optimized. This can be done
easily during the process with „volume+” and „volume-„ in the operation screen. You
don’t need to change to the „Setup“ menu!
Get out of any screen – back to the last one – easily by pressing exit in any screen.
All changes will be directly stored inside the program.

Manual_MCS_I_2021-10-002.00_EN.docx 17
3.7.2 SETUP “ARM” (SPEED AND PRESSURE)
To set the pressure and / or the speed of the coverglass head while bringing up the
coverglass onto the slide, go into “Setup” / “Arm & Disp” / “Arm” and adjust the
pressure and speed parameters from values between “10” and “200” to find the best
solution between reducing air-bubbles and being fast.
Best is, to have the MCS I adjusted by your local Slee sales or service representative. Slee
strictly recommends “automat star” coverglass from Knittel with a thickness of 0,12 to
0,19mm to receive best results without having problems of sticking to each other, that
can lead to crashes and damage of slides in bad cases, as the MCS I is working very fast
and has to bring all slides back into the basket, which may be impossible if too many
covers or splinters are placed there.
!!! Risk of broken slides and splinters of coverglass if ignored!!!
Be sure to guarantee a correct stock keeping of your coverglass! Avoid temperature
differences and high humidity! If still having such problems, there are some special
functions for Slee personal to activate a save mode of coverglass pickup. In these cases,
please call your local SLEE medical GmbH representative and ask for help in activating
and adjusting.
3.7.3 PROGRAMS
The MCS I can store up to 4 individual settings in different “programs”. Changes inside
the actual chosen program (indicated as “P#” in the lower left corner of the operation
screen – for example “P1”) will automatically be stored and used by the controller.
Mounting media length, volume, pressure or speed – all changes will only take effect in
the program, which you currently activated! This means, if you should need slower
speed and pressure for a special kind of samples, maybe due to air bubbles on the slides
for example, you may switch to another program no.# .For example “P2”. Now all
parameters changed to the values, which were actually stored in “P2”. You can now set
all parameters here to the same values, as in your “standard” program and only change
speed and pressure to a lower level. Finally set values are now automatically stored in
“P2” and it is easy now to switch the MCS I to these values, each time you run these
samples again, just by choosing “P2” again. Afterwards, you may switch back to your
standard / routine values by turning back to “P1”. The actual chosen program is
indicated in the main screen on the lower left side of the display (for example: “P1”). To
call up other programs, just turn to “SETUP” and choose another one by pressing
“P1(P2/P3/P4) change”. P1 changes from P1 to P2, then P3 or P4, then starts back at P1,
each time you hit this key one time.

18 Manual_MCS_I_2021-10-002.00_EN.docx
3.8 COVERGLASS
3.8.1 FILLING UP COVERGLASS
Slee offers you different sizes of cover glass boxes, adequate to your used cover glass.
These specially are designed for a high capacity (up to 300 pieces) of cover glass. All
available boxes can be easily pulled out of the holder and be quickly refilled outside. This
again guarantees you easy work with your MCS I, as well as a high capacity of
throughput before next refill. The cover glass box has to be refilled, when the MCS I
warns you with muted beep tones (at about 5% remaining pieces) – But the machine
will continue working until it finally doesn't have no further covers glass pieces. Then it
shows up an empty-problem, so now it is quite necessary to fill up the CG-box. To refill
the box, go on like shown in the next pictures. If the MCS I still works, just stop a
running process with the „BREAK“ key, to release the cover and hold all movements.
Only operate coverglass of high quality, that doesn‘t bring up
sticking problems, to ensure an optimized progress!

Manual_MCS_I_2021-10-002.00_EN.docx 19
3.8.2 COVERGLASS POSITIONING
To adjust your coverglass more to the front or
more back on the slides, just press “SETUP” to get
into the SETUP menu. Then press “Change CG”.
The MCS I will go to a special position and release
the hood to have best possibility to adjust the
coverglass container to the CG-Head.
As shown in the left picture, by turning the
adjusting-wheel, the coverglass-box will go more to
the front or more to the back.
Be careful and read attentively!!!
Due to the fact, that the CG-Head has to get into
the coverglass box without crash, it is strictly
necessary to adjust also the CG-Head to the new
position of the coverglass box!!!
Read and follow the next step before leaving
the adjustment function if you changed the
position of the coverglass box!!!
To Check with your fingers, if space to get
into the coverglass box in front and on the
backside is equal so it should be perfect for
the CG-Head to get inside the box.
Read and follow the next step before
leaving the adjustment function if you
changed the position of the coverglass
box!

20 Manual_MCS_I_2021-10-002.00_EN.docx
The CG-Head can also be adjusted by
just turning the adjustment-wheel (in
the upper area) as seen in the left
picture. So here again is the
information, to check with your fingers,
if space to get into the coverglass box
in front and on the backside is equal so
it should be perfect for the CG-Head to
get inside the box. See it in this picture:
The picture on the right again shows the
adjustment-wheel for the coverglass position.
When the position is perfectly adjusted, you
will need to check, if the separation pressure
(bending the coverglass) (fig. 1) is optimized
to your coverglass, as every glass has different
flexibility and separation characteristics! This
is explained in the next step
Table of contents
Other Slee Industrial Equipment manuals


Popular Industrial Equipment manuals by other brands

Ebmpapst
Ebmpapst R3G250-AY15-K1 operating instructions

FRONIUS
FRONIUS OPT/i TWIN SyncBox operating instructions

StoneAge
StoneAge AUTOBOX ABX-2L user manual

Alfalaval
Alfalaval BaseLine M instruction manual

Delta
Delta DTM Series manual

Premier Manufacturing Co.
Premier Manufacturing Co. 235SM Installation, Inspection, Operation & Maintenance Guide


