REPLACEMENT PARTS
Mirror Holder with Mirror $6.00
LTD Mirror Base 8.00
Mirror Arm 4.00
Isozone endcap 4.00
Small & Large Washers each .35
Endcap Bolt 1.50
Hex Wrench 3mm or 4mm .50
Cap Screw
.50
Objects you see in this mirror are
closer than they appear. This is
a convex mirror and it makes an
object appear smaller and more
distant than the object really is.
© 2017 MIRRYCLE CORPORATION 6101 Ben Place Boulder, Colorado 80301 USA www.mirrycle.com
Bontrager, Satellite Plus, and Isozone are trademarks of Trek Bicycle Corporation.
WARNING
ASSEMBLY INSTRUCTIONS for The LTD MIRRYCLE®for Bontrager®Satellite Plus Isozone Grip
INSTRUCTIONS
Printed in USA
1. Loosen the left hand grip clamp (1) using the
4 mm hex wrench and remove the endcap which
comes on the handgrip. If you live in a country
where you drive on the left side of the road,
remove the endcap from the right hand grip.
2. Fit the Isozone endcap (2) into the handlebar.
Retighten the grip clamp.
3. Place the LTD mirror base (3) over the endcap.
Position the mirror base so that the top of it tilts
forward (about halfway between straight up and
parallel to the ground. Push it on to the endcap
and secure it with the endcap bolt (4) using the
3mm hex wrench.
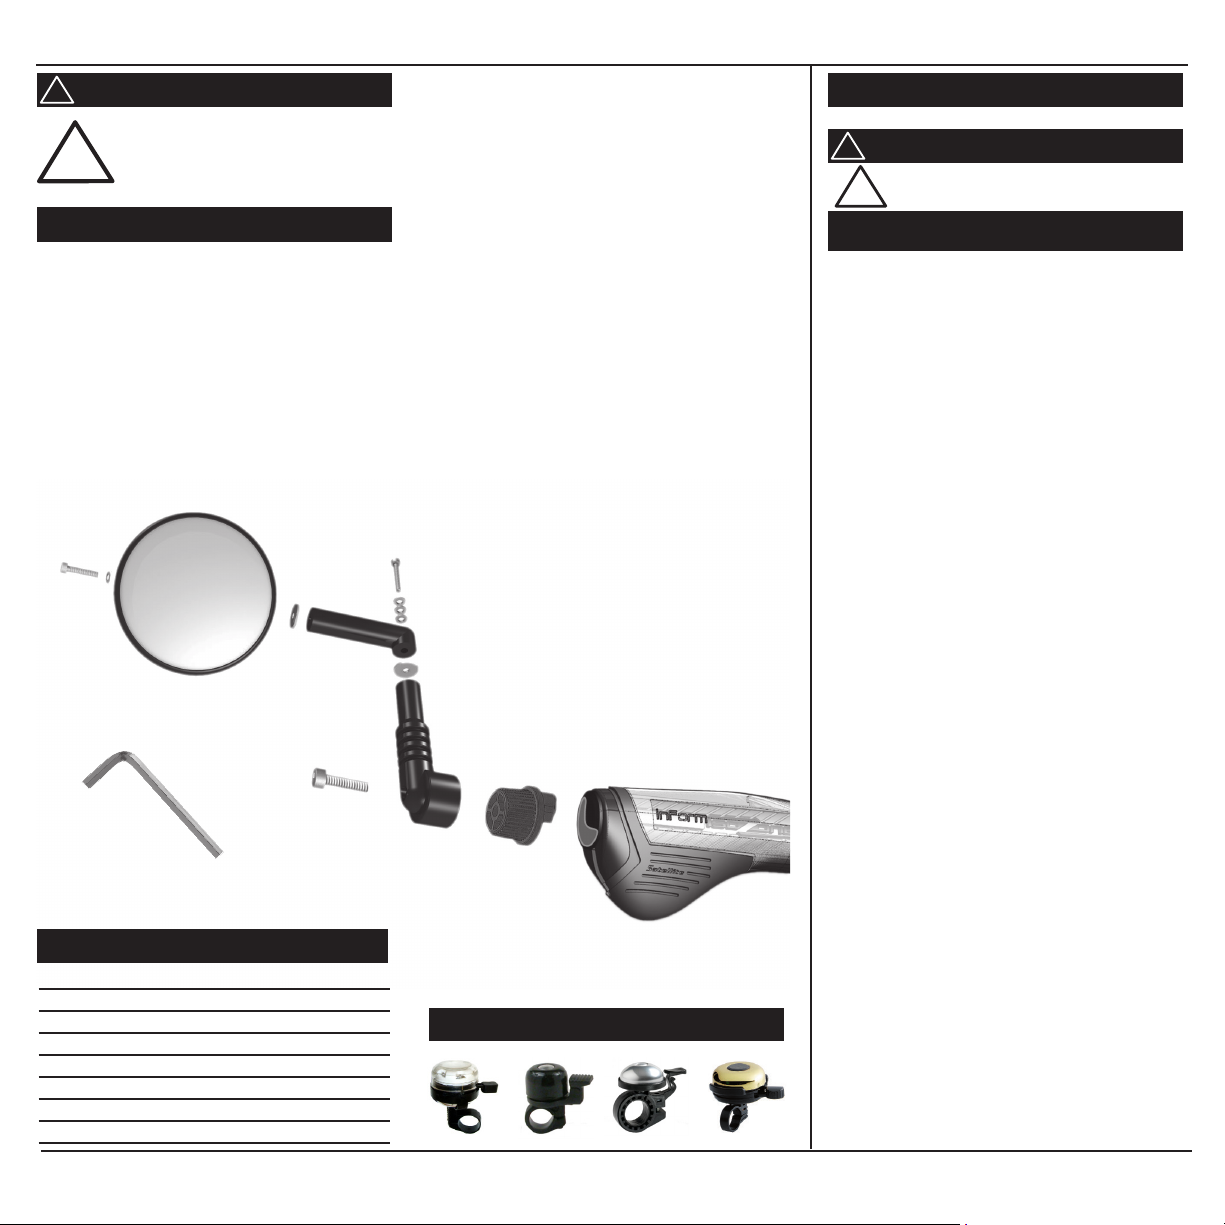
mirror arm (5)
endcap bolt (4)
cap screw (7)
LTD mirror base (3)
mirror holder with mirror (9)
3 small washers (6)
large washer (8)
1 small
washer (6)
4. Attach the mirror arm (5) to the mirror base.
Put three small washers (6) on a cap screw (7)
and insert it into the hole in the elbow end of
the mirror arm. Now put a big washer (8) on
the cap screw and screw it into the mirror base
and tighten it using the 3mm hex wrench (10).
The cap screws are an extremely tight fit when
screwed into the brass inserts. Keep the hex
wrench pushed into the head of the cap screw
while turning it.
5. Attach the mirror holder (9) to the mirror arm.
Put one small washer on a cap screw and insert
it into the countersunk hole in the mirror holder
bracket. Put a big washer on the cap screw and
screw it into the mirror arm and tighten it using
the 3mm hex wrench included. The cap screw fit
into the brass insert is extremely tight.
6. Take a ride on your bike on a quiet street
and adjust the mirror. Practice to get a good
idea of what your view will be.
Isozone endcap (2)
grip clamp (1)
large
washer (8)
For orders up to $20, for shipping & handling
in the U.S. and Canda, add $4.00;
to outside North America, add $7.00.
See our Incredibells at www.mirrycle.com
DEUTSCH
!
!
cap screw (7)
3mm or 4mm
hex wrench (10)
1. Lösen Sie die Klemmschelle (1) mit dem 4mm
Inbusschlüssel (10) am Handgriff und entfernen Sie
den Endstopfen der den Griff verschliesst.
2. Drücken Sie die Isozone Endkappe (2) in das
Lenkerrohr und ziehen Sie die Klemmschelle wie-
der fest.
3. Schieben Sie die LTD Spiegelgrundplatte
(3) auf die Endkappe. Positionieren Sie die
Grundplatte so, dass Sie nach vorne geneigt
ist (ca. 45 Grad Neigung). Drücken Sie die
Endplatte fest an und sichern Sie sie mit der
Endkappenschraube (4).
4. Befestigen sie den Spiegelarm (5) am die
Spiegelgrundplatte. Reihen sie drei kleine
Unterlegscheiben (6) auf eine der Inbusschrauben
(7) und stecken sie diese durch das Loch am
abgewinkelten Ende des Spiegelarms. Fügen sie
eine grosse Unterlegscheibe (8) hinzu und drehen
sie die Schraube in das Winkelstück. Ziehen sie
die Schraube mit dem 3 mm Inbusschlüssel (10) an,
sodass der Arm auf der Grundplatte noch beweg-
lich bleibt. Die Inbusschrauben haben, wenn sie
in die Messinghülsen eingeschraubt werden, eine
sehr genaue Passform. Achten sie deshalb darauf,
dass der Inbusschlüssel im Kopf der Schraube gut
verankert sitzt, bevor sie die Schraube fest anzie-
hen.
5. Befestigen sie die Spiegelhalterung (9)
am Spiegelarm. Stecken sie eine kleine
Unterlagscheibe auf eine Imbusschraube und
stecken sie diese in das versenkte Loch auf der
Rückseite der Spiegelhalterung. Stecken sie eine
grosse Unterlagscheibe auf das überstehende
Schraubenende, drehen sie es in den Spiegelarm
und ziehen sie die Schraube mit dem Inbusschlüssel
fest. Halten sie, während sie die Schraube bef-
estigen, die Grundplatte und den Spiegelarm
sorgfältig fest. Ziehen sie die Schraube an, sodass
die Spiegelhalterung gerade noch auf dem
Spiegelarm beweglich ist. Die Inbusschraube sitzt
sehr straff in der Messinghülse.
6. Machen sie mit ihrem Fahrrad in einer ruhi-
gen Gegend eine Testfahrt. Spielen sie mit den
Einstellungen, um ihren besten Blickwinkel heraus-
finden.
ACHTUNG
!
!
Objekte in diesem konvexen Spiegel
sind näher, als es scheint.
MONTAGEANLEITUNG
Der Spiegel kann links oder rechts am Lenker
angebracht werden.


