BONVISI ENDO P SYSTEM Installation guide
1 | QUICK MANUAL
QUICK MANUAL ENDO P® SYSTEM
POSITIONING OF ENDO P® AND ENDO H®
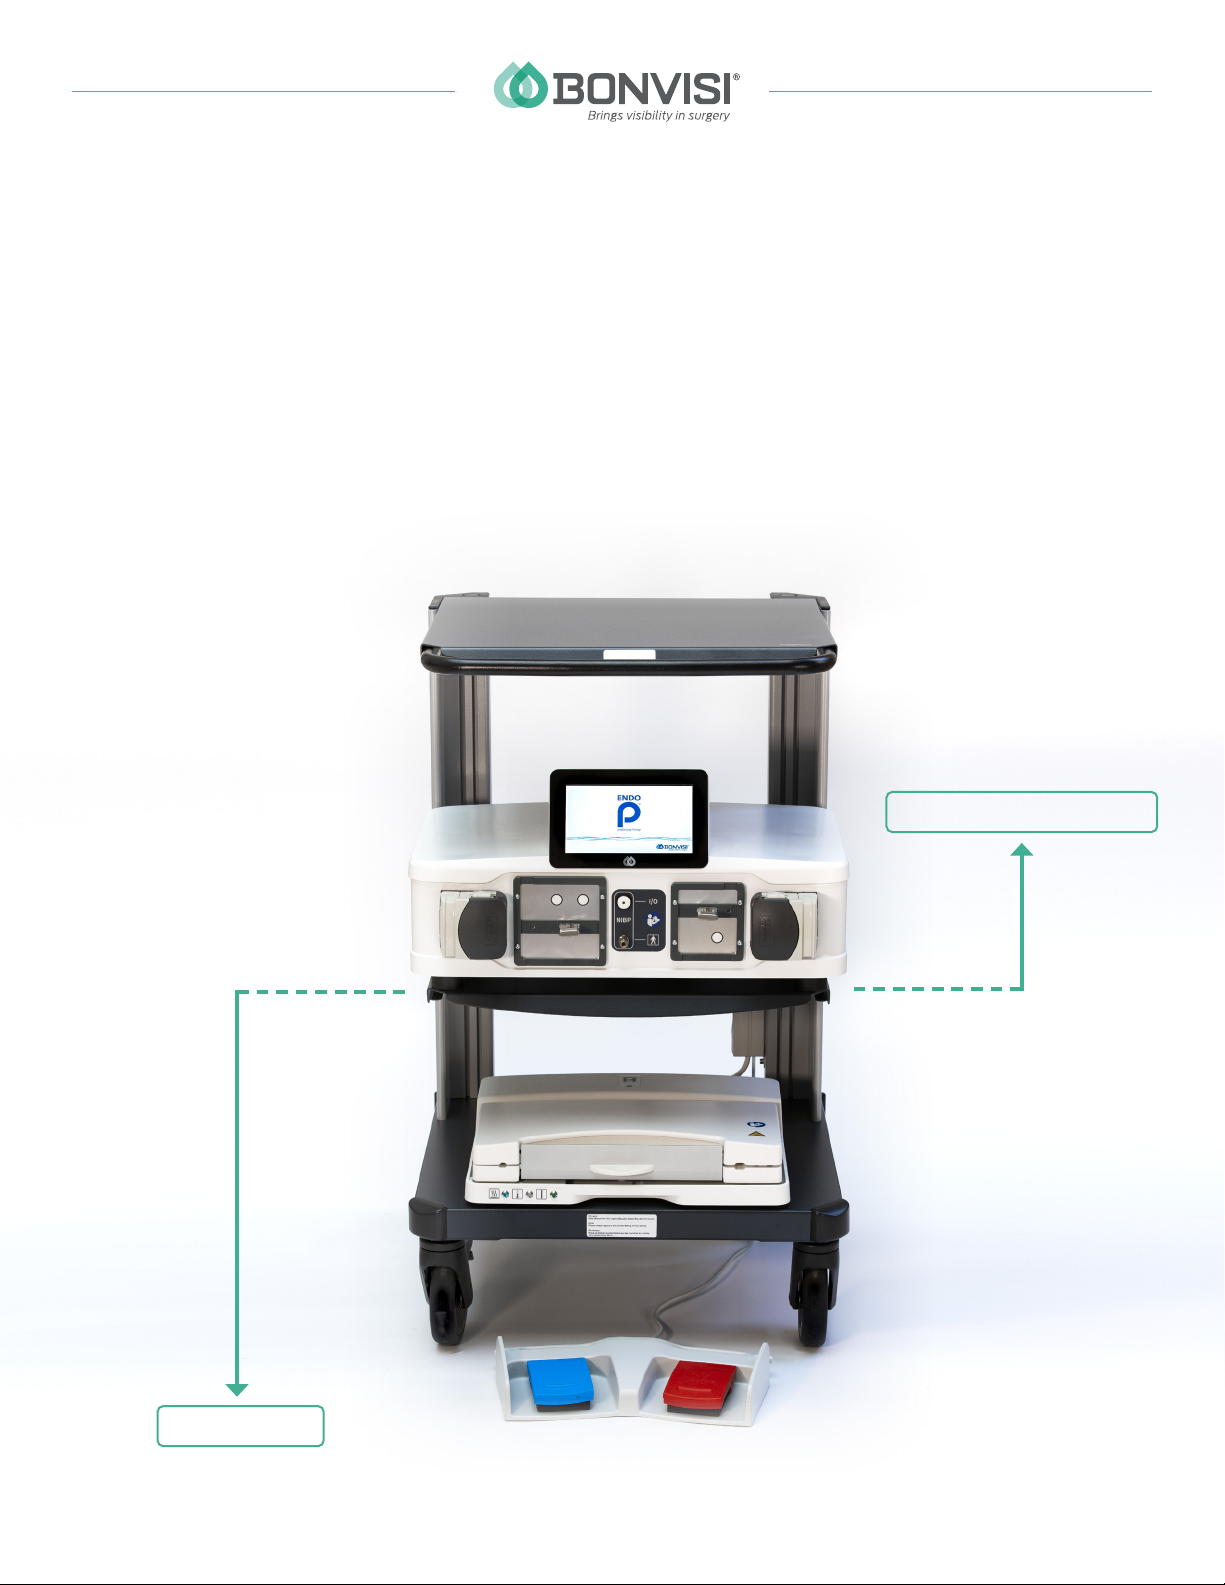
When placed on an equipment cart the ENDO P® should be at least 10 cm below the patient's median
line and approximately 50 cm from the ground. When placed on the Bonvisi Tower (shown below) the
ENDO P® will be 50 cm from the ground which is ideal.
Place the ENDO H® on the lowest shelf.
Place the ENDO P® on the shelf above the ENDO H®.
BONVISI TOWER
Floor
Patient's median line
Distance
50 cm
Minimum
distance
10 cm
2 | QUICK MANUAL
QUICK MANUAL ENDO P® SYSTEM
CONNECTING THE DAY CASSETTE
The Day Cassette can be used for more than one patient for an operating session up to 12 hours of
continuous use.
Personnel not wearing sterile scrubs, use aseptic technique:
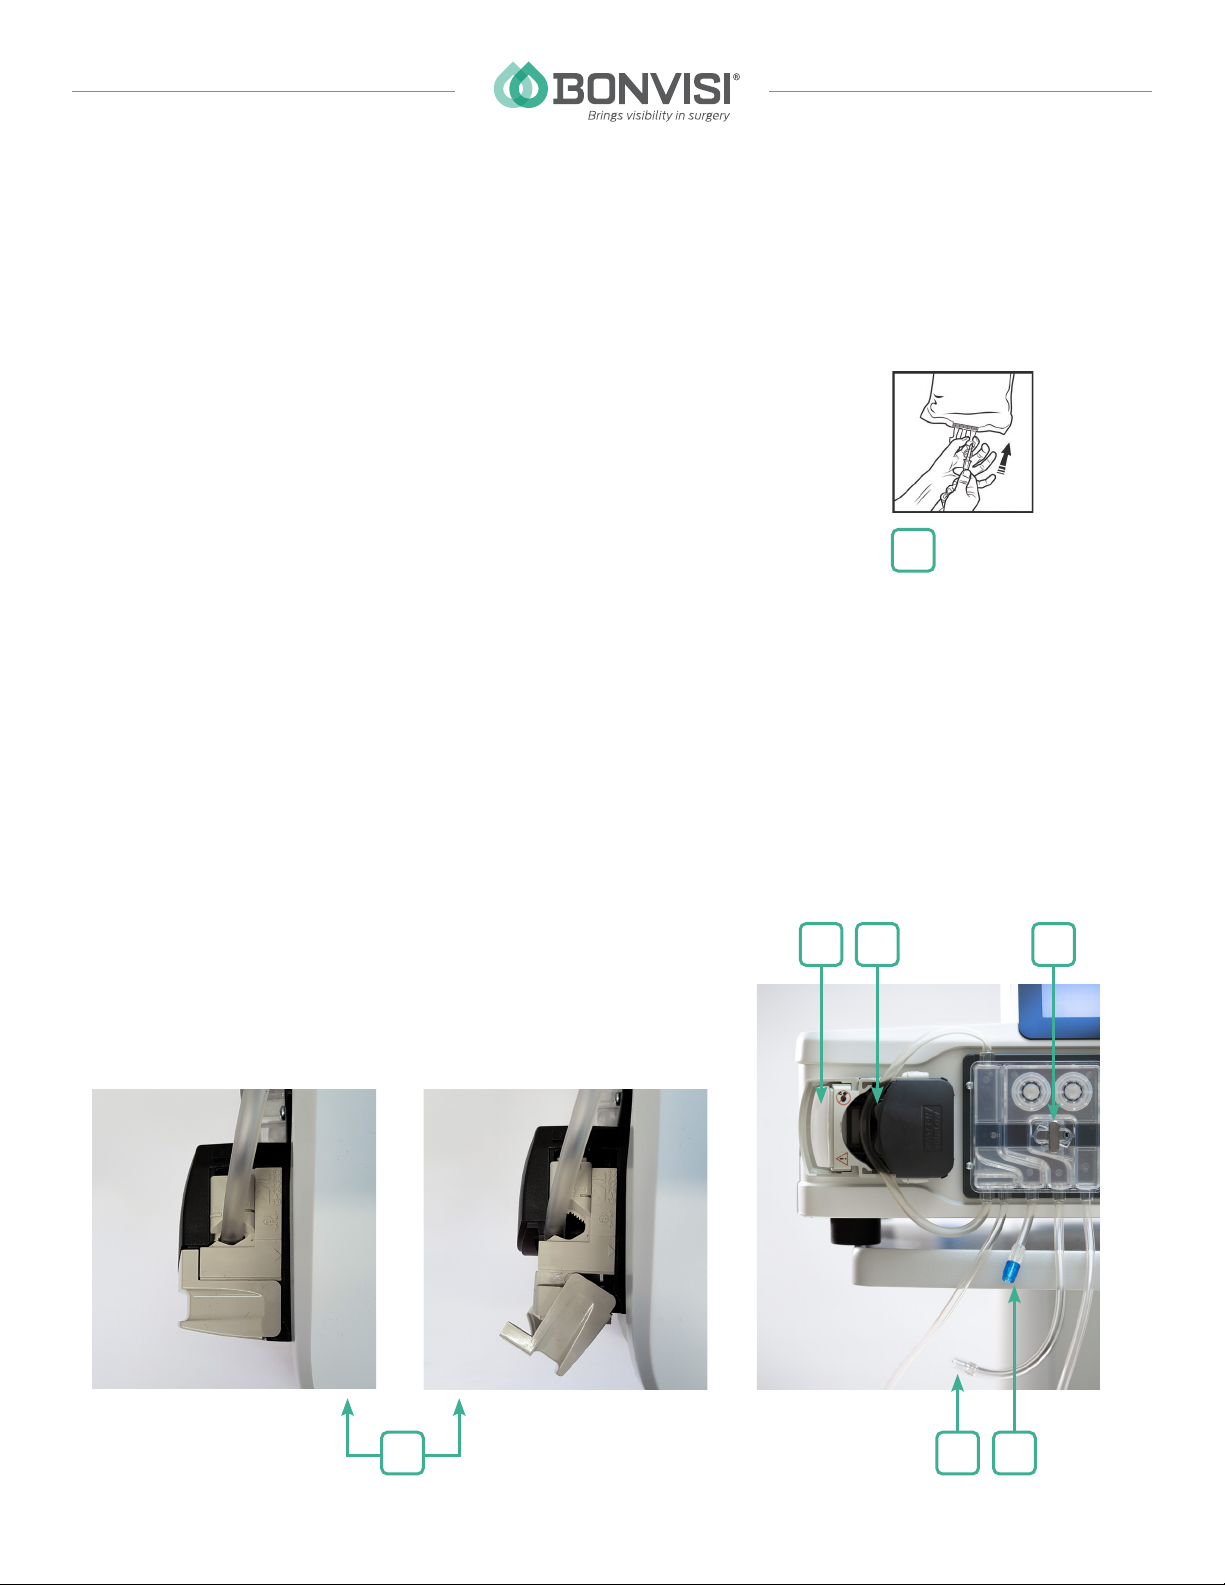
1. Open the sterile packaging and remove the cassette and associated
tubes. Close all three clamps. Remove the protective cap from one of
the cannula spikes and connect it to a bag of sterile irrigation fluid
Fig.1a. If two irrigation bags are to be used the other cannula should
be connected to a second bag in the same manner.
2. Open the light-grey cover Fig. 1b on the le pump by moving it to the
le. Check that the metallic key Fig. 1c on the cassette holder is in the
horizontal position, then slide the cassette into place over the key until it clicks into place and
is in contact with the front of the ENDO P®. Secure the cassette to the pump by turning the key
90° to the right.
3. It is important to place the tubing loop centred over the black wheel on the le pump, see Fig 1d
and Figs. 1g. Close the light-grey cover by moving it to the right.
4. If ENDO H® is not used, the connections for this must be connected to one another: Complete
this by connecting tubes Fig. 1e and Fig. 1f to one another using the Luer connectors. If ENDO H®
is used connect the Endo H® Heater Bag as instructed in the next chapter.
5. Check that all Luer locks are securely tightened.
6. Open the clamp for the primary bag of irrigation fluid.
Figure 1
1b
1a
1g
1d
1f 1e
1c
✓✗

3 | QUICK MANUAL
QUICK MANUAL ENDO P® SYSTEM
CONNECTING THE HEATER BAG
Personnel not wearing sterile scrubs, use aseptic technique:
1. Place the three holes of the Heater bag over
the three studs on the le side of the ENDO H®
heater plate Fig. 2a. Place the Heater Bag’s two
holes on the two studs on the right side of the
ENDO H® Fig. 2b.
2. Press firmly to close the ENDO H®.
3. Connect the Endo H® Bag tubes to the Day
Cassette by connecting Fig. 2c to Fig. 1f, then
connect Fig. 2d to Fig. 1e.
4. Check that the cable between ENDO H® and
ENDO P® is correctly connected to the rear of
both devices.
5. Plug the ENDO H® power cord into the earthed
outlet.
6. Turn ON power by using the switch located on the rear of the unit. In a few seconds, the power-
on LED (green) and heating LED (blue) will be lit.
Figure 2
2a 2b
2c 2d
PRIMING THE DAY CASSETTE
1. Make sure that all clamps on the Day
Cassette are open.
2. Make sure the tubing is not kinked or
obstructed by a wheel from for example
the equipment in the operating room.
3. Make sure that the instrument’s inflow and
outflow ports are fully open.
4. The Patient Cassette should not be primed.
5. From the Main Menu press Prime and Start
6. Once the fluid reaches the end of the Day
Cassette tubing press Standby to stop the flow.
7. The Day Cassette will not fill completely – this is normal.
4 | QUICK MANUAL
QUICK MANUAL ENDO P® SYSTEM
CONNECTING THE PATIENT CASSETTE
Personnel wearing sterile scrubs:
1. Remove the Irrigation Tube from the Patient Cassette packaging. Close the clamp on the Irrigation Tube
and check that the Luer connectors are securely tightened. Remove the transparent cap from the Luer
connector and connect it to the inflow channel on the instrument. If the Luer connector does not fit, it
can be cut o using sterile scissors and the tubing pushed into position on the inflow port. Now pass the
Irrigation Tube over to the nonsterile (circulating) sta for connection to the Day Cassette.
2. Remove the Patient Cassette from the packaging. Remove the transparent cap from the red Luer connector
and connect it to the outflow port on the instrument. If the Luer connector does not fit, it can be cut o
using sterile scissors and the tubing pushed into position on the outflow port. Now pass out the Cassette
over to the nonsterile (circulating) sta for connection to the ENDO P® pump.
Personnel not wearing sterile scrubs:
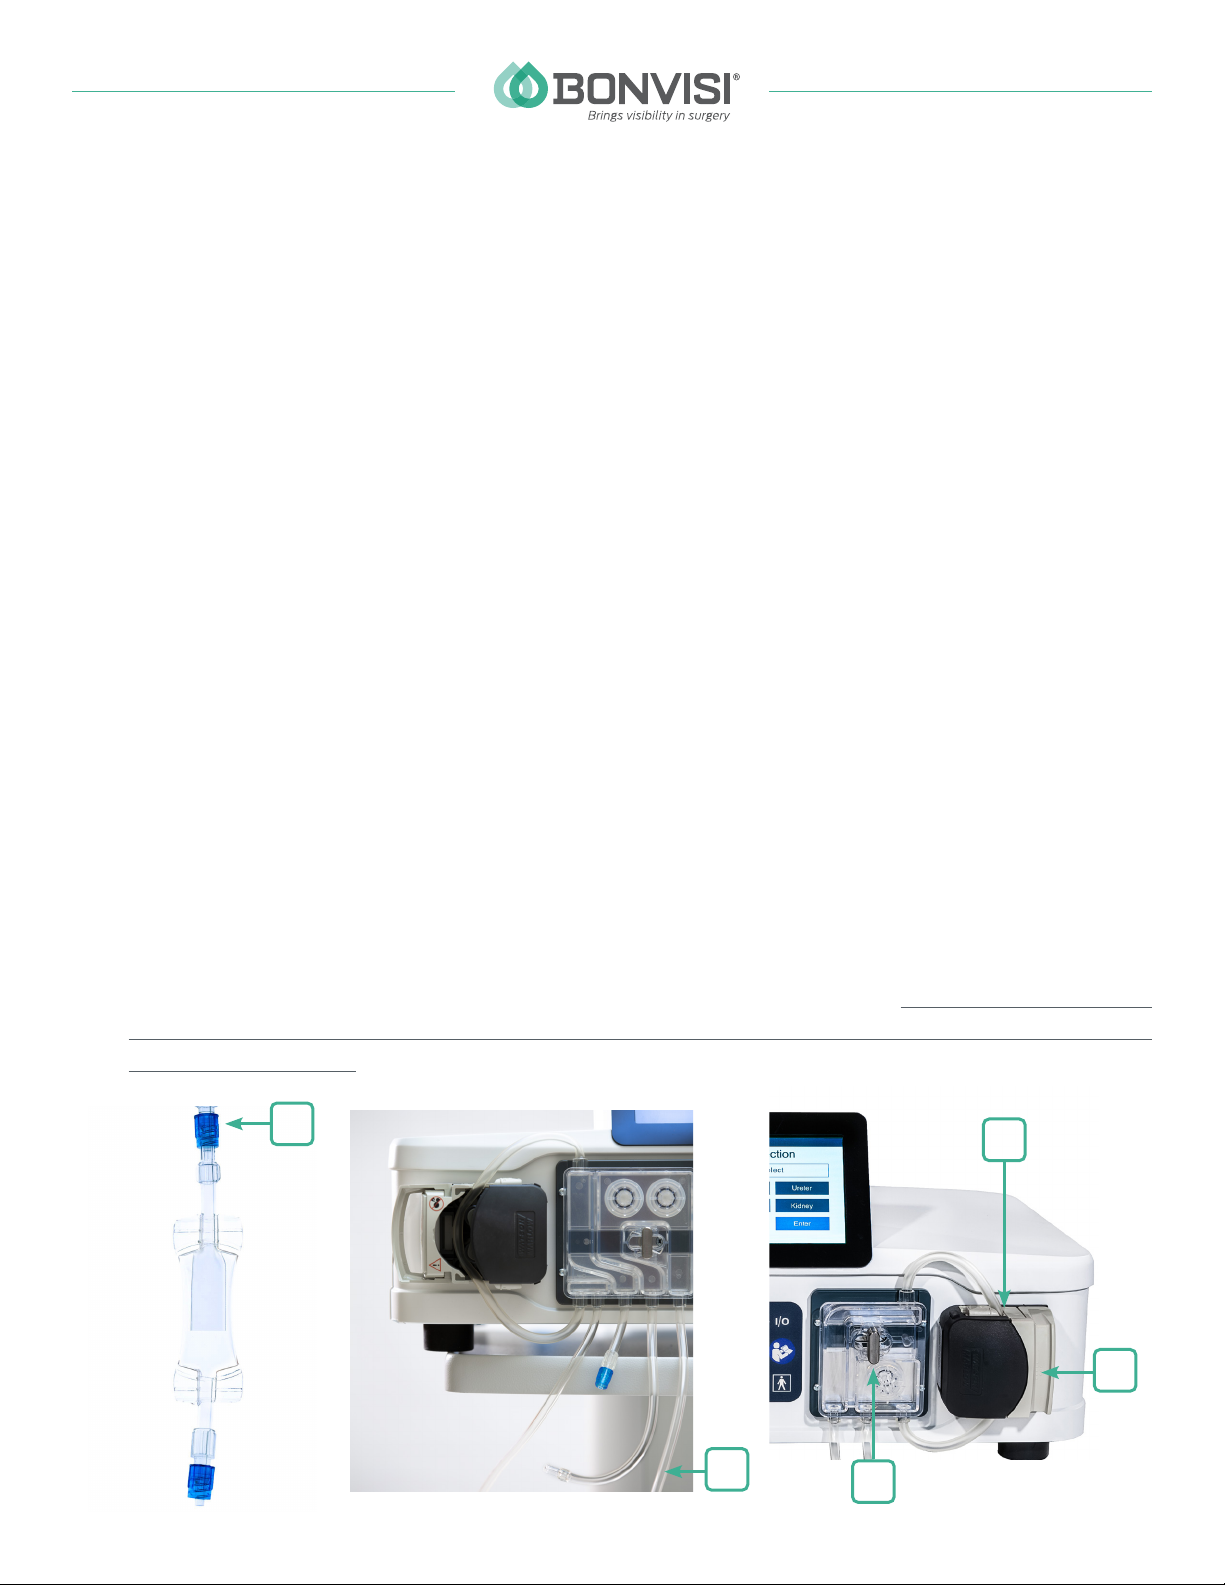
1. If a used check valve remains from a previous procedure, this must be removed from the Day Cassette
tubing, see Fig. 3a.
2. Connect the Irrigation Tube to the blue Luer connector furthest to the right on the Day Cassette. See Fig. 3b.
3. Open the light-grey cover Fig. 3c of the right pump by moving it to the right. Check that the metallic key
on the cassette holder Fig. 3d is in the horizontal position. Slide the cassette into place over the key until
it clicks into place and is in contact with the front of the Endo P®. Secure the cassette to the pump by
turning the key 90° to the right.
4. It is important to place the tubing loop centred over the black wheel on the right pump Fig. 3e. Close the
light-grey cover by moving it to the le.
5. The tubes that run from the cassette must run freely down from the cassette without being twisted.
6. Check that all Luer locks are securely tightened. Open all clamps.
7. Place the tube labelled WASTE into a non-conductive waste container. Make sure that nothing
blocks the flow and do not connect any active device such as suction pumps to the tubing of the
ENDO P® disposables. (!)
3a
3b
3c
3d
3e
Figure 3

5 | QUICK MANUAL
QUICK MANUAL ENDO P® SYSTEM
DISCONNECTION OF SINGLE-USE MATERIALS AFTER SURGERY
WHEN MULTIPLE SURGERIES WILL BE PERFORMED ON THE SAME DAY
Personnel not wearing sterile scrubs, use aseptic technique:
1. The connections to the Heater Bag should be le in place. No adjustments needed.
2. Close all tube clamps on the Irrigation Tube, Patient Cassette and Day Cassette. Ensure that the white
clamp on the Day Cassette´s tube furthest to the right Fig. 4a is closed.
3. Disconnect the Irrigation Tube and Patent Cassette from the operating instrument.
4. Remove the Patient Cassette from the ENDO P® by opening the cover and releasing the metallic key.
5. Disconnect the Irrigation Tube at the Luer lock beneath the check valve Fig. 4b. Leaving the check valve
in place protects the system from contamination when the system is inactive between cases. Discard the
rest of the Irrigation Tube in accordance with hospital waste procedures.
6. AnewIrrigation Tubecanbeconnectedwhenthenext surgery starts.FollowPatientCassetteinstructions.
WHEN THE FINAL SURGERY OF THE DAY HAS BEEN COMPLETED
Personnel not wearing sterile scrubs:
1. Turn o the ENDO P®. Turn o the ENDO H® and wait 2 min for the hot surfaces to cool down.
2. Close all disposables’ tube clamps and disconnect all tubing from the operating instrument.
3. Remove the Patient Cassette and Day Cassette by releasing the respective metallic key 90° to the le
and opening the covers.
4. Remove the ENDO H® Heater bag by opening the ENDO H®.
5. Discard all disposables according to hospital waste policy.
4b
4a
Figure 4

6 | QUICK MANUAL
QUICK MANUAL ENDO P® SYSTEM
PRIMING THE IRRIGATION TUBE AND
OPERATING INSTRUMENT
• Make sure all clamps are open (one
irrigation bag at a time).
• Make sure that the instruments inflow
and outflow ports are open.
• Hold the instrument over the waste
container and press Prime.
• Once fluid reaches the tip of the
instrument the procedure can begin.
• You can also use Start Surgery (see next chapter) when priming the Irrigation Tube and instrument.
SELECTION OF PROCEDURES
When using the ENDO BP™ and its data, the control of the target pressure is dynamic and automatically
maintained based on the patient's systemic blood pressure. The patient's measured systemic blood
pressure (systolic/diastolic) and delivery pressure (DP) are continuously shown on the device display.
If not using the ENDO BP™ the device will use the procedure specific default settings. Each surgery
type has default settings (pre-set) for flow and pressure. If the use of the ENDO BP™ is interrupted or
its readings are out of range the device will automatically use the procedure-specific default settings.
Check that all clamps are open. Select the desired surgery type/procedure. Confirm the procedure
by tapping Enter then reconfirm by pressing Accept. Press Start Surgery when you are ready to
start the procedure.
Figure 8
SURGERY TYPE ENDO BP™ MAY BE USED DEFAULT FLUID FLOW DEFAULT FLUID PRESSURE
TUR-P: PROSTATE
SURGERY Yes mL/min mmHg
TUR-B: BLADDER
SURGERY Yes mL/min mmHg
URETER: SURGERY IN
THE URETER No mL/min mmHg
KIDNEYS: SURGERY IN
THE RENAL PELVIS No mL/min mmHg
CYSTOSCOPY:
DIAGNOSTIC
EXAMINATION OF THE
URINARY TRACT
No mL/min Max mmHg

7 | QUICK MANUAL
QUICK MANUAL ENDO P® SYSTEM
© 2021 Bonvisi® AB
DOC ID: ART 19-005 EN ver 3
Manufactured by:
BONVISI AB
c/o IOice
Kungsgatan 60
111 22 Stockholm, Sweden
+46 (0)8 661 50 20
www.bonvisi.com
2797
This product is distributed locally by
(Space for information about the authorized Bonvisi® representative)
USING THE FOOTPEDAL DURING SURGERY
MODE SINGLE PRESS DOUBLE PRESS 3-SECOND PRESS
Blue
pedal
Standby Starts Surgery
Surgery
1. First single press
decreases flow by 30%.
2. Second single press
decrease flow by further
15%.
1. First double press
increases flow by 30%
for 2 minutes.
2. Second double press
increases flow by further
15% for 2 minutes.
Goes to Standby
Red
pedal
Standby Starts Surgery
Surgery
1. First single press
decreases pressure by
30%.
2. Second single press
decrease pressure
by further 15%.
1. First double press
increases pressure by
30% for 2 minutes.
2. Second double press
increase pressure
by further 15% for 2
minutes.
Note: Default pressure is
set to 30 mmHg for most
surgery types.
Goes to Standby
Both pedals
simultaneously Surgery Flushing function
at 600 mL/min
Table of contents
Popular Medical Equipment manuals by other brands

Quasar Biotech
Quasar Biotech MD BLUE instruction manual

Datex-Ohmeda
Datex-Ohmeda S/5 Avance Technical reference manual

XFT Medical
XFT Medical XFT-2003E user manual

Ultrasound Technologies
Ultrasound Technologies Freeplay FHRM operating manual

Coviden
Coviden Kangaroo Joey manual

Chattanooga
Chattanooga Neo Vacuum Module installation instructions


