Transcend Micro User manual

MicroTM
Quick Guide
®

1
Available For Download
Transcend MySleepDash™
Transcend User Guides
https://mytranscend.com/customer-care/user-guides/
Using your Transcend Micro with the
MySleepDash app
Transcend MySleepDash is a mobile device app that will
guide you through the setup process for your new Transcend
Micro device. It includes setup videos, helpful information
and can track your sleep health progress. The app is not
required to operate the Transcend Micro device.

2
Table of Contents
Using your Transcend Micro with the MySleepDash app ... 1
Indications for Use......................................................... 3
Contraindications .......................................................... 3
Adverse Effects .............................................................. 4
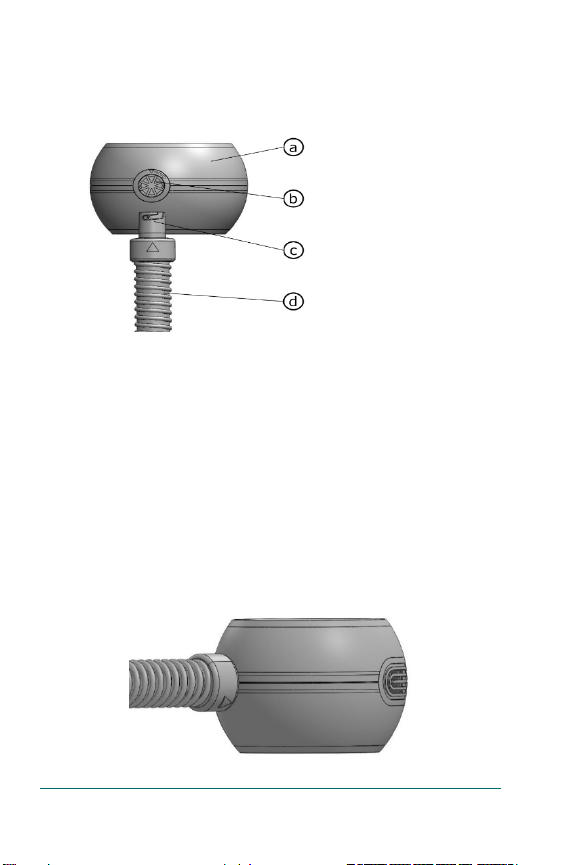
Your Transcend Micro .................................................... 5
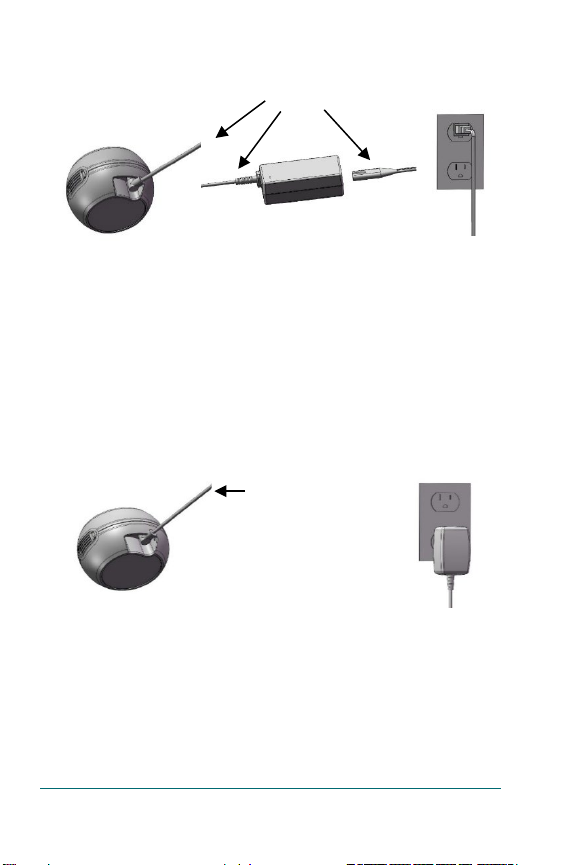
Setting Up Your Transcend Micro .................................... 6
AIRFLEX™ HOSE CONNECTION............................ 6
CONNECTING THE LAPTOP STYLE POWER SUPPLY 7
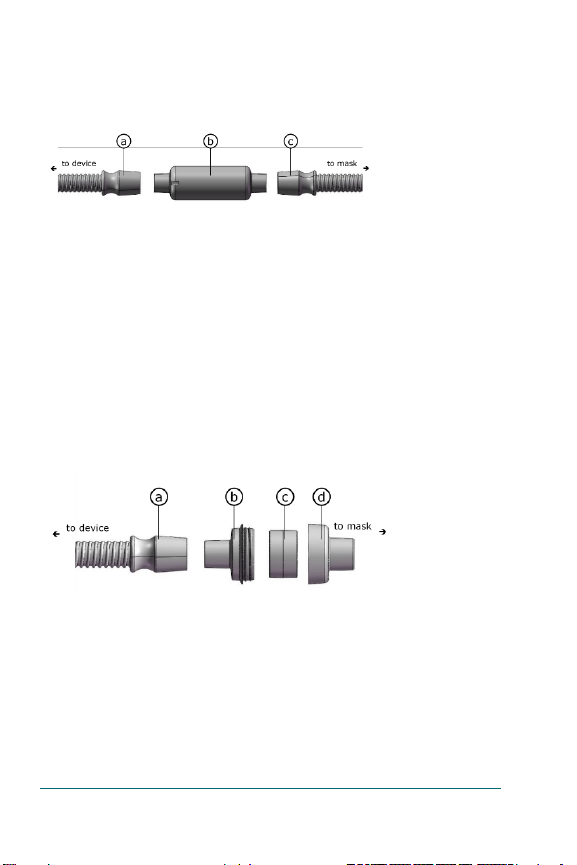
Connecting Comfort Features......................................... 8
WHISPERSOFT™ MUFFLER ASSEMBLY .................... 8
AIRMIST™ HME ADAPTER ASSEMBLY ...................... 8
Navigating the Device Buttons........................................ 9
BLUETOOTH BUTTON AND LED INDICATORS ..... 10
RAMP BUTTON AND LED INDICATORS ................ 11
DRY CYCLE BUTTON AND LED INDICATORS........ 11
Connecting your Transcend Micro and smart device....... 12
CONNECTING YOUR DEVICE ............................. 13
Starting Therapy .......................................................... 13
GentleRise Ramp Function ........................................... 14
Ending Therapy ........................................................... 15
Drying Mode............................................................... 15
Caring for your Device................................................. 16
Cleaning the Exterior ................................................... 17
Disconnecting Comfort Features ................................... 18
WHISPERSOFT MUFFLER ASSEMBLY ..................... 18
Transcend Batteries...................................................... 20
Replacing Transcend Micro PureFresh™ Air Filter........... 20
Precautions for Use...................................................... 24
Warnings .................................................................... 25
Cautions ..................................................................... 27
Environmental Information............................................ 31

3
Welcome
The Transcend Micro™ is Transcend’s smallest and lightest
Continuous Positive Airway Pressure (CPAP) device.
CAUTION
Federal law in the US restricts this device to the sale by, or
on the order of, a physician.
Indications for Use
The Transcend Micro provides positive airway pressure for
treatment of obstructive sleep apnea (OSA) in adults
weighing over 66 pounds (30 kg). The device is intended for
home and hospital/institutional use.
Contraindications
The Transcend Micro and positive airway pressure therapy
may be contraindicated in patients with these conditions:
•Bullous lung disease
•Pathologically low blood pressure, particularly if
associated with intravascular volume depletion
•Pneumothorax or pneumomediastinum
•Pneumocephalus has been reported in some users
using nasal PAP.
Caution should be used when prescribing PAP for susceptible
users such as those with any of these conditions:
•Cerebral spinal fluid (CSF) leaks
•Abnormalities of the cribriform plate
•A prior history of head trauma
•Pneumocephalus

4
Adverse Effects
You should report unusual chest pain, severe headache, or
increased breathlessness to your prescribing physician. An
acute upper respiratory tract infection may require temporary
discontinuation of treatment.
The following side effects have been reported by users of
airway delivery devices during CPAP therapy.
•congestion or mucus in the throat
•sneezing or cough
•bloating
•nocturnal wakening
•feelings of claustrophobia
•burn
•irritation/dryness of the mouth, nose, or throat
•nosebleed
•skin rashes
•eye irritation
•ear or sinus discomfort

5
Your Transcend Micro
a. Power button
b. Bluetooth button
c. Pressure ramp button
d. Dry cycle button
e. Air filter cover
f. Air outlet
g. USB-C data port
h. Power supply inlet

6
Setting Up Your Transcend Micro
AIRFLEX™ HOSE CONNECTION
1. Connect the hose firmly to the air outlet by inserting
the hose coupler into the air outlet on the device.
2. Locate the arrow on the air hose coupler and arrow
on the device.
3. Align the arrows and gently insert and twist the air
hose coupler clockwise until connector is seated
securely into the device. The image below indicates
a fully secured hose with the hose arrow below the
parting line of the device
4. Connect your mask to the opposite end of the hose.
5. To remove the hose simply turn it counterclockwise
and pull gently away from the device.
a. Transcend Micro device
b. Air outlet
c. Air hose coupler
d. AirFlex hose

7
CONNECTING THE LAPTOP STYLE POWER SUPPLY
1. Connect the power cord to the power inlet at the
bottom of the device.
2. Connect one end of the power cord into the AC
adapter and the other end into the power outlet.
3. When connected to power, the device power-up LED
flash sequence will begin. Once the sequence is
complete, the green Power LED light will remain on.
CONNECTING THE WALL MOUNT STYLE POWER SUPPLY
1. Connect the power cord from AC adapter into the
power inlet at the bottom of the device.
2. Connect power cord from device power inlet directly
to power outlet.
NOTE: Ensure the power cord is accessible so that it
can be easily unplugged from the wall.
Transcend Micro
Power Cord
Power
Outlet
Transcend Micro
AC Adaptor
Power Cord
Power Outlet

8
Connecting Comfort Features
WHISPERSOFT™ MUFFLER ASSEMBLY
1. Attach the short hose to the device.
2. Attach the short hose to the WhisperSoft muffler.
3. Attach one end of long (mask) hose to the other end
of the muffler and then attach the other end to the
mask or HME (Heat/Moisture Exchanger).
AIRMIST™ HME ADAPTER ASSEMBLY
The Transcend AirMist HME assembly is sold separately, and
it is not included with the Transcend Micro system.
1. Remove the HME cartridge from foil package. Handle
by the plastic shroud not the foam core.
2. Unscrew the HME adapter bottom from the HME
adapter top and place the HME cartridge inside the
HME adapter bottom.
3. Place the HME adapter top onto the HME adapter
bottom and gently turn the top until tight.
a. Short air hose
b. WhisperSoft
muffler
c. Long air hose
a. Long air hose
b. HME adapter
bottom
c. HME cartridge
d. HME adapter

9
4. Securely attach the HME adapter bottom to your
hose.
5. Securely attach the HME adapter top to your mask.
Navigating the Device Buttons
CONTROL PANEL
POWER BUTTON AND LED INDICATORS
Standby Mode
When the device is plugged in, it will be in Standby Mode.
•The LED glows green, indicating that the device has
power.
•Pressing the power button transitions the device to
Therapy Mode.
oAll LEDs will turn off.
oThe blower will start and the device will begin
regulating pressure.
a. Bluetooth
b. Pressure ramp
c. Dry cycle
d. Power

10
Therapy Mode
When the device is powered and in Therapy Mode:
•The LED is off.
•Pressing the power button transitions the device to
Standby Mode.
oThe LED glows green.
oThe blower stops.
BLUETOOTH BUTTON AND LED INDICATORS
Standby Mode
Pressing the button toggles Bluetooth communication
between enabled/disabled.
Bluetooth indicator
light is blue
Bluetooth communication is enabled
but there is not an active connection
with a mobile device.
Bluetooth indicator
light is green
Bluetooth communication is enabled
and there is an active connection with
a mobile device.
Bluetooth indicator
light is white
Bluetooth communication is disabled.
Therapy Mode
Pressing the Bluetooth button has no effect while in Therapy
Mode.
Bluetooth indicator light is off
Therapy Mode is on.

11
RAMP BUTTON AND LED INDICATORS
Standby Mode
•The LED glows blue if the Ramp is configured and
auto-ramp is enabled.
oThe LED is off if Ramp is not configured, or
Auto Ramp is disabled.
•Pressing the button when Ramp is not configured has
no effect.
oSee Transcend desktop software user guide to
configure https://mytranscend.com/customer-
care/user-guides/
•Pressing the button when Ramp is configured toggles
Auto Ramp between enabled and disabled.
Therapy Mode
•The LED is off.
•If Ramp is active, pressing and holding the button
accelerates Ramp increase.
•If Ramp is configured but not active, pressing the
button starts Ramp.
•If Ramp is not configured, pressing the button has no
effect.
DRY CYCLE BUTTON AND LED INDICATORS
Standby Mode
•The LED is off when Drying Mode is off.
•The LED glows blue when Dry Cycle is on.

12
•Pressing the Dry Cycle button toggles between on
and off.
Therapy Mode
•The LED is off.
•Pressing the button has no effect.
Connecting your Transcend Micro and smart
device
Before connecting Transcend Micro to a smart device, ensure
that the latest version of the MySleepDash app is installed on
the smart device. The app is available for download from the
App Store or Google Play.
To connect your smartphone and the app:
1. Ensure your Transcend Micro device is set up
correctly and plugged into a power source.
2. On your smart device, enable Bluetooth.
3. Open the MySleepDash app.
4. The first time you open the MySleepDash app, you
will be asked to login or create an account using your
email.
5. Once selections are complete on the Create Account
page, tap submit.
6. After creating your account, you will be required to
login using the email and password you just set up.
7. The next step will be to connect your Transcend Micro
device to the MySleepDash app.

13
CONNECTING YOUR DEVICE
•Ensure Bluetooth is enabled on the Transcend Micro
device.
•On the MySleepDash app, tap continue on the
welcome page.
•Open the QR scanner on your phone. You may be
required to allow the device to use the camera
features.
•Locate the QR code on the bottom of the Transcend
Micro device and scan using your smart device.
•Click add to complete adding your device.
•The blue light on the Transcend Micro will turn green.
•Your device is now connected.
Starting Therapy
1. Connect the Transcend Micro to a power source and
allow it to enter Standby Mode.
2. Be sure your mask fits firmly and in place before
starting therapy.
3. Press the Power button or breathe normally to engage
SleepStart, our auto start feature. Therapy will begin
when the blower delivers or ramps to the prescribed
therapy pressure.
NOTE: Some masks are configured differently. Due
to this variability SleepStart may not function.
NOTE: If therapy is interrupted by a power failure, the
device will automatically restart therapy once
power is restored.

14
GentleRise Ramp Function
The GentleRise feature lets you acclimate to air flow by
starting at a lower pressure and gradually increasing to the
prescribed pressure setting as you fall asleep.
To accelerate the rate of the pressure increase during
GentleRise:
•Hold the Ramp button down until the device reaches
a comfortable therapy pressure.
•When the Ramp button is released, the device will
continue in Ramp Mode until it reaches the prescribed
therapy pressure.
•To end GentleRise early, hold down the Ramp button
until the prescribed therapy pressure is reached.
•If Ramp is no longer desired, disable it via software or
app.
NOTE: Once installed and connected, you may use
the MySleepDash app to change ramp settings
on compatible Micro devices. Alternatively, to
adjust ramp starting pressure or duration see
the Transcend Micro software manual available
on the Transcend website (mytranscend.com).
AirRelief Function
The AirRelief function is a feature that decreases therapy
pressure on exhalation. This is designed to provide
additional comfort to the user by reducing the amount of
resistance they experience as they exhale.

15
There are four AirRelief settings: OFF, 1, 2 or 3. Each setting
progressively increases the amount of pressure relief from
none to maximum.
Once installed and connected, you may use the
MySleepDash app to change air relief settings on compatible
Micro devices. Alternatively, see the Transcend Micro
software manual available on the Transcend website
(mytranscend.com) and follow the steps to change settings.
Ending Therapy
Remove your mask and press the power button to end
therapy.
Drying Mode
At the end of each therapy session, it is recommended that
the user initiate the Drying Mode function to dry the attached
air hose and accessories.
To initiate Drying Mode:
•Press the Drying Mode button.
•When in Drying Mode, the blower will run at a low
speed for 30 minutes.
•During Drying Mode, the Drying Mode LED will
continue to glow.
•After 30 minutes, the blower will turn off and the
device will enter Standby Mode.

16
Caring for your Device
Warning:Unplug the Transcend Micro device before
cleaning and make sure it is dry before plugging it in again.
Do not perform any cleaning or maintenance tasks while the
device is in operation. Damage caused by improperly caring
for your device may not be covered by Transcend’s limited
warranty.
•Do not submerge the Transcend Micro device, power
supply or power cord in water.
•Prevent water from entering any openings of the
device.
•Do not use harsh or abrasive cleaning agents to
clean the device or any components.
•Do not attempt to sterilize the Transcend Micro
device.
•Do not place cleaning materials, such as a cloth or
liquid, into the device air inlet or air outlet connector.
•Do not open or modify the device. There are no user-
serviceable parts inside the device. Servicing and
repairs should only be performed by an authorized
Transcend person.
•Do not use chlorine, bleach, or scented cleaning
solutions, antibacterial or moisturizing soaps or oils,
including scented oils, to clean the device or its
components. These solutions may damage the device
or reduce its life.
•Exposure to smoke, including cigarette, cigar or pipe
smoke may damage the device.
•Exposure to ozone or other gases may damage the
device.

17
Cleaning the Exterior
Follow these instructions to clean the exterior of the
Transcend Micro device.
1. Mix a solution of 5% mild liquid detergent in distilled
water (1.6 fl. Oz. liquid detergent per quart of
distilled water). Mild detergent should contain
biodegradable anionic surfactants and no phosphate.
2. Submerge a lint-free cotton cloth into the detergent
solution.
3. Wring excess water from the cloth then wipe the
exterior surface of the Transcend Micro device for
approximately 20 seconds using a gentle back and
forth wiping motion. Ensure contact with all accessible
surfaces to adequately remove any soil buildup.
4. Rinse the cloth in clear water to remove residual
cleaning solution.
5. Wring excess water from the cloth and wipe the
Transcend Micro using a gentle front to back wiping
motion to remove any detergent solution remaining
on the surface.
6. Wipe the device with a dry, lint-free cotton cloth until
the device is fully dry.

18
Disconnecting Comfort Features
WHISPERSOFT MUFFLER ASSEMBLY
1. Remove the short air hose from the device, by twisting
the connector left or counterclockwise and pulling the
hose away from the device. Disconnect the other end
of the short air hose from the muffler.
2. Remove the muffler from one end of your long hose
and your mask from the other end of the hose.
3. After following the cleaning process, refer to steps in
the Connecting Comfort Feature section to
reassemble the muffler.
Cleaning of Accessories
The following accessories should be cleaned with a 5%
solution of mild dishwashing liquid, detergent in distilled
water (1.6 fl. oz. liquid cleaning detergent per quart of
distilled water). Mild detergent should contain biodegradable
anionic surfactants and no phosphate.
Clean the device and its components as shown in the
schedules below to maintain the quality of your device and
to help prevent the growth of germs that can adversely
impact your health.
a. Short air hose
b. WhisperSoft
muffler
c. Long air hose

19
Accessory
Periodic
Cleaning Cycle
Product Service
Life
AirFlex Hose
Weekly
3 Months
WhisperSoft Muffler
Weekly
3 Months
AirMist HME Adapter
Weekly
3 Months
Follow these steps to clean the accessories.
1. Fully immerse the accessory in the cleaning solution.
DO NOT immerse the Transcend Micro device.
NOTE: The HME Cartridge must be removed prior to
cleaning the HME Adapter. The HME cartridge
cannot be cleaned. Discard it after 7 days of
use.
2. While immersed, thoroughly wipe the surface with a
lint-free cotton cloth. Apply firm pressure and ensure
contact with all accessible connection surfaces to
adequately remove soil buildup.
3. Clean the inside of the accessory by lifting then
lowering the ends of the accessory, while the
accessory is filled with cleaning solution.
4. Rinse accessory by immersing in distilled water. Move
the accessory in a back-and-forth motion for
approximately 10 seconds to remove cleaning agent
residue.
5. Dry the outside of the accessory with a dry, lint-free
cotton cloth. Allow the accessory to air dry until the
inside is dry. The length of drying time will depend on
ambient conditions.
Other manuals for Micro
3
Table of contents
Other Transcend Medical Equipment manuals

Transcend
Transcend 365 miniCPAP Auto User manual

Transcend
Transcend 365 miniCPAP Auto User manual

Transcend
Transcend Micro User manual

Transcend
Transcend CPAP User manual

Transcend
Transcend 365 miniCPAP Auto User manual

Transcend
Transcend 365 miniCPAP Auto User manual

Transcend
Transcend AUTO User manual

Transcend
Transcend EZEX User manual

Transcend
Transcend EZEX User manual

Transcend
Transcend 365 miniCPAP Auto User manual