Shimmer 3 User manual

Getting Started
with Shimmer3
Streaming to
Windows PC
March 2015
Copyright © Shimmer, 2015


CONFIGURE YOUR SHIMMER DOCK (1/5)
A Shimmer Dock is needed in order to program the Shimmer with firmware.
See also: Shimmer3 Getting Started Video Tutorial † -1:38
WARNING: Do not connect the Shimmer Dock to the PC until STEP 3!
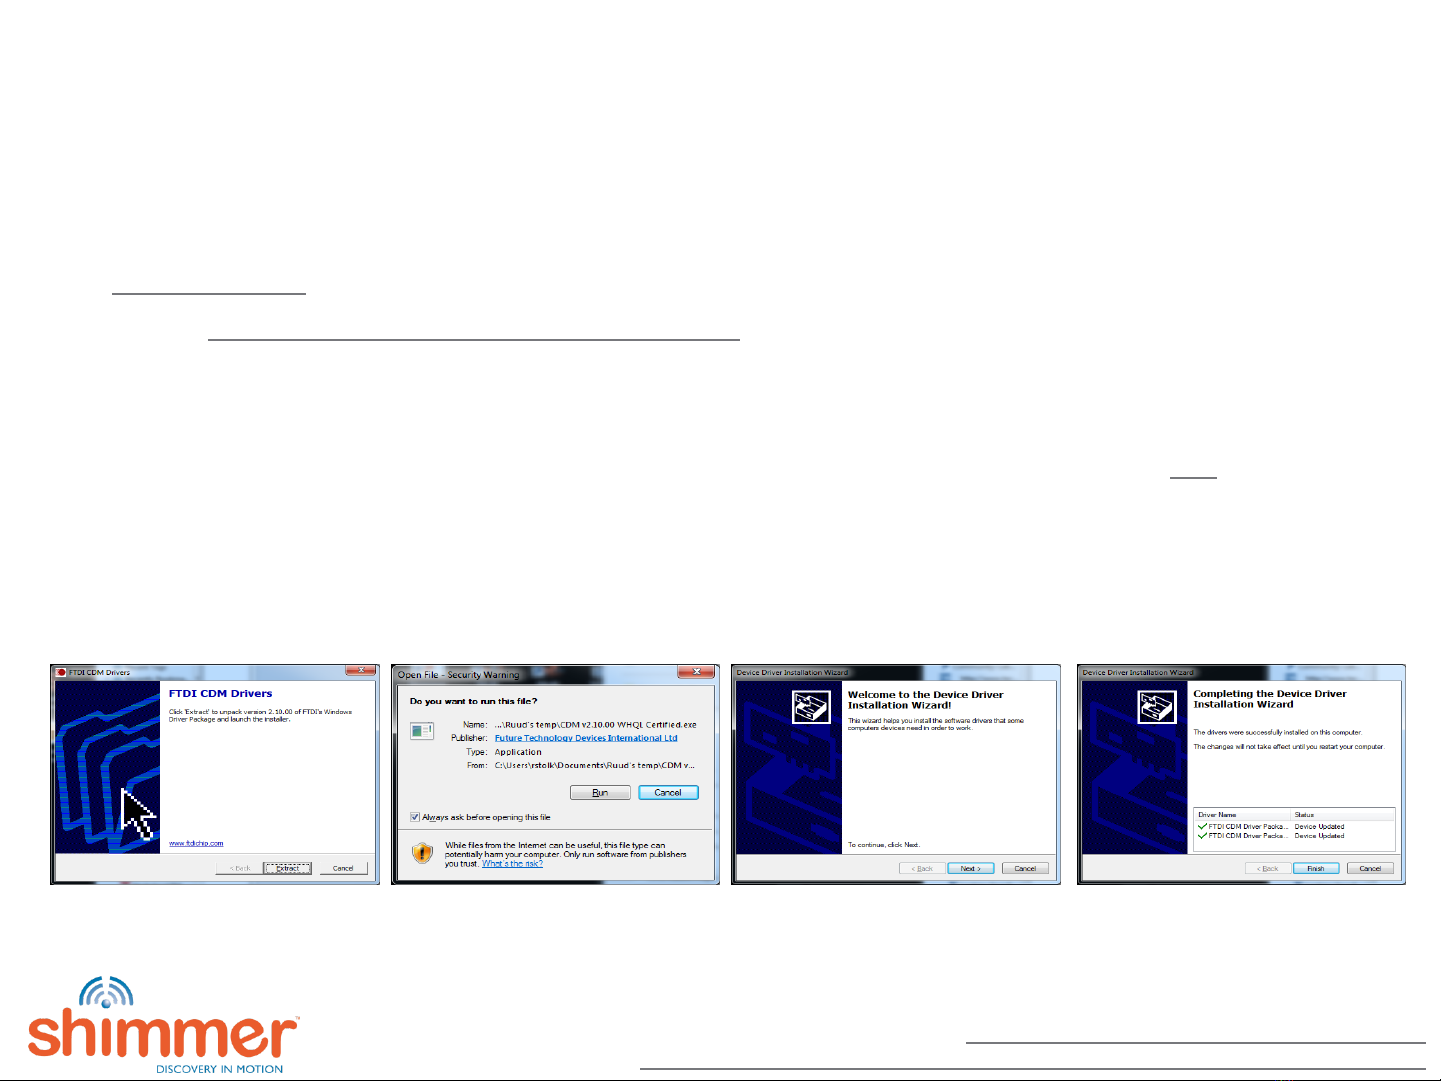
STEP 1 - Download the drivers. The driver package can be downloaded through this link*.
STEP 2 - Install the driver. Double-click the downloaded file to start the driver installation, and
follow the instructions.
Click extract: Click Run: Click Next: Click Finish:
Restart your PC if requested.
†https://www.youtube.com/watch?v=C2UdTdfiQ1g
*http://www.ftdichip.com/Drivers/CDM/CDM%20v2.10.00%20WHQL%20Certified.exe
CONFIGURE YOUR SHIMMER DOCK (2/5)
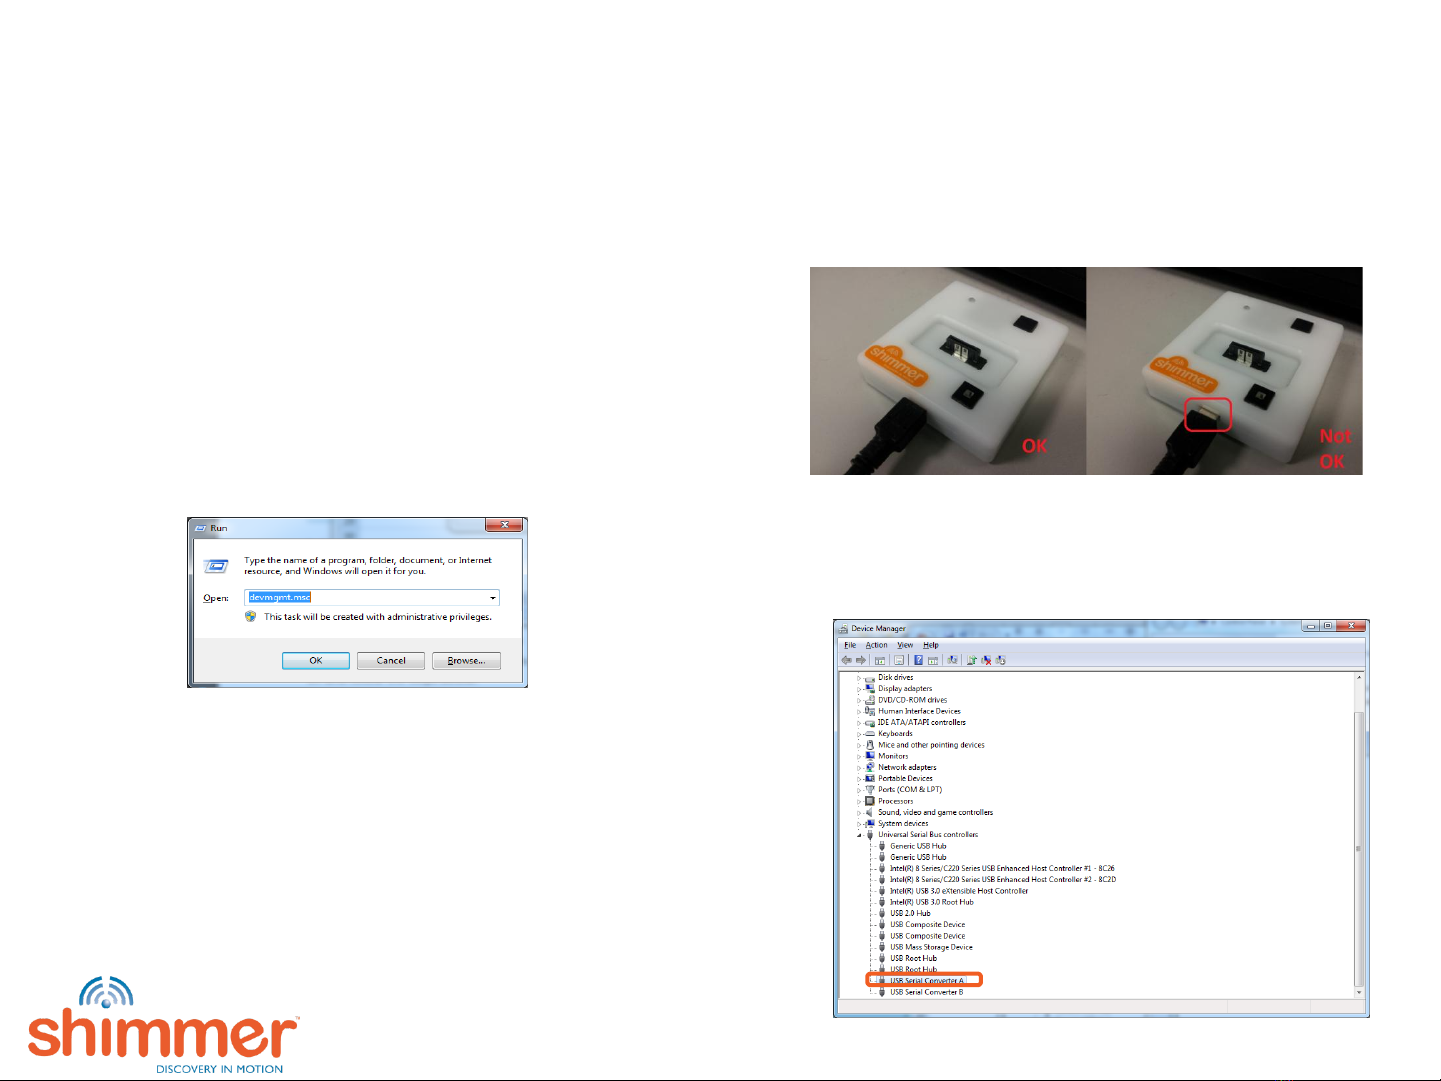
STEP 3 - Configure serial connection. Connect the
Shimmer Dock to the PC through USB. Wait till the
Windows completes the driver installation.
Run the Device Manager: Press [Windows Key] + R;
type devmgmt.msc; click OK.
Go to Universal Serial Bus controllers and right-click on
USB Serial Converter A*:
* It is assumed that the user does not have other Serial to USB converters than Shimmer Dock, connected.
CONFIGURE YOUR SHIMMER DOCK (3/5)
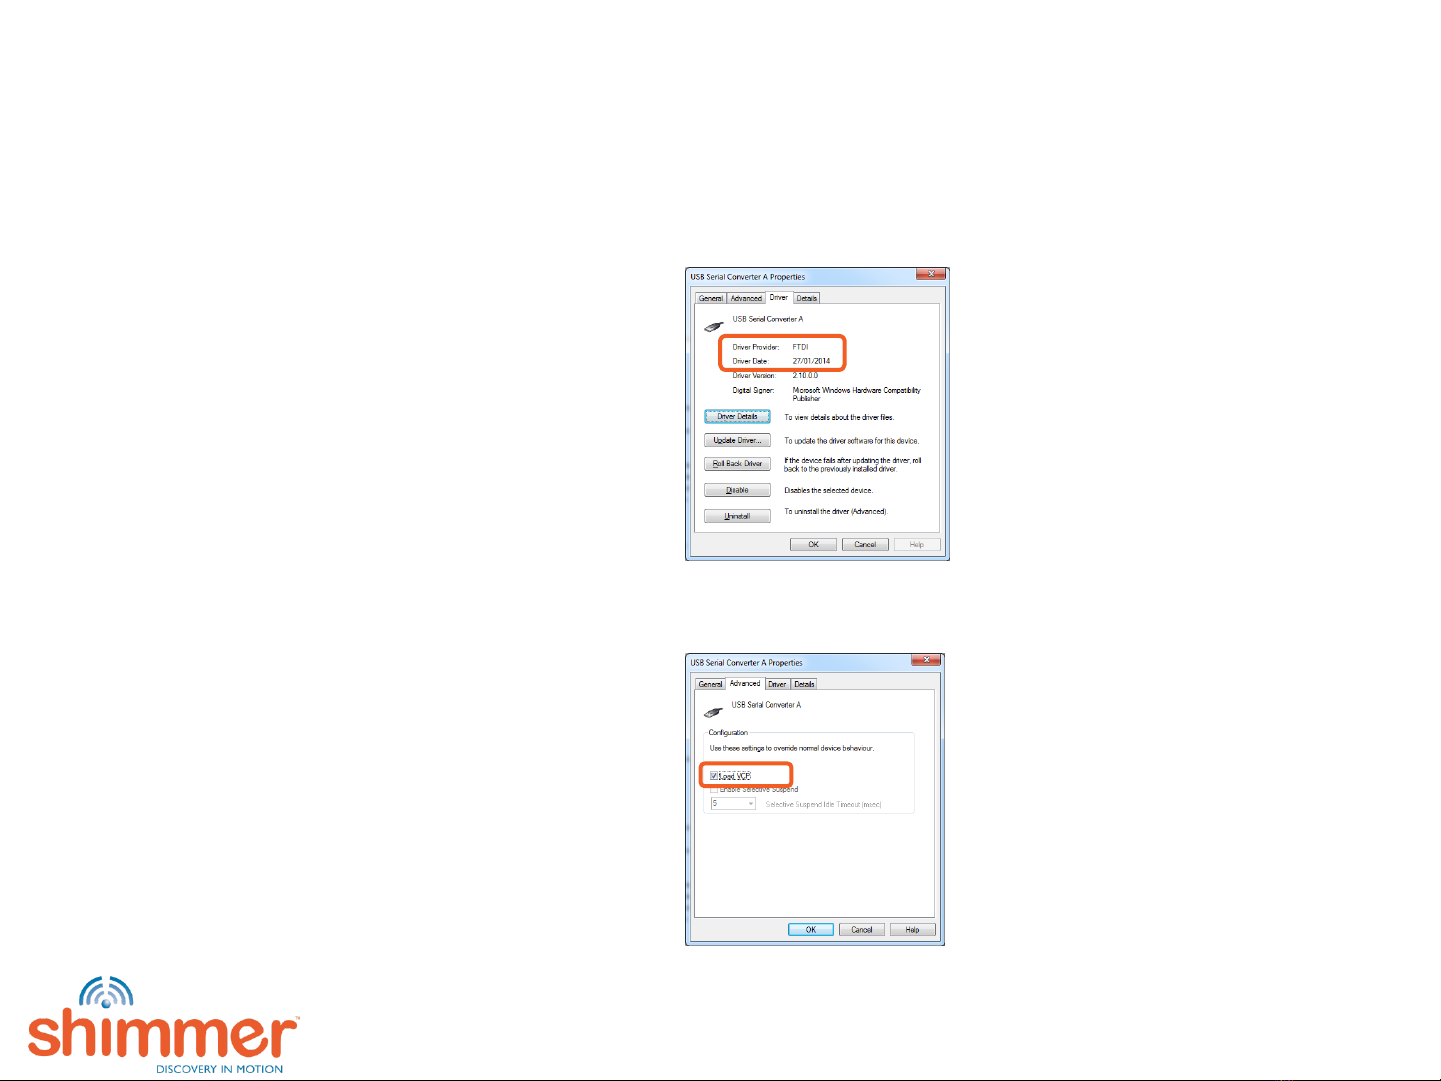
Click Properties. Check the Driver tab:
If the installed driver is provided by FTDI and dated 27/01/2014 or later, then the driver
installation has been successful.
In the Advanced tab, enable Load VCP:
Repeat for USB Serial Converter B.

CONFIGURE YOUR SHIMMER DOCK (4/5)
Go back to Device Manager. In the Ports (COM & LPT) section there are two USB Serial Ports. The
programming port is the USB Serial Port with the lowest COM Port number.
In this example the Programming Port is COM23.
The second port is the UART port.
This is COM24 in the example.

CONFIGURE YOUR SHIMMER DOCK (5/5)
Right-click on USB Serial Port (COM23). Click Properties.
Go to the Port Settings tab and click Advanced...
Enable Set RTS on Close.
Repeat both steps for the other Universal Serial Port - COM24 in this example.
NOTE: Make sure Load VCP is and Set RTS on Close are ticked for both Universal Serial Converters!
PROGRAMMING THE SHIMMER (1/3)
See also Shimmer3 Getting Started Video
Tutorial† - 4:16
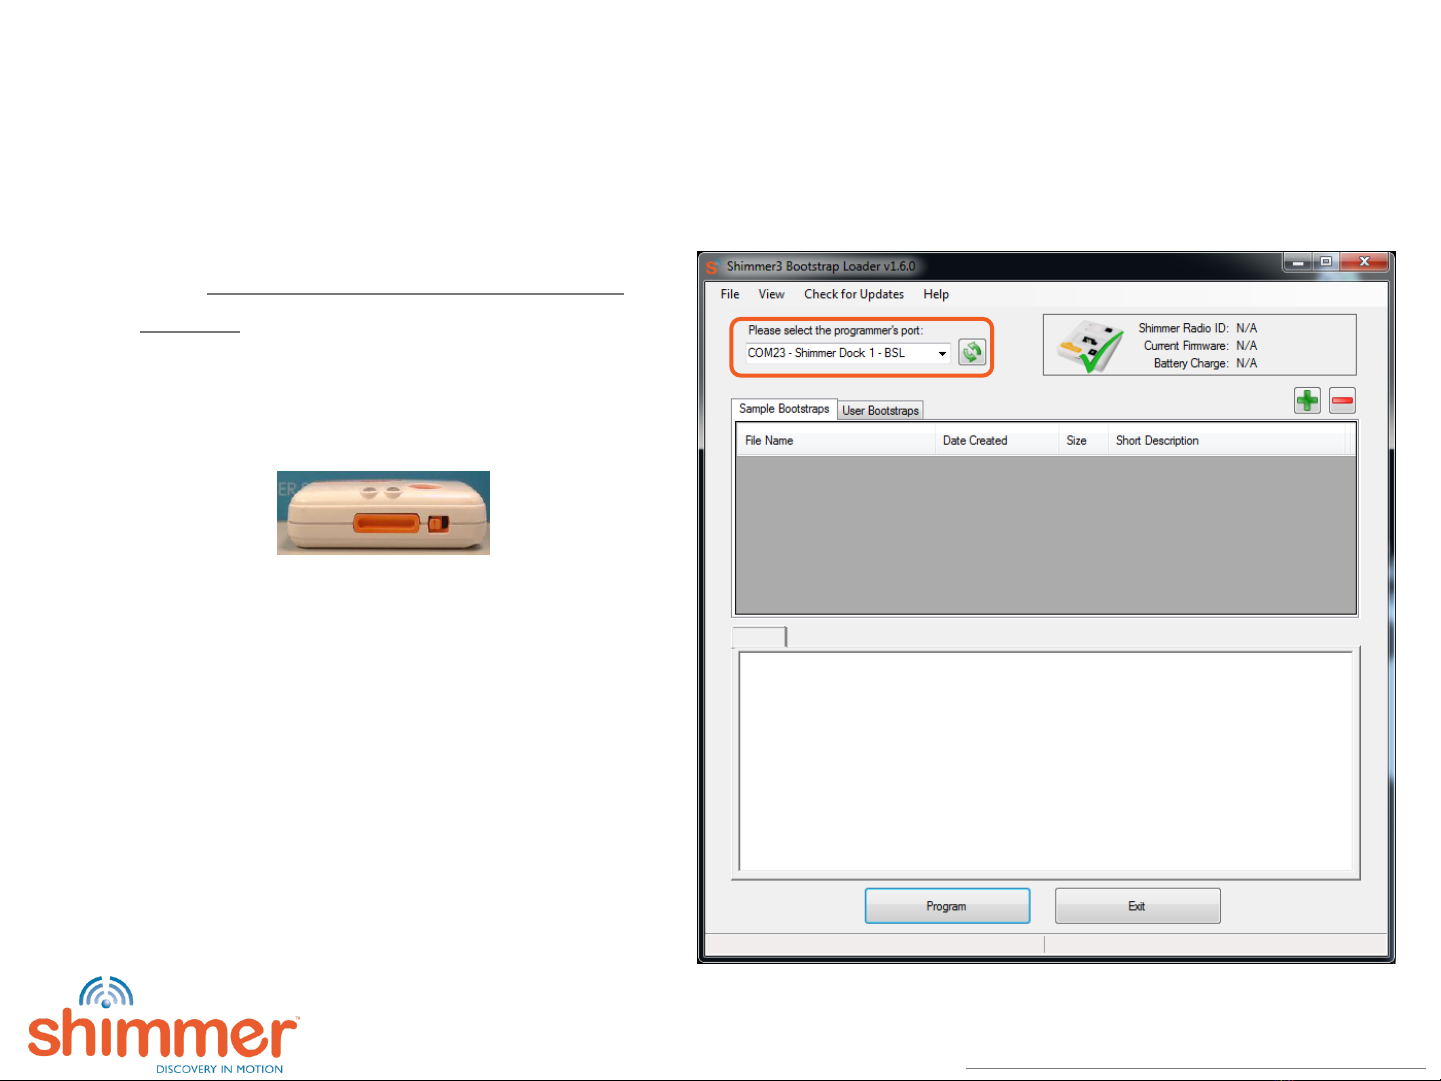
Power on and place Shimmer on the dock. The
Shimmer is powered on if the orange
switch is in the following position:
Download and extract the most recent
Shimmer3 Bootstrap Loader (BSL) zip-file
from the Shimmer website and run the
executable by double-clicking on it.
The Programming Port is automatically
detected. (In this example, it is ‘COM23’).
If automatic detection fails, use the drop-
down to select the Programming Port.
†https://www.youtube.com/watch?v=C2UdTdfiQ1g

PROGRAMMING THE SHIMMER (2/3)
Click Check for Updates. Click Download. Click OK.
Select the latest BtStream bootstrap
(BtStream_Shimmer3_v0.4.0.txt in this example).
Click the Program button.
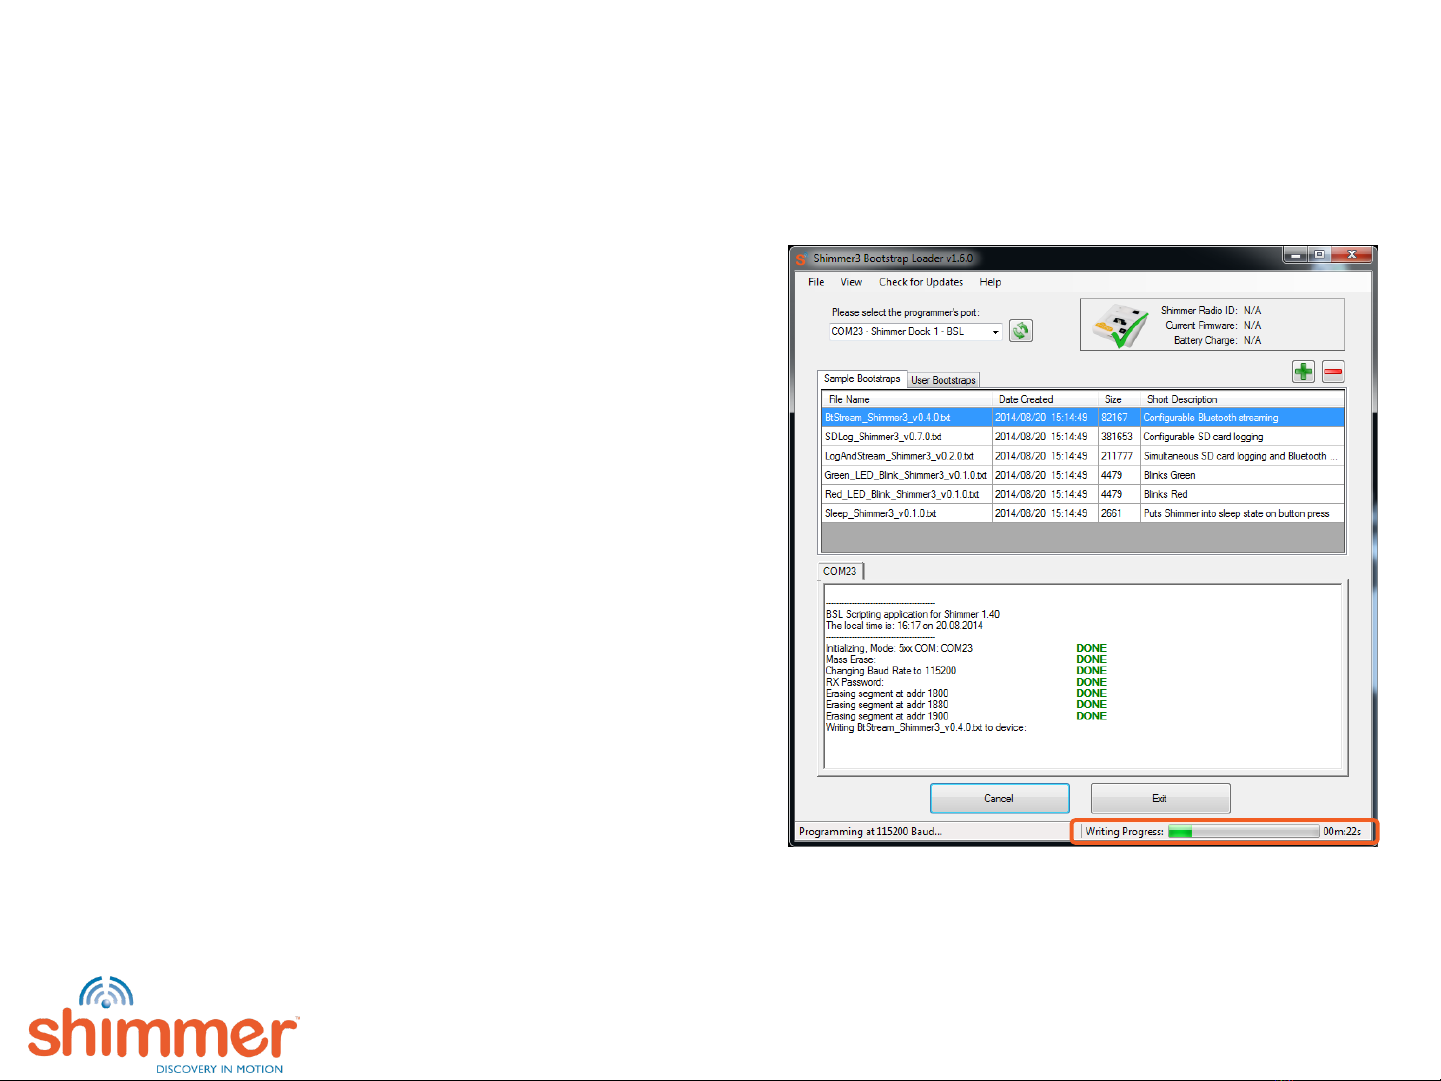
PROGRAMMING THE SHIMMER (3/3)
Programming underway:
NOTE: Programming can take up to 5 minutes.
Remaining time indicated in Status bar.
If programming fails, make sure:
1. The Shimmer is powered on.
2. The Dock is securely connected to the PC via USB.
When programming is complete, click OK on the popup widow and Exit the BSL program.

PAIRING THE SHIMMER OVER BLUETOOTH (1/2)
See also Shimmer3 Getting Started Video Tutorial† - 5:25
For Bluetooth communication the PC needs a built-in Bluetooth adapter or a Bluetooth USB
dongle. Shimmer does not supply Bluetooth dongles.
In order to establish a Bluetooth connection between the Shimmer and PC, the Shimmer needs
to be paired with the PC.
Notes:
1. Make sure the Shimmer is powered on and is programmed with BtStream before starting the
pairing process.
2. It is important to ensure a clear line of sight between the Shimmer and the BT radio of your
PC and to keep the distance as short as possible.
For an explanation of the behaviour of the status LEDs on the Shimmer, refer to the Shimmer3
Getting Started Video Tutorial and the Shimmer User Manual, available here.
†https://www.youtube.com/watch?v=C2UdTdfiQ1g

PAIRING THE SHIMMER OVER BLUETOOTH (2/2)
Go to Control Panel → Hardware and Sound → Add a device.
Select the device with the radio ID of your Shimmer3
(Shimmer3-978B in this example).
Click Next.
Select pairing option: “Enter the device’s pairing code”.
Click Next.
Enter the pairing code for the device: 1234.
Click Next.
Windows will install the required drivers for the device.
In the rare occasion that pairing is unsuccessful, please try again.
†https://www.youtube.com/watch?v=C2UdTdfiQ1g
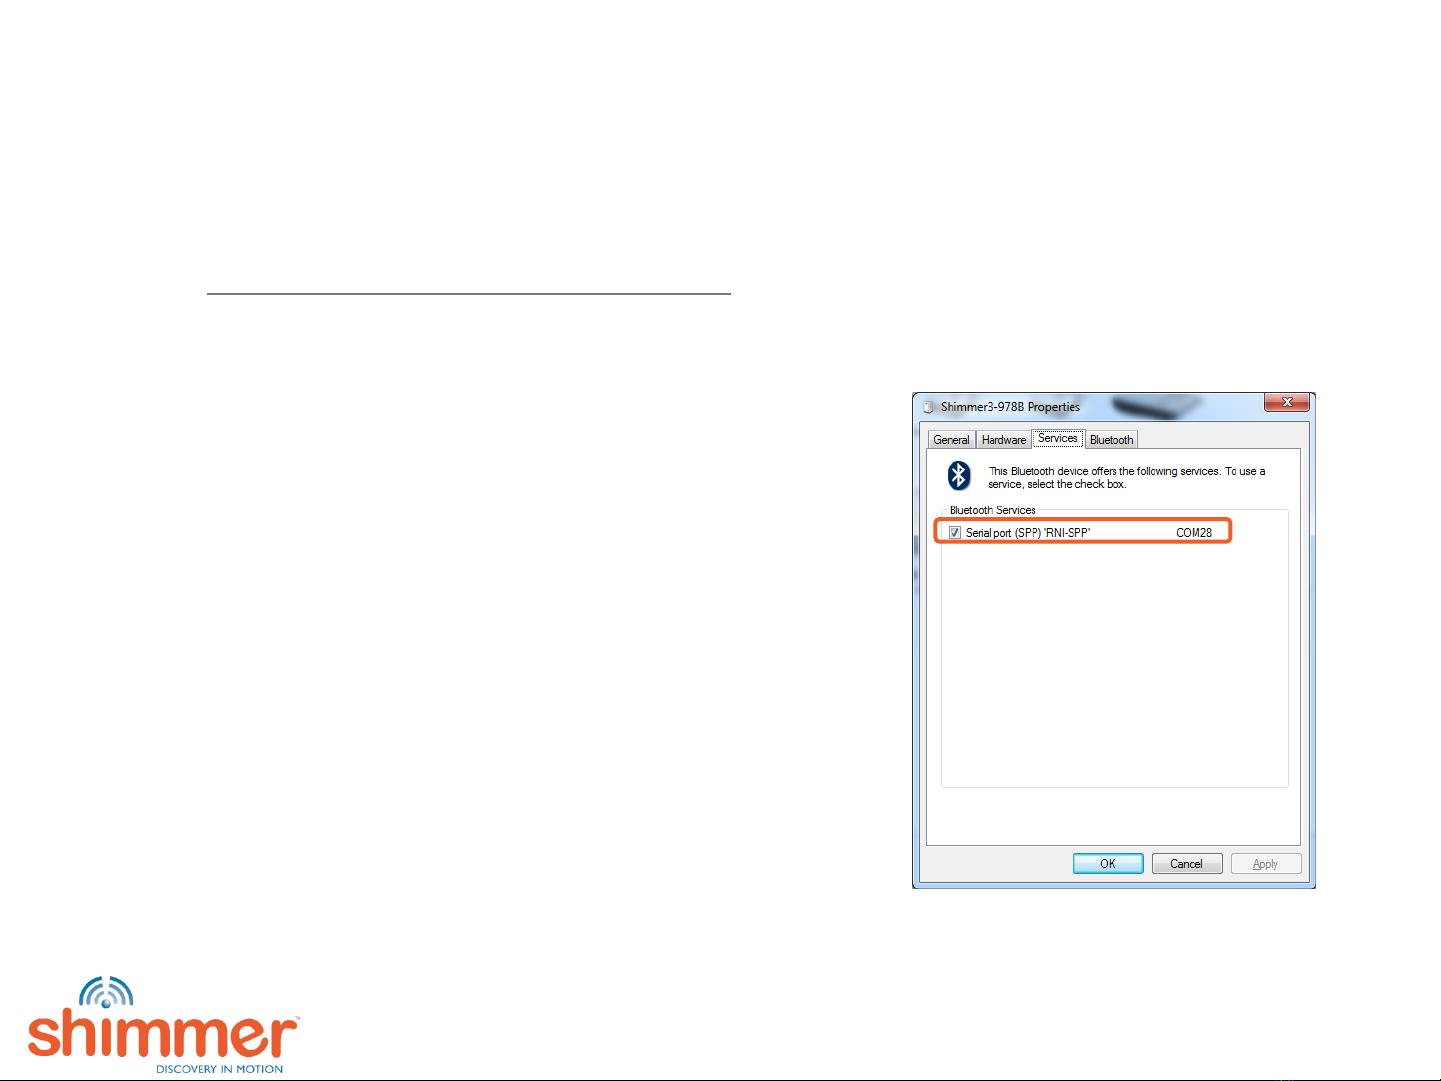
GET THE BT COM PORT
See also Shimmer3 Getting Started Video Tutorial† - 6:24
Go to Control Panel → Hardware and Sound → Devices and Printers.
Right-click on the Bluetooth device with the radio ID of your Shimmer3.
Click Properties and check the Services tab:
In this example the COM Port that the Shimmer uses for Bluetooth communication is COM28.
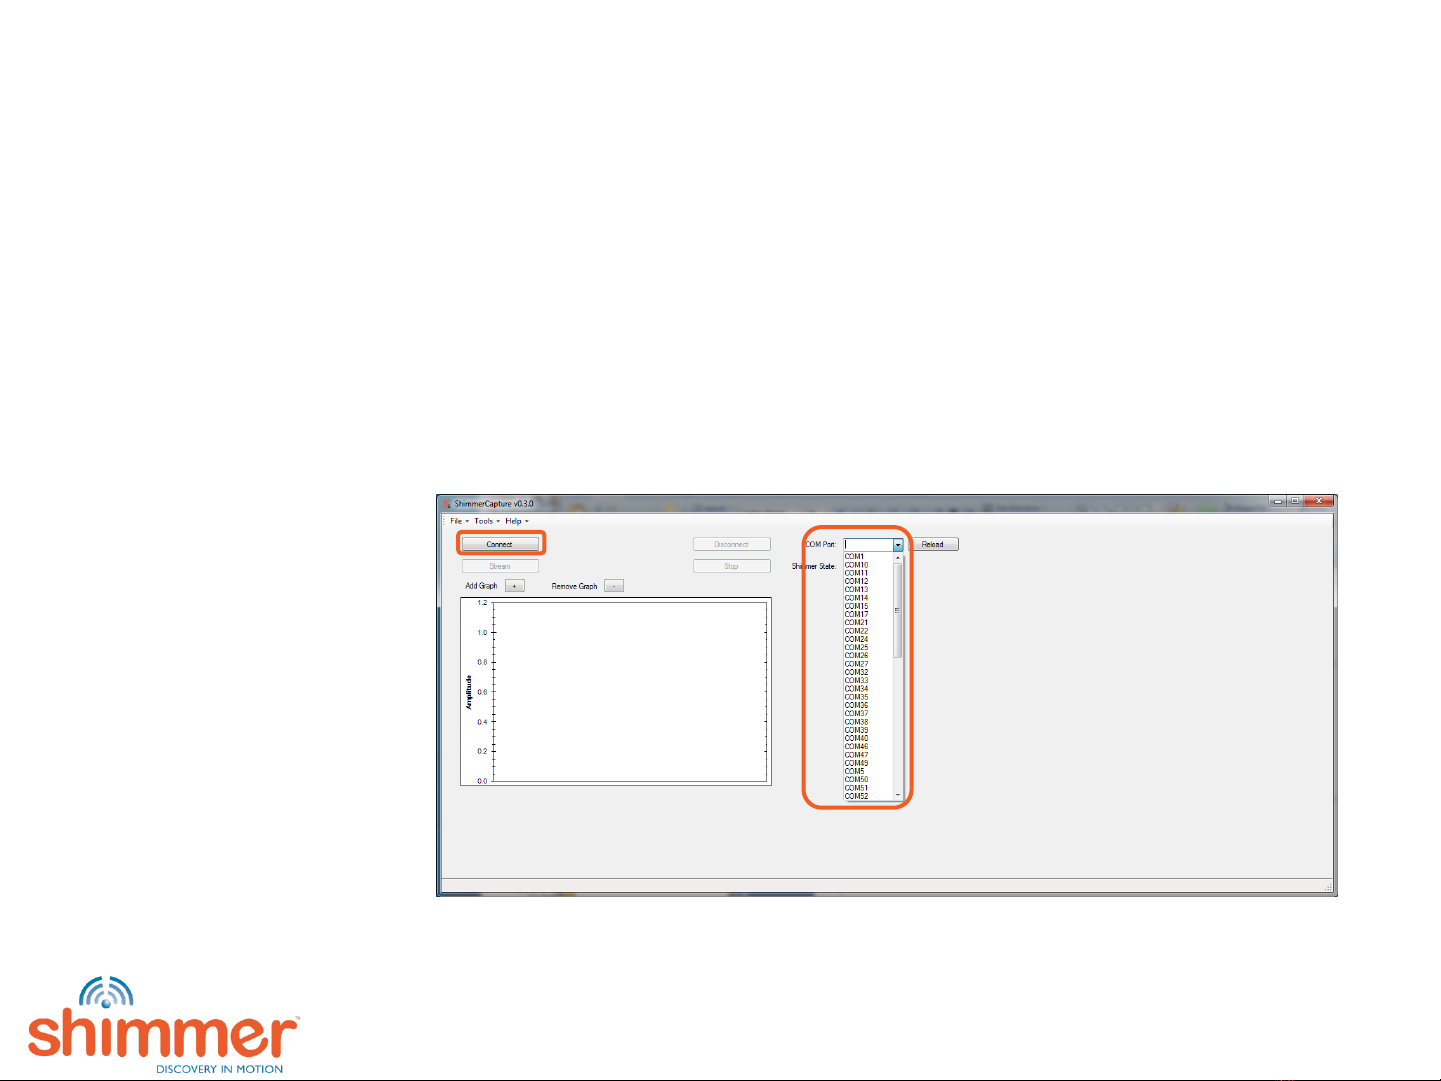
CONNECT TO SHIMMERCAPTURE
Download the latest version of ShimmerCapture from the Shimmer website.
Extract the downloaded zip-file and run ShimmerCapture by double-clicking the executable.
Choose Run if a Security Warning pops up.
Select the COM Port that the Shimmer uses for Bluetooth communication, see previous section.
Click Connect.
The status bar provides feedback on connection progress.
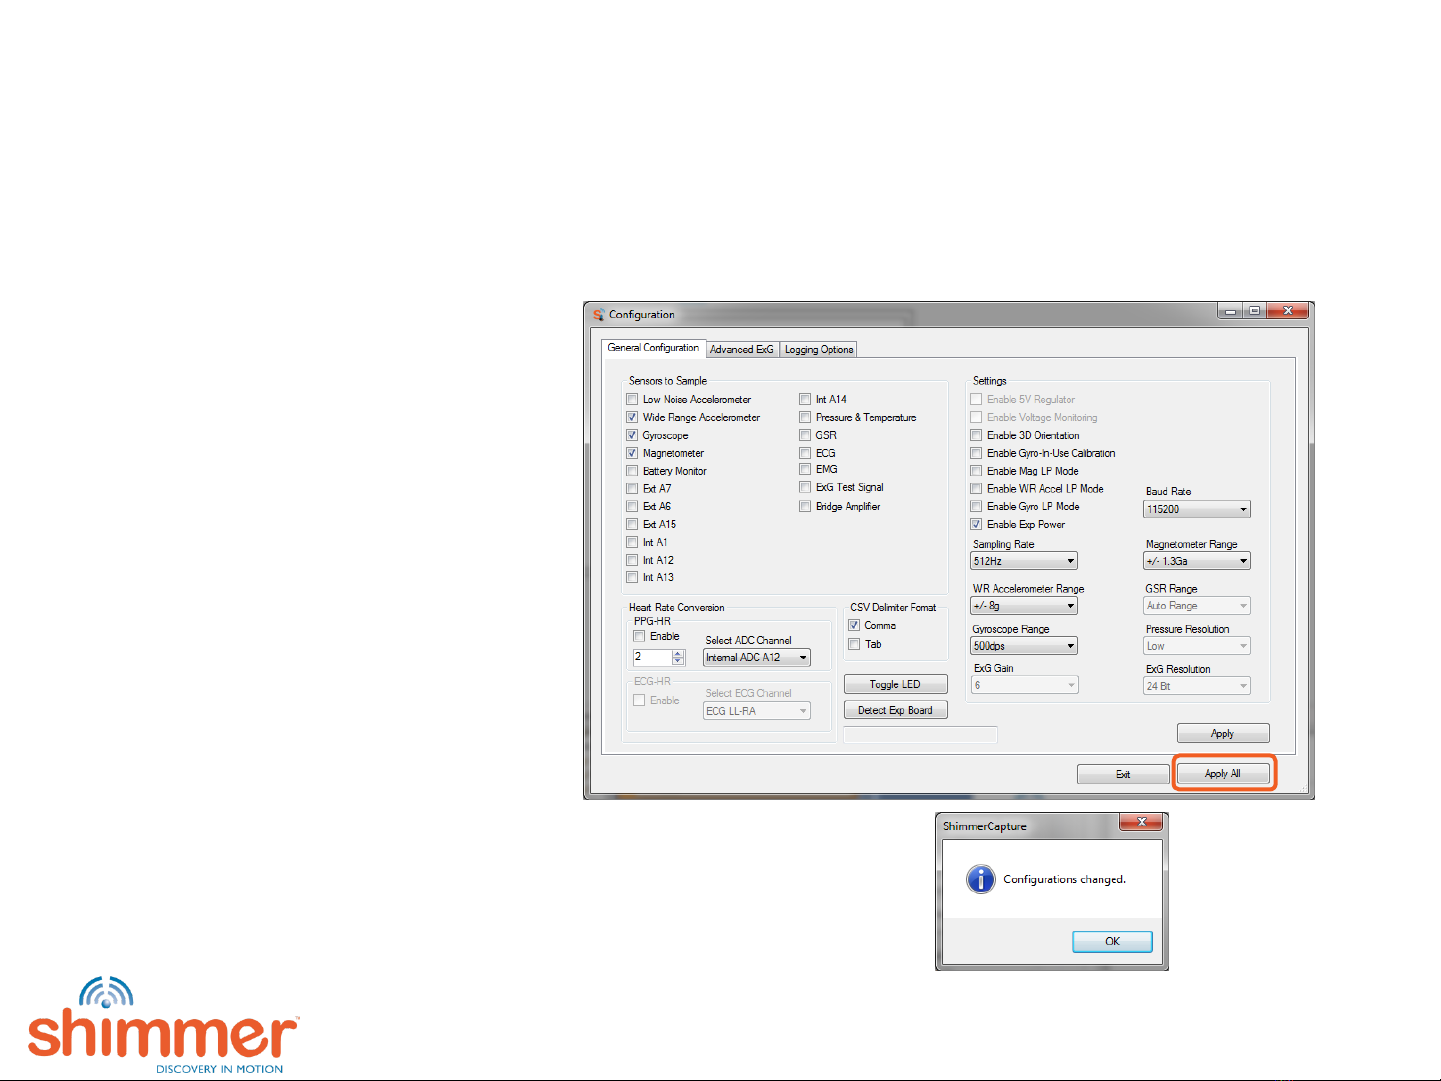
CONFIGURE THE SHIMMER
Click Tools → Configuration to enable sensors, set ranges and set the sampling rate of the
Shimmer.
Click Apply All to save and apply the new configuration.
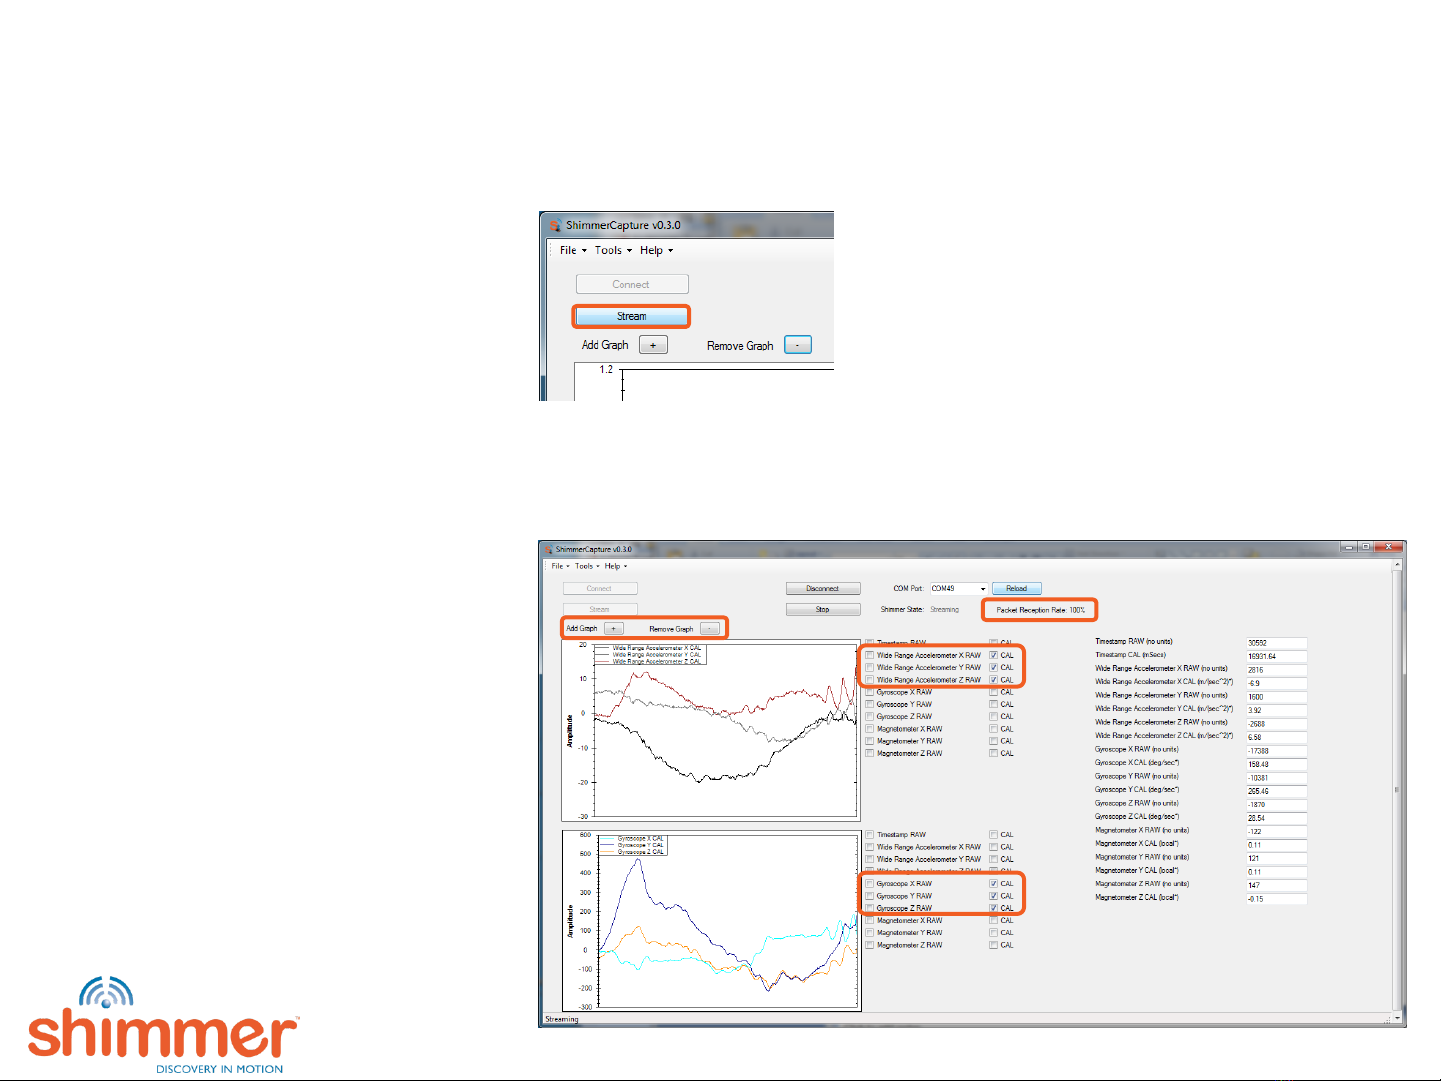
STREAM DATA
Click Stream to start streaming.
Select signals to plot by selecting their checkboxes (choose Raw or Calibrated data).
Add a new graph by selecting the “+” button.
Remove the last graph by selecting the “-” button.
Packet reception rate is indicated.
Click Stop to finish streaming.
Click Disconnect before powering
Shimmers off.

Other manuals for 3
4
Table of contents
Other Shimmer Medical Equipment manuals


Popular Medical Equipment manuals by other brands


Getinge
Getinge Arjohuntleigh Nimbus 3 Professional Instructions for use

Mettler Electronics
Mettler Electronics Sonicator 730 Maintenance manual

Pressalit Care
Pressalit Care R1100 Mounting instruction

Denas MS
Denas MS DENAS-T operating manual

bort medical
bort medical ActiveColor quick guide

AccuVein
AccuVein AV400 user manual


