Boombell BOOMRACK User manual

BOOMRACK
Montageanleitung
DE
EN
Montageanleitung
Mulfunkons-Hantelständer
Assembly Manual
Mulfunconal dumbbell stand
WORLDS SMARTEST DUMBBELL RACK
Assembly Manual

Boombell GmbH · Österreich · Graben 24 · 3003 Gablitz
www.boombell.eu
Technischer Support
www.boombell.eu/support
Lade dir die Anleitung in deiner
Landessprache herunter.
Scan and get the PDF
in your language.
Hier gelangst du zur
Video-Aufbauanleitung
Scan and view our
Assembly Video.
DE EN IT ES FR
SV NL PL TR RU

MONTAGEANLEITUNG - INHALTSVERZEICHNIS
2 . Technische Eigenschaften ................................................................................. 5
Vorwort ............................................................................................................... 4
1 . Wichtige Sicherheitsinformationen ................................................................. 4
5 . Wartung & Support .......................................................................................... 10
6 . Garantiebestimmungen .................................................................................. 11
3 . Montageanleitung ............................................................................................. 6
Gesamtübersicht - Explosionszeichnung ........................................................................................................... 6
Benötigtes Werkzeug ............................................................................................................................................. 6
Teileliste ................................................................................................................................................................... 7
Optionales Zubehör (nicht inkludiert) .................................................................................................................. 7
Schritt 1 .................................................................................................................................................................... 8
Schritt 2 .................................................................................................................................................................... 9
Schritt 3 .................................................................................................................................................................... 8
Schritt 4 .................................................................................................................................................................... 9
Schritt 5 .................................................................................................................................................................... 9
Schritt 6 .................................................................................................................................................................... 9
Schritt 7 .................................................................................................................................................................... 9
4 . Optionales Zubehör ......................................................................................... 10
Media-Halterung .................................................................................................................................................. 10
T-Bar Row Erweiterung ........................................................................................................................................ 10
ASSEMBLY INSTRUCTIONS - TABLE OF CONTENTS
3
Foreword ........................................................................................................... 12
1 . Important safety instructions ........................................................................ 12
2 . Technical characteristics ................................................................................. 13
5 . Maintenance & Support .................................................................................. 18
6 . Warranty terms ................................................................................................ 19
3 . Assembly instructions ...................................................................................... 14
Overview - Exploded assembly drawing ........................................................................................................... 14
Required Tools ..................................................................................................................................................... 14
Parts list ................................................................................................................................................................. 15
Optional extensions (not included in the set) ................................................................................................... 15
Step 1 ...................................................................................................................................................................... 16
Step 2 ...................................................................................................................................................................... 16
Step 3 ...................................................................................................................................................................... 16
Step 4 ...................................................................................................................................................................... 17
Step 5 ...................................................................................................................................................................... 17
Step 6 ...................................................................................................................................................................... 17
Step 7 ...................................................................................................................................................................... 17
4 . Optional accessories ........................................................................................ 18
Media Holder ......................................................................................................................................................... 18
T-Bar Row Extension ............................................................................................................................................ 18

4
Montageanleitung
Herzlich Willkommen im Boombell-Club!
Wir gratulieren Ihnen zu Kauf Ihres Boomrack, Sie haben soeben den innovativsten System-
Hantelständer am Markt erhalten!
Das BoomRack ist ein multifunktioneller Hantelständer und die optimale Ergänzung zu unserem
Boombell Kurzhantelsystem.
Durch den modularen Aufbau und die optionalen Erweiterungsmöglichkeiten wird das Boomrack
zum Multifunktionstrainingsgerät und ist die perfekte HomeGym Ergänzung!
Wir wünschen Ihnen viel Spaß und tolle Trainingserfolge mit Ihrem Boomrack.
VORWORT
1. WICHTIGE SICHERHEITSINFORMATIONEN
1 . Dieses Gerät ist nur für den Heimgebrauch bestimmt.
2 . Das Boomrack immer auf einer harten, ebenen Fläche aufstellen und benutzen.
3 . Montieren oder Verwenden Sie das Boomrack nur in Innenräumen.
4 . Es ist nicht für den Outdoor Bereich konzipiert und sollte vor Wasser und
Feuchtigkeit stets geschützt sein.
5 . Halten Sie auf jeder Seite des Ständers mindestens 1,0m Sicherheitsabstand.
6 . Stellen, sitzen oder klettern Sie nicht auf dem Ständer.
7 . Sichern Sie Ihre Hanteln nach jedem Training mithilfe der Sicherheitsgurte!
8 . Sofern Sie Zubehörteile wie Langhantelstangen oder Gewichtscheiben
verwenden, verstauen Sie diese nach jedem Training ordnungsgemäß am
Boomrack und etwaige Verletzungen während einer Trainingspause zu
vermeiden.
9 . Führen Sie alle Montageschritte in der Reihenfolge wie in der Beschreibung
angegebenen durch. Versuchen Sie nicht das Design oder die Funktionalität des
Boomracks zu verändern, dies könnte die Sicherheit beeinträchtigen und führt
zum Erlöschen der Garantie.
10 . Verwenden Sie das Boomrack erst, wenn es vollständig zusammengebaut und
auf ordnungsgemäße Funktion gemäß geprüft wurde.

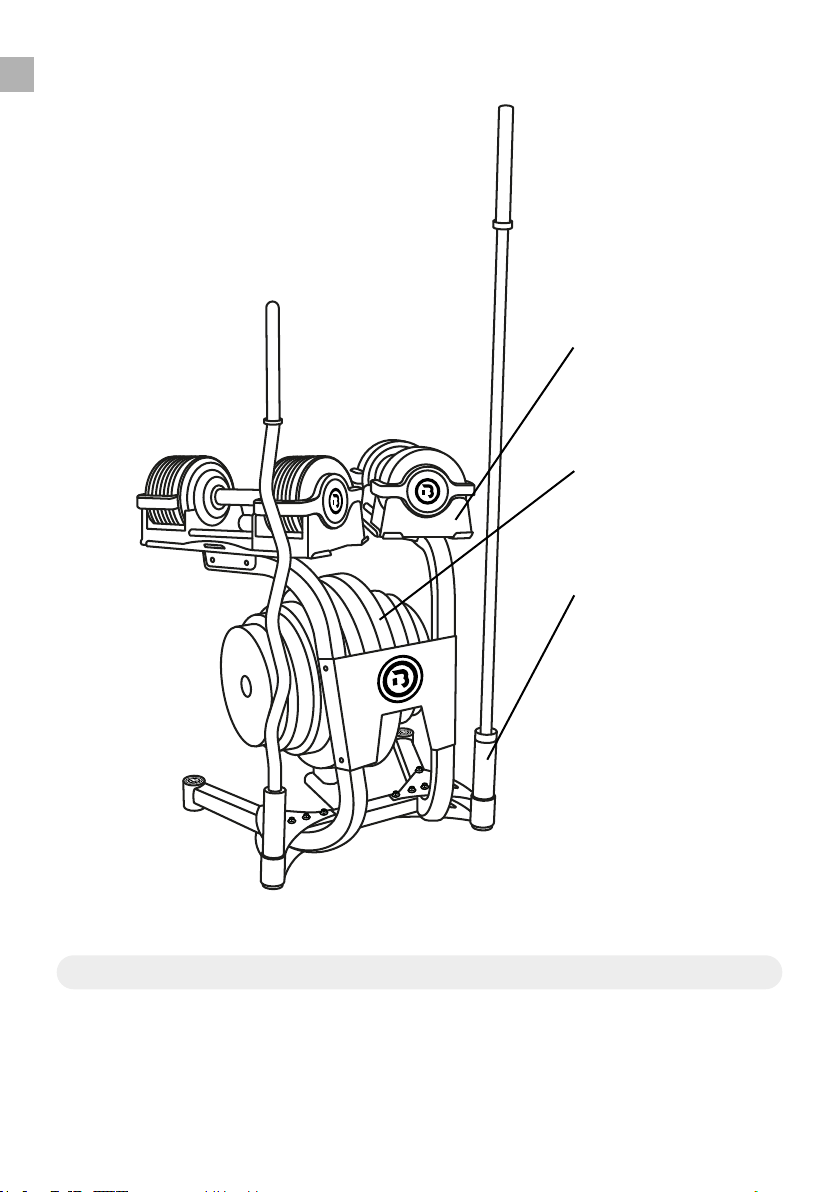
Perfekte Lagerung der
Kurzhanteln in einer
optimalen Arbeitshöhe mit
Sicherheitsgurten zum
Fixieren der Hanteln.
100% Platznutzung!
Gewichtscheibenhalter für
2“/50mm Gewichtscheiben
mit einer Tragkraft
von maximal 100kg
Gesamtgewicht.
2 integrierte
Langhantelstangen-Halter
für verschiedene 50mm
Olympia Stangen.
Gesamtgewicht: 22kg
Abmessungen (B/T/H): 65 / 55 / 70cm
Benötigte Grundäche: 0.4m²
Maximale Belastung
der Hantelträger: 40kg pro Seite
Aufbaudauer: 20min
2. TECHNISCHE EIGENSCHAFTEN
Optionale Erweiterungen (nicht im Set inkludiert)
Hinweis: Langhantelstangen und Gewichtscheiben sind nicht im Set inkludiert und können direkt
in unserem Webshop, unter www.boombell.eu erworben werden.
• T-Bar Row Erweiterung
• Media Tablet Halterung
5
3. MONTAGEANLEITUNG
• Bevor Sie nun beginnen Ihr Boomrack zusammen zu bauen, sorgen Sie zu allererst für
genügend freie Arbeitsäche und legen sie sich das benötigte Werkzeug zur Seite. Überprüfen
Sie nun das Set auf seine Vollständigkeit laut der angegebenen Teileliste.
• Sollten alle Teile vorhanden sein, können Sie nun mit der Schritt für Schritt Aufbauanleitung
beginnen.
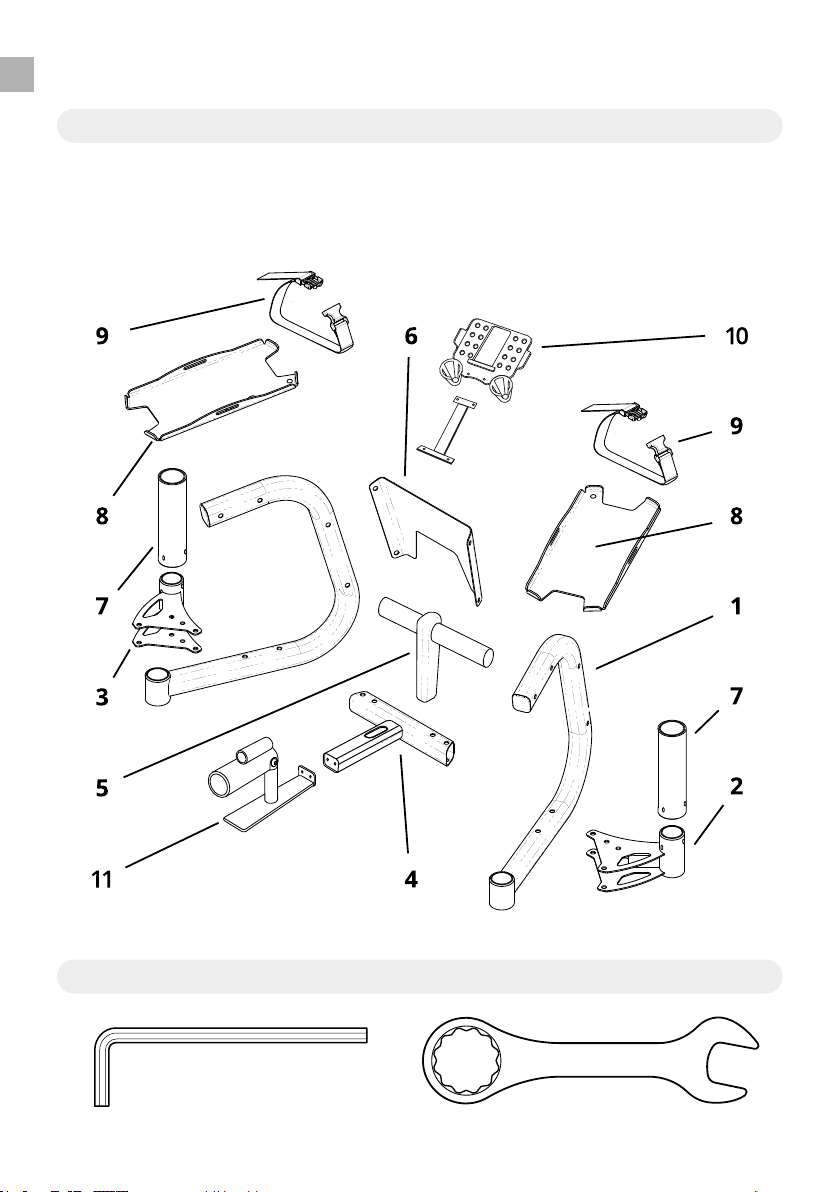
Gesamtübersicht - Explosionszeichnung
Benötigtes Werkzeug
6mm 17mm
6
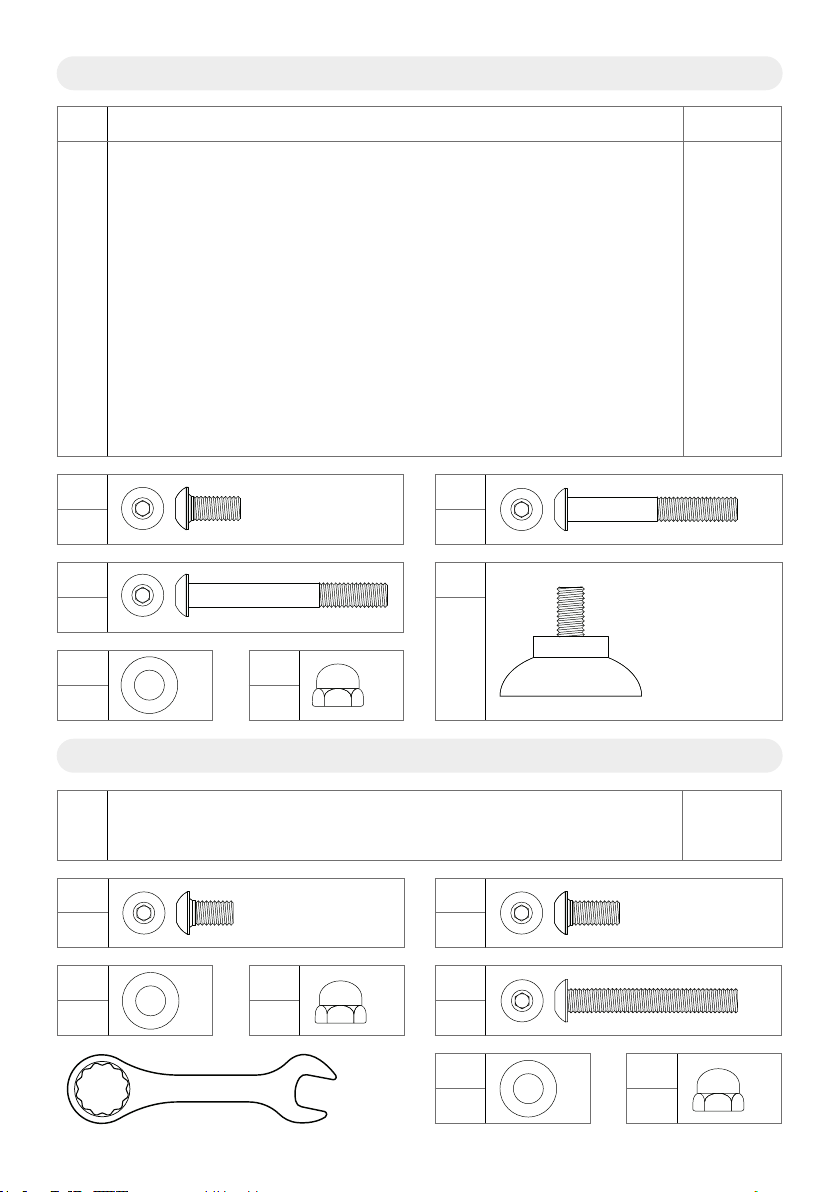
E
20x
11-L
4x
11-M
4x
10-G
4x
10-H
4x
10-I
4x
11-J
2x
11-K
1x
A
2x
F
5x
B
4x
C
2x
M8 x 15
D
42x
Teileliste
Ref. Bezeichnung Menge
1U-Prolständer 2
2Rechte Fußstütze 1
3Linke Fußstütze 1
4T-Querstrebe 1
5Gewichtsscheibenhalter 1
6Rückplatte 1
7Langhantelstangen-Halter 2
8Hantel-Trägerplatte 2
9Sicherheitsgurt 2
Optionales Zubehör (nicht inkludiert)
10 Media-Halterung 1
11 T-Bar Row Erweiterung 1
M10 x 70
M10 x 30 M10 x 65
M10 x 30
7
14mm
M10 x 75

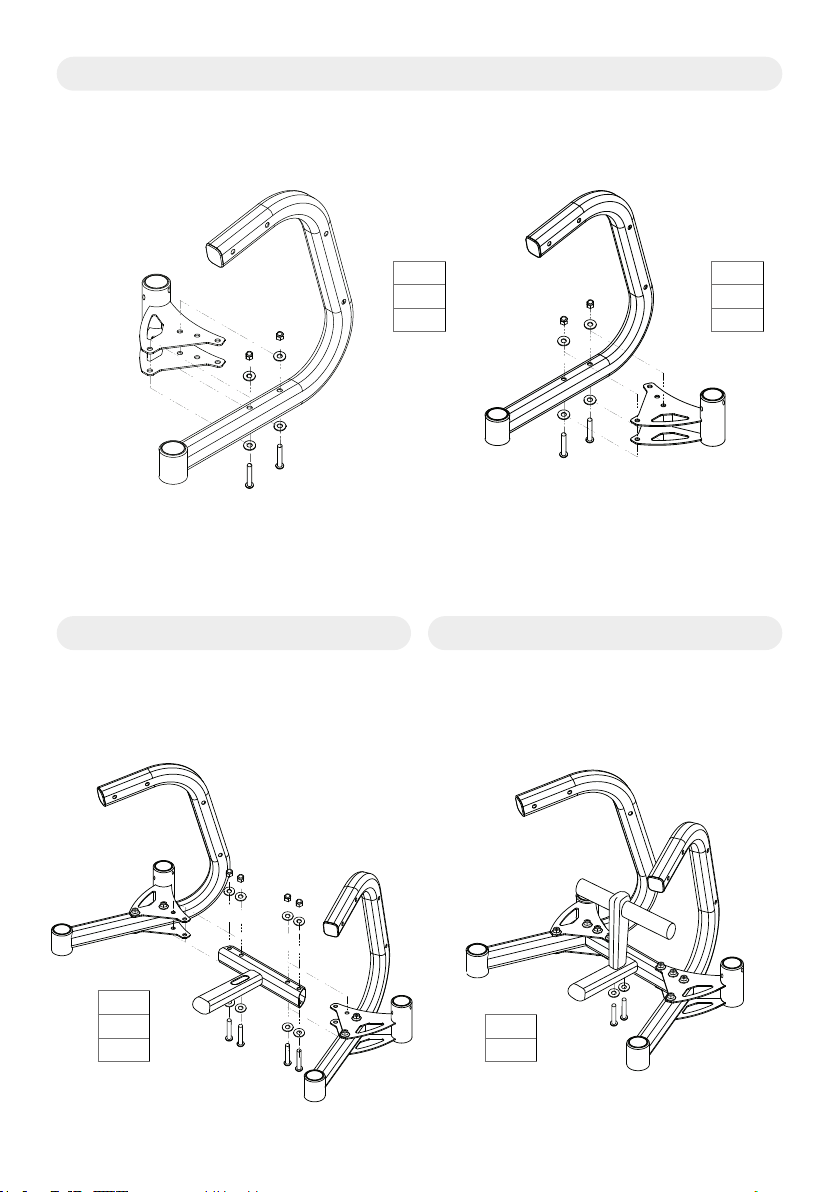
Schritt 2: Schritt 3:
Schritt 1:
Verbinden Sie die beiden Ständerprole mit je einer Fußstrebe.
Verbinden Sie die Ständerprole mit der
T-Querstrebe.
Stecken Sie den Gewichtscheiben-Halter
in die vorgegebene Önung des T-Stücks
und befestigen diesen von unten mit den
2 beiliegenden Schrauben.
Hinweis: Ziehen Sie die Schrauben zu diesem Zeitpunkt noch nicht vollständig fest.
Hinweis: Noch nicht vollständig festziehen.
2 x E
4 x D
2 x C
2 x E
4 x D
2 x C
4 x E
8 x D
4 x C
2 x A
2 x D
8
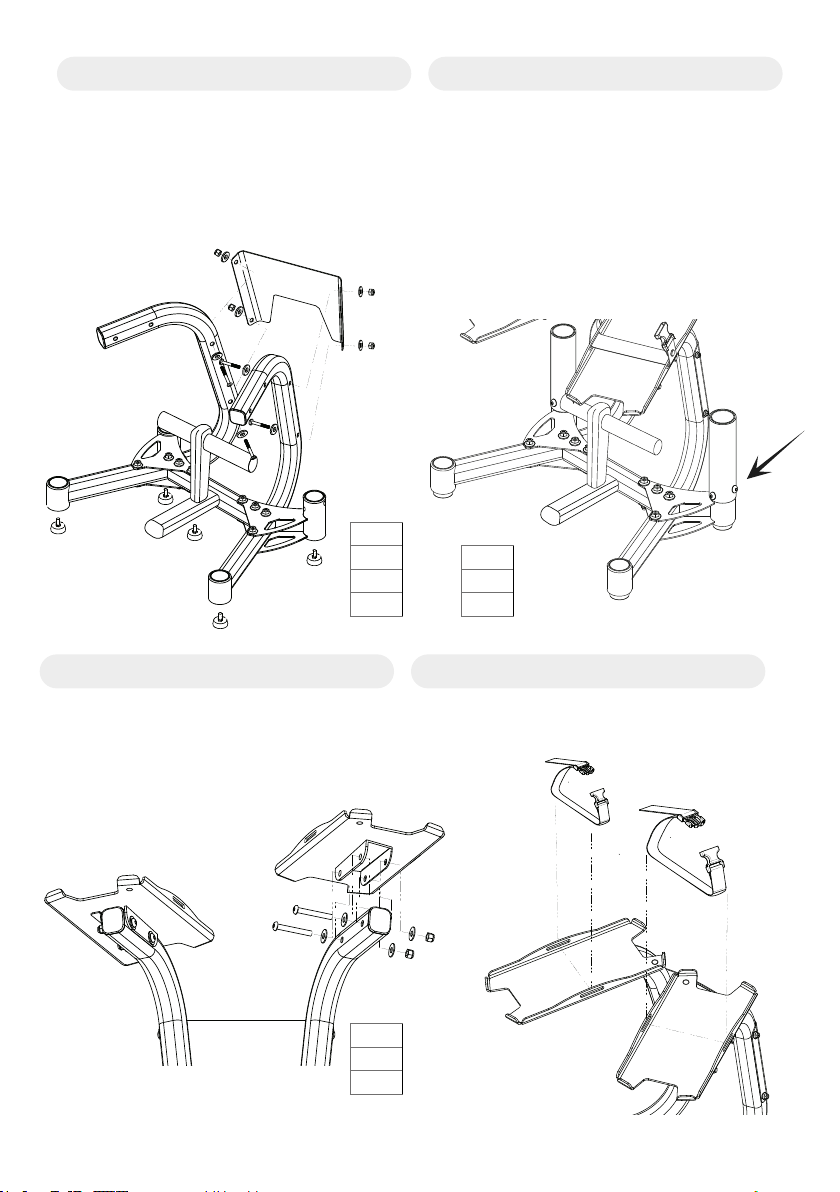
Schritt 4: Schritt 5:
Montieren Sie nun die Rückplatte auf den
Außenseiten der Ständerprole und ziehen
anschließend alle Schrauben aus den
Schritten 1, 2, 3 und 4 fest!
Nun können Sie den Ständer umlegen
und die Ständerfüße in die Vorrichtungen
einschrauben.
Lösen Sie die bereits vormontierten
Schrauben von beiden Langhantelstangen-
Halter. Setzten Sie diese auf die Fußstreben
auf und ziehen Sie danach die Schrauben
wieder fest.
Schritt 6: Schritt 7:
Montieren Sie die beiden Hantelträger-
Platten an den beiden Ständerprolen.
Fädeln Sie die Sicherheitsgurte durch die
Vorrichtung der Hantel-Trägerplatten.
4 x B
8 x D
4 x E
5 x F
4 x E
8 x D
4 x C
4 x E
8 x D
4 x C
9

5. WARTUNG & SUPPORT
WARNUNG!
●Reinigen Sie das Boomrack ausschließlich mit reinem Wasser ohne
chemische Reinigungsmittel. Diese könnten die Oberächenbeschichtung
beschädigen.
●Sollten Sie einen Mangel feststellen, welchen Sie nicht selbst beheben
können, dann setzten Sie das Boomrack vorerst bitte außer Betrieb und
kontaktieren unseren Support unter:
●Untersuchen Sie das Boomrack regelmäßig auf lose Teile oder Verschleißerscheinungen.
●Prüfen Sie alle Befestigungselemente sorgfältig und ziehen Sie ggf. locker gewordene Schrauben nach.
●Auch der Rahmen sollte optisch in regelmäßigen Abständen auf Anzeichen von Verformung oder Rissen
kontrolliert werden.
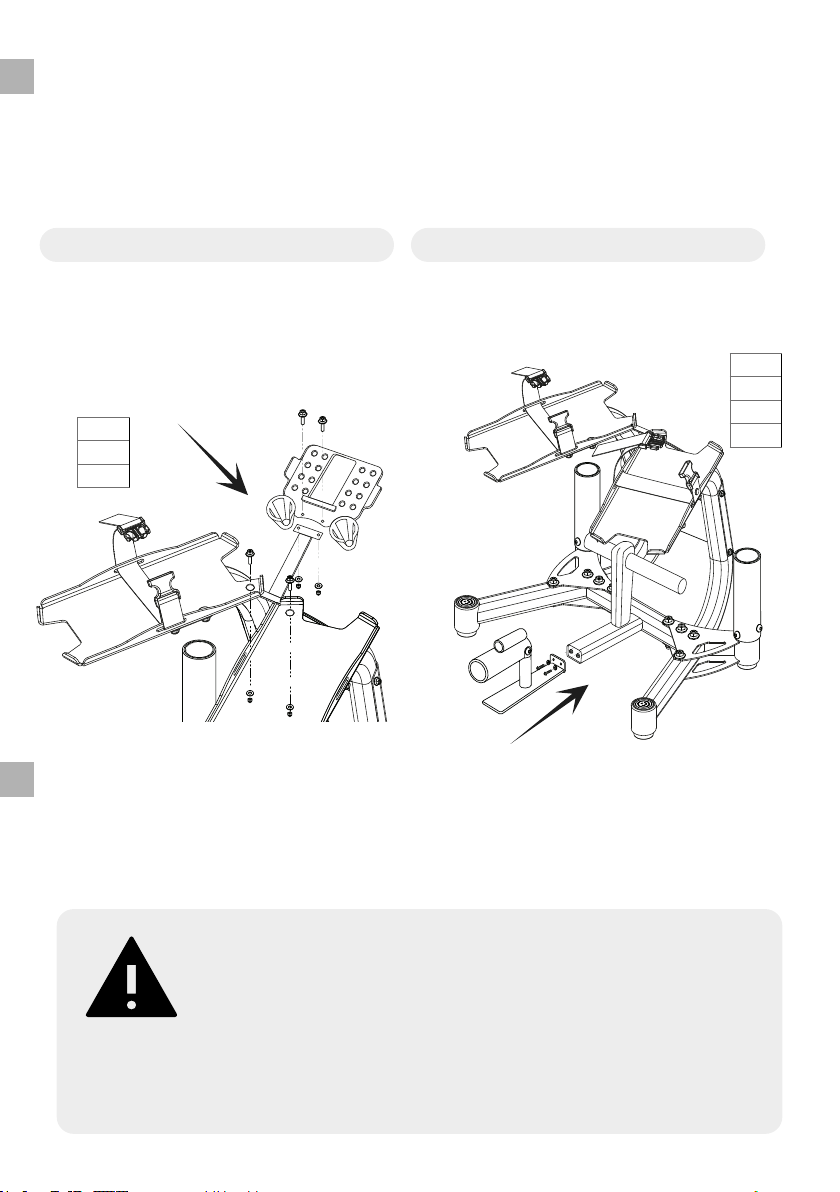
Anbringen des Media Halters Anbringen der T-Bar Row Erweiterung
4. OPTIONALES ZUBEHÖR
Befestigen Sie zuerst den Arm des Media
Halters mit den beiden Hantel-Trägerplat-
ten.
Danach setzen Sie den Tablet Halter auf
den Arm und befestigen diesen mit den
mitgelieferten Schrauben.
Entfernen Sie die Abdeckkappe der T-Quer-
strebe und montieren Sie das T-Bar Row mit
den mitgelieferten Schrauben direkt an das
Boomrack.
Und Ihr Boomrack kann noch mehr!
Mit den beiden optionalen Erweiterungssets, machen Sie Ihr Boomrack zum digitalen
Multifunktions-Trainingsgerät.
Mehr Informationen unter: www.boombell.eu/boomrack
10
4 x G
4 x H
4 x I
2 x J
1 x K
4 x L
4 x M

6. GARANTIEBESTIMMUNGEN
Diese Garantie wird von der
Boombell GmbH
Graben 24,
3003 Gablitz, AUSTRIA
ausgestellt.
Wann gilt die Garantie?
●Diese Garantie gilt nur für den ursprünglichen Erstkäufer und gilt ausschließlich für den privaten
Gebrauch.
●Die Garantie deckt alle Material- und Verarbeitungsfehler ab.
Wie lange besteht die Garantie?
●Diese Garantie gilt für 2 Jahre ab dem Datum der Zustellung des Produktes. Wenn Anbauteile oder der
Rahmen brechen, reißen oder sich verformen sollte, werden diese Teile kostenlos durch die Boombell
GmbH ersetzt.
●Boombell trägt im Garantiefall auch die Kosten des Versandes.
●Der Garantieschutz endet, wenn Sie die Boomrack weiterverkaufen oder einer anderen Person
übertragen.
Was deckt die Garantie nicht ab?
●Die Garantie tritt nicht in Kraft bei Designmängel und normale Abnutzung sowie bei Verschleiß
wie Absplittern, Abblättern oder Verkratzen der Farbbeschichtung. Auch von Problemen, die durch
missbräuchliche oder unsachgemäße Handhabung oder Lagerung durch den Besitzer oder durch Dritte
verursacht wurden, nimmt die Boombell GmbH Abstand.
●Bei technisch-baulichen Eingrien oder versuchten mechanischen Umarbeiten durch den Besitzer oder
unbefugte Dritte entfällt jeglicher Garantieanspruch.
●Ein Beispiel für missbräuchliche oder unsachgemäße Handhabung wäre das Lagern im Freien.
DIE BOOMBELL GMBH IST NICHT VERANTWORTLICH FÜR VERLETZUNGEN, VERLUSTE
ODER SCHÄDEN AN PERSÖNLICHEM KÖRPER ODER EIGENTUM. FOLGESCHÄDEN
UND ZUFÄLLIGE SCHÄDEN SIND IM RAHMEN DIESER GARANTIE NICHT
ERSTATTUNGSFÄHIG.
Wie können Sie Ihre Garantieansprüche geltend machen?
●Bitte senden Sie uns Boombell-Produkte immer im Originalkarton oder einer gleichwertigen Verpackung.
Für einen Verlust oder für Schaden während des Rückversandes übernehmen wir keine Verantwortung.
●Eine vollständige Inspektion oder Reparatur wird in der Regel innerhalb von 96 Stunden abgewickelt.
Etwaige Garantieansprüche müssen innerhalb von 30 Tagen nach Erhalt des Produktes gemeldet
werden. Wenn Ihre Boomrack während der Garantiezeit gewartet, repariert oder ersetzt werden muss,
kontaktieren Sie bitte unseren Support unter:
Bitte halten Sie folgende Unterlagen für den Support bereit:
• Kaufdatum
• Rechnungsnummer
• eine kurze Beschreibung Ihres Problems
11

Assembly instruction
Welcome to the Boombell Club!
Congratulations on buying your Boomrack, you have just received the most innovative dumbbell
stand on the market! The BoomRack is a multifunctional dumbbell stand and the ideal complement
to our Boombell dumbbell system.
Due to the modular design and the optional expansion options, the Boomrack becomes a
multifunctional training device and is the perfect HomeGym supplement!
We wish you a lot of fun and great training success with your Boomrack.
FOREWORD
1. IMPORTANT SAFETY INSTRUCTIONS
1 . This device is for home use only.
2 . Always place and use the Boomrack on a hard, at surface.
3 . Mount or use the Boomrack only indoors.
4 . It is not designed for outdoor use and should always be protected from water
and moisture.
5 . Keep a safe distance of at least 1.0m on each side of the stand.
6 . Do not stand, sit or climb on the Boomrack.
7 . Secure your dumbbells after each workout by using the safety belts!
8 . If you use accessories such as barbell bars or weight discs, store them properly
on the boom rack after each workout and avoid any injuries during a training
break.
9 . Perform all assembly steps in the order specied in the description.
Do not try to change the design or functionality of the boomrack, this could
compromise security and will void the warranty.
10 . Do not use the Boomrack until it is fully assembled and properly tested.
12
Total weight: 22kg
Dimensions (W/D/H): 65 / 55 / 70cm
Required oor area: 0.4m²
Maximum load on the
dumbbell carriers: 40kg per side
Assembly time: 20min
2. TECHNICAL CHARACTERISTICS
Optional extensions (not included in the set)
Note: Barbell bars and weight plates are not included in the set and can be purchased directly in
our webshop, under www.boombell.eu
• T-Bar Row Extension
• Media Tablet Holder
Perfect storage of the
dumbbells at an optimal
working height with
safety belts for xing the
dumbbells.
100% use of space! Weight
disc holder for 2”/50mm
weight discs with a
maximum load capacity of
100kg total weight
2 integrated bar bar
holders for various 50mm
Olympia bars
13

3. ASSEMBLY INSTRUCTIONS
• Before you start assembling your Boomrack, rst of all ensure enough free work space and
put the required tools aside.
• Now check the set for its completeness according to the specied parts list. If all parts are
available, you can now start with the step-by-step assembly instructions.
Overview – Exploded assembly drawing
Required Tools
6mm 17mm
14

E
20x
11-L
4x
11-M
4x
10-G
4x
10-H
4x
10-I
4x
11-J
2x
11-K
1x
A
2x
F
5x
B
4x
C
2x
M8 x 15
D
42x
Parts list
Ref. Description Amount
1U-prole stand 2
2Right footrest 1
3Left footrest 1
4T-crossbar 1
5Weight disc holder 1
6Back plate 1
7Barbell bar holder 2
8Dumbbell carrier plate 2
9Safety belt 2
Optional extensions (not included in the set)
10 Media-Tablet Holder 1
11 T-Bar Row Extension 1
M10 x 70
M10 x 30 M10 x 65
M10 x 30
15
14mm
M10 x 75
Step 2: Step 3:
Step 1:
Connect the two stand proles with a footrest each.
Connect the stand proles to the T-cross-
bar.
Insert the weight plate holder into the
specied opening of the T-crossbar and
attach it from below with the 2 enclosed
screws.
Note: Do not tighten the screws completely at this time.
Note: Do not tighten completely yet.
2 x E
4 x D
2 x C
2 x E
4 x D
2 x C
4 x E
8 x D
4 x C
2 x A
2 x D
16

Step 4: Step 5:
Now mount the back plate on the outside
of the stand proles and then tighten all the
screws from steps 1, 2, 3 and 4! Now you
can fold the stand and screw the stand feet
into the xtures.
Loosen the pre-assembled screws from
both barbell holders, place them on the
footrests and then tighten the screws
again.
Step 6: Step 7:
Mount the two dumbbell carrier plates
on the two stand proles.
Thread the safety belts through the Dumb-
bell carrier plate.
4 x B
8 x D
4 x E
5 x F
4 x E
8 x D
4 x C
4 x E
8 x D
4 x C
17
5. MAINTENANCE & SUPPORT
WARNING!
●Clean the Boomrack only with pure water without chemical detergents,
these could damage the surface coating.
●If you notice a defect that you cannot remedy yourself, please
decommission the Boomrack for the time being and
contact our support at:
●Regularly inspect the Boomrack for loose parts or signs of wear.
●Check all fasteners carefully and, if necessary, tighten any screws that have become loose.
●The frame should also be visually checked at regular intervals for signs of deformation or cracking.
Attaching the media holder Installation of the T-Bar Row extension
4. OPTIONAL ACCESSORIES
First, attach the arm of the media holder with
the two dumbbell carrier plates. Then place
the tablet holder on the arm and attach it with
the supplied screws.
Remove the cover cap of the T-crossbar and
mount the T-Bar Row directly to the boom rack
with the supplied screws.
And your Boomrack can do even more!
With the two optional extension sets, you can turn your Boomrack into a digital multifunc-
tional training device.
More information at: www.boombell.eu/boomrack
18
4 x G
4 x H
4 x I
2 x J
1 x K
4 x L
4 x M

6. WARRANTY TERMS
This warranty is issued by
Boombell GmbH
Graben 24,
3003 Gablitz, AUSTRIA
When is the warranty valid?
●This warranty applies only to the original original purchaser and is for private use only.
●The warranty covers all material and workmanship defects.
How long is the warranty?
●This warranty is valid for 2 years from the date of delivery of the product. If attachments or the frame
should break, tear or deform, these parts will be replaced free of charge by Boombell GmbH.
●Boombell shall also bear the costs of shipping in the event of a warranty claim.
●Warranty coverage ends when you resell the Boomrack or transfer it to another person.
What does the warranty not cover!
●The warranty does not come into force in the event of design defects and normal wear and tear as well as
wear and tear such as chipping, peeling or scratching of the paint coating. Boombell GmbH also refrains
from problems caused by improper or improper handling or storage by the owner or by third parties.
●In the event of technical-structural interventions or attempted mechanical reworking by the owner or
unauthorized third parties, any warranty claim shall lapse.
●An example of abusive or improper handling would be outdoor storage.
BOOMBELL GMBH IS NOT RESPONSIBLE FOR ANY INJURY, LOSS OR DAMAGE TO
PERSONAL BODY OR PROPERTY. CONSEQUENTIAL AND INCIDENTAL DAMAGES ARE
NON-REFUNDABLE UNDER THIS WARRANTY.
How can you make your warranty claims?
●Please always send us Boombell products in the original box or equivalent packaging. We assume no
responsibility for any loss or damage during the return shipment.
●A full inspection or repair is usually completed within 96 hours.
Any warranty claims must be reported within 30 days of receipt of the product.
If your Boomrack needs to be serviced, repaired or replaced during the warranty period, please contact
our support at:
Please have the following documents ready for support:
• Date of purchase
• Invoice number
• A brief description of your problem
19

Technischer Support
Boombell GmbH · Österreich · Graben 24 · 3003 Gablitz
www.boombell.eu
© Boombell 2022
www.boombell.eu/support
Lade dir die Anleitung in deiner
Landessprache herunter.
Scan and get the PDF
in your language.
Hier gelangst du zur
Video-Aufbauanleitung
Scan and view our
Assembly Video.
DE EN IT ES FR SV NL PL TR RU
Table of contents
Languages:
Popular Fitness Equipment manuals by other brands


G-FITNESS
G-FITNESS AIR ROWER user manual

CAPITAL SPORTS
CAPITAL SPORTS Dominate Edition 10028796 manual

Martin System
Martin System TT4FK user guide

CIRCLE FITNESS
CIRCLE FITNESS E7 owner's manual

G-FITNESS
G-FITNESS TZ-6017 user manual

Accelerated Care Plus
Accelerated Care Plus OMNISTIM FX2 CYCLE/WALK user manual


