Boost WARP 4G Specification sheet

Get Started
All you need to know to get going.

Your Device Features
Microphone
Status Bar Icons
Volume Buttons
Display Screen
HOME Key
Menu Key
Front
Camera
LED Indicator
BACK Key
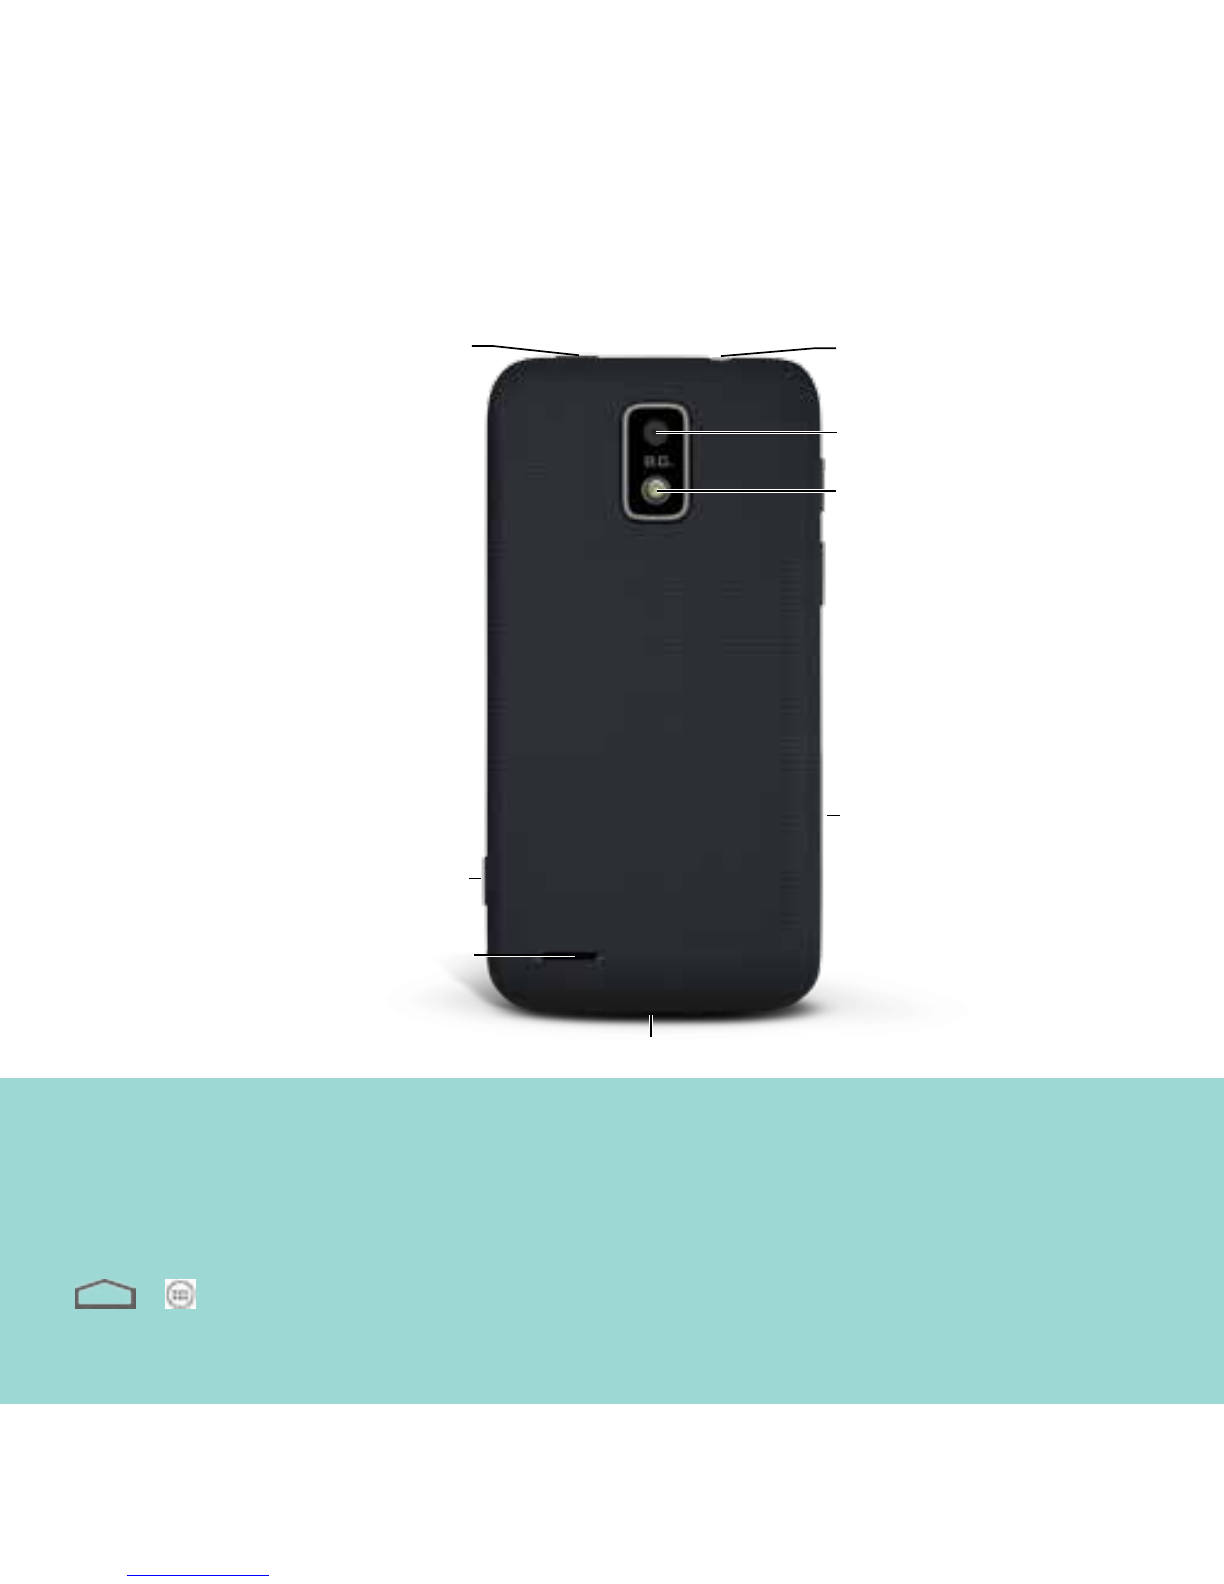
Headset Jack
External Speaker
Camera Lens
Camera Flash
Charger/Accessory Jack
microSD Card Slot
Camera Button
Power Button
Quick Tip.
For additional device support please visit the Boost Mobile Device Support Webpage at:
http://www.boostmobile.com/support/device-support/
Or access the full user guide on your device by going to:
> > Boost Zone > My Device > User Manual

Set Up Your Device
You must first install and charge the battery
to begin setting up your device.
1. Remove the back cover.
2. Insert the battery by aligning the metal
contacts on the battery with the metal
contacts in the battery compartment.
Gently push down on the battery until it
clicks into place.
3. Press the cover gently back into place
until you hear a click.
4. Connect the adapter to the charger jack
Ensure that the adapter is inserted with
the correct orientation. Do not force the
connector into the charger jack.
5. Connect the charger to a standard
AC wall outlet.
6. Disconnect the charger when the battery
is fully charged.
Get Your Device Ready

Turn Your Device On
1. Make sure the battery is charged.
2. Press and hold the Power Button to turn on your phone.
Turn Your Device Off
1. Press and hold the Power Button to open the options menu.
2. Touch Power off and then touch OK.

Calling
Make a Call
1. Touch > to open the phone screen.
2. Touch the number keys on the dialpad to enter the phone number.
3. Touch to call the number.
4. To end the call, touch .
Answer a Call
+ To answer an incoming call, touch the incoming call icon and drag it to the
Answer Call icon .
+ To reject an incoming call, touch the incoming call icon and drag it to the
Reject Call icon .
+ To reject a call with a text message, touch the incoming call icon and drag it to
the Send Text icon .
Contacts
Voicemail
Add a Contact
1. Touch > > People.
2. Touch to add a contact.
3. Use the keyboard to enter as much information as you want in each text field.
4. When you have finished adding information, touch DONE.
Set Up Voicemail
1. Touch > to open the phone screen.
2. Touch and hold to dial your voicemail number.
3. Follow the system prompt to create your password, record your name,
announcement and greeting.
Retrieve Voicemail Message
1. Touch > to open the phone screen.
2. Touch and hold . If prompted, enter your voicemail password.
3. Follow the voice prompts to listen to and manage your voicemail messages.

Messaging
Send a Text Message (SMS)
1. Touch > > Messaging.
2. On the messaging screen, touch . The new message screen opens.
3. Fill in one or more recipients.
4. Touch the ‘Type message’ box to start composing your message.
5. When done, touch to send the message.
Send a Multimedia Message (MMS)
1. Touch > > Messaging.
2. On the messaging screen, touch . The new message screen opens.
3. Fill in one or more recipients.
4. Touch the ‘Type message’ box to start composing your message.
5. Touch to open the Attach window. Select file attachments from Pictures,
Capture picture, Videos, Capture video, Audio, Record audio, Slideshow,
Files, and Insert contacts.
6. To make changes to your attachment, touch Replace or Remove.
7. Touch or Send (If a slideshow is attached) to send the MMS message.

Email
Add an Email Account
1. Touch > > Email.
2. For the first time to use Email, type your email address and password, and
then touch Next.
3. Select the account type (POP3 for instance) and then touch Next.
3. Set the email checking frequency, download options, account name and
the name displayed on outgoing messages.
4. Touch Next until the inbox is displayed.
Compose and Send an Email
1. Touch > > Email.
2. On the email account inbox, touch .
3. Fill in one or more recipients.
4. Enter the subject, and then compose your message.
5. To add an attachment, touch > Attach file to add file from Camera/
Camcorder, Choose music track/Select music track, File manager,
Gallery and Sound recorder.
6. Touch to send the email.

Wi-Fi
Turning on your smartphone’s Wi-Fi connection is a great way to make the
most of your wireless data experience – it’s faster and it puts less strain on your
battery. With Wi-Fi on, you can discover and connect to wireless networks and
talk while you surf the Internet. Remember, battery savings depend on network
configuration, usage patterns and many other factors.
Turn Wi-Fi On
1. Touch > > Settings >Wi-Fi.
2. Slide the Wi-Fi switch to the ON position to turn Wi-Fi on.
Connect To A Wi-Fi Network
1. Touch > > Settings > Wi-Fi.
2. Slide the Wi-Fi switch to the ON position to turn Wi-Fi on. The phone will scan
for available wireless networks.
3. Touch a Wi-Fi network to connect. If you select an open network, you will be
automatically connected to the network. If you select a secured network, enter
the password, and then touch Connect.
Table of contents
Other Boost Cell Phone manuals


