BOOV BABY FORMULA MAKER V2 Product guide

FORMULA MAKER V2
BPA
FREE
ADJUSTABLE
TRAY
EASY
TO USE
PERFECT FORMULA IN SECONDS!
MANUAL BOOK
Information or order: 0895809000050 boovbaby.indonesia

ALWAYS TEST THE MILK TEMPERATURE
BEFORE FEEDING YOUR BABY.
Please Read this manual thoroughly before using and
save it for future reference
All rights reserved. No portion of this manual may be reproduced by any
means whatsoever without written permission from The Steelstone Group,
except for the inclusion of quotations in a media review.
Although every precaution has been taken in the preparation of this
manual, The Steelstone Group assumes no responsibility for errors or
omissions. Nor is any liability assumed for damages resulting from the use
of the information contained herein. Although every eort has been made
to ensure that the information contained in this manual is complete and
accurate, The Steelstone Group is not engaged in rendering professional
advice or services to the individual consumer; further, The Steelstone
Group shall not be held responsible for any loss or damage allegedly arising
from any information or suggestion in this manual.
Manual Book
Formula Maker (FM)
IMPORTANT SAFEGUARDS
Before using this product please read this manual
carefully, and save for future reference.
SAFETY INSTRUCTIONS
!! IMPORTANT
Thank you for purchasing a Babyboov Formula Maker!
The pages of this manual oer comprehensive instruc-
tions to guide you through the functions and features of
this Formula Maker.
When using any electric appliance, basic precautions should always be
followed to reduce the risk of fire, electric shock and injury, including the
following:
Read all instructions.
To protect against electrical shock do not immerse cord, plugs, or the base
of the machine in water or other liquids.
Close supervision is necessary when any appliance is used by or near
children.
Do not operate any appliance with a damaged cord or plug or after the
appliance malfunctions or has been damaged in any manner. Return appli-
ance to the nearest authorized service facility for examination, repair, or
adjustment.
The use of accessory attachments not recommended by the appliance man-
ufacturer may cause injuries.
Do not use outdoors.
Do not let cord hang over edge of table or counter, or touch hot surfaces.
Do not place on or near a hot gas or electric burner, or in a heated oven.
Always attach plug to appliance first, then plug cord into the wall outlet.To
disconnect, turn any control to“o”, then remove plug from wall outlet.
Do not use appliance for other than intended use.
Before serving be sure food is at safe temperature.
This appliance is not intended for use by persons (including children) with
reduced physical,- sensory or mental capabilities, or lack of experience and
knowledge, unless they have been given supervision or instructions
concerning the use of the appliance by a person responsible for their safety.
Do not exceed the maximum level of water- the appliance will not work.
Always place the formula maker on a dry, flat surface- out of reach of
children.
-
-
-
-
-
-
-
-
-
-
-
-
-
-

1. Please read this manual carefully before you start to use it
2. This manual cation important information don’t lost it.
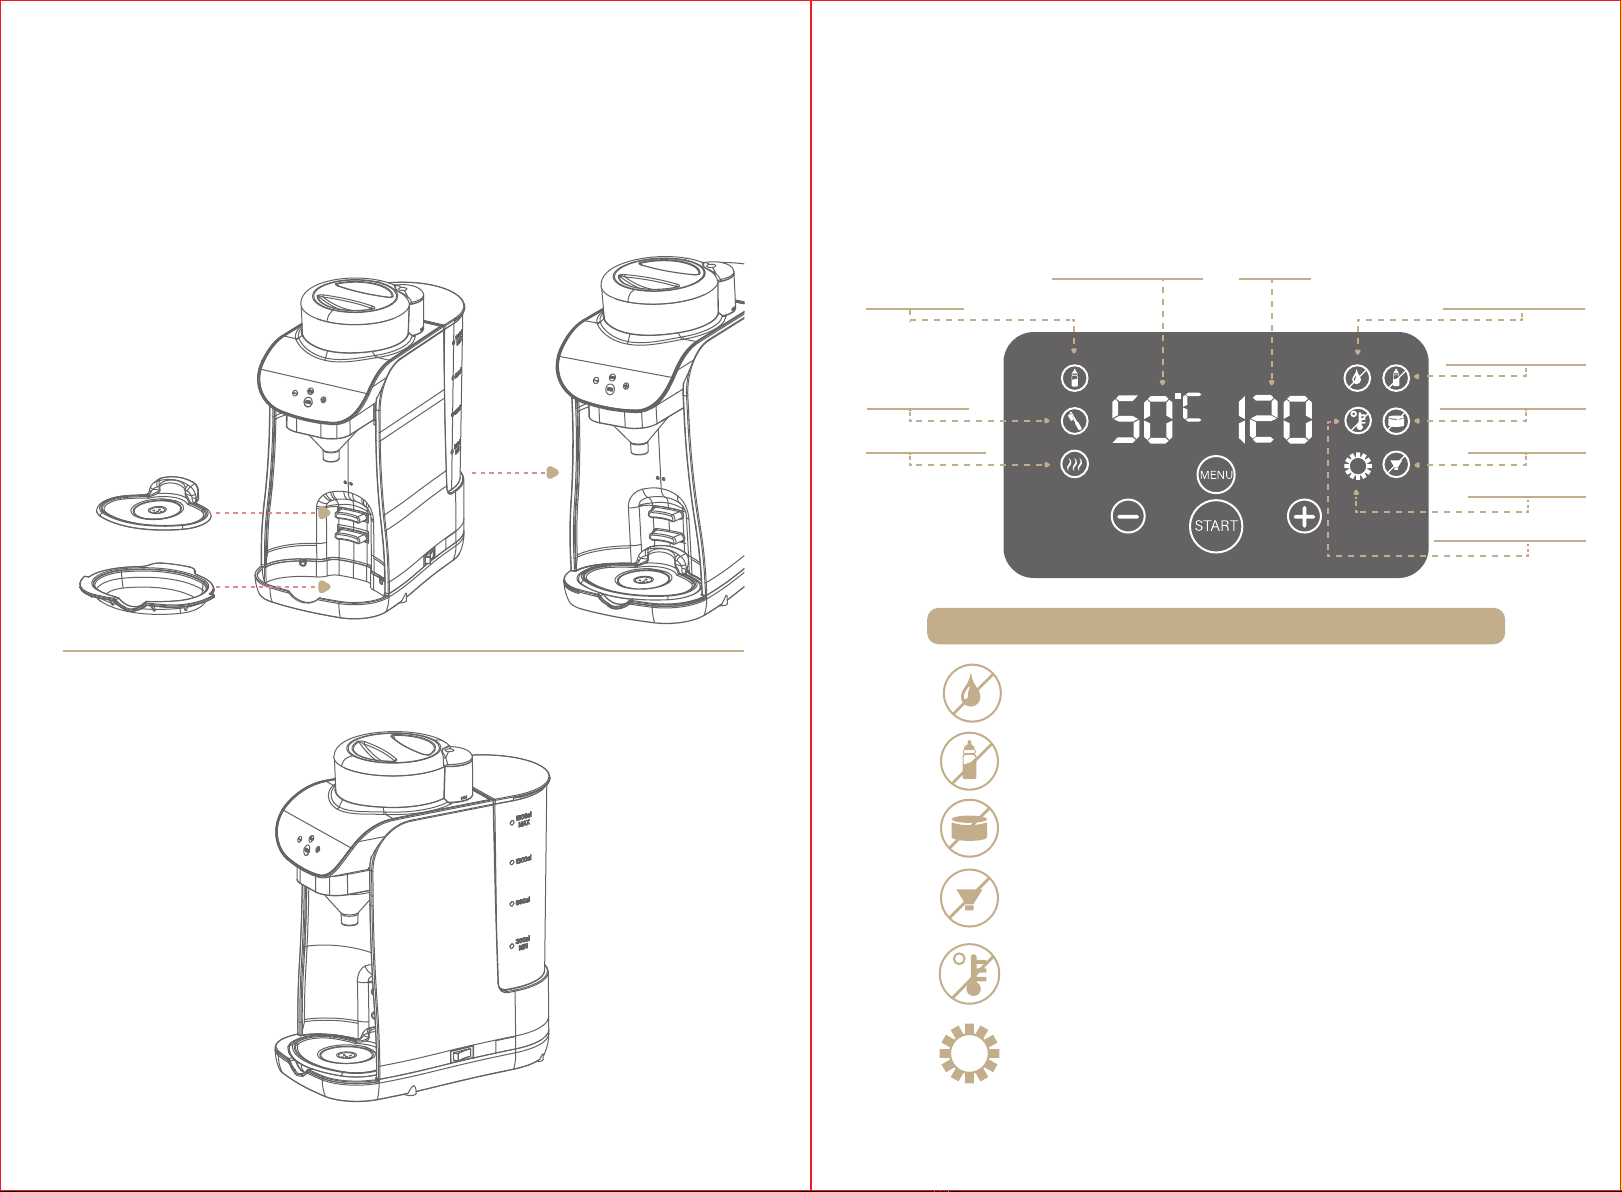
Control panel
Removable funnel
Removable powder box
Removable water tank
ON/OFF
Adjustable tray
02
Product
Powder capacity 300 g Voltage 220V-240V
Water capacity 1800ml Frequency 50Hz
Weight 2.75 kg
Size 180×300×370mm
Working power 550W
Standby power 5W
SOMO Smart Formula Maker
Specifications
TABLE OF CONTENTS FORMULA MAKER V2

Removable
water tank
Body
Powder cover
Powder turnable
Stator
Powder feeding carousel
Milk powder box
Water tank cover
Upper part of the funnel
Lower part of the funnel
Adjustment tray
Water tray
Boiler cover
03 04
2
1
3
4
1. Pay attention to the buckle of the lid and the
powder box, screw it clockwise
PRODUCT STRUCTURE PRODUCT ASSEMBLY
1. Install the formula powder box and three rotors
2. Install the the powder
box lid
When installing, the milk
powder box must be aligned
with the rails on the main unit.
Install the powder feeding
carousel
When installing the stator,
align the red arrow of the
stator with the red arrow in
the box.
Installation the powder
mixing turntable.

3. Install the water tank 4. Install the funnel
2. Put on the water tank
1.Intall the boiler cover
0605
1. Combine the upper and lower parts first 2. Mixing chamber is docked with the
fuselage
Install the boiler cover. After installa-
tion, firmly press down on the boiler
cover.
Install the water tank. Secure the
water tank in the card slot of the
machine to stabilize the water tank.
07
07 08
Milking indicator
High temperature
Cleaning indicator
Warm water drinking
indicator
Milking water temperature Water volume
Water level warning light
Milk bottle warning light
Powder box warning light
Funnel warning light
Motor warning light
Temperature warning light
Warning Light Description
OPERATING INSTRUCTION
3. Install the water tray and bottle
6. Complete
3. Control panel description
When the water level warning light is on, there is no water in the boiler.
Please confirm whether the water tank is short of water; it will light up
briefly after making milk each time.
When the bottle warning light is on, it means that the bottle is not placed
well. Please confirm that the bottle is placed well and then make milk
When the powder box warning light is on during use, it means that the
powder box or the powder cover is not installed. Please check and
continue to use.
When the funnel warning light is on during use, please check if the mixing
chamber is in place.
When the temperature warning light is on during use, the water tempera-
ture in the boiler is higher than the set milking temperature. Please wait
for the temperature to cool down.
When the motor warning light is on, please send it to the repair
Milking indicator
1009
Warm water drinking
indicator
Temperature indicator
OPERATING INSTRUCTION
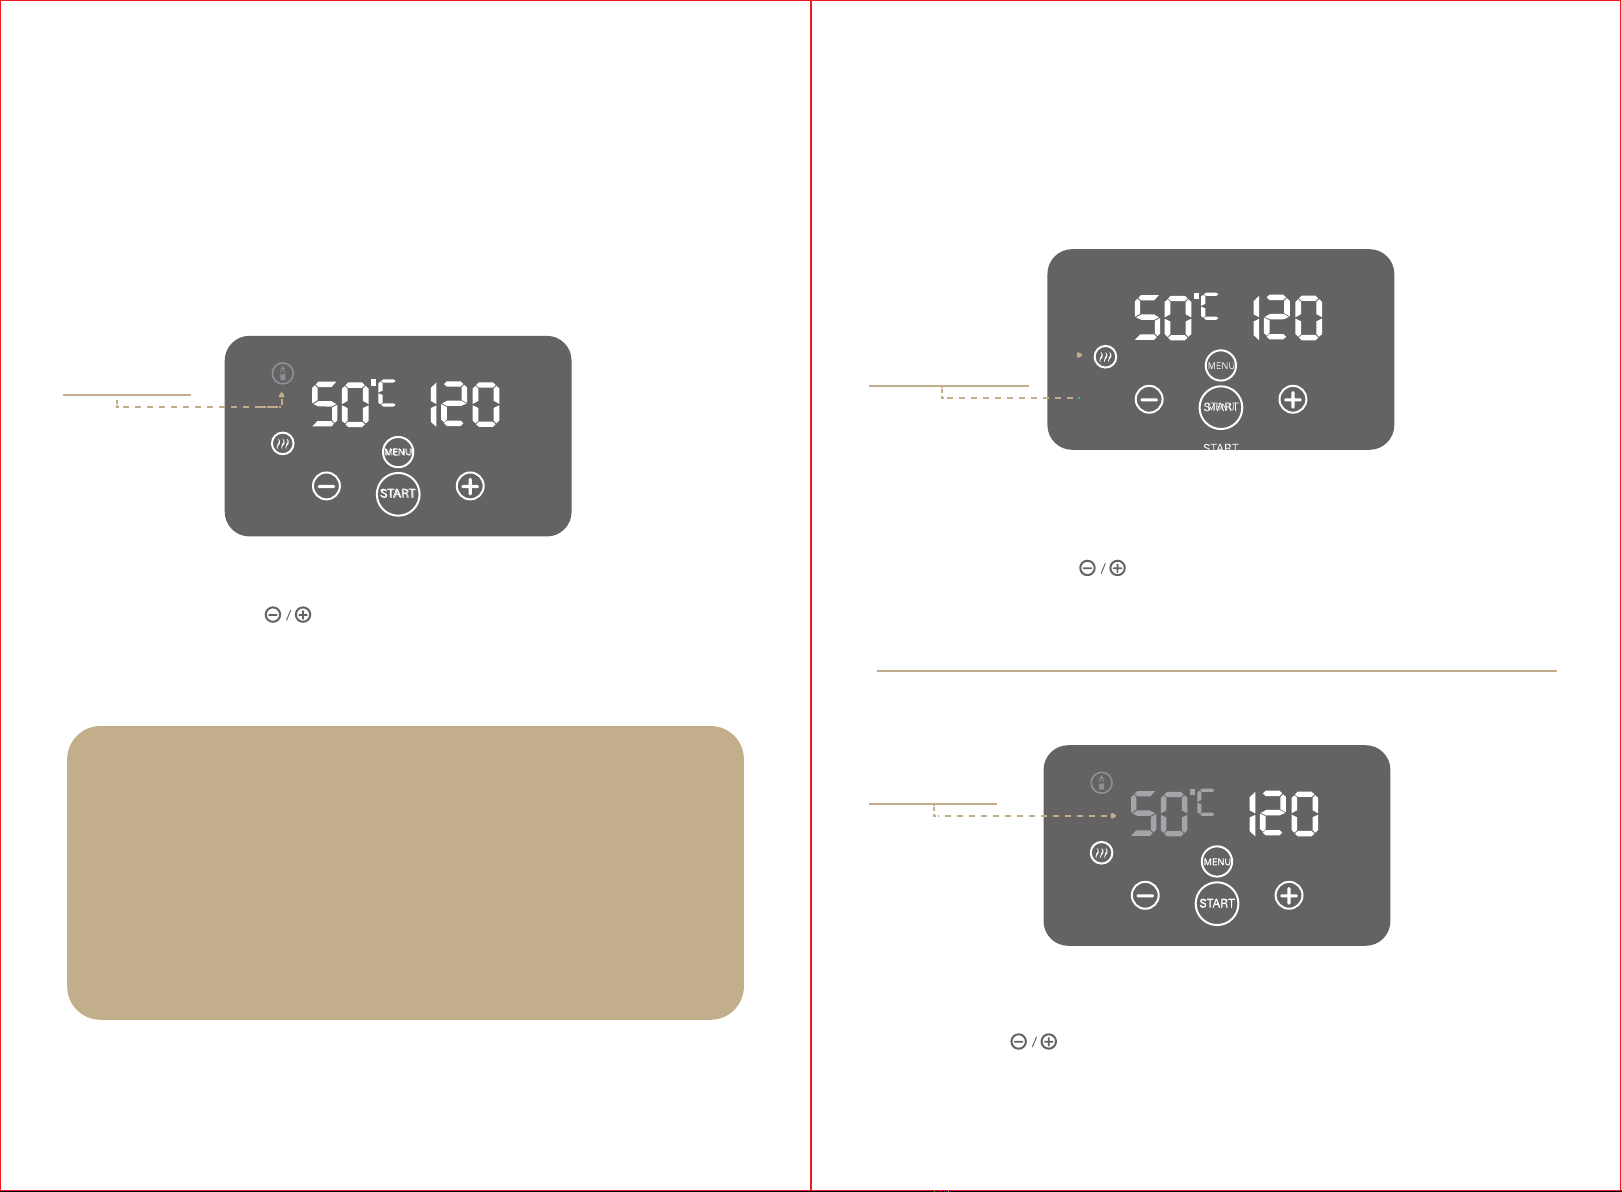
Brewing Milk Powder Mode Warm water mode
Temperature adjustment
OPERATING INSTRUCTION
The machine defaults brewing milk mode,and the milking indicator light flashs means the
water is heating. Click the button to adjust the amount of water, and the number on
the right is the current amount. When the milking indicator light is on, press START to brew
milk.
Press the MENU button to switch to the warm water drinking mode. The warm water drinking
indicator lights up to indicate successful switching of the warm water drinking mode. In the
warm water drinking mode, the warm water drinking indicator flashes to indicate that the
water is heating. Click the button to adjust the amount of water, and the number on
the right is the current amount. When the water indicator light is on, press START come out
warm water. click the menu button to return to the milking mode.
Press the menu button twice to the temperature adjustment function. When the temperature
indicator flashes, it indicates that the temperature adjustment mode has been successfully
entered. Click the button to adjust the temperature and display the number as the set
temperature. click the menu button to return to the milking mode.
NOTE
The machine is equipped with a bottle sensor to prevent the milk from being
accidentally touched after the milk is flushed. If the secondary brewing is
required, the bottle must be removed before re-positioning and the machine
can be started

OPERATING INSTRUCTION
Formula Setting
High Temperature Cleaning Mode
Prepare before brewing milk powder
Press the MENU button four time to the formula setting function(C2 Mode).Set the formula
concentration according to your formula powder.This numerical value means the powder
weight/1oz(or 30ml)water. Click the button to adjust the formula concentration and
display the number as the set formula concentration.
Please clean and dry the following parts before use.
(Warning: powder box, lunch box cover, water tank, water tank cover, adjust-
ment tray, water tray prohibit steam sterilization of high temperature water
boiler to prevent deformation. Please use 50-70°C warm water for cleaning and
disinfection, dry and use.)
Pour milk powder into the powder box (300G
recommended, no more than 400G) and close the
powder cover
pour pure or cold water into the water tank, do
not exceed the maximum value, do not pour
the tap water directly for the baby's health
Press and hold the MENU button for three seconds to enter the high temperature clean- ing
mode. The high temperature cleaning indicator lights up to enter the high tempera- ture
cleaning mode. The temperature indicator appears 95°C, the water level indicator is 220ML,
and the high temperature cleaning indicator flashes to indicate that it is heating. The
temperature and water volume are fixed and cannot be adjusted. When the high tempera-
ture cleaning indicator light is on, it means the heating is completed. Click start to clean.
Please do not stay in this mode for a long time.
11 12
2
1
3
High temperature cleaning
Press the menu button ,set the water ,concen-
tration as you want and the temperature to
40°C - 70°C
Turn on the switch, wait until the milk indicator
light is on, indicating that the heating is
complete, you can use
1413
Adjust the tray to the right height White light is on
4
5
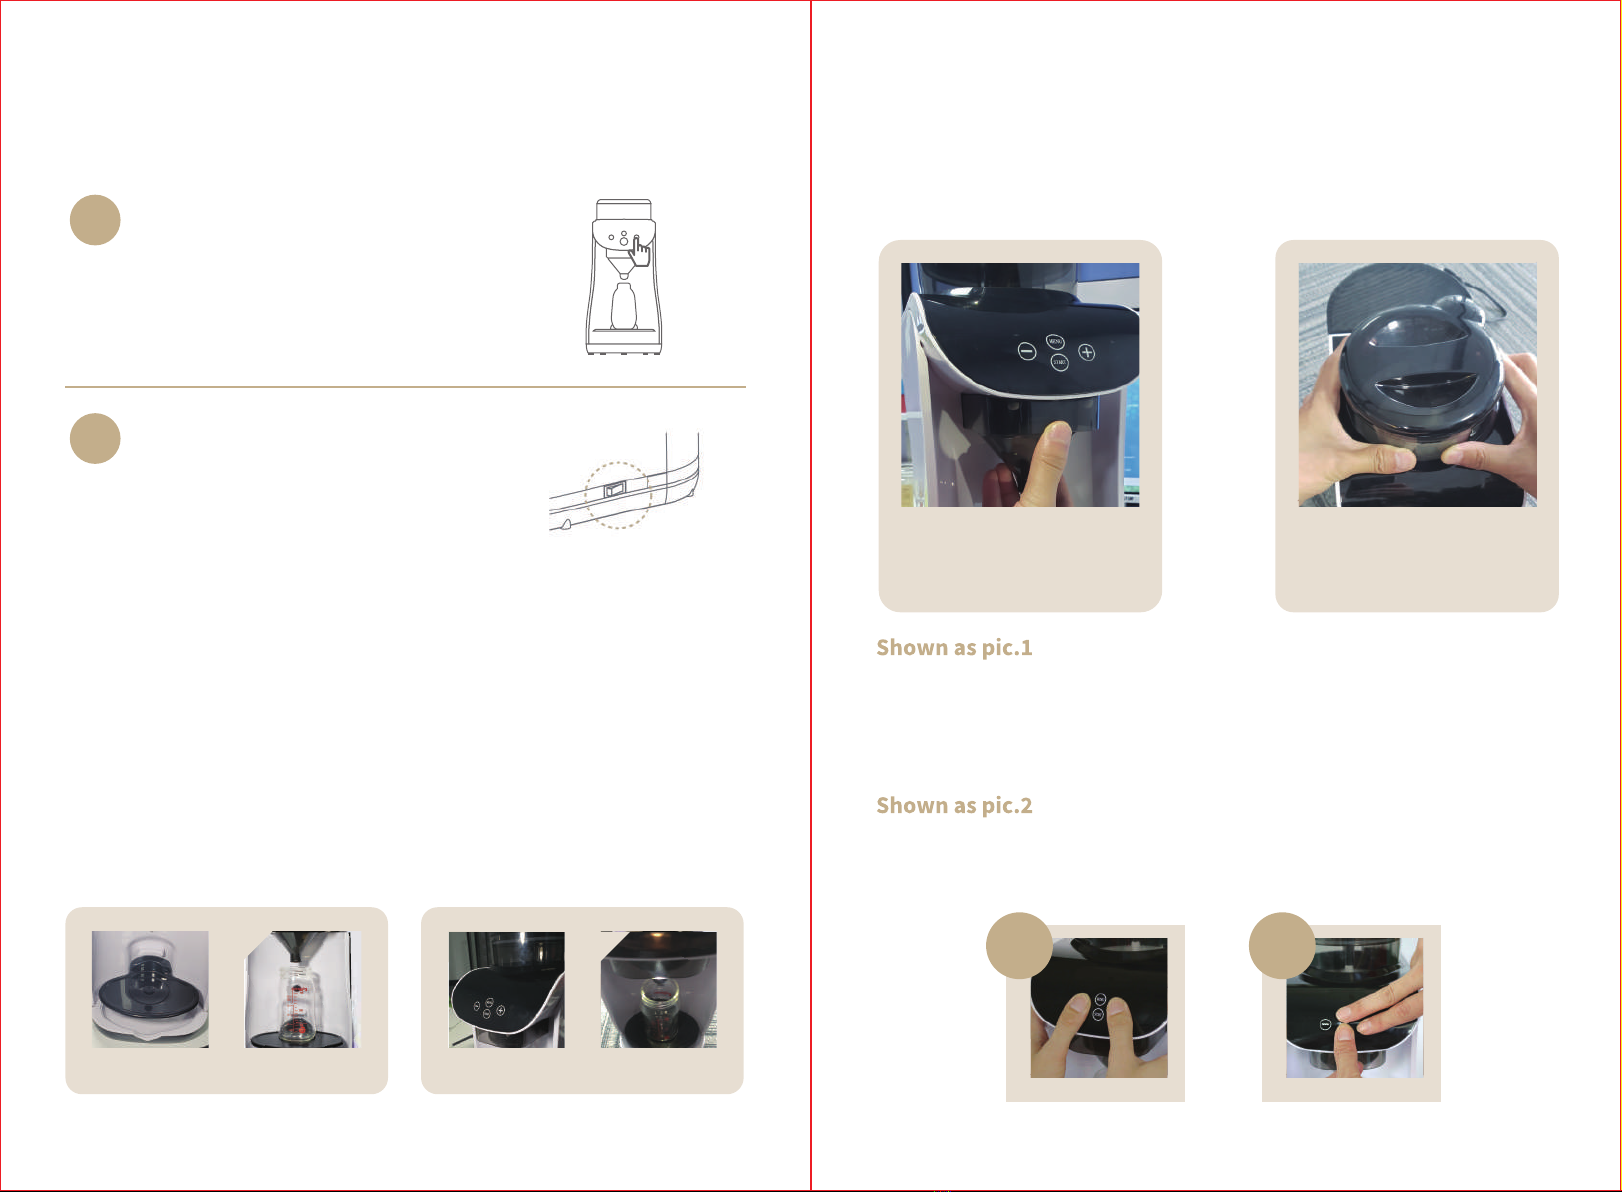
Clean the funnel(clean every day)
Before clean the boiler, in order to prevent access to the inside of the machine while pouring
out boiler water, please drain the water in the boiler as follows: In the normal mode, remove
the water tank. Put the bottle on the tray, press "+ -"these 2 buttons. At the same time, the
machine will automatically come out the water, and press any key will stop pumping.
When the sensor can not sense the bottle, you can turn o the sensor as follows: you can
press "MENU START +" these 3 buttons at the same time, the machine will have a long
sound "di--" ,at the same time the white light is on,then you can start brewing milk powder.
Clean the Powder box
Attention:
place the bottle on the tray. When the milking machine senses the bottle, the body will light
up in white. Then the bottle warning light of the display goes out, indicating that it is
correctly placed.
Cleaning and Care
1 2
Please remove the funnel for
cleaning after it is no longer
used within 2 hours.
Please remove and clean the powder
box every time after using all the
powder in the box
Note: When removing the powder box,
please press the fuselage with both
hands and pull it out.

Add the water to the tank,add the powder into the powder box and turn
on the machine.
Press the menu button and set the water as you want and the
temperature to 56°C
Note: As it’s the first use,it may take a few minutes for the water get to
setting temperature.
Check the formula information on the package.
After you setting the formula concentration.Just press the Start button.
This formula shows you need mix 6.0 g powder with 30 ml water which
means 6/1= 6 g powder in 30 ml water.
So you just need to set the C2 value to 6 g.(don’t worry about 0.05g
deviation,it will not eect your baby’s health).
1.
2.
3.
Please read the instructions carefully before use.
This instruction manual contains important information and should not
be discarded.
Please read the following warnings and safety instructions carefully.
After the finished milk powder, confirm the proper temperature and give
it to your baby.
1.
2.
3.
4.
Do not use the power supply or power cord if it is damaged or the plug
is loose. It may cause fire, electric shock or personal injury.If the power
cord is damaged, in order to avoid danger, it must be replaced by the
manufacturer's maintenance department or a similar department.
Use only under 220V AC power supply, otherwise it may cause electric
shock, fire and performance abnormality.
Please insert the power supply correctly, otherwise it may cause person-
al injury such as fire and electric shock.
Prohibit excessive bending, bundling, dragging, or pressing the power
cord with heavy objects, and rushing the power cord close to the high
temperature and fire source.If the power cord is caught in the crack or
the power cord is changed by yourself, the power cord may be damaged,
resulting in electric shock or fire.
It is forbidden to modify, disassemble or repair it by yourself. It is forbid-
den to insert foreign objects such as fingers and iron sheets into the gap
of the precursor.It is easy to cause fire, electric shock, personal injury,
malfunction and other accidents. Please call the after-sales service
hotline for A/S and inspection of the product.
1.
2.
3.
4.
5.
4.
How to make baby formula Safe Operation Instruction
=
15 16
POWDER
WATER C2
Attention
Warning
For more information, check our milk calcuator and find your milk brand
concentartion for boov baby machine via boovbaby.id/milk-calculator/
Do not plug or unplug the power supply directly with wet hands, which
may cause electric shock or personal injury.
Do not allow the body to get in or spray on the water to prevent foreign
matter and water from entering the ON/OFF button.
Do not touch the switch when the hand is wet, which may cause electric
shock, fire, etc.
For safety reasons, be sure to use it after connecting it to a grounded
outlet. Otherwise, it may become an electric shock, fire, malfunction or
explosion.
The cause of the accident.
Do not insert spoons, chopsticks, etc. at the milking mouth. Do not move
the machine or disassemble or assemble parts during operation.Person-
al injury or machine malfunction.
Keep the product away from where children can touch.
Do not clean the machine's unremovable parts
Please comfirm the temperature before you give it to your baby.
The Preparing Machine for Baby Formula should be transported at an
ambient temperature of +5°C to +30°C and maximum relevant humidity
of no more than 75%.
Do not subject the unit to sharp temperature changes or high humidity.
Remove and dry the water tank if you do not plan to use the machine for
a long time (over 30 days)
6.
7.
8.
9.
10.
11.
12.
13.
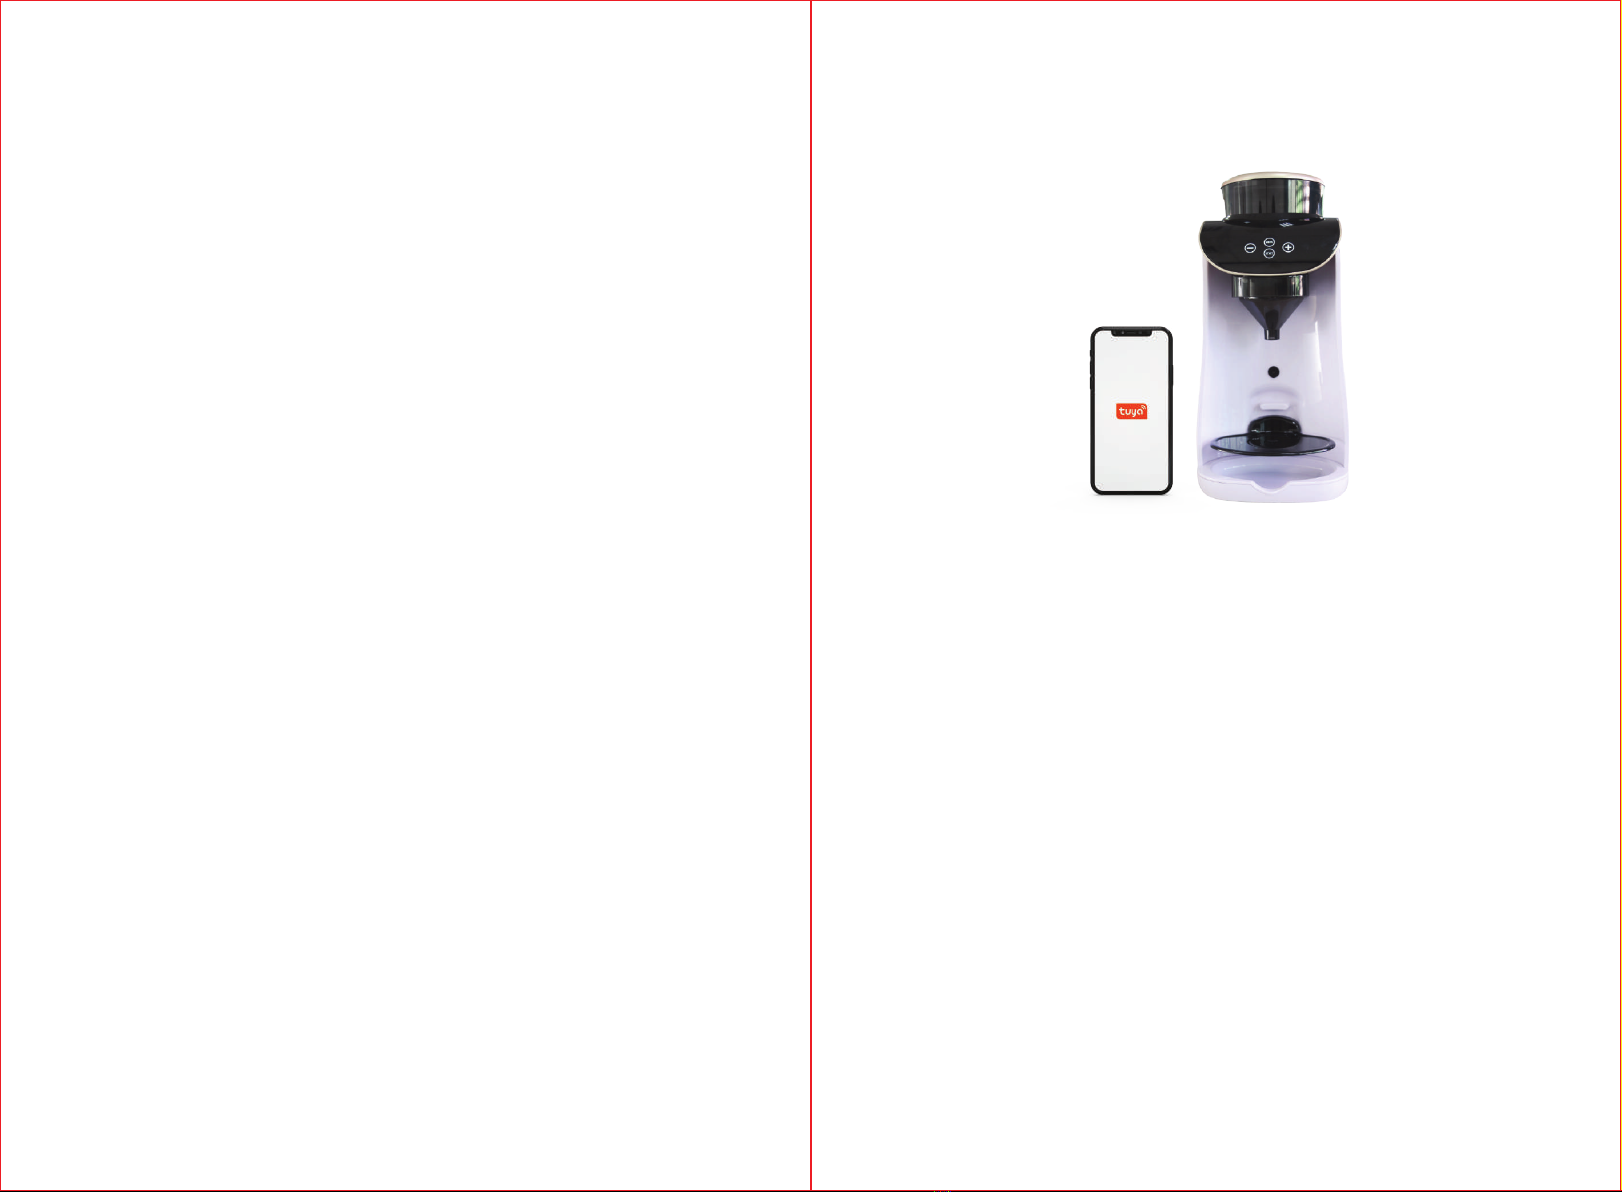
Safe Operation Instruction Connect with your Smart Phone
Storage, Transportation, and Operation Regulation
15 16
1.
2.
3.
Download and install Smart Life-Smart Living or Tuya Smart
APP, Then registered successfully.
Turn on the machine.
Mobile turn on Bluetooth ,open the APP the device will pop
up on the screen,choose the device and Click to add , Enter
Wi-Fi password point confirm waiting for connecting then
use it.
If can not connect the APP,restart the machine,press and hold
the + button until the Flashing number 01 appears on the left
screen, use step 3. if number is 02 repeat this step to make
the number be 01.
1.
2.
3.
4.
with TUYA APPS
This product is fully guaranteed service for a period of 12
months from the date of purchase.
The warranty provided by Boov baby shall apply to manufac
-
turing defects and covers for domestic/household use only.
This warranty card must be duly completed and returned to us
within 14 days from the d ate of purchase.
Warranty card is not transferable and not replaceable in the
event of loss.
authorized Boov baby dealer.
The purchaser is required to present warranty card and original
proof of purchase document when service is required.
Under the following circumstances, parts and labour will be
chargeable even during the warranty period. The warranty
DOES NOT extend to the followings :
The serial number of the appliance has been altered, tamp ered with
or removed
The appliance has not been installed, maintained or op erated in
acco rdance with instruction g iven by manufacturer.
The appliance has und ergone, repai rs, modifications, or dismantled
by any o ther person prior verification of approval by Boov baby.
Defect caused by abnormal voltage or in-coming power supply
from a generator.
Defect caused by fire, lightning, electri cal disturbance, negligence,
accidents and other natural disasters or due to deviation from
recommended application and installation.
Defect caused by household pests such as lizard, rat, cockroach,
etc.
Terms and Condition
Name
Customer
Registration
for c ustomer
Product Information
Phone Number
Email
Product Model
Product Number
Date of Purchase
No.
Name
Customer
Registration
for store
Product Information
Phone Number
Email
Product Model
Product Number
Date of Purchase
No.
FORMULA MAKER
Table of contents
Popular Dispenser manuals by other brands


PolyJohn
PolyJohn MiniSan MSN01-1000 Assembly instructions

lancer
lancer Flavor Select 22 Operation manual

ASI
ASI 0338 Installation & operation instructions

Kimberly-Clark PROFESSIONAL
Kimberly-Clark PROFESSIONAL AQUARIUS Series instructions

DEMA
DEMA Master Nitro Express manual

Labelmate
Labelmate LD-200-RS-SS quick start guide