SODAX X1 User manual


1
Introduction
Dear Customer,
We thank for your wise decision to purchase the SODAX X1-X10, the Water-Soda
dispenser manufactured by the SODAX S.r.l. company in Italy.
Your SODAX X1-X10 dispenser contains the latest, most advanced technologies utilized
in the field of filtering and water purification in household/office water dispensing
systems.
In order to maximize your enjoyment and utility from this product, please read this guide
carefully; it contains the required safety information and will guide you, step by step how
to install, program and operate the dispenser's features. It will also show you how to
replace its consumable components, to ensure the continuous supply of purified, filtered
and tasty cold, warm, or hot water and of carbonated soda water (for X1) .
Please comply with the warnings and safety precautions to prevent the risk of accidental
spillage of hot water. The child safety feature should always be activated when
applicable.
Please keep this guide handy for future reference.
Sincerely,
SODAX TEAM
2
Important Safeguards and
Precautions
When using electrical appliances, basic safety precautions should always be followed, including
the following:
1. Read all instructions.
2. Do not touch hot surfaces. Use handles or knobs.
3. To protect against fire, electric shock and injury to persons do not immerse cord, plugs, or
appliance in water or other liquid.
4. Close supervision is necessary when the appliance is used by or near children.
5. Unplug from outlet when not in use and before cleaning. Allow to cool before putting on or
taking off parts, and before cleaning the appliance.
6. Do not operate any appliance with a damaged cord or plug or after the appliance
malfunctions, or has been damaged in any manner. Return appliance to the nearest
authorized service facility for examination, repair or adjustment.
7. The use of accessory attachments not recommended by the appliance manufacturer may
result in fire, electric shock or injury to persons.
8. Do not use outdoors.
9. Do not let cord hang over edge of table or counter, or touch hot surfaces.
10. Do not place on or near a hot gas or electric burner, or in a heated oven.
11. Always attach plug to appliance first, then plug cord into wall outlet. To disconnect, turn any
control to “off”, then remove plug from wall outlet.
12. Do not use appliance for other than intended use.
13. Save these instructions.

3
CAUTION
1. This appliance is for household use only.
2. Any servicing, other than cleaning and user maintenance, should be performed by
an authorized service center.
3. Do not immerse machine in water.
4. To reduce the risk of fire or electric shock, do not disassemble the machine.
5. There are no parts inside the machine serviceable by the user.
6. Repair should be done by authorized service personnel only.
7. Check voltage to be sure that the voltage indicated on the nameplate corresponds
with your voltage.
8. If the supply cord is damaged, it must be replaced by the manufacturer, his service
agent or similarly by a qualified person in order to avoid a hazard.
9. Never use warm or hot water to fill the water tank. Use cold water only.
10. Keep your hands and the cord away from hot parts of the appliance during
operation.
11. Never clean with scrubbing powders or harsh cleaners. Simply use a soft cloth
dampened with water.
INSTRUCTIONS FOR POWER
SUPPLY CONNECTION
If a long detachable power-supply strip or extension cord is used:
1. The marked electrical rating of the detachable power-supply cord or extension cord should be
at least as great as the electrical rating of the appliance.
2. If the appliance is of the grounded type, the extension cord should be a grounding-type 3-wire
cord.
3. The longer cord should be arranged so that it will not drape over the counter top or table top
where it can be pulled on by children or tripped over.
4
Contents
Introduction
............................................................................................................
1
Important Safeguards and Precautions
.........................................................................
2
Instructions for Power Supply connection
.......................................................................
3
Safety instructions
....................................................................................................
5
Safety Precautions
...................................................................................................
7
Overview
...............................................................................................................
8
Installing your SODAX X1 – X10 Water – Soda Dispenser
..................................................
9
Preparing the SODAX X1 – X10 for operation
...............................................................
11
Water Dispensing Display
........................................................................................
16
The Settings Screen
...............................................................................................
18
Replacement of Consumables
...................................................................................
33
Replacing The CO
2
Bottle
........................................................................................
37
The Technical Settings Screen
..................................................................................
38
In Case of a Problem
..............................................................................................
41
Technical Specifications SODAX X1-X10 Dispenser
......................................................
43
Machine disposal
...................................................................................................
44

5
Safety instructions
This machine is equipped with safety features. Nevertheless read the safety instructions
carefully and only use the machine as described in these instructions to avoid accidental
injury or damage.
Keep this user manual for future reference.
The term WARNING and this sign warn against possible severe injuries,
danger to life and/or damage to the machine.
The term CAUTION and this sign warn against slight injuries and/or
damage to the machine.
WARNING
• Connect the machine to a wall socket which is properly wired. Its main voltage should
comply with the technical data of the machine.
• Do not let the mains cord hang over the edge of a table or counter, or touch hot
surfaces.
• Never immerse the machine, mains plug or mains cord in water (danger of electrical
shock).
• Never direct the hot water towards body parts (danger of burning).
Do not touch hot surfaces. Use handles and knobs.
• Remove the mains plug from the wall socket:
- If a malfunction occurs.
- If the machine will not be used for a long time.
- Before cleaning the machine.
• Pull on the plug, not on the power cord. Do not touch the mains plug with wet hands.
• Do not use the machine if the mains plug, the mains cord or the machine itself is
damaged.
• Do not make any modifications to the machine or its power cord. Only have repairs
carried out by a service centre authorized by Sodax to avoid a hazard.
• This machine is not intended for use by persons (including children) with reduced
physical, sensory or mental capabilities, or lack of experience and knowledge, unless
they have been given supervision or instruction concerning use of the machine by a
person responsible for their safety.
• Children should be supervised to ensure that they do not play with the machine.
6
CAUTION
• The machine is for household use only. It is not intended for use in work environments.
• Always put the machine on a flat and stable surface.
• Do not place the machine on a hot plate, directly next to a hot oven, heater or similar
source of heat.
• Cool down the machine before insert or remove any component.
• Never use warm or hot water to fill the water tank. Use cold water only.
• Never clean with scrubbing powders or harsh cleaners. Simply use a soft cloth
dampened with water.
• Do not keep the machine at temperature below 0°C. Residue water in the system may
freeze and cause damage.
• Do not leave water in the water tank when the machine is not used over a longer period
of time. The water can become contaminated. Use fresh water every time you use
the
machine.

7
Safety Precautions
General
The SODAX X1-X10 dispenser system is intended to treat water supplied by the
household water supply system only.
Should health hazard bulletins be issued by the local Public Health authorities regarding
the safety of the drinking water supply, please comply with their instructions and boil the
drinking water if instructed to do so.
The dispenser's performance criteria were lab tested under controlled conditions. During
regular use, changes in the system's performance may occur based on environmental
conditions.
DO NOT change or modify the mechanical/electrical/electronic components in the
system and DO NOT use non genuine replacement parts.
DO NOT allow children under the age of 12 to use the boiling water feature of the dispenser.
With small children present, keep the Child Safety protective feature activated at all times.
The Display (Screen)
The dispenser's display (screen) is a touch screen.
DO NOT PRESS on an icon or a screen button. Just touch the icon or screen button
with your forefinger.
Touch the icon briefly to operate/turn on/turn off a feature.
Hold your finger on the icon to continue the activity you selected for as long as your
finger is on that icon.
Electric Power:
Connect the power cord to a 230 Vac household electric socket protected by a residual
current circuit breaker (see page 43).
Do not route the power cord around sharp edges or hot items and do not place it in a
humid environment.
DO NOT touch the power cord and/or the plug with wet hands.
Locating the Dispenser:
Place the SODAX X1-X10 dispenser on a firm, smooth, horizontal surface such as the
kitchen counter – away from heat generating sources (Grills, Ovens etc.)
DO NOT shake the dispenser when moving it around.
DO NOT expose the dispenser to temperatures lower than 0C. The water in the
dispenser system may freeze.
Using the Dispenser:
Using the dispenser for purposes other than dispensing water, using a faulty dispenser
or a dispenser with a damaged UV lamp holder - is dangerous. UV radiation, even in
small doses may escape and harm your eyes and skin. Read the safety instructions
before replacing the UV lamp (see page 34).
8
Overview
1 Top cover 5 Water reservoir 9 UV lamp
2 Main Display 6 CO
2
bottle (only X1) 10 Water inlet port
3 Water spout 7 Filter housing opening
handle 11 Electric Cord
4 Drip tray 8 Filter housing 12 Main fuse
The Main Display (X1)
8
7
6
2
3
4
1
9
5
12
10
11
Settings screen
icon
Jug
dispensing
icon
Boiling
Water
icon
Hot water
icon
My Cup
icon
Cold water
icon
Child
Protection
Active
Clock
Soda
Water icon

9
The Main Display (X10)
Installing your SODAX X1- X10
Water – Soda Dispenser
WARNING
It is recommended that the connection of the SODAX X1-X10
dispenser to the household water supply system and the readying of
the dispenser for use, will be accomplished by an authorized service
person.
Selecting the water supply source
Connect the dispenser to the household water supply system.
Use the dispenser as a standalone unit by utilizing its built in (integrated) water reservoir
as the water source.
(When selecting the standalone mode, the dispenser may be connected to an external
water supply source.)
Using the SODAX X1-X10 as a standalone
See page 11 "Preparing the SODAX X1-X10 for Operation"
Clock Child
Protection is
not Active
Settings screen
icon
Boiling
Water
icon
Jug
dispensing
icon
Hot water
icon
My Cup
icon
Cold water
icon
10
CAUTION
Connection to the water main supply source
Any temporary connections are forbidden for a good functioning of the dispenser. The following
operations must be carried out by a skilled staff.
During the installation, new water supply pipes for connection to the water mains must replace the
old ones that must not be used again.
When connecting the dispenser to the domestic water supply system:
The distance between the dispenser and the connection point should not exceed 5
meters (16 feet).
The water supply system pressure should be between 2.5 - 3.5 bar (0.25Mpa -
0.35Mpa).
If the water pressure is not within the recommended range, it will be necessary to install
a pressure regulator between the water supply outlet and the dispenser’s inlet and set it
to 3 bar.
An interception valve (ball type shut-off faucet) and a non-return valve must be installed
between the SODAX X1-X10 dispenser water inlet and the water system. The faucet
should be located in an easily accessible position.
Fittings and pipes for connection to water mains must be certified for food compatibility. All the
pipes and fittings provided have to comply with the above mentioned features.
Optional accessories such as filters, pre-filters, to be assembled on the water mains after the
interception valve, must be certified for food compatibility
CAUTION
The water supply plug of the water dispenser must be made up of an interception valve (tap) and
a non-return valve.
For a good functioning of the dispenser the water mains must satisfy the following the
characteristics:
•no overpressure;
•pressure values according with the dispenser requirements
Installing the consumable components
1. Remove the filter cartridge from protective plastic wrapping and insert the cartridge into the
filter housing.
2. Screw the adaptor onto the CO
2
bottle (only for X1);
Pull up the CO
2
handle and insert the CO
2
bottle in its place (only for X1);
3. Install the bottle-adaptor assembly by rotating it a quarter turn clockwise (only for X1).
4. Insert the UV lamp in his quarters, turning slightly, until it reach the limit stop with the
technical roof.
See from page 33 to page 37 for more details.

11
Preparing the SODAX X1-X10 for
operation
CAUTION
The dispenser's heating & cooling systems will be enabled, ready to operate, only after the
installation and sanitation procedures are completed. This is to insure the proper sanitation of the
system before its first use (See page 14 for more details).
CAUTION
The Main Display is a digital touch screen. DO NOT press the icons or the screen buttons.
Pressing damages the screen.
Selecting the touch screen operating
language
After the dispenser is plugged into the electric
socket The CHOSE LANGUAGE screen is
displayed.
Touch the national flag icon to select your
language. All screens and menus will appear
in the selected language.
Touch the Metric Units or the Imperial units
icon to select the desired system.
Touch the NEXT screen button to confirm
and continue.
Starting the SODAX X1-X10 Installation
Procedure
Touch the "hand" icon to start the installtion
and sanitation proceedures.
12
Installing the filter
Remove the filter cartridge from the plastic
wrapping.
Pull up the grey handle.
The filter housing will pop up.
Insert the filter cartridge into the filter
housing. Following the indications on the
direction of mounting, maintaining the
upward arrow.
Push and hold down the filter housing.
Press the handle until it locks in place.
Touch the NEXT screen button.
Installing the CO2bottle (only X1)
Screw the adapter on the CO2bottle (see
the bottle replacement instructions on
page 37).
Pull up the CO2handle.
Insert the CO2bottle into its cavity.
Install the adapter-bottle assembly by
rotating it a quarter turn clockwise.
Push the handle down until locks in place.
Touch the NEXT screen button to confirm
and continue.
Selecting the water supply source
mode
If the SODAX X1-X10 is to be fed by the
household water system, touch the faucet
icon.
If you chose to use the SODAX X1-X10 as
a standalone utilizing the dispenser's built
in water reservoir as the water supply
source, touch the jug icon.
Touch the CONFIRM screen button to
confirm your choice and continue.
NOTE:
You may change the dispenser's water
supply source anytime. See the
information regarding the "SETTINGS"
menu screen on page 18.

13
CAUTION
Make sure the shutoff valve connecting
the dispenser to the water supply system
is CLOSED.
Touch the NEXT screen button to continue.
Make sure the faucet connecting the dispenser
to the water supply system is OPEN.
Touch the NEXT screen button
Filling the built in water reservoir
(standalone operating mode)
Note:
This screen will display if the built in reservoir
option was selected as the water source. It
will also appear each time the reservoir is
almost empty.
Lift the reservoir by lifting up its handle.
Fill the tank with water to the maximum
level mark on the reservoir's side.
When reservoir is full, replace the cover
and but it back into the machine.
Touch the NEXT screen button.
CAUTION
The Sanitation procedure cleanses the dispenser's internal system and the new filter by rinsing
and washing away all foreign matter or residues.
14
Preparing the SODAX X1-X10 for the
sanitation procedure
Place a container (at least 3 liter capacity)
under the dispenser's spout.
Touch the NEXT screen button.
Note:
Touching NEXT will start the sanitation
process;
Water will fill the cold & hot water
reservoirs .This water will be used to flush
and sanitize the entire system.
The process will last several minutes.
Please note:
The sanitation process may be stopped at
any time by touching the PAUSE icon .
To continue the process, touch the
CONTINUE icon .
If the built in reservoir was chosen as the
water supply source, a warning screen may
appear (from time to time) requesting you to
refill the reservoir.
The blue progress bar indicates the progress
of the sanitation process.

15
At the end of the sanitation process the next
screen will appear with the prompt:
"Did water flow out from the dispensing spout
during sanitation?"
If yes, touch the YES screen button to
continue.
If no, touch the NO screen button to go back
and choose the correct water source.
After completing the sanitation process – the
dispenser is ready to dispense clean, filtered
hot, cold or soda water (only X1).
The next screen will inform you that a few
minutes are needed for the SODAX X1-X10
to heat and boil the water in its hot water
reservoir and to cool the water in its cold
water reservoir.
Water Dispensing Display (X10)
Child protection disabled Child protection active
16
Water Dispensing Display (X1)
Child protection disabled Child protection active
Dispensing water is accomplished by touching the desired icon.
Touch the "COLD" or "SODA" icons briefly (soda only for X1), to dispense the set volume of cold
or soda water which was determined using the SETTINGS display (see page 18). If no volume
was set, the dispenser will dispense the default water volume set in the factory (140 cc).
Touch and hold your finger on the "Cold" or "Soda (only X1)" icons to dispense water as long as
your finger remains on the icon. Lift your finger to stop the dispensing.
Dispensing Hot Water
WARNING
DO NOT allow children under the age of 12 to use the boiling water feature of the dispenser. With
small children present, keep the children safety feature activated at all times.
Under normal operating conditions the dispenser maintains the water at a temperature range of
80C to 92C. See the settings for "Hot water temperature" on page 25. Within this temperature
range, the icon of the cup "HOT" is "HIGHLIGHTED". If you want to increase the temperature to
boil water, touch the icon "EXTRA HOT". The icon will illuminate while the heating element will
heat the water. Once you have reached the boiling point, the icon will turn off. At a temperature
lower than 4°C compared the set temperature, the icon "HOT" function is turned off and the hot
water is not available. To boil water, touch the "EXTRA HOT" or wait for the water to be brought
up to temperature.
When the child protection feature is activated, the system prevents the instantaneous dispensing
of hot water. See the Child Protection feature below. To dispense hot water when the child
protection is active, touch the child protection icon on the Main Display. Touching this icon,
disables momentarily the child protection feature. The hot water icon will be highlighted and
enable dispensing of hot water by touching the "HOT" icon . The child protection feature will
reactivate 20 second after the dispensing of hot water ended.

17
MY CUP Dispensing Feature
Select this dispensing option, to open a new display enabling you to identify the pre-set drinking
glass volume and temperatures. There are four options for the MY CUP feature. See MY CUP
settings on page 25.
Dispensing Soda Water (only for X1)
Touch and hold the soda water icon to dispense the required volume. Automatic dispensing of a
preset soda water volume is not available.
When the soda water reservoir is empty, a
warning will be displayed. Wait until the soda
water reservoir is filled and the CO2gas is
injected into the reservoir. The water
dispensing display will reappear.
When the CO2bottle is empty, and no gas
can be injected into the soda water reservoir,
a massage will display advising you to renew
the CO2bottle. See the CO2bottle
replacement instructions on page 37.
A yellow circle on the soda glass icon in the
water dispensing display indicates the soda
water is not available as long as the CO2
bottle was not replaced,
Dispensing cold water into a glass or jug
Touch briefly the appropriate icon to automatically dispense the preset volume.
Touch and hold your finger on an icon to dispense any desired volume.
18
The Settings Screen
Tech Support Setting the Sodax X1-X10 features
The SETTINGS display screen contains six icons which represent the main functions that may be
set and customized to meet your personal needs and preferences.
Setting Screen Icons - Brief Overview
The SETTINGS screen enables you to set and customize the following features/functions:
Child Safety – Prevents small children from dispensing hot / boiling water
Date & Time - Sets the clock, energy saving feature, sleep mode and wake up times
Volumes & Temperatures - Sets cup sizes, water volumes and temperatures.
Changing or select the water supply source:
a. The household water supply system
b. The built in water reservoir
(
Standalone mode)
Selecting the display language - Changes the screen display/menu language
Tech Support – The Tech Support display screen provides technical information and is used
by the service persons.
Touch the Home icon (top right corner) to access the Water Dispensing Display (see page 16).
water supply
selection
language
selection
Tech
Support
Child Safety Date &
Time
Volumes &
Temperatures

19
Child Safety
In the SETTINGS display touch the icon.
The Child Protection display will appear.
Turning the child safety feature ON and OFF
To prevent children from dispensing hot or
boiling water from the dispenser, touch the
Child Saftey ON icon. The icon will be
highlighted and will be copied to the upper
part of the Water Dispensing Display .
To disable the Child Safety feature, touch the
Child Safety OFF icon. Touch the CONFIRM
screen button.
To dispense hot /boiling water while the Child Safety feature is ON, touch the child safety icon
in the Water Dispensing Display (see page 16) to temporarily override the child safety
feature. Touch the HOT icon to dispense the water.
20
Setting the Times
Touching this icon will enable you
To set the time indicated on the
dispenser's display.
To set the Energy Saving feature.
To set the Sleep/Wake Up mode.
Touch the TIME icon in the SETTINGS clock
options display to access the set time options.
To access the clock setting menu, touch the
time icon .
The Set Time display will appear.
Select the 12h or 24h time system by
touching the desired icon.
The selected icon will be highlighted.
Touch the up or down arrows to set the hour
and the minutes.
Every touch advances /reverses the reading
by one numeral.
Touch and hold the arrows to advance/
reverse faster.
Please Note:
The clock will reset to 12:00 noon following a power shortage or the disconnection of the
dispenser from the electrical system.
To return to the previous screen, touch the BACK screen button.
To confirm the time setting and continue, touch the CONFIRM screen button.

21
Setting the Energy Saving Mode
To access the Energy Savings mode display
touch the icon in the SETTINGS = Clock
Options screen.
The Energy Saving mode is intended to save on electricity costs during periods when the
dispenser is not in frequent use.The hot water temperature will be lowered to 60C.
To return to the boiling water function, touch the EXTRA HOT icon and wait for the boiling to end.
You may select automatic timing to activate
this feature.
The Energy Savings mode will activate 30
minutes after the last use of the dispenser.
The Energy Savings mode will activate 60
minutes after the last use of the dispenser.
The Energy Savings mode will activate
120 minutes after the last use of the
dispenser.
To disable this feature altogether, touch the
OFF icon. The icon will be highlighted.
Touch the CONFIRM screen button to save
the setting and continue.
When the Energy Saving mode is activated
the display will be darkened, displaying only
the time.
Touching the screen will reopen the water
dispensing display
22
Setting the Sleep / Wake up Mode
The SLEEP MODE is designed to saves electricity consumption during night time when dispenser
is not in use.
In this mode, the heating element is disabled, cancelling the automatic boiling and the display is
darkened.
To access the SLEEP mode or turn it off, touch the icon in the Settings and Clock Options
screen.
To set the SLEEP mode, change or cancel
this feature touch the icon in the Settings
and Clock Options screen.
To set the times for the SLEEP/WAKE UP
mode, touch the ON screen button. The icon
will be highlighted to indicate the feature is
active.
To set the starting time of the SLEEP mode,
touch the up or down arrows on the left side
of the display.
Every touch advances /reverses the reading
by one numeral.
Touch and hold the arrows to
advance/reverse faster.
To set the WAKEUP time, touch the up or
down arrows on the right side of the display.
Every touch advances /reverses the reading
by one numeral.
Touch and hold the arrows to
advance/reverse faster.
Touch the CONFIRM screen button to save
the setting and continue.
Please Note:
The clock will reset to 12:00 noon following a power shortage or the disconnection of the
dispenser from the electrical system. You will have to reset the times previously selected.

23
Setting the dispensed Water Volumes and Temperatures
This function, enables you to set the characteristics which suit the multiple users' personal
preferences.
The automatic water dispensing may be set in accordance with the glass volume and the desired
temperature. You may also set the carbonation level ("strength") of the soda water (only for X1).
You may set the exact water volume that will be dispensed into a glass by briefly touching the
appropriate glass icon. The dispenser will dispense the exact volume.
You may preset 4 different volumes and temperatures (for multiple users) using the MY CUP
feature.
In the SETTINGS display touch the hot water
temperature and volume icon to access
the hot water volume and temperature
selection menu.
WARNING
The water dispensed by the dispenser, may be at the boiling temperature and may scald
you. Be careful while dispensing hot water. Do not allow your fingers to touch the water.
With children around, always activate the Child Protection feature.
24
Setting the Dispensed Volume (X1)
Touch the hot water cup icon in the Volume
and Temperatures Setting display.
Setting the Dispensed Volume (X10)
The following display will appear
Touch the icon to set the hot water
volume.
Place a glass under the spout.
Touch and keep your finger on the icon
during the dispensing.
When the glass is filled to the desired
volume lift your finger off.
The flow will stop and the CONFIRM
screen button will appear.
Touch the CONFIRM screen button to set and
save the hot water volume
To continue to set another volume, repeat
these steps.
25
Setting the Hot Water Temperature
Touch the temperature setting icon to
access the temperature setting menu.
In the Temperature Settings display, touch
the right arrow to raise the temperature or the
left arrow to lower it.
Touch the CONFIRM screen button to confirm
the set temperature.
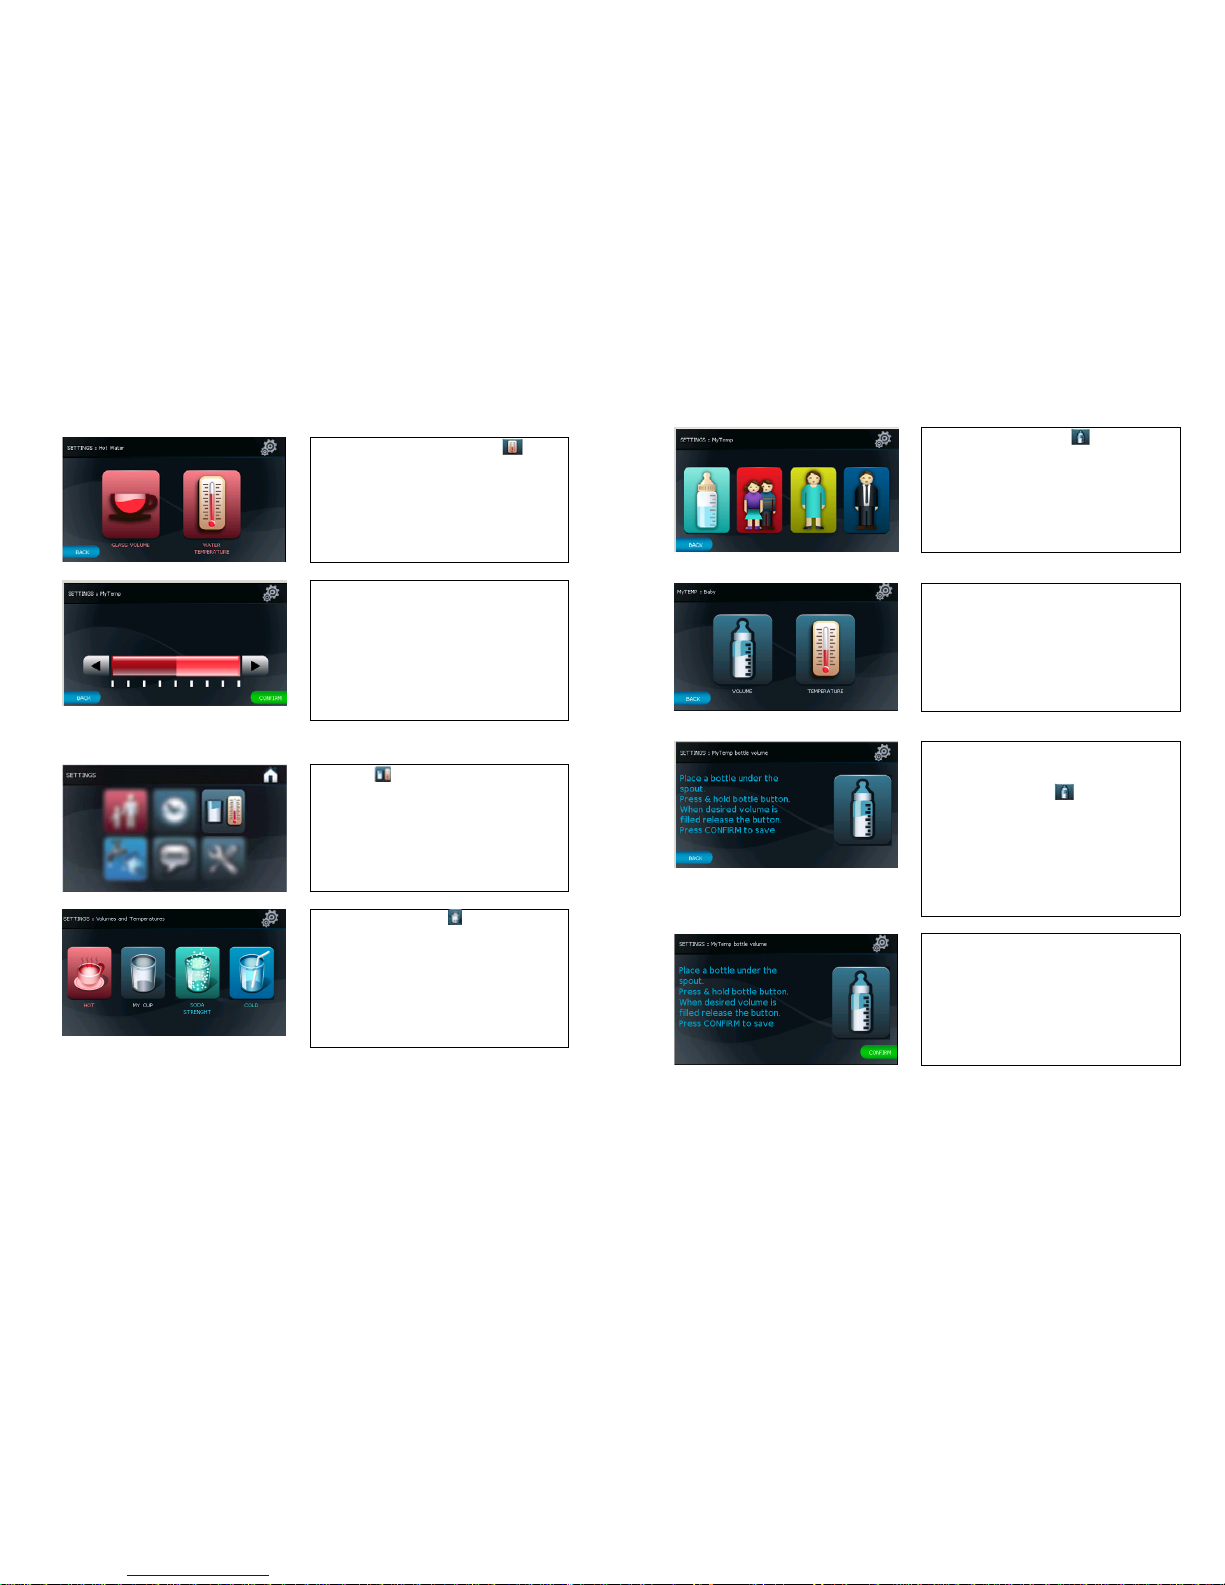
Setting the MY CUP Feature
Touch the icon on the SETTINGS display
to access the volume and temperature of the
MY CUP feature.
Touch the MY CUP icon to access the
setting of the personal preferences menu.
You may set the volumes and temperatures
for 4 persons including a baby's bottle.
26
Touch the baby bottle icon to access the
water volume and temperature setting menu.
Touch the temperature setting icon to access
the temperature setting menu.
Setting the Water Volume for a Baby
Bottle
Place a baby bottle under the spout and
touch the bottle icon .
Keep your finger on the icon while water is
dispensed into it.
When the desired level is reached, lift your
finger off the icon.
Dispensing will stop and the CONFIRM
screen button will appear.
Touch the CONFIRM screen button to save
and continue or repeat the steps for a
different volume.

27
Setting the Water Temperature for the Baby Bottle
In the Temperature Settings display, touch
the right arrow to raise the temperature or the
left arrow to lower it.
Touch the CONFIRM screen button to confirm
the set temperature.
To set different volumes and temperatures,
repeat the last three steps using one of the
the icons in the MY CUP display.
Setting the Carbonation Level (only X1)
You may select one of the tree available water carbonation levels ("Soda strength"):
Light, Medium and Strong.
The dispenser's soda water carbonation level default is "Medium".
To select/change the carbonation level, access the SETTINGS display
Touch the temperature volume setting icon
to access the soda strength menu.
Touch the soda strength icon to enter
the SETTINGS = SODA (soda strength
selection display). .
Touch the desired soda strength icon. The
icon will be highlighted.
Touch the CONFIRM screen button to save
the selection and continue.
28
Setting the cold water volume in a glass or a jug
Touch the temperature volume setting icon
in the SETTINGS display to access the
cold water or jug volume menu.
Setting the Cold Water Volume
Touch the cold water icon in the
SETTINGS = Cold display.
To dispense a measured volume of water,
you may select the measured volume of a
drinking glass or of a water jug. To set the
cold water volume to be dispensed into the
glass touch the icon to access the menu.
Setting the Poured Cold Water Volume
Place a glass/cup under the spout.
Touch the icon and keep you finger on the
icon while water is being poured.
When the glass/cup is filled with the desired
volume, remove your finger.
The dispensing will stop and the CONFIRM
screen button will appear.

29
Touch the CONFIRM screen button to confirm
and save this volume setting for next time or
repeat the steps for saving another volume.
Setting the Volume of Cold Water in a Jug
Touch the jug icon in the SETTINGS =
Cold display to access the menu.
To set the measured volume of cold water in
a jug,
Remuved the drop collector and insert it
upside down
Place the jug under the water spout.
Touch the jug icon and keep your finger on
the icon while water is dispensed into the jug.
When the jug is full to the desired level, lift
your finger off the icon.
The flow will stop and the CONFIRM screen
button will appear on the display.
Touch the CONFIRM screen button to confirm
and save this volume setting for next time, or
repeat the steps to save another volume.
30
Changing the Display Language
This feature is used to select/change the displays and menus language.
To access the language select/change menu,
touch the icon in the settings display.
The language selection display will open.
Touch the flag icon representing the
selected language.
Touch the Metric Units or the Imperial
Units icon to select the desired system.
Touch the NEXT screen button to confirm
and continue.

31
Changing the Dispenser's Water Supply Source
During the dispenser's initial installation, a water supply source was selected. If you wish to
change the present water supply source please contact the Service Department
The change will have no effect the dispenser's performance.
The changing of the water supply source is accomplished by using the SETTINGS display.
To access the menu, touch the icon on the
SETTINGS display.
To select the water supply system as the
source (tap water), touch the icon.
To selects the dispenser's own water
reservoir, touch the icon.
Touch the CONFIRM screen button to confirm
and save your selection.
CAUTION
If the water supply system was selected,
the following display will appear:
Ensure that the shut-off faucet connecting
the dispenser to the water system is open.
Touch the NEXT screen button to continue.
32
If the dispenser's built in water reservoir was
selected as the water supply source (the
Standalone mode) please ensure the water
faucet is closed.
Touch the NEXT screen button to continue.
Filling the Water Reservoir
Following the selection of the built in water
reservoir as the water source, the following
display will appear:
Remove the reservoir's top cover and fill it
with water.
You may remove the reservoir from the
dispenser by lifting it out by the handle,
Fill it and reinstall the reservoir in the
dispenser. Replace the cover and touch
the NEXT screen button to confirm and
continue.

33
Replacement of Consumables
The UV Lamp
The function of the UV lamp is to eliminate bacteria which may be found in the water. The UV
lamp life span is one year on the average. Its life span may be longer than one year. However, the
radiation efficacy of the lamp and the bacteria elimination efficiency are gradually reduced. In
order to maintain the optimal purified water quality, replace the UV lamp once a year.
Two weeks prior to the scheduled
replacement date, a warning is displayed on
the screen indicating that the lamp should be
replaced soon. This warning will reappear any
time a dispensing icon is touched.
Press REPLACE to proceed with the
replacement.
To remove the warning and return to the
dispensing screen touch the NEXT screen
button.
Replacing the UV Lamp:
When the year is over, a warning will display indicating that the service life of the lamp has ended
and that the purification level of the water delivered by the SODAX X1-X10 is below the specified
level.
Please replace the lamp.
Press REPLACE to proceed with the
replacement or press CLOSE to shut off the
dispenser
To clear the warning and return to the
dispensing screen, touch the NEXT screen
button.
WARNING
Do not turn on the UV lamp when it is outside the dispenser – danger of radiation to
eyes and skin.
Prior to replacement of the lamp, disconnect the dispenser from the electric supply
socket.
Do not touch the new bulb with bare fingers. Hold the lamp by its plastic handle.
Inspect the lamp housing in the dispenser for damage or cracks.
If damaged/cracked, Contact the service department
34
Replacement Procedure:
Remove the top cover.
Pull the lamp straight up and remove from the dispenser.
Unwrap the new bulb. Be careful not to touch the glass with bare fingers.
Insert the lamp and press it into its socket. A slight twist may be required to align the lamp with
its socket.
Touch the NEW UV LAMP screen button
to reset the lamp service life counter.
Replacing The Filter
The Sodax filter has been tested for high efficacy chlorine reduction and for high performance
particle reduction.
To ensure the supply of filtered drinking water per the specifications and to ensure the efficient
filtering by the filter, the filter must be replaced every 6 months.
WARNING
Two weeks prior to the scheduled replacement date, a warning is displayed on the screen
indicating that the filter should be replaced soon. This warning will reappear any time a
dispensing icon is touched.
To clear the warning and return to the
dispensing screen touch the NEXT screen
button.
At the end of six months of use, the message indicating the termination of the filter's service life
will display The water dispensed will no longer meet the specified filtered water quality of the
SODAX X1-X10.

35
Replace the filter on schedule.
To clear the warning and return to the
dispensing screen touch the NEXT screen
button.
Replacement Procedure
Remove the top cover and pull the filter housing handle up. The filter housing will rise and its
opening will be exposed.
Remove the used filter.
Unwrap the new filter and insert it into the filter housing so that the SODAX icon embossed on
the filter will face upward and forward.
Using one hand, press the filter housing while using the other hand to lock the handle.
Touch the NEXT screen button to reset the filter service life counter.
Touch the NEW FILTER screen button to
reset the counter.
Touch the NEW FILTER screen button to
reset and start the service life counter.
Touch the NEXT screen button to continue
Preparing the Filter's Initial Rinse
Following the filter replacement, the new filter
must be rinsed prior to use.
Place a 3 liter capacity water container under
the dispenser's spout.
36
Rinsing (sanitizing) the filter
Touch the NEXT screen button to start the initial rinsing process.
The rinsing process will last approximately 2
minutes. Water (slightly darkened), will pour
out of the dispenser into the water container.
This water contains minute carbon particles
embedded in the filter.
Once the container has filled up, you may
pause the rinsing process by touching the
pause icon .
Return the empty container to its former
position and touch the continue icon to
renew the rinsing.
The container may fill up a number of times.
Dispensing screen (X1)
Once the filter has been thoroughly rinsed the
dispenser system will automatically display
the dispensing screen.
Dispensing screen (X10)

37
Replacing The CO2Bottle (X1)
An empty CO
2
bottle Indication is displayed
by a yellow circle on the Soda Water glass
icon. The yellow circle will disappear only
after a new CO
2
bottle has been installed in
the dispenser and the soda glass icon will be
touched.
Empty CO
2
Bottle Warning
When the empty bottle display appears the
CO
2
bottle should be changed to enable the
production of soda water.
Should you decide not the replace the bottle
at this time, touch the NEXT screen button to
exit this display. To replace the CO
2
bottle,
touch NEXT.
The dispenser may now be used to dispense
only hot and cold water.
Removing the Empty Bottle
Lift the dispenser's top cover.
Remove the water reservoir.
Pull up the bottle installation/removal
mechanism handle and pull out the bottle.
Release the bottle from the mechanism by
twisting the adapter/bottle assembly ¼ turn
clockwise.
Unscrew the adapter from the empty bottle.
Installing the Replacement Bottle
Screw on the adapter onto the full CO
2
bottle.
Lower the assembly into place the
installation/removal mechanism and turn the
assembly quarter turn counterclockwise.
Replace the water reservoir and the top
cover.
Touch the NEXT screen button
38
The Technical Settings Screen
To access the technical settings screen touch
the Technical Screen icon .on the
SETTINGS display.
The technical settings screen enables you to
carry out routine maintenance of the
dispenser.
To prevent problems stemming from stone
buildup, periodically clean and rinse the
reservoirs and the internal system parts that
come in touch with the water.
You may cancel the screen automatic blackout following the dispensing operation and keep the
screen lit at all times. However, this mode is not recommended due to the electricity costs and the
fact that is shortens the screen life.
Adjusting the Operating Screen Lighting
To set the screen lighting (ON or OFF), touch
the first icon on the left .
To keep the screen continuously lit, touch the
ON bulb icon.
Touch the Confirm screen button to continue.
To cancel this feature touch the OFF icon.
Please Note:
Keeping the screen lit at all times increases electricity costs and shortens the screen's service life.
This manual suits for next models
1
Table of contents


