Boppy ComfyHug User manual

CAREFULLY READ AND FOLLOW WARNINGS
AND INSTRUCTIONS BEFORE USE.
KEEP THIS MANUAL FOR
FUTURE REFERENCE.
ENGLISH INSTRUCTIONS: PAGE 4
LEA DETALLADAMENTE Y SIGA
LAS ADVERTENCIAS E
INSTRUCCIONES ANTES DEL USO.
CONSERVE ESTE MANUAL PARA
REFERENCIA FUTURA.
INSTRUCCIONES EN ESPAÑOL:
PÁGINA 15
LISEZ ATTENTIVEMENT ET
SUIVEZ LES AVERTISSEMENTS
ET LES INSTRUCTIONS AVANT
UTILISATION.
CONSERVEZ CE MANUEL
POUR CONSULTATION FUTURE.
INSTRUCTIONS EN FRANÇAIS :
PAGE 24
Support for All Momkind™
Boppy®
ComfyHUG®
HYBRID
NEWBORN
CARRIER
The International Hip
Dysplasia Institute (IHDI)
acknowledges the
Boppy®ComfyHUG®
HYBRID NEWBORN CARRIER
as a “hip-healthy” product
when used as directed.
0+
months
5-20 lbs
0+
mois
2,3 à
9 kg
0+
meses
2,3 a
9 kg

2
Adjustable t for
multiple carrying positions
INSTRUCTIONS:
Carefully read and follow warnings and instructions before use.
Keep this manual for future reference.
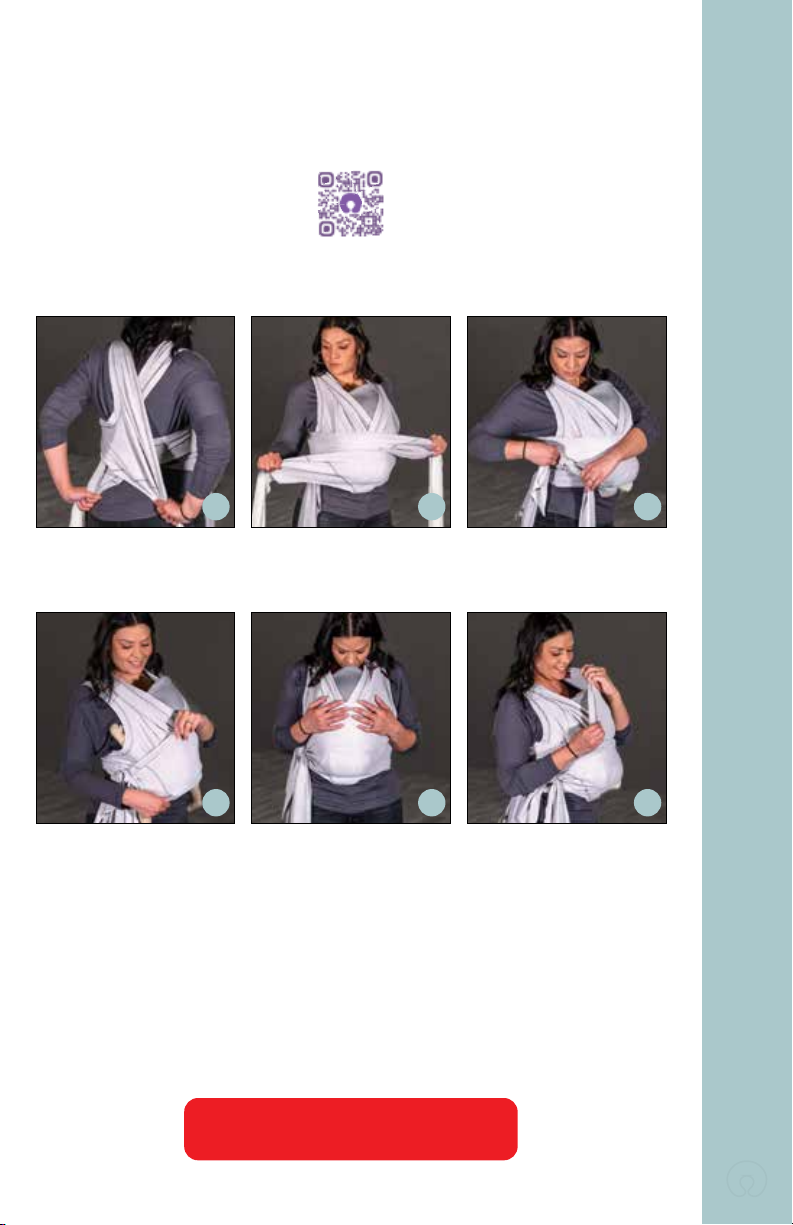
Before each use, make sure all knots are securely tied.
Inspect the baby carrier regularly for any signs of wear and tear.
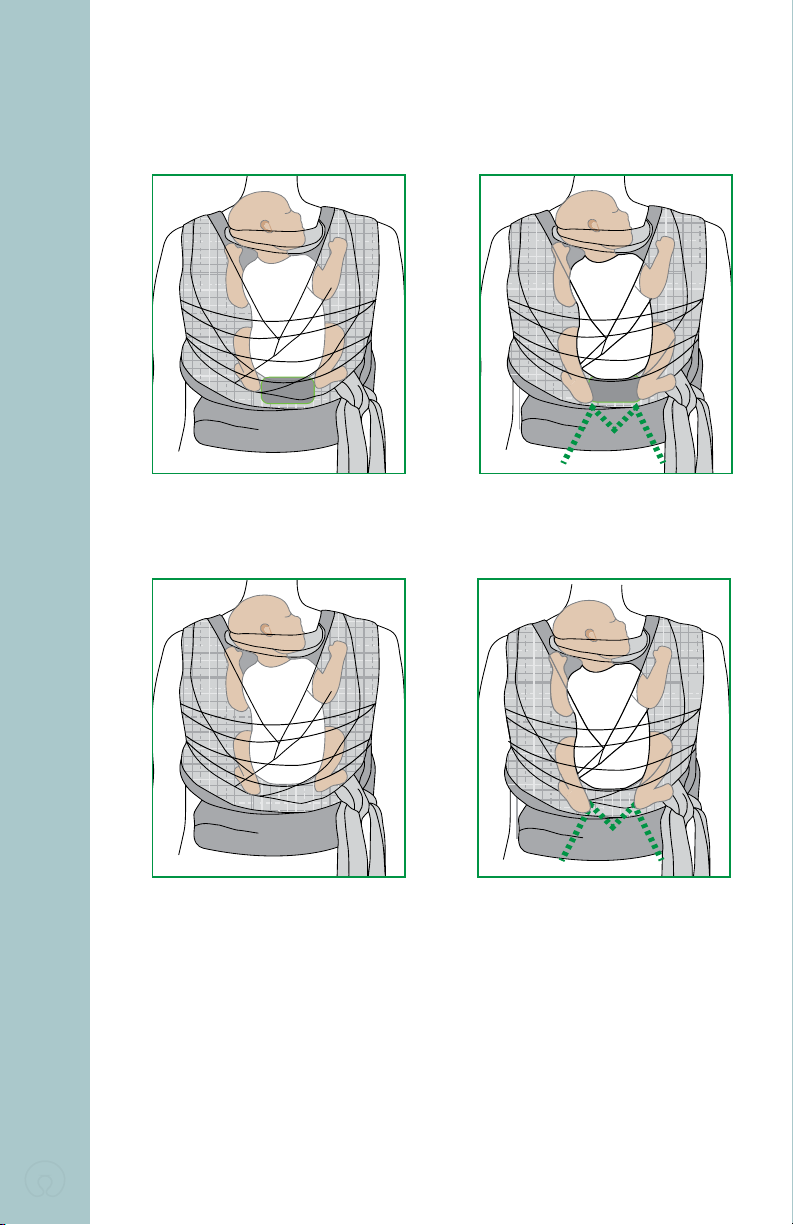
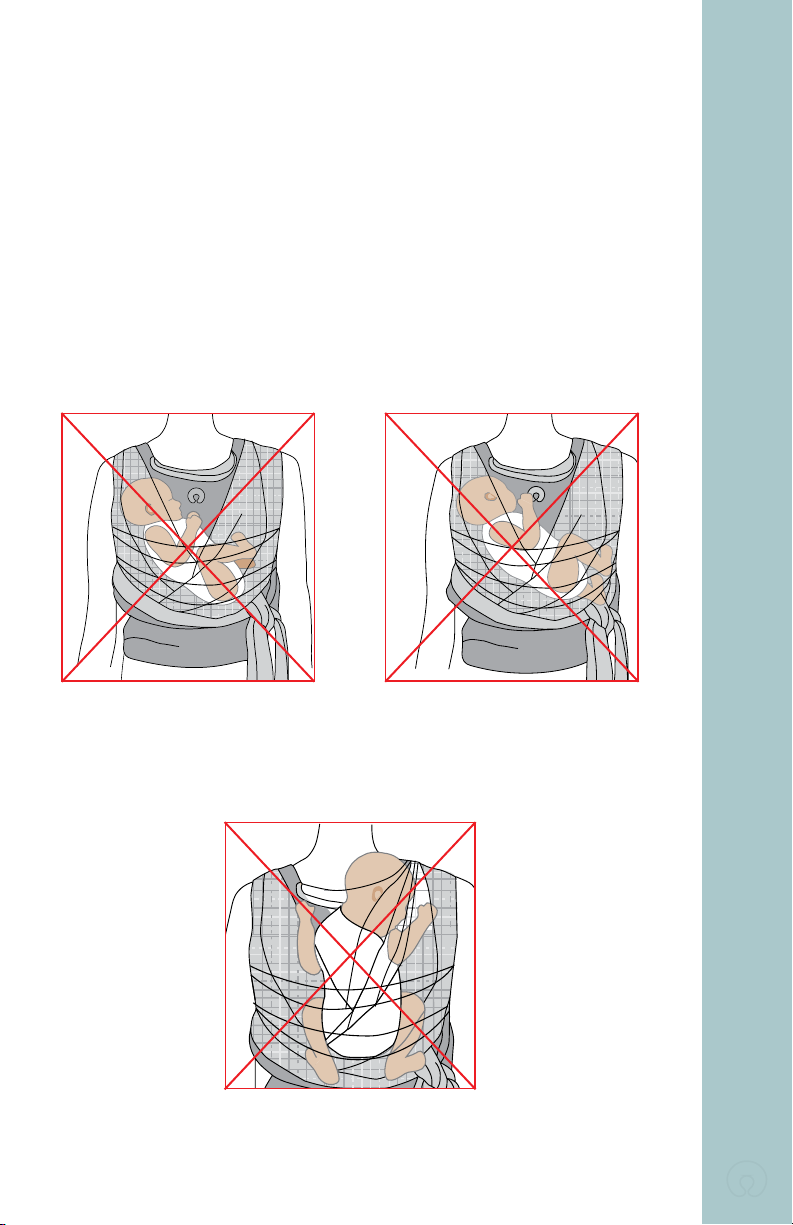
Ensure proper placement of child in product,including leg placement.
Premature infants, infants with respiratory problems, and infants under
4 months are at great risk for suffocation.
Never use a soft carrier when your balance or mobility is impaired because
of exercise, drowsiness or medical conditions.
Never use a soft carrier while engaging in activities such as cooking and
cleaning which include a heat source or exposure to chemicals.
Do not use while driving, or as a passenger in a motor vehicle.
Do not use during physical activities such as running and cycling.
Do be aware of your surroundings, as the two of you take up more space
than you alone. Be particularly mindful of doorways, furniture corners or
car doors.
This baby carrier must not be used as a back carrier.
WASHING/CARE INSTRUCTIONS:
Machine wash using mild liquid detergent, delicate cycle,cold 30°C
(65°F - 85°F). Non-chlorine bleach when needed.Tumble dry low on delicate
cycle. Do not iron. Do not dry clean.
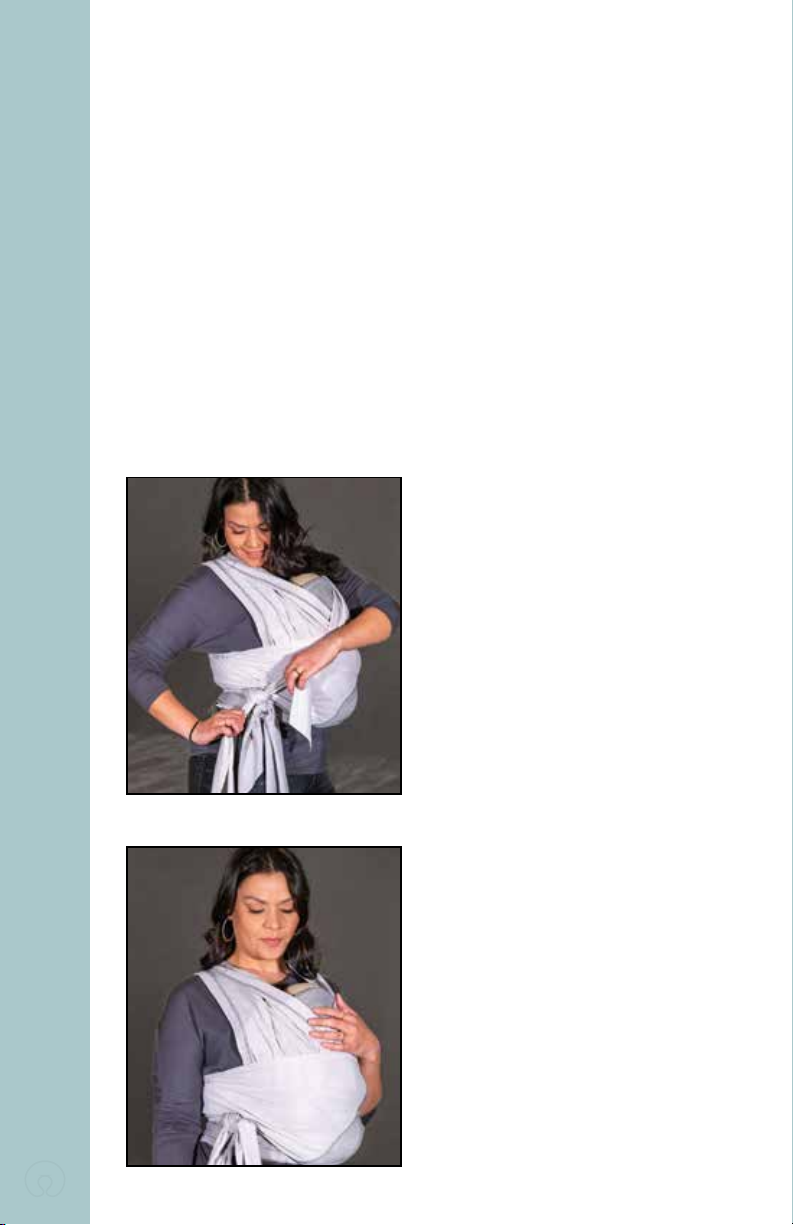
Newborn Front Facing-In Baby Front Facing-In

3
Adjustable t for
multiple carrying positions
Getting to know your carrier
A. Warning and Care Labels
B. Easy-Follow Labels
C. Waist Belt
D.Bolster
E. Bolster Tab
F. Bolster Placement Markers
G. Color Coded Waist Belt
H. Center Panel
I. Tank Top-style Arm Straps
J. Color Coded Shoulder Wraps
K. Snuggle Screen™ Mesh Panels
G
G
F
C
H
I
I

4
The T.I.C.K.S.rule for safe babywearing
Keep baby close and keep baby safe.
When you’re wearing a carrier, don’t forget the T.I.C.K.S.
T IGHT
I N VIEW AT ALL TIMES
CLOSE ENOUGH TO KISS
KEEP CHIN OFF THE CHEST
S UPPORT BABY’S BACK
TIGHT
Carriers should be tight enough to
hug baby close to you as this will be
most comfortable for you both.Any
slack/loose fabric will allow baby to
slump down in the carrier which can
hinder baby’s breathing and pull on
your back.
IN VIEW AT ALL TIMES
You should always be able to see
baby’s face by simply glancing down.
The Snuggle Screen™ mesh panel
should not fully close around baby.

5
The T.I.C.K.S.rule for safe babywearing
Keep baby close and keep baby safe.
When you’re wearing a carrier, don’t forget the T.I.C.K.S.
KEEP CHIN OFF THE CHEST
Baby should never be curled so
baby’s chin is forced onto baby’s
chest as this can restrict breathing.
Ensure there is always a space of at
least a nger width under baby’s chin.
SUPPORT BABY’S BACK
In an upright carry position baby
should be held comfortably close
to you so baby’s back is supported
in its natural position and baby’s
tummy and chest are against you.
If the wraps are too loose, baby can
slump which can partially close
baby’s airway.
(This can be tested by placing a
hand on your baby’s back and
pressing gently - baby should not
uncurl or move closer to you.)
CLOSE ENOUGH TO KISS
Baby’s head should be as close
to your chin as comfortable.
By tipping your head forward you
should be able to kiss on the head
or forehead.Adjust the waist belt to
ensure baby sits high enough.

6
How to Correctly Use Your Carrier
Correct Use
This carrier is front facing only.
Newborn front facing-in with
legs in (frog position)
and bolster
Newborn front facing-in with
legs out and bolster
Front facing-in with legs in
(frog position) with no bolster Front facing-in with legs out
with no bolster
Use the bolster if baby’s head isn’t close enough to
kiss without it.
Stop using in the frog position when baby starts to
push with legs.
Baby’s chin is up and face is visible.

7
How to Correctly Use Your Carrier
Correct Use Continued
Incorrect Use
Do not allow baby’s head
to get trapped in the
wraps or armholes
Do not allow baby to be
hunched with chin touching
chest or face covered
Do not wear baby low on the
body or have baby’s face
pressed tightly against wearer
Baby is high on wearer’s body.
Baby’s nose and mouth are free from obstruction.
Adjust fabric to fully support baby and roll thighs back
into a sitting “M” position.

8
Putting on your carrier with newborn facing in.
(with bolster)
The bolster is used to bring baby up higher so baby
doesn’t sink into the carrier, or if baby isn’t close enough
to kiss without it. Recommended for babies under 8 lbs.
For a how-to video scan the QR code
with your smartphone camera
1 - Identify the warning label on the
waist belt to place the belt in the
correct orientation.
1
2 - Hold belt with the bolster between
the markers with the tab between you
and the belt.
2
3 - Wrap belt around your waist
(where your elbows hit your torso) like
an apron and tie tightly in a double
knot.
3
4 - Locate tank top-style armholes and
ensure no wraps are on the center
panel.
4
5 - Hold baby facing-in and place
baby on the bolster in either frog
position or with feet on either side of
the bolster.
5
6 - Pull the center panel over baby’s
back.
6
7 - Place tank top-style armholes
around your shoulders.Labels should
be facing you.
7
8 - Baby and you share the same arm-
holes.Lift baby’s thighs up allowing
the butt to sink down in frog position.
8
9 - Pull up center panel to
provide proper head support.
9

9
Putting on your carrier with newborn baby front facing-in.
(with bolster) continued
For a how-to video scan the QR code
with your smartphone camera
10 - Locate shoulder wraps.
Cross in back and pull down tightly.
10
11 - Bring wraps around your front
and across baby’s back.
11
12 -Tie in a double knot.
12
13 - Spread the fabric for added
support and comfort.
13
14 - Baby should be close enough
to kiss.
14
15 - Feature:For an even more cozy
environment or privacy while nursing
in the carrier,you can take the
Snuggle Screen™ mesh panel
opposite of baby’s face over the
midline of the carrier.
15
TIME FOR A
SAFETY CHECK, p. 4

10
Putting on your carrier with baby facing in
(no bolster)
For a how-to video scan the QR code
with your smartphone camera
1 - Identify the warning label on the
waist belt to place the belt in the
correct orientation.
1
2 - Wrap belt around your waist
(where your elbows hit your torso) like
an apron and tie tightly in a double
knot.
2
3 - Locate tank top-style armholes and
ensure wraps are out of the way.
3
4 - Hold baby facing-in.
4
5 - Pull the center panel over baby’s
back.
5
6 - Place tank top-style armholes
around your shoulders.
Labels should be facing you.
6
7 - Baby and you share the same
armholes.Lift baby’s thighs up
allowing the butt to sink down into an
“M”position.
7
8 - Pull up center panel to
provide proper head support.
8
9 - Locate shoulder wraps.
Cross in back and pull down tightly.
9

11
Putting on your carrier with baby facing in
(no bolster) continued
For a how-to video scan the QR code
with your smartphone camera
10 - Bring wraps around your front
and across baby’s back.
10
11 -Tie in a double knot.
11
12 - Spread the fabric for added
support and comfort.
12
13 - Feature:For an even more
cozy environment or privacy while
nursing in the carrier,you can take the
Snuggle Screen™ mesh panel from
behind baby’s head to the midline of
the carrier.
13
TIME FOR A
SAFETY CHECK, p. 4

12
www.boppy.com
!
CAUTION
SUFFOCATION HAZARD:
• Never place blankets or jackets over the child
while he is in the carrier.
• Make sure the carrier is not covering the child’s
nose or mouth at any time during use.
• Make sure newborns to 3 months are positioned
properly in the carrier to provide adequate head
support. See instructions at boppy.com.
• Monitor baby’s breathing at all times.
• Make sure a young infant’s chin is off his or her
chest and the back is supported.
• For pre-term, low birthweight babies and children
with medical conditions, seek advice from a
health professional before using this product.
• Inspect the baby carrier regularly for any signs
of wear and tear.
FALL HAZARD:
• Do not tie the ends of the straps close to the baby’s
abdomen as it could cause it to become too
constricted.
• The straps should not fall below the knees of the
adult user.
• Do watch your step, as your balance can be affected
while wearing.
FALL AND SUFFOCATION HAZARD
FALL HAZARD – Infants can fall through a wide leg opening or out of carrier.
• Always hold baby closely until carrier is correctly attached to you.
• Place baby directly against your chest, with no carrier fabric between you and your baby.
• Before each use, make sure all knots are securely tied at all times.
• Take special care when leaning or walking.
• Never bend at waist; bend at knees.
• Ensure proper placement of child in product including leg placement.
• Only use this carrier for babies between 5 lbs. and 20 lbs. (2.3 kg. and 9 kg.)
SUFFOCATION HAZARD – Infants under 4 months can suffocate in this product if face is
pressed tight against your body.
• Do not strap baby too tight against your body.
• Allow room for head movement.
• Keep infant’s face free from obstructions at all times.
• Never lie down or sleep with baby in the baby carrier.
• Never place infant in the outward-facing position.
• Not suitable for back carrying.
!
WARNING

13
Ajuste adaptable a múltiples
posiciones para llevar
INSTRUCCIONES:
Lea detalladamente y siga las advertencias e instrucciones antes del uso.
Conserve este manual para referencia futura.
Antes de cada uso,verique que estén bien atados todos los nudos.
Inspeccione regularmente el portabebé en busca de señales de desgaste.
Conrme la colocación correcta del niño en el producto incluso la posición
de las piernas.
Los bebés prematuros, con problemas respiratorios y menores de 4 meses
son los que tienen mayor riesgo de asxia.
Nunca use un portabebés suave si usted no tiene suciente equilibrio o
movilidad debido a ejercicio,somnolencia o afecciones médicas
Nunca use un portabebé suave mientras realice actividades como
cocinar y limpiar que implican una fuente de calor o exposición a
agentes químicos.
Nunca lo use mientras conduce o como pasajero en un vehículo
motorizado.
No lo use durante actividades físicas como correr y andar en bicicleta.
Tenga siempre presente su entorno,porque ustedes dos ocupan más
espacio que una sola persona. Preste particular atención a los umbrales,
esquinas de muebles o puertas de vehículos.
Este portabebé no debe usarse para llevar al niño en la espalda.
INSTRUCCIONES DE LAVADO Y CUIDADO:
Lavado a máquina con detergente líquido suave, en el ciclo delicado, a
18°C - 30°C (65°F - 85°F).
Usar blanqueador sin cloro según sea necesario. Secar a temperatura baja
en el ciclo delicado. No planchar. No lavar en seco.
Recién nacido
apuntando hacia dentro Bebé apuntando
hacia dentro

14
Conozca el portabebé
A. Etiquetas de advertencia y cuidado
B. Etiquetas fáciles de seguir
C. Cinturón
D. Refuerzo
E. Lengüeta del refuerzo
F. Marcas de colocación del refuerzo
G. Cinturón identicado con colores
H. Panel central
I. Agujeros para los brazos estilo camiseta sin mangas
J. Envolturas para los hombros identicadas con colores
K. Paneles de malla Snuggle Screen™
G
G
F
C
H
I
I

15
La regla T.I.C.C.S.para llevar al bebé de
manera segura
Mantenga al bebé cerca y seguro.Cuando use un
portabebé,no olvide las reglas T.I.C.C.S.
T ENER BIEN AJUSTADO
I NFALIBLEMENTE A LA VISTA EN TODO MOMENTO
CERCA LO SUFICIENTE COMO PARA BESARLO
CON EL MENTÓN DESPEGADO DEL PECHO
S UJETANDO LA ESPALDA DEL BEBÉ
TENER BIEN AJUSTADO
Los portabebés deben quedar
sucientemente ajustados como para
sujetar al bebé cerca de usted porque
es la posición más cómoda para ustedes
dos. Cualquier tela que quede holgada
o suelta permitirá al bebé quedar en
mala posición dentro del portabebé
pudiendo obstruir la respiración del
bebé y ejercer presión sobre la espalda
de usted.
INFALIBLEMENTE A LA VISTA EN
TODO MOMENTO
Siempre debe poder ver la cara del
bebé con solo mirar hacia abajo.El
panel de malla Snuggle Screen™ no
debe cerrarse totalmente alrededor del
bebé.

16
SUJETANDO LA ESPALDA DEL BEBÉ
En posición vertical para llevarlo, debe
sostener al bebé cómodamente cerca
de usted y con la espalda apoyada en su
posición natural quedando el abdomen
y el pecho del bebé contra usted.Si las
envolturas están muy sueltas el bebé
puede quedar acurrucado en mala
posición pudiendo cerrarle parcialmente
las vías respiratorias.(Esto puede probarse
colocando una mano en la espalda del
bebé y presionando suavemente; el bebé
no debe estirarse ni moverse más cerca
de usted.)
CON EL MENTÓN DESPEGADO
DEL PECHO
El bebé no debe quedar nunca
enroscado de modo que se fuerce
el mentón contra el pecho del bebé
porque esto puede restringir la
respiración. Conrme que haya siempre
espacio para un dedo como mínimo
debajo del mentón del bebé.
CERCA LO SUFICIENTE COMO
PARA BESARLO
La cabeza del bebé debe quedar lo
más cerca posible de su mentón como
le resulte cómodo.Al inclinar la cabeza
hacia delante usted debe poder besar al
bebé sobre la cabeza o la frente.Ajuste
el cinturón para vericar que el bebé
quede sentado sucientemente alto.

17
Cómo usar correctamente el portabebé
Uso correcto
Este portabebé solo puede llevarse
puesto por delante.
Use el refuerzo si el bebé no queda sucientemente cerca como
para besarlo sin tenerlo puesto.
Deje de usar la posición de rana cuando el bebé comience a
empujar con las piernas.
El mentón del bebé queda arriba y con la cara visible.
El bebé queda alto en el cuerpo del usuario.
La nariz y la boca del bebé quedan libres de obstrucciones.
Ajuste la tela para apoyar totalmente y mueva los muslos del
bebé de tal modo que queden en la posición de “M”.
Bebé hacia dentro con las
piernas adentro (en posición
de rana) sin refuerzo
Recién nacido apuntando
hacia dentro,con las piernas
adentro (en posición de
rana) y con refuerzo
Recién nacido apuntando
hacia dentro,con las piernas
afuera y con refuerzo
Bebé hacia dentro con las
piernas afuera y sin refuerzo

18
Cómo usar correctamente
el portabebé
Uso correcto
Uso incorrecto
No deje que la cabeza
del bebé quede atrapada
en las envolturas ni en los
agujeros para los brazos
No permita que el bebé
quede agachado con el
mentón tocándole el pecho
y con la cara cubierta
No lleve al bebé muy abajo
en su cuerpo ni permita que
la cara del bebé quede
presionada fuertemente
contra el usuario
La nariz y la boca del bebé quedan libres de
obstrucciones.
Ajuste la tela para apoyar totalmente y mueva los muslos
del bebé de tal modo que queden en la posición de “M”.

19
Cómo ponerse el portabebé con el bebé recién nacido
apuntando hacia dentro.(con el refuerzo)
Se usa el refuerzo para subir al bebé más arriba de tal modo
que no se hunda dentro del portabebé. Recomendado para
bebés que pesen menos de 3.6 kgs (8 lbs).
Para ver un video explicativo escanee el código QR con la
cámara de su smartphone
1- Remítase a la etiqueta de adverten-
cia en el cinturón para ponérselo en
la orientación correcta.
1
2 - Sostenga el cinturón con el refuer-
zo entre las marcas con la lengüeta
entre usted y el cinturón.
2
3 - Envuelva el cinturón alrededor de
la cintura (donde sus codos tocan
el torso) como un delantal y átelo
apretado con un doble nudo.
3
4 - Localice los agujeros para los
brazos estilo camiseta sin mangas y
revise que no haya envolturas en el
panel central.
4
5 - Sostenga al bebé apuntando hacia
dentro y póngalo en el refuerzo ya sea
en posición de rana o con los pies a
cada lado del refuerzo.
5
6 - Pase el panel central por encima
de la espalda del bebé.
6
7 - Ponga los agujeros para los brazos
estilo camiseta sin mangas alrededor
de sus hombros.Las etiquetas deben
apuntar hacia usted.
7
8 - Bebé y tú compartes las mismas
sisas.Levante los muslos del bebé para
permitir que el trasero se hunda en
posición de rana.
8
9 - Mueva hacia arriba el panel cen-
tral para dar más apoyo a la cabeza.
9

20
Cómo ponerse el portabebé con el bebé recién nacido
apuntando hacia dentro.(con el refuerzo) continuación.
Para ver un video explicativo escanee el código QR
con la cámara de su smartphone
10 - Localice las envolturas de los
hombros.Crúcelas en la espalda y
jale hacia abajo apretándolas.
10
11 - Pase las envolturas hacia delan-
te,cruzando la espalda del bebé.
11
12 - Átelas con un nudo doble.
12
13 - Extienda la tela para dar más
apoyo y comodidad.
13
14 - El bebé debe quedar suciente-
mente cerca como para besarlo.
14
15 - Característica:Para un ambiente
aún más acogedor o privado mientras
amamanta en el portabebé,puede
mover el panel de malla Snuggle
Screen™ frente a la cara del bebé
pasándolo por encima de la línea
media del portabebé.
15
¡Es hora de hacer una
revisión de seguridad! p. 15
Other manuals for ComfyHug
1
Table of contents
Languages:
Other Boppy Baby Carrier manuals