BOS Lighting AMADEUS H250 User manual
B O S
MAKE LIFE BRIGHTER
AMADEUS
H250
CONTACT
Address
BOS Lighting
Dommelseweg 148
5554 NV Valkenswaard
The Netherlands
Online
Email [email protected]
Website www.bos-lighting.nl
BOS LIGHTING
3 // 14
BOS LIGHTING
BOS LIGHTING AMADEUS H250
TABLE OF CONTENTS
SAFETY INSTRUCTIONS & MAINTENANCE PAGE 3
INSTALLATION PAGE 4
WHAT IS IN THE BOX? PAGE 4
DIMENSIONS AMADEUS H250 PAGE 4
PREPARING PAGE 5
INSTALLATION OF THE CLAMP PAGE 5
DMX-512 CONTROL CONNECTIONS PAGE 6
PHOTOMETRIC DATA PAGE 7
MENU OVERVIEW PAGE 8
DMX CHANNELS PAGE 9
16 CH MODE PAGE 9
18 CH MODE PAGE 10
DMX VALUES PAGE 11
GOBOS PAGE 12
TROUBLESHOOTING AND CLEANING PAGE 13
TECHNICAL SPECIFICATIONS PAGE 14
SECTION 1
SAFETY INSTRUCTIONS & MAINTENANCE
• Do not look directly at the light source from close range.
• Take precautions to prevent injury due to falls when working at height.
• For permanent installation, ensure that the xture is securely fastened to a load-bearing surface with suitable corrosion-resistant hardware.
• For temporary installation with clamps, ensure that the quarter-turn fasteners are turned fully and secured with a suitable safety cable.
• The cable must be approved for a safe working load (SWL) of 10 times the weight of the xture, and it must have a minimum gauge of 3 mm.
WARNING!
Take measure to prevent personal injury.
This product is for professional use only. It is not for household use.
This product presents risks of severe injury or death due to re and burn hazards, electric shock and falls.
Read this manual before installing, powering or servicing the xture, follow the safety precautions listed below and observe all warnings in this manual
and printed on the xture. This device has left the factory in perfect condition. In order to maintain this condition and to ensure a safe operation, it is
absolutely necessary for the user to follow the safety instructions and warning notes written in this user manual.
If you have questions about how to operate the xture safely, please contact us via [email protected].
• Always power off/unplug the xture before removing any covers.
• Ensure that the power is turned off when connecting the xture to the AC mains supply.
• Do not apply power if the xture is in any way damaged.
• Do not immerse the xture in water or liquid.
WARNING!
Risk of electric shock.
• This luminaries are multi-environmental xtures with an IP-rating of 65, intended for professional use only. They are not suitable for household use.
• Review the following safety precautions carefully before installing or operating the xture. This xture must be installed in accordance with the
applicable installation code by a person familiar with the construction and operation of the xture and the hazards involved.
WARNING!
Read the safety precautions in this section before unpacking, installing, powering or operating this product.
• Install in a location that prevents accidental contact with the xture.
• Install only in a well-ventilated space.
• Install at least 0.3 m (12 in.) away from objects to be illuminated.
• Install only in accordance with applicable building codes.
• Ensure a minimum clearance of 0.1 m (4 in.) around the cooling fans.
• Do not paint, cover or modify the xture.
• Keep all ammable materials away from the xture.
• Allow the xture to cool for 15 minutes after operation, before touching it.
• CAUTION: Exterior surface temperature after 5 min. operation = 45 °C
WARNING!
Take measures to prevent burns and re.
The following points have to be considered during the inspection:
1. All screws for installing the devices or parts of the device have to be tightly connected and must not be corroded.
2. There must not be any deformations on the housing, color lenses, xations and installation spots (ceiling, suspension, trussing).
3. Mechanically moved parts must not show any traces of wearing and must not rotate with unbalances.
4. The electric power supply cables must not show any damage, material fatigue or sediments.
Further instructions depending on the installation spot and usage have to be adhered by a skilled installer and any safety problems have to be removed.
CAUTION!
Disconnect from mains before starting maintenance operation

BOS LIGHTING
BOS Lighting Amadeus H250
Page 4
Version: v1 // 2022
Lighting
B O S
• 1x Amadeus H250
• 1x Shuko -> True1
• 2x Tilt brackets with fast locks with manual tilt adjustment
• 2x Stands
• 1x Safety cable
WHAT IS IN THE BOX?
SECTION 2
INSTALLATION Unpack the xture and inspect it to ensure that it has not been damaged during transport. Read the manual before installation.
When selecting a location for the xture, ensure that:
• It is situated away from public thoroughfares and protected from contact with people.
• It is not immersed in water or exposed to high-pressure water jets.
• It has adequate ventilation.
PREPARING
2
4
1
1/4 turn 1/4 turn
1 : Omega Bracket
2 : Clamp
3 : Safety Cable
4 : 1/4 Turn Quick-Lock Fasteners
3
INSTALLATION OF THE CLAMP
DIMENSIONS AMADEUS H250
328
500
328
220
220
204
BOS LIGHTING
7 // 14
BOS LIGHTING
BOS Lighting Amadeus H250
Page 6
Version: v1 // 2022
Lighting
B O S
SECTION 3
DMX-512 CONTROL CONNECTIONS
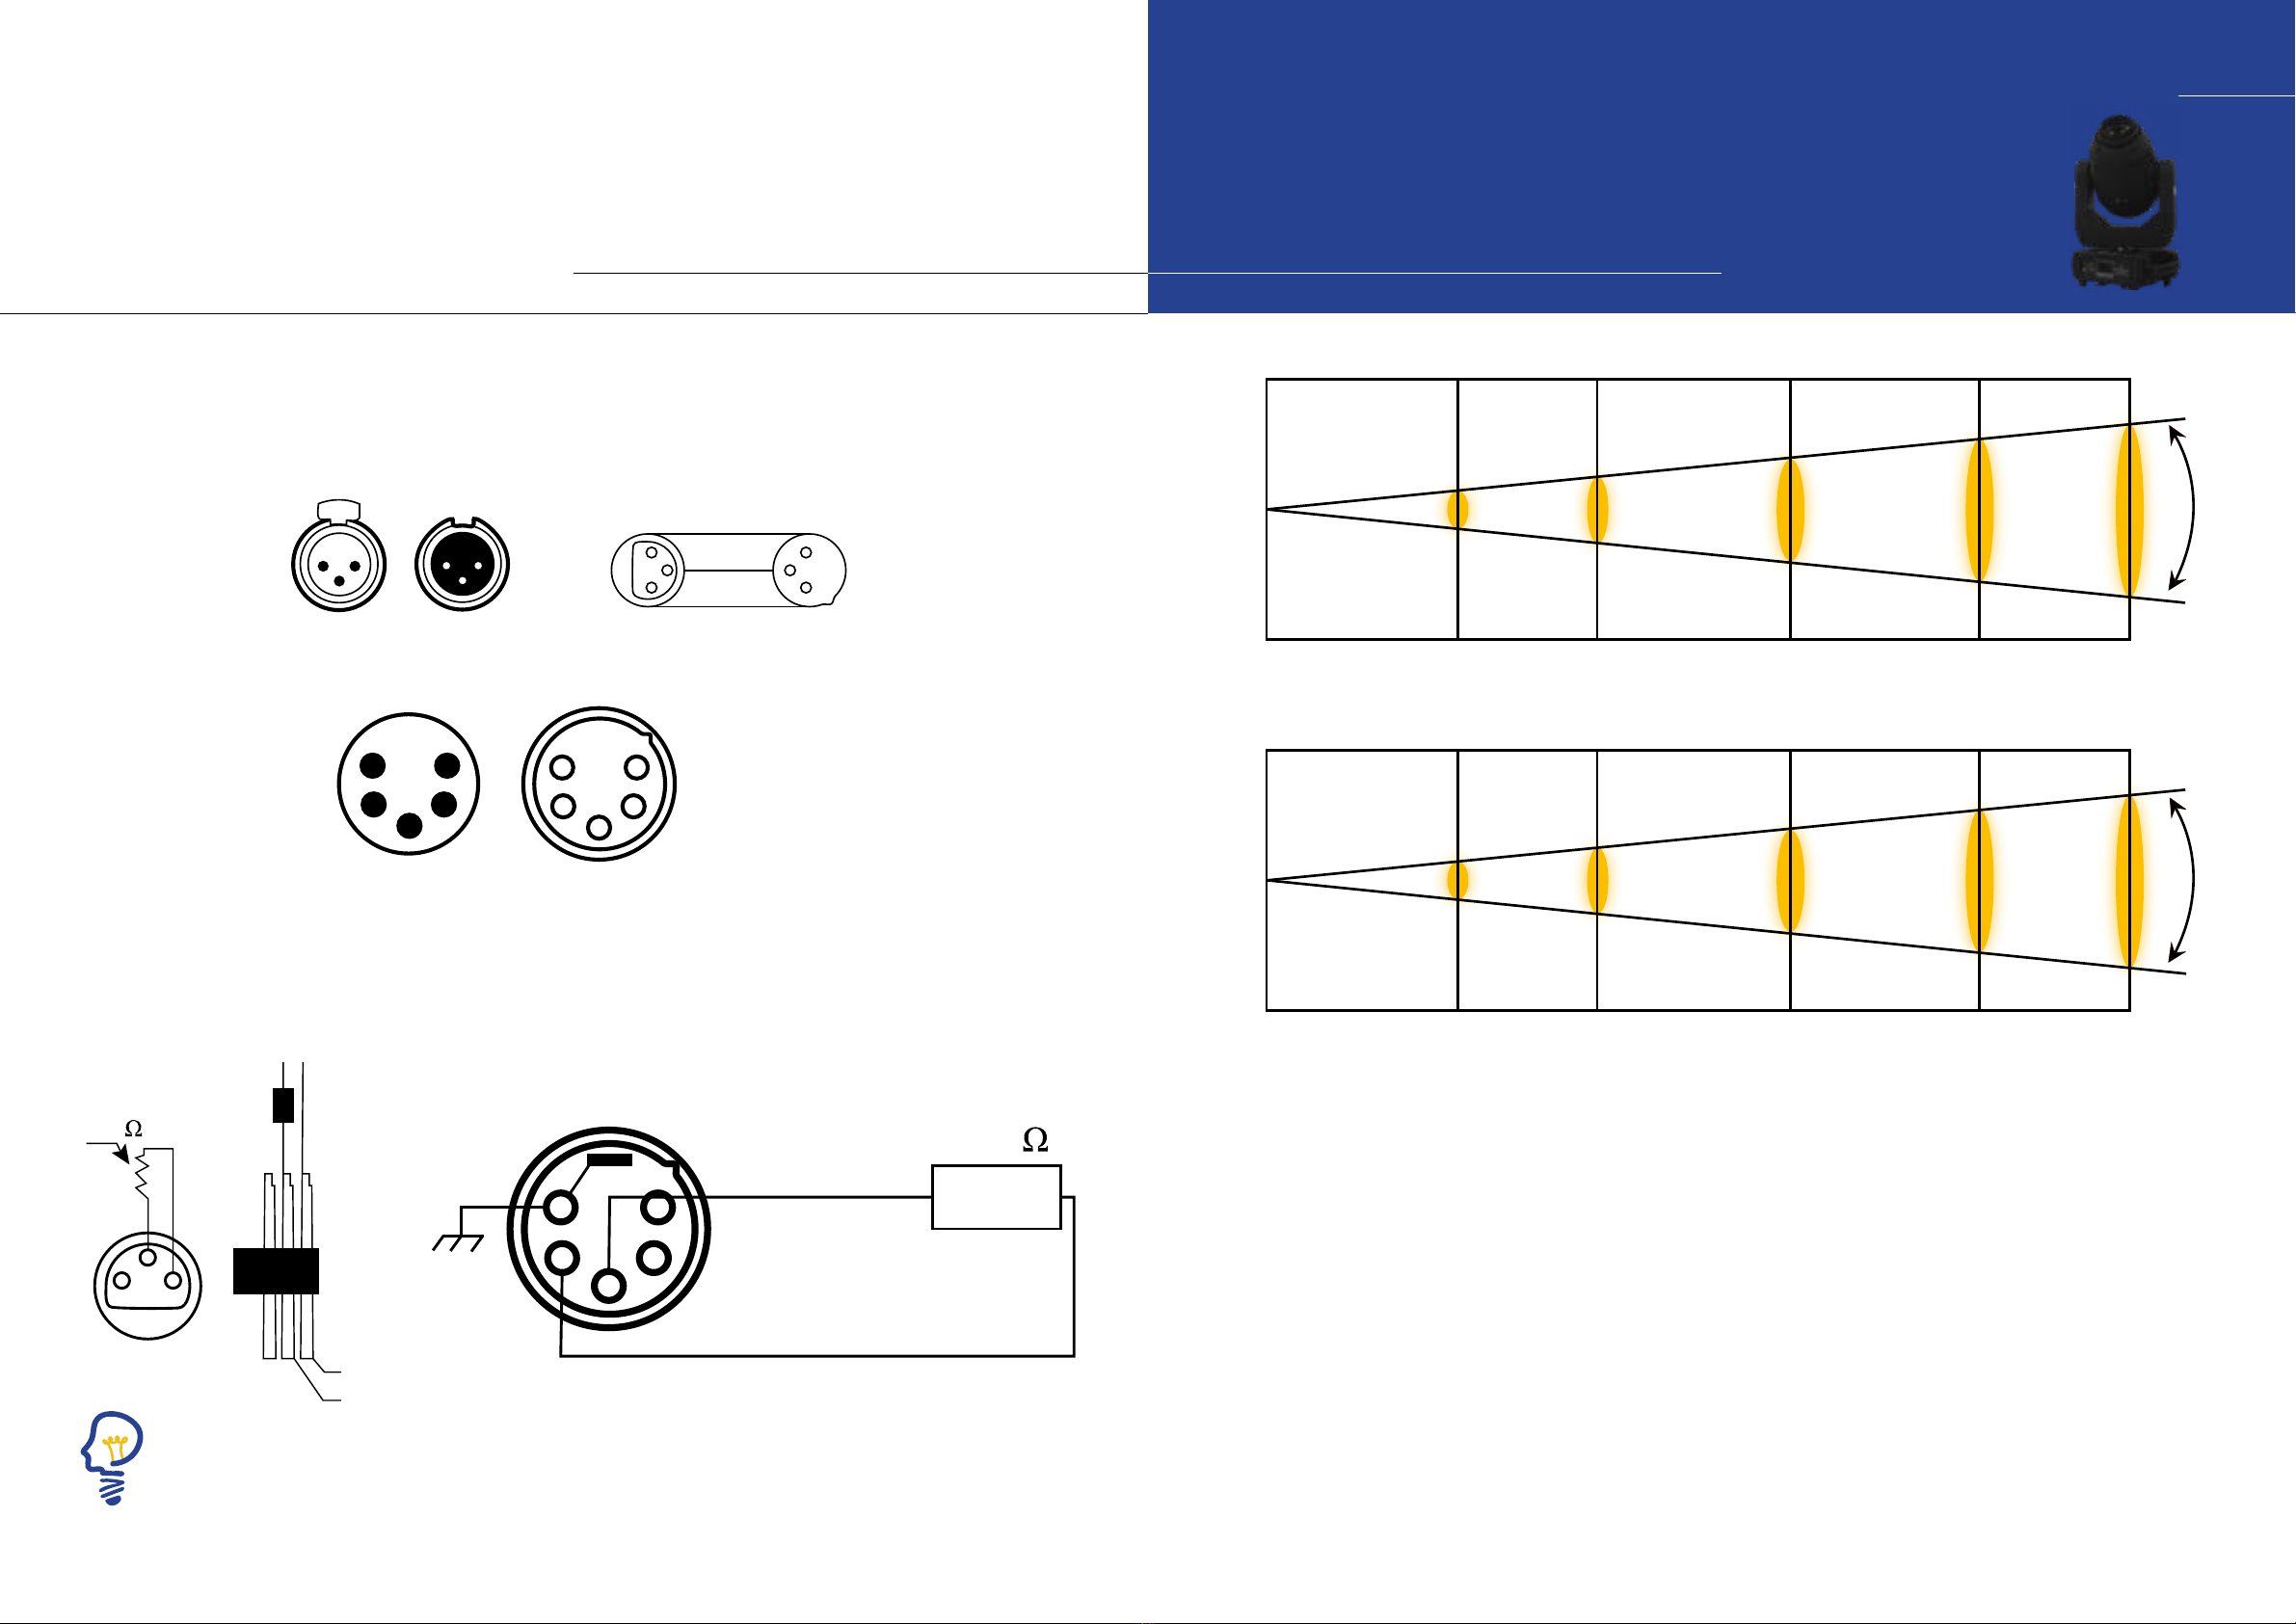
SECTION 4
PHOTOMETRIC DATA
12
3
1 2
3
DMX Output
3-pin XLR Socket
DMX Input
3-pin XLR Socket
1: Ground
2: Data (-)
3: Data (+)
1
2
3
1
2
3
COMMON
DMX +
DMX --
1
2
3
4
5 1
2
3
4
5
FEMALE MALE
1: Ground
2: Data (-)
3: Data (+)
DMX 512 OUT
3-PIN XLR
DMX 512 IN
3-PIN XLR
120
1
2
3
4
5
1 2
3
120
PIN3
PIN2
Distance in meters
Distance in meters
1M 2M 3M 4M 5M
1M 2M 3M 4M 5M
241160 83080 42320 24390 17440
Lux
Lux
Beam size in centimeters Beam size in centimeters
14540 4695 2251 1413 923
62
114
168
225
275
30°
12
23
32
42
51
5.5°
Connect the provided XLR cable to the female 3-pin XLR & 5-pin XLR output of your controller and the other side to the male 3-pin XLR & 5-pin XLR input of
the moving head. You can chain multiple moving head together through serial linking. The cable needed should be two core, screened cable with XLR input
and output connectors. Please refer to the diagram below.
For installations where the DMX cable has to run a long distance or is in an electrically noisy environment, such as in a discotheque, it is recommended to
use a DMX terminator. This helps in preventing corruption of the digital control signal by electrical noise. The DMX terminator is simply an XLR plug with a
120 Ω resistor connected between pins 2 and 3, which is then plugged into the output XLR socket of the last xture in the chain.
Please see illustrations below.
BOS LIGHTING
9 // 14
BOS LIGHTING
BOS Lighting Amadeus H250
Page 8
Version: v1 // 2022
Lighting
B O S
SECTION 5
MENU OVERVIEW
SECTION 6
DMX CHANNELS
Adress Set
001...512
Run Mode
DMX
AUTO
SOUND
MANUAL
Setup
Advanced Setting
Pan reverse
System Info
Ver V1
DMX Address
Temperature
AUTO 1
AUTO 2
Tilt reverse
Display
Screen Rev
Channel
Sensitivity
Motor zero
Reset
Factory Set
LCD DISPLAY
INDICATOR
DOWN
UP
MENU
ENTER
Pan
Tilt
Dimmer
Shutter
Color
Gobo
Zoom
Focus
Gobo 2
G-Rotate
Prism
P-Rotate
Frost
16CH
18CH
Channel Funciton Value Description
1Pan 000...255 0-540°
2Tilt 000...255 0-270°
3 X, Y speed 000...255 From fast to slow
4Dimmer 000...255 From dark to bright
5Shutter 000...255 See DMX value Page 13
6Color 000...255 See DMX value Page 13
7Color Effect 000...255 See DMX value Page 13
8 Static gobo wheel 000...255 See DMX value Page 13
9Rotating Gobo wheel 000...255 See DMX value Page 13
10 Gobo Rotation 000...255 See DMX value Page 13
11 Focus 000...255 Unsharp to Sharp
12 Zoom 000...255 Narrow To Wide
13 Prism 000...255 Prism in from 064...255
14 Prism Rotation 000...255 See DMX value Page 13
15 Frost 000...255 Frost in from 064...255
16 Modes 000...255 See DMX value Page 13
16 CH MODE
Table of contents
Other BOS Lighting Lighting Equipment manuals


