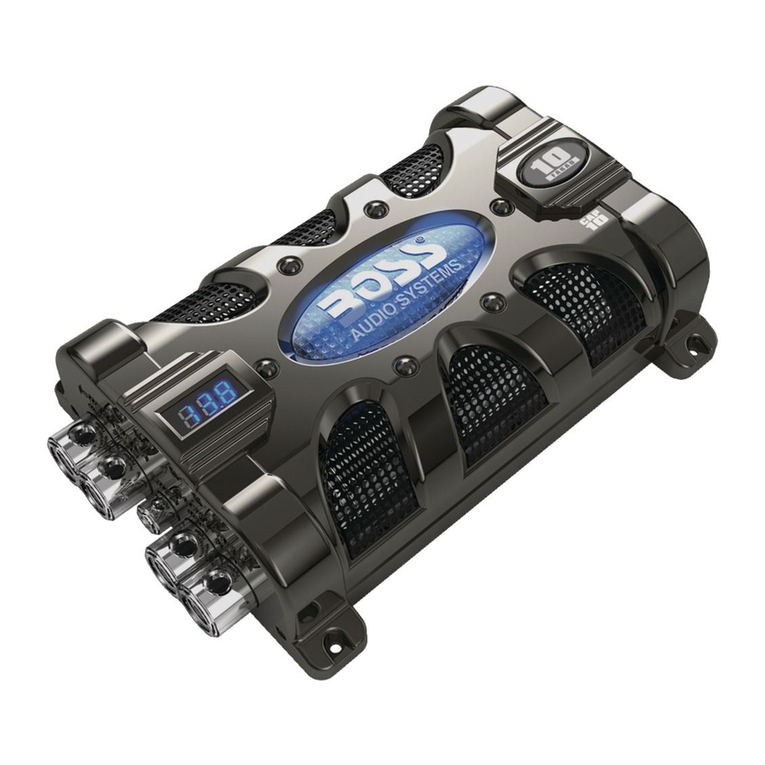
Boss Audio Systems CAP18 User manual

USER MANUAL
CAP18
FARAD | SUPER HYBRID
POWER CAPACITOR
CAP8
FARAD | SUPER HYBRID
POWER CAPACITOR
0522
BOSS Audio Systems
3451 Lunar Court • Oxnard, CA 93030
www.bossaudio.com
805-751-4853 Customer Service
Tech Support: www.bossaudio.com/support

Thank you for choosing our product!
Please read the instructions carefully so you will know how to operate your
product properly.
If there are any technical questions, please contact:
Customer care: (805) 751-4853 & Live chat
Online support: www.bossaudio.com/support
IMPORTANT
Please enter below the Serial No. which is located on the exterior of the product.
Retain this information for future reference.
Model No.
Serial No.
Date of Purchase

- 1 -
Table of Contents
Introduction.........................................................................................................................................................1
Package contents...............................................................................................................................................1
Features .............................................................................................................................................................2
Important ............................................................................................................................................................2
Product overview for CAP18 ..............................................................................................................................3
Product overview for CAP8 ................................................................................................................................3
Mounting.............................................................................................................................................................4
Important note about charging the capacitor......................................................................................................4
Electrical connection for CAP18.........................................................................................................................5
Electrical connection for CAP8...........................................................................................................................6
Charging the capacitor .......................................................................................................................................7
Discharging the capacitor...................................................................................................................................8
Troubleshooting..................................................................................................................................................8
Specications .....................................................................................................................................................9
Introduction
This power capacitor is an energy storage device. It is designed to supplement your car’s charging system
when your audio amplier places a high current demand upon it. This occurs, for example, when the music you
are playing contains a loud, transient, deep bass signal.
This product can discharge extremely rapidly on demand (e.g. from your amplier’s short bursts) to deliver the
current your car battery cannot produce. Thus, this enhances overall bass response of your car audio system.
In addition, this product can lter out audio noise caused by the AC voltage which is induced in the amplier’s
power supply. A 1 Farad (1F) capacitor works up to about 500 watts of amplier power.
This product also features a digital voltage display.
Package contents
When rst unpacking this product, please check that the package contains each of the items listed below. If
something is missing, contact the store where you purchased the product.
• 1 x Power capacitor
• 1 x Resistor (1 watt / 51 Ω)
• 2 x Power terminal connection sets
• 2 x Hex wrenches
• 4 x Screws
• User manual and warranty card

- 2 -
Features
This product features the following:
• Voltage meter with 3-digit blue LED display
• Voltage measurement accurate to +/- 0.1VDC
• Blue illuminated window with light following playing music
• Automatic sleep status when volume is low or there is no voltage variation present
• Audible warning tones for the followings: 1) reverse polarity connection, 2) low battery voltage,
and 3) voltage overload.
Important
Read and understand all instructions before you use your product. If you do not follow the instructions
in this manual, we are not responsible for any resulting personal injury or damage to property. This
will also void the warranty.
Important Safety Precautions
• Do not open or attempt to repair this product yourself. Dangerous high voltages are present which may
result in electric shock.
• To avoid risk of electronic shock or damage to the product, do not permit the product to become damp or
wet from water or other liquids. If this does occur, immediately unplug the power wires and send the product
to your local dealer or service center as soon as possible.
• In the event of smoke, strange noise or odor emitted from the product or any other abnormal operational
signs appearing on the product, disconnect the product from the power supply. Discontinue use and contact
your dealer or our technical support. Using the product in this condition may result in permanent damage
to the system.
• Servicing must only be carried out by a technician. Contact our technical support for any service question.
Installation Precautions
• WARNING: Always consult a professional installer.
• Installation must be performed by a professional. Contact our technical support for any installation question.
• Always wire the product to the power source (battery) through a fuse to prevent a short circuit and re.
• Before installation, disconnect the negative terminal of the vehicle battery to prevent damage to the product,
re, and/or possible injury.
• Never operate the product when it is not mounted. Make sure the product is securely mounted and all the
cables are securely connected to prevent damage, especially in an accident.
• Observe the safety and operating instructions of the devices which are connected to the product.
• Do not use any aggressive cleaning agents. Clean the product with a dry, ber-free cloth.
Environmental Care
Do not throw away the product with normal household waste at the end of its life. Follow your local laws when
disposing of electronic products. By doing this, you help preserve the environment.


- 3 -
Product overview for CAP18
1. 3-digit voltage display
2. Voltage Adjust (for only manufacture
use in voltage calibration)
3. Negative Input Terminal (-)
Connect to the chassis ground point
(vehicle’s metal frame).
4. Negative Output Terminal (-)
Connect to the negative/ground wire of
your amplier.
5. Remote Terminal
Connect to the remote wire of your
amplier for power on/off control.
6. Positive Input Terminal (+)
Connect to the positive power wire of
your car battery.
7. Positive Output Terminal (+)
Connect to the positive power wire of
your amplier.
8. Screw mounting hole
1
2
345678
Product overview for CAP8
1. 3-digit voltage display
2. Voltage Adjust (for only manufacture
use in voltage calibration)
3. Positive Terminal (+)
Connect to the positive power wire of
your car battery and amplier.
4. Remote Terminal
Connect to the remote wire of your
amplier for power on/off control.
5. Negative Terminal (-)
Connect to the chassis ground point
(vehicle’s metal frame).
6. Screw mounting hole
1
2
3456

- 4 -
Mounting
See the section “Installation Precautions” on page 2.
Before you drill or cut any holes, investigate your car’s layout very carefully. Take special care when
you work near the fuel tank, fuel lines, hydraulic lines and electrical wiring.
Mount the capacitor in the location away from moisture, and where connection cables are not
pinched or damaged by sharp objects.
1. Find a suitable location in the vehicle to mount the capacitor.
2. Secure the capacitor with four supplied screws as follows:
a. Use the four screw holes on the capacitor to mark the mounting holes on the mounting surface.
b. Drill the mounting holes on the mounting surface.
c. Place the capacitor in position, and attach the capacitor to the mounting surface using four screws.
Important note about charging the capacitor
This capacitor must be charged before connecting the power cable to the POSITIVE (+) terminal on the capacitor.
Failure to charge the capacitor will result in a large spark generated from the rapid inow of current which can
be very dangerous.
To charge the capacitor, see the section “ Charging the capacitor” on page 7.

- 5 -
Electrical connection for CAP18
See the section “Installation Precautions” on page 2.
For safety, disconnect the negative terminal of the vehicle battery prior to wiring.
For short-circuit protection, make sure a fuse (not included) is installed in line with the positive
battery terminal.
Make sure the ground wire is fastened on the ground point. Scrape away any paint, rust or dirt from
the ground point to provide a clean contact.
Use wires of proper gauge for connection. Consult an expert if in doubt about wire gauge selection.
Make sure wires are not squeezed or damaged by sharp edges. Securely connect all the cables and
properly insulate bare wires.
Reconnect the negative terminal of the vehicle battery only when all wire connections are correctly
and securely made.
Make all wiring connections as shown in the illustration below, but do not connect the power cable from the
positive battery terminal to the capacitor positive terminal.
Make the positive terminal connection only after charging the capacitor. See the section “Charging the
capacitor” on page 7.
Fuse/Fuse
Block
Distribution Block (+
+
)
Distribution Block (-
-
)
Head unit
Amplifier #2
Relay
Amplifier #1
Remote
Terminal
Remote
Terminal
Remote
Terminal
Amplifier Power
Terminals
Amplifier Power
Terminals
Chassis
Ground
Point
Chassis
Ground
Point
Car Battery
(12V)
Important!
Make this connection only after
charging the capacitor.
CAP18

- 6 -
Electrical connection for CAP8
See the section “Installation Precautions” on page 2.
For safety, disconnect the negative terminal of the vehicle battery prior to wiring.
For short-circuit protection, make sure a fuse (not included) is installed in line with the positive
battery terminal.
Make sure the ground wire is fastened on the ground point. Scrape away any paint, rust or dirt from
the ground point to provide a clean contact.
Use wires of proper gauge for connection. Consult an expert if in doubt about wire gauge selection.
Make sure wires are not squeezed or damaged by sharp edges. Securely connect all the cables and
properly insulate bare wires.
Reconnect the negative terminal of the vehicle battery only when all wire connections are correctly
and securely made.
Make all wiring connections as shown in the illustration below, but do not connect the power cable from the
positive battery terminal to the positive capacitor terminal.
Make the positive terminal connection only after charging the capacitor. See the section “Charging the
capacitor” on page 7.
Remote
Terminal
Amplifier Power
Terminals Chassis
Ground
Point
Distribution
Block (+
+
)
Distribution
Block (-
-
)
Chassis
Ground
Point
Remote
Terminal
Amplifier
Head unit Fuse/Fuse
Block
Important!
Make this connection only after
charging the capacitor.
CAP8
Car Battery
(12V)

- 7 -
Charging the capacitor
IMPORTANT!
You must charge the capacitor before connecting the power cable to the positive capacitor terminal. This can
prevent a large spark generated from the rapid inow of current, and eliminate the possibility of damaging the
capacitor, battery and other audio devices.
1. Make all connections except for the POSITIVE (+) terminal connection to the capacitor. See the section
“Electrical connection for CAP18” on page 5, or “Electrical connection for CAP8” on page 6.
Make sure the NEGATIVE (-) and REMOTE terminal connection are properly and securely made.
2. Connect one end of the supplied resistor to the power cable from the positive battery terminal, and the other
end to the POSITIVE (+) terminal on the capacitor.
Caution! During charging, the resistor will become hot. This is normal. Exercise caution for the hot resistor.
- The capacitor will start charging automatically. Charging generally takes 5 - 60 seconds.
- During charging, the voltage shown in the 3-digit display will rise rapidly, then slowly as it approaches the
voltage of your car battery. When fully charged, the displayed voltage will stop rising to show the voltage
of your car battery.
- To check with accuracy whether the capacitor is fully charged, measure the voltage of your car battery
using a voltmeter. If fully charged, the displayed voltage will match the car battery voltage.
3. After charging is complete, remove the resistor from the power cable and immediately connect the power
cable to the POSITIVE (+) terminal on the capacitor.
Put the resistor in a safe storage location for future use when you need to discharge the capacitor.
Remote
Terminal
Amplifier Power
Terminals
Distribution
Block (+
+
)
Distribution
Block (-
-
)
Amplifier
Car
Battery
Fuse/Fuse
Block
Supplied resistor
(1 watt/51 Ω)
Cable from battery
positive (+)
CAP8
CAP18
Cable from battery
positive (+)
Supplied resistor
(1 watt/51 Ω)
CAP8
(example only)

- 8 -
Discharging the capacitor
Discharge the capacitor before you store the capacitor.
IMPORTANT!
Never remove the capacitor without discharging the stored power. This can cause a dangerous electrical shock
even after disconnection.
1. Disconnect the cables from the capacitor in the following order:
a. Positive cable (from the POSITIVE terminal)
b. Ground cable (from the NEGATIVE terminal)
c. Remote cable (from the REMOTE terminal)
2. Connect one end of the supplied resistor to the POSITIVE (+) terminal, and the other end to the NEGATIVE
(-) terminal. After 1-5 minutes, the capacitor will be discharged (no sound from a buzzer can be heard).
Caution! During discharging, the resistor will become hot. This is normal. Exercise caution for the hot
resistor.
CAP8
(example only)
Supplied resistor
(1 watt/51 Ω)
Troubleshooting
If you have problems using this product, check the following points before you request service. If you still have
a problem, contact our technical support.
Problem Solution
Voltage display not turned on
when charging the capacitor
Check that the REMOTE terminal on the capacitor is properly and
securely connected to your amplier, and the amplier is turned on.
Capacitor not fully charged When fully charged, the displayed voltage will stop rising to show the
voltage of your car battery. To check with accuracy on full charge,
measure the voltage of your car battery using a voltmeter.

- 9 -
Specications
Power supply............................................... 12VDC
Working voltage........................................... 16VDC
Surge voltage .............................................. 24VDC
ESR (Equivalent series resistance)............. 0.004 Ω
Capacitance tolerance................................. ±10%
Capacitance (Microfarads) .......................... CAP18: 18,000,000 µF (18 Farad)
CAP8: 8,000,000 µF (8 Farad)
Weight ......................................................... CAP8: 4.6 lbs / 2.1 kg
CAP18: 7.1 lbs / 3.2 kg
Dimensions (W x D x H) .............................. CAP18: 10.9” x 7.8” x 3. 3” (27.5 x 19.7 x 8 mm)
CAP18: 9. 7” x 6.4” x 2.4” (24.5 x 16.2 x 6.2 mm)
Specications are subject to change without notice.
0622

USER MANUAL
CAP18
FARAD | SUPER HYBRID
POWER CAPACITOR
CAP8
FARAD | SUPER HYBRID
POWER CAPACITOR
0522
BOSS Audio Systems
3451 Lunar Court • Oxnard, CA 93030
www.bossaudio.com
805-751-4853 Customer Service
Tech Support: www.bossaudio.com/support
0622
Other manuals for CAP18
1
This manual suits for next models
1
Table of contents
Other Boss Audio Systems Automobile Accessories manuals

Boss Audio Systems
Boss Audio Systems BE7ACP-FT User manual

Boss Audio Systems
Boss Audio Systems CAP18 User manual

Boss Audio Systems
Boss Audio Systems ELITE ELPC40B User manual

Boss Audio Systems
Boss Audio Systems HIR70UG User manual

Boss Audio Systems
Boss Audio Systems BV430RVM User manual

Boss Audio Systems
Boss Audio Systems BVR4.3RM User manual

Boss Audio Systems
Boss Audio Systems BV435WTR User manual

Boss Audio Systems
Boss Audio Systems BPRZRD User manual