Boss Audio Systems MGR350B User manual

BLUETOOTH®ENABLED
GAUGE HOLE RADIO
MGR350B
USER MANUAL
FEATURING ZERO
STANDBY CURRENT DRAIN
QUICK INSTALLATION GUIDE

The Bluetooth® word mark and logos are registered trademarks
RZQHGE\%OXHWRRWK6,*,QFDQGDQ\XVHRIVXFKPDUNVLVXQGHU
OLFHQVH2WKHUWUDGHPDUNVDQGWUDGHQDPHVDUHWKRVHRIWKHLU
respective owners.
Thank you for purchasing this
MGR350B Bluetooth Gauge Hole Radio
Please read thorough these instructions
FDUHIXOO\VR\RXZLOONQRZKRZWRRSHUDWH
your model properly.
$IWHU\RXKDYH¿QLVKHGUHDGLQJWKHLQVWUXFWLRQV
NHHSWKLVGRFXPHQWLQDVDIHSODFH
IRUIXWXUHUHIHUHQFH
INFORMATION TO THE USER
MGR350B
(1pc)
Hexagon Mounting Studs
(2pcs)
M4 Secure Nuts
(8pcs)
User Manual
(1pc)
Metal Bracket
(1pc)
BAND
SRC
FUNC
MENU
ENTER
DISP
VOL VOL
50w x4
USB
Warranty Card
(1pc)
Facebook Card
(1pc)
Thank You Card
(1pc)
THIS PACKAGE CONTAINS

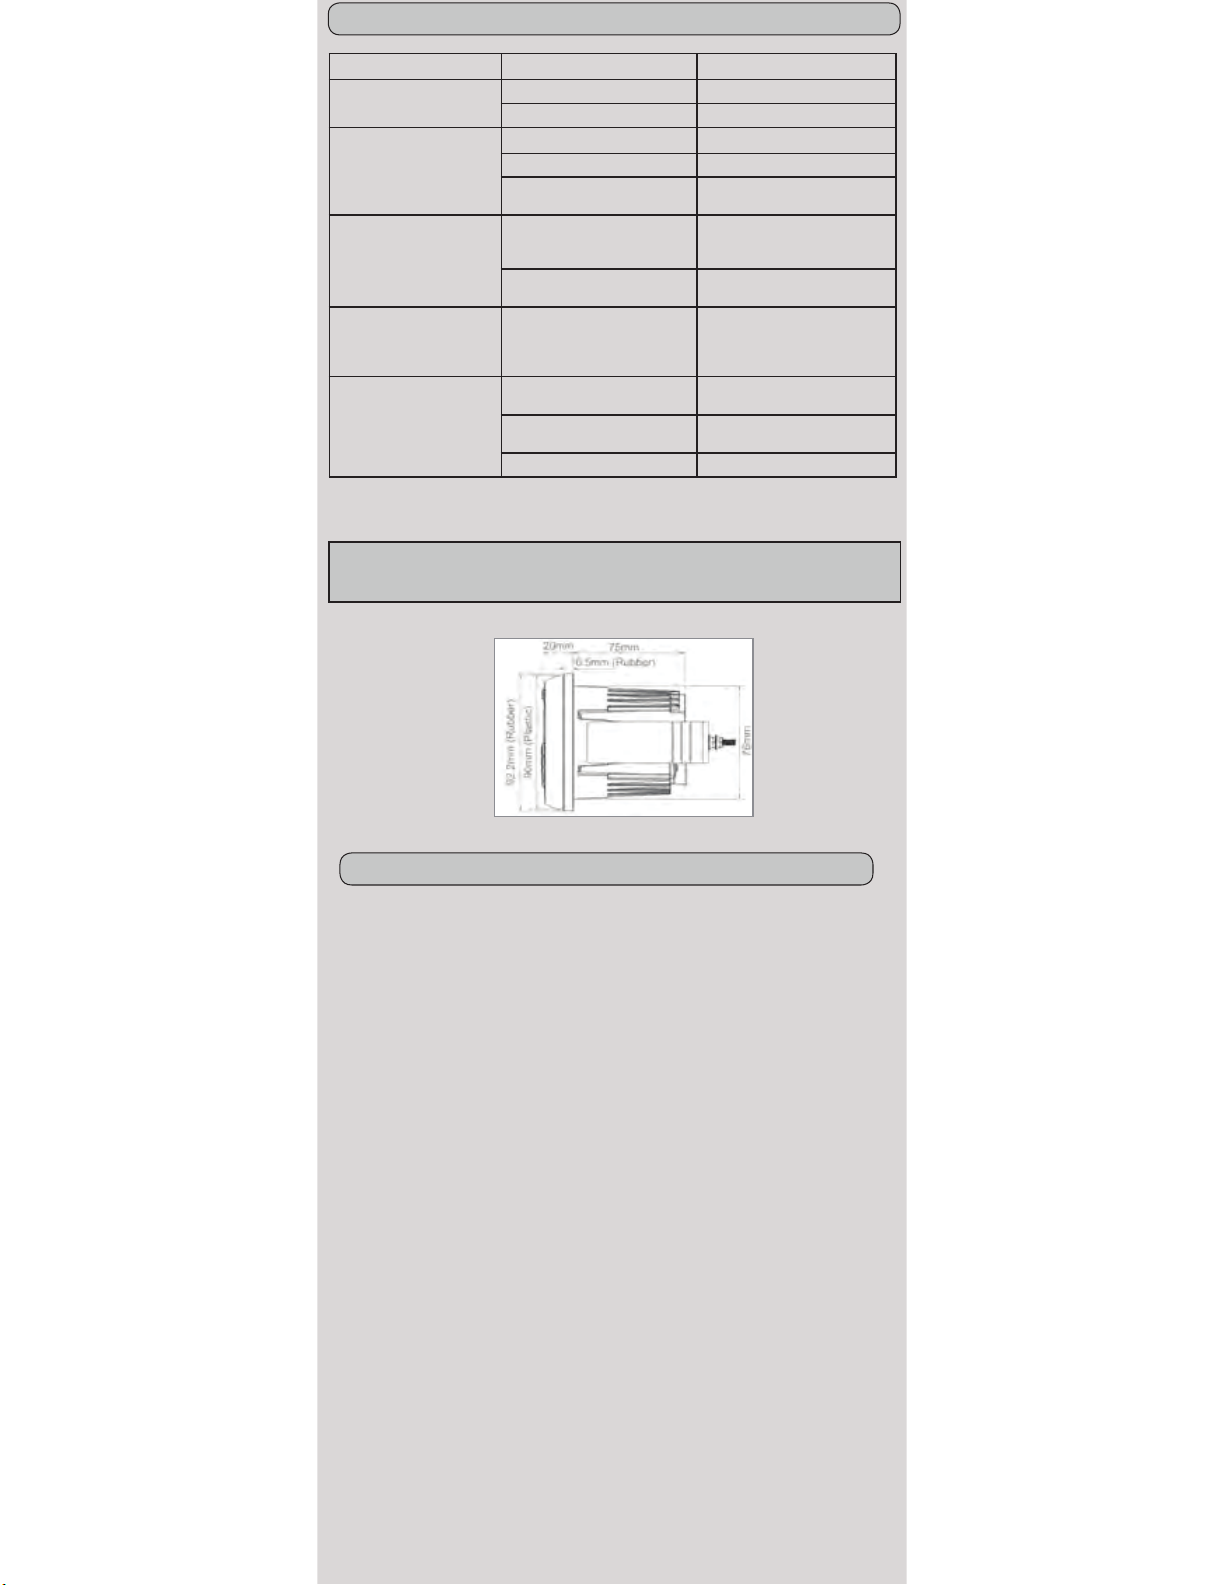
Make the mounting hole size as follows
3.00” / 76mm
1
2
Snap off break-away tabs to best fit
your applications depth
Slip the unit through the hole cutout and into U-bracket
4
Install studs mounts into rear of chassis
5
3Adjust M4 nuts for the best mounting depth
Firmly tighten remaining M4 nuts
6Secure and waterproof the wiring
BEFORE YOU START
IMPORTANT SAFETY PRECAUTIONS
BE SURE TO OBSERVE THE FOLLOWING GUIDELINES:
Do not turn up the volume so high that you can’t hear what’s
around you.
Use caution or temporarily discontinue use in potentially
hazardous situations.
Do not operate mobile video equipment while driving a motorized
YHKLFOH±VDIHGULYLQJDQGVDIHW\FRQVLGHUDWLRQRIRWKHUVVKRXOG
always be your highest priority.
6HW\RXUYROXPHFRQWURODWDORZVHWWLQJWKHQVORZO\LQFUHDVHWKH
VRXQGXQWLO\RXFDQKHDULWFRPIRUWDEO\ZLWKRXWGLVWRUWLRQRUHDU
GLVFRPIRUW
,QWKHHYHQW\RXVKRXOGQRWLFHVPRNHVWUDQJHQRLVHVRURGRUIURP
WKLVSURGXFWRUDQ\RWKHUDEQRUPDOVLJQVLPPHGLDWHO\WXUQRIIWKH
power and consult your dealer or the nearest authorized
BOSS AUDIO Service Center Using this product in this condition
may result in permanent damage to the system.
WIRE DIAGRAM
SUGGESTED MOUNTING METHODS
White
Red
Yellow
Aux-In Left
Right
Black
Rear Line Out White
Red
Left
Right
Antenna
Fuse Box
Left Rear Speaker (+) Green
15A
Left Rear Speaker (-) Green/Black
Left Front Speaker (+) White
Left Front Speaker (-) White/Black
Right Front Speaker (+) Gray
Right Front Speaker (-) Gray/Black
Right Rear Speaker (+) Purple
Right Rear Speaker (-) Purple/Black
Accessory (+12V) Red
Ground (-) Black
Battery (+12V) Yellow
Amp Remote (+12V) Blue
1A
CHARGING MAX
Replace Fuse
with AGU
type only
BATTERY
20A
Fuse and Fuse Holder
(not included)
Chassis
ground
point
Battery Kill Switch
(not included)
OPTIONAL DIRECT BATTERY WIRING CIRCUIT
BLACK
Chassis
ground
point
Ground wire
Metal frame
Recommended
12 ~ 14ga
Primary Wire
(not included)
15A
INSERT
USB
YOUR
USB CABLE
YOUR
ANTENNA
C
NO
Normally open
ACC switch
(not included)
Grey
Subwoofer
Front Line Out White
Red
Left
Right
To avoid potential shorts in the electrical
V\VWHPEHVXUHWRGLVFRQQHFWWKH±
EDWWHU\FDEOHEHIRUHLQVWDOODWLRQ8VHWKLV
unit with a 12-Volt battery and negative
grounding only. Failure to do so may result
LQD¿UHRUPDOIXQFWLRQ
:KHQUHSODFLQJWKHIXVHEHVXUHWRRQO\XVHD
IXVHRIWKHUDWLQJVSHFL¿HGRQWKLVSURGXFW7R
DYRLGVKRUWFLUFXLWLQJFRYHUDQ\GLVFRQQHFWHG
leads with insulating tape. It is specially impor-
WDQWWRLQVXODWHDQ\XQXVHGZLUHVZKLFKLIOHIWXQFRYHUHGPD\FDXVHD
VKRUWFLUFXLW:KHQFRQQHFWLQJRWKHUGHYLFHVWRWKLVSURGXFWUHIHUWR
WKHPDQXDOIRUWKHSURGXFWWREHFRQQHFWHG7KHEODFNFDEOHLVJURXQG
PDNHVXUHWRFRQQHFWWKHJURXQGZLUH¿UVW
(QVXUHWKDWWKHJURXQGFDEOHLVSURSHUO\FRQQHFWHGWRPHWDOSDUWVRI
WKHYHKLFOHVERG\IUDPHRUGLUHFWWRWKHEDWWHU\LI\RXUYHKLFOHGRHVQRW
KDYHDJURXQGHGFKDVVLVIUDPH7KHJURXQGFDEOHRIWKLVXQLWVSRZHU
DPSDQGDVHFRQGSRZHUHGV\VWHPPXVWEHFRQQHFWHGWRWKHIUDPH
VHSDUDWHO\ZLWKGLIIHUHQWVFUHZV,IWKHVFUHZIRUWKHJURXQGZLUH
ORRVHQVRUIDOOVRXWLWFRXOGUHVXOWLQ¿UHRUPDOIXQFWLRQ
CAUTION!!
Do not ground or short the speaker leads
1
32
INSTALLATION PRECAUTIONS
Always consult with a professional installer
'RQRWDWWHPSWWRLQVWDOORUVHUYLFHWKLVSURGXFWE\\RXUVHOI
,QVWDOODWLRQRUVHUYLFLQJRIWKLVSURGXFWE\SHUVRQVZLWKRXW
SURIHVVLRQDOWUDLQLQJDQGH[SHULHQFHLQHOHFWURQLFHTXLSPHQWDQGPR-
WRUL]HGYHKLFOHDFFHVVRULHVPD\EHGDQJHURXVDQGFRXOGH[SRVH\RX
WRWKHULVNRIHOHFWULFVKRFNLQMXU\RURWKHUKD]DUGV
5HIHUDQ\UHSDLUVWRDTXDOL¿HGBOSS AUDIO SYSTEMS Service
Center
The MGR350B should be wired directly to a vehicles battery
:KHQZLULQJGLUHFWO\WRWKHYHKLFOHVEDWWHU\EHVXUHWRGLVFRQQHFW
WKHEDWWHULHVQHJDWLYHWHUPLQDOZLUHEHIRUHVWDUWLQJDQ\ZLULQJ
SURFHGXUHVLIH[WHQGLQJWKHPDLQSRZHUSULPDU\ZLUHLWLV
VXJJHVWHGWKDWDQRSWLRQDOIXVHDQGIXVHKROGHUQRWLQFOXGHGZLWK
PLQLPXPUDWLQJRI$PSHUHVEHLQOLQHZLWKWKHSRVLWLYHEDWWHU\
terminal
7KHJURXQGFDEOHOHQJWKVKRXOGEHDVVKRUWDVSRVVLEOHLI
H[WHQGLQJIURP\RXEDWWHU\EHVXUHWRXVHDSURSHUJDXJHUDWLQJIRU
WKHOHQJWKRIWKHUXQXVHRQO\KLJKTXDOLW\FRSSHUSULPDU\W\SHZLUH
7KH0*5%KDVD,3;ZHDWKHUUHVLVWDQWGHVLJQLWVKRXOGQRWEH
submerged in or under water under any circumstances
Do not use abrasive cleaning materials on the lens or bezel
Use only the installation parts provided with the MGR350B
TOOLS NEEDED:
- Measuring Tape / Ruler
- Wrench and/or Pliers
- Hole Saw
- Crimp Tool
CAUTION!!
Using other mounting methods may void
this warranty
FOR CHARGING ONLY: Cell Phone and iPod
0HGLD3OD\EDFN1RW6XSSRUWHG

GETTING STARTED
Tuner/Weather Band Mode: Press to enter into the Manual Seek mode,
press and hold to enter into the Auto Seek mode.
Media Playback Mode: Press to TrackUp Down press and hold for
FastForward/Rewind.
/,
Short press to mute or restore volume.
Turn the unit on, Press and hold again to turn the unit off.
Press to pause, Press again to resume playback.
Press to scroll and select available Source.
Press to decrease the volume, press to increase the volume.
Press and hold to enter into the Tuner Function modes:
A-STORE / M-STORE / LOCAL / AREA / RDS / AF / TA / PTY
SRC
PRESET
Fn
Tuner Mode: To change different Band. Press and hold to
access into Auto Store mode, the strongest stations of the selected band
will be saved in preset channel automatically.
Media Playback Mode: Press to access into search Folder/File music mode
Returns to the previous item
/Weather Band
.
.
Tuner Mode: Press to view RDS receiver information.
Media Playback: Press to view ID3 information.
BAND
DISP
ENTER
AUDIO
VOL
VOL
VOL VOL
MENU
Press to scroll and select Presets 1 ~ 6
FM1, FM2, AM1, WB1
Press to access into the Audio Menu mode for adjustments:
EQ / XBASS / BASS / MIDDLE / TREBLE / BALANCE / FADER /
REAROUT / SUBW / SUBW LPF / SUBW LEVEL
Press and hold to access into the System Menu:
BT RECONNECT / BEEP ON/OFF / ABOUT / RESET
MY SONGS
SUBW
BT
A
OPERATION QUICK START GUIDE \ \ \ \ \ \ \ \ \
TITLE
SUBW
USB
SUBW
AUX-IN
P6 10350
SUBW
LOCAL
RADIO
SOURCE MODES
$OOULJKWVUHVHUYHG1RSDUWRIWKLVSXEOLFDWLRQPD\EHUHSURGXFHGGLVWULEXWHGRUWUDQVPLWWHGLQDQ\
IRUPRUE\DQ\PHDQVLQFOXGLQJSKRWRFRS\LQJUHFRUGLQJRURWKHUHOHFWURQLFRUPHFKDQLFDOPHWKRGV
ZLWKRXWWKHSULRUZULWWHQSHUPLVVLRQRI%266$8',26<67(06,QF

TUNER SETUP
B
Turn On or Off the RDS function.
RDS On/Off
Media Playback
Mode
Tuner Mode
Selectable settings
Selectable settings
This function allows you to play tracks/songs from the
current album, songs or artists in a random order.
When a desired radio station is set, press M-STORE to save
it in the memory, you can store a total of 12 FM or 6 AM.
Repeat
Auto Store
Random
On/Off
Manual Store
Local On/Off
ALL:
Song:
to repeat all tracks on the storage media
the current track will be repeated
Folder: repeats all tracks in the current folder
Press to access into A-STORE mode, the strongest
stations of the selected band will be saved in FM 1 or
FM 2, AM 1 BAND presets automatically
ON:
OFF:
only stations with strong signal can be broadcast.
The Local indicator will light up
Stations of both strong and weak signals can be
broadcast.
Area Select suitable country area for this unit:
USA / EUROPE / ASIA / AUST
ON: The unit will search for another station with stronger
signal, but with the same program identification as the
current station automatically.
OFF: Turn off AF function
ON: When there is traffic announcement, unit will
automatically switch to the tuner mode (regardless of the
current mode) and begins to broadcast the announcement
on traffic conditions. When the traffic announcement is
over, unit will automatically return to the previous mode.
OFF: Traffic announcement does not cut in.
AF On/off
TA On/off
Once inside the PTY mode, press the get into program type
item, and rotat encoder volume knob to selected category.
PTY
Available Program Type:
POPM;ROCKM;EASYM;LIGHTM;CLASSICS;
OTHER M; JAZZ M; COUNTRY; NATION M; OLDIES
M; FOLK M; A-TEST; ALARM; NEWS; AFFAIRS; INFO;
SPORT; EDUCATE; DRAMA; CULTURE; SCIENCE;
VARIED; WEATHER; FINANCE; CHILDREN; SOCIAL;
RELIGION; PHONE IN; TRAVEL; LEISURE; DOCUMENT
VOL
VOL
123 4
ENTER
DISP
BAND
Long Press for
FUNCTION options
Fn
PRESET
Navigate Main
System Tree
To select through
FUNCTION options
Press ENTER
to select option
Exit
ENTER
DISP
Fn
PRESET
PRESET AUTO STORE 1 ~ 6
PRESET RECALL
Fn
PRESET
Short Press
Long Press
ENTER
DISP
ENTER
DISP
VOL
VOL
VOL
VOL
ENTER
DISP
VOL
VOL
ENTER
DISP
ENTER
DISP
ENTER
DISP
VOL
VOL
VOL
VOL
VOL
VOL
VOL
VOL
ENTER
DISP
ENTER
DISP
MORE SETTINGS
FM1 / FM2 / AM1 / WB1

AUDIO
xBass On/Off
MID Level
Treble Level
Balance Level
Fader Level
AUDIO
Short Press
VOL
VOL
VOL
VOL
VOL
VOL
VOL
VOL
VOL
VOL
VOL
VOL
AUDIO
Long Press
ENTER
DISP
VOL
VOL
ENTER
DISP
ENTER
DISP
EQ
BASS Level
SYSTEM
AUDIO
VOL
VOL
Subwoofer Settings
ENTER
DISP
VOL
VOL
VOL
VOL
ENTER
DISP
AUDIO and SYSTEM SETUP
C
VOL
VOL
123 4
Item Selectable settings
This feature allows to Reconnect or Disconnect to the
paired mobile phone or Bluetooth device manually.
Turn On or Off beep sound.
To restore the factory defult settings.
To view the device hardward and software versions.
BT
BEEP
RESET
ABOUT
ENTER
DISP
BAND
Long Press for
MAIN MENU options
MENU
AUDIO
Navigate Main
MENU Tree
To select through
MENU options
Press ENTER
to select option
Exit
7RDYRLGEDWWHU\H[KDXVWLRQEHVXUHWRUXQWKH
vehicles engine while using this product.
Using this product without running the engine can drain the battery.
Tips:

BLUETOOTH OPERATION
PAIRING & DISCOVERING A NEW BLUETOOTH CONNECTION
3RZHURQWKH0*5%E\SUHVVLQJDQGKROGLQJGRZQWKH3RZHU EXWWRQIRUVHFRQGWKH%OXHWRRWK,&21
ZLOOVWDUWWRÀDVKVLJQDOOLQJWKDWWKH0*5%LVQRZUHDG\IRU%OXHWRRWKSDLULQJ
NOTE:<RXKDYHPLQXWHVEHIRUH\RXPXVWUHVWDUWWKLVSURFHGXUHRYHUDJDLQ
1RZWKDWWKH0*5%LVLQSDLULQJPRGH
ANDROID users:
D*RLQWRWKH6HWWLQJV0HQXRI\RXU$1'52,'GHYLFH
b. Enter the Bluetooth Menu and press SCAN
G,ISURPSWHGHQWHUSDVVFRGH³´
iOS users:
D*RLQWRWKH6HWWLQJV0HQXRI\RXUL26GHYLFH
b. Enter the Bluetooth Menu
G,ISURPSWHGHQWHUSDVVFRGH³´
,IWKH0*5%LVQRWVHHQUHSHDWWKHDERYHVWHSVWRUHIUHVKWKH³'HYLFH/LVW´
:KHQWKH%7FRQQHFWLRQLVVXFFHVVIXO\RXZLOOVHH%7&211(&7('PHVVDJHRQWKHMGR350B LCD GLVSOD\\RX
DUHQRZUHDG\WRVWUHDPPXVLFIURP\RXUGHYLFHVIDYRULWHPHGLDSOD\HUWRWKHMGR350B
RECONNECTION
3RZHURQWKHMGR350B and your last paired device Bluetooth
7KHXQLWZLOOQRZDXWRPDWLFDOO\EHUHFRQQHFWHG
,I\RXUGHYLFHZDVSUHYLRXVO\SDLUHGZLWKWKHMGR350BEXWLWZDVQ¶WWKHODVWSDLUHGGHYLFH
a. Ensure no other devices are currently paired
b. Press and hold MENU button to manually connect / reconnect to the MGR350B
,IWKHGHYLFHLVRXWRIUDQJHIURPWKHMGR350BLWZLOOGLVFRQQHFWDXWRPDWLFDOO\
7KHMGR350BZLOOUHFRQQHFWWRWKHGHYLFHRQFHLQUDQJHDFRQ¿UPDWLRQPHVVDJHZLOOEHGLVSOD\HGRQWKH/&'
RADIO OPERATION
3UHVVWKH65&EXWWRQWRVHOHFW5$',2
3UHVV WR087(SUHVVDJDLQWR81087(
7RDGYDQFHVWDWLRQVSUHVV
7RVNLSSUHYLRXVVWDWLRQVSUHVV
3ress the
ENTER
DISP
EXWWRQWRGLVSOD\5$',2LQIRUPDWLRQ
3UHVVWKH35(6(7EXWWRQWRUHFDOO35(6(76a
P6 10350
SUBW
LOCAL
RADIO
BT
SUBW
SYSTEM
D
E
MY SONGS
SUBW
BT
c. “BOSS MGR350” will now be displayed
c. “BOSS MGR350” will now be display under AVAILABLE DEVICES

BLUETOOTH STREAMING MUSIC
AUX-INPUT
3UHVVWKH65&EXWWRQWRVHOHFW%7$8',2
3UHVV WRVWDUW3/$<SUHVVDJDLQWR3$86(
7RVNLSVRQJVRUDGYDQFHWUDFNVSUHVV SUHVVDQGKROGWR)$67)25:$5'
7RVHOHFWWKHSUHYLRXVWUDFNSUHVVWKHEXWWRQ SUHVVDQGKROGWR)$675(:,1'
3ress the
ENTER
DISP
EXWWRQWRGLVSOD\VRQJ,'LQIRUPDWLRQ
3UHVVWKH65&EXWWRQWRVHOHFW$8;,1
3UHVV WR087(SUHVVDJDLQWR81087( (QVXUHWRDGMXVWWKHOHYHORI\RXU
devices master volume to 75%
Tips:
USB OPERATION
3UHVVWKH65&EXWWRQWRVHOHFW86%
3UHVV WRVWDUW3/$<SUHVVDJDLQWR3$86(
7RVNLSVRQJVRUDGYDQFHWUDFNVSUHVV SUHVVDQGKROGWR)$67)25:$5'
7RVHOHFWWKHSUHYLRXVWUDFNSUHVV SUHVVDQGKROGWR)$675(:,1'
3ress the
ENTER
DISP
EXWWRQWRGLVSOD\VRQJ,'LQIRUPDWLRQ
MY SONGS
SUBW
BT
TITLE
SUBW
USB
SUBW
AUX-IN
F
G
H

TROUBLE SHOOTING GUIDE
1-805-751-4853
www.bossaudio.com/support
TECHNICAL SUPPORT
TROUBLE CAUSE SOLUTION
Unit will not turn on
The fuse is blown Check / replace the fuse
Ignition not engaged Turn ignition to on position
No sound is heard
Blown speaker Replace faulty speaker
Volume is low / muted Press the volume level up
Device is paused or muted
Check your devices playing /
volume status
Cannot pair Bluetooth
The Bluetooth function of the
device is not enabled
Refer to the user manual of the
device for how to enable the
Bluetooth function
The MGR350B BT memory
is full
Follow how to reconnect a
device in section E
The audio quality is poor
after connection with a
Bluetooth enabled device The Bluetooth reception is poor
Move the device closer to the
audio system or remove any
obstacle between the device
and the systems antenna
Unit has become
unresponsive
Power glitch or interference
Disconnect power for
10 seconds to reset
Low battery power
Charge battery, run the engine
to recharge the battery
Reset the main system Follow steps in section B
FM TUNER FREQUENCY RANGE
86$a0+]
Europe 87.5~108MHz
Asia 87.5~108MHz
Australia 87.5~108MHz
8VDEOH6HQVLWLYLW\G%61 G%
Bands: 2
AM TUNER FREQUENCY RANGE
USA 530~1710KHz
Europe 522~1620KHz
Asia 522~1620KHz
Australia 522~1620KHz
8VDEOH6HQVLWLYLW\G%61 G%
Bands: 1
WEATHER BAND SELECTION
CH.1 162.400MHz
CH.2 162.425MHz
CH.3 162.450MHz
CH.4 162.475MHz
CH.5 162.500MHz
CH.6 162.525MHz
CH.7 162.550MHz
Bands: 1
BLUETOOTH
BT: 3.0
%75DQJH)W0&ODVV
%73UR¿OHV$'3$95&3
USB DRIVE MEDIA SUPPORTED
MP3
WMA
6RQJV
32GB / FAT 32
USB 2.0 High Speed
USB Output Voltage: 5VDC @ 1A
INTEGRATED AMPLIFIER
MOSFET
MAX Continuous Output: 240W
$OOFKDQQHOVGULYHQ
PEAK Power Rating: 60W / channel
RMS Total Power Output: 80W
Channels: 4
Class: AB
Frequency Response: 20-20kHz
VWDEOH
CHASSIS
Button Backlight Illumination: BLUE LED
F/R/S RCA Preamp Output: 2VRMS
5&$,QSXW,PSHGDQFHN
/&'717\SH$FWLYH0DWUL[
GENERAL
Power Source: 14.4VDC
9a9DOORZDEOH
Grounding System: Negative type
0D[LPXP&XUUHQW&RQVXPSWLRQ$
ZD\SURWHFWLRQFLUFXLWU\WKHUPDO
RYHUORDGDQGVSHDNHUVKRUWSURWHFWLRQ
Unit Weight: 1.08lbs / 0.52kg
Storage Temperature:
-22oF to 176oF / -30oC to 80oC
Operation Temperature:
-4oF to 158oF / -20oC to 70oC
Replacement Fuse: 15A
5HSODFHZLWK$7*)XVH7\SH2QO\
SPECIFICATIONS
6SHFL¿FDWLRQVVXEMHFWWRFKDQJHZLWKRXWQRWLFH

!! WARNING !!
ADJUSTMENT OR ALTERATIONS OF THIS DEVICE MAY
RESULT IN HAZARDOUS RADIATION EXPOSURE.
7KLVGHYLFHFRPSOLHVZLWKSDUWRIWKH)&&5XOHV2SHUDWLRQLV
VXEMHFWWRWKHIROORZLQJWZRFRQGLWLRQV
WKLVGHYLFHPD\QRWFDXVHLQWHUIHUHQFHDQG
WKLVGHYLFHPXVWDFFHSWDQ\LQWHUIHUHQFHLQFOXGLQJLQWHUIHUHQFH
WKDWPD\FDXVHXQGHVLUHGRSHUDWLRQRIWKLVGHYLFH
This transmitter must not be co-located or operated in conjunction
with any other antenna or transmitter. The Bluetooth antenna cannot
EHUHPRYHGRUUHSODFHGE\XVHU7KLVHTXLSPHQWFRPSOLHVZLWK
)&&,&UDGLDWLRQH[SRVXUHOLPLWVVHWIRUWKIRUDQXQFRQWUROOHG
HQYLURQPHQWDQGPHHWVWKH)&&UDGLRIUHTXHQF\5)([SRVXUH
*XLGHOLQHVDQG566RIWKH,&UDGLRIUHTXHQF\5)([SRVXUH
UXOHV7KLVHTXLSPHQWKDVYHU\ORZOHYHOVRI5)HQHUJ\WKDWLW
GHHPHGWRFRPSO\ZLWKRXWPD[LPXPSHUPLVVLYHH[SRVXUH
HYDOXDWLRQ03(%XWLWLVGHVLUDEOHWKDWLWVKRXOGEHLQVWDOOHGDQG
RSHUDWHGNHHSLQJWKHUDGLDWRUDWOHDVWFPRUPRUHDZD\IURP
SHUVRQ¶VERG\H[FOXGLQJH[WUHPLWLHVKDQGVZULVWVIHHWDQG
DQNOHV$OWHUDWLRQRUPRGL¿FDWLRQVFDUULHGRXWZLWKRXWDSSURSULDWH
authorization may invalidate the user’s right to operate the
equipment.
NOTE: 7KLVHTXLSPHQWKDVEHHQWHVWHGDQGIRXQGWRFRPSO\ZLWK
WKHOLPLWVIRUD&ODVV%GLJLWDOGHYLFHSXUVXDQWWR3DUWRIWKH)&&
Rules. These limits are designed to provide reasonable protection
DJDLQVWKDUPIXOLQWHUIHUHQFHLQDUHVLGHQWLDOLQVWDOODWLRQ7KLV
HTXLSPHQWJHQHUDWHVXVHVDQGFDQUDGLDWHUDGLRIUHTXHQF\HQHUJ\
DQGLIQRWLQVWDOOHGDQGXVHGLQDFFRUGDQFHZLWKWKHLQVWUXFWLRQV
PD\FDXVHKDUPIXOLQWHUIHUHQFHWRUDGLRFRPPXQLFDWLRQV+RZHYHU
WKHUHLVQRJXDUDQWHHWKDWLQWHUIHUHQFHZLOOQRWRFFXULQDSDUWLFXODU
LQVWDOODWLRQ,IWKLVHTXLSPHQWGRHVFDXVHKDUPIXOLQWHUIHUHQFHWR
UDGLRRUWHOHYLVLRQUHFHSWLRQZKLFKFDQEHGHWHUPLQHGE\WXUQLQJ
WKHHTXLSPHQWRIIDQGRQWKHXVHULVHQFRXUDJHGWRWU\WRFRUUHFW
WKHLQWHUIHUHQFHE\RQHRUPRUHRIWKHIROORZLQJPHDVXUHV
Relocate or reorient the receiving antenna.
Increase the separation between the equipment and receiver.
&RQQHFWWKHHTXLSPHQWLQWRDQRXWOHWRQDFLUFXLWGLIIHUHQWIURP
that to which the receiver is connected.
&RQVXOWWKHGHDOHURUDQH[SHULHQFHGUDGLR79WHFKQLFLDQIRUKHOS
FCC COMPLIANCE STATEMENT

MGR350B
USER MANUAL
QUICK INSTALLATION GUIDE
BLUETOOTH®GAUGE HOLE RADIO
PRINTED IN CHINAVER:1.0 EN0215
BOSS Audio Systems
/XQDU&RXUW2[QDUG&$
www.bossaudio.com
Tech Support: www.bossaudio.com/support
iPod® and iPhone®DUHUHJLVWHUHGWUDGHPDUNVRI$SSOH,QF
registered in the USA and other countries.
%266$XGLR6\VWHPVLVQRWDI¿OLDWHGZLWK$SSOH,QF
Copyright © 2015
805 322 8794

THANK YOU
from
BOSS
AUDIO
SYSTEMS
FOR YOUR PURCHASE
There's a reason
we
have
been
a
leader
and
innovator
in
the
business since 1987.
Our
goal
is
for
you
to
be
completely
satisfied
with
your
purchase.
If
for
any reason
you
are unsatisfied, please
let
us
be
the
first
to
know.
Contact
our
Customer
Care
dept.
at
805.988.0192
WE
WANT
YOUR POSITIVE FEEDBACK
AND
REVIEWS!
www.bossaudio.com
1115

!O~S
AUDIO SYSTEMS

EIO~S
AUDIO SYSTEMS
3451
Lunar
Court
Oxnard, CA 93030
~
PLACE
I
P~STAGE
I
HERE
L___

IO~S
AUDIO SYSTEMS
LIMITED
WARRANTY
This
product
has
a manufacturer's warranty against defects
in
materials and workmanship
to
the
original purchaser
for
a period
of
one
year
from
the
date-of-purchase
(DOP).
This manufacturer warranty
is
non-transferable. The warranty
is
for
repair or replacement at the
sole discretion
of
BOSS
AUDIO
SYSTEMS
(BAS).
For
service under this warranty you need
to
return
the
product
to
BAS.
If
replaced,
BAS
reserves
the
right
to
replace
it
with
a new or reconditioned
product
of
the
same
or
similar design.
Your
product
may
qualify
for
a free extended warranty.
Please
see
www.bossaudio.com
for
the qualifications and details
of
this program.
Obtain Warranty Service
Within
the
first
30
days
from
the
original
DOP,
BAS
will
provide a return shipping label
for
any defective
product
shipped
from
within
the
50
US
States. After the first
30
days
you
are
responsible
for
the
freight charges incurred
to
send the
product
back
to
BAS.
To
send a
product
in
for
warranty service you
will
need
the
following:
• A Return Authorization number
(RA#).
Please
contact
our
Technical Support
Team
to
receive a
RA#.
• A legible copy
of
the
proof-of-purchase
with
your name,
the
name
of
the authorized dealer,
the
DOP and the model number
of
the
product
requiring service.
• Enclose a
note
stating the problem or
issues
with
the product, your daytime phone number, email and return shipping address
(within
the
USA,
no
P.O.
Box
please).
This warranty does
not
cover any product subjected
to
abuse,
neglect, incorrect wiring, water
or
physical damage or any
attempt
to
repair
or
modify
the
product
by anyone
other
than
an
BAS
Repair Technician. Any damages, resulting
from
legal action
for
breach
of
expressed or implied warranty shall
be
limited
to
the cost
of
the
original purchase price
of
the
product. All liability
for
coincidental
damages
are
excluded under this warranty. The Customer
agrees
to
retain the original proof-of-purchase
for
establishing
the
effective
date
of
this warranty.
If
BAS
or
an
Authorized Dealer replace your
product
under warranty, the replacement
product
shall
be
considered
a transaction under the original warranty, and does
not
extend
the
original warranty period.
FOLD
HERE
To
register this product fill-in this form and mail this card
to
the address shown on
the
reverse side.
For
online registration,
see
reverse side
of
this card for instructions.
NAME
AGE
ADDRESS
CITY
STATE
ZIP
E-MAIL
PHONE
MODEL NO.
DATE
OF
PURCHASE PURCHASE
PRICE
PURCHASED
FROM
INSTALLED
BY
SERIAL
NUMBER
{If applicable)
VEHICLE:
YEAR,
MAKE
AND MODEL
1115
Other manuals for MGR350B
3
Table of contents