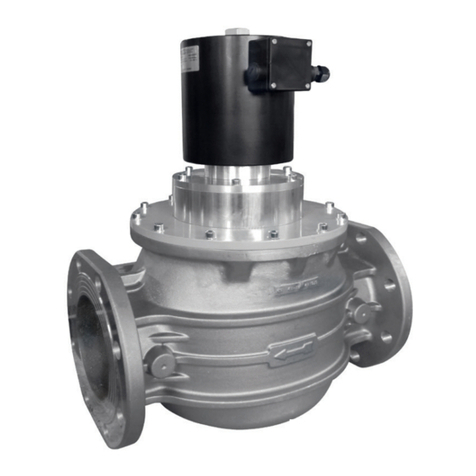
BOSSCO 355AA DN15 User manual

AUTOMATIC NORMALLY CLOSED SOLENOID VALVE FOR GAS
355AA
DN 15 - DN 20 - DN 25
CE-51CT4873/ED05
CE-51CM4100/ED05
MADE IN ITALY
EN
EC approval according to EN 161, compliant with Regulation (EU) 2016/426

2
EN
INDEX
pag.
English ........................................................................................................................................................ 3
Drawings...................................................................................................................................................... 14
Dimensions (table 1) ..................................................................................................................................... 16
Spare coils and connectors (table 2) ............................................................................................................... 17
SIL Level (table 3) ......................................................................................................................................... 18
Diagram ....................................................................................................................................................... 19

3
EN
1.0 GENERAL INFORMATION
This manual shows you how to safely install, operate and use the device.
The instructions for use ALWAYS need to be available in the facility where the device is installed.
ATTENTION: installation/wiring/maintenance need to be carried out by qualified staff (as explained
in section 1.3) using appropriate personal protective equipment (PPE).
For any information pertaining to installation/wiring/maintenance or in any case problems that cannot be resolved with the use
of the instructions, it is possible to contact the manufacturer from the address and phone numbers provided on the last page.
1.1 DESCRIPTION
Normally closed automatic fast opening solenoid valves for gas. They open the flow of gas when the coil is electrically powered
and close them when power is disconnected. They can be controlled by pressure switches, thermostats, etc.
They can be equipped with CPI switches to control the valve’s obturator position (closed) remotely. The CPI can also be
installed at a later time ONLY IF the device is set-up properly (cap under the valve body). Further information regarding the
CPI switch is available in 6.0.
Reference standards: EN 161 - EN 13611.
1.2 KEY OF SYMBOLS
ATTENTION: Attention
is drawn to the technical
details intended for
qualified staff.
DANGER: In the event of
inobservance, this may cause damage
to tangible goods, to people and/or
pets.
DANGER: In the event
of inobservance, this may
cause damage to tangible
goods.

4
EN
1.3 QUALIFIED STAFF
These are people who:
•Are qualified to carry out product installation, assembly, start-up and maintenance;
•Know the regulations in force in the region or country pertaining to installation and safety;
•Are trained in first aid.
1.4 USING NONORIGINAL SPARE PARTS
•To perform maintenance or replace parts (ex. coil, connector, etc.) ONLY manufacturer-recommended parts can be used.
Using different parts not only voids the product warranty, it could compromise correct device operation.
•The manufacturer is not liable for malfunctions caused by unauthorised tampering or use of non-original parts.
1.5 IMPROPER USE
•The product must only be used for the purpose it was built for.
•It is not allowed to use different fluids than those expressly stated.
•The technical data set forth on the rating plate must not be exceeded whatsoever. The end user or installer is in charge of
implementing proper systems to protect the device, which prevent exceeding the maximum pressure indicated on the rating
plate.
•The manufacturer is not responsible for any damage caused by improper use of the device.

5
EN
2.0 TECHNICAL DATA
• Use : non-aggressive gases of the three families (dry gases)
• Ambient temperature (TS) : -20 ÷ +60 °C
• Supply voltages (see table 2) : 24 V/50 Hz - 110 V/50-60 Hz - 230 V/50-60 Hz*
• Power supply tolerance : -15% ... +10%
• Electric wiring : cable gland M20x1.5
• Absorbed power : see table 2
• Maximum operating pressure : (DN 15 - DN 20) 200 mbar
: (DN 25) 500 mbar
• Opening time : <1 s
• Closing time : <1 s
• Protection rating : IP65
• Class : A
• Mechanical resistance : Group 2
• Rp Threaded connections : (DN 15 - DN 20 - DN 25) according to EN 10226
• NPT threaded or ANSI 150 flanged connections : on request
• Filter element : 1 mm wire mesh
• In compliance with : Regulation (EU) 2016/426 (Appliances burning gaseous fuels)
Directive EMC 2014/30/EU - Directive LVD 2014/35/EU
Directive RoHS II 2011/65/EU
* Only single-phase, the device does not work if powered with three-phase voltage.

6
EN
2.1 MODEL IDENTIFICATION
See Table 2 on page 17.
2.2 SIL LEVEL
The SIL level of the stand-alone solenoid valve is SIL 2; when two solenoids are installed in series and the relative leak test
(Valve Proving System), certified according to EN 1643, the achieved level is SIL 3, as set forth in EN 676:2008. The solenoid
valve has PL d level. For further data refer to the SIL LEVEL table (table 3).
3.0 COMMISSIONING THE DEVICE
3.1 OPERATIONS PRIOR TO INSTALLATION
•It is necessary to close the gas upstream of the valve prior to installation;
•Make sure that the line pressure DOES NOT EXCEED the maximum pressure declared on the product label;
•Any protective caps (if any) must be removed prior to installation;
•Valve pipes and insides must be clear of any foreign bodies;
•Make sure that the pipe thread is not too long, to prevent damaging the body of the device when screwing it on;
•In accordance with EN 161 a suitable filter must be installed upstream of a gas closing safety device;
•With outdoor installation, it is advisable to provide a protective roof to prevent rain from damaging the electrical parts of
the device;
•Prior to carrying out any electrical wiring operations, make sure that the mains voltage matches the supply voltage indicated
on the product label;
•Cut out power prior to proceeding with wiring;
•According to the plant geometry, check the risk of explosive mixture arising inside the piping;
•If the solenoid valve is installed near other devices or as part of an assembly, compatibility between the solenoid
valve and this other device must be evaluated beforehand;
•Avoid installing the solenoid valve near surfaces that could be damaged by the coil temperature;
• Provide a protection against impacts or accidental contacts if the solenoid valve is accessible to unqualified personnel.

7
EN
3.2 INSTALLATION (see example in 3.4)
•Assemble the device by screwing it, with the correct seals, onto the plant with pipes and/or fittings whose
threads are consistent with the connection being attached;
•Do not use the coil (11 ) as a lever to help you screw it on, only use the specific tool;
•The arrow, shown on the body (4) of the device, needs to be pointing towards the application;
•The device can also be installed vertically without prejudicing correct operation. It cannot be put in upside
down (with the coil (11 ) pointing downwards);
•During installation, avoid debris or metal residues from getting into the device;
•To guarantee mechanical tension-free assembly, we recommend using compensating joints, which also adjust to the pipe’s
thermal expansion;
•If the device is to be installed in a ramp, it is the installer’s responsibility to provide suitable supports or correctly sized
supports, to properly hold and secure the assembly. Never, for any reason whatsoever, leave the weight of the ramp only on
the connections (threaded or flanged) of the individual devices;
•In any case, following installation, check the tightness of the plant;
•Wiring cannot have cables connected directly to the coil. ALWAYS and ONLY use the connector identified by the
manufacturer;
•Before wiring the connector (1), unscrew and remove the central screw (13). Use proper cable terminals (see figures on
page 21). NOTE: Connector (1) wiring must be do ensuring a product rating of IP65;
•Wire the connector (1) with 3x0.75mm² cable with external Ø 6.2 to 8.1 mm. The cable must have double sheathing, be
suitable for use outdoors, with minimum voltage of 500V, and minimum temperature of 105°C;

8
EN
•Connect terminals 1 and 2 to the power supply and the earth cable to terminal .
•Secure the connector (1) to the coil (11 ), tightening (recommended tightening torque 0.4 N.m ± 10%) the centre screw (13);
•The valve needs to be earthed either through the pipe or through other means (ex. cable jumpers).
3.3
INSTALLATION IN PLACES WHERE THERE IS THE RISK OF EXPLOSION (DIRECTIVE 2014/34/EU)
The solenoid valve is not suitable for use in potentially explosive areas.

9
EN
123
5
47
6
13
piping
applicaon
discharge in open air
internal thermal unit
external roof
8
9
Power
12
11
10
3.4 GENERIC EXAMPLE OF AN INSTALLATION
(Burner Gas Train)
1. Gas filter
2. OPSO shut off valve
3. Pressure regulator
4. Minimum pressure switch
5. 355AA fast opening
automatic solenoid valve
6. Maximum pressure switch
7. Slow opening automatic solenoid valve
8. External reset
9. Burner control
10. Valve proving system
11. Relief valve
12. Pressure gauge and relative button
13. Gas detector

10
EN
4.0 FIRST STARTUP
• Before start-up make sure that all of the instructions on the rating plate, including the direction of flow, are observed;
•After having gradually pressurised the system, check tightness and operation of the solenoid valve, electrically
powering / disconnecting the connector ONLY IF connected to the coil.
IMPORTANT NOTE: Do not use the connector as a switch to open/close the solenoid valve.
4.1 - RECOMMENDED PERIODIC CHECKS
•Use a suitable calibration tool to ensure the bolts are tightened as indicated in 3.2;
•Check tightness of the flanged/threaded connections on the system;
•Check tightness and operation of the solenoid valve;
It is the responsibility of the final user or installer to define the frequency of these checks based on the severity of the service conditions.
5.0 MAINTENANCE
No maintenance operations need to be carried out inside the device.
If the coil and/or connector need to be replaced:
•Before performing any operation, make sure that the device is not electrically powered;
•Since the coil is also suitable to be permanently powered, high coil temperature in case of continuous operation is
entirely normal. It is advisable to avoid touching the coil with bare hands after a continuous power supply lasting longer
than 20 minutes. In case of maintenance, wait for the coil to cool down or, if necessary, use suitable protections;
NOTE: if the coil (11 ) needs to be changed following an electrical failure, we recommend changing the connector (1) as well. The coil
and/or connector replacement operations need to be carried out taking care to ensure the product’s IP65 rating.

11
EN
5.1 - REPLACING THE CONNECTOR
•Unscrew and remove the central screw (13), then remove the connector (1) from the coil (11 );
•When you have taken out the existing internal electrical wiring, wire the new connector and secure it to the coil, as shown in 3.2;
5.2 - REPLACING THE COIL
•Unscrew and remove the central screw (13), then remove the connector (1) from the coil (11 );
•Loosen the screw (or nut) (12) that locks the coil (11 ) and take it out from the armature assembly along with the seals/discs;
•Place the new coil + seals + discs inside the armature assembly and secure with the relative screw (or nut);
6.0 - CPI SWITCH
The microswitch that signals the closed position (CPI SWITCH) is a magnetic proximity sensor with normally open contact. It
provides a signal when the valve obturator closes.
If the solenoid valve comes with the microswitch, the position of the sensor is already calibrated and set, therefore, for operation
you simply need to connect it to the power supply.
If it comes separately and is installed at a later time on a solenoid valve with CPI set-up, follow the instructions provided in
paragraph 6.2
6.1 - CPI SWITCH TECHNICAL DATA
• Ambient temperature : -20 ÷ +60 °C
• Switchable voltage : max 1000 V (dc or ac peak)
• Switchable current : max 1 A (dc or ac peak)
• Switchable power : max 40W ohmic
• Resistance : 200 mΩ
• Protection rating : IP65
• Cable length : max 5m
CPI wiring diagram
open valve / open contact
closed valve / closed contact
SPST

12
EN
6.2 - CPI SWITCH INSTALLATION and CALIBRATION
It is necessary to close the gas prior to installation.
NOTE: CPI connector (19) wiring must be do ensuring a
product rating of IP65;
• Unscrew the cap (14) under the valve body (4);
• In place of the cap (14) screw in the CPI kit (21). Make
sure that between the body (4) and CPI kit (21) there is
the aluminium washer (16);
• Tighten the CPI kit (21) onto the valve body (4) with a
special commercial spanner;
• Before wiring the CPI connector (19), unscrew and remove
the central screw (18);
• Connect the CPI connector (19) terminals 1 and 2 in series
to the signalling device. Use proper cable terminals (see
figures in 3.2);
• WiretheCPIconnector(19)with 2x1mm² cable with external
Ø of 6.7 mm. The cable to be used must be in double sheath,
suitable for outdoor use, with a minimum voltage of 500V
and a temperature of at least 90°C;
• Secure the CPI connector (19), tightening (recommended
tightening torque 0.4 N.m ± 10%) the centre screw (18);
• To calibrate the microswitch loosen the fastening nut (20)
and position (by screwing on or off) the adjustment ring nut
(17 ) so that, with the solenoid valve in a closed position,
the microswitch provides the signal;
• Secure the adjustment ring nut (17 ) in that position by
tightening the nut (20);
• The kit is now installed. Open and close the solenoid valve
(by supplying and cutting off power) 2-3 times to make sure
the microswitch is signalling correctly.
7.0 TRANSPORT, STORAGE AND DISPOSAL
• During transport the material needs to be handled with care,
avoiding any impact or vibrations to the device;
• If the product has any surface treatments (ex. painting,
cataphoresis, etc) it must not be damaged during transport;
• The transport and storage temperatures must observe the
values provided on the rating plate;
• If the device is not installed immediately after delivery it must be
correctly placed in storage in a dry and clean place;
• In humid facilities, it is necessary to use driers or heating
to avoid condensation;
• At the end of its service life, the product is to be disposed of
in compliance with the legislation in force in the country where
this operation is performed.
8.0 WARRANTY
The warranty conditions agreed with the manufacturer at the
time of the supply apply.
For damage caused by:
•Improper use of the device;
•Failure to observe the requirements described herein;
• Failure to observe the regulations pertaining to installation;
• Tampering, modification and use of non-original spare parts;
are not covered by the rights of the warranty or compensation
for damage.
The warranty also excludes maintenance work, other
manufacturers’s assembling units, making changes to the
device and natural wear.

13
EN
9.0 RATING PLATE DATA
The rating plate data (see example provided here) includes the following:
• Manufacturer’s name/logo and address
• Mod.: = device name/model followed
by the connection diameter
• CE-51.../ED05 = certification pin number
• Cl. A = Seal strength in counterflow at 150 mbar in accordance with EN 161
• Gr. 2 = Mechanical resistance group 2 in accordance with EN 161
• EN 161 = Product reference regulation
• P.max = Maximum pressure at which product operation is guaranteed
• IP.... = Protection rating

• 230V.... = Power supply voltage, frequency (if Vac), followed by electrical absorption
• TS = Temperature range within which product operation is guaranteed
• = Conformity with Regulation (EU) 2016/426 followed by Notified Body No.
• year = Year of manufacture
• Lot = Product serial number (see explanation below)
• U2002 = Lot issued in year 2020 in the 2nd week
• 1728 = progressive job order number for the indicated year
• 00002 = progressive number referring to the quantity of the lot
Mod.: 355AA DN 25 CODE: 35500033
CE-51..../ED05 Cl.A Gr.2 EN 161 P. max:500 mbar
IP65 - 230 V/50-60 Hz 18 VA TS: -20+60 °C
year: 2020 Lot: U2002 1728/00002
0051
Lodge Way House, Lodge Way,
Harlestone Road,
Northampton NN5 7UG.

14
EN
fig. 1
DN 15-20
P.max 200 mbar

15
EN
fig. 2
DN 25
P.max 500 mbar
fig. 3
CPI installation

16
EN
fig. 1, 2 and 3
1. Electric connector
2. Cover sealing O-Ring
3. Closing spring
4. Valve body
5. Obturator
6. Sealing washer
7. Cap G 1/4
8. Filter
9. Cover fastening screws
10. Cover
11. Electric coil
12. Coil fastening screw
13. Connector centre screw
14. Lower cap (on versions set-up for CPI installation)
15. Microswitch
16. Aluminium washer
17. CPI adjustment ring nut
18. CPI connector centre screw
19. CPI connector
20. CPI fastening nut
21. CPI kit
Table 1
Overall dimensions in mm
Threaded connections P. max
(mbar) A B=(D+E) C D E F
(CPI)
Rp DN 15 - Rp DN 20 200 75 137 74 22 115 95
Rp DN 25 200 75 142 74 27 115 100
The dimensions are provided as a guideline, they are not binding

17
EN
Table 2
Coils and connectors
Valve code
Connections Voltage Coil + connector code
Coil stamping
Connector type
Absorbed power
35500173 Rp DN 15
24 V/50 Hz
B13052 BO-0410
24 VDC 17W
24 Vac
Rectifier
14 VA35500184 Rp DN 20
35500195 Rp DN 25
35500642 Rp DN 15
110 V/50-60 Hz
B13089 BO-0420
110 V RAC 17W
110 Vac, 230 Vac
Rectifier
17 VA35500653 Rp DN 20
35500664 Rp DN 25
35500011 Rp DN 15
230 V/50-60 Hz
B13051 BO-0430
230 V RAC 17W
110 Vac, 230 Vac
Rectifier
18 VA35500022 Rp DN 20
35500033 Rp DN 25

18
EN
Table 3
SIL LEVEL
Parameter Value
Hardware Failure Tolerance - HFT 0
Common Cause Failure - CCF in points 75
Safe Failure Fraction - SFF in % 65%
Expected Lifetime Cycles - B10d 251278
Expected Lifetime - T10d [years] 87
Probability of Dangerous Failures - PFHD[1/h] 1.33E-07
Performance Level - PL d
Safety Integity Level - SIL 2
Mean Time to Dangerous Failure - MTTFD[years] 860
DESIGNED LIFETIME
Designed operating cycles (According to EN 161) Time (years)
from 100.000 to 200.000 depends on diameter 10

19
EN
dv = 0,65
dv = 1
dv = 0,47
dv = 1,67
Pressure drop diagram (calculated with P1 = 50 mbar)
dv = density relative to the air
1) methane
2) air
3) town gas
4) lpg

Mod. IT390.00 E
We reserve the right to any technical and construction changes.
Registered Office: Travis Perkins PLC, Lodge Way House, Lodge Way, Harlestone Road, Northampton NN5 7UG.
Telephone Number: 0116 245 5500
This manual suits for next models
11
Table of contents
Other BOSSCO Control Unit manuals
Popular Control Unit manuals by other brands

Stagnoli
Stagnoli A24 instructions

Assa Abloy
Assa Abloy OneSystem N5952 Installation instructions and functional description

SSS Siedle
SSS Siedle FPM 611-02 Product information

Topway
Topway LMT056DIDFWD-AEN user manual

GESTRA
GESTRA ZK 213 Original Installation Instructions

SMC Networks
SMC Networks VOA325 Series Operation manual

GEM
GEM R488 Victoria operating instructions

Haws
Haws SP157.15 Installation, operation & maintenance instructions

Texas Instruments
Texas Instruments bq20z65EVM-001 user guide

Flowserve
Flowserve GESTRA BB 1 Series Installation and maintenance instructions

GEM
GEM R677 operating instructions

Eneo
Eneo VHM/H24W Mounting instructions