BOSSCO Dr. Beat DB-66 User manual
Owner's Manual
Thank you, and congratulations on your choice of the BOSS DB-66 Dr. Beat. To
ensure proper operation, and years of trouble-free service, please take the time
to read through this Owner's Manual before starting out.
FEATURES
The BOSS Dr. Beat DB-66 is a perfect rhythm training aid for variable
types of music from rock to classical.
Adopting quartz system, the DB-66 guarantees extremely high accu-
racy.
The tempo is digitally shown in the Display, allowing you to set it
precisely and quickly.
Tapping the TAP Button to the music, you can see its tempo in the
Display Window.
The DB-66 outputs the standard pitch 440 Hz (A4) which can be
effectively used for usual tuning.
For basic rhythms ( , , , ) can be independently volume-
adjusted and accented.
IMPORTANT NOTES
WhenusinganACadaptor,useonlythespecifieddevice(PSASeries). Useofany
other AC adaptor could result in damage, malfunction or electric shock.
[POWER SUPPLY]
Before connecting this unit to other devices, turn off the power to all units; this
will help prevent damage or malfunction.
Donotusethisunitonthesamepowercircuitwithanydevicethatwillgenerate
line noise; an electric motor or variable lighting system for example.
The power requirement for this unit is indicated on its nameplate (rear panel).
Ensure that the voltage in your installation meets this requirement.
Avoiddamagingthepower cord: do not step on it,placeheavyobjectsonit,etc.
When disconnecting the AC adaptor from the power outlet, grasp the plug itself;
never pull on the cord.
Iftheunitistoremainunusedforanextendedperiodoftime,unplugthepowercord.
When installing or replacing batteries, refer to “CHANGING THE BATTERY”.
[PLACEMENT]
Do not subject the unit to temperature extremes (eg., direct sunlight in an
enclosedvehicle).Avoidusingorstoringtheunitindustyorhumidareas,orareas
that are subject to high levels of vibration.
Usingtheunitnearpoweramplifiers(orotherequipmentcontaininglargepower
transformers) may induce hum.
Donotexposetheunittotemperatureextremesorinstallitneardevicesthatradiate
heat. Direct sunlight in an enclosed vehicle can deform or discolor the unit.
[MAINTENANCE]
For everyday cleaning wipe the unit with a soft, dry cloth or one that has been
slightlydampenedwithwater.Toremovestubborndirt,usea mild,non-abrasive
detergent. Afterwards, be sure to wipe the unit thoroughly with a soft, dry cloth.
Never use benzene, thinners, alcohol or solvents of any kind, to avoid the
possibility of discoloration and/or deformation.
[ADDITIONAL PRECAUTIONS]
Protect the unit from strong impact.
Do not allow objects or liquids of any kind to penetrate the unit. In the event of
such an occurrence, discontinue use immediately. Contact qualified service
personnel as soon as possible.
Shouldamalfunctionoccur, orif yoususpectthereisaproblem,discontinue use
immediately. Contact qualified service personnel as soon as possible.
To avoid the risk of electric shock, do not open the unit.
[CHANGING BATTERY]
Whenreplacingbattery,besuretoinsertthemcorrectly(toensurecorrectpolarity).
Removethebatterywhenevertheunitistoremainunusedforanextendedperiod
of time.
CLASS B NOTICE
ThisdigitalapparatusdoesnotexceedtheClassBlimitsforradionoiseemissions
set out in the Radio Interference Regulations of the Canadian Department of
Communications.
CLASSE B AVIS
Cet appareil numérique ne dépasse pas les limites de la classe B au niveau des
émissionsdebruitsradioélectriquesfixésdansleRéglementdessignauxparasites
par le ministère canadien des Communications.
For Canada
For the USA
Bescheinigung des Herstellers / Importeurs
Hiermit wird bescheinigt, daß der/die/das
Roland Dr.Beat DB-66
(Gerät, Typ, Bezeichnung)
in Übereinstimmung mit den Bestimmungen der BMPT-AmtsblVfg 243/1991 funk-
entstört ist. Der vorschriftsmäßige Betrieb mancher Geräte (z. B. Meßsender) kann
allerdingsgewissenEinschränkungenunterliegen.BeachtenSie deshalb die Hinweise
in der Bedienungsanleitung.
Dem Zentralamt für Zulassungen im Fernmeldewesen wurde das Inverkehrbringen
dieses Gerätes angezeigt und die Berechtigung zur Überprüfung der Serie auf die
Einhaltung der Bestimmungen eingeräumt.
Roland Corporation
4-16 Dojimahama 1-Chome Kita-ku Osaka 530 Japan
(Name und Anschrift des Herstellers/Importeurs)
For Germany
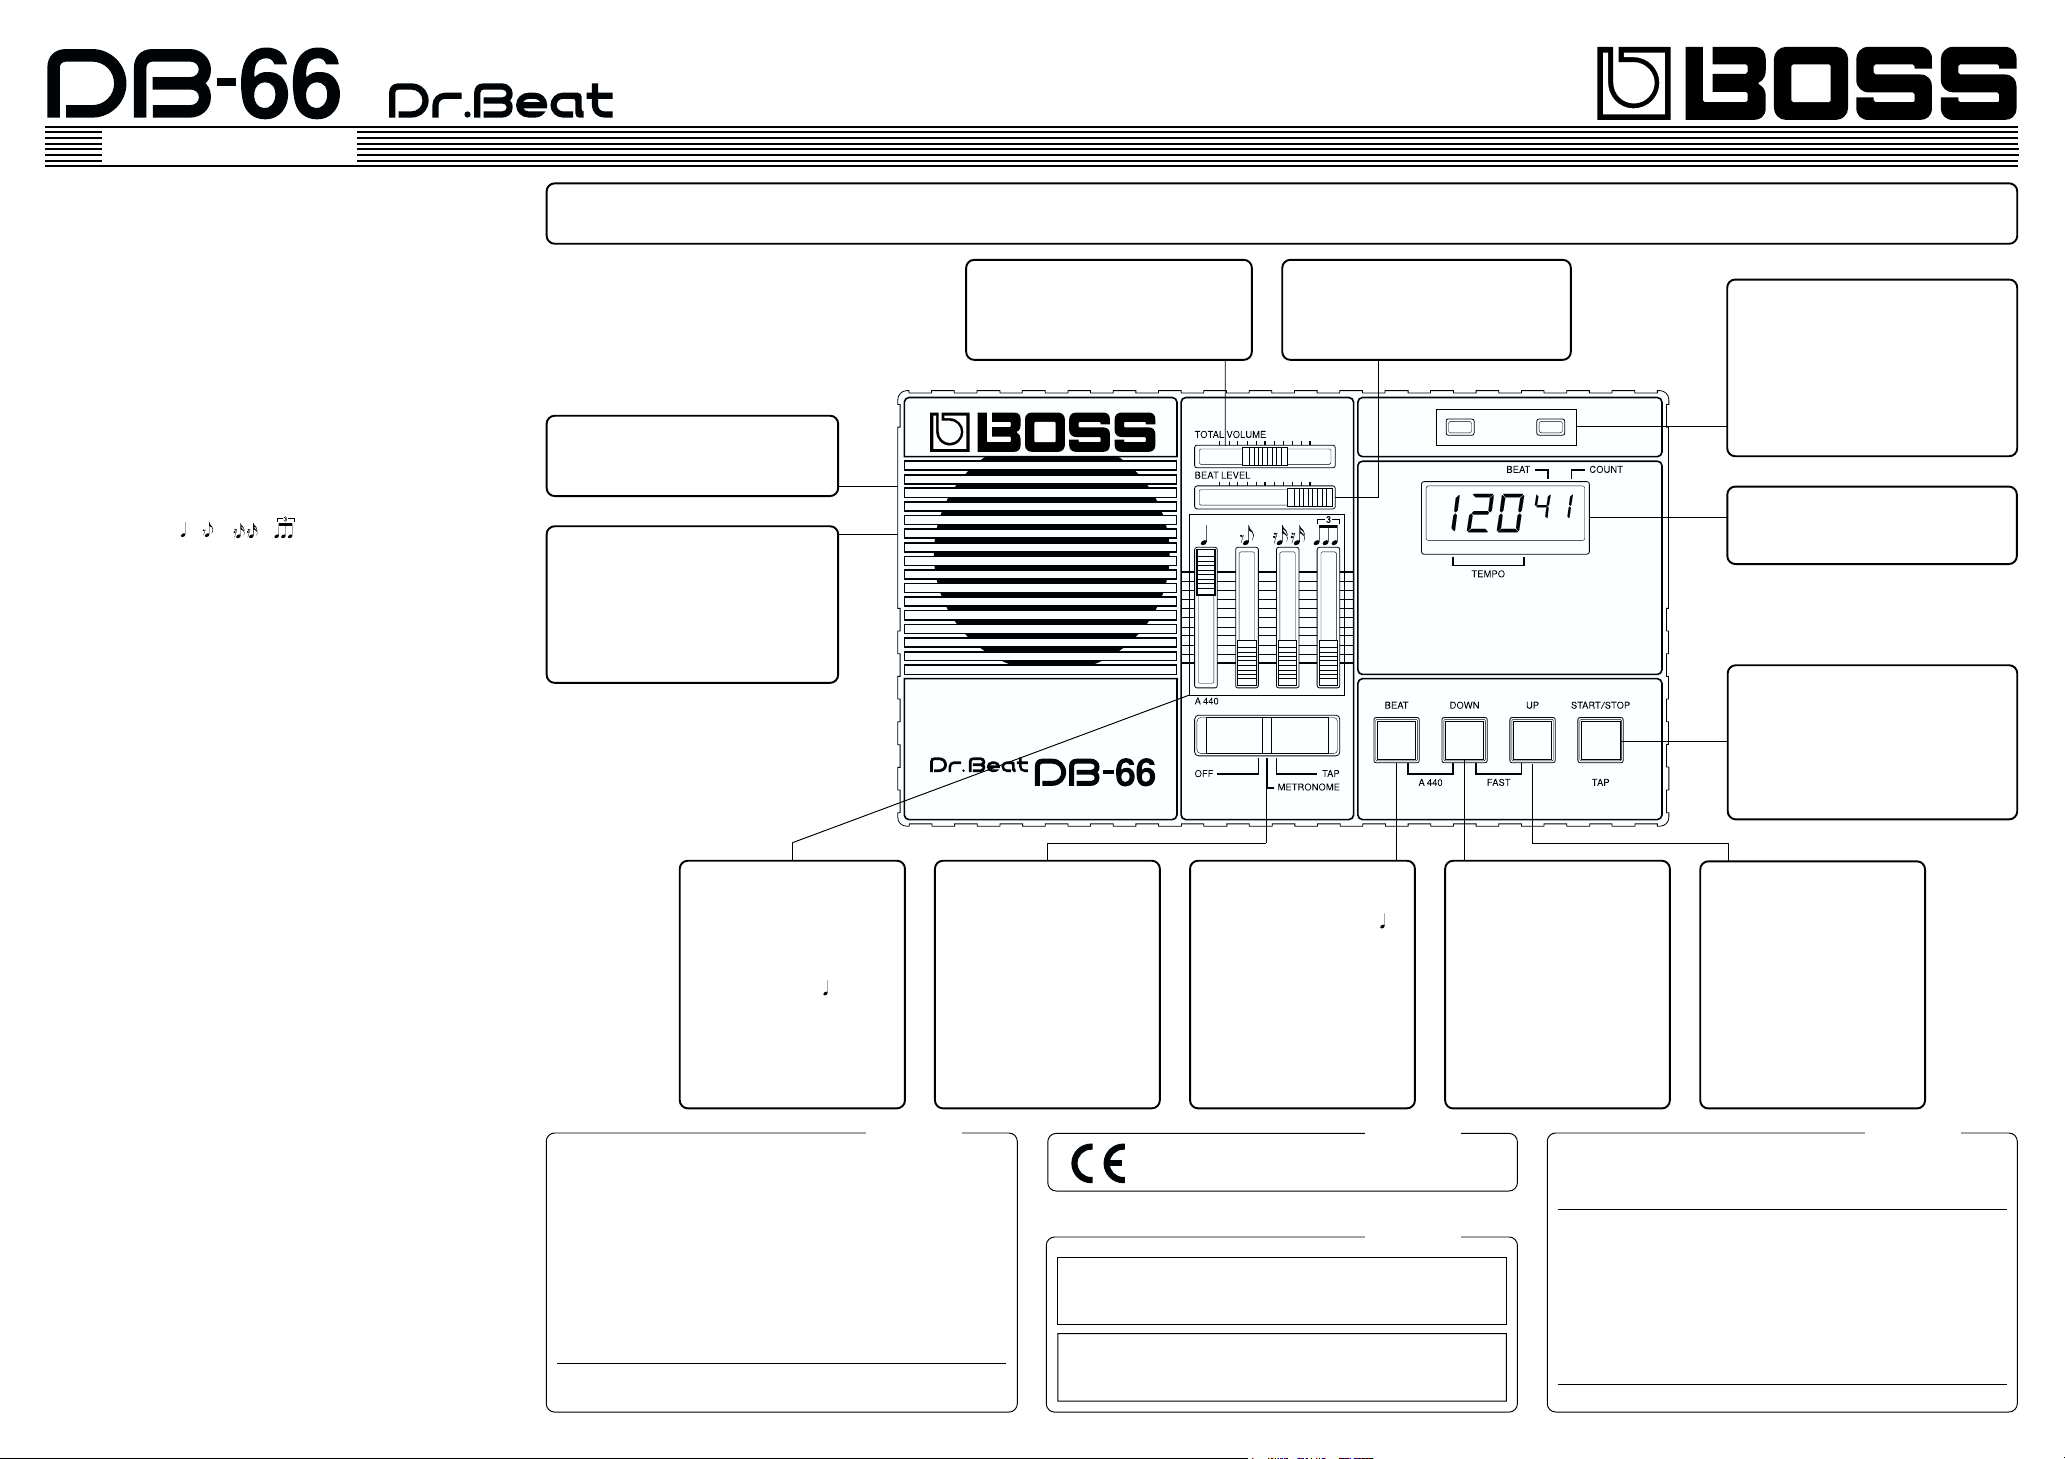
Tempo Indicators
TheseLED's indicatethe currenttempo.
Whenthe Beatselects 2,3, 4,5 or6,the
left LED flashes at the first beat and the
rightLEDflashesatotherbeats.Onlythe
leftLEDflasheswhenthebeat issetto 1.
And only the right LED flashes with the
beat set to 0.
Display
This shows the current tempo, beat and
beat number.
HEADPHONES Jack
Accepts connection of headphones
(stereo mini type).
AC ADAPTOR Jack
Connect the optional AC adaptor (BOSS
PSA Series) to this jack. By using an AC
adaptor, you are freed from worry about
the battery wearing out, and can con-
tinue to use the unit for as long as you
want. START/STOP (TAP) Button
WhentheDB-66isintheMETRONOME
mode, press this to start rhythm, and
press it again to stop. In the TAP mode,
just by tapping this button to the music,
you can see the tempo number in the
display.
TOTAL VOLUME Slider
This adjust the volume of the sound.
Sliding it rightward increases the vol-
ume.
BEAT LEVEL Slider
Whenthe Beat isset to1, 2, 3,4, 5or 6,
this slider controls the volume of the
chime that is heard on every first beat.
BEAT Button
By using this button, you can
select any beat of 0 to 6 ( is
counted as 1 beat). Each time
you press the button, the
number in the Display will
change.PressingtheBEATBut-
ton and the DOWN Button at
the same time will output the
standard pitch (440 Hz).
Power/Mode
Selection Switch
This switch serves two pur-
poses; it turns the power ON/
OFF,andprovidesselectionof
the operating mode : METRO-
NOME or TAP.
DOWN Button
Use this button to change the
current tempo setting. Pressing
this button backs up the tempo
display by a number. To move
the number quickly, press the
DOWN Button, and without
releasing it, press the UP But-
ton.PressingtheDOWNButton
and the BEAT Button at the
sametimewilloutputthestand-
ard pitch (440 Hz).
UP Button
Use this button to change the
current tempo setting. Press-
ing this button will move the
tempo display one step for-
ward. If you wish to move the
number quickly, press the UP
Button, and without releasing
it, press the DOWN Button.
Rhythm Volume
Sliders
These sliders adjust the sound
levelofrespectiverhythms.The
volume increases as the slider
israised.Theslider isusedto
output the standard pitch (440
Hz) as well.
PANEL DESCRIPTIONS
Please note that although a battery was installed in your DB-66 when it was shipped from the factory, it has not been connected. You will need to refer
to the section "CHANGING THE BATTERY", for instruction on connecting the battery.
FEDERAL COMMUNICATIONS COMMISSION
RADIO FREQUENCY INTERFERENCE STATEMENT
Thisequipmenthasbeentestedandfound to comply with the limits for a Class B digital device,
pursuant to Part 15 of the FCC Rules. These limits are designed to provide reasonable
protection against harmful interference in a residential installation. This equipment generates,
uses, and can radiate radio frequency energy and, if not installed and used in accordance with
theinstructions,maycauseharmful interferencetoradiocommunications.However,thereisno
guaranteethatinterferencewillnotoccurinaparticularinstallation.Ifthisequipmentdoescause
harmful interference to radio or television reception, which can be determined by turning the
equipment off and on, the user is encouraged to try to correct the interference by one or more
of the following measures:
–Reorient or relocate the receiving antenna.
–Increase the separation between the equipment and receiver.
–Connect the equipment into an outlet on a circuit different from that to which the
receiver is connected.
–Consult the dealer or an experienced radio/TV technician for help.
Unauthorizedchangesormodificationtothissystemcanvoidtheusersauthoritytooperatethis
equipment.
This equipment requires shielded interface cables in order to meet FCC class B Limit.
For Europe
This product complies with the requirements of
European Directive 89/336/EEC.

OPERATING THE UNIT
Using the DB-66 as Metronome
1546
2
3
1. Set the Power/Mode Selection Switch to "METRONOME".
* When the DB-66 is turned on, tempo is set to 120, and beat to 4.
2.SettheBEATLEVELSliderandtheRhythmVolumeSlidersasshown
in the illustration.
3. Adjust the overall volume with the TOTAL VOLUME Slider.
4. By using the UP and DOWN Buttons, set the tempo you like.
* Hold down either "DOWN" or "UP" while you press the other
button to obtain a more rapid change in the tempo value.
5. Press the BEAT Button to select the beat you like.
6.Press the START/STOP Button to start the rhythm and press it again
to stop.
Try making more complicated rhythm like syncopation,
16 beat, etc., by varying the Rhythm Volume setting.
Standard Pitch 440 Hz (A4) Mode
13
2
4
1.Set the Power/Mode Selection Switch to "METRONOME" or "TAP".
2. Adjust the Rhythm Volume Slider to your taste.
* If this Slider is set to low, there is no sound heard from the
speaker.
3.Press theBEATButtonand theDOWNButtonat thesametime.The
Display will show(440 A4)
And the Standard Pitch will be output through the speaker.
4.Tostop thesound, pressanyoftheBEATButton, theDOWNButton
or UP Button.
Tempo Setting in Real Time (Tap Mode)
12 3
1. Set the Power/Mode Selection Switch to "TAP".
* When the DB-66 is turned on, tempo is set to 120, and beat to 4.
2. By pressing the BEAT Button, Select the desired beat.
3. Tap the TAP Button in the tempo you like, as many times as
necessary depending on the beat setting in the step 2.
* When 0 or 1 beat is selected in the step 2, hitting the TAP Button
twice is enough. But when 2, 3, 4, 5 or 6 beat is selected, hit the
TAP Button as many times as the number of selected beat, and
next tapping will cause the Display to show the average tempo
of the tapping.
* At this stage if you return the Power/Mode Selection Switch to
"METRONOME", the DB-66 is ready to work as a metronome in
the last temp setting.
Error Indications in Tap Mode
When the tempo you set is faster than 250 the Display will show
(High)
When the tempo you set is as slow as 30 to 34, the Display will show
(Low)
Whenthetempoyousetisslowerthan30,thetemposettingjustbefore
thatwillremain.Therefore,ifyoustoptherealtimetemposettinginthe
middle and start again later, the DB-66 will work in this last tempo.
* Turning the DB-66 off sill erase the tempo setting.
SPECIFICATIONS
DB-66 : Dr.Beat
Power Supply
9 V DC : Dry battery S-006P/9 V (6F22/9 V)
AC Adaptor (PSA Series : Optional)
Current Draw
55 mA (MAX)
* Expected battery life under continuous use :
Carbon : 17 hours
Alkaline : 45 hours
(TEMPO:120,TOTALVOLUME:MAX,BEATLEVEL:MAX, :MAX)
These figures will vary depending on the actual conditions of use.
Tempo Range
M. M. 35 to 250
Tempo Accuracy
+/- 0.15 %
Beat
0, 1, 2, 3, 4, 5 and 6
Standard Pitch
440 Hz (A4) +/- 0.2 cent
Display
7 segments, 5 characters
Speaker
1
Indicators
Tempo Indicator x2
Controls
TOTAL VOLUME Slider
BEAT LEVEL Slider
RHYTHM VOLUME Sliders ( , , , )
Power/Mode Selection Switch
BEAT Button
DOWN Button
UP Button
START/STOP (TAP) Button
Connectors
HEADPHONES Jack (Stereo Miniature phone type)
AC ADAPTOR Jack
Dimensions
170 (W) x 96 (D) x 33 (H) mm
6-11/16 (W) x 3-3/4 (D) x 1-5/16 (H) inches
Weight
320 g / 11 oz (including battery)
Accessories
Soft Case, Owner’s Manual, Dry battery S-006P/9 V (6F22/9 V),
Roland Service
Options
AC Adaptor PSA-Series
0 dBm = 0.775 V rms
*Inthe interest of product improvement, the specificationsand/orappearance
of this unit are subject to change without prior notice.
©1995 BOSS Corporation
All rights reserved. No part of this publication may be reproduced in
any form without the written permission of BOSS Corporation.
CHANGING THE BATTERY
When the battery is nearly exhausted, speaker output becomes low or
theTempoIndicatorslightdimmer. Topreventthis,replacethebattery
as soon as possible.
1.Press downand slideoffthe lidofthe batterycompartment (located
on the bottom of the unit).
2. Remove the old battery from the compartment and disconnect the
snap cord.
3. Connect the snap cord to the new battery.
4.Placethe newbatteryinsidethecompartment andslidethelidback
into place.
8 beat
BEAT
16 beat
BEAT
12 beat
BEAT
Metronome
Syncopation
Combined and
rhythm
MAKING THE CONNECTIONS
Headphones
AC Adaptor
(PSA-Series ; Optional)
OUT 9V DC / 200mA
SAMPLE SETTINGS
* For the rhythm without BEAT setting, set it as you like.
* To accent a beat, set the corresponding volume higher than others.
Other BOSSCO Music Equipment manuals

BOSSCO
BOSSCO DR-55 User manual

BOSSCO
BOSSCO RC-50 User manual

BOSSCO
BOSSCO DB-60 User manual

BOSSCO
BOSSCO DR. Beat DB-90 User manual

BOSSCO
BOSSCO LM-2B User manual

BOSSCO
BOSSCO DB-60 Dr.Beat User manual

BOSSCO
BOSSCO RC-50 User manual

BOSSCO
BOSSCO Giga Delay DD-20 User manual

BOSSCO
BOSSCO Digital Delay DE-200 User manual

BOSSCO
BOSSCO ROD-10 User manual

BOSSCO
BOSSCO RC-50 User manual

BOSSCO
BOSSCO ME-25 User manual

BOSSCO
BOSSCO NS-2 User manual

BOSSCO
BOSSCO ROD-10 User manual

BOSSCO
BOSSCO Dr. Beat DB-88 User manual

BOSSCO
BOSSCO DB-90 METRONOME Dr. Beat. User manual

BOSSCO
BOSSCO DR-55 User manual

BOSSCO
BOSSCO GS-10 User manual

BOSSCO
BOSSCO Digital Delay DD-6 User manual

BOSSCO
BOSSCO RC-50 User manual


