BOSSCO MR634UAB User manual
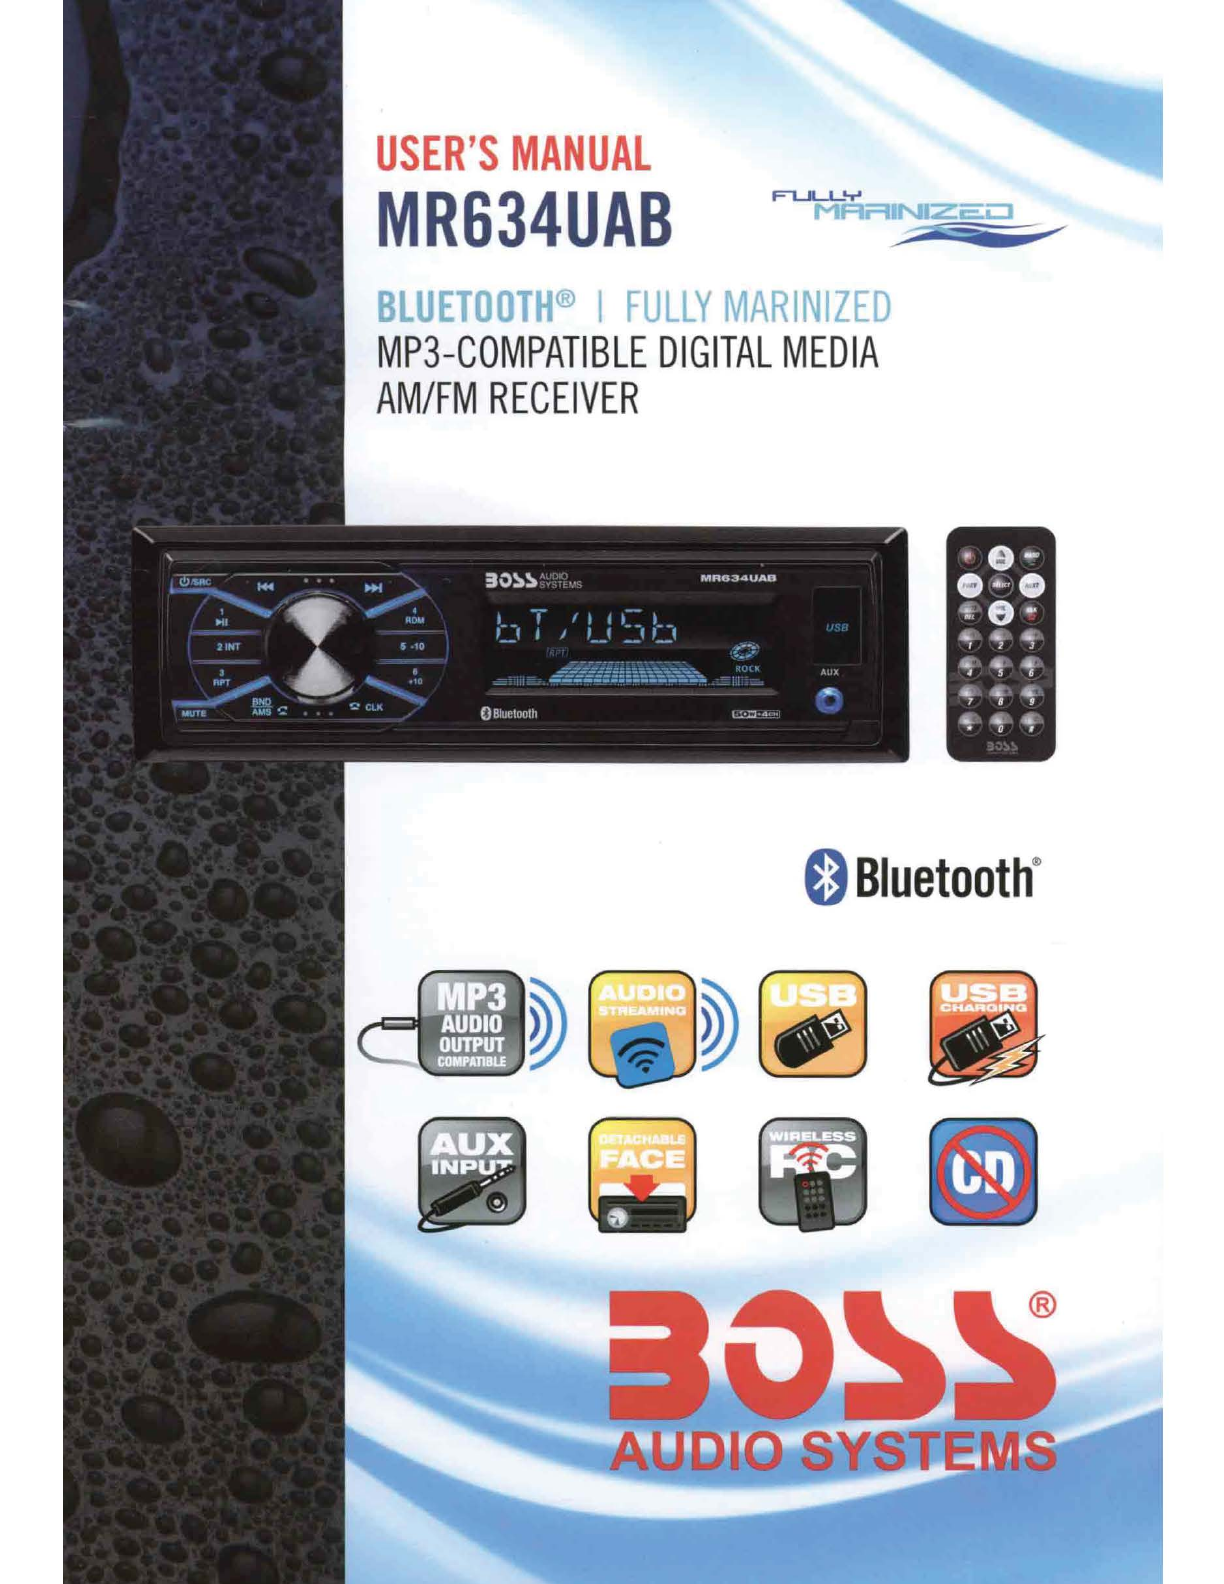
USER'S
MANUAL
MR634UAB
T ® I
Fl
II
IV
ly1/\DINIZCI"\
MP3-COMPATIBLE
DIGITAL
MEDIA
AM/FM
RECEIVER
MA834UAB
~---=-.:...-·-
---
··----·--
~";:_~-::
0
Bluetooth
®
,::
·~ .
~
~
[j)
w ®
CONTENTS
Precautions
..
.................................................
..
...................
..
...
..
..............................
..
.................................. 1
Lithium Battery Cell Warnings ..................................
..
..
...
...
...
............................................................................... 1
Use Cautions ....................................................................................................................................
....
..1
Installation ..............
..
.....
..
.................
....
..................................................................
..
.................................. 2
Installation Procedures
...
....................................................................................................
..
................. 2
Installation Opening
...
.......
..
................................................................................
....
..............
..
.......
..
.......2
Wiring Connections..................................................
....
.................
..
......
....
....................................
..
....... 3
Uninstall the Main
Unit
............
...
........
..
...................
..
..
..
.......
..
...............
..
...............................................3
Control Panel Button Locations......................................................................
...
......................................... 4
Operation .................................................................................................................................
..
.
..
............. 4
Power/ SRC •·•••••••••••···•••················••••···································································································· 4
Change the Source (SRC) ...................................................············..................
..
................................. 4
Store/Recall Preset Stations
(1
-6)..........
....
.......
..
.................................................................................4
Play/Pause, Intro, Repeat, Random, Tracks playbaGk...............•...•..
..
............................•..........•
•·
..
•••.... 5
Track/Folder Navigation ··
..
··
..
··
..
··
..
·
..
··
..
··
..
····
..
···
..
············..······
..
··
..
··
..
·······························
··
·······
..
··
..
·······5
Set
the Clock (CLK} ....................................·.......
..
..............
..
··
..
·
..
............·······
..
····
..
··············......·····
····
· 5
Adjust Volume (VOL) ·
····
············......................................
..
...............................
··
··················...........······5
Switch Between US and EU Frequen
cy
................
..
..........................................
..........
.....
....
........
..
........5
Manual Tuning (I<< I >>I} ........................................................
..
.................................
..
........................ 5
Auto SeekTuning (I<< I >>I).................................................................................................................. 5
Next/Previous Track
••
....
••
..
••
•
•••••••••••
..
•··•
•
•·••••••
..
••••••·•••••••••
..
••
..
••••••
..
••
..
•••••••••••
••·
•
••
..
••
..
••
..
•••••
•
•••
..
•••··••
•••
•
•••
5
Fast Forward/Backward •······························································
··
···················
··
······
······
····················
··
5
Change Bands (BAND)········
...
·....................................................................................................
..
...
..
... 6
Automatic Music Search (AMS) •
··
········
····
·····
··
·
····..··
···............
......
...............
....
.......
..
............................
-6
Track Search......·
..
··
..
··
..
··········........··..··············
..
·..······..······..........·····..
··
..
··..
·····························..·········· 6
Mute ..............
..
............
..
........................................................................................................................ 6
Insert USB ·
..
··
..
··
..
··
··
......··
..
··
..
....··
··
··
··
··.....·········...········..······..··..·········......·········
....
·········..··..·····
..
········· 6
AUX
In Jack .................
....
..................................................................................................................... 6
Release Panel
..
··
..
······
..
········......··..··········
..
·········..······
..
······
..
··
..
·········......······
..
·
..
······..·········
....
·····..··
..
··6
Reset System (RESET) ..··
..
······
..
···
..
·
..
·····..··
..
············....·
..
·············
..
··
..
·············..··..······················
..··
·····7
Bluetooth Operation..
..
................
..
...............
....
......................
..
............................................
..
..................... 7
Pair and Connect...................................................................................................................................7
Make a Call .
......
.....................
..
...........................
..
..
.................
..
...
....
.........................
..
.......................... 7
Redial Last Dialed
Number
...............
..
.......
..
..
..
........
..
................
..
.........................
....
....................
..
...... 7
Answer a Call...........
..
.....................
..
........................
...
............................
..
............................................ 7
End a Call ...........
......
............................................................................................................................. 7
Switch Audio Between
Car
and Phone .....................................................
..
........................................... 7
Adjust Talk Volume................................................................................................................................. 7
Bluetooth Music (A2DP)
..
....................................................................................................................... 7
Remote Control ......................
..
......................................
..
........................................................
..
...............8
Remove Insulating Sheet.................................................................................·...................................... 8
Replace Lithium Battery Cell......................................
..
.............................................................
..
........... 8
Remote Control Operation........................................................................
..
...............................
..
.......... 8
Button Names and Locations...
..
..
....
..............
..
......
..
.............................................................................. 9
Troubleshooting..................................................................
..
...............
..
...
....
......
..
...
..
.............
....
...............1o
Specifications .
....
.................................................................
..
....................................................................
11
-
PRECAUTIONS
Lithium Battery Cell Warnings
• Cell leakage may cause damage to the remote control.
Do notthrow cells into fire, as this may cause an explosion.
Keep battery cells out
of
reach
of
children.
Use cautions
•
•
•
•
•
To
reduce
the
risk
of
fire,
electric
shock,
and
annoying
interference
,
do
not
repair
yourself.
Please
refer
serving
to
qualified
person
.
Some MP3/WMAfiles
may
not be playable.
Keep
lower
volumes
to
concentrate
on
traffic
and road
conditions
for
safety
driving
.
If
users'
car
is
under
sunlight
for
sometime
,
please
lower
the
temperature
inside
the
car
then
start
the
player
operation
.
If
the
battery
is
disconnected
or
discharged
or
changed
,
the
preset
memory
will
be
erased
and
must
be
reprogrammed
.
Installation
of
unit
is
better
at
a
horizontal position
,
or
if
it
is
at
an
angle
,
it
may
be
not
working
at
its
best
situation.
Never
use
force
or
grip
the
display
and
the
buttons
tightly
when
removing
or
attaching
,
Be sure to lowerthe volume before switching off the unit
or
the ignition key.
1111
INSTALLATION
Installation Procedures
First complete the electrical connections and then check for correctness.
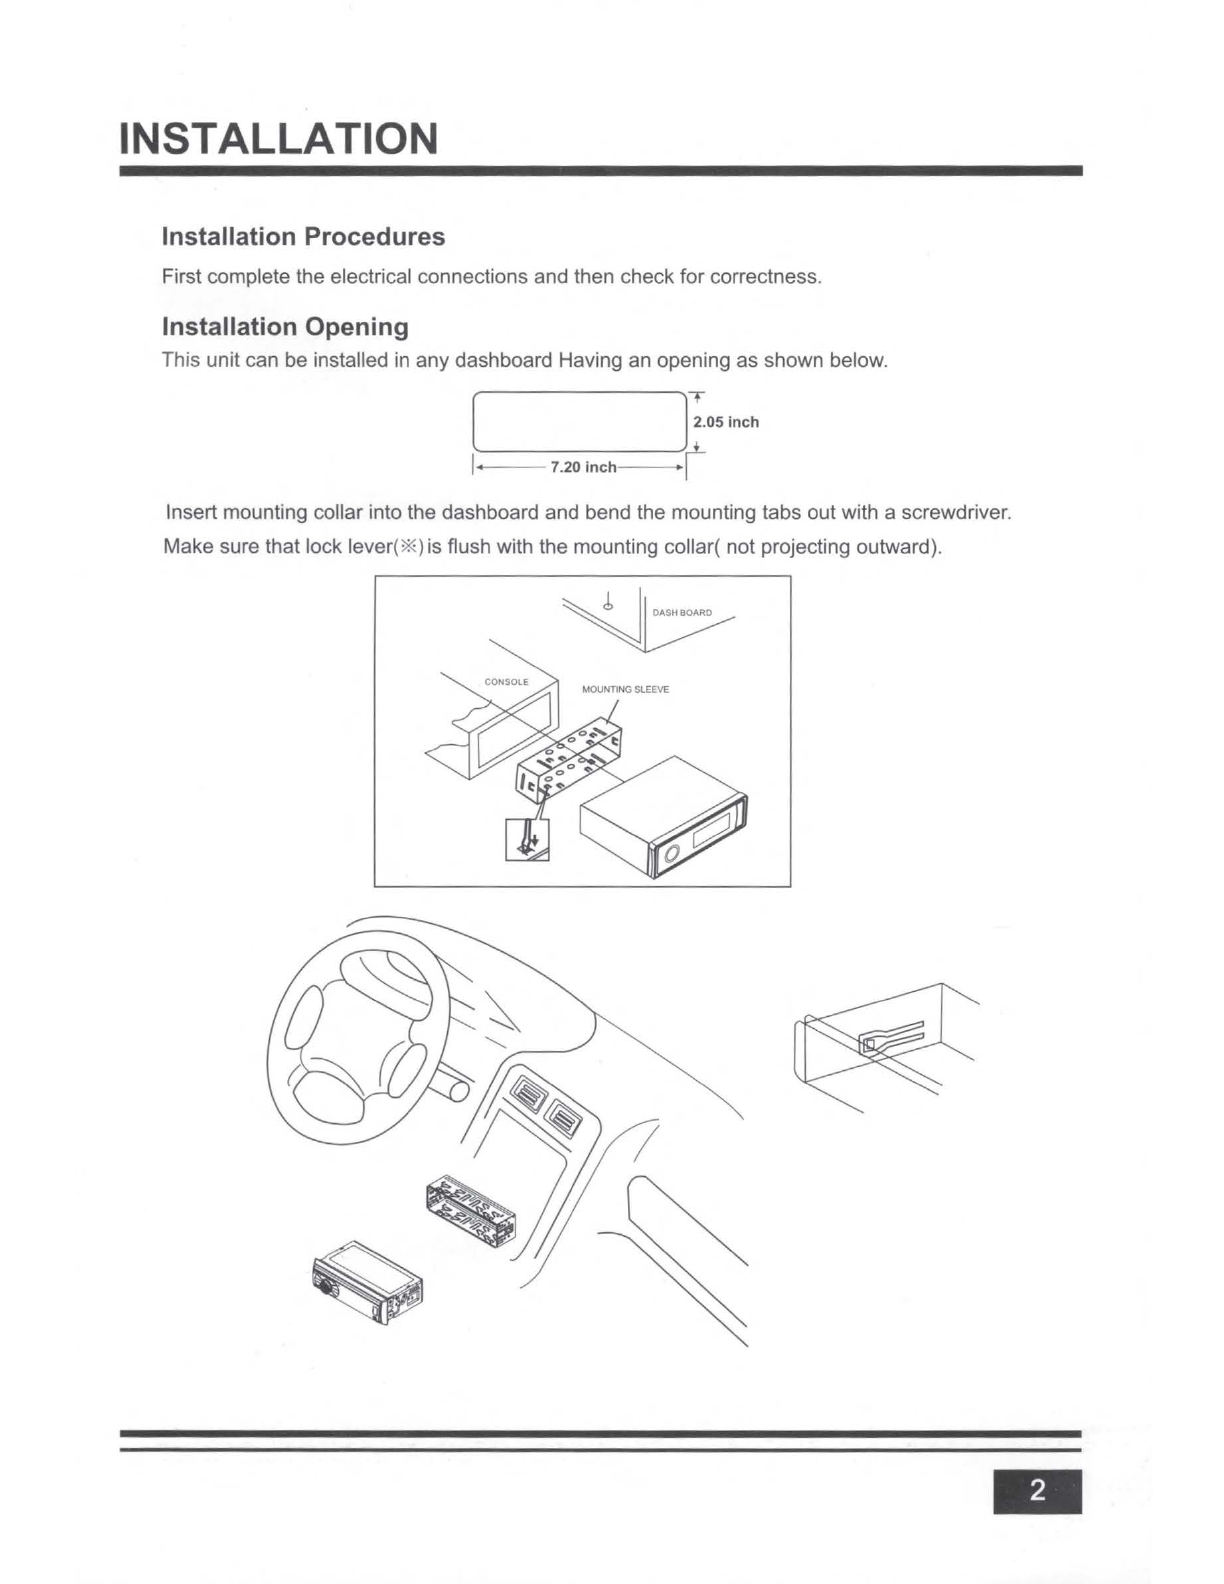
Installation Opening
This unit can be installed in any dashboard Having an opening as shown below.
[
]:.05
inch
1
----~µ_
-
--
7.20
inch
--
-+J
Insert mounting collar into the dashboard and bend the mounting tabs out with a screwdriver.
Make sure that lock lever(* )is flush with the mounting collar( not projecting outward).
-

INSTALLATION(CONT.)
-
Only
use speakers with 4
ohms
impedance.
-
Do
not attach the control panel to the chassis before wiring is complete.
-
The
maximum current
of
the
Amp
Remote trigger is 200mA.
Wiring Connections
WIRING
DIAGRAM
White:Front
Left
PRE-
AMP
Output
Red
:
Front
Right
PRE
-
AMP
Output
Red:
Rear
Right
PRE
-
AMP
Output
White:
Rear
L
eft
PRE-AMP
Output
Purple+
Rear
Right
Speaker
l)====l
Purple
/
Black
-
Gray+
I I I I
I I I I
I I
I I
t
f1sAMP~
H---
--
FUSE REPLACEMENT
WITH ATO TYPE ONLY
L======<I
Rear
Left
Speaker
Green/Black
-
CAUTION
+12V
DC
NEGATIVE
GROUND
White
+
Front
Right
Speaker
ll====
l=======<I
Front
Left
Speaker
ACC + (Red)
GND
-(B
lack
)
ANT+
(B
lu
e)
Power
B +
(Yellow)
Gray/Black
-
White
/
Black
-
Uninstall
the
Main Unit
1.
Remove the plastic trim out from the main unit.
2. Insert a bracket key into the left and right side
of
the main unit and drawthe unit out
of
the mounting sleeve.
-
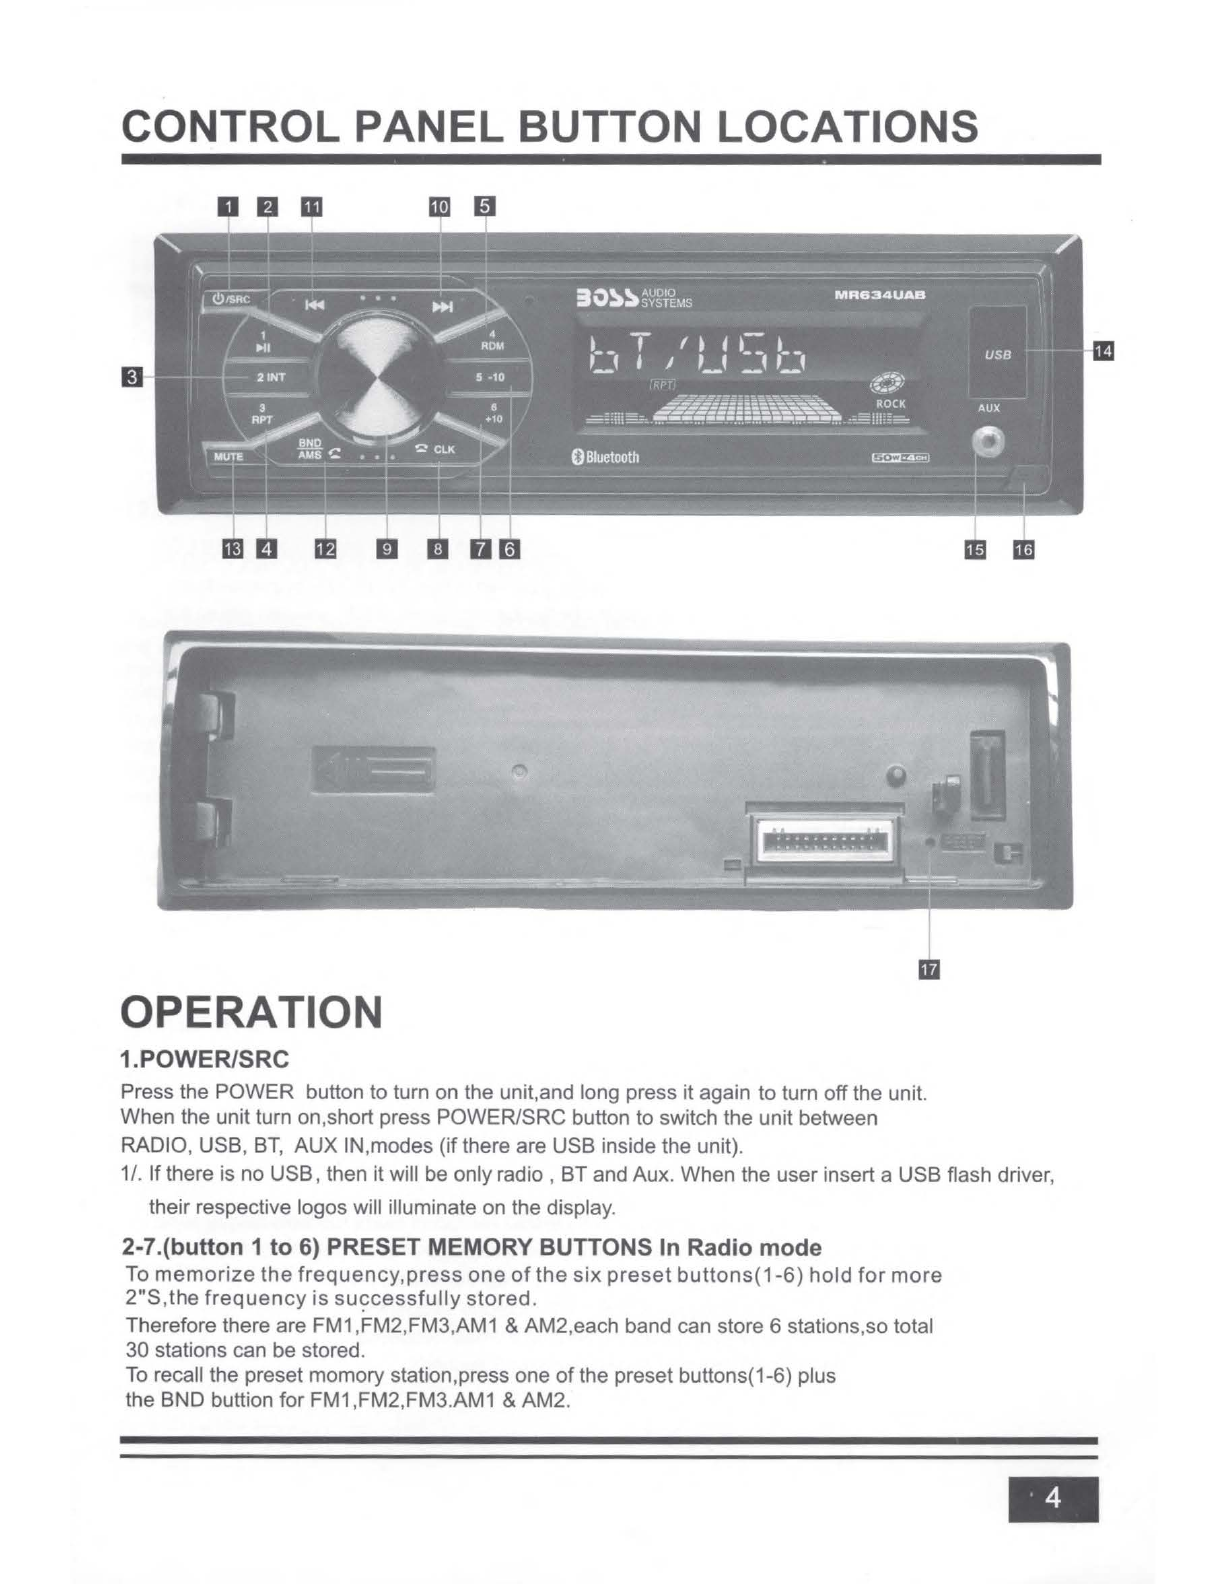
CONTROL PANEL BUTTON LOCATIONS
D fJ Ill
Ill
II
m
mom
OPERATION
1.POWER/SRC
Press the POWER button to turn
on
the unit.and long press it again to turn off the unit.
When the unit turn on.short press POWER/SRC button to switch the unit between
RADIO, USS,
BT,
AUX IN.modes (if there are USS inside the unit).
IE
Im
1/.
If
there is
no
USS, then it will be only radio , BT and Aux. When the user insert a USS flash driver,
their respective logos will illuminate
on
the display.
2-7.(button 1 to 6) PRESET MEMORY BUTTONS In Radio mode
To
memorize
the
frequency
.
press
one
of
the
six
preset
buttons(1-6)
hold
for
more
2"S,the
frequency
is
su<?cessfully
stored.
Therefore there are
FM1
,FM2,FM3,AM1 & AM2,each band can store 6 stations.so total
30 stations can be stored.
To
recall the preset momory station,press one
of
the preset buttons(1-6) plus
the BND buttion for
FM1
,FM2,FM3.AM1 & AM2. -

OPERATION
During USB mode, press the '1/>II' button to pause
or
resume music playback.
Press the
'2/1
NT' button to play the first 10 seconds
of
each track, press again to stop the introduction
scan, and play the current track.
Press the '3/RPT' button to toggle between RPTALL (Play all track), RPT FLR (Continuously repeats all
tracks
in
current folder) and RPT ONE (Continuously repeats current track).
Press the '4/RDM' button to play all tracks in random order, press again to cancel random playback.
During USB mode,
press
'5/-1
0'
button to
go
backward 10 tracks.
Press '6/+1
0'
button to
jump
toward
10
tracks
.
During USB mode,
long
press '5/-1 0' button to
go
back
1 folder.
Long press '6/+10' button to
go
up 1 folder. You can
repeat
this function
depending
on
the number
of
folders. This button will have no function
if
the USB or SD card has no folders.
8. CLK
Press the CLK button once to display the real time, With time appearing on the display.Press and hold
CLK button for more than 2 seconds until the hourflashes.
You
can adjust the HOUR by pressing the
»1
button and 1« button. Then press the CLK button briefly, the minute will flash, you can adjust the
MINUTE by pressing the » 1 button and 1« button.
Finally press the CLK button to confirm the time adjustments.
9.
VOLUME
adjustment
Rotate the volume knob to increase ordecrese the volume level
of
the sound output.
Press the SEL button on the front panel or on the remote control repeatedly to cycle through the
following adjustable audio functions: ILL MID/HI/LOW, BASS, TREBLE, BALANCE, FADER, EQ OFF,
CLASS/ROCK/POP/ FLAT, LOUD ON/OFF, DX/LOC, STEREO/MONO, CLOCK 12/24, AREA US/EU.
• Rotate the VOL knob on the front panel or press the VOL+ A
NOL-
• button on the remote control
to adjust the selected item.
-ILL MID/HI/LOW: This receiver is equipped with 3 brightness settings.
Rotate the volume knob to preset the illumination to middle, high
or
low.
-BASS: -7,-6,
-,
-1
,0,
+1
,- , +6,+7
-TREBLE: -7,-6, - ,
-1
,0,
+1
,
-,
+6,+7
-BALANCE:
L7
,L6,
-,
L1, 0,
R1
,- ,R6,R7
-FADER: R7,R6-,R1
,0
,
F1
,- ,F6,F7
-EQ(Equalizer) Setting: OFF, CLASS, ROCK, POP, FLAT
-Loudness: LOUD ON/OFF
-DX/LOCAL: Enables or disables the local broadcast mode (LOCAL).
-Stereo/Mono: Switches between MONO and STEREO reception mode for radio frequencies.
-CLOCK 12/24: Select between 12 hours and 24 hours display.
Note:
If
12 hourdisplay is selected , AM= Morning; PM= Afternoon
-AREA US/EU: This car radio is equipped the
USA/
Europe frequency.
-
Rotate the volume knob to switch between USA and Europe frequency.
The system will change the frequency setting in about 3 seconds.

OPERATION
10.FF(>>I)
&11.FB(I<<)
In the radio mode:
Long press the » 1
or
1« button for more than 2 seconds, the unit will switch to manual tuning
mode, briefly press the
»1
or
1« button to search the next
or
previous frequency step by step.
Short press the
»1
or
1« button, the automatic search will start, it will search upward
or
downward
for the strong signal radio station within the cuttent band. The auto searching will stop until find a
station.
In
the USB mode:
Briefly press the » 1
or
1« button to play the the next
or
previou track.
Press and hold the » 1
or
1« button to fast forward
or
fast backward.
12.BND/AMS
In radio mode.short press the BND/AMS button repeatedly to select the one
of
the radio band : FM 1,
FM 2,FM 3,
AM1
,AM2 in a cycle sequence. When you selecta band, the word
F1
,
F2,
F3 for FM band,
and A1,A2
for
AM band will be shown on the LCD display.
Press the BND/AMS button for several seconds.the radio searches form the current frequency and check
the signal strength until one cycle search is finished. When the 6 strongest stations will be stored into
the corresponding preset numberwithin the current band. Short press the AMS button on the remote
control to scan each preset station
in
each band.
During USB playb
ac
k, press and hold the BND/AMS button to enter track search mode, the "TRK0000"
will appearon the display. Rotate VOL knob to select the "first number
".
Then press the 1« button to
move the "first number" to the left and enterthe next number. Finally press the SEL button to
confirm and play the selected track.
If
no
any operation
in
5 seconds.it will play the current track.
13. MUTE
Short press the MUTE button to turn MUTE ON/OFF, when it is on, the MUTE will be flash on the LCD
and no sound output. When short press again itwill be cancelled.
14. USB PORT
15.
AUX
IN
JACK
16.
~
If
you want to reset the unit, remove the front panel from the head unit, press the £ button to detach the
press the £ button to detach the front panel.
17
.
RESET
To
reset all parameters to factory default values. Press the £ button to detach the control panel form
the head unit and remove the control panel,then use a subject with a sharp point end to thrush the
RESET hole.
-

BLUETOOTH OPERATION
Pair and Connect
Prior to using the Bluetooth device as a handsfree system for a Bluetooth-enabled mobile
phone for the first time, you must pair and connect the two devices as follows:
1.
In
any mode, prior to pairing and connecting, the BT logo flashes
in
the LCD indicating
that no device is connected.
To
begin pairing, enable
BT
mode on your mobile phone.
2. When the phone finds the car audio system, the "BOSS MR634UAB" will be displayed.
3. Choose the "BOSS MR634UAB" from the device list to pair and connect with the car audio
audio system. Upon confirming, the BT logo will stop flashing.
4. When pairing is complete, the mobile phone audio will automatically transfer to the car
audio system whenever a call is made
or
received, or when the mobile phone plays
music.
Make a Call
•
To
make a call, dial the call directly from the paired mobile phone.
•
To
make a call with this Bluetooth handsfree system.
a) When linking up the Bluetooth mobile phone to this car audio handsfree system, press
the
~
button to access the dial telephone number mode, then press the "0~9",
*and#
button on the remote control to input the telephone number, the entered numberwill
be
shown on the LCD.
b)
If
a number has been incorrectly input, press the DEL button
or
!:.! button to delete it.
c) Press the
~
button to make outgoing call.
Redial Last Dialed Number
Press and hold the
~
button on the control panel to redial the last dialed phone number.
Answer a Call
• When the mobile phone is called, the incoming telephone number displays in the LCD.
•
To
receive the call, press the
~
button on the control panel
or
remote control.
Reject or End a Call
To
reject the call
or
end
an
active call, press the !:.! button.
Switch Audio Between Car and Phone
During a call, press the VOL knob/button to switch the audio source from the car audio
system back to your mobile phone.
Adjust Talk Volume
• During a call, use VOL knob
or
VOL+
and
VOL
-buttons to adjustthe volume level.
• Use the MUTE button to mute sound.
Audio Streaming (A2DP)
1. Press the
C!.>/SRC
button to enter BT mode and display pause
in
the LCD.
2. When a mobile device is paired, music played through that device will automatically be
heard through the car audio system.
3. Press the
>>I
or
I<<
button to play the next
or
previous song/file on the mobile phone.
4.
Press the
>II
button to pause
or
resume music playback.
-

REMOTE CONTROL
Remove Insulating Sheet
The remote control comes with an insulating sheet
attached to the underside
of
the remote control, as
illustrated on the right. The remote control will not
work until the insulating sheet is removed.
Replace Lithium Battery Cell
1.
When the lithium cell battery becomes weak,
replace it
as
illustrated on the right.
2. Press and hold the movable block in the
direction indicated by arrow
1.
At
the same
time, pull the cell holder out
of
the remote
control in the direction indicated by arrow 2.
3.
Replace the old cell with a new one, maki
ng
sure
the(+)
polarity is facing upward.
4. Re-insert the cell holder into the remote
control.
A -Cell leakage may cause damage to the remote control.
-Do notthrow cells into fire, as this may cause an explosion.
-Keep battery cells out
of
reach
of
children.
Remote Control Operation
Position the emitting window
of
the remote control
toward the sensor window
of
the unit.
• The operation angle for front panel remote control
reception is about 30 degrees.
• The distance between the emitting window
of
the remote control and the sensorwindow
of
the unit should remain less than 5 meters.
1111

REMOTE CONTROL
Button Names and Locations
1.
CD
(Power on/off) button
2.
VOL+NOL-(volume increase/decrease) button
3.
Band button, ~ (answer call) button
4. PREV: tune down, seek down;
Previous Track, fast reverse
5. SEL(selection) button
6.
NEXT: tune up, seek up; Next Track, fast forward
7. Mute button, DEL(Delete) button
8. CLK(clock setting) button,
!:!
(end call) button
9.
►
II
button, preset station 1 button, keypad 1
10. INT(intro) button, preset station 2 button, keypad 2
11.
RPT(repeat) button, preset station 3 button,
keypad 3
12.
ROM
(random), preset station 4 button, keypad 4
13.
-1
0(previous 10 tracks), preset station 5 button,
keypad 5
14. +10(next 10 tracks), preset station 6 button,
keypad 6
15. ST(stereo) button, keypad 7
16. LOUD(loudness) button, keypad 8
17. AMS(automatic music search) button, keypad 9
18. SRC(Source) button, keypad *
19. EQ(Equalizer) button, keypad 0
20. LOC(local)/DX button, keypad #
4
7
9
10
12
13
15
18
19
14
-
16
17
20
Note: When using the remote control forthe first time, you must pull out the portective plastic
tab from the battery compartment found on the back
of
the remote control.
-
TROUBLESHOOTING
If
you
suspect
something
is
wrong
,
immediately
switch
power
off
. Do
not
use
the
unit
in
abnormal
condition,
for
example
without
sound
,
or
with
smoke
or
foul
smell
,
can
cause
fire
or
electric
shock
.
Immediately
stop
using
it
and
call
the
store
where
you
purchased
it.
Never
try
to
repair
the
unit
by
yourself
because
it
is
dangerous
to
do
so.
■
General
1)
Car's
engine
switch
is
not
on.
Turn you c
ar's
key
toACC
or
ON.
2)
Cable
is
not
correctly
connected.
Check
the
connection.
3)
Fuse
is
burnt.
Replace
fuse
.
4)
Volume
is
in
mute
or
minimum.
Check
volume
or
mute on/
off
,
adjust
volume
to
a
desired
level.
5)
Sound
skips.
The
installation
angle
is
more
than
30°.
Adjust
the
installation
angle
less
than
30°.
6)
The
operation
keys
do
not
work.
The
built-in
micro-
computer
is
not
operating
properly
due
to
noise
.
Press
the
RESET
button
to
restore
the
program
to
zero
.
■
Radio
1)
Much
noise
in
broadcasts.
Station
or
signal
is
too
weak
.
Select
other
stations
of
stronger
signal
level.
2)
The antenna cable is not connected.
Insert
the
antenna
cable
firmly
into
the
antenna
socket
of
this
c
ar
radio
.
3)
Preset
station
is reset.
Battery
cable
is
not
correctly
connected
.
Connect
the
battery
cable
to
the
terminal
that
is
alway
s
live
.
■
USB
USB
is
connecting
but
no
sound
a)
USB
connection
is
not
good.
Take
it
out
and
insert
again
.
b) USS is
damaged
or
no
music
file
inside
.
Change
to
another
USB,
or
record
music
inside
it.
-
SPECIFICATIONS
General
Power supply Requirement :
Maximum
power
output :
Speaker impedance :
Unit Dimensions(WxHxD) :
Weight :
Fuse:
RADIO
FM
Frequency Range
USA/
EUROPE:
Channel step:
AM
DC 12V
50WX4CH
4 - 8 Ohm
7.0 X 2.0 X 3.8 inch
1.54 Lb (0.7 kg)
15A
87.5 MHz -107.9
MHz/
87.5
MHz
-108.0MHz
200 KHz / 50 KHz
Frequency Range
USA/
EUROPE: 530 KHz -1710
KHz/
522-1620 KHz
Channel step: 10
KHz/
9 KHz
USB
Usable
Audio
Formats:
USB
Port
Type:
USB Charging:
Pre-amp
Output:
Frequency Response :
S/N Ratio:
BT
BT
Profile
supports:
Range
of
frequency:
-
MP3/WMA
2.0
5V/1A
Front
and
Rear
20
Hz
-
20
KHz
60d8
Headset
, Handsfree
and
A2DP
&
AVRCP
2.4GHz
spectrum
MR634UAB
BLUETOOTH®
I
FULLY
MARINIZED
MP3-COMPATIBLE
DIGITAL
MEDIA
AM/FM
RECEIVER
ao~s
AUDIO SYSTEMS
3451
Lunar
Court
• Ox
nard
,
CA
93030
www.bossaudio.com
800-999-1236
US
Toll-free
805-751-4853
Customer
Service
Tech
Support:
www.bossaudio
.
com/support/techn
i
cal-support
@CER
-
iPod® and iPhone® are trademarks
of
Apple, Inc. registered
In
the U.S. and other countries.
BOSS Audio Systems is not affiUated with Apple, Inc. or Google, Inc.
The Bluetooth® word mark and logos are registered trademarks owned
by
Bluetooth SIG, Inc. and any use of such marks
by
BOSS Audio Systems is under license. Olher trademarks and trade names are those of t
he
ir respective owners.

THANK YOU
from
BOSS
AUDIO
SYSTEMS
FOR YOUR PURCHASE
There's a reason
we
have
been
a
leader
and
innovator
in
the
business since
1987
.
Our
goal
is
for
you
to
be
completely
satisfied
wi
th
your
purchase.
If
for
any reason
you
are unsatisfied, please
let
us
be
the
first
to
know
.
Contact our Customer Care
dept.
at
805.
988.0192
WE
WANT
YOUR POSITIVE FEEDBACK
AND
REVIEWSf
www.bossaudio.com
1115

PLEASE
WRITE
A
REVIEW
on
Amazon.com and BOSSaudio.com
*****
510~S
AUDIO SYSTEMS
SHARE
YOUR
BOSS
Audio Systems photos and videos
on
our
website and Facebook!

510~S
AUDIO SYSTEMS
LIMITED
WARRANTY
This product
has
a manufacturer's warranty against defects in materials and workmanship
to
the
original purchaser
for
a period
of
one
year from the date-of-purchase
(DOP),
This manufacturer
warranty
1s
non-transferable. The warranty
,s
for
repair
or
replacement at
the
sole discretion
of
BOSS
AUDIO
SYSTEMS
{BAS).
For service under this warranty you need
to
return
the
product
to
BAS.
If
replaced,
BAS
reserves the right
to
replace
It
with
a new
or
reconditioned
product
of
the
same
or
s1m1lar
design.
Your product may qualify for a free extended warranty.
Please
see
www.bossaudio.com for
the
quallncallonsand details
of
this program.
Obtain Warranty Service
Within the first 30 days from
the
original
DOP.
BAS
will provide a return shipping label
for
any
defectiveproduct shipped from
within
the 50
US
States.
After
the
first30
days
you
areresponsible
for
the
freightcharges incurred
to
send the product back
to
BAS.
Tosend aproduct in
for
warranty
service you will need
the
following:
• A Return Authoriz.ation number
(RA#).
Please
contact
our
Customer Service
to
receive a
RA#
• A legible copy
of
the
proof-of-purchase
with
your name, the name
of
the authorized
dealer. the
DOP
and
the
model number
of
the
product requir
mg
service.
• Enclose a
note
stating the problem
or
issues
with
the
product. your daytime phone number,
email and return shipping address (within the
USA.
no
P.
O.
Box
please).
This warranty does
not
cover any
product
subjected
to
abuse,
neglect, incorrect wiring, water
or
physical damage or any
attempt
to
repair
or
modify
the product by anyone
other
than an
BAS
Repair Technician. Any damages, resulting
from
legal action
for
breach
of
expressed
or
implied
warranty shall be limited
to
the cost
of
the
original purchase price
of
the
product.All liability
for
coincidental damages are excluded under this warranty.The Customer
agrees
to
retain
the
original
proof-of
-purchase
for
establishing
the
effective date
of
this warranty.
If
BAS
or
an
Authorized
Dealer replace your product under warranty, the replacement product shall be considered a
transaction under the original warranty,
and
does
not
extend the original warranty period.
www.bossaudio.com
ONLINE:
www.bossaudio.com/support/techn
icaI-
support
US
Toll-
free
:800-999-1236 •
Customer
Service:
805
-
75
1-4853
02l7
NAME
AGE
ADDRESS
CITY
STATE
ZIP
E-MAIL
PHONE
MODEL NO.
DATE
OF
PURCHASE PURCHASE
PRICE
PURCHASED
FROM
INSTALLED
BY
SERIAL
NUMBER
(Ifapplicable)
VEHICLE:
YEAR
,
MAKE
AND MODEL
To
register this
product
fill-in this
form
,fold
and
mail this card
to:
10~S
AUDIO SYSTEMS
BOSS
AUDIO
SYSTEMS
3451
Lunar
Court,
Oxnard
,
CA
93030
For online registration,
scan
this
QR
Code
with
your
smart
___
;;;,~•--.
device,
fill
-in
the
online
form
to
register
your
product.
Or
fill
-in
the
online
form
by visiting:
www
.bossaudio.com/support/
product
-registration
Table of contents
Other BOSSCO Receiver manuals


