BOSSCO BE9ACP User manual

BE9ACP
USER'S
MANUAL
BLUETOOTH·
I
340
WATTS
I
MP3-COMPATIBLE
DIGITAL
MEDIA
AM/FM
RECEIVER
FEATURING
9
11
(229
mm}
CAPACITIVE
TOUCHSCREEN
AND
MULTICOLOR
ILLUMINATION
OPTIONS
f:::I
Workswith
m
Apple
CarPlay

10~S
AUDIO SYSTEMS
Thank
you
for
Choosing
Boss
Audio
Systems!
IMPORTANT! Fill
Out
And
Keep
Fo
r Your Records.
CD
IMPORTANT
Record
the
serial number
of
the
product:
Model:
Serial Number:
Date
of
Purchase:
The serial
number
is
located on
thetop
part
of
the
chassis.
1

Contents
Contents
.......................
..
........................
2
No
te
s.
.
..
...4
Cautions
.............................................................5-7
About
this
Manual...
California Prop. 65
..
.
..
7
..7
Basic
Product
Operation
...................
8
What comes in
the
box ............8
Product
Bas
i
cs
................................
...
..
...
.....
..
9-16
Unit
Installation
Op
eratio
n instruction
....
11
....12
Display screen disassembly instructions... .13
Using and Caring
for
th
e Touchscreen... .....
..
14
ProductSetup ....
....
..15
Navigating
the
Menus
.
..
...
..
....
.
.......
.
....
.
.....
..
...
...16
Apple
CarPlay
......................................
17
Warning
s....
Using CarPlay
.......
17
..
18
Gestures & Control
CarP
la
y Displ
ay
Di
sa
ble Apps.
..
...
...
..
...
.....
...
.
....
...
...
17
.......18
...18
Android
Auto'::
.....................................
19
Warn
in
gs.
Us
in
g Android Auto... .
..
...... 19
Bluetooth•
..........................................
20
Cautions
........
...................................................
....
20
Setup
&
Connections
.
......
.............
......
...............20
Phonebook .......
...
.
...
..................
.....
.
....
.....
.....
.
..
..
20
Device St
at
us
...
...
Calling.
Histo
ry
Priv
ate
Mo
de
Audio
Track Cont
rol
2
..20
.
..
21
..
..
21
.....21
.22
...22
Me
dia
Pl
ayer Source Switching
..
..................
..
.22
Media
......
.
.......
.
.......................
.
...........
23
Warnings ......
...
.
..
.
...
..
...
.....
...
.
..
............
...
....
...
....
.23
U
SB
Pl
ayback.. ......23
Navigating
Menu....
...
.
........
.......
......
..
..
.
......
...
....
23
Phot
os
......... ...
....
.
..
23
Radio
.........
....
.....................
.....
...
.
..........
24
Display Ove
rview
Controls......
..
.
Tuning.
....
.
Bands
..
.
Presets
Favorites
...........24
.
...
24
.
24
.
24
....
24
...............
24
Contents
AVIN
....................................................25
Pl
ayback
..
.
..
.
...
. ........
.....
..
...
....25
Camera
..................
..
.............................
25
Wa
rnings ......................................
...
...................25
Reverse Vi
ew
..........................
.....
.
..
..................25
General
Settings
....
.....
26
Cautions
...
.
....................
...
....
..
...............
...
.........
.
..
26
System Langu
age
Ti
me
Z
on
e............ ..........26
......26
Date & Time
..
.......................
..
...
...
......
..
..
.
26
Au
to
Adjust Daylight
Sav
ing ....
26
Sys
te
m Tone
..
...... ....
..
26
Po
wer Off
De
lay ..
..
...
...
......................
....
.............26
Par
en
tal D
isc
Lock ..........................................26
Audio
.
..
.
.........
.
..........
.
...........
.
..............
.
27
EQ
..
Balanc
e/
Fader
..
.
..
.
Subwoofer
Loudness
In
te
rn
al
Amp
Vol
ume
So
ur
ce level.
..
.........
27
.....
..
27
....27
............
27
................................27
....
27
.............
..
................
..
....
27
Display
Settings
......
.
...
.
..
.
..
.
..
...
.
............
28
Illumination Control
..
.......
..
...............................28
G
am
ma... .........
28
LED
Touch
Buttons
..........
...
...............................28
LED
A
nimati
on.................................................. 28
Bl
uet
o
oth
®Settings.
..
.........
....
..
.
...
....
..
29
Device Name
..
..
Camera.........................................
29
Rear Camera input... .
...
..
29
Front Camera input
..
....
..
..................
.....
.
....
......
29
Rear Vi
ew
pelay
..
. ..29
Ra
dio
Se
tti
ngs............
..
..
..
.
..
...
..
...
..
....
..
29
Regi
on
..
RBDS
..
29
...29
Alternative
Frequency
(AF)
....
.
.........
....
......
.......29
T
ra
ffic Ann
ou
ncement (TA) ..
..
.
..
....
..
.
..
.
..
....
..
.....29
3
Connections
.
.....
....
..
.
..
...
....
.......
..
...
..
..
...
30
Cautions
&
Warnings
..
.........
.
....
..
...
...
..
...
...
..
.30-35
Power/ SWC
Spe
aker...
Au
di
o
Pr
e-
am
p
/A
V I
N/
Radio
Camera/
US
B/ MI
C.
..
Parking Brake..
..
..
Hands-free M ic.........
..
.
..31
...
..
.......
..
.
32
.
..
..
..
....33
...34
..
..
35
Troubleshooting
.....
.
......
..
...................
.
36
Specifications
......
.
..
.......
...
......
.
......
.
..
.
...
38
Important
This symbol
with
"WARNING" is
intended
to
alertthe
user
to
the
presence
of
crltical
Instructions/procedures.
Fallure
to
observe
theinstructions/procedures
can
result
in
injury,
death,
damage
to
the
product
and/or
property.
A
LhWARNING
This symbol
with
"CAUTION"
is
intended
to
alert
the
user
to
the
presence
of
important
instructions/procedures.
Failure
to
observe
theInstructions/procedures
can
result
In
injury
or
damage
to
the
product
and/or
property.
&CAUTION
Works
with
Ap
ple
Ca
r
Play
0
Bluetooth
®
4
Use
of
the
Apple CarPlay logo means
that
a
vehicle user interface meets Apple
performancestandards.
Apple
is
not
responsible
forthe
operation
of
thisvehicle
or
its compliance
with
safety and
regulatory standards.
Please
note
that
the
use
ofthis
product
with
iPhone
or
iPod mayaffect
wireless performance.
ipone
is
trad
emark
of
Apple lnc.,registered
in
the
U.S.and
other
countries.
Apple CarPlay is atrademark
of
Apple Inc.
Android
Auto
is atrademark
of
Google
LLC.
The Bluetooth®word mark and logos are
registered trademarks owned by Bluetooth
SIG,
Inc. and any use
of
such marks by
Boss
Audio Systems is
under
license.
Other
trademarks and trade names arethose
oftheir
respective
owners

Caution
Precautions
BE
SURE
TO
OBSERVE
THE
FOLLOWING
GUIDELINES:
Do
not
turn
up
th
e
volume
so high
that
you can't h
ea
r
what's
around you.
Use
caution
or
temporarily
discontinue
use
in
potentially
hazardous
situations.
Do
not
operate
mobile
video
equipment
whiledriving a motorized vehicle
-safe
driving
and
safety
consideration
of
others
should
always be
your
highest
priority.
Set
your
volume
control
at alow
setting,
then
slowly
increase
the
sound
until
you
can
hearit comfortably without
distortion
,
or
ear
disco
mfort
.
In
the event
you
should
notice
smoke,
strange
noises
or
odorfrom
this
product,
or
any
other
abnormal
signs,
immediatelyturn
off
th
e
pow
er and consult
yo
ur
dealer
or
th
e nearest authorized
BOSS
AUDIO
SYSTEMS
S
erv
ice Cente
r.
Using
this
product
in
this
condition
may
result
in
permanent
damage
to
the
system.
Installation
Precautions
Boss
Audio
Systems does not recommend
to
install
the
product
yourself.
We
recommend
to
have
it
professionally
installed
by
acertified
professional.
Always consult
with
a professional install
er
.
Do
not attemptto install or
service
this
product
by
yourself.
Installation or
servicing
of
this
product
by
persons
without
profess
i
onal
trainingand
experience
in
electronic
equipment
a
nd
motorized vehicle accessories
may
be dangerous and couldexpose you to
th
e risk
of
electric shock,
injury
or
oth
er
hazards
Refer any repai
rs
to
a qualified
BOSS
AUDIO
SYS
TE
MS
ServiceCenter
5

Caution
Before Installing
To
avoid
pot
e
ntial
shorts
in the
electrical
system,
be
sure
to
disconn
ect
the(-)
battery
cable
before
ins
t
allation
.
Use this
unit
with
a 12-voltbattery
and
negative
grounding
only.
Failure
to
do
so
may
result
in
afire or
malfunction.
CAUTION:
TO
REDUCE
THE
RISK
OF
ELECTRICL
SHOCK
,
DO
NOT
REMOVE
COVERS.
NO
USER
SERVICABLE
PARTS
INSIDE.
REFER
SERVICING
TO
A
QUALIFIED
SERVICE
PROFESSIONAL
Product Safety
It
is
against
Federal
and
Local
laws
for
video
to
be
viewed
by
the
driver
while the
vehicle
is
in
motion
.
This
video
product
wa
s intended
to
be used w
ith
the
parking
brake
safety
feature.
Video
cannot
be
seen
withoutthe proper
parking
brake
powered
connection
.
Tampering
or
disabling
thi
s fe
atu
re
will
void any
and all
warranty.
Please check
with
a
prof
essional installer
to
have
your
product
installed properly.
CD
Important Note
Due
to
ongoing enhancements, example images on screens mayslightly differ
from
actual product.
6
Caution
Images
and
Video
Watching video
while
driving isagainst Federal, State, and
Local
laws.
Drive safely, know and
obey
trafficrules.Watchingthisscreen and making selections
while
drivingcan lead
to
aserious accident.
Check surroundings
for
safety while camera imag
es
are displayed.
Do
not
usefeatures
of
this
product
while
driving
ifit
cannot
be
operated safely and legally
in
your
location. Before operation
of
smartphoneApps
ac
c
ess
ible
from
thisdevice, read safety instructions In
your
Owner's Manual. When using navigation Apps stay
alert
to
observe real
world
conditions.
About
this
manual
Toentirelyunderstand
how
to
properlyuse
your
new
Boss
product,
it
isrecommended
to
read this
entire
user's manual, and keep
it
in
asafe place
for
futu
re
reference.
-
Read
the
entire
manual
-Keep
the
manual
-Follow all instructions
-Clean
with
a
dry
cloth only
-Do
not
us
e
or
operate near
wat
er
-Do
not
defeat
any safety features
California Residents (Proposition
65)
This product
may
contain chemicals known
to
the
St
a
te
of
California
to
cause cancer, bi
rth
defects
or
other
reproductive harm.
7

Basic
Product
Operation
What
comes in
the
box
Hardware
Qty
1
BE9ACP
Qty 1 T
appi
ng
Scre
w
5X
18B/A Qty 2 Br
ac
kets
Qty
1
Ru
bbe
rG
rome
t Qty 1
Sp
ri
ng
Was
he
r
Connections
Q
ty
1
Hex
Bo
lt Qty 2 P
lai
n
Wash
er Qty 1
Po
we
r
/H
arness
Qty
1 HexNut
Qt
y 2 K
ey
Qty 1
Hand
s-free M
ic
ro
Qty8
Scr
ew
MSx
6 Qty 1 MountingBr
ack
et
(
00000000000001
8
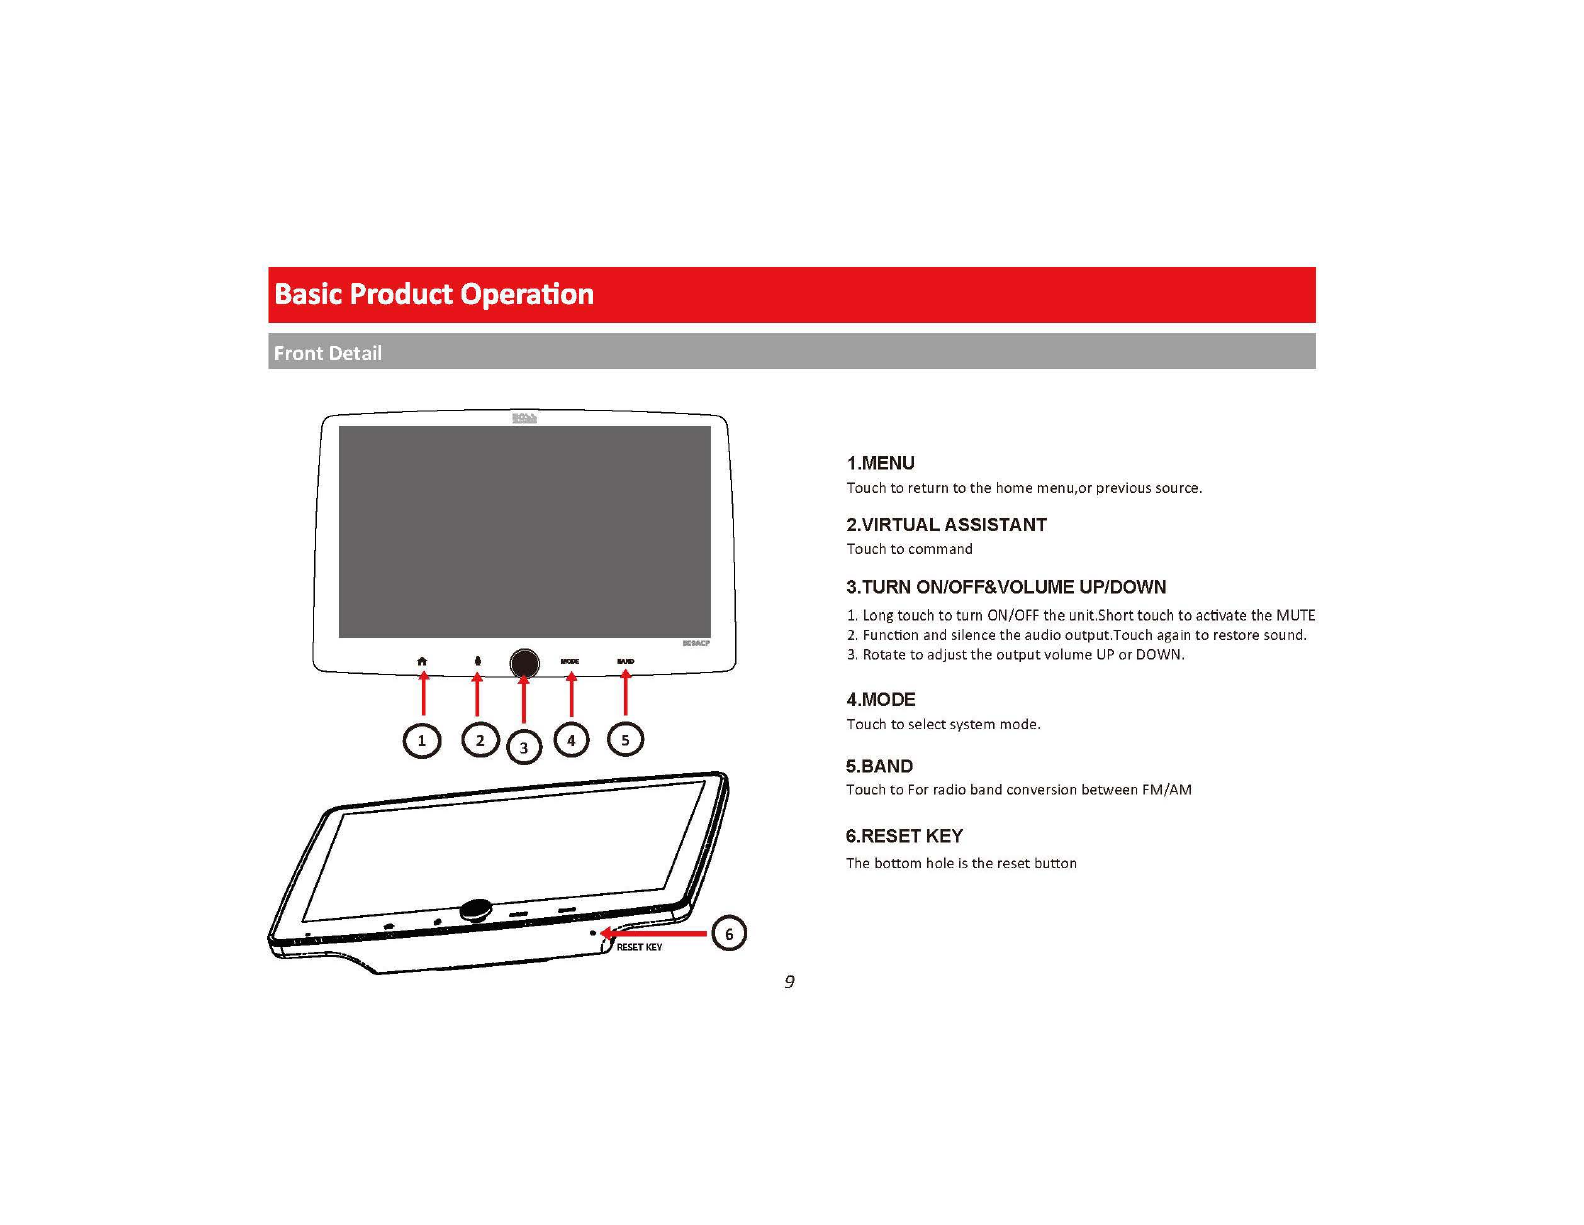
Basic
Product
Operation
Front Detail
1.MENU
Touch
to
return
to
the
home
menu,or
previous source.
2.VIRTUAL ASSISTANT
Touch
to
command
3.TURN ON/OFF&VOLUME UP/DOWN
1. Long touch
to
turn
ON
/
OFF
the
unit.Short
touch
to
activate the MUTE
2. Function and silence
the
audio
output
.Touch
aga
in
to
restore sound.
3.
Rotate
to
adjust
the
output
v
olume
UP
or
DOWN.
4.MODE
00000
Touch
to
select system mode.
5.BAND
Touch
to
For radio band conversion
between
FM/
AM
6.RESETKEY
The
bottom
hole
is
the
reset
button
--
• 0 9

Basic
Product
Operation
Rear Detail
i
f
::;;
I
I!'
!!'
I i l
,:,
I
0
USB2
0
USB1
10
0
Main
Harness
I
0000
0
®
R
ADIO
Pre-AmpO
ut
put
AJV
In
put AM/FM
Antenna
Basic
Product
Operation
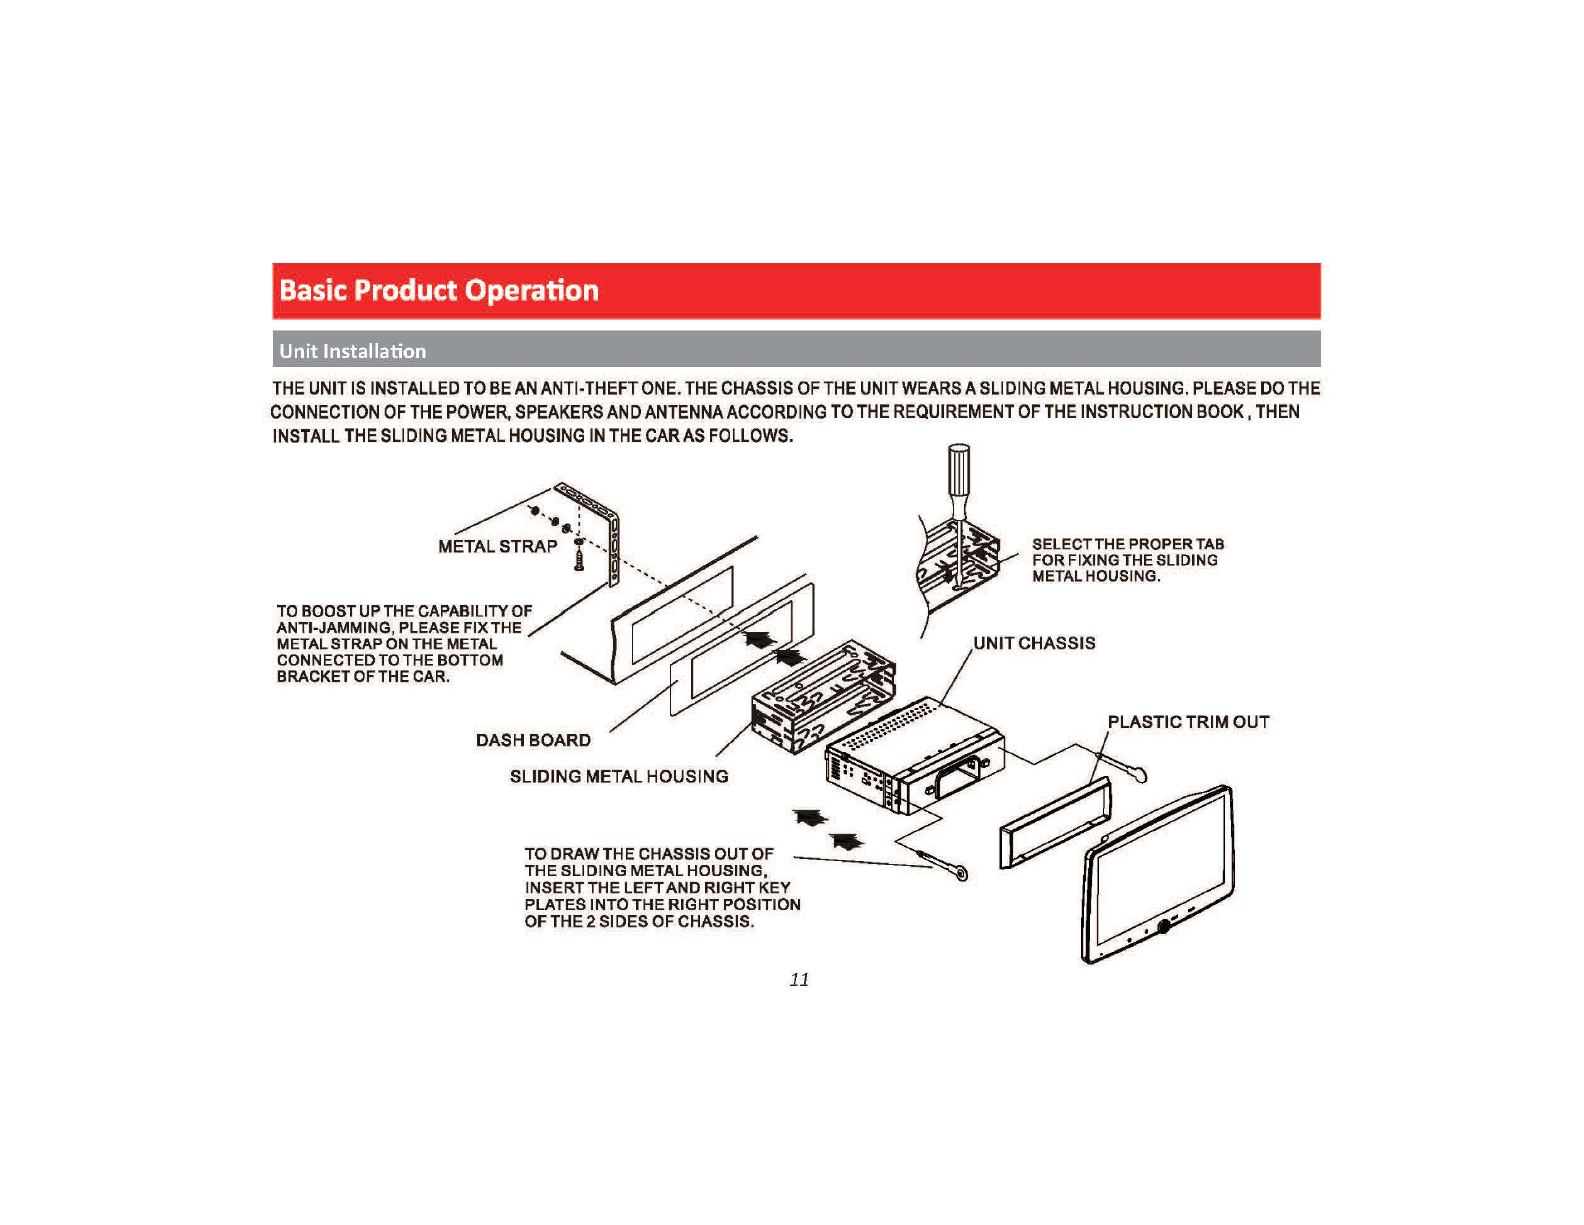
Unit
Installation
THE
UNIT
IS
INSTALLED
TO
BE
AN
ANTI-THEFT
ONE.
THE
CHASSIS
OF
THE
UNIT
WEARS
A
SLIDING
METAL
HOUSING
.
PLEASE
DO
THE
CONNECTION
OF
THE
POWER,
SPEAKERS
AND
ANTENNA
ACCORDING
TO
THE
REQUIREMENT
OF
THE
INSTRUCTION
BOOK,
THEN
INSTALL
THE
SLIDING
METAL
HOUSING
IN
THE
CAR
AS
FOLLOWS.
~
: 0
~
--
....
;
METAL
STRAP
r·-
TO
BOOSTUPTHE CAPABILITYOF
ANTI-JAMMING, PLEASE FIXTHE
METALSTRAP
ON
THE METAL
CONNECTED
TO
THE BOTTOM
BRACKET OF
THE
CAR.
DASHBOARD
SLIDING
METAL
HOUSING
TO
DRAW
THE
CHASSIS
OUT
OF
THE
SLIDING
METAL
HOUSING,
INSERT
THE
LEFT
AND
RIGHT
KEY
PLATES
INTO
THE
RIGHT
POSITION
OF
THE
2
SIDES
OF
CHASSIS.
11
SELECTTHE PROPERTAB
FORFIXING THESLIDING
METALHOUSING.
UNITCHASSIS

Basic
Product
Operation
Operation instruction
ooooooooaooo•ooeooo
000000000000000000
ooo
oo
ooooooooooooeo
*
,---
---,
*
\\
~'
;J'
I}
" u
The display screen can be freely
adjusted 25 degrees back
or
forth
The display screen can befreely
adjusted 15degrees right
or
left
~=~
,,-<
<\
'
'
'
''
'
''
'
''
'
'
'
'
'
'-
•12
The upand
down
position
of
the
display
screen can be freely
adjusted
0 0
o 0
~
Basic
Product
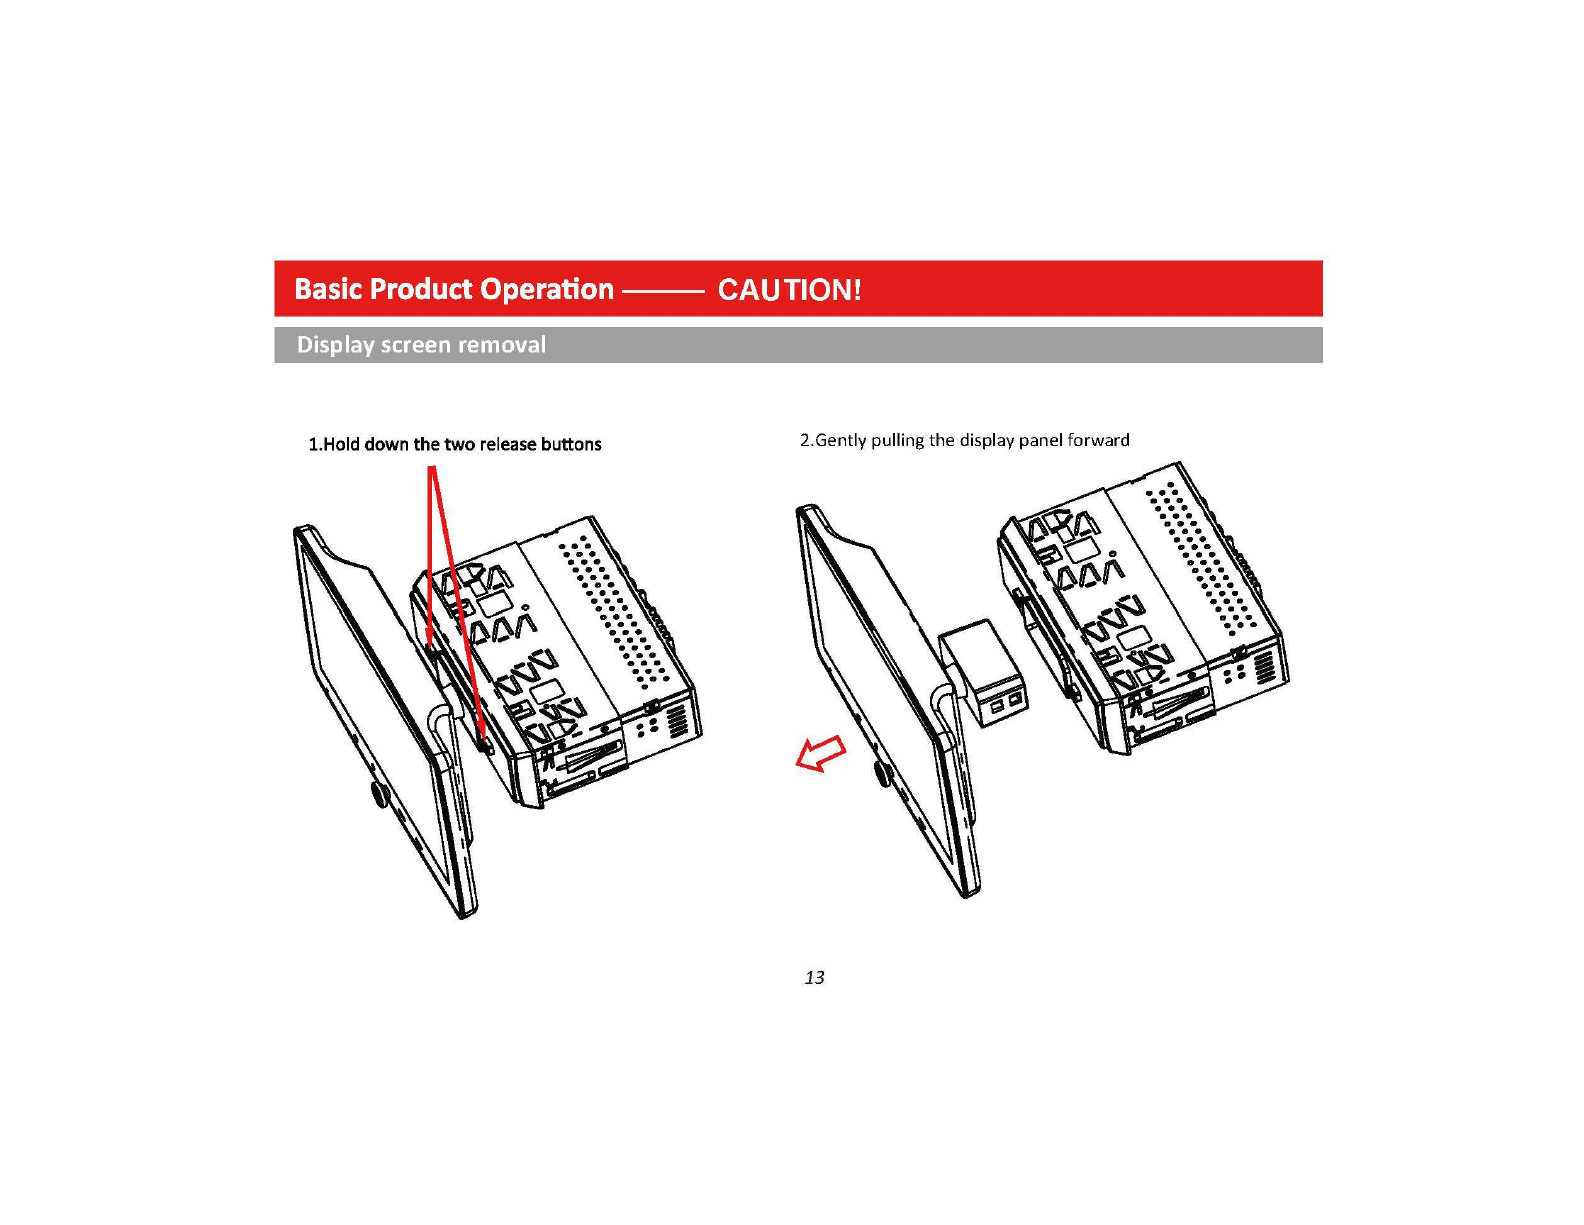
Operation--
CAUTION!
Display screen removal
1.Holddown
the
two
release buttons 2.Gently pulling
the
display panel forward
13
Basic
Product
Operation
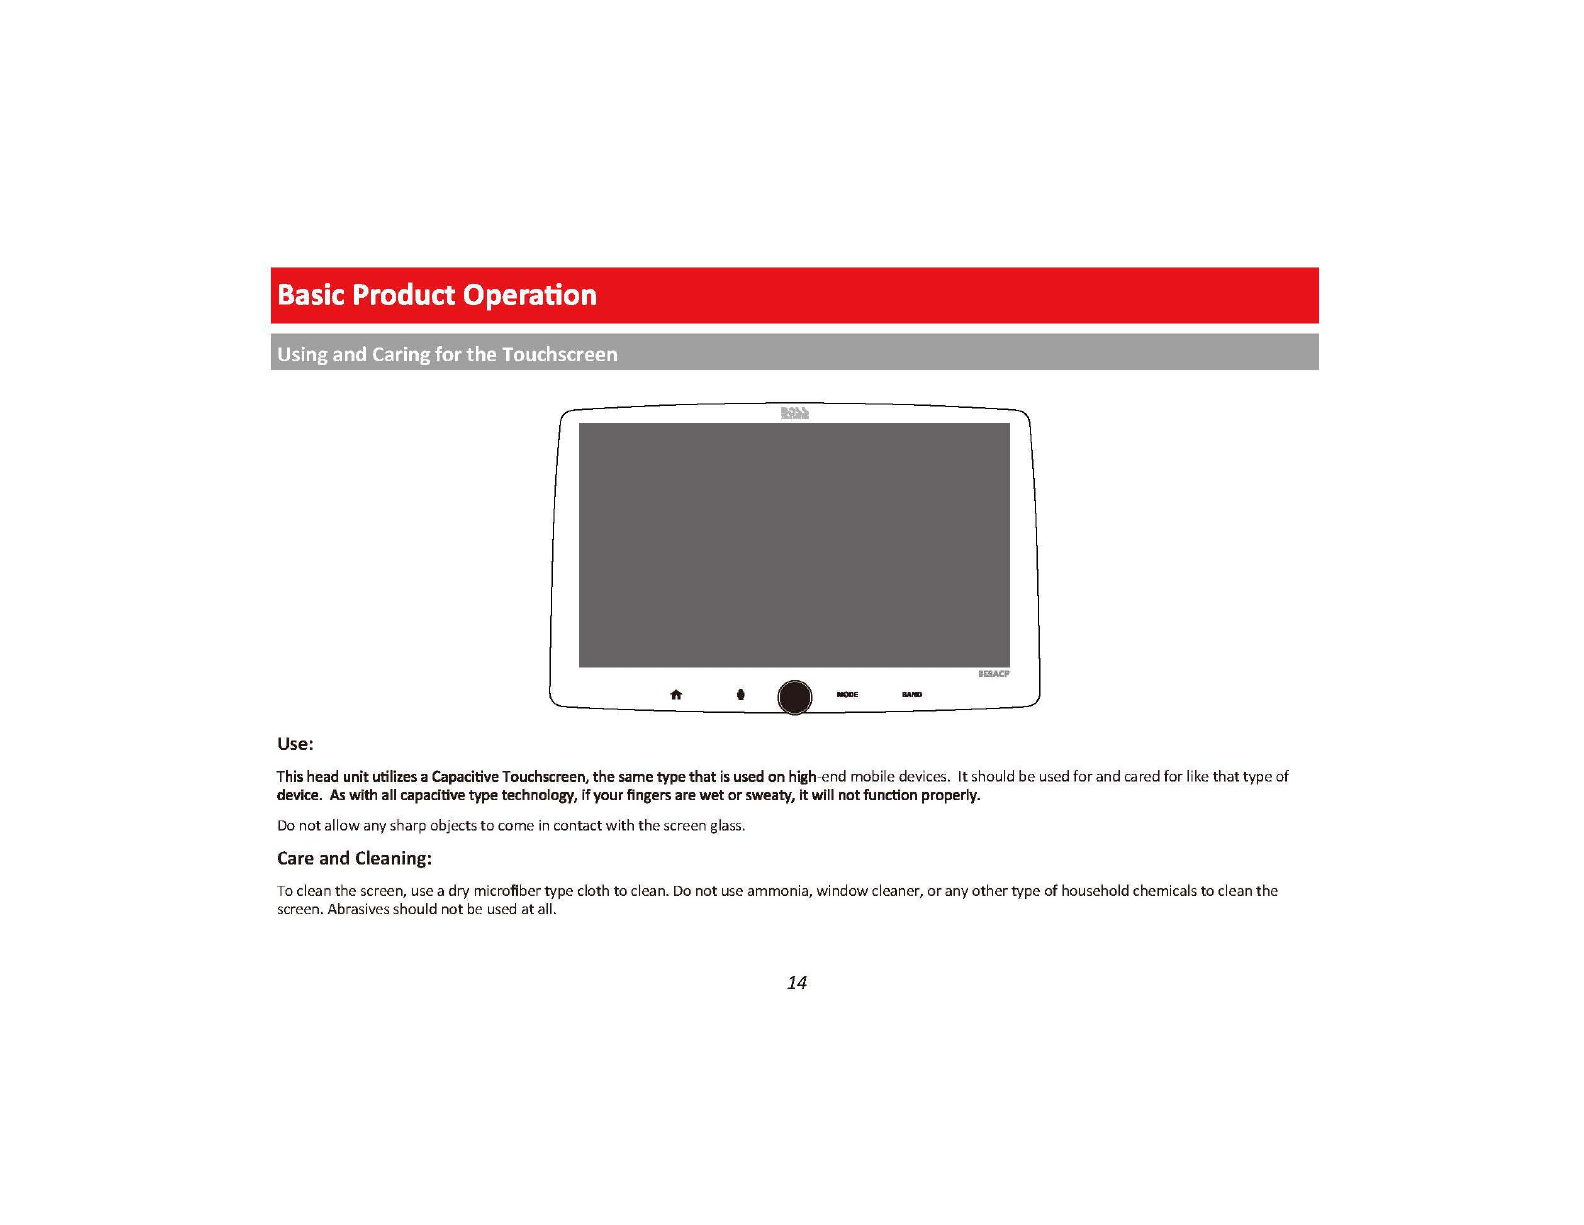
Using
and
Caring
for the Touchscreen
Use:
This head
unit
utilizes a CapacitiveTouchscreen,
the
same type
that
is
used
on
high-end mobile devi
ces
.
It
should be u
se
d
for
a
nd
c
ar
ed
for
li
ke
that
type of
device.
As
with all capacitivetype technology,
If
your
fingers are
wet
or
sweaty,
it
will
not
function properly.
Do
not
all
ow
any sharp
obj
ec
ts
to come in contactwith
the
sc
reen g
las
s.
Care and Cleaning:
To
cl
ea
n
th
e s
cr
een, u
se
a dry microfiber
typ
e cloth
to
cl
ea
n. Do
not
u
se
ammonia, window cleaner, or any
oth
er
typ
e
of
household chemicals
to
cl
ean
th
e
sc
r
ee
n.Abras
iv
es s
hould
not be u
se
d at all.
14

Basic
Product
Operation
Product
Setup (Date &
Time)
Setup
Option
A:
tarPlay Method
Connect
your
Apple "' device usinga
Li
g
ht-
ning®cabl
e*
. The CarPlay
US
B
port
mu
st be
used.
This
will
automatically setup
the
time
and
dat
e.
User
must
s
et
Time
Zone manually.
De
fault
is Pacific T
im
e Z
on
e
@
General
Date&Time
Setup
Option B:Date
and
Time
@
General
Date&Time
15
Additional
Setup
General > Language
Audio>
EQ,
Other
Audio
Settings
Display> Illumination, Brightness
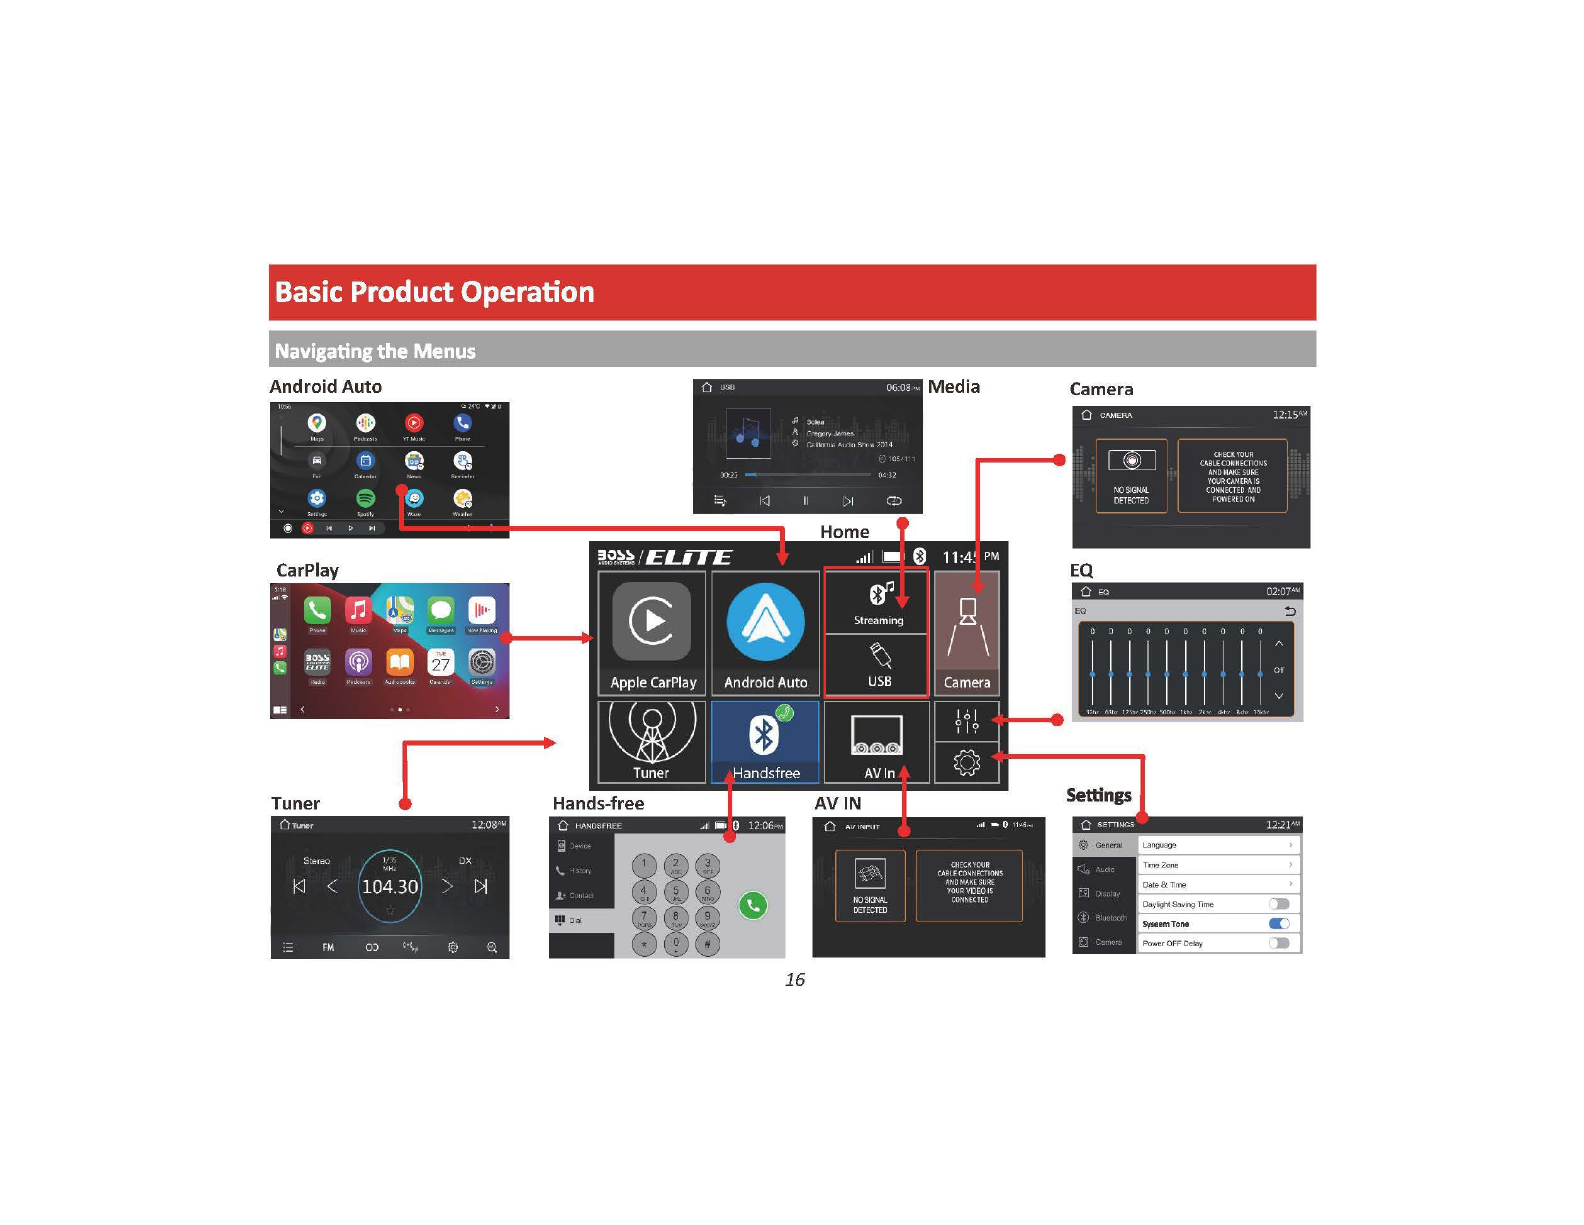
Basic
Product
Operation
Navigating
the
Menus
Android
Auto
Tuner
I
16
Camera
EQ
iii •
OJOO
COCO
OO
I I I I I I I I I I
:,
I I I I I I I I I IV
~
<a
l S l S
S~
" , 4 S 1
Settings
Cl
Apple CarPlay
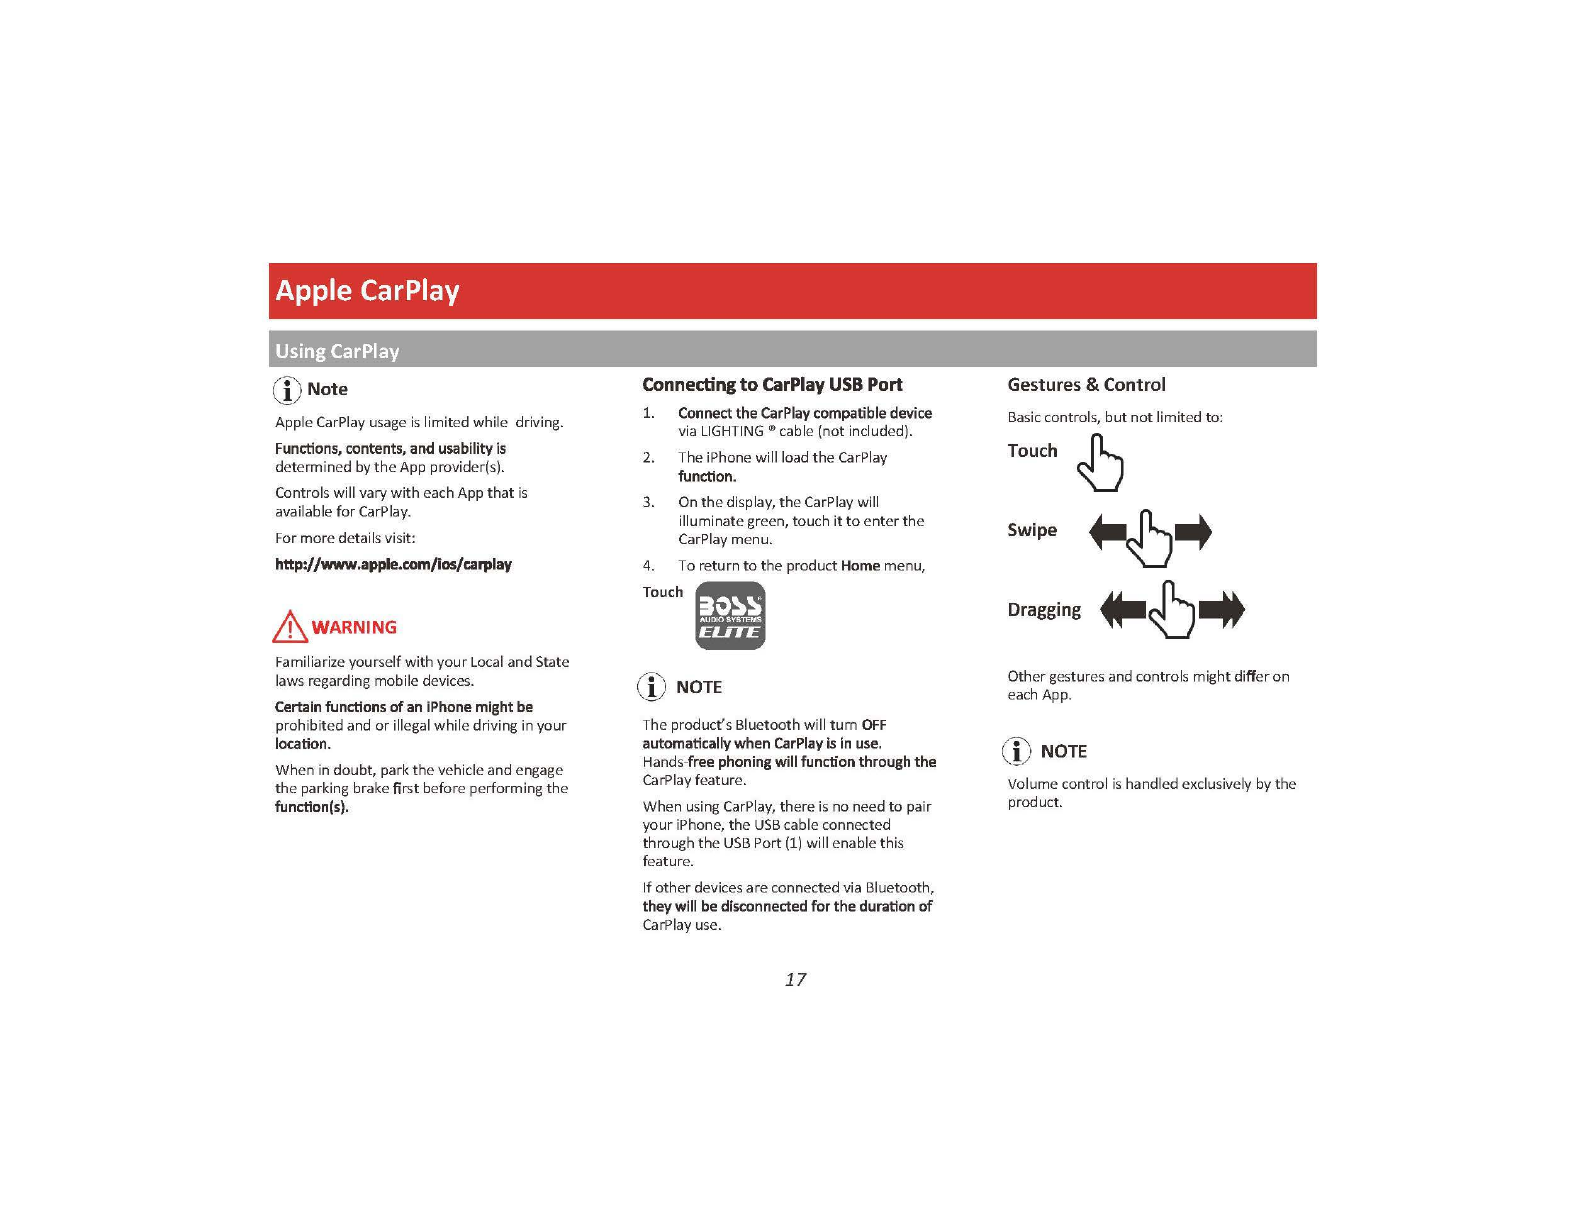
Using CarPlay
(DNote
Apple CarPlay usage
is
limited
while
driving.
Functions,
contents,
and
usability
is
determined by
the
App provider(s).
Controls
will
vary
with
each App
that
is
available
for
CarPlay.
For
more
details visit:
http://www.apple.com/ios/carplay
&_WARNING
Familiarize yourself
with
your
Local and State
laws regarding mobiledevices.
Certain
functions
of
an
iPhone
might
be
prohibitedand
or
illegal while
dri
ving in
your
location.
When in
doubt,
park
the
vehicleand engage
the
parking brake
first
before performing
the
function(s).
Connecting
to
CarPlay
USB
Port
l.
Connect
the
CarPlay
compatible
device
via
LIGHTING
®cable (not included).
2. The iPhone will load
the
CarPlay
function.
3. On
the
display,
th
eCarPlay will
illuminate green, touch
it
to
enter
th
e
CarPlay menu.
4. To return
to
the
product
Home
menu,
G)
NOTE
The product'sBluetooth will
turn
OFF
automatically
when
CarPlay
is
in
use.
Hands-free
phoning
will
function
through
the
CarPlay feature.
When using CarPlay,
ther
e
is
no need
to
pair
your iPhone, the
USB
cable connected
through
th
e
USB
Port
(1)
will enable
thi
s
feature.
If
other
devices areconnected via Bluetooth,
they
will
be
disconnected
for the
duration
of
CarPlay use.
17
Gestures & Control
Ba
sic controls,
but
not
limited to:
Touch
~
Swipe
~
..
Dragging
♦-~--
Othergestures and
contr
o
ls
mig
ht
differ
on
each App.
CD
NOTE
Volume control
is
handled exclusively by
th
e
product.

Apple CarPlay
Using CarPlay
[
CarPlay DisplaySetup
1.
Using
your
iPhone:
Settings
>
General
>
CarPlay
2.Touch
and
Hold each App icon
to
move.
To re
mo
ve anApp, Touch -
16:33
( General CarPlay
,lll
4G
ffl}
If
your
car
supports
wire
less
CarP
lay,
press
and
ho
ld
the
voice control button
on
your steering wheel to
start
CarPlay
se
tu
p.
MY
f
AR
BOSS
AUDIO
BE9A
CP
!°'
)
NOTE
-.,
_!
,.,
Only Apps
with
th
e ic
on
can
be
removed
from
CarPla
.
Only Apps
with
th
e icon c
an
be added
in carpla
y.
,111
4G
(tiiJ•
<
Back
Cu
st
om
ize Reset
Add
and
organ
i
ze
apps
to
show
in
Ca
rPl
ay's
hom
e scree
n.
INCLUDE
mPho
ne
n
Mu
s
ic
~ ;
Map
s
C M
es
sages
Iii
~ N
ow
Pl
ay
i
ng
~
Radio
0
CJ
Audiobooks
1A
Cal
endar
&
Se
t
tin
gs
0 a Podcasts
MORE
APPS
0
ml
NetEa
se
Music
18
How
to
Disable Apps
1. Using yo
ur
iPhone:
Settings
>Notifications >
App
to
Disa
ble
15:
50
o111
4G
!iw-
<
Notif
i
cat
ions M
essa
g
es
Allow
N
ot
ific
at i
ons
C)
ALElrS
□
8 D
Not
il
icl:
ionCcrtcr
• • •
Ba
n
ner
Style Temporary
So
un
ds
Note
Bad
gm;
Sh
ow
in C
ar
Pl
ay
C)
CFfONS
Sh
ow Previews When Unlocked (Default)
NotificationGrouping Automatic
Repeat Aler
ts
Once

Android Auto
Using Android Auto
("'
'-!)
Note
Android
Auto
usage
is
limited
while
driving.
Functions,
contents,
and
usability
is
determined by
th
eApp provider(s).
Controls
will
vary
with
each App
that
is
available
for
Android Auto.
For
more
details visit:
https://www.androld.com/auto/
6wARNING
Familiarize yourself
with
your
Local and State
laws regarding mobiledevices.
Certain
functions
ofthe
mobile
device
might
be
prohibited and
or
ille
ga
l
while
driving
in
your
location
.
When in
doubt,
park
the
vehicle and engage
the
parking brake
first
before performing
the
function(s).
CD
NOTE
To complete
the
setup properly,
the
Parking Brake status wire mustbe
connected.
6wARNING
For
your
safety,
the
setup proc
ess
MUST
be
accomplished while
the
vehicle is Parked and
ParkingBrake Engaged.
Android Auto App
1.
For
Android 9.0
or
earlier, download and install the
Android Autoapp from
Goo
gle
Play.
For
smartphone
withAndroid
10.0
or later, plug in your phone
and
follow
theprompts
on
your phone
to
accept the permissions
thatAndroid Auto requires
~
GETITQN
~
,...
Google
Play
Minimum
Requirements:
Android
5.0
For
a
list
of
compatible
devices
:
https://www.android.com/auto/
Updating
Related
Apps
1. During
th
e
rst
start
up
and setup
of
th
e
Android
Auto
app, the Maps, Music, Google
apps
will
install/update
automatically.
19
Connecting
to
Android
Auto
USB
Port
1.
Connect
the
Android
compatible
device
v
ia
the
appropriate
USB
cable
(not
included).
2.
TheAndroid device will load
th
e Android
Auto
function
.
3.
Bluetooth
will
connect
automatically
when
th
e setup
is
completed.
Android Auto Permissions
Permissions
Several features can
be
allowed
or
denied
access
to
customize
your
usability
of
th
e product.
The
access
can
always
be
modified
in
Settings
on
the
Android
device.
Table of contents
Other BOSSCO Receiver manuals


Popular Receiver manuals by other brands


Herutu
Herutu POKAYOKE TWF-600R operating instructions

Pioneer
Pioneer ELITE VSX-LX505 instruction manual

Harman Kardon
Harman Kardon AVR 340 quick start guide

CYP
CYP CH-103Rx Operation manual

Akai
Akai AA-1010 Service manual and parts list

Sirius Satellite Radio
Sirius Satellite Radio Streamer Replay SIR-STRC1 user guide


