BOSSCO TU-2 Chromatic Tuner User manual
1
Owner’s Manual
DCAC
AC & BATTERY
POWERED
FET

2
Thank you, and congratulations on your choice of BOSS TU-2 Chromatic Tuner.
Before using this unit, carefully read the sections entitled: “USING THE UNIT SAFELY”
and “IMPORTANT NOTES” (p. 28–34; 5–7). These sections provide important information
concerning the proper operation of the unit. Additionally, in order to feel assured that you
have gained a good grasp of every feature provided by your new unit, Owner’s manual
should be read in its entirety. The manual should be saved and kept on hand as a conve-
nient reference.
Copyright © 1998 BOSS CORPORATION
All rights reserved. No part of this publication may be reproduced in any form without the
written permission of BOSS CORPORATION.

3
Features
• The ideal tuner for use in live concert situations.
•Since the TU-2 uses the same shape and structure as other Boss compact effect
units, it features excellent durability and allows neat connection with other effect
units.
•The OUTPUT is muted when the tuning function is on, allowing you to tune
without being heard.
• High-luminosity LEDs allow visual tuning even in outdoor sunlight.
•You can choose from two types of meter display: CENT (normal needle-style
movement), or STREAM (a flow of lights indicates the pitch deviation).
•In addition to chromatic mode which indicates the note name of the input sound,
you can also use Guitar/Bass mode which displays the string number. (5-string
bass is supported.)

4
•In Guitar/Bass mode, you can also use Flat tuning (a semitone down) or Double-
flat tuning (a whole step down).
•When the tuner is off, a battery conservation function minimizes power con-
sumption.
•By using an AC adapter (sold separately) with the DC 9V in/out jacks, you can
supply power to other compact effect units as well.

5
IMPORTANT NOTES
In addition to the items listed under “USING THE UNIT SAFELY” on page 28–34, please read
and observe the following:
Power Supply: Use of Batteries
•Do not use this unit on the same power
circuit with any device that will generate
line noise (such as an electric motor or
variable lighting system).
•The AC adaptor will begin to generate
heat after long hours of consecutive use.
This is normal, and is not a cause for con-
cern.
•Batteries should always be installed or re-
placed before connecting any other de-
vices. This way, you can prevent malfunc-
tion and/or damage to speakers or other
devices.
•Abattery was installed in the unit before it
left the factory. The life of this battery may
be limited, however, since its primary pur-
pose was to enable testing.
•Before connecting this unit to other de-
vices, turn off the power to all units. This
will help prevent malfunctions and/or
damage to speakers or other devices.
Placement
•Using the unit near power amplifiers (or
other equipment containing large power
transformers) may induce hum. To allevi-
ate the problem, change the orientation of
this unit; or move it farther away from the
source of interference.

6
•This device may interfere with radio and
television reception. Do not use this de-
vice in the vicinity of such receivers.
•Do not expose the unit to direct sunlight,
place it near devices that radiate heat,
leave it inside an enclosed vehicle, or oth-
erwise subject it to temperature extremes.
Excessive heat can deform or discolor the
unit.
•To avoid possible breakdown, do not use
the unit in a wet area, such as an area ex-
posed to rain or other moisture.
Maintenance
•For everyday cleaning wipe the unit with a
soft, dry cloth or one that has been slightly
dampened with water. To remove stub-
born dirt, use a cloth impregnated with a
mild, non-abrasive detergent. Afterwards,
be sure to wipe the unit thoroughly with a
soft, dry cloth.
•Never use benzine, thinners, alcohol or
solvents of any kind, to avoid the possibil-
ity of discoloration and/or deformation.
Additional Precautions
•Use a reasonable amount of care when
using the unit’s buttons, sliders, or other
controls; and when using its jacks and
connectors. Rough handling can lead to
malfunctions.

7
•Never strike or apply strong pressure to
the display.
•When connecting / disconnecting all
cables, grasp the connector itself—never
pull on the cable. This way you will avoid
causing shorts, or damage to the cable’s
internal elements.
•To avoid disturbing your neighbors, try to
keep the unit’s volume at reasonable lev-
els. You may prefer to use headphones, so
you do not need to be concerned about
those around you (especially when it is
late at night).

8
Panel Description
1 82
10 9
6
4
12
13
3
7
5
11
1. DC 9V In jack
An AC adapter (BOSS PSA-Series: sold sepa-
rately) can be connected to this jack. If an
AC adapter is used, you will be able to play
for extended periods without worrying about
battery life.
*As soon as you connect the AC adapter, the
unit is turned ON.
2. DC 9V Out jack
When an AC adapter is used, you can con-
nect a PCS-20A parallel DC cord (sold sepa-
rately) to supply power to other 9V effect
units.
*Power cannot be supplied when the TU-2 is
running on batteries.
*When using the PSA-Series with the PCS-20A,
make sure that the total current draw of this
unit combined with that of the external
effects unit being supplied power does not

9
exceed the PSA-Series' maximum output
current.
3. Meter
The meter indicates the pitch deviation of
the input sound from the note name or string
number that is shown in the note name /
string number indicator.
CENT display
The LED that is lit will be further toward the
left as the input pitch is flat, and further to-
ward the right as the input pitch is sharp.
The pitch is correct when the center (green)
indicator of the meter is lit.
STREAM display
Deviation of the input pitch will be shown
by a flow of lights toward left or right.
The lights will flow toward the left if the in-
put pitch is flat, and toward the right if the
input pitch is sharp.
As the pitch deviation decreases, the flow
will become slower, and the flow will stop
when the pitch is correct.
4.
Note name / String number in-
dicator
In Chromatic mode, this indicates the note
name.
In Guitar/Bass mode, this indicates the string
number.
10
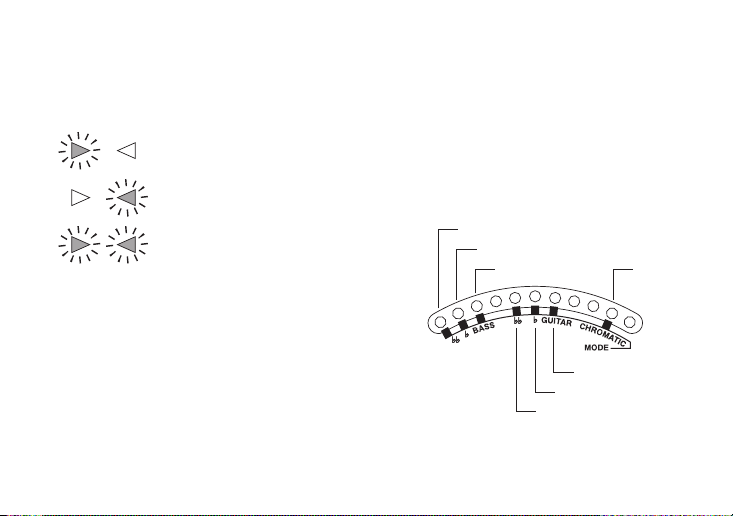
5. Tuning guide indicators
These will light to roughly indicate the tun-
ing.
The pitch is flat
The pitch is sharp
The pitch is correct
(within +/-3 cents)
6. MODE select switch
This switch changes the tuning mode.
When this switch is first pressed, the meter
will blink to indicate the current mode.
If you press the switch again, the meter will
cycle through the following modes, and the
corresponding indicator will light.
Guitar
Guitar Flat
Guitar Double Flat
Bass Double Flat
Bass Flat
Bass Chromatic

11
7. STREAM/CENT select switch
This switches the meter display method.
The meter will indicate the selected display
method for approximately two seconds after
the method has been switched.
8. CHECK indicator
This shows the Tuner On/Off status and also
serves as a battery check indicator.
This indicator will light when the tuner is on.
If the indicator is dim or fails to light when
the tuner is on, the battery has run down,
and should be replaced with a new battery
as soon as possible. For the procedure, refer
to “Changing the battery” (page 23).
*The CHECK indicator shows whether the ef-
fect is being applied or not. It does not indi-
cate whether the power to the device is on or
not.
9. INPUT jack
Use this jack to connect the electric guitar /
electric bass that you wish to tune.
*When a battery is used, the input jack also
functions as a power switch. When a plug is
inserted into the input jack, the power will
be turned on. When the plug is pulled out,
the power will be turned off. When you are
not using the tuner, pull the plug out of the
input jack.
10. OUTPUT jack
Connect your amp or another effect unit to
this jack.
When the tuner is off, this will output the sig-
nal of the instrument connected to the Input
jack.
When the tuner is on, no sound will be out-
put from this jack, so use this jack if you wish
to tune silently.

12
11. BYPASS jack
Connect your amp or another effect unit to
this jack.
This jack will always output the signal from
the instrument connected to the Input jack.
Use this jack if you want to be heard while
you tune.
12. Pedal switch
Pressing this switch will turn the tuner on/off.
13. Thumbscrew
When this screw is loosened, the pedal will
open, allowing you to change the battery.
For the procedure, refer to “Changing the
battery” (page 23).

13
Connections
*Before connecting or disconnecting any patch cords, be sure all the volume controls in your
system are set to minimum. This will help prevent any damage to system components.
*To prevent malfunction and/or damage to speakers or other devices, always turn down the vol-
ume, and turn off the power on all devices before making any connections.
*If there are batteries in the unit while an AC adaptor is being used, normal operation will con-
tinue should the line voltage be interrupted (power blackout or power cord disconnection).
Electric Guitar
AC Adaptor
(PSA-Series: optional)
OUT DC 9V
Parallel DC cord (PCS-20A: optional)
Boss compact other
effect units
(BYPASS) If you want to be heard while tuning
(OUTPUT) If you do not want to be heard while tuning
Amplifier
Electric Bass

14
Turning on the power
*Always make sure to have the volume level of your amp turned down before switching on power.
Even with the volume all the way down, you may still hear some sound when the power is
switched on, but this is normal, and does not indicate a malfunction.
If you are using an AC adapter
The power will be turned on when you con-
nect the AC adapter to the DC 9V In jack.
If you are using a battery
The power will be turned on when you insert
a plug into the Input jack.
When the power is turned on, the meter will light to indicate the current tuning mode. Then
the note name / string number indicator will indicate the first digit of the currently selected
standard pitch.
440 Hz
15
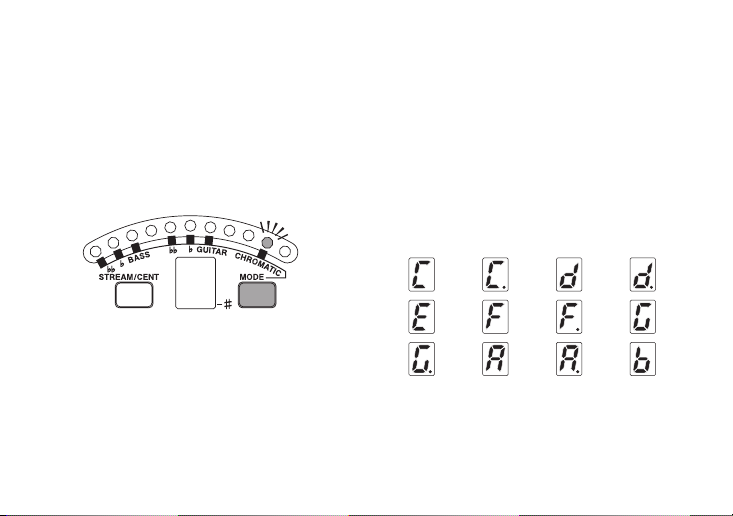
Tuning in chromatic mode
*If you wish to change the standard pitch, do so before you begin tuning (page 20).
1. Press the MODE select switch several
times to make “CHROMATIC” light.
*When the TU-2 is shipped from the fac-
tory Chromatic mode is selected.
2. If the tuner is not on (CHECK should be
lit), press the pedal to turn it on.
3. Play a single note on your instrument.
The name of the note closest to the pitch
of the input sound will appear in the note
name / string number indicator, and the
meter will indicate the pitch deviation.
(Note name display)
CC# DD#
EFF# G
G# AA# B
4. Tune your instrument.

16
Tuning in Guitar mode
*If you wish to change the standard pitch, do so before you begin tuning (page 20).
1. Press the MODE select switch several
times to make “GUITAR” light.
If you are using flat tuning (semitone
down) make “ ” light. If you are using
double flat tuning (whole step down)
make “ ” light.
Flat tuning
Double flat tuning

17
2. If the tuner is not on (CHECK should be
lit), press the pedal to turn it on.
3. Play a single note on your instrument.
The string number closest to the pitch of
the input sound will appear in the note
name / string number indicator, and the
meter will indicate the pitch deviation.
(String number display)
1st string E 2nd string B
3rd string G 4th string D
5th string A 6th string E
4. Tune your instrument.

18
Tuning in Bass mode
*If you wish to change the standard pitch, do so before you begin tuning (page 20).
1. Press the MODE select switch several
times to make “BASS” light.
If you are using flat tuning (semitone
down) make “ ” light. If you are using
double flat tuning (whole step down)
make “ ” light.
Flat tuning
Double flat tuning

19
2. If the tuner is not on (CHECK should be
lit), press the pedal to turn it on.
3. Play a single note on your instrument.
The string number closest to the pitch of
the input sound will appear in the note
name / string number indicator, and the
meter will indicate the pitch deviation.
(String number display)
1st string G 2nd string D
3rd string A 4th string E
LoB (5th string) B
4. Tune your instrument.

20
Adjusting the standard pitch
1. Simultaneously press the MODE select
switch and the STREAM/CENT select
switch.
2. The first digit of the currently selected
standard pitch (0, if 440 Hz) will blink in
the note name / string number display.
3. Press the MODE select switch to change
the standard pitch as follows.
440 441 442 443
439 438 445 444
When you press the STREAM/CENT se-
lect switch, the standard pitch will
change as follows.
440 441 442 443
439 438 445 444
The standard pitch will be memorized
until the power is turned off.
When you turn off the power, the stan-
dard pitch will be reset to 440 Hz.
Other manuals for TU-2 Chromatic Tuner
2
Table of contents
Other BOSSCO Tuner manuals

BOSSCO
BOSSCO CT-6 User manual

BOSSCO
BOSSCO TU-12 User manual

BOSSCO
BOSSCO tu-3 User manual

BOSSCO
BOSSCO TU-15 User manual

BOSSCO
BOSSCO TU-12EX User manual

BOSSCO
BOSSCO TU-05 User manual

BOSSCO
BOSSCO tu-3 User manual

BOSSCO
BOSSCO tu-3 User manual

BOSSCO
BOSSCO METRONOME Dr.Beat DB-60 User manual

BOSSCO
BOSSCO Brass & Wind TU-12BW User manual

BOSSCO
BOSSCO TU-121 User manual

BOSSCO
BOSSCO TU-80 User manual

BOSSCO
BOSSCO TU-80 User manual

BOSSCO
BOSSCO TU-03 User manual

BOSSCO
BOSSCO TU-2 Chromatic Tuner User manual

BOSSCO
BOSSCO TU-1000 User manual

BOSSCO
BOSSCO TU-12EX User manual

BOSSCO
BOSSCO TU-12H User manual

BOSSCO
BOSSCO TU-88 User manual

BOSSCO
BOSSCO TU-8 User manual


