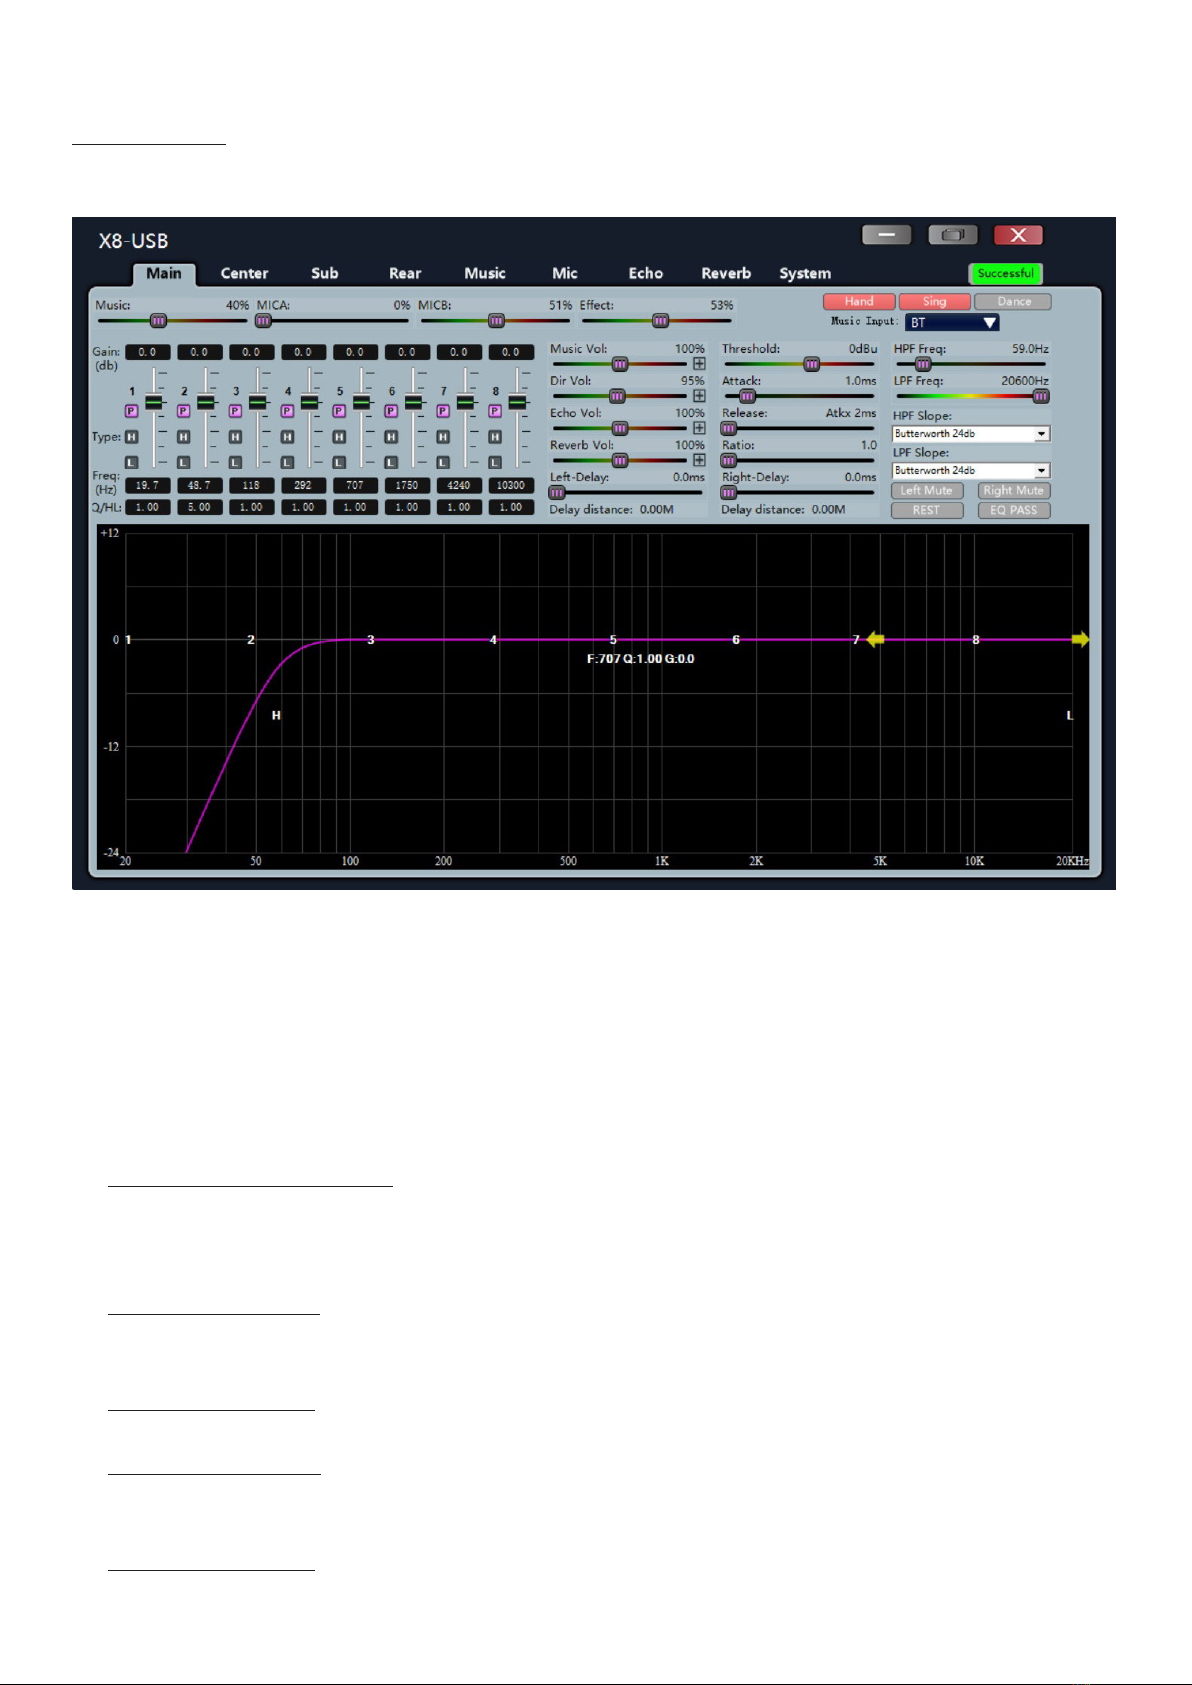
Boston Acoustics BA X8 User manual

Boston Acoustics BA X8
Karaoke Mixer
User Manual
bostonacousticspro.com

Boston Acoustics BA X8
User Manual
Thank you for trusting a high quality audio product developed and produced by Boston Acoustics.
Please refer to and implement the instructions on this User Guide so that the product is set up to cor-
rect technical requirements, helping to bring the optimum experience, while ensuring durability for many
years of use.
Boston Acoustics BA X8 Karaoke Mixer (with digital echo) uses DSP technology with 15-band Equalizer to
adjust background music, a 15 band equalizer to adjust vocals (Mic), a 3 band equalizer to adjust Echo and
3 band equalizer for reverb. It is equipped with the world’s top quality CPU and components for fast and
accurate signal processing.
The Boston Acoustics BA X8 features excellent howling and hissing reduction, diverse audio input ports
and an intuitive, vivid interface that is easily adjusted by hand right on the Mixer and by computer.
INTRODUCTION
1
1. Please keep this document for future reference.
2. Please keep all packaging and documentation for easy transport to warranty repair center when needed.
3. The power source used must conform to the description in the instruction document or the symbol on
the device.
4. Do not place device near water sources, humid places to avoid the risk of re, explosion, and electric
shock.
5. Do not place device near sources of heat such as stoves, heat vents, or other heat generating appliances.
6. Do not place objects containing liquid such as vases, water cups, etc. on the device.
FOR YOUR OWN SAFETY, PLEASE READ THE FOLLOWING INSTRUCTIONS CAREFULLY BEFORE USE.

MIXER FRONT
2
Buttons & ports
1. MIC INPUT: MIC 1/2/3 input port with Volume to adjust the input volume for each microphone.
2. MIC: Press to adjust Microphone settings when singing.
3. ECHO: press to adjust Echo settings when singing.
4. REV: Press to adjust Reverb settings when singing.
5. MUSIC: Press to adjust background music settings when singing.
6. RECALL: Recall the saved Karaoke modes after editing.
7. MAIN: Press to adjust settings for the main speaker to use.
8. SUB: Press to adjust settings for the subwoofer (adding bass).
9. SC: Press to adjust settings for Surround speakers (sub speakers additionally support creating surround
sound, placed behind the stand-out position) and Center speaker (sub-speaker supporting vocals,
placed in the middle 2 main speakers).
10. SYSTEM: Press to adjust the audio source connection port and set parameters for the system control.
11. SAVE: Press to save the calibration parameters.
12. UP / ESC & DOWN: Adjustment navigation buttons
Knobs
13. Control: Adjust settings
14. MIC: Adjust the output volume for Microphone
15. EFF: Adjust the volume of the eect for both Echo and Reverb
16. MUSIC: Adjust the volume of background music
2 3 4 5 6 13 14 15 16
1 98 10
711 12

3
1. POWER: Power on / o switch and power supply cord port.
2. Software Control: USB port computer connection to adjust Mixer settings by software.
AUDIO OUTPUT
3. The audio output ports connect to the Power Amplier using the XLR jack.
yMR / ML: 2-channel audio output terminal for Main speaker (main speaker) Left / Right.
yC: Audio output terminal for Center speaker supports gentle karaoke singing.
ySUB: Output port for connecting subwoofer.
ySR / SL: Audio output for Left / Right 2-channel Surround speaker for better karaoke sound with
surround sound set.
4. REC OUT: Left / Right 2-channel Analog audio output terminal using RCA jack (lotus jack). This port can
be used to connect the Subwoofer.
AUDIO INPUT
5. IN1 & IN2: Left / Right 2-channel Analog audio input port uses RCA jack (lotus jack) to connect
traditional Karaoke DVD player, CD player ...
6. MICB1/MICB2: Microphone port
7. OPTICAL/COAXIAL: Input port to receive Digital audio signal via Optical Out and Coaxial Out
connection from TV or Karaoke player, HDbox ...
MIXER BACK
3
12
7
56
4

DIRECT ADJUSTMENT
After pressing the setting buttons for MIC, ECHO ... directly on the Mixer, please use the UP / ESC and
DOWN buttons to navigate the settings list, rotate the Control knob to change the adjust each setting. If
there is no additional adjustment, after 20 seconds, the detailed setting screen interface will automatically
exit back to the Mixer’s default operating screen interface.
BA X8 Mixer and PA 1000 Amplier
MUSIC
Press the MUSIC button -> DOWN, turn the Control knob to select HPF to cut the Bass band frequency
for the Main speaker for Karaoke. Normally, if you use a subwoofer, cut the HPF for the Main speaker in the
range of 75Hz to 110Hz.
Press the MUSIC button “2 times”, navigate to the 15 band Equalizer for MUSIC, press the UP / ESC and
DOWN buttons, turn the Control knob to change setting:
yEQ 1 -> EQ 5 for tuning Bass frequency from 20.5Hz -> 125Hz
yEQ 5 -> EQ 11: for tuning frequency 125Hz -> 1920Hz
yEQ 11 -> EQ 15: for tuning high frequency 1920Hz -> 12000Hz
yFor Dance music, you can increase the bass (63Hz -> 125Hz) about 2-3 dB to give the Bass more power,
reduce the Midrange (400Hz -> 2000Hz) about 3dB and increase the High sound (4000Hz -> 16000) 1dB
to help the Treble sound range as well as the instrument sound stand out.
yFor Bolero music, you can reduce the mids (400Hz -> 2000Hz) about 1 -> 3dB so that the singer’s voice
does not overwhelm the musical instruments for all 3 bands.
yDepending on the genre of music, dierent types of speakers, and dierent room spaces, when listening
you may need dierent settings to suit your karaoke set.
4

Calibration by software on a computer
Software to download to the computer from the link: http://bostonacousticspro.com/support/software
Use a USB cable to connect the computer to the Mixer (USB Software Control port behind the Mixer) and
click open to run the software.
On interface software, in the Music section, you will nd the following options:
In addition to choosing the HPF Freq to cut the Bass band frequency, there is also a LPF Freq setting to
cut the High band frequency, a crossover lter with 3 types of crossover: Bessel, Butterworth, Link Riley
(Linkwitz-Riley) with a 24-48dB / oct option.
The Music section calibrates depending on the speaker and listening space
5

MAIN
Press the MAIN button twice to enter the calibration menu for the Main speaker for Karaoke, press the UP
/ ESC and DOWN buttons, turn the Control knob to change the parameter.
Volume for sections
yMU: background music volume, default at +100, custom + (-) 0 -> + (-) 200
yMI: Micro volume (singing voice), default at +100, custom + (-) 0 -> + (-) 200
yEcho: volume of humming eect for vocal, default at +100, custom + (-) 0 -> + (-) 200
yRev: vocal echo eect volume, default at +100, custom + (-) 0 -> + (-) 200
After adjusting the above settings, press the MAIN button, press UP / ESC and DOWN, rotate the Control
knob to change settings of each section:
yHPF to cut the frequency of the Bass range, the HPF for the Main speaker should only be cut if you are
using a sub-woofer, cut in the range of 35Hz to 63Hz.
yLPF to cut the High band frequency, usually you should not cut the high frequency for the Main speaker.
yCrossover lter has 3 cut formats: Bessel, Butterworth, Link Riley (Linkwitz – Riley) with 24-48dB / oct
option.
Press the MAIN button, select UP / ESC and DOWN, rotate the Control knob to change the 8-band EQ
settings:
yEQ 1 -> EQ 3 for tuning Bass frequency from 20.9Hz -> 99.0Hz
yEQ 3 -> EQ 6: for tuning mid-frequency equalizer 99.0Hz -> 1500Hz
yEQ 6 -> EQ 8: for tuning high frequency 1500Hz -> 7850Hz
Press the MAIN -> UP / ESC and DOWN buttons, turn the Control knob to adjust the Compressor function
to process the compression to audio passing threshold, to balance the volume and soften the sound:
yAT (Attack): the amount of time it takes to switch from the original signal to a fully compressed form
after the signal exceeds the threshold of sound intensity.
yLU (Threshold): Sound intensity limit is set to prevent music noise.
yRT (Release Times): the amount of time after the audio is compressed will return to normal.
yRatio: The rate of compression of when the audio signal is beyond the threshold.
Press the MAIN button, select UP / ESC and DOWN, rotate the Control knob to calibrate: Delay L and
Delay R: set up 2 channels of Left speaker (left) and speaker R (Right) with dierent Delay speed.
DELAY: Adjust the repetition rate (the amount of time between repeated sounds from the microphone
with reverberation eects, increase (fast) or decrease (slow), suitable for many music genres.
The Delay eect on either left or right speaker should be adjusted to be higher than the other side so the
Delay sound is more harmonious when one speaker is placed closer to a wall corner than another. This
method can also create a Pingpong style Delay eect. Delay repetition will be set for left and right speaker
channels with dierent delay speeds, creating the feeling that the sound bounces between the speakers,
6

The Main setting calibrates depending on the speaker and listening space
On the computer calibration software, you can see the increase / decrease of Dir Vol (Mic Direct - direct
sound of the microphone without processing). Increasing this setting will make bright sounds rawer,
reducing this setting will make high sounds softer.
SUB
yPress the SUB button twice to enter the individual settings an additional subwoofer added, press UP
/ ESC and DOWN, turn the Control knob to set the volume of the background music to the speaker
(MUSIC - Music Vol on the software) , the volume of the microphone sound out to the speaker (MIC -
Dir Vol on the software).
yClick the SUB button -> press the UP / ESC and DOWN buttons, rotate the Control knob to cut HPF
and LPF frequencies, Crossover settings have 3 types of frequency cuts: Bessel, Butterworth, Link Riley
(Linkwitz-Riley) and an option for 24 -48dB / oct.
yClick the SUB button -> press the UP / ESC and DOWN buttons, rotate the Control knob to change the
8-band EQ calibration parameters from 20.9Hz -> 227Hz.
yClick the SUB button -> press the UP / ESC and DOWN buttons, rotate the Control knob to change
parameters to adjust the compression features of the compression processing to avoid exceeding the
threshold.
yClick the SUB button -> press the UP / ESC and DOWN buttons, rotate the Control knob to change the
Delay calibration parameters or select Mute to mute the subwoofer.
great for large spaces to create more resonance for the microphone.
Press the MAIN -> UP / ESC and DOWN buttons, turn the Control knob to select Mute L and Mute R: the
left speaker (left) and speaker R (Right) mute option.
7

The SUB section adjusts to the speaker and listening space
S.C
If you add a center speaker and surround speakers, press the SC button twice to select the adjustment
for each speaker, the setup steps are the same as the installation steps for the main speaker used to sing
Karaoke.
MIC
Press the MIC button -> press the DOWN button, rotate the Control knob to turn on the anti-howling
mode (anti-Feedback) with 3 optional levels, choose the active microphone port as MicA port (front port)
or MicB (back port).
Hold the MIC button -> press the DOWN button to select HPF to cut the Bass band frequency for the
microphone (on the software, select LPF to cut the High band frequency), Crossover lter with 3 cutting
formats: Bessel, Butterworth, Link Riley (Linkwitz – Riley) with an option for 24-48dB / oct.
Press the MIC button -> select 15 band EQ for Microphone
8

Calibrate the MIC setting depending on the speaker, microphone used and listening space
Press the MIC button next, choose the Compressor feature to process the compression to avoid over the
threshold for the microphone, bringing the balance of the vocal volume along with the soft and neat.
Also depending on the genre of music, dierent types of speakers, and dierent room space, you will have
dierent adjustments to best suit your karaoke set.
The MIC section will have 15 band EQ for us to customize the microphone’s signal cut, used to cut the
howls or compensate for the low signal.
yEQ 1 -> EQ 5 tuned Bass frequency from 20.5Hz -> 125Hz
yEQ 5 -> EQ 11: mid frequency 125Hz -> 1920Hz
yEQ 11 -> EQ 15: high frequency 1920Hz -> 12000Hz
Depending on the voice quality of each person and depending on the type of microphone, you can make
basic adjustments as follows:
yFor people with a rich bass heavy voice, the sound intensity should be reduced between 125Hz and
250Hz to avoid humming.
yFor people with a thin voice, it is recommended to increase the sound intensity between 60Hz and
125Hz to thicken and add warmth to the voice.
yIf the speaker Mid sounds outperforms the Bass and Treble, you can reduce the sound intensity at the
250-Hz-1000Hz frequency to get an equal sound on all 3 EQ bands. On the contrary, if the speaker has a
superior Bass and Treble sound, you can adjust the intensity of these 2 bands so that the singing is less
harsh, cutting the howls of the Microphone, the voice becomes sweeter and more elegant.
9

Echo and Reverb adjustments
yEcho: is the echo eect on your voice.
yReverb: is the repetition of your voice, creating a vibrating sound when singing.
Adding both Echo and Reverb adjustments will create better resonance when singing.
ECHO
Press the ECHO button -> press UP / ESC and DOWN, rotate the Control knob to change parameters:
Level (on the software will be Echo Vol) is the intensity of the echo eect on the voice, usually left at about
50 -> 70 so that the Echo is not too loud. To avoid overwhelming the voice, adjust the Direct Level (Dir
Vol on the computer software).
Press the ECHO button -> press UP / ESC and DOWN, rotate the Control knob to change the Delay
parameter (time delay between repeated sounds of the microphone)
yPre Delay ( Echo Pre-Delay): is the delay before the start of a repeat sound, usually set at 5.0ms
yHPF: cut the Bass band frequency for Echo, usually cut in the range from 75Hz to 110Hz to help the
Echo eect when the Low band sound thicker humming and howling when singing.
yLPF to cut the High band frequency for Echo, will usually cut in the range from 5000Hz to 16000Hz to
help the Echo eect when the High band sound smooth and reduce hissing.
Press the ECHO button -> press UP / ESC and DOWN, rotate the Control knob to change settings:
yEcho Delay (Echo Delay Time): repetition speed of vocals. Depending on the space and the specic
genre of music, you can make adjustments as follows:
yFor lyrical Bolero music, slow tempo ballads, decrease the repeat speed (185ms -> 195ms) so that the
banding is in harmony with the rhythm and accompaniment.
yFor Remix music, Dance music, Rock ... fast tempo, push the repetition speed up (157ms) to reduce the
level of Delay
yRepeat (Echo Repeat Ratio): is the degree of repetition of the vocal with an echo, for example we
say “one”, the Echo eect with Repeat will create a repeat sound “One-One-One-One ...” many times.
Customize based on how much of a ringing eect you prefer when singing. It is recommended that
you keep repeat a little high (level 50 to 60) to help the microphone sound less dry and help vocals mix
with the music better.
yIn order for Karaoke to become more soft, gentle and easy to, in addition to slowing the repeat sound
to create a wide echo, you can increase the Repeat level to create more vibrancy of the voice. Say the
word“One”and adjust so that the word is repeated about 6 times so that when singing with background
music, the voice will have enough natural vibration.
Press the ECHO button -> press UP / ESC and DOWN, turn the Control knob to select ECHO Pre_Del_R
(Echo RpreDeplay) and Delay_R (Echo Rdelay) to adjust the level of Delay for the Right speaker channel
- right speaker channel. Add a little latency to the Right speaker channel to create a wider music space, but
ensure a harmonious continuity between the Left and Right speaker channels.
10
Echo and Reverb

Echo adjustment depends on the speaker, microphone used and listening space
REV
Press REV button -> press UP / ESC and DOWN, rotate Control knob to change parameters for Reverb:
Level (on the software will be Reverb Vol) intensity of the echo eect of the voice, usually left at about
20 -> 50 so that the Reverb is not too loud. Ensure the reverb does not overpower the singing voice by
adjusting Direct Level (Dir Vol on the software)
Press the REV button -> press UP / ESC and DOWN, rotate the Control knob to change parameters
yReverb Time: The amount of stretch to the echo of the voice, usually left between 1500ms and 3120ms
depending on the speakers and space.
yReverb Pre Delay: is the time delay before the echo starts, normally left at O because Reverb will not
need Delay.
yHPF cut the Bass band frequency for Reverb, usually cut in the range from 75Hz to 110Hz to help the
Reverb sound thick and reduce humming and howling when singing.
yLPF to cut the High band frequency for Reverb, will usually cut in the range from 5000Hz to 16000Hz
to help the Reverb eect sound smooth and reduce sharpness hissing when singing.
Press the REV button -> press UP / ESC and DOWN, rotate the Control knob to adjust the 3-band EQ for
Reverb.
Press the ECHO button -> press UP / ESC and DOWN, rotate the Control knob to adjust the 3-band EQ for
Echo.
11

The Reverb section adjusts practically according to the speaker, microphone used and listening space
CREATE PROGRAMS WITH CUSTOMIZED INDIVIDUAL PARAMETERS
After making adjustments directly on the Mixer, press SAVE -> Save to mode, press the UP / ESC button,
choose to save into one of the 16 pre-programmed modes, then press SAVE -> DOWN (select Ye s)
On Mixer, after manually adjusting and saving to a mode, please press the RECALL button -> press the UP
/ ESC button to select the mode you want to use, then press the RECALL button -> The screen will show
Recall Mode -> Press the DOWN button (select Yes).
On the software, go to Num, click Factory Preset options
12

Then, click on Name to rename for easy use. Then click Save.
After clicking Save, press Use to load using the newly adjusted program settings.
13

If you want to save a program you have set up on your computer, copy the newly created Mode name line
in Name and Past Paste into the Local Mode Name as shown, then click the Save Mode Local box, the
installation program will be saved in your computer.
14

When you need to install a dierent Boston Acoustics BA X8 digital Mixer paired with a Karaoke system
with the same congurations (Speakers, Microphone ...) that you have set to calibrate, you just need to
click on the saved program line in your computer and click Update To Equip to use immediately.
yTo set the volume level to start working as soon as the Mixer is turned on and the volume level is
limited when the Mixer is active, just like on the computer software screen, press the SYSTEM button
right on the Mixer, from the 6th time onwards, you will ndthe following items:
yMusic Start: (Music Star Vol - on the Mixer screen) Default volume level for music when using Mixer,
turn the MIC VOL knob to adjust 0 -> 80.
yMusic Max: (Music Limter Vol - on the Mixer screen) Limit the maximum volume level for music when
using the Mixer, turn the MIC VOL knob to adjust 0 -> 80.
yMicA Start: (MicA Star Vol - on the Mixer screen) Default volume level for Microphone A when Mixer
is turned on, turn the MIC VOL knob to adjust 0 -> 80.
yMicA Max: (MicA Limter Vol Limit the maximum volume level for Microphone A when using the Mixer,
turn the MIC VOL knob to adjust 0 -> 80.
yMicB Start: (MicB Star Vol - on the Mixer screen) Default volume level for Micro A when turned on
using Mixer, turn the MIC VOL knob to adjust 0 -> 80.
yMicB Max: (MicB Limter Vol Limit the maximum volume level for Micro A when using the Mixer, turn
the MIC VOL knob to adjust 0 -> 80.
yEect Start: (Eect Star Vol - on the Mixer screen)The default volume for the eect sound when Mixer
is turned on, turn the MIC VOL knob to adjust 0 -> 80.
yEect Max: (Eect Limter Vol - on the Mixer screen) Limit the maximum volume level for the eect
sound when Mixer is turned on, turn the knob to adjust 0 -> 80.
yLOCK: disable / unlock or allow manual adjustment of parameters directly on Mixer, except volume
yMUTE: Mute / unmute the Mixer.
15

yMusic Exciter: turns on / o the feature that enhances the vibrancy of the background music.
yMic Feedback: turn on / o the function of canceling feedback, to help keep the sound from howling.
Customize Mixer's anti-howling mode
The MIC_FBE entry in the Mic section of the computer software
Use computer software to turn on / o Lock mode, which does not allow or allows manual adjustment on
the Mixer, except for volume
yOn the computer software screen, click Enable (Lock mode - not allow), click Disable (UnLock mode
- allow)
16

On the Mixer, press the SYSTEM button 2 times -> see Auto Keyset Lock -> press the DOWN button
to nd Mode: OFF (Mixer is fully unlocked) -> turn the Control knob, select ON -> press SAVE -> press
DOWN (select Yes ) -> Mixer is locked, now you can only adjust the Volume
To unlock, you press the SAVE button 5 times - the Mixer screen will show the word Unlock. To fully
unlock, press the SYSTEM button 2 times -> nd Auto Keyset Lock -> press DOWN to switch to Mode:
ON (Mixer is still in Lock mode) -> turn the Control button, select OFF -> press SAVE -> press DOWN
(select Ye s ) -> Mixer is completely unlocked by, now you can adjust all features.
ySystem Reset: select if you want to switch the Mixer back to the factory default settings.
TECHNICAL SPECIFICATIONS
17
Model BA X8
Wireless connection Bluetooth
Input 6.3mm jack for microphone, RCA and Optical
Output XLR and RCA
Frequency response range 20Hz - 20kHz
Processor D/A 24bit/192kHz
DSP processor 32 bit
Computer connection USB 2.0
Dimensions (H x W x Depth) 48 x 480 x 220mm
Weight 2.9 kg
Table of contents
Popular Mixer manuals by other brands

Kasco
Kasco CertiSafe 2400C61 Operation & maintenance manual

Farberware
Farberware SPECIAL SELECT FSM126EM Use and care instructions

JB-Lighting
JB-Lighting LICON 1X user manual

Collomix
Collomix Collomatic XM 2-650 manual

Mackie
Mackie DXB 200 - CONNECTIONS Connections

Studiomaster
Studiomaster Horizon 2012 user guide