Botex DPX-620 III 6-Channel Dimmer S User manual

DPX-620 III 6-Channel
Dimmer S
Dimmer Pack
User Manual

Thomann GmbH
Hans-Thomann-Straße 1
96138 Burgebrach
Germany
Telephone: +49 (0) 9546 9223-0
Internet: www.thomann.de
11.01.2024, ID: 186689 (V3)

Table of contents
1 General information................................................................................................................................. 5
1.1 Symbols and signal words............................................................................................................... 5
2 Safety instructions..................................................................................................................................... 7
3 Features....................................................................................................................................................... 10
4 Installation and starting up................................................................................................................ 11
5 Connections and controls................................................................................................................... 12
6 Operating.................................................................................................................................................... 15
7 Technical specications....................................................................................................................... 22
8 Plug and connection assignments.................................................................................................. 24
9 Protecting the environment.............................................................................................................. 25
Table of contents
DPX-620 III 6-Channel Dimmer S 3
Dimmer Pack

4DPX-620 III 6-Channel Dimmer S
Dimmer Pack

1 General information
This document contains important instructions for the safe operation of the product. Read and
follow the safety instructions and all other instructions. Keep the document for future refer‐
ence. Make sure that it is available to all those using the product. If you sell the product to
another user, be sure that they also receive this document.
Our products and documentation are subject to a process of continuous development. They
are therefore subject to change. Please refer to the latest version of the documentation, which
is ready for download under www.thomann.de.
1.1 Symbols and signal words
In this section you will nd an overview of the meaning of symbols and signal words that are
used in this document.
Signal word Meaning
DANGER! This combination of symbol and signal word indicates an
immediate dangerous situation that will result in death or
serious injury if it is not avoided.
NOTICE! This combination of symbol and signal word indicates a pos‐
sible dangerous situation that can result in material and
environmental damage if it is not avoided.
General information
DPX-620 III 6-Channel Dimmer S 5
Dimmer Pack

Warning signs Type of danger
Warning – high-voltage.
Warning – danger zone.
General information
6DPX-620 III 6-Channel Dimmer S
Dimmer Pack

2 Safety instructions
This appliance is designed for professional use only and is intended to be used to control the
brightness of connected spotlights. Use the device only as described in this user manual. Any
other use or use under other operating conditions is considered to be improper and may result
in personal injury or property damage. No liability will be assumed for damages resulting from
improper use.
This device may be used only by persons with sucient physical, sensorial, and intellectual
abilities and having corresponding knowledge and experience. Other persons may use this
device only if they are supervised or instructed by a person who is responsible for their safety.
Safety
DANGER!
Risk of injury and choking hazard for children!
Children can suocate on packaging material and small parts. Children can injure themselves when handling the device. Never allow
children to play with the packaging material and the device. Always store packaging material out of the reach of babies and small
children. Always dispose of packaging material properly when it is not in use. Never allow children to use the device without supervi‐
sion. Keep small parts away from children and make sure that the device does not shed any small parts (such knobs) that children
could play with.
DANGER!
Danger to life due to electric current!
Within the device there are areas where high voltages may be present. Never remove any covers. There are no user-serviceable parts
inside. Do not use the device when covers, safety equipment or optical components are missing or damaged.
Intended use
Safety instructions
DPX-620 III 6-Channel Dimmer S 7
Dimmer Pack

DANGER!
Danger to life due to electric current!
A short circuit could lead to a re hazard and risk of death. Do not modify the mains cable or the plug! In case of isolation damage,
disconnect immediately the power supply and arrange repair. If in doubt, seek advice from a qualied electrician.
DANGER!
Risk of death from electrical current!
Hazardous voltage may be present at cable ends and screw terminals. The connection of screw terminals and all maintenance and
repair work on the electrical installation of the device may only be performed by a qualied electrician. Always perform maintenance
and repair work when the device is free from voltage. Failure to comply may result in electric shock and risk of re and loss of life.
Always observe all electrical safety instructions applicable in the country of operation.
NOTICE!
Risk of re due to covered vents and neighbouring heat sources!
If the vents of the device are covered or the device is operated in the immediate vicinity of other heat sources, the device can over‐
heat and burst into ames. Never cover the device or the vents. Do not install the device in the immediate vicinity of other heat
sources. Never operate the device in the immediate vicinity of naked ames.
NOTICE!
Damage to the device if operated in unsuitable ambient conditions!
The device can be damaged if it is operated in unsuitable ambient conditions. Only operate the device indoors within the ambient
conditions specied in the “Technical specications” chapter of this user manual. Avoid operating it in environments with direct sun‐
light, heavy dirt and strong vibrations. Avoid operating it in environments with strong temperature uctuations. If temperature uc‐
tuations cannot be avoided (for example after transport in low outside temperatures), do not switch on the device immediately.
Never subject the device to liquids or moisture. Never move the device to another location while it is in operation. In environments
with increased dirt levels (for example due to dust, smoke, nicotine or mist): Have the device cleaned by qualied specialists at reg‐
ular intervals to prevent damage due to overheating and other malfunctions.
Safety instructions
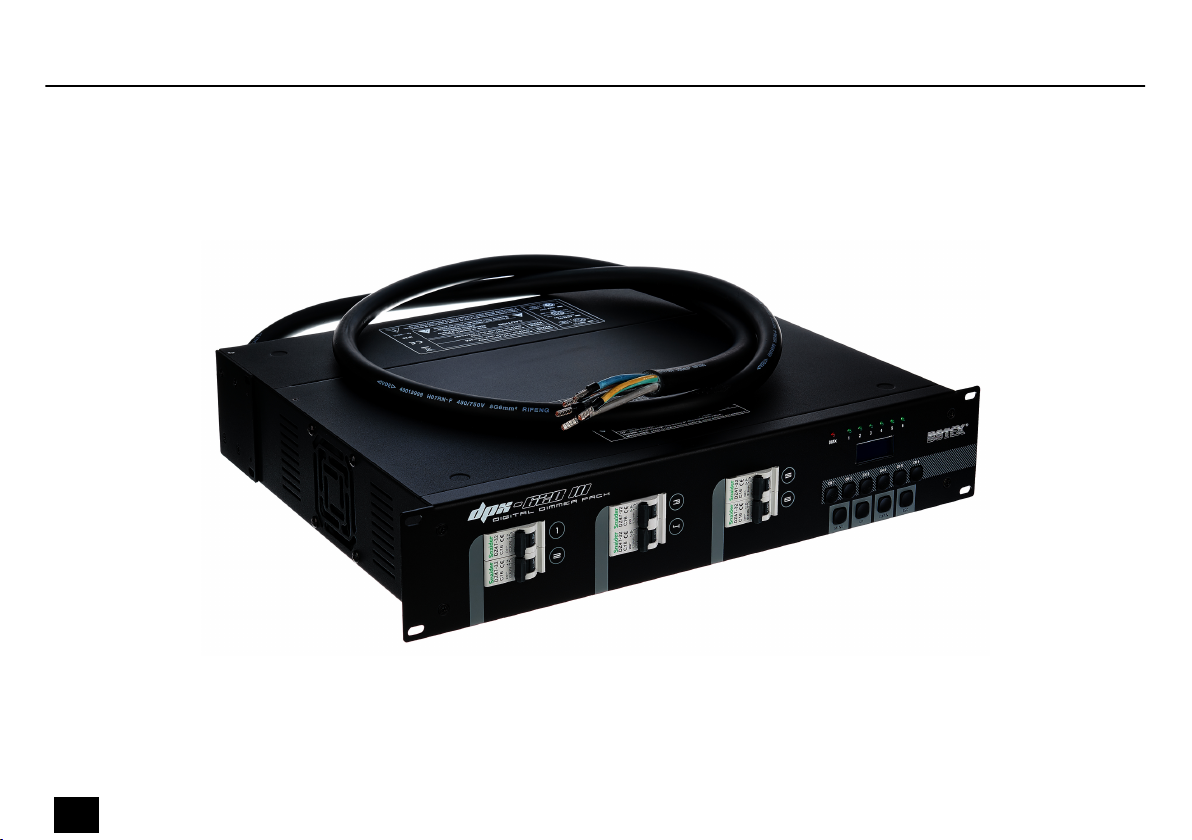
8DPX-620 III 6-Channel Dimmer S
Dimmer Pack

NOTICE!
Damage to the device due to high voltages!
The device can be damaged if it is operated with the incorrect voltage or if high voltage peaks occur. In the worst case, excess vol‐
tages can also cause a risk of injury and res. Make sure that the voltage specication on the device matches the local power grid
before plugging in the device. Only operate the device from professionally installed mains sockets that are protected by a residual
current circuit breaker (FI). As a precaution, disconnect the device from the power grid when storms are approaching or it the device
will not be used for a longer period.
Safety instructions
DPX-620 III 6-Channel Dimmer S 9
Dimmer Pack

3 Features
nSix dimmer channels
nOutput: 6 shockproof sockets
nDigital control system
nControl via DMX 512
nSingle channel fuse (each 16 A)
nPhase correction for linear dimming
nIndividually adjustable dimmer curve
nPower supply via 5-pin mains connection cable for CEE plug
Features
10 DPX-620 III 6-Channel Dimmer S
Dimmer Pack

4 Installation and starting up
Unpack and check carefully there is no transportation damage before using the unit. Keep the
equipment packaging. To fully protect the product against vibration, dust and moisture during
transportation or storage use the original packaging or your own packaging material suitable
for transport or storage, respectively.
Create all connections while the device is o. Use the shortest possible high-quality cables for
all connections. Take care when running the cables to prevent tripping hazards.
The device is designed for mounting in 19-inch racks, it occupies two rack units (RU).
If necessary, install a CEE plug on the power cord of the device.
First, connect the loads to the terminals on the back of the device. Establish the DMX link to
the controller. Finally, connect the CEE plug of the device to a CEE socket.
Connect the DMX input of the device to the DMX output of a DMX controller or another DMX
device. Connect the output of the rst DMX device to the input of the second one and so on,
to form a series connection. Make sure that the output of the last DMX device in the chain is
terminated by a resistor (110 Ω, ¼W).
Connections in “DMX” mode
Installation and starting up
DPX-620 III 6-Channel Dimmer S 11
Dimmer Pack

5 Connections and controls
CH6CH5CH4CH3CH2CH1
MENU UP DOWN ESC
1DMX 2 3 4 5 6
ö %$#
&() '
Front panel
Connections and controls
12 DPX-620 III 6-Channel Dimmer S
Dimmer Pack

1[DMX] | The control LED lights when a DMX signal is received.
2[1]…[6] | Voltage indicators of channels 1…6.The LEDs of active channels light solid green during operation.
3 Display
4[CH 1] … [CH 6] | Buttons for direct control of channels 1…6
5[ESC] | Closes an opened menu
6[UP] / [DOWN] | Navigates within a menu, increases or decreases the displayed value
7[MENU] | Opens the main menu
8[1]…[6] | Circuit breakers for channels 1…6, arranged in three blocks. With the circuit breakers, the desired channels
are being activated ([I - ON]) or deactivated ([O - OFF]).
Connections and controls
DPX-620 III 6-Channel Dimmer S 13
Dimmer Pack

PUSH
1 2 3 4 5 6 POWER INPUT
DMX IN
ANALOG
DMX OUT
ö $#
& %
1[DMX IN] | DMX input
2[ANALOG] | Connections to control the device by a voltage in the range 0 V … 10 V
3 Power cord for 5-pin CEE plug (40 A / phase, 3 × 230 V)
4 Dimmer outlets, designed as safety sockets
5[DMX OUT] | DMX output
Rear panel
Connections and controls
14 DPX-620 III 6-Channel Dimmer S
Dimmer Pack

6 Operating
As soon as you connect the device to the power supply, the display shows the current software
version, then a bar graph with the brightness set for each channel.
Turn on the required channels via the associated circuit breakers (LEDs of active channels light
up green).
Disconnect the device from the power supply to turn it o.
Press one of the channel buttons [CH 1] … [CH 6] to change the brightness. Pressing briey
results in changes with small increments, press longer for changes with larger increments.
Press [ESC] to reverse the direction of change.
Press one of the channel buttons [UP] or [DOWN] to increase or decrease the brightness of all
channels together. Pressing briey results in changes with small increments, press longer for
changes with larger increments.
Turning the device on / o
Adjusting the brightness of an
individual channel
Setting the brightness for all
channels
Operating
DPX-620 III 6-Channel Dimmer S 15
Dimmer Pack

Proceed as follows to assign DMX addresses to the dimmer channels:
1. Press [MENU] to open the main menu. Press [UP] or [DOWN] to select the ‘Patching’
menu.
2. Conrm with [MENU].
ðThe display shows ‘Patching Start’
3. Use [UP] or [DOWN] to choose between assignment mode ‘Start’ (channels are automat‐
ically addressed consecutively) and ‘Independent’ (DMX addresses are independently of
each other).
Conrm with [MENU].
4. In ‘Start’ mode: Use [UP] or [DOWN] to set the DMX address of channel 1 to between 1
… 512.
Conrm with [MENU].
5. In ‘Independent’ mode: Use [UP] or [DOWN] to choose between ‘All’ (all channels get the
same DMX address) and ‘Single’ (each channel can get an individual DMX address).
In ‘Independent – All’ mode: Use [UP] or [DOWN] to set the DMX address to between 1 …
512 for all channels. Conrm with [MENU].
In ‘Independent – Single’ mode: Use [UP] or [DOWN] to rst select the channel whose
DMX address is to be set. Conrm with ‘MENU’ . Then set a DMX address between 1 …
512 for this channel. Conrm with [MENU] and repeat the procedure for all channels.
6. Press [ESC] to return to the main menu.
Assigning a DMX address
(patching)
Operating
16 DPX-620 III 6-Channel Dimmer S
Dimmer Pack

Proceed as follows to specify how the device behaves when the DMX signal fails:
1. Press [MENU] to open the main menu. Press [UP] or [DOWN] to select the ‘DMX Fail’
menu.
2. Conrm with [MENU].
ðThe display shows ‘Dmx fail’
3. Use [UP] or [DOWN] to switch between the following options
n‘LastHold’ : Most recent setting is retained
n‘Analog’ : The analogue control signal (input [ANALOG]) is analysed
n‘Progr:01-12’ : The built-in automatic programmes are executed
Conrm with [MENU].
4. In ‘Progr:01-12’ mode: Use [UP] or [DOWN] to set the duration of each step (and thus the
programme speed) to between 0.005 s … 30.0 s.
5. Press [ESC] to return to the main menu.
Device behaviour if DMX signal
fails
Operating
DPX-620 III 6-Channel Dimmer S 17
Dimmer Pack

Proceed as follows to set the maximum brightness for the dimmer channels:
1. Press [MENU] to open the main menu. Press [UP] or [DOWN] to select the ‘MaxLevel’
menu.
2. Conrm with [MENU].
ðThe display shows ‘MaxLevel’ .
3. Use [UP] or [DOWN] to choose between ‘All’ (all channels get the same maximum bright‐
ness) and ‘Single’ (each channel can get an individual maximum brightness).
Conrm with [MENU].
4. In ‘All’ mode: Use [UP] or [DOWN] to set the maximum brightness for all channels to
between 70% … 100%. Conrm with [MENU].
In ‘Independent – Single’ mode: Use [UP] or [DOWN] to rst select the channel whose
maximum brightness is to be set. Conrm with ‘MENU’ . Then set the maximum bright‐
ness for this channel to between 70% … 100%. Conrm with [MENU] and repeat the pro‐
cedure for all channels.
5. Press [ESC] to return to the main menu.
Setting maximum brightness
Operating
18 DPX-620 III 6-Channel Dimmer S
Dimmer Pack

Proceed as follows to set the minimum brightness for the dimmer channels:
1. Press [MENU] to open the main menu. Press [UP] or [DOWN] to select the ‘MinLevel’
menu.
2. Conrm with [MENU].
ðThe display shows ‘MinLevel’ .
3. Use [UP] or [DOWN] to choose between ‘All’ (all channels get the same minimum bright‐
ness) and ‘Single’ (each channel can get an individual minimum brightness).
Conrm with [MENU].
4. In ‘All’ mode: Use [UP] or [DOWN] to set the minimum brightness for all channels to
between 0% … 30%. Conrm with [MENU].
In ‘Single’ mode: Use [UP] or [DOWN] to rst select the channel whose minimum bright‐
ness is to be set. Conrm with ‘MENU’ . Then set the minimum brightness for this
channel to between 0% … 30%. Conrm with [MENU] and repeat the procedure for all
channels.
5. Press [ESC] to return to the main menu.
Setting minimum brightness
Operating
DPX-620 III 6-Channel Dimmer S 19
Dimmer Pack

Proceed as follows to adjust the dimmer curve of the dimmer channels:
1. Press [MENU] to open the main menu. Press [UP] or [DOWN] to select the ‘Curve’ menu.
2. Conrm with [MENU].
ðThe display shows ‘Curve’ .
3. Use [UP] or [DOWN] to choose between ‘All’ (all channels get the same dimmer curve)
and ‘Single’ (each channel can get an individual dimmer curve).
Conrm with [MENU].
4. In ‘All’ mode: Use [UP] or [DOWN] to select the dimmer curve from the options:
n‘Linear’
n‘S-Curve’
n‘Non Dim’
n‘Square’
Conrm with [MENU].
In ‘Single’ mode: Use [UP] or [DOWN] to rst select the channel whose dimmer curve is to
be set. Conrm with ‘MENU’ . Then select the dimmer curve for this channel from the
options:
n‘Linear’
n‘S-Curve’
n‘Non Dim’
n‘Square’
Conrm with [MENU] and repeat the procedure for all channels.
Setting the dimmer curve
Operating
20 DPX-620 III 6-Channel Dimmer S
Dimmer Pack
Table of contents
Other Botex Recording Equipment manuals