BOWHEAD REACH User manual
Bowhead
REACH Adventure Ebike
OWNER’S MANUAL
Read this manual carefully as it contains important safety & maintenance
information.

2 | P a g e
WARNING
Please read, understand, and follow all the instructions and safety
precautions in this manual and on all product labels prior to operating
your new Bowhead Reach.
Copyright 2021 Bowhead Design Corp. All information contained within this publication is based
on the latest product information at the time of publication. Due to constant improvements in
the design and quality of production components, some minor discrepancies may result between
the actual Bike and the information presented in this publication. Depictions and/or procedures
in this publication are intended for reference use only. Bowhead makes every effort to ensure
the accuracy of its documentation and assumes no responsibility or liability if any errors or
inaccuracies appear within. Any reprinting or reuse of the depictions and/or procedures
contained within, whether whole or in part, is expressly prohibited. The original instructions
for this Bike are in English.

3 | P a g e
Welcome!
Thank you for purchasing your REACH Adventure Ebike from Bowhead!
We take pride in bringing you a quality product that will offer years of enjoyment. Although
your Reach comes pre-assembled in a crate, it has travelled a great distance to reach you and
needs a bit of extra attention prior to riding. Please read and understand this manual fully
before riding your Reach and check out our “how to”videos on our YouTube channel
(https://www.youtube.com/channel/UCqZii12qtvKGZOnqSHkXGQg).
Be sure to check all hardware for correct torque (see “Tools and recommended torque values”
on page 10-12). Before each ride, follow the recommendations in the “Safety checklists” on
page 24. And finally, take care of your new Reach by following the guidelines in “Recommended
service intervals” on page 27. If you are not sure you have the skills, experience, and special
tools required for assembly and maintenance, get help from a local, certified, and reputable
bike mechanic, or contact Bowhead at service@bowheadcorp.com.
We are here to help!
If you have questions after reading this manual and watching the videos, please consult the
Bowhead Team via:
Visit our website to chat with our virtual Bowhead Bot
WARNING
Incorrect assembly, maintenance, or use of your Reach can cause component or performance
failure, loss of control, serious injury, or death. Even if you are an experienced bike rider,
you must read and understand the entire manual and any documentation provided for
subcomponents or accessories before riding. If you are not sure you have the experience,
skills, and tools to correctly perform all assembly steps in the manual, consult a local,
certified, reputable bike mechanic, or contact Bowhead at service@bowheadcorp.com.
WARNING
To reduce the risk of injury, close supervision is necessary when the product is used near
children.

4 | P a g e
Contents
Using this manual ............................................................................................ 5
Post crate Pre-Ride check ................................................................................. 7
Adjusting for comfort and Safety......................................................................... 8
Tools and recommended torque values................................................................11
Battery ........................................................................................................13
Operation.....................................................................................................18
Maintenance .................................................................................................25
Recommended Service Intervals ........................................................................28
Safety..........................................................................................................32
Troubleshooting.............................................................................................36
Warranty......................................................................................................38

5 | P a g e
Using this manual
Riding any bike or other vehicle involves some risk of serious injury or death. Your safety
depends on many factors including your bike knowledge, your bike’s maintenance,
foreseeable riding conditions, etc. There are also factors we cannot control or anticipate in
every situation or condition while riding. This manual makes no representations about the
safe use of bikes under all conditions. If you have any questions, you should contact Bowhead
immediately.
First adjustment and inspection of your bike requires specific tools and attention. Keep this
manual and any other documents that came with your Bowhead REACH. All content in this
manual is subject to change or withdrawal without notice. Visit www.bowheadcorp.com/help
to view and download the latest version. Bowhead makes every effort to ensure the accuracy
of its documentation and assumes no responsibility or liability if any errors or inaccuracies
appear within.
SAFETY SYMBOLS & WARNINGS
The following signal words appear throughout this manual. Your safety is involved when these
words and symbols are used. Become familiar with their meanings before reading the manual.
DANGER
DANGER indicates a hazardous situation which, if not avoided, WILL result in death or
serious injury.
WARNING
WARNING indicates a hazardous situation which, if not avoided, COULD result in death or
serious injury.
CAUTION
CAUTION indicates a hazardous situation which, if not avoided, COULD result in minor to
moderate injury.
NOTICE
NOTICE provides key information by clarifying instructions
IMPORTANT
IMPORTANT provides key reminders during disassembly, assembly, and inspection of
components.

6 | P a g e
VEHICLE IDENTIFICATION NUMBERS
Record your Reach’s identification number and date of sale in the spaces provided. Remove
the spare throttle key and store it in a safe place. The throttle must be replaced if all keys
are lost.
Bike identification number:
Date of sale:
BEFORE YOU RIDE
This Bowhead REACH Adventure Ebike may be used as an Off-Road Vehicle. Familiarize
yourself with all laws and regulations concerning the operation of this bike in your area.
WARNING
Failure to heed the warnings and safety precautions contained in this manual can result in
severe injury or death. Your REACH Adventure Ebike is not a toy and can be hazardous to
operate.
• Read this owner’s manual and review the safety information contained within.
Understand all safety warnings, precautions and operating procedures before operating the
Adventure Ebike.
• Never operate this bike without proper instruction.
• Always wear a helmet, eye protection, gloves, long-sleeve shirt, long pants and over-the-
ankle socks.
• Never operate this bike under the influence of drugs or alcohol.
• Never permit a guest to operate this vehicle unless the guest has reviewed the owner’s
manual and all safety labels.

7 | P a g e
Post crate Pre-Ride check
1.Open the crate and remove the 2 boards locking the wheels in place. With the help of
another person, slowly roll the bike out of the crate. Remove anything else (accessories,
additional components, packaging materials) from inside the crate and recycle the packaging
wherever possible.
2.Carefully unwrap the charger from in front of the seat and ensure all the following pieces
are included with your Bowhead REACH:
•Charger
•Battery
•Seat cushion (if ordered)
•Informational hang tags (attached to bike)
•Leg strap & Rear axle pin
If anything is missing, please contact Bowhead immediately.
NOTICE
If you are located outside of North America, your battery and charger will be shipped
separately. Your bike will come with an empty Pelican 1200 case pre-drilled and ready for
your battery to be installed. Please see New International Battery Installation Instructions
on page 18.
3.We also recommend the following (not included) for post crate pre-ride check and
maintenance:
•Strong friend or work stand to
lift your bike when required
•18mm socket wrench
•T25 drive-style screwdriver
•Bicycle grease
•H4 & H5 Hex Key
•Torque wrench (3Nm-30Nm) with
Hex bits
•Adjustable flat edge pliers
•Clean shop towel or paper towel
for cleaning excess grease
•Bike pump with pressure gauge
Now that your bike is un-packed, and you have checked to make sure you have all the
required components (List 2 above) for your REACH, it is time for the pre-ride check!
PRE-RIDE CHECK
1. Ensure you read and understand all hang tags attached to your bike. If you have any
questions, please contact us via email at service@bowheadcorp.com.
2. Please remove and replace your battery a few times following the “Battery removal
instructions” on page 14 to get accustomed to the locking mechanism.
3. Complete all sections in ‘Adjusting for comfort and Safety’ in the next chapter.
4. Complete the appropriate “Safety Checklists” in the ‘Maintenance’ Chapter on page 25.

8 | P a g e
Adjusting for comfort and Safety
The following steps are critical for your comfort and safety and must be performed before your
first bike ride.
ADJUSTING THE SEAT POSITION
The seat is adjustable to slide along the frame
rails to accommodate various user height
requirements.
It is secured in place by 4 screws.
To move the seat plate:
i. The 4 screws located on the bottom of
the rail mount must be loosened.
A 5 mm Hex Key should be used to loosen
these screws.
ii. The entire seat assembly may now be
slid forward and backward to reach a
comfortable position.
iii. After locating the seat in the
appropriate position, the 4 screws must
be torqued to 12Nm to secure the seat
in its’ new location.
9 | P a g e
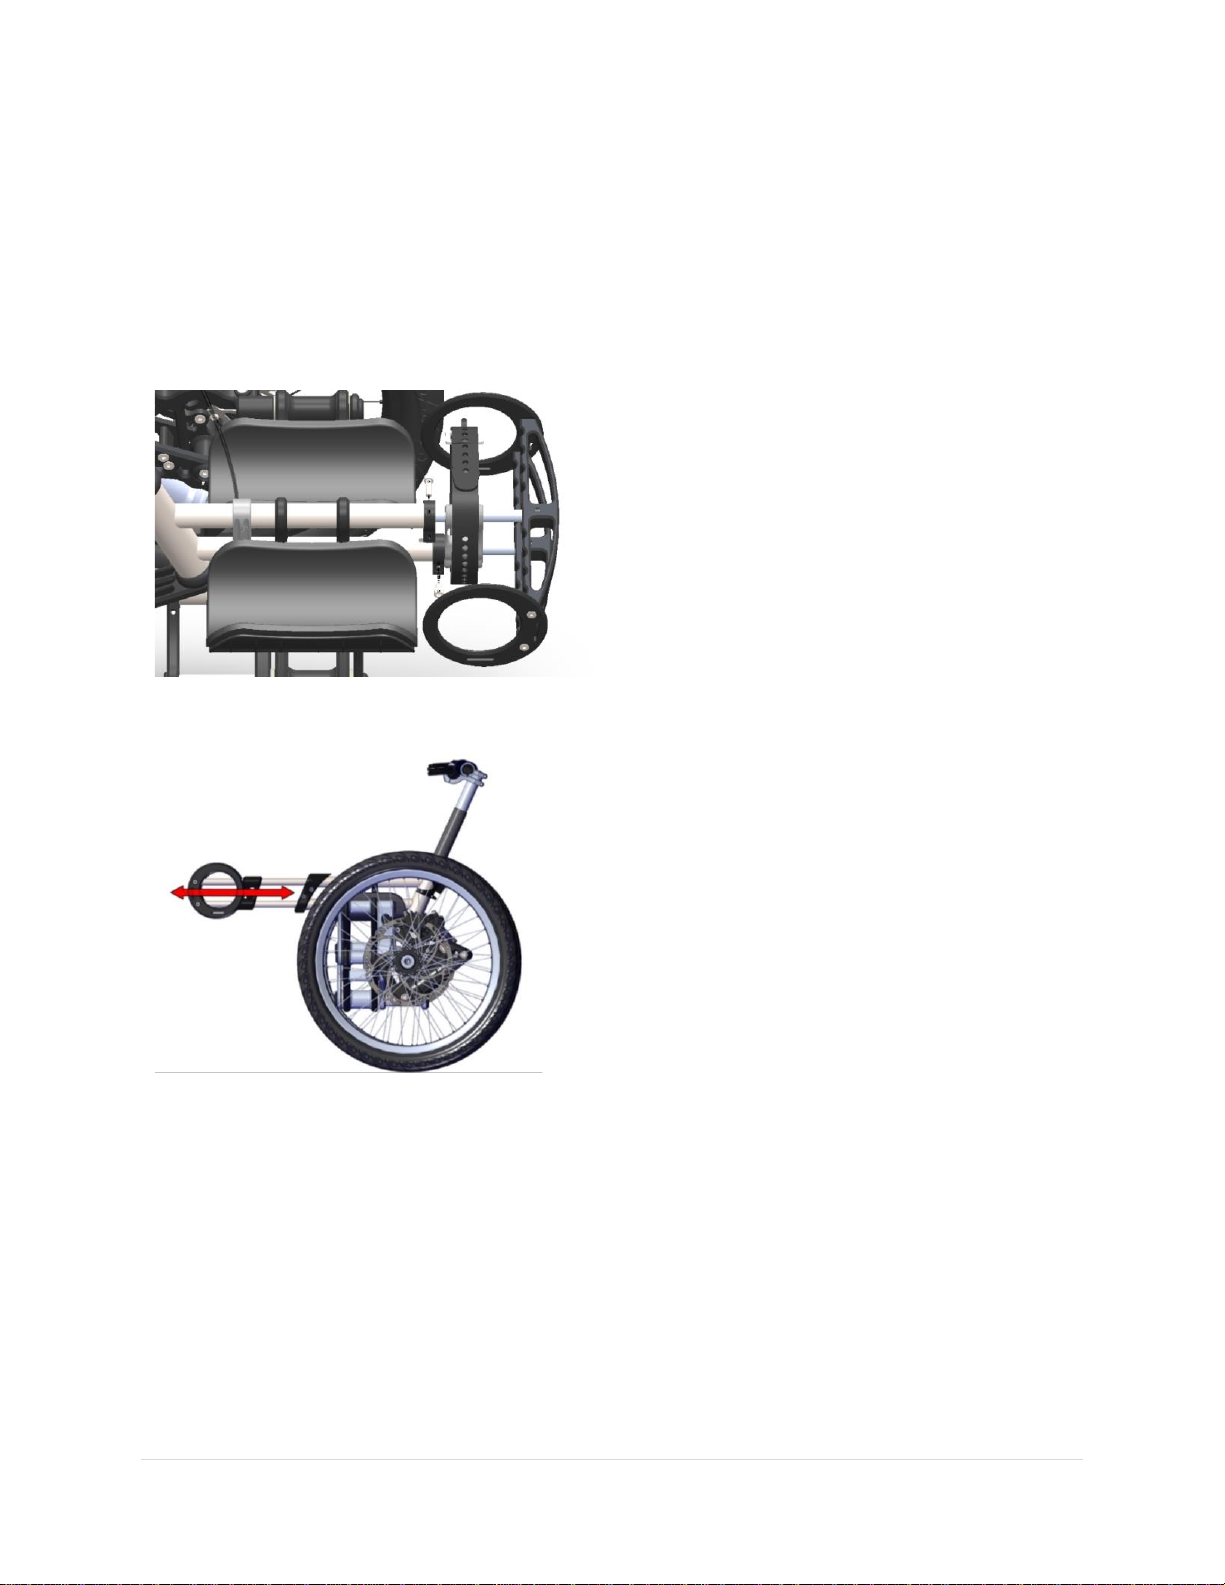
ADJUSTING THE FOOTREST POSITION
Similar to the seat, the footrest may also be
adjusted to an appropriate length for each
individual user.
It is secured in place by 2 screws.
To move the footrest:
i. The 2 screws located on either side of
the footrest frame must be loosened.
A 5 mm Hex Key should be used to
loosen/remove these screws.
ii. The footrest may now be slid forward
or backward to lengthen or shorten
this distance.
iii. Once the footrest is in a comfortable
location for riding the 2 screws must
be tightened (10Nm torque) to secure
the new position.

10 | P a g e
FINE-TUNE THE HANDLEBAR & BRAKE LEVER POSITIONING
Most riders will be comfortable with the handlebar angled so that the handlebar grips are
roughly parallel with the ground. Others may prefer the handlebar grips to be angled slightly
downwards.
The angle of the brake levers can also be adjusted for the most comfortable hand position
possible. To do so, loosen the brake lever clamp bolt, adjust the angle, and then re-tighten
according to the torque specifications in “Tools and recommended torque values” on the next
page.
However you prefer your handlebar and brake levers, make sure that you can twist your
handlebar 90° left and right without the handlebar or brake levers touching your body or the
frame of the bike. Ensure there is enough cable slack to allow the handlebar to turn fully to
each side without pulling cables taut.
If you adjust your handlebar or brake levers, be sure to tighten them according to the
specifications in “Tools and recommended torque values” on the next page.
NOTICE
Please contact Bowhead at service@bowheadcorp.com for additional instructions on
Quadriplegic handlebar and brake lever positioning.
ENSURE ALL HARDWARE IS TIGHTENED PROPERLY
Ensure all hardware is tightened properly according to the values in “Tools and recommended
torque values” on the next page. This is a critical safety step that you must not skip. If you
do not own a torque wrench or do not have the skills to check the tightness of your hardware,
consult a local, certified, reputable bike mechanic for help, or contact Bowhead.

11 | P a g e
Tools and recommended torque values
The tool sizing listed below is a general guide, but it is possible that the head of a particular
bolt on your bike may vary, requiring a different tool (e.g., a 4 mm Allen wrench instead of a
5 mm Allen wrench). If so, use whatever tool fits the bolt head. Such differences will not affect
the recommended torque for that piece of hardware.
WARNING
Failure to follow the below recommended torque values can cause component or
performance failure, loss of control, serious injury, or death. If you are not sure you have
the experience, skills, and tools to correctly perform all Pre-ride Safety checks and
maintenance steps in the manual, consult a local, certified, reputable bike mechanic, or
settings will void your warranty.
Tool
Required Torque
Handlebar area
Stem clamp bolts
4 or 5mm Hex
10Nm
Stem faceplate bolts
5mm Hex
6Nm
Brake lever clamp
bolts
T25 Torx
6Nm
Throttle clamp bolt
2.5mm Hex
3Nm
Brake area
Caliper adapter to
frame
4mm Hex
6-8Nm
Caliper to adapter
T25 Torx
6-8Nm
Brake rotor to hub
T25 Torx
7Nm
Seat area
Seat adjustment bolt
5mm Hex
12Nm
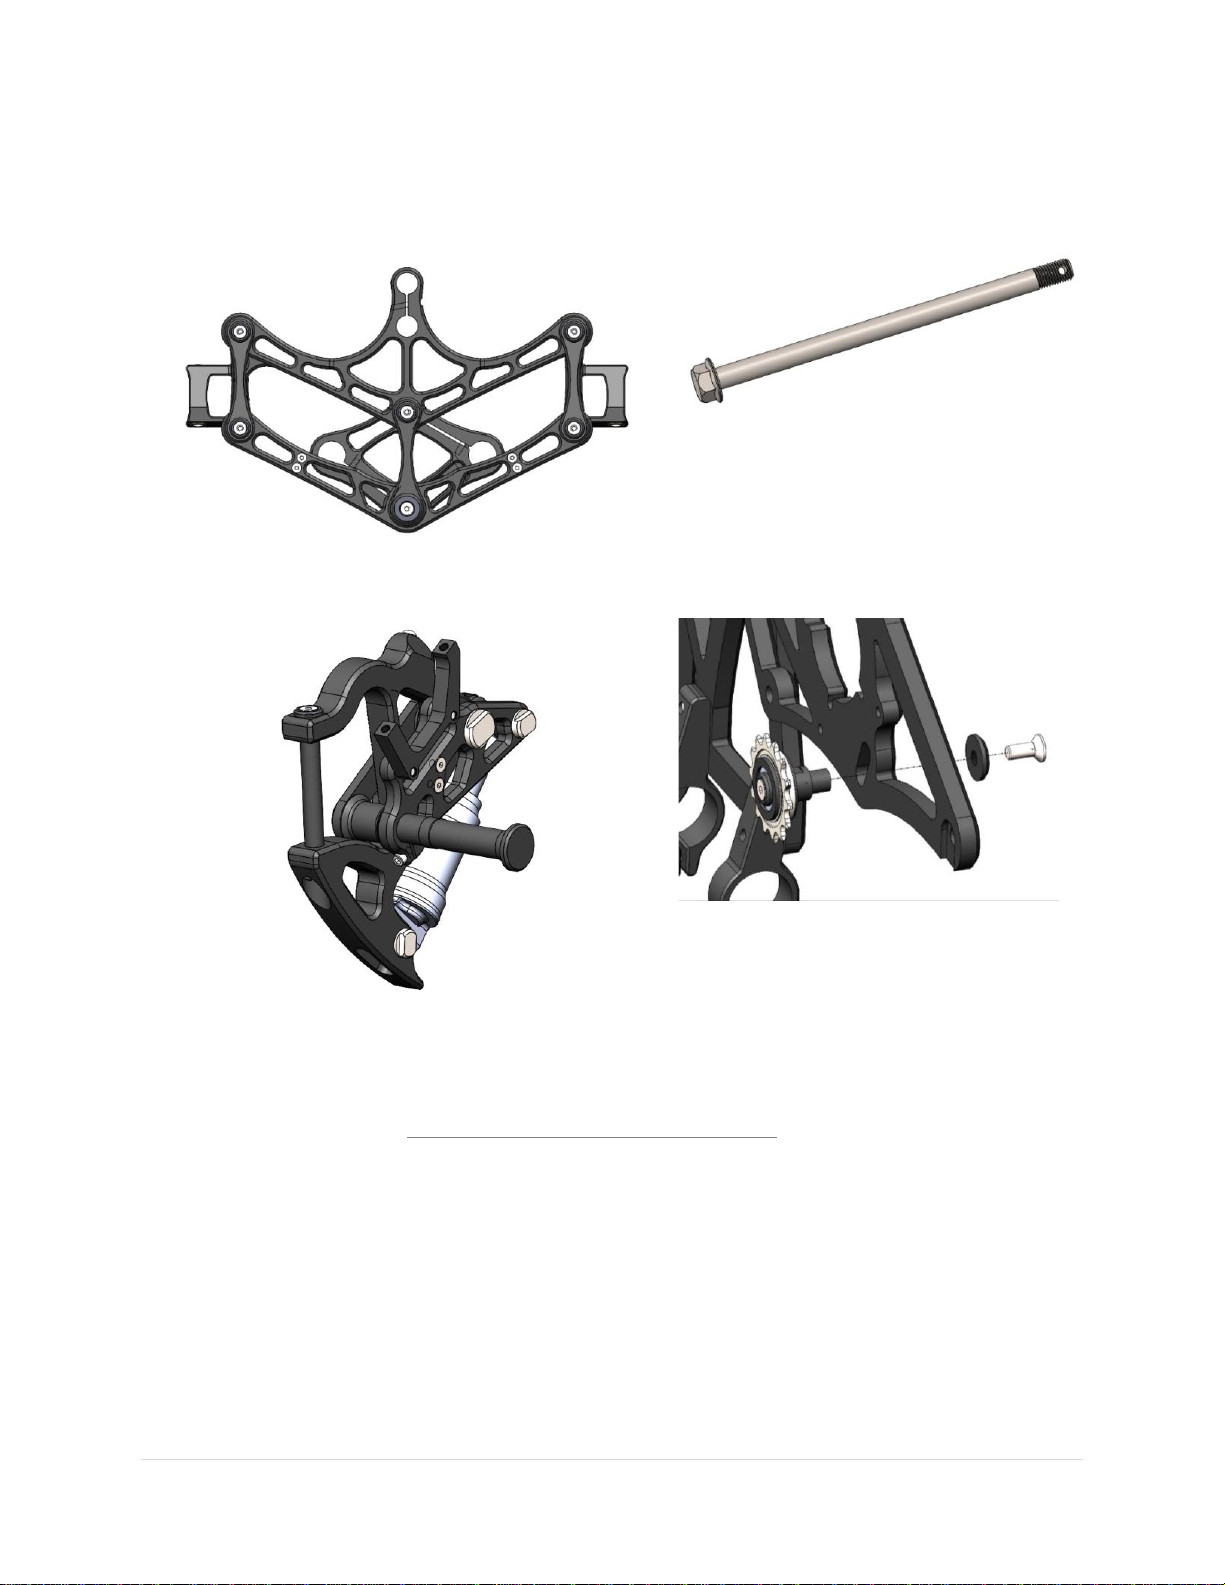
Rear Suspension
area
Idler bolt
5mm Hex
10Nm
Rear axle
18mm socket
30Nm
ADDITIONAL TORQUE SPECIFICATIONS
oCheck the rear frame clamp screws (6) to ensure they are sufficiently tight (12 Nm or
106 inlb torque).
oCheck the steering pin pivot screws (2) to ensure they are sufficiently tight (5 Nm or
44 inlb torque).
oCheck the rear axle to ensure it is sufficiently tight (30 Nm) and the locking pin is still
in place.
oCheck all screws involved in the seat plate adjustment and footrest adjustment to
ensure they are sufficiently tight.
oCheck the front articulation screws (6) on the very front face of your bike to ensure
they are sufficiently tight (3 Nm or 20 inlb torque).
12 | P a g e
Articulation: 20inlb or 3Nm
Rear Axle: 30Nm
Steering pivot: 5Nm
Idler Gear: 12Nm
If you are installing accessories from Bowhead on to your REACH, any necessary instructions,
important safety information, and torque specifications will come with your accessory and/or
will be available online at https://www.bowheadcorp.com/info.

13 | P a g e
Battery
The battery that comes with your Bowhead REACH is a state-of-the-art, lithium-ion battery
that’s designed to give you years or power with proper care and use.
WARNING
Charging your battery with a charger other than one supplied by Bowhead and designed for
your specific bike can cause damage to your bike’s electrical system or create a fire
hazard. Only use a battery charger designed for your bike and supplied by Bowhead.
•The battery should be fully recharged after each use. That way, you’ll get the
maximum range on your next ride and reduce the chance that you’ll over-discharge
the battery, which can reduce its lifespan. There is no memory effect on this type of
battery, so charging after short rides will not cause damage.
•Charging the battery after a ride generally takes 3 to 7 hours (see “Estimated charging
time” on page 17) unless you’re performing battery balancing (see “Balancing the
battery” on page 16). In rare cases, charging may take longer to allow the battery
management system to balance the battery, particularly when the bike is new, after
long periods of storage, or if the battery has been completely depleted.

14 | P a g e
NOTICE
Failure to follow the battery-charging best practices outlined here and in the following
sections could result in unnecessary wear to the charging components, battery, and/or
charger, and could lead to an underperforming or non-functional battery. Batteries
damaged due to improper care will not be replaced under warranty.
WARNING
Using a damaged battery or charger can create additional bike damage or a fire hazard.
Stop using your battery and charger and contact Bowhead immediately if any of the
following occur:
(1) Your battery or charger is physically damaged, non-functional, or performing
abnormally,
(2) Your battery or charger experienced a significant impact from a fall or crash, with or
without obvious signs of damage, or
(3) Your charger becomes too hot to touch (it’s designed to get warm with normal use),
makes a funny smell, or shows other signs of overheating. Store the damaged battery in a
safe location and, as soon as possible, recycle or otherwise dispose of it according to local
rules.
REMOVING THE BATTERY
•To remove the battery, first turn off your bike and unplug your battery from the power
extension cable and follow the remaining steps in the table to follow.
•Be careful not to drop or damage the battery when loose from the bike.
The battery is locked in place via a secure
magnetic locking system under typical
operating conditions.
User input is required to remove the system
and recharge the battery.
To remove the battery:
i. Press down (the direction indicated
by the red arrow in the diagram) on
the self-locking tab

15 | P a g e
ii. While pressing down on the self-
locking tab, grab the handle mounted
on the top of the battery case and
pull upwards.
iii. Once the case begins to move along
the case slots it is no longer
necessary to manually engage the
tab. The battery will slide up and out
of the slots.
BEFORE YOU CHARGE
Any time you charge your battery, whether you’re following the instructions in “Balancing the
battery” on the next page or “Routine charging procedure” on the next page make sure you
first check the battery, charger, and electrical cables for signs of damage, and follow the
guidelines below.
CHARGE IN A SAFE, APPROPRIATE LOCATION
Store and use the charger in a safe place—away from children, direct sunlight, dirt, debris,
tripping hazards (including electrical cords), or any materials that could ignite in the unlikely
event of a charger or battery malfunction. Position the charger and battery where they are
not at risk for falls or other impacts.
WARNING
Letting the charger’s plug contact metal objects could cause a power discharge (a spark),
which could injure you or create a fire hazard.
WARNING
Letting a battery charge unattended increases the risk that a charging problem will go
undetected and lead to component damage or a fire hazard. Always charge your battery
where you can monitor it.

16 | P a g e
Your battery needs to charge at room temperature or a bit cooler (10°C–25°C (50°F–77°F)).
It generates heat while charging, but it’s designed to air-cool; keep it uncovered and facing
upward on a flat, stable, hard surface.
NOTICE
Charging your battery in excessively hot or cold conditions or interfering with its ability to
air-cool can damage your battery or charger. Always charge your battery in temperatures
between 10° C–25° C (50° F–77° F), keep the battery and charger uncovered, make sure
the charger is on a hard, flat, stable surface, and use the charger right-side-up.
BALANCING THE BATTERY
After each of your first three rides, follow the special charging procedure outlined below,
which will ensure the cells that power the battery are balanced. After the third balance
charge and your fourth ride, begin routine charging procedures as described in “Routine
charging procedure” below.
NOTICE
Your battery should arrive with between 50% and 75% of a charge, so it is ready for a first
ride.
1. Begin this and every charging procedure by following the advice in “Before you charge” on
the previous page.
2. Charge your battery for as close as possible to 12 hours (but not longer), regardless of how
far you travelled. This might require leaving the charger attached to the battery and outlet
even after one of the charger’s red lights turns green (during routine charging, this green
light will be your indicator that charging is complete—see “Routine charging procedure”
below for more information).
3. Disconnect the charger first from the outlet, and then from the battery. Store the bike
until you’re ready to ride.
4. Ride the bike again as normal, discharging part (or all) of the battery capacity. Repeat
battery balancing steps only after a period of long-term battery storage (see “Long-term
battery storage” on page 18), if experiencing noticeable range decline, if instructed to do so
by Bowhead Customer Support, or up to once per month with frequent use as explained in
“Recommended service intervals” on page 27. Do not perform battery balancing more than
once per month. For routine charging, follow the steps in “Routine charging procedure”
below.
ROUTINE CHARGING PROCEDURE
When you first get your bike, follow the special charging instructions in “Balancing the
battery” above. For routine charging, mind the advice in “Before you charge” on the previous
page and then follow these steps.
1. Ensure your bike is turned off.

17 | P a g e
2. Unplug your battery from the power extension cable. Please ensure to pull on the yellow
connectors when unplugging electronics and not the cables.
3. Remove the plastic cover from the charger port and plug the charger into the battery’s
charging port. With the battery removed from the bike, place the charger on a flat, secure
surface and connect the DC output plug from the charger to the charging port.
4. Plug the charger into a power outlet. Connect the charger input plug (110/220-volt plug)
to the power outlet. Charging should initiate and will be indicated by the LED charge status
light on the charger turning red. When charging is complete, one indicator light will turn
green.
5. Unplug the charger from the outlet, then the charging port. Once fully charged, indicated
by the light turning green, unplug the charger from the wall outlet first and then remove the
charger output plug from the battery charging port. Be sure to pull gently on the plugs, not
on the cables themselves.
NOTICE
The charger is designed to stop charging automatically when the battery is full.
Nevertheless, leaving your battery charging longer than necessary can cause needless wear.
We recommend you remove the charger from the battery within one hour of the green light
indicating a complete charge. Store the charger carefully, making sure its plug does not
come in contact with liquids, dirt, debris, or metal objects, which can damage the plug and
interfere with future operation.
WARNING
Charging your battery with a charger other than one supplied by Bowhead and designed for
your specific bike can cause damage to your bike’s electrical system or create a fire
hazard. Only use a battery charger designed for your bike and supplied by Bowhead.
ESTIMATED CHARGING TIME
The time the charger takes to fully charge the battery depends on distance travelled, riding
characteristics, terrain, payload, battery age, and other factors. However, the typical
charging range for our batteries is provided below.
17.5 Ah- ~3-5 hours
21.5 Ah- ~5-7 hours
23.5 Ah- ~6-8 hours
NOTICE
The battery may take longer to charge when fully depleted, when very new, and after 3–5
years of regular use. If your battery doesn’t seem to be charging normally, is taking longer
to charge than expected, or you’re experiencing substantial reduction in range, discontinue
use and contact Bowhead.

18 | P a g e
LONG-TERM BATTERY STORAGE
If storing your bike from Bowhead for longer than two weeks at a time, follow the
recommendations below to maintain the health and longevity of your battery.
•Charge (or discharge) the battery to approximately 75% charge, which is the
equivalent of approx. 79 V on your battery display located on your handlebar.
•Power off the battery and remove from the frame for storage.
•Store the battery in a dry, climate controlled, indoor location between 10° C–25° C
(50° F–77° F).
•Check the battery monthly, and if necessary, use the charger from Bowhead to charge
the battery to 75% charged.
NOTICE
Incorrect storage of your battery can result in a damaged or non-functional battery. Follow
the above instructions to reduce such risk. Batteries damaged by improper use, charging, or
storage will not be replaced under warranty.
NEW INTERNATIONAL BATTERY INSTALLATION
All international customer bikes come with a pre-drilled Pelican case that is already mounted
to the battery rails. All that remains is installing the blue battery shipped to you direct from
LiTech Power. This is performed via the following simple steps:
1. Remove all packaging on the LiTech battery. You should be left with a blue outer
battery shell.
2. Place the battery inside the case and thread the wire connectors through the 2 holes
predrilled in the case.
3. Open the small plastic bag containing the 4 half plugs you will need to completely seal
the connectors.
4. Start by applying silicone to the outer edges of each half.
5. Insert one side of each plug and press the connector wires into the grooves of the
plug.
6. Insert the other half of each plug using care to not crimp or cut the wires.

19 | P a g e
Operation
WARNING
Incorrect assembly, maintenance, or use of your REACH can cause component or performance
failure, loss of control, serious injury, or death. Even if you are an experienced bike rider,
you must read and understand the entire manual and any documentation provided for
subcomponents or accessories before riding.
GUARD AGAINST RUST, WATER DAMAGE, AND CORROSION
Like any vehicle used outdoors, your Reach needs care to ensure it is not damaged by the
elements. Follow these steps for a long, healthy life for your bike:
•Store under shelter and in an upright position; avoid leaving the bike in the rain or
exposed to corrosive substances such as water, salt, or de-icing substances. If
exposed to rain, dry your bike afterward, and apply an anti-rust treatment to the
chain and other unpainted steel surfaces.
•To clean your Reach, turn the bike and battery off and wipe the frame with a clean,
damp cloth. If needed, apply a mild, noncorrosive detergent mixture to the damp
cloth and wipe the frame. Dry by wiping with a clean, dry cloth. Never use high-
pressure water on your bike. Wipe down your bike frequently and wipe or spray all
unpainted mechanical parts with anti-rust treatment.
•If painted metal parts become scratched or chipped, use touch up paint or nail polish
to prevent rust.
•Never immerse or submerge the bike or any components in water or liquid, which
can damage the electrical system.
•Avoid riding on the beach, in coastal areas with high-salinity fog, or on surfaces
treated with salt or de-icing compounds. Doing so exposes your bike to salt or other
substances that are very corrosive. Corrosion of electrical components can lead to
permanent, irreversible damage that can cause battery failure, electrical system
failure, or electrical fire. Damage from corrosion is not covered under warranty.
WARNING
Damage to your Reach’s electrical system caused in any manner, including water intrusion,
can lead to battery failure, electrical system malfunction, or electrical fire and consequent
property damage, injury, or death. Follow all recommendations to minimize chance of water
damage. If you have any questions, contact Bowhead Customer Support.
HOW THE ELECTRICAL SYSTEM WORKS
This bike is equipped with a throttle to provide power assistance from the motor to propel the
bike forward and requires no pedal action.
Throttle key positions
Familiarize yourself with the keyport and key positions before riding the bike. Always remove
the key after riding and store in a safe location.

20 | P a g e
CAUTION
Always ensure the key is in the off position when unplugging or plugging in any electrical
components.
How the throttle works
The throttle is located on the right side of the handlebar. The rider can use it with a twist of
the throttle grip to propel the bike forward without pedaling. To engage the throttle while
riding, slowly and carefully rotate it toward yourself. The more you twist, the more powerfully
the throttle will propel the bike forward. Once you release the throttle or apply the brakes,
the throttle will no longer propel the bike forward. Always keep one hand on the brake lever
and be prepared to squeeze the lever if needed. Thumb throttles from Bowhead are equipped
with an on/off switch for the throttle.
IMPORTANT
The throttle displays battery life in voltage (V) NOT percentage. This display will never
reach 0V. It is strongly recommended that riders head back to a charging zone once the
throttle display reads 72V.
How the charger works
Charging the battery should be at room temperature (±20°C/68°F). Charging below 0°C or
above 40°C (32°F~104 °F) can lead to insufficient charging and can be harmful to the
battery life cycle.
You should always remove your battery from your bike prior to charging.
CHARGER
• Not connected: Charger LED is green (constant).
• During charging: Charger LED is red (constant)
• Charging issue: Charger LED is red (blinking)
• Charging is completed (100%): Charger LED is green (constant)
CONTROLLER
Controller LED Codes
Green LED Codes
LED Code
Explanation
Solution
Green Off
No power or switched off
1. Check if all wires are
correct. 2. Check fuse and
power supply
Green On
Normal operation
That’s great! You got a
solution!
Green & Red are both On
1. Software needs upgrading.
2. Supply voltage too low or
battery too high 3. The
Other manuals for REACH
2
Table of contents
Other BOWHEAD Scooter manuals


