BRAND-MAN Bronco BMBROPN User manual

rt
TEL: 1300 667 146
Bronco 3 Burner Gas Grill
BMBROPN/ BG2046A3
OWNER’S MANUAL
rt
rt
rt
rt
rt
rt
rt
Made from 75% Bagasse
(enviromentally-friendly sugar cane
pulp by-product
Keep this manual for future reference.
This instruction manual contains important information necessary for the
proper assembly and safe use of the appliance.
Read and follow all warnings and instructions before assembling and using
the appliace.
Follow all warnings and instruction when using the appliance
rt
If you smell gas -
• Shut o gas to appliance.
• Extinguish any open ame.
• Open lid.
•If odor continues, keep away from the appliance and
immediately call your gas supplier or your re department.
DANGER
rt
rt
rt
WARNING
For Outdoor Use Only
(Outside any enclosure)
FOR YOUR SAFETY:
rt
• Improper Installation,
adjustment, alteration,
service or maintenance can
cause injury or property
damage.
•Read the installation,
operation, and maintenance
instructions thoroughly
before installing or
servicing this equipment.
• Failure to follow these
instruction could result
in re or explosion, which
could cause property
damage, personal injury, or
death.
• This instruction manual
contains important
information necessry for
the proper assembly and
safe use of the appliance.
•Read and follow all
warnings and instructions
before assembling and
using the appliance.
• Follow all warnings and
instructions when using the
appliance.
• Keep this manual for future
reference.
FOR YOUR SAFETY:
WARNING
WARNING
• Do NOT store or use
gasoline or other ammable
liquids or vapors in the
vicinity of this or any other
appliance.
• An LP cylinder not
connected for use shall
NOT be stored in the
vicinity of this or any
other appliance.
MD
一:
GRILLS

THREE BURNERS
BARBECUE
BG2046A3
1
Important Safeguards
DANGER: Failure to follow the dangers, warnings and cautions in this manual may result in serious bodily injury or death, or in a re or an explosion
causing damage to property
WARNINGS:
This Barbecue is for outdoor use only, and should not be used in a
building, garage or any other enclosed area.
Do Not operate, light or use this appliance within ten feet (3.05m) of
walls, structure or buildings.
For residential use only. This Barbecue is NOT for commercial use.
This BBQ is not intended for and should never be used as a heater.
TOXIC fumes can accumulate and cause asphyxiation.
This Barbecue is safety certied for use in any other location. Modi-
cation will result in a safety hazard and will void your warranty.
This Barbecue is for use with liquid propane (LP) gas only. The con-
version to or attempted use of natural gas in this LP gas Barbecue is
dangerous, may cause bodily harm and will void your warranty.
LP gas characteristics:
a. LP gas is ammable and hazardous if handled improperly. Be
come aware of the characteristics before using any LP gas
product.
b. LP gas is explosive under pressure, heavier than air, and settles/
pools in low areas.
c. LP gas in its natural state has no odor. For your safety, an odorant
is added that smells like rotten cabbage.
d. Contact with LP gas can cause freeze burns to skin.
Apartment dwellers: Check with management to learn the requir-
ments and re codes for using a LP gas Barbecue in your apartment
complex.
LP gas cylinder needed to operate. Only cylinders marked“propane”
may be used.
The LP gas cylinder must be constructed and marked in accordance
with the Specication for LP-gas Cylinders of the U.S. Department
of Transportation (D.O.T.) or the National Standard of Canada, CAN/
CSA-B339, Cylinders, Spheres and Tubes for the Transportation of
Dangerous Goods; and Commission.
LP gas cylinder must be arranged for vapor withdrawal.
The LP gas cylinder must have a listed overlling prevention device
(OPD).
Only use LP gas cylinders equipped with a cylinder connection de-
vice compatible with the connection for outdoor cooking appliances.
The LP gas cylinder must have a cylinder collar to protect the cylin-
der valve.
Never use an LP gas cylinder with a damaged body, valve, collar or
footing.
Dented or rusted LP gas cylinder may be hazardous and should be
checked by your LP gas supplier prior to use.
The LP gas cylinder should not be dropped or handled roughly.
LP gas cylinders must be stored outdoors out of reach of children
and must not be stored in a buiding, garage or any other enclosed
area. Your cylinder must never be stored where temperatures can
reach over 125F.
Do NOT insert any tool or foreign object into the valve outlet or
safety relief valve. You may damage the valve and cause a leak. Leak-
ing propane may result in an explosion, re, severe personal injury
or death.
Do NOT block holes in sides or back of Barbecue.
Never keep an LP gas cylinder in a hot car or trunk. Heat will cause
the gas pressure to increase, which may open the relief valv and al-
low gas to escape.
Place dust cap on cylinder valve outlet whenever the cylinder is not
in use. Only install the type of dust cap on the cylinder valve outlet
that is provided with the cylinder valve. Other types of caps or plugs
may result in leakage of propane.
If Barbecue is not in use, the gas must be turned o at the supply
cylinder and disconnected.
Do NOT store a spare LP gas cylinder under or near this appliance. If
not followed, a re causing death or serious injurymay occur.
Never ll the cylinder beyond 80 percent full. If not followed, a re
causing death or serious injurymay occur.
Keep the fuel supply hose away from any heated surfaces.
A re causing serious injury or damage to property may occur if the
above is not followed exactly.
Never attempt to attach this Barbecue to the self-contained LP gas sys-
tem of a camper trailer, motor home or house.
Never use charcoal, lighter uid, lava rocks, gasoline, kerosene or alcohol
with this product.
Your Barbecue has been checked at all factory connections for leaks.
Re-check all connections as described in the “Operating Instructions” sec-
tion, as shipping can loosen connections.
Check for leaks even if your unit was assembled for you by someone else.
Do NOT operate if a gas leak is present. Gas Leaks may cause a re or
explosion.
You must follow all instructions in the “Checking for Leaks” section
before operating. To prevent re or explosion hazard when testing for a
leak:
a. Always perform a leak test before lighting the BBQ and each time
the cylinder is connected for use.
b. No smoking. Do NOT use or permit sources of ignition in the area
while conducting a leak test.
c. Conduct the leak test outdoors in a well-ventilated area.
d. Do NOT use matches, lighters, or a ame to check for leaks.
e. The use of alcohol, prescription or non-prescription drugs may impair
the consumer’s ability to properly assemble or safely operate the
appliace.
f. Strong odors, colds, sinus congestion, etc. may prevent the detection
of propane. Use caution and common sense when testing for leaks.
g. Do NOT use Barbecue until any and all leaks are corrected.
If you are unable to stop a leak, disconnect the LP gas supply. Call a
gas appliance serviceman or your local LP gas supplier.
This Barbecue is designed to operate at an inlet pressure of 11 inches
water column.
Do NOT store or use gasoline or other ammable liquids or vapors within
25 feet (7.62 m) of this appliance.
Do NOT use in an explosive atmosphere. Keep Barbecue area clear and
free from combustible materials, gasoline and other ammable vapors
and liquids.
Minimum clearance from sides and back of unit to combustible construc-
tion is 30 inches (76.2 cm). Do NOT use this appliance under any type of
overhang or roof.
It is essential to keep the Barbecue’s valve compartment, burners and
circulating air passages clean.
Inspect Barbecue before each use.
Do NOT alter Barbecue in any manner. Any alteration will void your war-
ranty.
Do NOT use the Barbecue unless it is COMPLETELY assembled and all
parts are securely fastened and tightened.
Do NOT build this model of Barbecue in any built-in or slide-in construc-
tion. Ignoring this warning could cause a re or an explosion that can
damage property and cause serious bodily injury or death.
This Barbecue should be thoroughly cleaned nd inspected on a regular
basis.
Clean and inspect the hose before each use of the appliance. If there is
evidence of abrasion, wear, cuts or leaks, the hose must be replaced prior
to operation.
Use only the regulator and hose assembly provided. Use only the re-
placement regulator and hose assembly specied by CAPTIVATE BRANDS
USA INC.
Use only CAPTIVATE BRANDS USA INC. factory authorized parts. The use
of any part that is not factory authorized can be dangerous and will void
your warranty.
Do NOT operate this appliance without reading “Operating Instructions”
in this manual.
Do NOT attempt to disconnect the gas regulator from the cylinder or any
gas tting while the Barbecue is in use.
Always place your Barbecue on a hard, non-combustible, level surface.
An asphalt or blacktop surface may not be acceptable for this purpose.
Move gas hoses as far away as possible from hot surfaces and dripping
hot grease.

THREE BURNERS
BARBECUE
BG2046A3
2
Do NOT touch metal parts of Barbecue until they have completely
cooled to avoid burns, unless you are wearing protective gear (pot
holders, gloves, BBQ mittens, etc.)
Do NOT install or use in or on boats or recreational vechicles.
When cooking, re extinguishing materials should be readily acces-
sible. In the event of an oil/grease re, do NOT attempt to extinguish
with water. Use type BC dry chemical re extinguisher or smother
with dirt, sand or baking soda.
Do NOT use Barbecue i high winds.
Never lean over the Barbecue when lighting.
Do NOT leave a lit Barbecue unattended. Keep children and pets
away from Barbecue at all times.
Do NOT leave Barbecue unattended while preheating or burning o
food residue on high. If Barbecue has not been cleaned, a grease re
can occur that may damage the product.
DO NOT place empty cooking vessels on the appliance while in
operation.
Use caution when placing anything on the Barbecue while the appli-
ance is in operaation.
Do NOT attempt to move Barbecue when in use. Allow the Barbecue
to cool before moving or storing.
LP gas cylinder must be properly disconnected and removed prior to
moving this Barbecue.
Storage of Barbecue indoors is permissible only if the cylinder is
disconnected, removed from the Barbecue and properly stored
outdoors.
Keep all electrical cords away from a hot Barbecue.
After a period of storage and/or nonuse, check for leaks, burner
obstructions and inspect for any abrasion, wear or cuts to the hose.
Failure to open side shelves while igniting the Barbecue’s burners, or not
waiting 5 minutes to allow the gas to clear if the Barbecue does not light,
may result in an explosive ame-up.
Always use a meat thermometer to ensure food is cooked to a safe tem-
perature.
Use protective gloves when assembling this product.
Do NOT force parts together as this can result in personal injury or dam-
age to the product.
Never cover entire cooking area with aluminium foil.
Deaths, serios injury or damage to property may occur if the above is not
followed exactly.
Using pan larger than 240mm diameter in capacity could exceed weight
limit of the side burner shelf
Do not modify the appliance.
This appliance must be kept away from ammable materials during use.
This outdoor cooking gas appliance is not intended to be installed in or
on boats. For other than RV grills, a statement that this appliance is not
intended to be installed in or on recreational vehicles.
rt
rt
(a) The burning of Gas cooking fuel generates some by products which are on the list of substances known by the
State of California to cause cancer, reproductive harm, or other birth defects. To reduce exposure to these substances,
always operate this unit according to the use and care manual, ensuring you provide good ventilation when cooking
with Gas.
(b) Handling the brass material on this product exposes you to lead, a chemical known to the State of California to
cause cancer and birth defects or other reproductive harm. Wash hands after handling.
(c) This product contains chemicals, including lead and compounds, known by the State of California to cause cancer,
reproductive harm, or other birth defects.
(d) Wash your hands after using this product.
For more information go to: www.P65Warnings.ca.gov
WARNING
CALIFORNIA PROPOSITION 65 WARNING:
THREE BURNERS
BARBECUE
BG2046A3
3
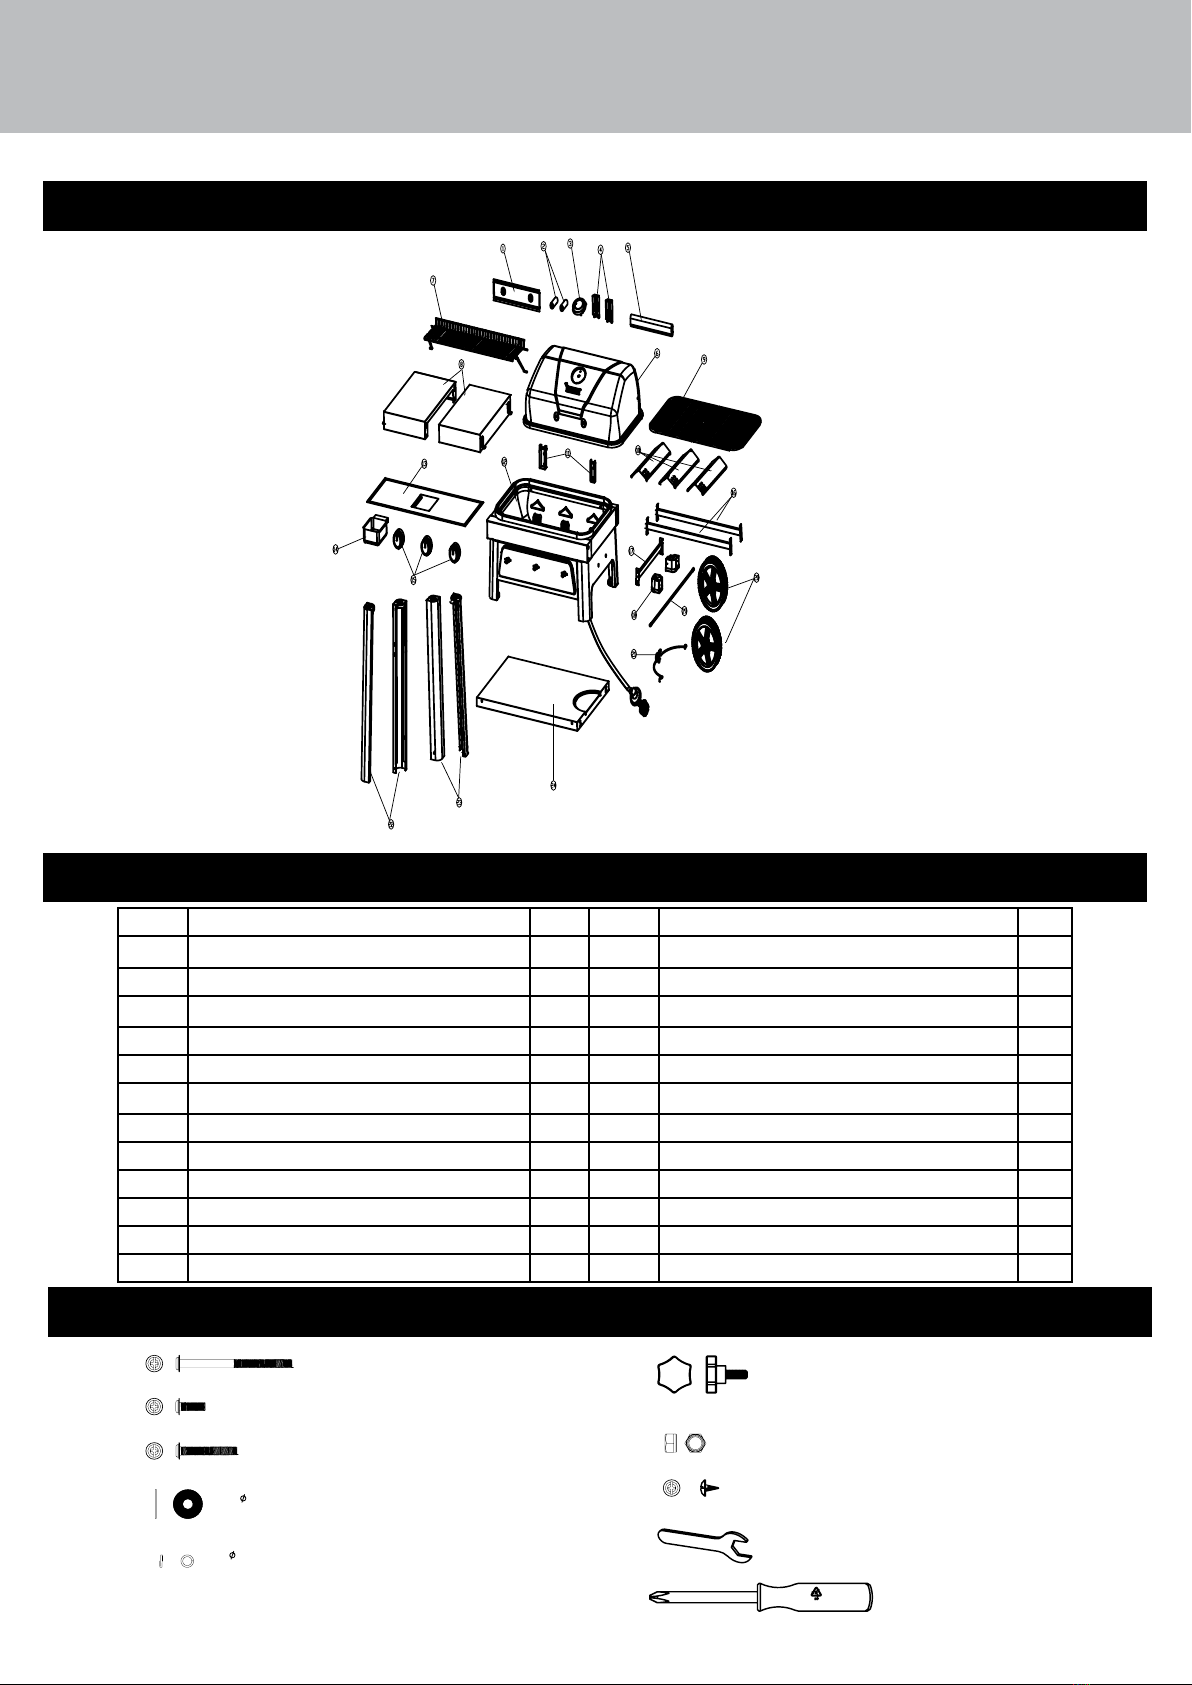
Expanded View
PART LIST
HARDWARE
B:M6X15Q235
NickelPlatedPhillipsTrussHead.........32Pcs
C:M6X40Q235
NickelPlatedPhillipsTrussHead.........8Pcs
A:M6X75Q235
NickelPlatedPhillipsTrussHead.........2Pcs
E: 6.2 65Mn
Large Lock Washer.........2Pcs
D: 6.2
HeatResistanceWasher......2Pcs
G:M8 Q235 Hex Nuts.........2Pcs
I:M8Q235 Wrench L=75mm.........2Pcs
J:Screwdriver......1PC
H:ST4.2*10 Q235 TappingScrew............4Pcs
F:M6X15Q235.........4Pcs
No Part Name Qty No Part Name Qty
1 Lid Handle Heat Insulator 1 13 Firebox Heat Insulation Bottom Panel 1
2 Lid Handle Support 2 14 Oil Cup 1
3 Thermometer 1 15 Control Knob 3
4 Top Hinge 2 16 Front Rail 2
5 Lid Handle 1 17 Cart Left Rail 1
6 Lid 1 18 Leg Seat 2
7 Warming Rack 1 19 Axle 1
8 Side Shelf 2 20 Wheel 2
9 Grill 2 21 Tank Clip 1
10 Heat Shield 3 22 Left Leg 2
11 Bottom Hinge 2 23 Right Leg 2
12 Firebox 1 24 Cart Bottom Panel 1

THREE BURNERS
BARBECUE
BG2046A3
4
ASSEMBLY INSTRUCTIONS
Step 1
Step 2 a. Attach the Leg Seats (18) onto both Left Leg (22) and secure it with two Tapping
Screw (H) each.
DO NOT RETURN TO PLACE OF PURCHASE.
For assistance, call 1.855.200.8445 toll-free. Please have your owner’s manual and
model number available for reference.
Note: The model number is printed on a label which can be found on the side of the
rebox
Assembly Tips:
1. Select an area where you will assemble this product. To protect components, choose
a smooth surface that’s free of cracks or openings.
2. Spread out all parts.
3. Tighten all hardware connections by hand rst. Then, before completing each step,
go back and fully tighten all hardware.
Be careful not to over-tighten. That could damage surfaces or strip threads.
4. For best results, complete each step in the order presented.
To complete assembly you will need:
• (1) Leak detection solution (instructions on how to make the solution are
included in the “Operating Instructions”section of this manual).
• (1) Precision-lled LP gas grill tank with Acme Type 1 external threaded valve
connection.
Typical assembly is approximately one hour.
CAUTION: Two (2) people are required for assembly.
22
18
H

THREE BURNERS
BARBECUE
BG2046A3
5
ASSEMBLY INSTRUCTIONS (CONTINUE)
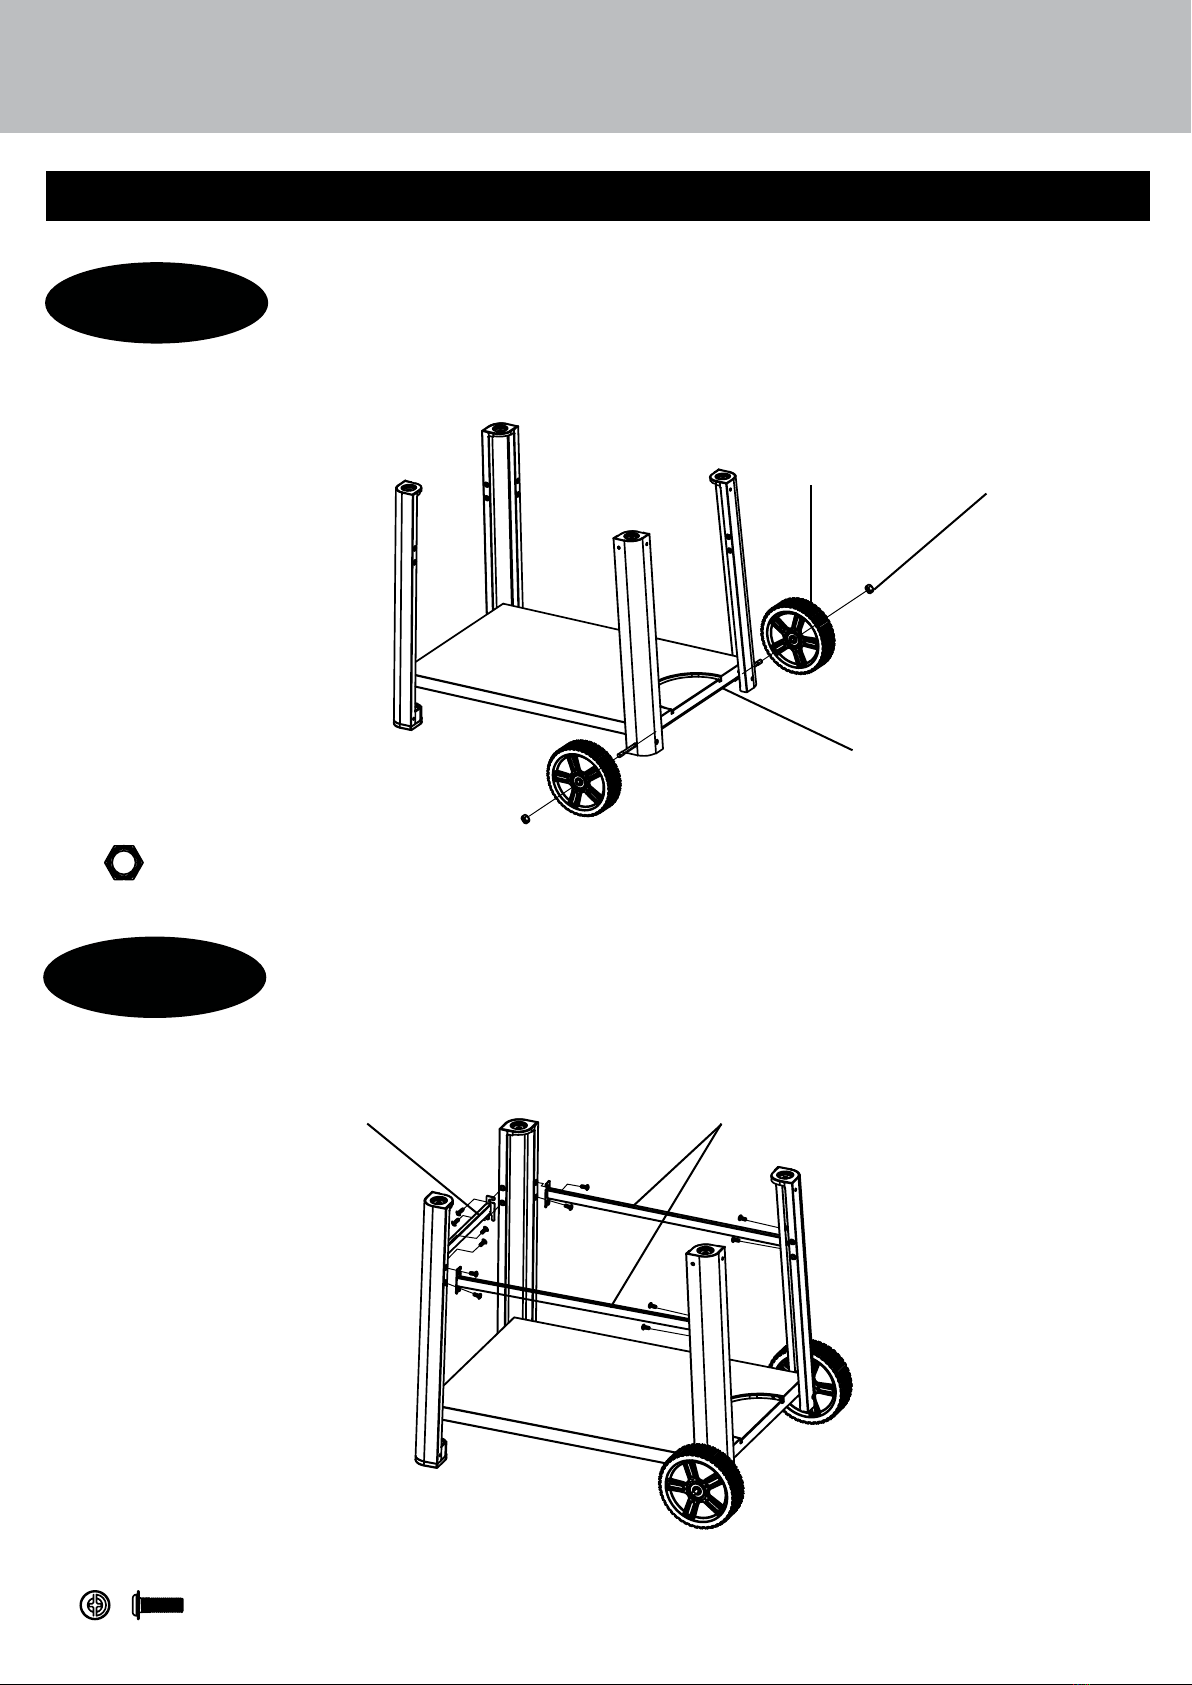
Step 3 a. Attach the Left Leg (22) prepared in Step 2 onto the Cart Bottom Panel (24) with two
Bolts (B) on each side. Ensure the position is as shown below.
b. Make sure all bolts are tightened.
Step 4 a. Attach the Right Cart Leg (23) onto the assembly prepared in Step 3 with two Bolts (B)
on each side. Ensure the position is as shown below.
b. Make sure all bolts are tightened.
M6*15 4PCS
M6*15 4PCS
24
23
B
B
THREE BURNERS
BARBECUE
BG2046A3
6
ASSEMBLY INSTRUCTIONS (CONTINUE)
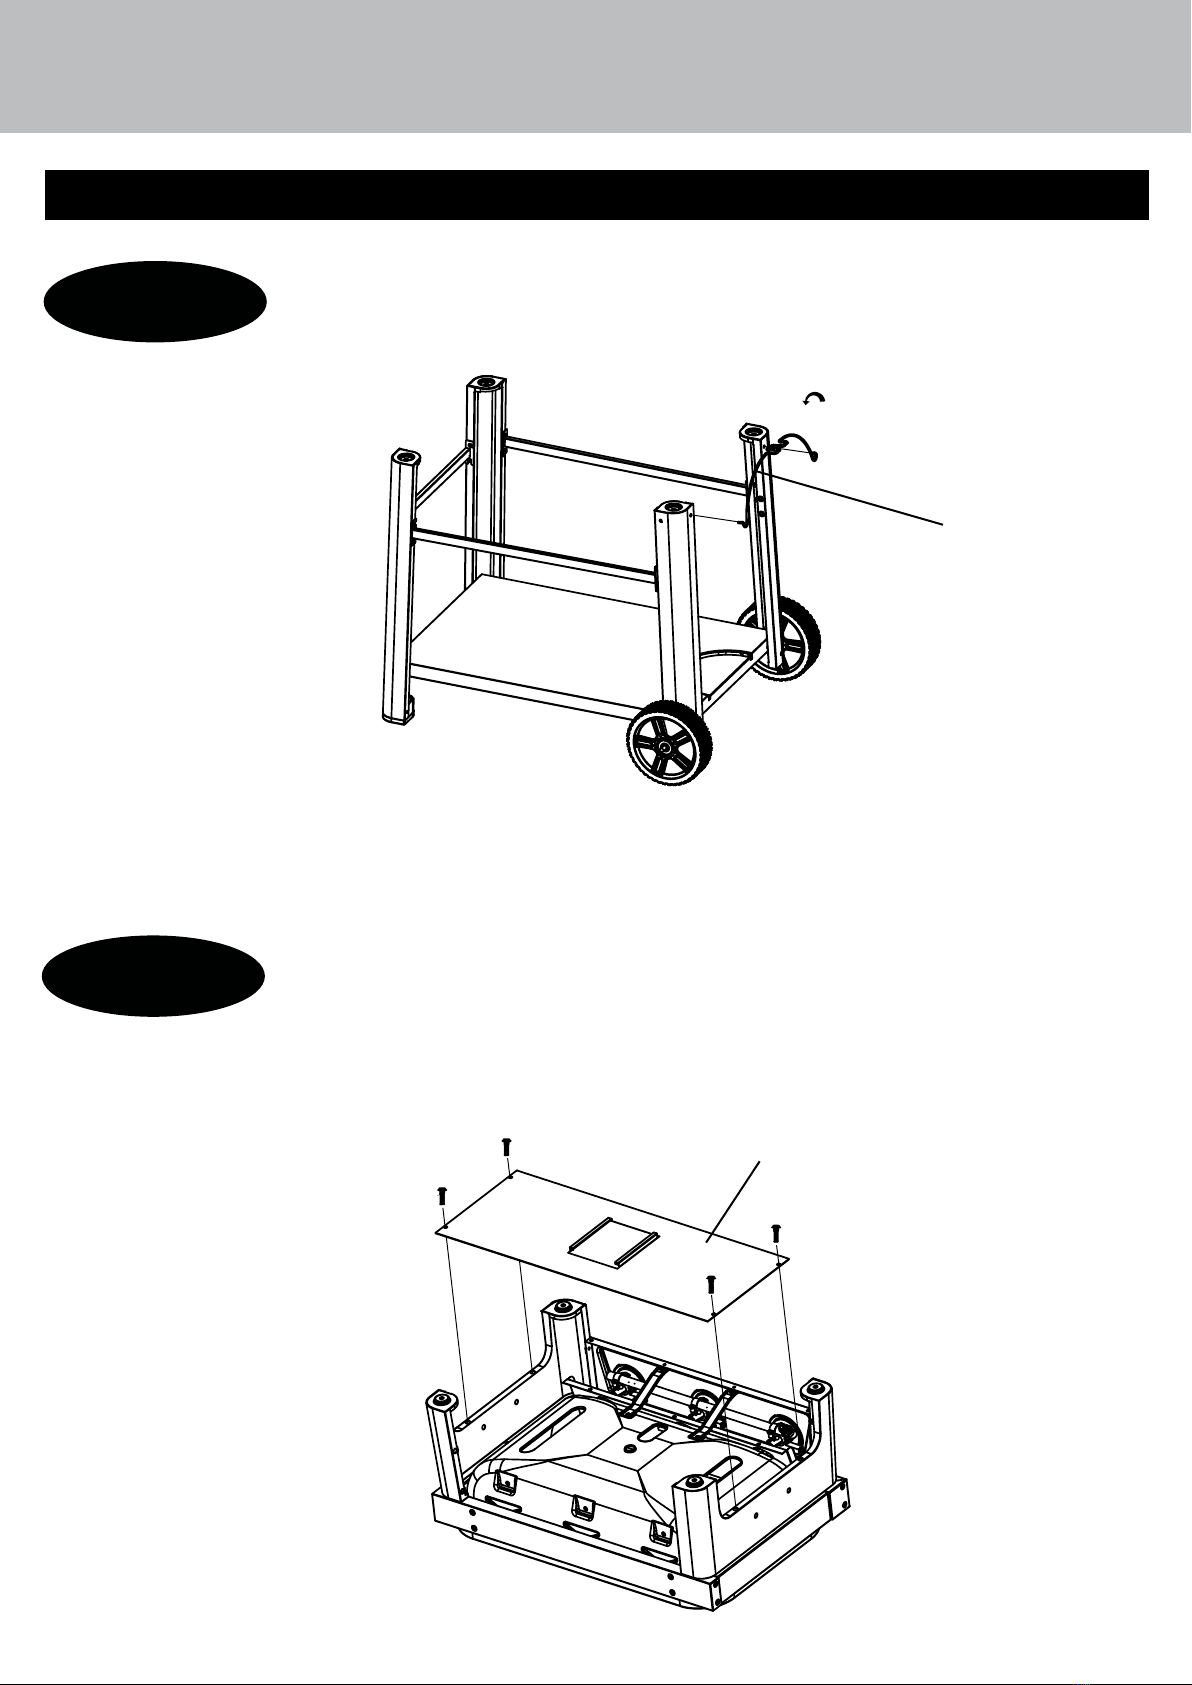
Step 5 a. Attache the Wheels (20), Spacers (II) and Wheel Axis (19) to the Right Cart Leg and
secure with Nut (G).
b. Use the two Spanners (I) provided to tighten nuts
Step 6 a. Attach the two Cart Rail (16) and Cart Left Rail (17) onto the Cart Assembly prepared
in Step 5 with twelve Bolts (B) as shown below.
b. Ensure all bolts are tightened.
M8 2PCS
M6*15 12PCS
20
19
17 16
G
G
B
THREE BURNERS
BARBECUE
BG2046A3
7
ASSEMBLY INSTRUCTIONS (CONTINUE)
Step 7 a. Attach the Tank Clip (21) as shown below.
Step 8 a. Install the Firebox Heat Insulator Bottom Panel (13) underneath the rebox with four
Bolts as shown.
b. Tighten all the bolts properly.
First
Second
21
13
Note: Pre-assembly
THREE BURNERS
BARBECUE
BG2046A3
8
ASSEMBLY INSTRUCTIONS (CONTINUE)
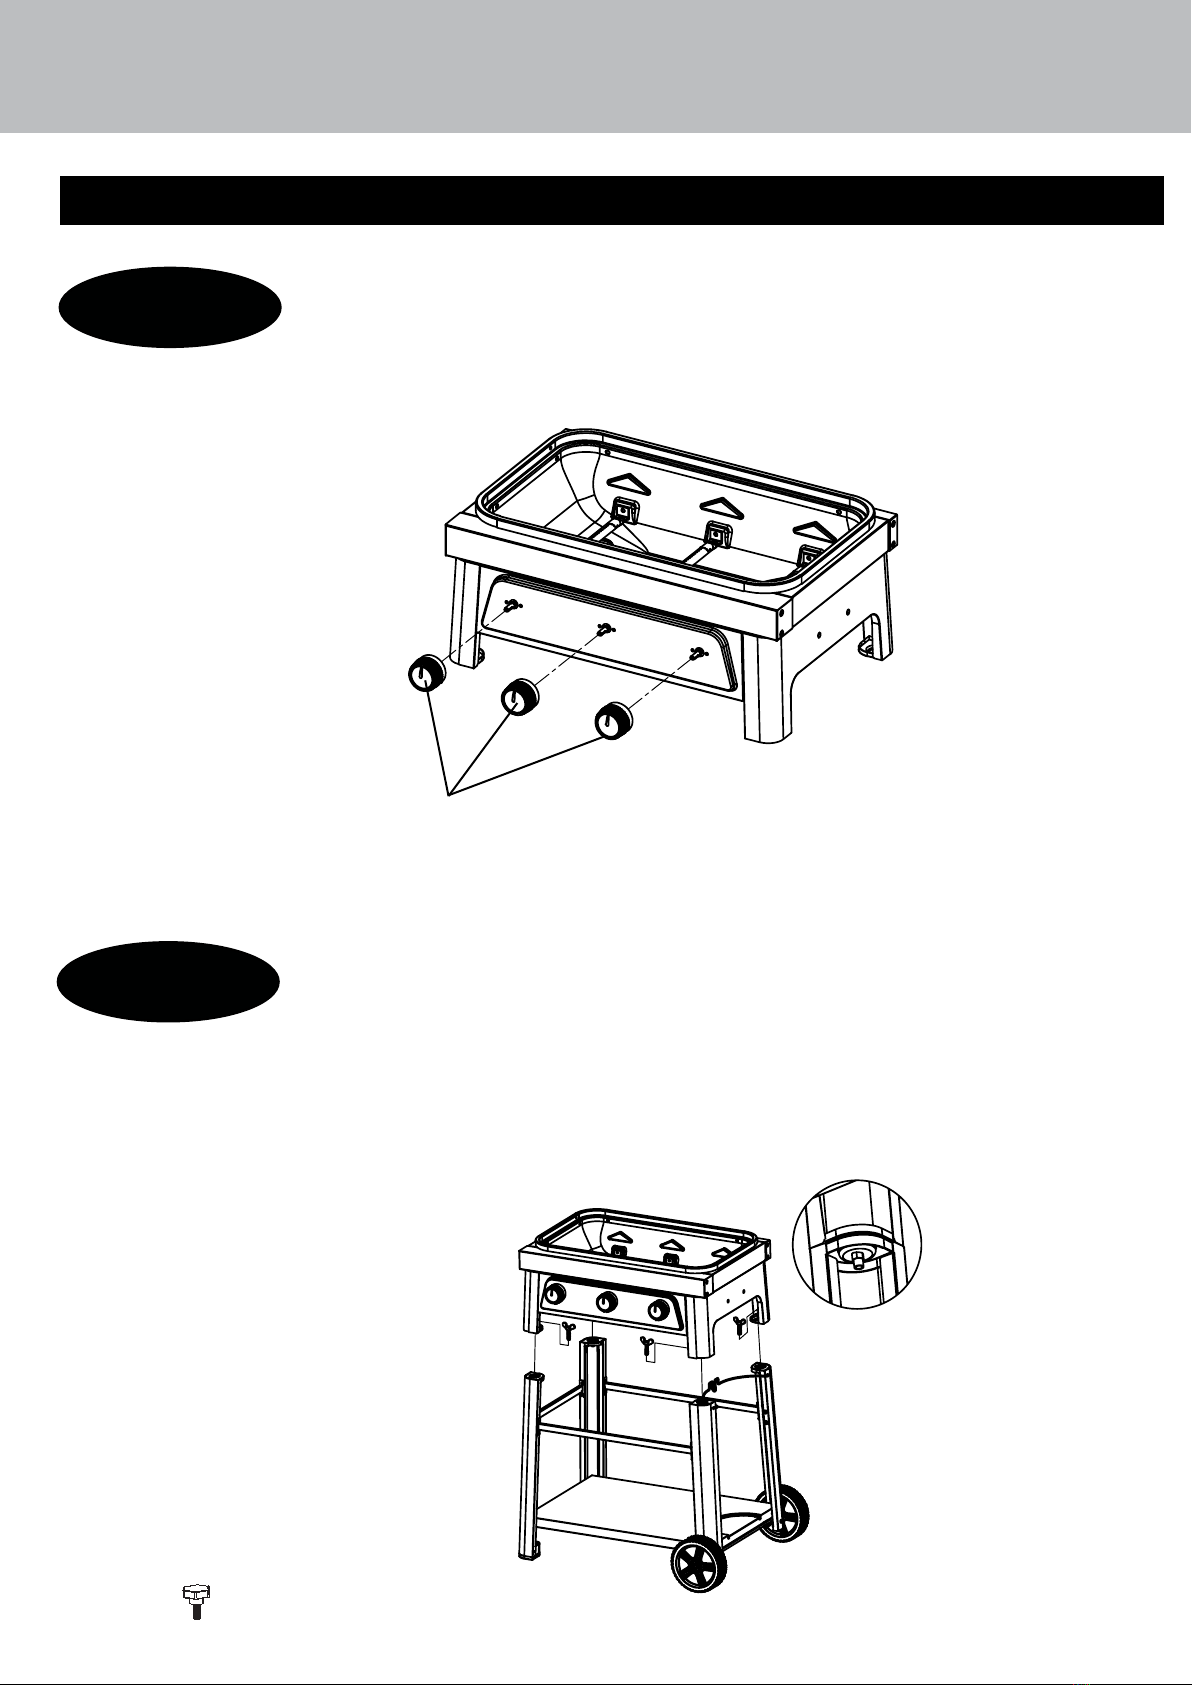
Step 9 Attach on the Control Knobs (15) onto the facial of the rebox.
Step 10 a. Lift the Firebox into place on the prepared cart in Step 7 and secure with four Bolts
from side of the cart leg and under the rebox as shown.
b. Go back and tighten all bolts.
15
M6*15 4PCS
F

THREE BURNERS
BARBECUE
BG2046A3
9
ASSEMBLY INSTRUCTIONS (CONTINUE)
Step 11 a. Attach the Bottom Hinge (11) at the back of the rebox with two bolts (M6) each.
b. Tighten the bolts properly.
Step 12 Start with the left side:
a. Fit two Bolts (B) onto the two top shelf holes position on rebox. Don’t tighten it but
leave bolt length of 5mm.
b. Align the top two holes on the Side Shelf (8) with the two installed bolts in step “a”,
then attach the Side Shelf onto them.
c. Tighten the two top Bolts (B) and further securing the Side Shelf with two more Bolts
(B).
d. Go back and ensure all the bolts are tightened.
e. repeat step a. to e. for the Side Shelf on the right side.
M6*15 8PCS
11
C
B
8
40

THREE BURNERS
BARBECUE
BG2046A3
10
ASSEMBLY INSTRUCTIONS (CONTINUE)
Step 13 a. Insert the Oil Cup (14) onto the Oil Cup support undeneath the rebox.
Step 14 a. Attach the two Top Hinges (4) onto the back of the Hood with two Bolts each.
b. Ensure all bolts are tightened.
M6*40 4PCS
14
4
C
THREE BURNERS
BARBECUE
BG2046A3
11
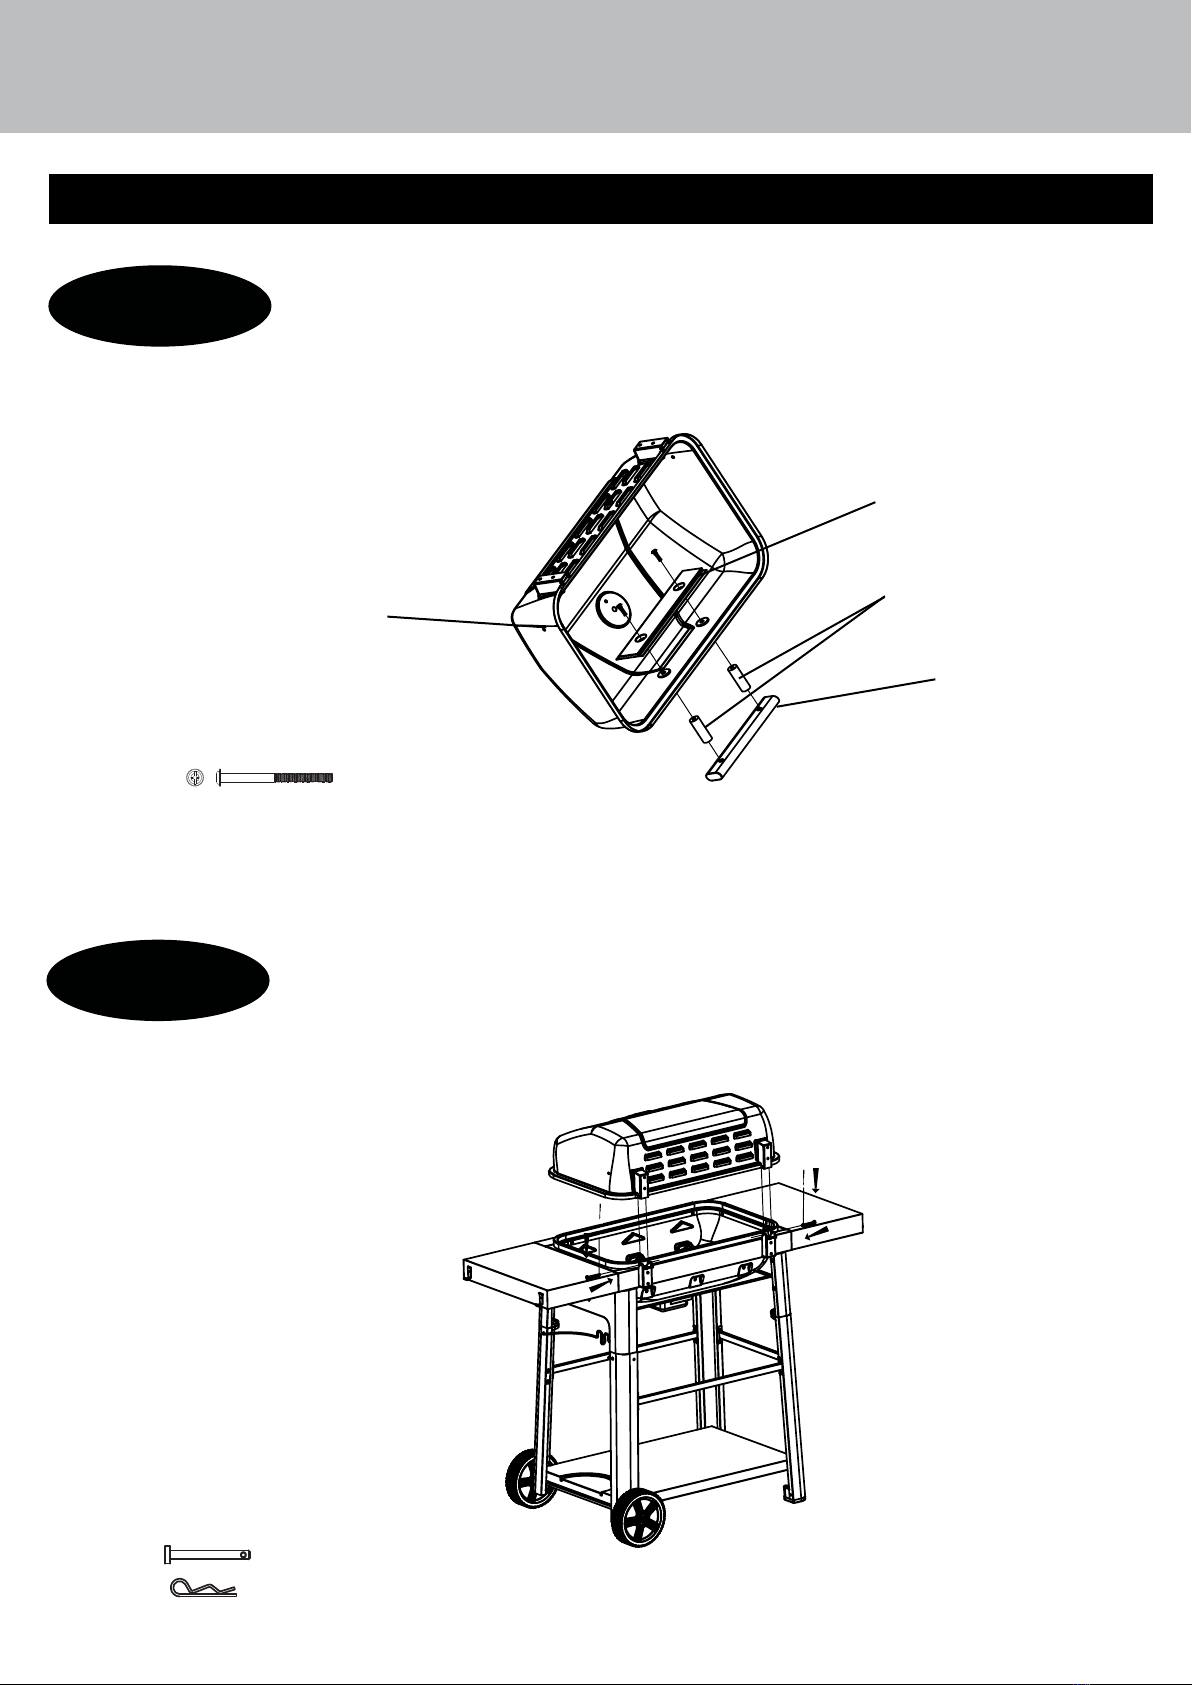
ASSEMBLY INSTRUCTIONS (CONTINUE)
Step 15 a. Attached the Lid Handle (5) onto the Lid (6) via Lid Handle Support (2) and Lid
Handle heat insulator (1) with two Bolts as shown below.
Step 16 a. Attached the prepared Lid in Step 15 onto the main unit with the hinge axis and wave
pin.
First
Second
Second
First
1
5
2
6
M6X75 2Pcs
A
L: WAVE PIN ......2PC
K: HINGE-AXIS ......2PC
THREE BURNERS
BARBECUE
BG2046A3
12
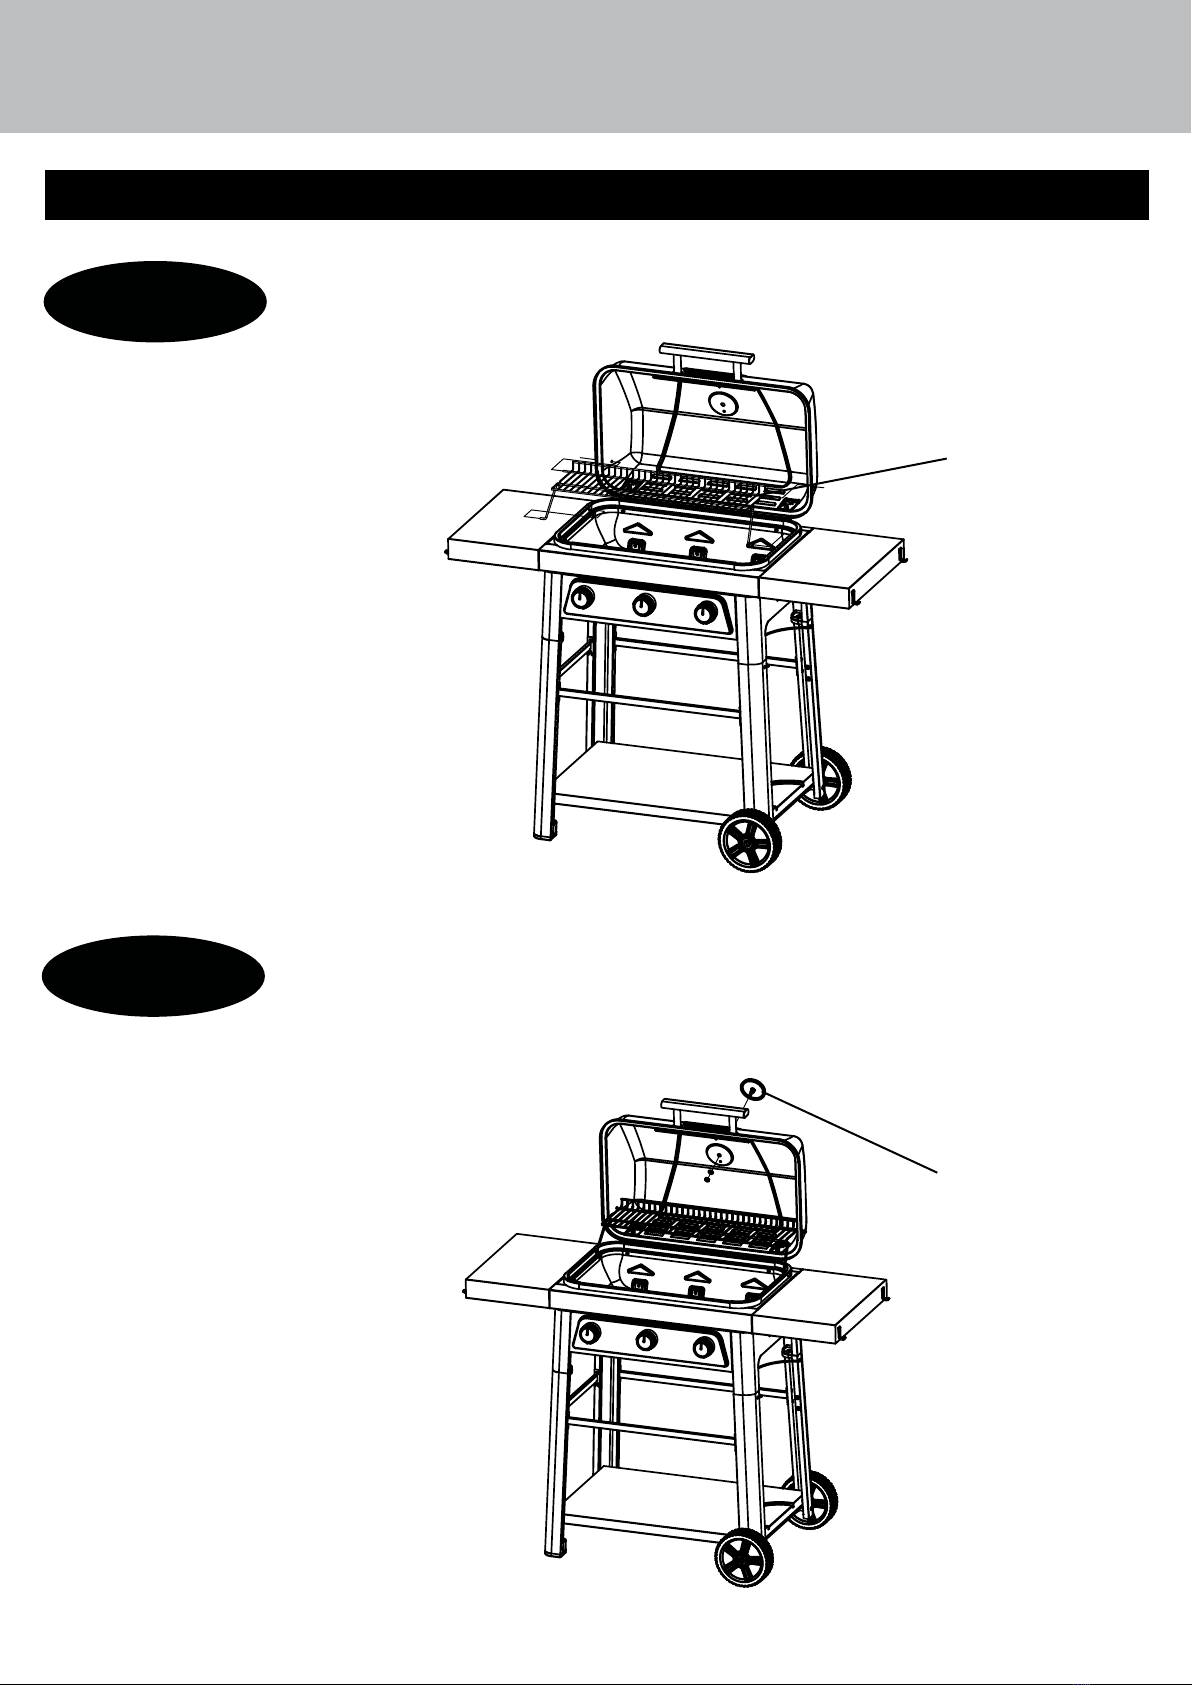
ASSEMBLY INSTRUCTIONS (CONTINUE)
Step 17 a. Attach the Warming Rack (7) as shown, putting the prongs into the hood rst (you
may have to slightly bend it at this stage).
Step 18 a. Attach the Thermometer (3) onto the Hood with the pre-installed Washer and Wing Nut
as below.
7
3

THREE BURNERS
BARBECUE
BG2046A3
13
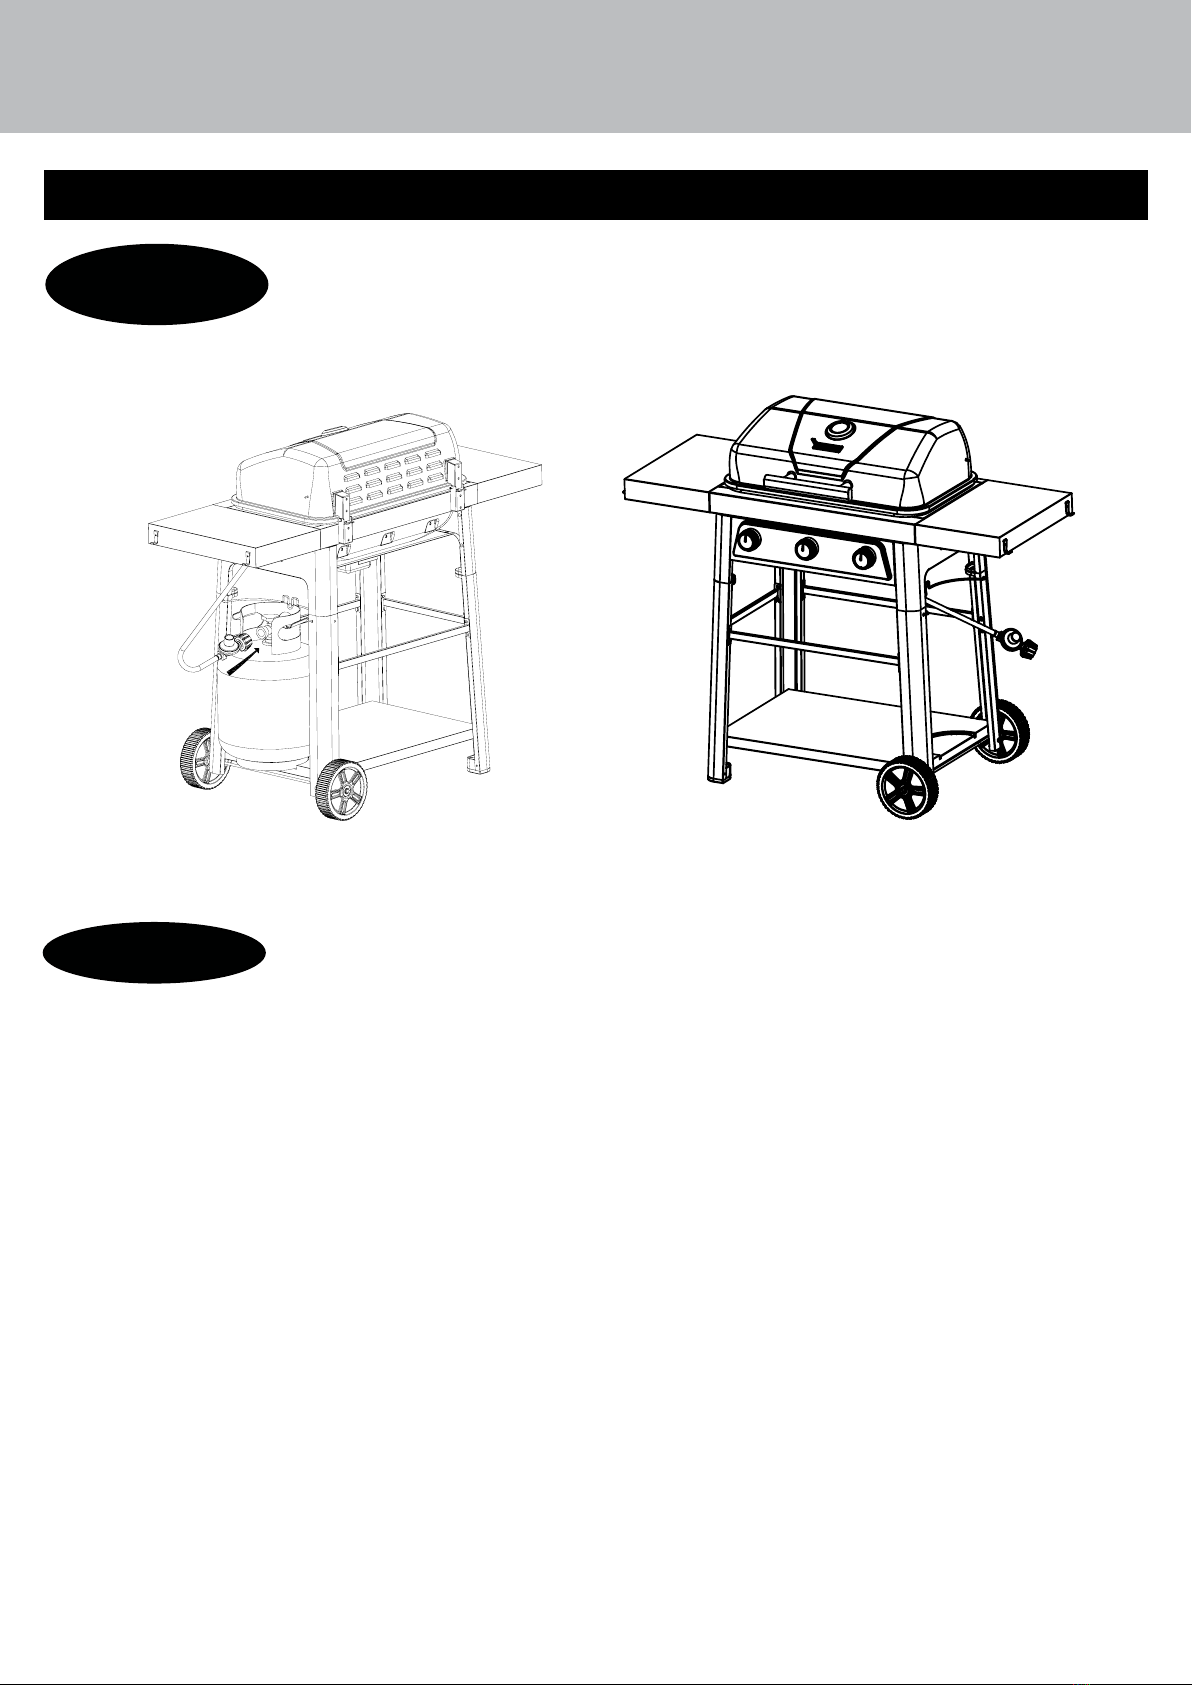
ASSEMBLY INSTRUCTIONS (CONTINUE)
Step 19 a. Sit the three Heat Shield (10) so that they rest on Heat Support located inside the
Firebox as shown below.
b. Place both the Grills (9) above the Heat Shield (10) and onto the Cooking Grid
Support.
Step 20 Place the gas tank onto the gas tank slot on the Right Cart Leg and the Gas Tank Support.
WARNING:
The cylinder need to be in upright position.
Ensure the clyinder is located in a cylinder holder that is not easily get knock or pull.
This is important in order to avoid potential explosion, re, severe personal injury or death.
9
10
THREE BURNERS
BARBECUE
BG2046A3
14
ASSEMBLY INSTRUCTIONS (CONTINUE)
Step 22
Seasoning Barbecue
Important: season your Barbecue cooking surface every time you use it.
Chefs at Japanese steakhouses and short-order restaurants do it all the time, and it is
critical for you to do it too. Seasoning helps prolong the life of your Barbecue cooking
surface, makes the cooking surface non-stick and helps prevent rust.
Tools needed for seasoning:
• Metal scraper or metal spatula
• Cooking oil, such as vegetable oil or extra virgin olive oil
• Paper towels
• BBQ stone or steel wool
• Finishing oil such as axseed oil
CAUTION: Do NOT use corn oil as it contains a high level of sugar, which can
carmelize and burn onto the surface.
1) While the Barbecue is o and cold, scrap o all excess food or rust using a metal
scraper or metal spatula if any. If there are excessive of rust, use a BBQ stone and some
cooking oil to scrap the rust out.
2) Clean up the Barbecue with paper towels.
3) Seasoning the Barbecue by applying a small amount of oil onto the top of Barbecue
and spread it around evenly using paper towel. We recommend using ax oil if avail
able.
4) Turning the burner to middle high heat and after awhile, the oil will start to smoke
and the top of the Barbecue will start to discolor. Let it continue to burn until the sur
face become dark brown, matt gray or bronze, which take about 30mins and is ready to
cook.
5) Once nish cooking, let the Barbecue cool down.
6) Once the Barbecue has cooled, apply a layer of cooking oil evenly again. This will help
prevent rusting.
Step 21 Full Assembly

THREE BURNERS
BARBECUE
BG2046A3
30
in
30
in
27.5in(max)
10in(min)
WARNING!
damage, personal injuryor death.
USING THE BARBECUE TABLETOP UNIT
2) Detach the Barbecue Tabletop unit from the cart
15

THREE BURNERS
BARBECUE
BG2046A3
16
USING, CONNECTING & DISCONNECTING LP GAS TANK
12.2 in. / 31cm
20 lb
9 kg
17.9 in. / 45.5cm
OPERATING INSTRUCTIONS
LP Gas
Valve with
Orice
Burner/
Venturi Tube LP Gas
Connection
Figure 1
Burner Connections
1. Make sure the regulator hose and valve connections are securely fastened
to the burner and the tank.
2. Visually check the connection between theburner/venturi tube and orice.
3. Make sure the burner/venturi tube ts over theorice.
WARNING: Failure to inspect this connection or follow these
instructions could cause a re or an explosion which can cause death,
serious bodily injury or damage to property.
4. Please refer to diagram for proper installation (Figure 1).
5. If the burner/venturi tube does not rest ush to the orice, as shown, please
contact Captivate Brands USA Inc. for assistance.
The installation must conform with local codes or, in the absence of local codes,
with either the National Fuel Gas Code, ANSI Z223.1/NFPA 54, or the Natural Gas
and Propane Installation Code CSA B149.1, or Propane Storage and Handling
Code, CSA B149.2, or the Standard for Recreational Vehicles, ANSI A119.2/NFPA
1192, and CSA 2240 RV Series, Recreational Vehicle Code as applicable.
Use standard exible tube with length less than 1.5 m. the tube shall be
readily visible across its entire length for inspection after installation.
To operate, you will need on precision-lled standard barbecue grill LP gas tank
with external valve threads.
CAUTION: LP gas tank must be properly disconnected and removed
prior to moving this appliance
Connecting LP Gas Tank
1. Before connecting, be sure there is no debris caught in the head of the LP
gas tank, head of the regulator valve or in the head of the burner or burner
ports.
2. Connect regulator/hose assembly to tank by turning knob clockwise until it
stops. The cylinder supply system must be arranged for vapor withdrawal.
Disconnecting LP Gas Tank
1. Before disconnecting, make sure the LP gas tank valve is “CLOSED.”
2. Disconnect regulator/hose assembly from LP gas tank by turning knob
counterclockwise until it is loose.
CAUTION: LP gas tank must be properly disconnected and removed prior to
moving this appliance.
3. Place the protective cap cover on the LP tank and store the tank outdoors in
a well ventilated area out of direct sunlight.
THREE BURNERS
BARBECUE
BG2046A3
17
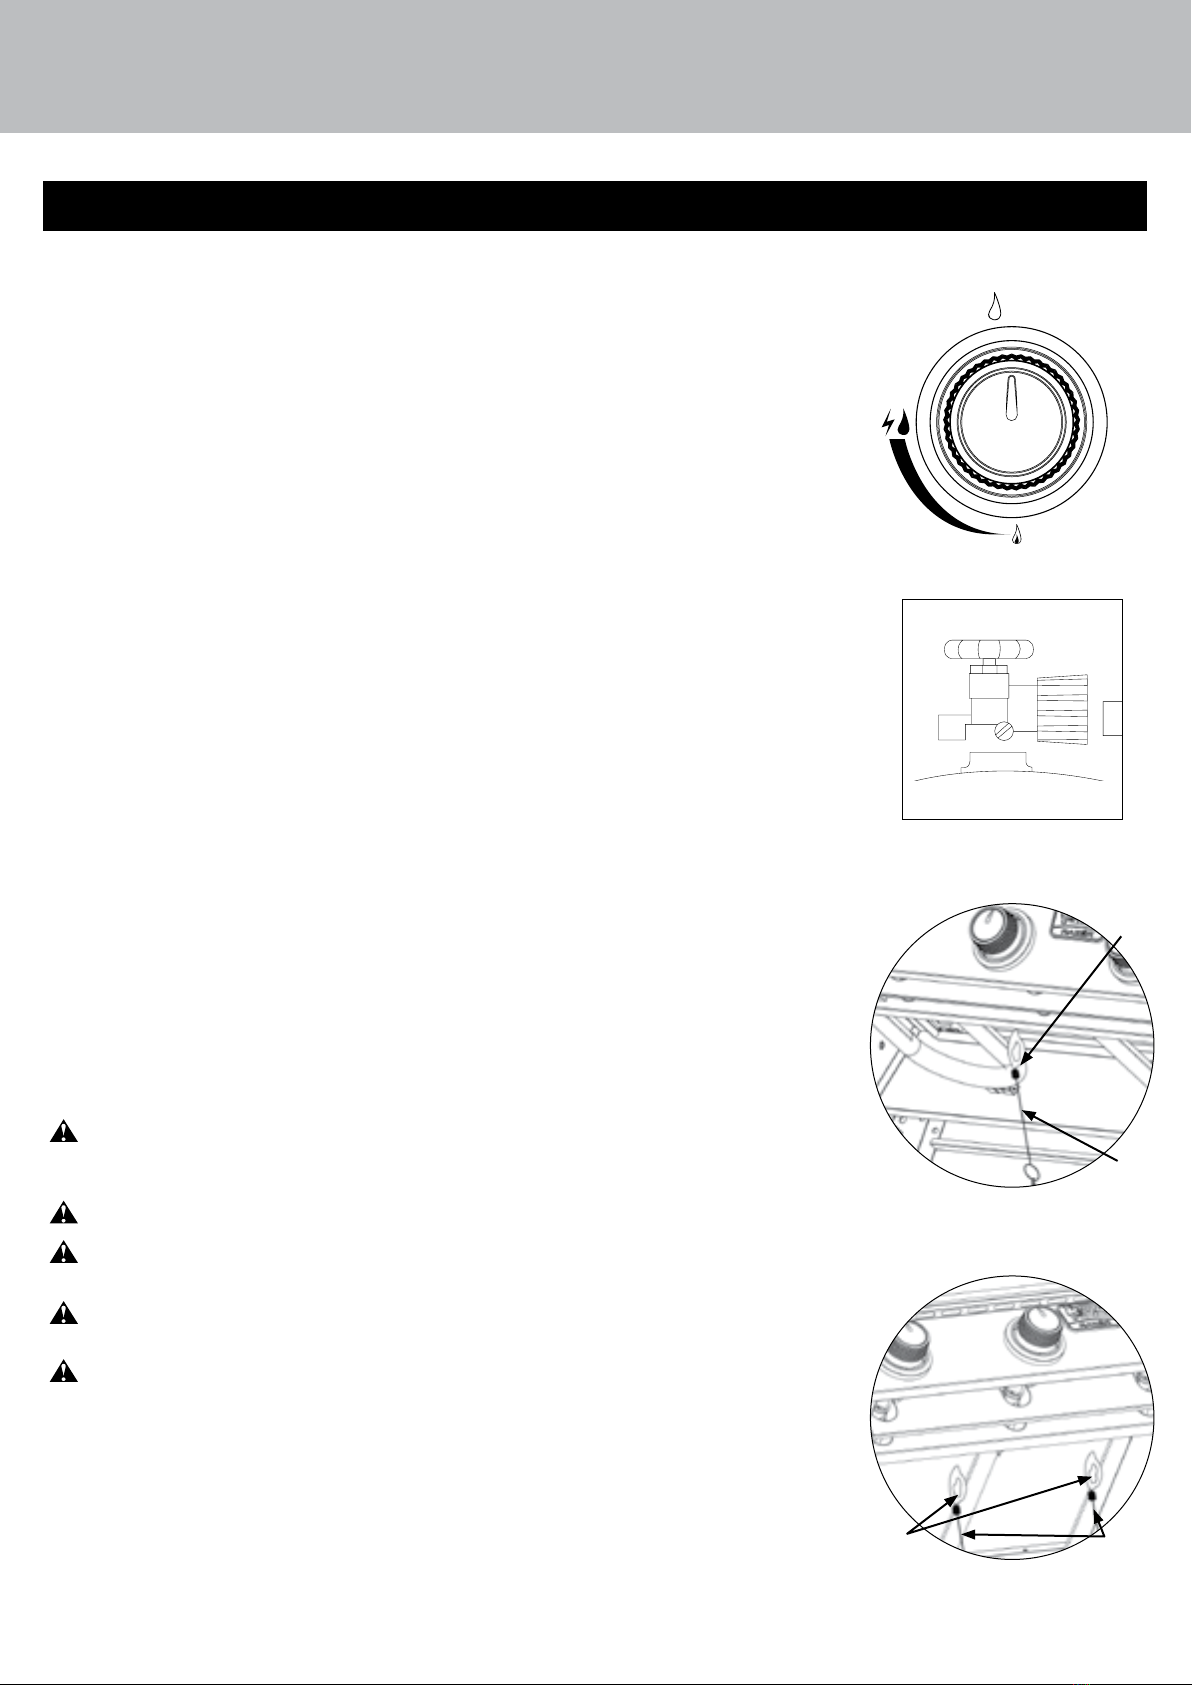
OPERATING INSTRUCTIONS (CONTINUE)
Tank/Gas Line Connection
1. Make 2-3 oz. of leak detection solution by mixing one part liquid dish
washing soap with three parts water.
2. Make sure control knobs are in the “ OFF” position (Figure 2).
3. Connect LP gas tank per “Installing LP Gas Tank” section.
4. Turn LP gas tank valve to“OPEN.”
5. Spoon several drops of solution, or use a squirt bottle, at all“X”
locations (Figures 1 and 3).
a. If any bubbles appear, turn LP gas tank valve to“CLOSED,”reconnect
and re-test.
b. If you continue to see bubbles after several attempts, turn LP gas tank
valve to“CLOSED” and disconnect LP gas tank, per “Disconnecting LP
Gas Tank” section. Contact Captivate Brands USA Inc. for assistance.
c. If no bubbles appear after one minute, turn LP gas tank valve to
“CLOSED,” wipe away solution and proceed.
X
XX
XX
OFF
APAGADO
Figure 2
Figure 3
Operating Main Burners
First Use
1. Make sure all labels, packaging and protective lms have been re
moved from the Barbecue.
2. Light Barbecue per “Lighting”section.
3. Remove manufacturing oils before cooking on this Barbecue for the
rst time.
4. Season your Barbecue cooking surface per “Seasoning Barbecue”
section.
Lighting
CAUTION: Keep outdoor gas cooking appliance area clear and free
from combustible materials, gasoline and other ammable vapors and
liquids.
CAUTION: Do NOT obstruct the ow of combustion and ventilation air.
CAUTION: Check and clean burner/venturi tubes for insects and insect
nests. A clogged tube can lead to a re.
CAUTION: Do NOT use non-stick cooking sprays because they contain
a lot of water and can burn onto the Barbecue, damaging the surface.
CAUTION: Do NOT use corn oil as it contains a high level of sugar, which
can carmelize and burn onto the surface.
1. Check for obstructions of airow to the burners. Spiders, insects and
webs can clog the burner/venturi tube. A clogged burner tube can
lead to a re.
2. All control knobs must be in the “ OFF”position (Figure 2).
3. Connect LP gas tank per “Installing LP Gas Tank” section.
Figure 4
Figure 5

THREE BURNERS
BARBECUE
BG2046A3
18
OPERATING INSTRUCTIONS (CONTINUE)
4. Turn LP gas tank valve to“OPEN.”
5. Push and turn any control knob to (HIGH). The burner should light. If it
does not, repeat up to three times.
6. If ignition does not occur in 5 seconds, turn burner control knob “ OFF,” wait
5 minutes, and repeat lighting procedure.
7. If igniter does not light burner, use a lit match secured with the Lighting
Hook (included with the Barbecue) to light burners. Access the burners from
under the Barbecue. Position lit match near side of burner (Figures 4 and 5).
Important: Always use the Lighting Hook (included) when lighting burners
with a match.
8. After lighting, observe the burner ame. Make sure all burner ports are lit
and ame height matches illustration (Figure 6).
Note: Each burner lights independently - repeat steps 5-9 for the other burners.
CAUTION: If burner ame goes out during operation, immediately turn
the control knobs to the “ OFF” position, turn the LP gas tank valve to
“CLOSED” and open lid to let the gas clear for 5 minutes before relighting.
Figure 6
Burner
Flame Slight
Yellow
Slight
Blue
Dark
Blue
Controlling Flare-ups
CAUTION:
1. If a grease re develops, turn control knobs to the “ OFF”position and LP gas tank valve to
“CLOSED.” Do NOT use water on a grease re. This can cause the grease to splatter and could result
in serious burns, bodily harm or other damage.
2. Do NOT leave Barbecue unattended while preheating or burning o food residue on or (HIGH).
If Barbecue has not been cleaned, a grease re can occur.
WARNING: When cooking, re extinguishing materials should be readily accessible. In the event of an
oil/grease re, use type BC dry chemical re extinguisher or smother with dirt, sand or baking soda.
Do NOT attempt to extinguish with water.
Flare-ups are a part of cooking meats on a Barbecue and add to the unique avor of grilling.
Excessive are-ups can over-cook your food and be dangerous.
Important: Excessive are-ups result from the build-up of grease in the grease cup.
If a grease re occurs, turn the control knob(s) to “ OFF” until the grease burns out.
If excessive are-ups occur, DO NOT pour water onto the ames.
Minimize Flare-ups:
1. Trim excess fat from meats prior to cooking.
2. Cook high fat content meats on (LOW) setting or indirectly.
3. Ensure that your Barbecue is on a hard, level, non-combustible surface and the grease is allowed to drain
into grease receptacle.
NOTE: Using pan larger than 240mm diameter in capacity could exceed weight limit of the side burner shelf

THREE BURNERS
BARBECUE
BG2046A3
19
CLEANING AND CARE
CAUTION:
1. All cleaning and maintenance should be done when Barbecue is cool and with the fuel supply
disconnected.
2. Do NOT clean any Barbecue part in self-cleaning oven. The extreme heat will damage the nish.
3. Do Not enlarge valve orices or burner ports when cleaning the valves or burners.
Notices
1. This Barbecue should be thoroughly cleaned and inspected on a regular basis.
2. Abrasive cleaners will damage this product.
3. Never use oven cleaner to clean any part of Barbecue.
Before Each Use:
1. Keep the Barbecue area clean and free from any combustible materials, gasoline, and other ammable vapors
and liquids.
2. Do NOT obstruct the ow of the combustion of LP gas and the ventilation of air.
3. Keep the ventilation opening(s) of the LP gas tank area free and clear from debris.
4. Visually check the burner ames to make sure your Barbecue is working properly (Figure 7).
5. See sections below for proper cleaning and seasoning instructions.
6. Check for obstructions of airow to the burners. Spiders, insects and webs can clog the burner/venturi tube. A
clogged burner tube can lead to a re.
1-2 in./
25.4 - 50.8mm
Figure 7
Burner Flame Conditions
Use this chart to see if your burners
need to be cleaned
Normal: Soft blue ames with yellow tips
between 1 in- 2 in. height
Needs cleaning: Noisy with hard blue
ames
Has to be replaced: Wavy with yellow
ames
Cleaning Cart Surfaces
1. Wipe surfaces clean with mild dish washingdetergent or baking soda mixed
with water.
2. For stubborn surfaces, use a citrus-based degreaser and a nylon scrubbing
brush.
3. Rinse clean with water.
4. Allow to air dry.
Cleaning Main Burners
1. Turn LP gas tank valve to“CLOSED.”
2. Turn all control knobs clockwise to the “ OFF” position.
Note: A “poof” sound is normal as the last of the gas is burned.
3. Disconnect LP gas tank per “Disconnecting LP Gas Tank” section
.
4. Remove Barbecue by lifting it o the cart.
5. Remove burners by removing the fasteners, whichsecure the burners to the
frame bottom.
6. Lift burners up and away from gas valve orice.
7. Disconnect wire from spark electrode.
This manual suits for next models
1
Table of contents
Other BRAND-MAN Grill manuals

BRAND-MAN
BRAND-MAN SIERRA BG1932B3 User manual

BRAND-MAN
BRAND-MAN BG2102D2 User manual

BRAND-MAN
BRAND-MAN BMBROCH User manual

BRAND-MAN
BRAND-MAN RUSTLER 4B GRAY User manual

BRAND-MAN
BRAND-MAN Rustler 6B User manual

BRAND-MAN
BRAND-MAN Rodeo Deluxe with cart User manual

BRAND-MAN
BRAND-MAN Bronco2 User manual


