BRAND-MAN BG2102D2 User manual

Important: Please save these instructions for future reference
THIS BARBEQUE IS INTENDED FOR OUTDOOR USE ONLY
Model BG2102D2
2 BURNER
PORTABLE GAS BBQ
USER GUIDE
• Folding stand with wheels
• 22 Mj/H output with piezo
ignition
• Porcelain-enamelled hood and grill
• Hose and LCC27 gas regulator included

1. WARNING! FOR OUTDOOR USE
FOR OUTDOOR USE ONLY!
DO NOT USE INDOORS. ONLY USE
IN WELL-VENTILATED AREAS.
• Please read and follow these installation,
maintenance and operation instructions
carefully before assembling, installing,
servicing or using this appliance.
• The barbeque is for permitted outdoor
residential use only and must be
placed on a stable, firm, level and non-
combustible outdoor surface for use.
• Improper installation, use, alteration,
service or maintenance, or failure to
follow these instructions could result
in fire or explosion and lead to serious
injury, death and/or significant damage
to property.
• Do not start the barbeque if there
is any doubt over the correct
assembly, ignition, gas control or
cooking use of the barbeque.
• Follow all warnings and instructions
when using this barbeque. These
instructions contain important
information necessary for its proper
assembly and safe use and should be
retained for future reference.
• For use with propane cylinder gas only.
• The barbeque must have a minimum
side clearance from any combustible
material of at least 250mm. Additionally
there must be a clearance of at least
1500mm above the cooking surface of
the barbeque, and 350mm clearance at
the back.
• Do not store or use gasoline or other
flammable liquids, vapours or materials
in or near this appliance.
• Do not place any article on or against
this appliance.
• Do not modify this appliance.
• Do not spray aerosols in the vicinity of
this appliance while it is in operation.
• A lit barbeque should be attended at all
times. Avoid using in windy conditions.
• Gas cylinder MUST be stored vertically
and never where temperatures can
exceed 50˚C.
• Do not use this appliance if it is leaking,
damaged or does not operate properly.
IMPORTANT SAFETY AND USE INFORMATION
Important. Read these instructions for use carefully.
Familiarise yourself with the appliance before connecting it to its gas container.
Keep these instructions for future reference.
• Do not store any gas cylinder not
connected for use in the vicinity of this
appliance.
• Avoid dousing the barbeque with water.
• Turn off the gas cylinder supply valve
when the barbeque is not in use.
• Always allow the barbeque to cool
completely before cleaning or covering.
• For safety reasons it is advisable to keep a
fire extinguisher and blanket close to hand
when using this barbeque.
• Unsupervised children, and elderly or
infirm people should not be allowed close
to the barbeque during pre-heat, cooking,
burn off or cooling down of the unit.
• Please remove/dispose of all transit
protection (polythene packing and plastic
bags) carefully and keep out of the reach
of children and pets.
• CARBON MONOXIDE HAZARD - USING THIS
APPLIANCE IN AN ENCLOSED OR HABITABLE
SPACE MAY CAUSE DEATH. DO NOT USE IN
CARAVANS, TENTS, MARINE CRAFT, CARS,
MOBILE HOMES OR SIMILAR LOCATIONS.
NEVER USE THIS APPLIANCE AS A HEATER.
• WARNING! Accessible parts will become
very hot. Use gloves when using and allow to
cool before touching.
• WARNING! Keep young children and pets
away from barbeque at all times.
• WARNING! Any service shall be carried
out by authorised persons only.
• Do not install in, or connect to the
consumer piping or gas system of a boat
or caravan.
• NEVER leave a lit barbeque unattended.
• NEVER block side or back vents or move
barbeque when it is in use.
• NEVER use lighter fluid, charcoal, gasoline
or other flammable fuels in this barbeque.
• Clean and inspect barbeque, cylinder and
hose before each use, and on a regular
basis. See BARBEQUE CLEANING AND
CARE (page 18).
• Inspect gas hose before each use and
replace if it shows signs of wear, abrasion
or cuts. Do not attempt to modify any
damaged hose assembly. Call customer
service to request a replacement hose
assembly.
2

3. IF YOU SMELL GAS
DANGER!
DO NOT ATTEMPT TO OPERATE
THE BARBEQUE UNTIL THE
CAUSE OF THE GAS SMELL HAS
BEEN IDENTIFIED AND
ELIMINATED.
• If there is a leak from your appliance (smell of
gas), immediately attempt to isolate the gas
supply by turning off the gas cylinder valve.
Remove the appliance to a well-ventilated
location away from any ignition sources.
Check for leaks using soapy water.
Do not try to detect leaks using a flame.
• Extinguish all naked flames.
• Open the hood.
• Ensure that the immediate area is
well ventilated to remove any excess
gas.
• Check for leaks as described on page 14
under OPERATING INSTRUCTIONS:
‘PRECAUTIONARY LEAK TEST’.
• If the gas smell continues, do not use.
Disconnect gas supply immediately
and call customer service.
Should there be any concern in
making the correct regulator
connection please contact the
customer service number listed in
this user guide.
2. GAS CYLINDER, TYPE AND
REGULATOR
• This appliance shall only be used with
ULPG gas from cylinders complying
with AS2469 andAS2030.
It may be hazardous to attempt to use
other types of gas containers.
.
• To ensure maximum performance, a
gas cylinder of 9kg and minimum of
4.5kg is recommended.
• The regulator supplied should be firmly
• Do not use this appliance if it has damaged
or worn seals.
tightened but care must be taken not
to over-tighten the connections.
• Check that seals between the appliance
and the gas container are in place and in
good condition before connecting the gas
container.
• The regulator supplied is the
correct regulator for this item. It is
recommended to replace the hose and
regulator every 2-3 years.
• When using the cart, ensure barbeque
is securely assembled to cart before
attempting to connect the gas cylinder.
Position and keep gas hose away from
cooking fats and grease that may drip,
and away from surfaces and parts that
may become hot.
• DO NOT USE AN ADAPTOR AT THE
CYLINDER CONNECTION.
• Turn off gas at the cylinder supply valve
whenever the barbeque is not in use.
• NEVER connect the barbeque to a gas
cylinder that is damaged , dented or
has been dropped.
• When connected to the barbeque, the
gas cylinder should not be exposed
to direct sunlight.
• Stored or spare gas cylinders should not
be left exposed to direct sunlight.
• For storage and cylinder exchange,
disconnect the cylinder only. Do not
disconnect the hose from the
barbeque.
• Ensure gas cylinder is inspected and
tested regularly (the inspection due
date can generally be found on the
cylinder collar).
IMPORTANT SAFETY AND USE INFORMATION
Important. Read these instructions for use carefully.
Familiarise yourself with the appliance before connecting it to its gas container.
Keep these instructions for future reference.
5/8” SAE THREAD
LCC27
CONNECTOR
3

3
ANY ENCLOSURE IN WHICH
THE BARBEQUE IS USED SHALL
COMPLY WITH ONE OF THE
FOLLOWING:
• An enclosure with walls on all sides, but
at least one permanent opening at
ground level and no overhead cover
(EXAMPLE 1).
• Within a partial enclosure that includes
an overhead cover and two walls
(EXAMPLES 2 & 3).
• Within a partial enclosure that includes
an overhead cover and more than two
walls, the following shall apply:
A) at least 25% of the total wall area is
completely open; and
B) at least 30% of the remaining
wall area is open and unrestricted
(EXAMPLES 4 & 5).
.
• In the case of balconies, at least 20%
of the total of the side, back and front
wall areas shall be and remain open
and unrestricted.
1. POSITIONING
• Please make sure that the barbeque
is NOT positioned underneath any
combustible material or surface.
• When using barbeque, there MUST
be a clearance of at least 250mm
from the sides of the barbeque to any
combustible materials or surfaces.
There must also be a clearance of
at least 1500mm above the cooking
surfaces to any combustible surface,
and 350mm clearance at the back.
• Flammable materials of any description
MUST be kept well away from the
barbeque.
• The barbeque must be positioned such
that the gas cylinder is kept away from
direct sunlight.
• The barbeque must be positioned to
avoid walkways, gangways and general
pedestrian access.
• The nature of a barbeque is such that
many of the surfaces are hot to touch,
the positioning of the barbeque should
take into consideration the possibility of
accidental hand or body contact.
EXAMPLE 1
EXAMPLE 2 EXAMPLE 3
Open side at least 25%
of total wall area
Open side at least 25%
of total wall area
30% or more in total
of the remaining wall area
is open and unrestricted
EXAMPLE 4 EXAMPLE 5
SETTING UP THE BARBEQUE
This appliance shall only be used in an above ground open air location with
natural ventilation.
4
4
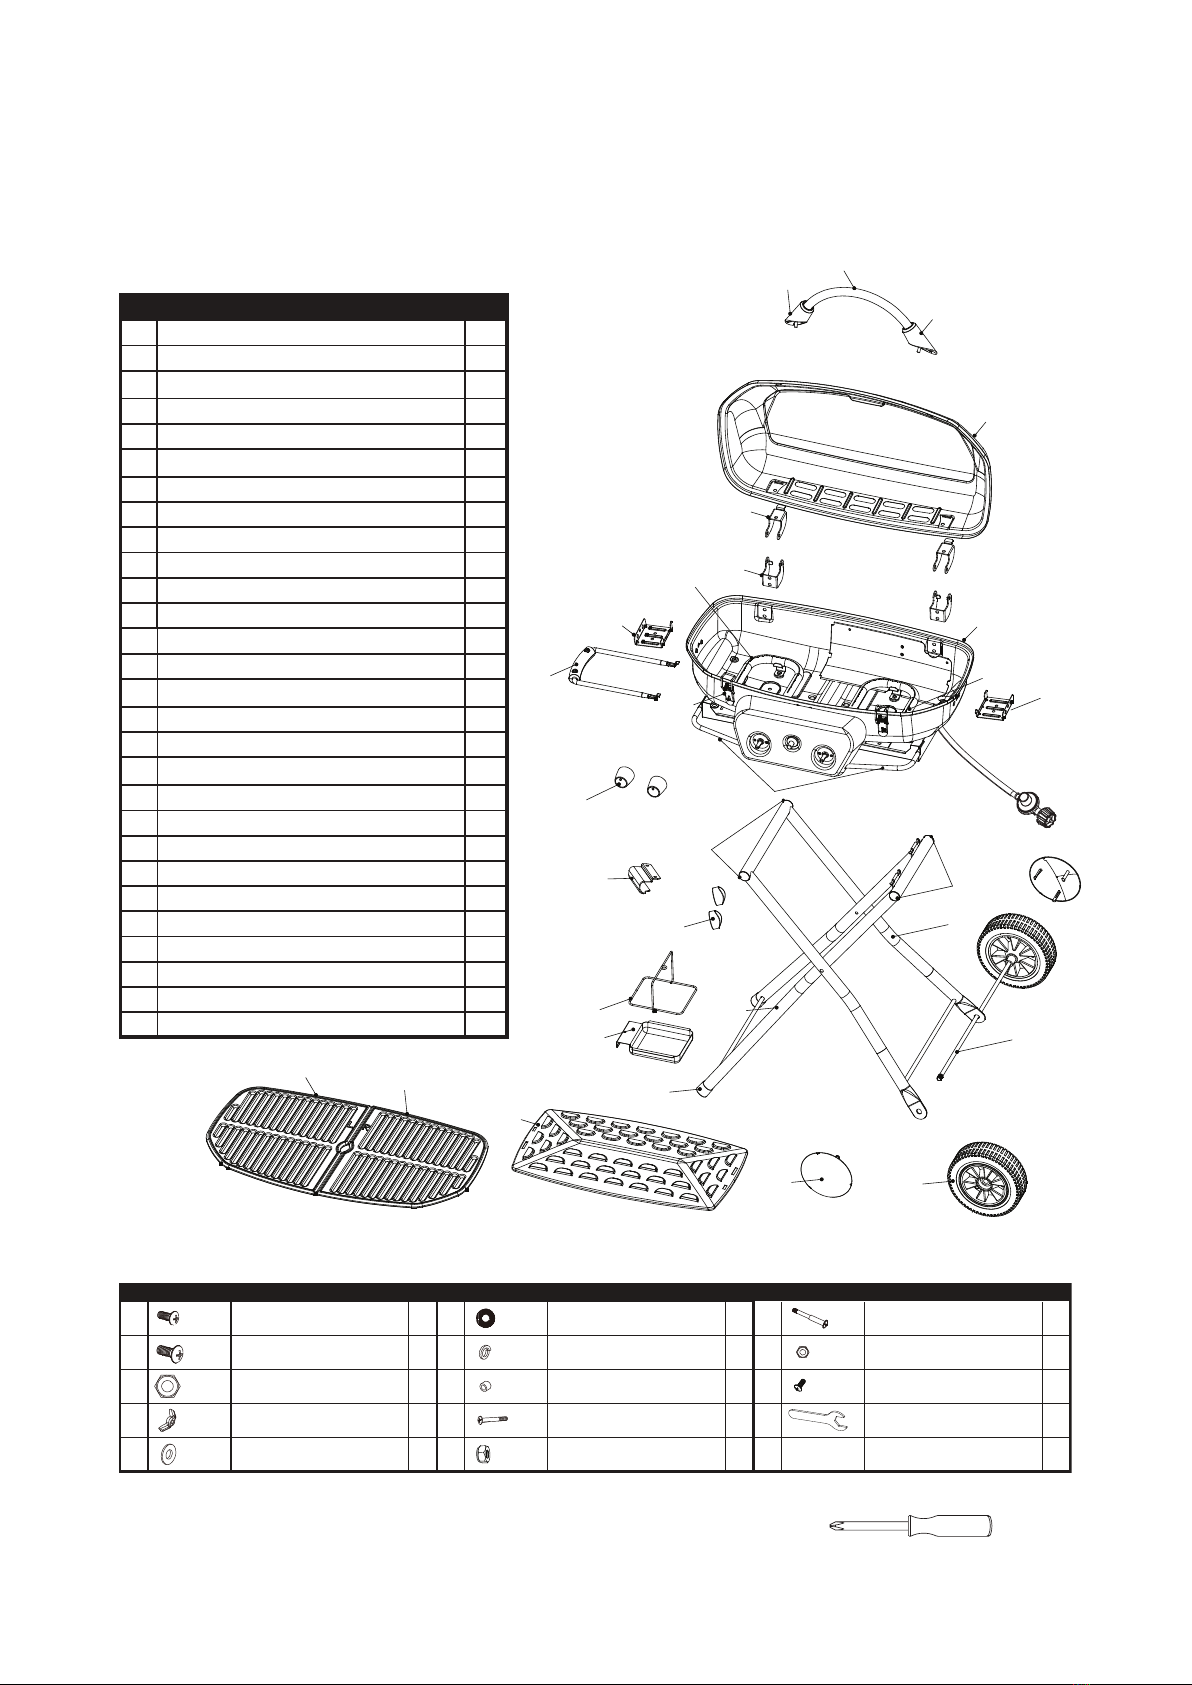
Hardware Parts List
You will need a Phillips head screwdriver (not included)
Ref. Diagram Hardware Part Name & Descr. Qty
ANickel-plated Phillips Truss Head
Screw M5X12 7
BNickel-plated Phillips Truss Head
Screw M6X20 10
CNickel-plated Hex Nut
M10 2
D10
E18
Nickel-plated Wing Nut
M6
Ref. Diagram Hardware Part Name & Descr. Qty Ref. Diagram Hardware Part Name & Descr. Qty
F
Nickel-plated Washer
Ø6.2mm
8
G
Heat-resistant Washer
Ø6.4mm
12
H
Nickel-plated Locking Washer
Ø6.4mm
2
I
J
2
2
Spacer
Ø18 x Ø11 x 20mm
Nickel-plated Phillips Truss Head
Bolt M6X47
Nickel-plated Hex Nut
M6
K2
L
Nickel-plated Phillips Truss Head
Step Bolt M5X62
2
M
Nickel-plated Hex Nut
M5
2
N2
Black Phillips Truss Head
Screw M4X10
Wrench
12
3
2
10
11
28
13
14
15
16
17
18
22
20
19
19
21
23 24
25
26
27
4
1
5
6
7
8
9
13
PARTS AND HARDWARE LIST
Before assembling your barbeque, carefully unpack all parts from packaging. Check
that all parts, hardware and tools are included. Check packaging carefully for any
missing parts. If any items are missing, please call customer service.
No Part Name Qty
1 Hood Handle 1
2 Hood Handle Left Support 1
3Hood Handle Right Support 1
4 Hood 1
5 Left Cooking Grill 1
6 Right Cooking Grill 1
7 Top Hood Hinges 2
8 Bottom Hood Hinges 2
9 Heat Plate 1
10 Left Burner 1
11 Right Burner 1
12 Firebox 1
13 Heat Plate Supports 2
14 Hood Latches 2
15 Handle 1
16 Burner Control Knobs 2
17 Oil Cup Support 1
18 Oil Cup 1
19 Tube Caps 4
20 Left Leg 2
21 Right Leg 1
22 Left Leg Caps 2
23 Wheel Caps 2
24 Wheels 2
25 Axle 1
26 Tool Rails 2
27 Stand Lock 1
28 Cushion Pads 2
5
Barbeque Parts List

5
• Count all parts and hardware before assembling (see page 5). If any parts are missing,
call customer service. Please do not return this item to the store where you purchased it.
• Choose a firm, smooth surface for assembly where parts and hardware can’t fall or be
misplaced. Lay out all parts before assembling, and consider using a container for hardware.
• Carefully follow these instructions step-by-step. Parts may look the same but can have
slight differences (e.g. left and right legs). Ensuring you have correctly checked the part
means you won’t have to redo any assembly steps later.
• If you need assistance during the assembly process, or don't understand any steps,
please call customer service. Have this guide and the model number handy. The model
number is printed on the cover page of this guide and on the metal plate affixed
to the barbeque.
• Finger-tighten all hardware connections first, then tighten with tools provided before
moving onto the next step. Don’t over-tighten nuts and bolts to prevent stripping the threads.
• Leak must be performed after assembly see ‘OPERATING INSTRUCTIONS’ (See Page 14)
• LCC27 gas cylinder is required (LCC27 gas cylinders have an external valve screw).
ASSEMBLY INSTRUCTIONS
STEP 1
Reference hardware guide at right and
assemble in the sequence shown to attach
Hood Handle Supports (2 & 3) and Hood
Handle (1) to front of Hood (4).
Then attach Top Hood Hinges (7) to back of
Hood.
Tighten all bolts securely.
ASSEMBLY TIPS
Allow approximately 20 minutes.
6
BNickel-plated Phillips Truss Head
Qty 2
DQty 4
Nickel-plated Wing Nut
M6
EQty 6
Qty 2
FHeat-resistant Washer
Ø6.4mm
Qty 4
GNickel-plated Locking Washer
Ø6.4mm
BNickel-plated Phillips Truss Head
Screw M6X20 Qty 2
Nickel-plated Washer
Ø6.2mm

67
STEP 3
Attach Heat Plate Supports (13) inside on each side of Firebox using hardware as shown.
Tighten all bolts securely.
STEP 2
Attach Left Leg (20) to Right Leg (21) with Truss Head Step Bolts (K) and Hex Nuts (L).
Ensure Left leg Caps (22) are pressed firmly onto ends of Left Leg.
Insert Wheels (24) onto Axle (25) with Spacers (H) and secure with Hex Nuts (C).
TIP: Use both wrenches provided and tighten Hex Nuts (C) at the same time.
Tighten all bolts securely.
20
21
22
25
O
24
23
Qty Qty 2
Qty 2
KNickel-plated Phillips Truss Head
Step Bolt M5X62
Qty 2
LNickel-plated Hex Nut
M5 Qty 2
HSpacer
CNickel-plated Hex Nut
M10 Qty 2
BFEGD
BFEGD
13
BNickel-plated Phillips Truss Head
Qty 2
DQty 2
Nickel-plated Wing Nut
M6
EQty 2
Nickel-plated Washer
Qty 2
FHeat-resistant Washer
Ø6.4mm
Qty 2
GNickel-plated Locking Washer
Ø6.4mm
BNickel-plated Phillips Truss Head
Screw M6X20 Qty 2
ENickel-plated Washer
Ø6.2mm
Qty 2
HSpacer
Ø18 x Ø11 x 20mm
Qty 2
NWrench
N
7

7
8
STEP 4
Attach Bottom Hood Hinges (8) to back of Hood using hardware as shown.
Tighten all bolts securely.
STEP 5
Attach Handle (15) and Stand Lock (27) to
bottom of Firebox using hardware as shown.
Tighten all screws securely.
EGD
BEF
8
EGD
BEF
BNickel-plated Phillips Truss Head
Screw M6X16 Qty 4
DQty 4
Nickel-plated Wing Nut
M6
EQty 8
Nickel-plated Washer
Ø6.4mm
Qty 4
FHeat-resistant Washer
Ø6.4mm
Qty 4
GNickel-plated Locking Washer
Ø6.4mm
BNickel-plated Phillips Truss Head
Qty 2
ANickel-plated Phillips Truss Head
Screw M5X12 Qty 2
B
17 A
29
STEP 6
Attach Cushion Pads (28) to Left Leg, then
attach Legs to bottom of Firebox using
hardware as shown.
Tighten all screws securely.
A
28
ANickel-plated Phillips Truss Head
Screw M5X12 Qty 4
BNickel-plated Phillips Truss Head
Screw M6X20
ENickel-plated Washer
Ø6.2mm
BNickel-plated Phillips Truss Head
Screw M6X20 Qty 2 Qty 2
MBlack Phillips Truss Head
Screw M4X10
M
8
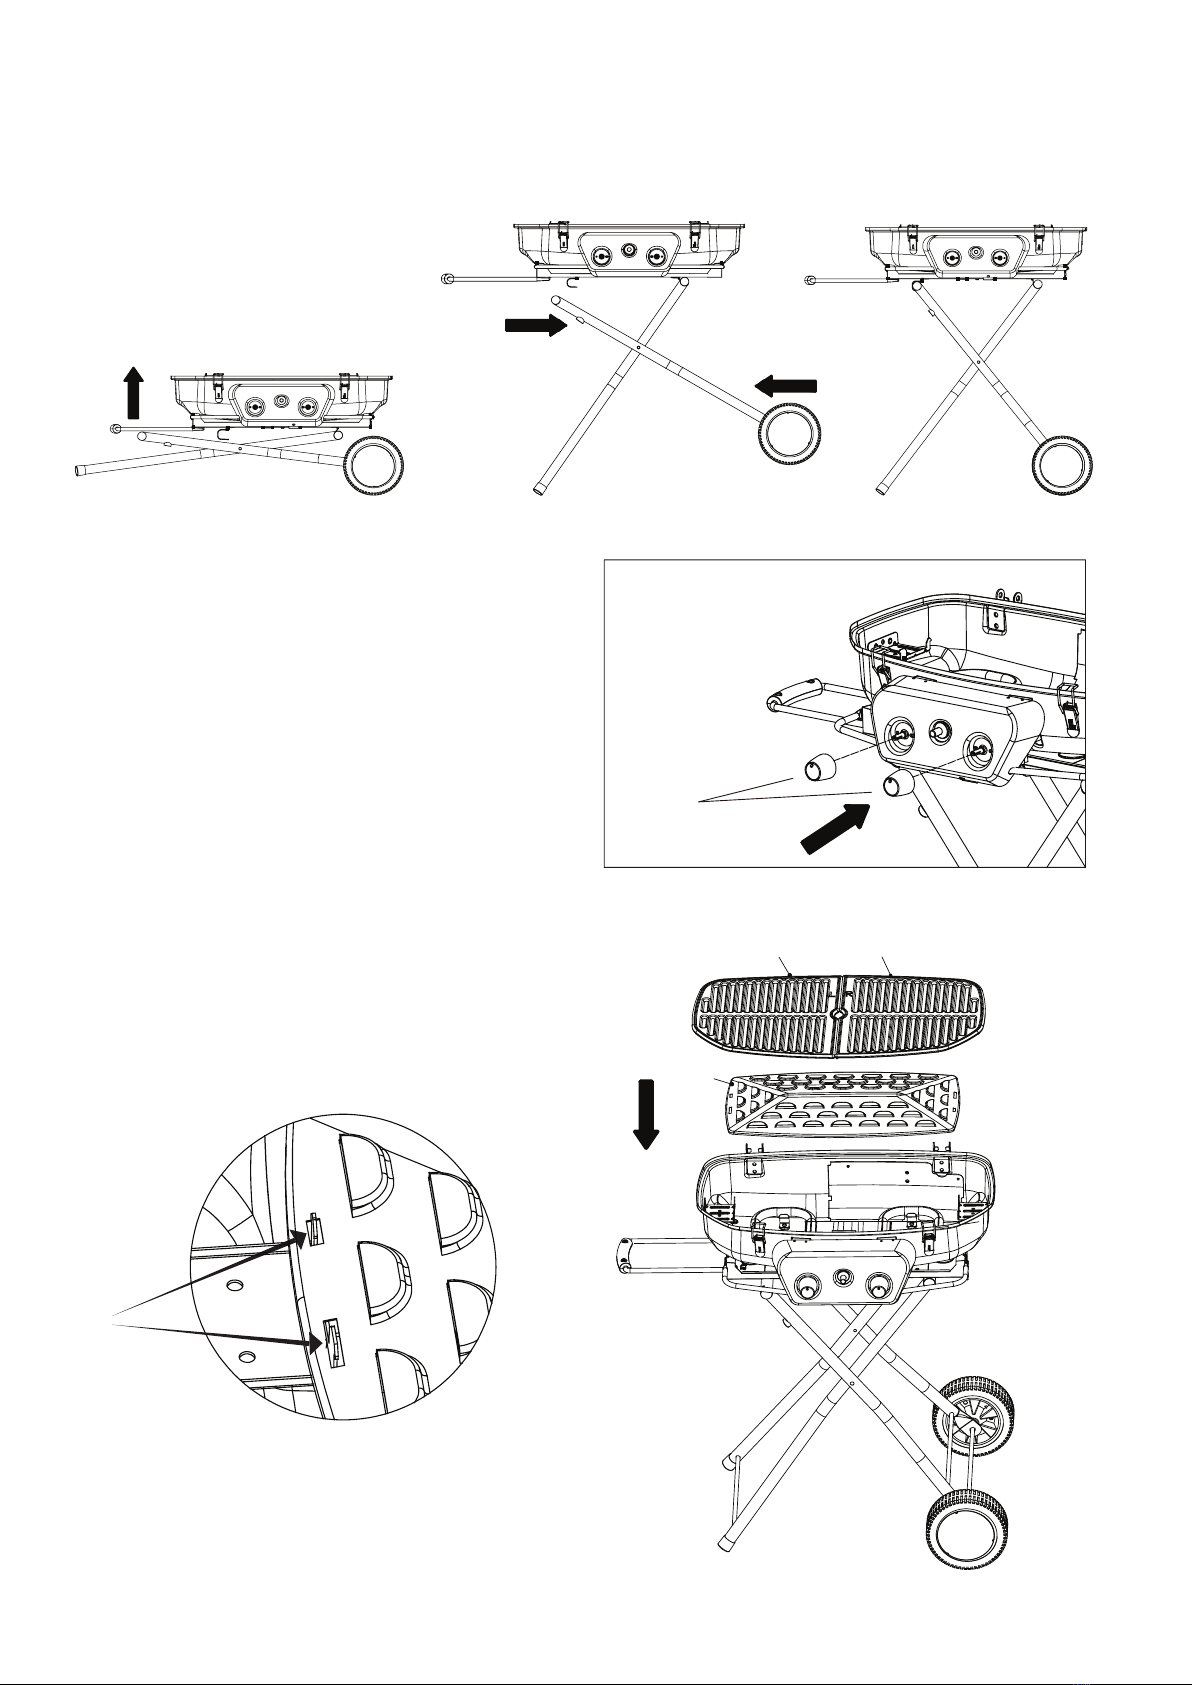
STEP 9
Place Heat Plate (9) on Heat Plate Supports.
Ensure prongs on Heat Plate Supports
protrude through holes in Heat Plate (as
shown below):
When Heat Plate is installed, place Left
and Right Cooking Grills (5 & 6) on top lip of
Firebox. Ensure Cooking Grills sit flush with
top edge of Firebox.
9
STEP 7
Stand the barbeque upright in the locked position. Lift it up, unfold the legs and hook the
Left Leg under the Stand Lock.
STEP 8
Attach Burner Control Knobs (16) to front of
barbeque by pressing each knob onto its
spindle.
Ensure each knobs are pushed all the way
down on the spindles
16
9
6
5
Ensure
prongs
protrude
through holes
9

9
STEP 11
Attach Oil Cup Support (17) to underside of Firebox with hardware as shown, then place Oil
Cup (18) in support.
STEP 10
Place Hood on Firebox and make sure that Top and Bottom Hood Hinge holes align,
then connect hinges by inserting Bolt (I) through hinge holes and secure with
hardware as shown.
Tighten all bolts securely.
10
EQty 2
Nickel-plated Washer
Qty 2
GNickel-plated Locking Washer
Ø6.4mm
Qty 2
INickel-plated Phillips Truss Head
Bolt M6X47
Qty 2
JNickel-plated Hex Nut
M6
I
E
G
J
A
17
ANickel-plated Phillips Truss Head
Screw M5X12 Qty 1
18
MAINTENANCE OF FIXINGS
Over time and with regular use the fixing screws and nuts may start to become loose.
A regular check of all fixings is recommended.
Ø6.2mm

10
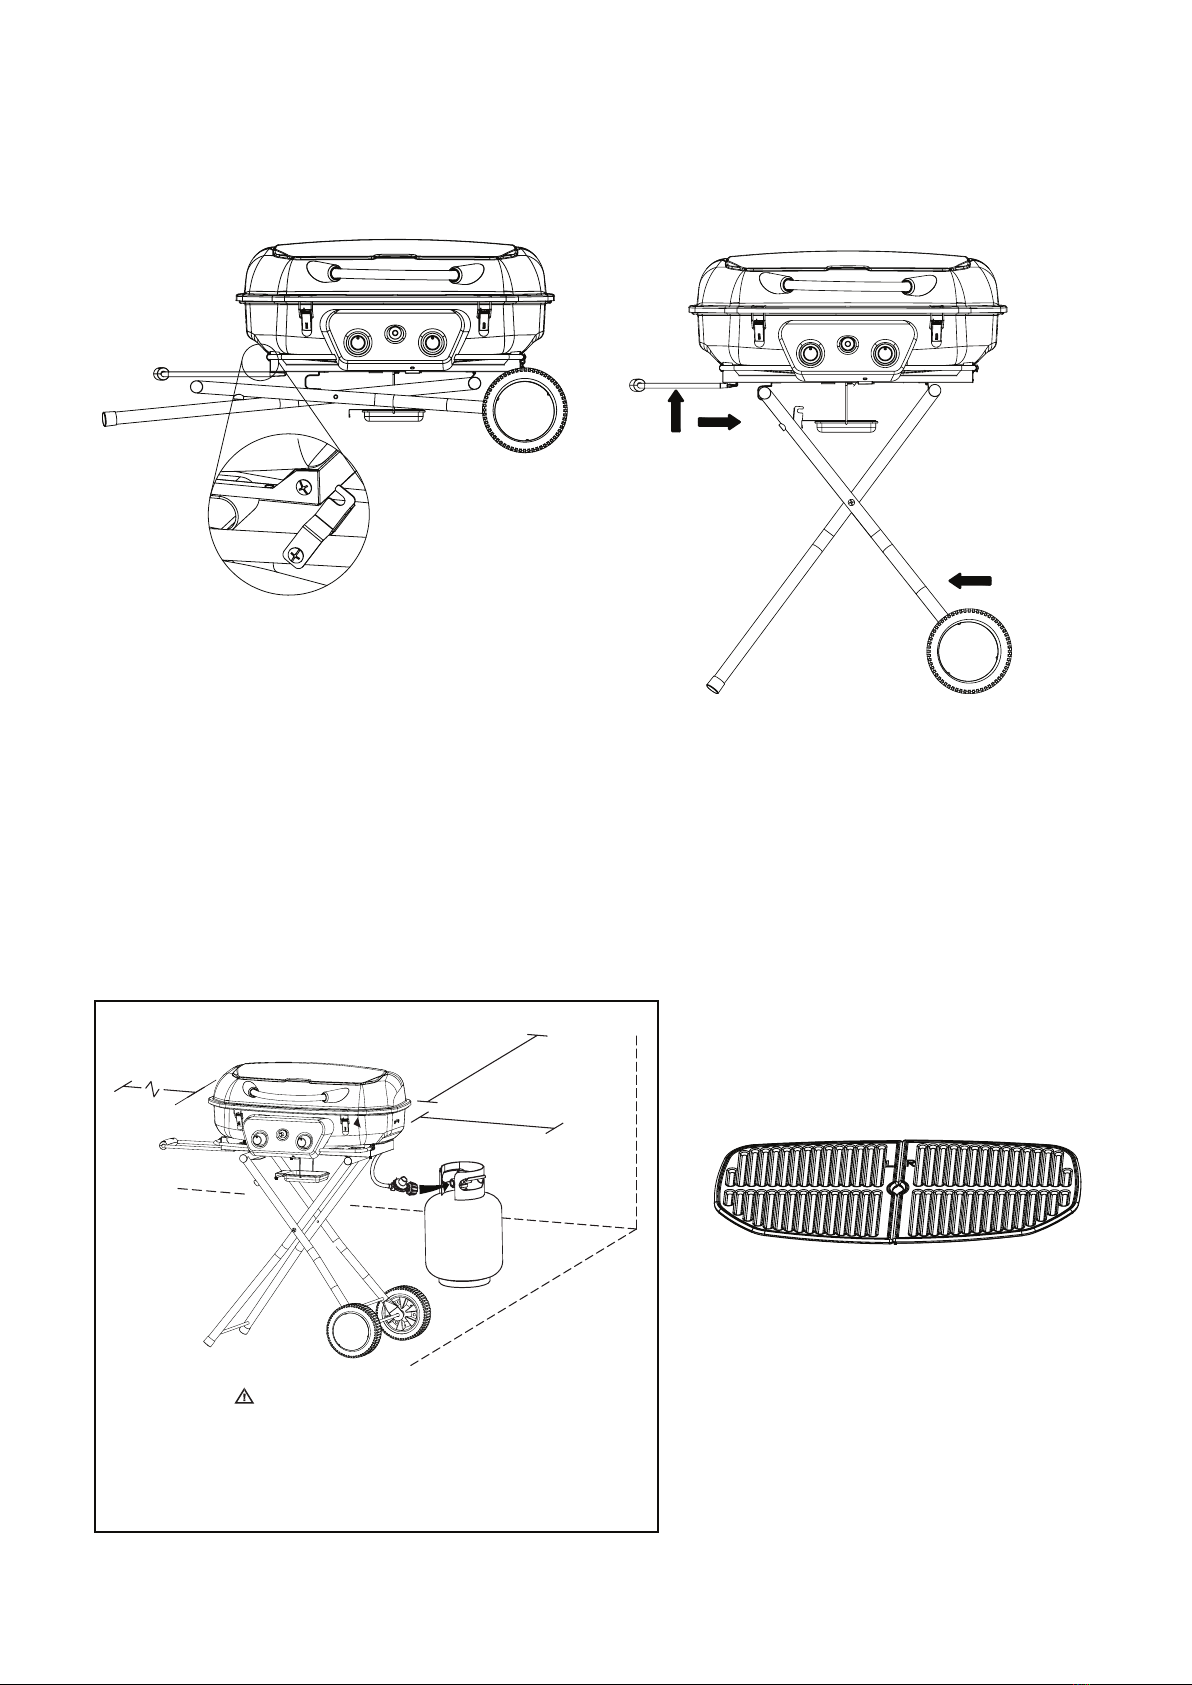
FOLDING, UNFOLDING AND TRANSPORTING THE BARBEQUE
WARNING! HOOD LATCHES MUST BE CLOSED TO LOCK THE HOOD WHILE FOLDING OR
TRANSPORTING THE BARBEQUE. HOOD MUST BE OPEN WHEN LIGHTING BARBEQUE.
11
Close hood latches by hooking over hood and
pushing the lever down
Open hood latches by lifting lever and disengaging
latch
TO FOLD BARBEQUE
Close hood latches, then unhook top of left leg from stand lock.
Engage lock on left leg with body of barbeque to prevent legs unfolding when lifting.
Barbeque is now ready to transport. Always grip handle firmly when wheeling barbeque.
1
2
When barbeque is folded flat, engage
lock on left leg by pushing to the right (1),
then locking it over the screw on barbeque body (2)
11
11
LOCATING THE BARBEQUE AND FIRST TIME USE
Back and sides of the barbeque must be located a minimum of 53cm away from walls or
other structures when barbeque is in use.
12
TO UNFOLD BARBEQUE
Make sure barbeque is on a firm, level surface. Disengage lock on rear of barbeque. Lift
barbeque up, unfold the legs and hook the left leg under the stand lock.
Release the hood latches. Barbeque is now ready for use.
1
When unfolding barbeque,
disengage lock by unhooking
from screw on rear of barbeque
body (1)
WARNING! When barbeque is in use, follow the
minimum distance from objects as shown above.
Failure to follow these instructions could result
in fire or explosion which could cause property
damage, personal injury or death.
25cm
35cm
25cm
This barbeque has a porcelain-
enameled cooking surface. This
does not require any seasoning
and will provide years of service.
Before using for the first time, wash
the grills in hot soapy water and dry
thoroughly.
12
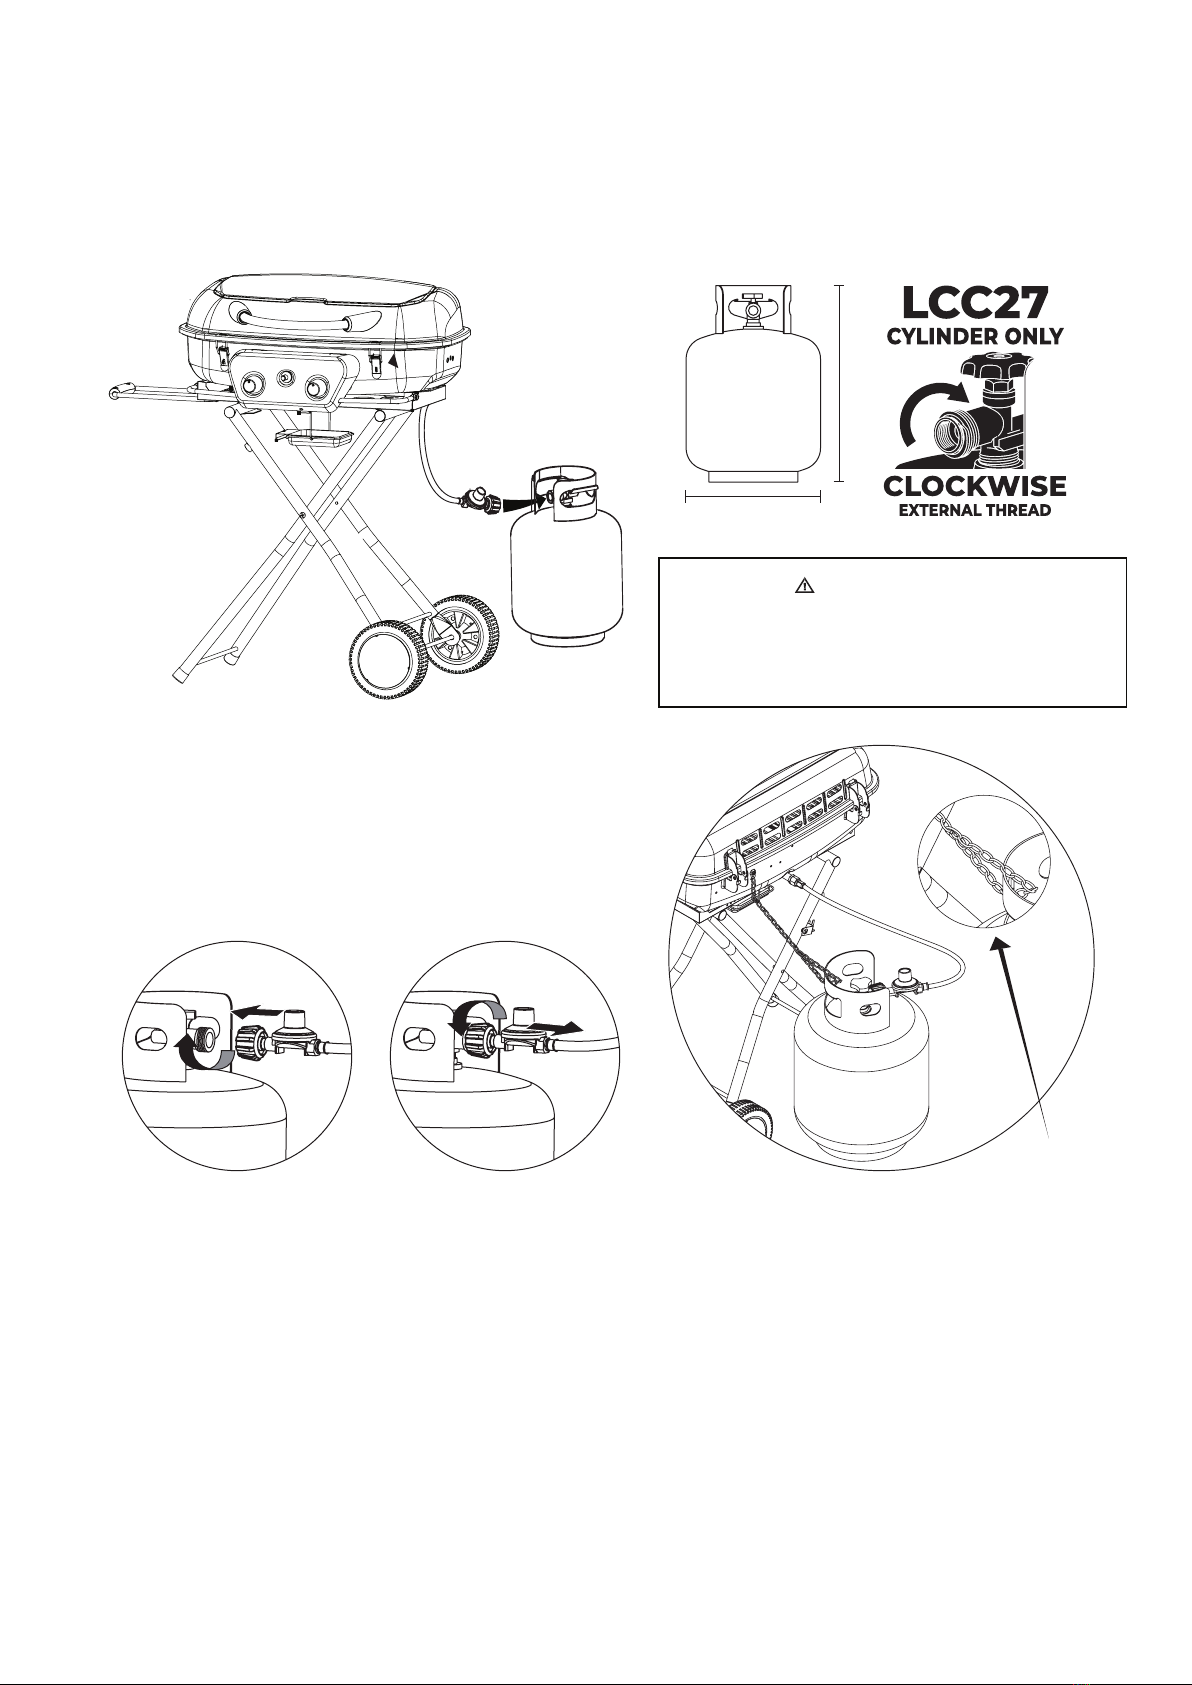
USING, CONNECTING & DISCONNECTING PROPANE CYLINDER
13
To operate, you will need a standard
barbeque propane cylinder with external
valve threads.
(LCC27 cylinder connection)
31cm diameter
9 kg
45.5cm height
Connecting Propane Cylinder
1. Before connecting the cylinder, remove any debris in or around the head of the gas cylinder,
regulator valve, burner heads and burner ports. Use a brush to clean burner ports if necessary.
2. Connect regulator/hose assembly to cylinder by turning knob clockwise until hose is fully
tightened.
Disconnecting Propane Cylinder
1. Before disconnecting cylinder, make sure the propane cylinder valve is closed by turning the
top valve clockwise until it is fully tightened.
2. Disconnect regulator/hose assembly from propane cylinder by turning knob anti-clockwise
until it disconnects from cylinder.
3. Place the protective cap cover on the propane cylinder and store the outdoors in a well ventilated
area away from direct sunlight.
B. To connect
cylinder, screw end of
hose tightly onto cylinder
in a clockwise direction.
Attach restraint chain
to cylinder as shown
(see right).
C. To disconnect
cylinder, turn end of
hose in an anti-
clockwise direction.
Unhook restraint
chain.
A. Place gas
cylinder on a firm
level surface
CAUTION! FOR OUTDOOR USE
Never move barbeque with propane
cylinder in place. Propane cylinder must
be properly disconnected and
removed before moving this barbeque.
Restraint chain

13
LIGHTING THE BARBEQUE (CAUTION! HOOD MUST BE OPEN WHEN LIGHTING)
1. Make sure all labels, packaging and protective films have been removed from the barbeque
and that the barbeque grills have been washed thoroughly.
2. Check for obstructions of airflow to the burners.
Spiders, webs, insects and debris can clog the burner/
venturi tube. A clogged burner tube can lead to a fire.
3. Ensure control knobs are in the 'OFF' position.
4. Connect propane cylinder (see page 13).
5. Turn propane cylinder valve to ‘OPEN’.
6. Turn control knob to 'HIGH' and press ignition button.
The burner should light. If it does not,
repeat this step up to three times.
If burner still does not light, turn
control knob to 'OFF', wait 5 minutes
and repeat lighting procedure.
7. TO LIGHT MANUALLY
If igniter does not light burner, use a long
lit match to light each burner (Matches are not
included). Remove cooking grills and heat plate
first (Fig. 3).
Position lit match above each burner to light.
OPERATING INSTRUCTIONS
BURNER CONNECTIONS
1. Make sure the regulator hose and valve connections are securely
fastened to the burner and the cylinder.
2. Visually check the connection between the burner/venturi tube
and orifice (Fig. 1).
3. Make sure the burner/venturi tube fits over the orifice.
4. Please refer to diagram for proper installation.
If the burner/venturi tube does not rest flush to the orifice, as
shown, please contact customer service for assistance.
WARNING! Failure to inspect this connection or follow these instructions
could cause a fire or an explosion which can cause death, serious bodily injury
or damage to property.
Fig. 2
14
PRECAUTIONARY LEAK TEST
1. Make about 60mL of leak detection solution by mixing one part
dishwashing liquid with three parts water.
2. Make sure control knobs are in the ‘OFF’ position.
3. Connect propane cylinder (see previous page).
4. Turn propane cylinder valve to ‘OPEN’.
5. Use a spoon or spray bottle to apply the solution you made to all
locations marked with an ‘X’ shown in Figs. 1 and 2.
6. If any bubbles appear, turn propane cylinder valve to ‘CLOSED’,
reconnect any connections you made, and re-test.
7. If you continue to see bubbles after several attempts, turn propane cylinder valve to ‘CLOSED’
and disconnect propane cylinder (see previous page). Contact customer service for assistance.
Fig. 1
X
XX
X
Fig. 3
Burner
To light manually, remove
both cooking grills and heat
plate, then position long lit
match above burners to light

14
CAUTION! Before lighting barbeque make sure outdoor cooking appliance
areas are clear and free from combustible materials, gasoline and other
flammable vapors and liquids.
CAUTION! Do NOT obstruct the flow of combustion and ventilation air.
CAUTION! Before each use, check burner/venturi tubes for insects and
nests. Clean if necessary. A clogged tube can lead to a fire.
CAUTION! Do NOT use non-stick cooking sprays on this barbeque. The high
water content can cause them to burn and damage the grill surface.
CAUTION! Do NOT use corn oil when cooking on this barbeque as it contains
sugar, which can caramelise and burn onto the surface of the grill.
CAUTION! If burner flame goes out during operation, immediately turn
the control knobs to the 'OFF' position, turn the propane cylinder valve to
'CLOSED' and open lid to let the gas clear for 5 minutes before relighting.
BURNER FLAME APPEARANCE GUIDE
1. Each time barbeque is started you should check the flame appearance. When each burner is
lit and set to 'HIGH', you should see soft blue flames (about 2 - 3cm long) with yellow tips.
2. Flames should burn evenly and not erratically. If flames appear all blue or all yellow, this
indicates the burners need cleaning or replacing.
Yellow
Light blue
Darker blue
All blue Yellow
Blue
A. Correct - smooth,
soft flame with
darker blue bottom
and yellow tips
B. Incorrect - all blue
flame and noisy
operation (e.g.
popping) indicates
that burners need
cleaning or replacing
C. Incorrect - uneven
flames that are mostly
yellow, red or orange
means burners need
cleaning or replacing, or
gas pressure is too low
due to a leak or faulty
regulator
8. After lighting, observe the burner flame. Make sure all burner ports are lit and flame height
and appearance matches correct flame appearance below.
NOTE: each burner lights independently. Follow steps 6 - 8 to light the other burner.
OPERATING INSTRUCTIONS (cont'd)
15

15
OPERATING INSTRUCTIONS (cont'd)
BURNER CONTROL SETTINGS FOR DIRECT AND INDIRECT GRILLING
Designed for high heat output when the hood is closed, this barbeque is ideal for quickly searing
juicy steaks and burgers. Use the burners as shown below for delicious grilling results - every
time by making the most of indirect and direct cooking zones.
16
HIGHOFFMED
HIGHOFFLOW
HIGHHIGH
CLOSE
HOOD WHEN
COOKING
CLOSE
HOOD WHEN
COOKING
HOOD CAN
BE CLOSED
OR OPEN
A. INDIRECT ZONE COOKING
IDEAL FOR ROASTING (2 - 3 HOURS)
• Prime rib
• Whole chicken
• Baking bread or cakes
Light the left or right burner and set to MEDIUM
heat. Place food above the unlit burner. Close
hood. Your barbeque will cook food like an oven
does. Use a barbeque thermometer to ensure
desired temperature is maintained and adjust
burner setting up or down as needed.
B. INDIRECT SURROUND COOKING
IDEAL FOR SLOW COOKING (4 - 10 HOURS)
• Brisket
• Pulled pork
• Smoking foods
Light the left or right burner. Set each to MED-
LOW heat. Place food above the unlit burner.
Close hood. Your barbeque will cook food
like a smoker - low and slow. Use a barbeque
thermometer to ensure desired temperature
is maintained and adjust burner setting up or
down as needed.
C. 100% DIRECT COOKING
COOKS FOOD IN MINUTES
• Steaks
• Burgers (meat and plant-based)
• Searing fish and vegetables
Light both burners and set to HIGH heat. Use
a barbeque thermometer to ensure desired
temperature is maintained and adjust burner
settings up or down as needed. Turn food once
after 2-6 minutes to complete cooking.

16
OPERATING INSTRUCTIONS (cont'd)
CONTROLLING FLARE-UPS
CAUTION!
If a grease fire develops, turn control knobs to the 'OFF' position and propane
cylinder valve to 'CLOSED'. Do NOT use water on a grease fire. This can cause the
grease to splatter and could result in serious burns, bodily harm or other damage.
Do NOT leave barbeque unattended while preheating or burning off food residue
on or 'HIGH'. If barbeque has not been cleaned, a grease fire can occur.
WARNING! When cooking, fire extinguishing materials should be readily
accessible. In the event of an oil/grease fire, use type BC dry chemical fire
extinguisher or smother with dirt, sand or baking soda. Do NOT attempt to
extinguish with water.
17
Flare-ups are a part of cooking meats on a barbeque and add to the unique flavor of grilling.
However, excessive flare-ups can overcook your food and can be dangerous.
Important: Excessive flare-ups result from the build-up of grease in the oil cup.
If a grease fire occurs, turn the control knob(s) to 'OFF' until the grease burns out.
If excessive flare-ups occur, DO NOT pour water onto the flames.
To minimise flare-ups
1. Trim excess fat from meats prior to cooking.
2. Cook high fat content foods on 'LOW' setting or indirectly. Indirect cooking is when you use
the burners on one side of the grill only and cook food on the opposite side of the grill (or on
the warming rack). This means the food you are cooking will cook more slowly as it is not
cooking over direct heat.
3. Ensure that your barbeque is on a hard, level non-combustible surface and that grease is
allowed to drain into the oil cup.

17
BEFORE EACH USE
1. Keep the barbeque area clean and free from any combustible materials, gasoline, and other
flammable vapours and liquids.
2. Do NOT obstruct the flow or the combustion of propane, or the barbeque vents.
3. Keep the propane cylinder free and clear of debris.
4. Visually check the burner flames to make sure your barbeque is working properly (page 15).
5. Check for obstructions of airflow to the burners. Spiders, insects and webs can clog the
burner/venturi tube. A clogged burner tube can lead to a fire.
CAUTION!
1. All cleaning and maintenance should be done when the barbeque is
completely cool and the gas supply has been disconnected (see page 13).
2. Do NOT clean any part of the barbeque in a self-cleaning (pyrolytic) oven.
The extreme heat generated during pyrolysis will damage the finish.
3. Take care not to enlarge valve orifices or burner ports when cleaning the
valves or burners.
IMPORTANT
1. This barbeque should be thoroughly cleaned and inspected on a regular
basis.
2. Abrasive cleaners will damage this product.
3. Never use oven cleaner to clean any part of the barbeque.
BARBEQUE CLEANING AND CARE
18
BARBEQUE CLEANING AND CARE
1. Wipe surfaces clean with a solution of mild dishwashing detergent or baking soda mixed
with water.
2. For stubborn surfaces, use a citrus-based degreaser and a nylon scrubbing brush.
3. Rinse clean with water and allow to air dry.
BURNER CLEANING AND CARE (Barbeque must be completely cool)
1. Turn gas cylinder valve to 'CLOSED'.
2. Turn all control knobs clockwise to the 'OFF' position.
3. Disconnect gas cylinder (page 13).
4. Carefully remove grills and heat plate and place where they will not obstruct access to
the burners. Then remove the fasteners which secure the burners to the firebox.
5. Grasp the rear part of the burner and lift it up and away from the gas valve orifice.
6. Disconnect wire from spark electrode (if applicable).
7. Clean the venturi tube end of each burner and the outlet holes with small bottle brush or
compressed air.

18
8. Remove all residue and dirt from burner surfaces.
9. Clean any clogged ports with a stiff wire brush (or an opened paper clip).
10. Inspect burners for any damage (cracks or holes). If damage is found, replace with new
burner(s). Call customer service to order replacement burners.
11. Re-install burner(s) by reconnecting spark electrode and inserting venturi tube end over gas
valve orifice. Before securing with fasteners, check to ensure that gas valve orifice is correctly
positioned inside each burner. Also, check connection of each spark electrode (if applicable).
12. Replace heat plate and grills.
13.Reconnect gas cylinder and perform PRECAUTIONARY LEAK TEST (see page 14).
AFTER EACH USE
1. After cooking, turn burners onto 'HIGH' for 5 minutes to burn off food residue, then turn 'OFF'
and allow to cool.
2. While still warm, scrape off any remaining food residue with a scraper or barbeque stone.
3. Remove cooking surfaces and wipe inside of hood and firebox with paper towel until clean.
4. Light barbeque, close hood and allow burners to remain on high for 15 minutes, then turn
burners 'OFF'.
5. Repeat steps 2 - 4 if necessary and wipe cooking surfaces and inside of hood to remove
any residue.
STORING THE BARBEQUE
1. Turn propane cylinder tank valve to 'CLOSED' and disconnect gas cylinder.
2. Turn all control knobs clockwise to the 'OFF' position.
3. Clean all surfaces.
4. Lightly coat the burner(s) with cooking oil to prevent rusting
5. Place the protective cap cover on the propane cylinder and store cylinder outdoors in a
well-ventilated area out of direct sunlight.
6. If storing indoors, cover the barbeque and store in a cool dry place.
7. If storing outdoors, cover with a barbeque cover for protection from the weather.
19
BARBEQUE CLEANING AND CARE (cont'd)

19
BRAND-MAN GRILLS CUSTOMER SERVICE CENTRE:
Hours - 9AM to 5:00PM AEST M-F (excluding holiday)
PHONE: 1300 667 146 (AUS)
0800 585 300 (NZ)
EMAIL:
help@solutionservices.net.au
Model BG2102D2
Gas Type Propane
Burner Injector Size 0.94mm
Burner Gas Consumption 11 MJ/hr
Burner Gas Pressure 2.75 Kpa
Total Gas Consumption 22 MJ/hr
Approval Number GSCS 20243
20
TECHNICAL SPECIFICATIONS
TECHNICAL INFORMATION
PLEASE DO NOT RETURN THIS BARBEQUE TO THE STORE WHERE YOU
PURCHASED IT. Call our Customer Service Centre number listed below.
IF AT ANY TIME YOU ARE IN ANY DOUBT ABOUT THE CORRECT COMPONENTS
TO BE USED WITH THIS BARBEQUE, OR ANY OTHER ASPECT OF THE
Barbeque’S USE AND FUNCTION, PLEASE CONTACT OUR CUSTOMER SUPPORT.
FOR REPLACEMENT PARTS, CONTACT OUR CUSTOMER SERVICE CENTRE.
CUSTOMER SERVICE, PARTS AND PRODUCT
REGISTRATION INFORMATION
Table of contents
Other BRAND-MAN Grill manuals

BRAND-MAN
BRAND-MAN Rodeo Deluxe with cart User manual

BRAND-MAN
BRAND-MAN SIERRA BG1932B3 User manual

BRAND-MAN
BRAND-MAN Bronco2 User manual

BRAND-MAN
BRAND-MAN Bronco BMBROPN User manual

BRAND-MAN
BRAND-MAN RUSTLER 4B GRAY User manual

BRAND-MAN
BRAND-MAN BMBROCH User manual

BRAND-MAN
BRAND-MAN Rustler 6B User manual


