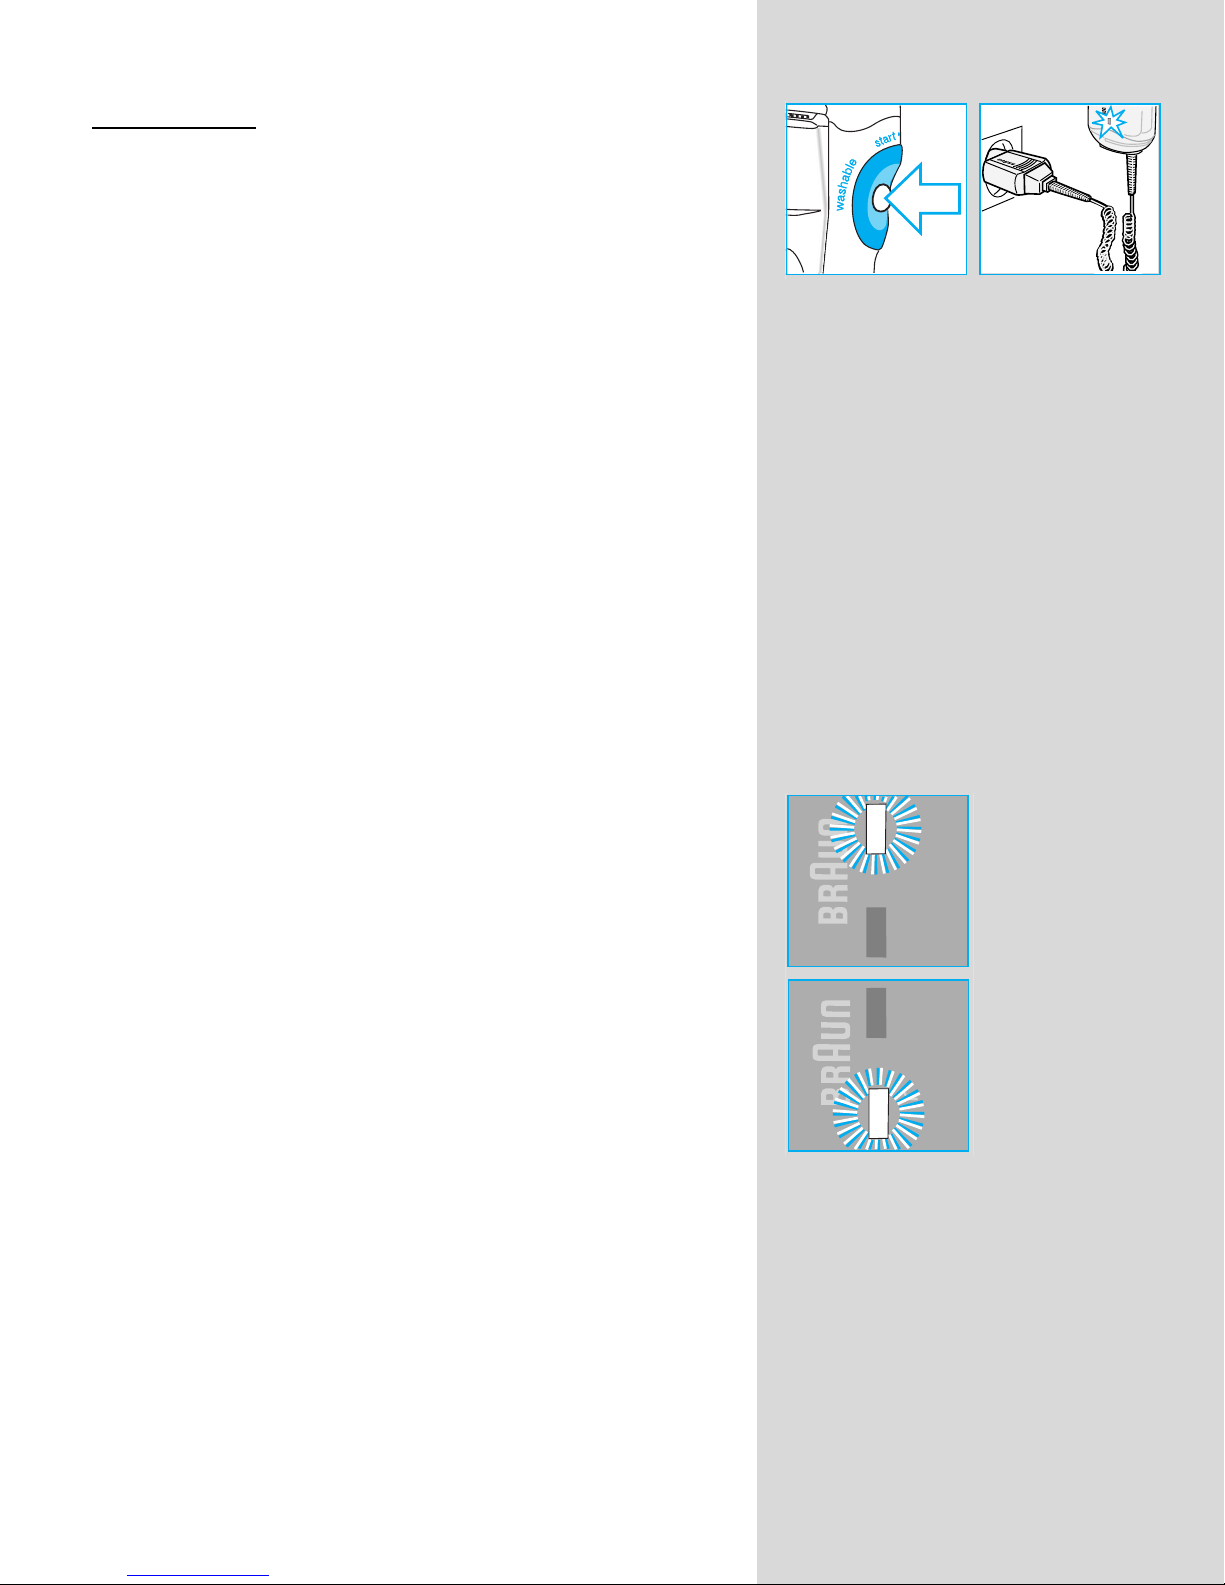
Braun FreeGlider 6690 User manual

5710
FreeGlider
6690
Type Modèle Modelo
®
5710458_S1 Seite 1 Freitag, 8. August 2003 9:35 09

English 4
Français 15
Español 25
Internet
www.braun.com
5-710-458/02/VIII-03/G2
USA / CDN / MEX
Printed in Germany
Imprimé en Allemagne
Impreso en Alemania
Thank you for purchasing a Braun product.
We hope you are completely satisfied with
your new Braun shaver.
If you have any questions, please call:
US residents 1-800-BRAUN-11
1-800-272-8611
Canadian residents 1-800-387-6657
Merci d’avoir fait l’achat d’un produit Braun.
Nous espérons que vous serez pleinement
satisfaite de votre nouveau rasoir Braun.
Si vous avez des questions, veuillez appeler
Braun Canada : 1-800-387-6657
Gracias por haber comprado un producto
Braun.
Esperamos que su nueva afeitadora Braun
satisfaga por completo sus necesidades.
Si Ud. tiene alguna duda, por favor, en México,
llame al: 01 (800) 508-5800
5710458_S2 Seite 1 Freitag, 8. August 2003 9:36 09

FreeGlider
1
2
7
3
(SCR)
8
14
18
11
10
9
4
5
6
15
16
17
13
12
max
max
min
min
b
c
a
FreeGlider
Ingredients:
SD alcohol 40-B
(alcohol denat.),
C12-13 Alkyl Lactate,
Bisabolol,
Tocopheryl Acetate,
Lecithin, Parfum
Ident.Nr. 5337
16 ml
16 ml
max
max
min
min
FreeGlider
FreeGlider F500 Explo NA KURTZ DESIGN 24.04.03
®
5710458_S3 Seite 1 Freitag, 8. August 2003 9:37 09

4
English
IMPORTANT SAFETY
INSTRUCTIONS
When using an electrical appliance, basic precautions should always be
followed, including the following:
Read all instructions before using this appliance.
DANGER
To reduce the risk of electric shock:
1. Do not reach for an appliance that has fallen into water.
Unplug immediately.
2. Do not use while bathing or in a shower when the appliance is connected to
an electrical outlet.
3. Do not place, store or charge the appliance where it can fall or be pulled
into a tub or sink. Do not place in or drop into water or other liquid.
4. When not using for a longer period of time, unplug this appliance from the
electrical outlet.
5. Unplug this appliance before cleaning.
6. This appliance is provided with a low-voltage adapter. Use only the adapter
provided. Do not exchange or manipulate any part of it.
FOR HOUSEHOLD USE
SAVE THESE INSTRUCTIONS
5710458_S4-34 Seite 4 Freitag, 8. August 2003 9:31 09

5
WARNING
To reduce the risk of burns, fire, electric shock, or injury to persons:
1. Close supervision is necessary when this appliance is used by, on, or near
children or invalids.
2. Use this appliance only for its intended use as described in this manual.
Do not use attachments not recommended by the manufacturer.
3. The appliance should never be exposed to temperatures of less than
32 ºF / 0 ºC and more than 105 ºF/+ 40 ºC for longer than a few hours.
Be sure to completely dry appliance after use. Keep cord and adapter dry at
all times. Do not store in a damp environment. To avoid damage do not wind
the cord around the appliance. It is important to check the cord for damage
periodically particularly at each end where the cord enters the plug.
4. Never operate this appliance if it has a damaged cord or plug, if it is not wor-
king properly, if it has been dropped or damaged, or dropped into water.
Return the appliance to a service center for examination and repair.
5. Keep the cord away from heated surfaces.
6. Never drop or insert any object into any opening.
7. Do not use outdoors or operate where aerosol (spray) products are being
used or where oxygen is being administered.
8. Do not use this appliance with a damaged or broken foil, as serious facial
injuries may occur.
9. Always attach plug to appliance first, then to outlet.
To disconnect, turn all controls to «off», then remove plug from outlet.
10. The Shaving Conditioner provided contains approx. 90% alcohol and is
highly flammable. Keep locked up. Keep out of the reach of children.
Keep away from sources of ignition. Do not smoke while using this appliance
or immediately after use.
5710458_S4-34 Seite 5 Freitag, 8. August 2003 9:31 09

6
The Braun FreeGlider
®
is a shaver which automatically
applies a Shaving Conditioner during shaving. The
shaver is washable.
Description
1 Foil protection cap
2 Foil frame
3 GlideControl
a) exchangeable applicator
b) distancing bar
c) scale
4 Cutter block
5 Head lock
6 Long hair trimmer
7 Foil frame release button
8 Start/stop button
9 Charging light (green)
10 Low-charge light (red, model 6680 only)
11 Shaver socket
12 Cover
13 Cover latch
14 Low-voltage adapter
15 Sealing foil
16 Cartridge with Shaving Conditioner (SCR)
17 Pull-out tag
18 Charging stand
English
5710458_S4-34 Seite 6 Freitag, 8. August 2003 9:31 09

7
Charging the shaver
• First charging: Connect the charging stand to an elec-
trical outlet. Place the shaver into the charging stand and
allow it to charge for at least 4 hours (during charging
shaver and adapter might get warm). Once the shaver
is completely charged, disconnect the shaving stand.
Shave until fully discharged. Then reconnect and re-
charge to full capacity again (subsequent charges will
take about 1 hour).
• When the shaver is completely discharged, you cannot
know if it is switched on or not. When you connect the
charging stand with the shaver to an electrical outlet,
make sure the green charging light illuminates. If it does
not, push the start/stop button (turning off the shaver).
The shaver is only charging when the green light is on.
• A full charge will give up to 50 minutes of cordless
shaving time depending on your beard growth. However,
the maximum battery capacity will only be reached after
several charging/discharging cycles.
• Best environmental temperature range for charging is
60 °F to 95 °F / 15 °C to 35 °C.
Indicator lights
The green charging light shows that the shaver is being
charged. When the rechargeable battery is fully charged,
the charging light goes off. If later on, the charging light
comes on again, this indicates that the shaver is being
recharged to maintain its full capacity.
The red low charge light glows when the battery capacity
has dropped below 20%, provided the shaver is
switched on. The remaining capacity will then be
sufficient for 2 to 3 shaves.
Preserving the cell unit
In order to maintain the optimum capacity of the
rechargeable battery, the shaver has to be fully dis-
charged (by shaving) every 6 months approximately.
Then recharge the shaver to full capacity again.
Shaving with the cord
If the rechargeable battery is discharged, you may
also shave with the shaver connected to the mains via
the low-voltage adapter (if the shaver does not run
immediately, turn it off and charge for approx. 1 minute).
Then shave with the cord connected.
6680
stop
6680
stop
FreegliderFreeglider
5710458_S4-34 Seite 7 Freitag, 8. August 2003 9:31 09

8
Inserting the cartridge
a) Disconnect the power supply cord from the shaver.
b) Open latch and pull away cover.
c) If necessary, remove old cartridge by its pull-out tag.
d) Remove sealing foil from new cartridge.
e) Insert cartridge as shown, push firmly.
f) Put cover in place and close latch.
•Only use original Braun cartridges.
•Depending on scale setting and your personal shaving
habits, one cartridge will last for approximately
15 shaves.
•Do not attempt to refill cartridges.
•The cartridge can be removed and reinserted later.
In that case a small loss of Shaving Conditioner might
occur. While traveling, do not take an unsealed cartridge
along nor leave one in the shaver.
Shaving
GlideControl allows you to choose the amount of
Shaving Conditioner you want to apply («min-max»):
When you raise the distancing bar (moving the scale to
«min»), the applicator will have less contact with your
skin and will apply less Shaving Conditioner.
If you move the scale to «max», more Conditioner will be
applied.
Please be aware that, in order to optimally pre-condition
your skin, during the first seconds somewhat more
Conditioner will be applied.
Before shaving you should not use moisturizing creme or
lotions, as they might impair the effectiveness of the
applicator. After shaving, there is no restriction on the
use of After Shave or Eau de Toilette.
Turning on the shaver («start»):
The pivoting cutting system automatically adjusts to
every contour of your face.
ab
cd
ef
clack!
min max
start
5710458_S4-34 Seite 8 Freitag, 8. August 2003 9:31 09

9
Head lock:
Shaving in difficult areas (e.g. under the nose) will be
facilitated if the shaving head is locked.
Trimmer:
When the long hair trimmer is activated, it allows the
controlled trimming of moustache or sideburns.
Keeping your shaver in top shape
Important:
•
When the foil frame is removed, do not turn on the
shaver. Shaving Conditioner may leak.
•
Always unplug the shaver before cleaning.
•
After cleaning with water, disassemble the shaving
parts (cutter block and foil frame) and let dry.
Daily cleaning
After each shave, you should hold the shaver –turned on
and with its foil frame attached –upside down under
running hot water.
General cleaning
Occasionally you should, while the shaver is turned off,
remove the foil frame, and, using the brush, clean the
cutter block and the inner area of the shaver head.
Replace foil frame, ensuring both sides click audibly into
place. If not properly attached, Shaving Conditioner
could leak.
Tips for the perfect shave
•It can take 14–21 days for your beard to adjust to the
new shaving system.
•How much Shaving Conditioner you want to apply
depends on your type of skin: wet skin might require
more Shaving Conditioner. You may want to try out
different scale positions.
•Hold the shaver at right angles (90°) to the skin.
Stretch your skin and shave against the direction of
beard growth.
•To maintain 100% shaving performance, replace
your foil and cutter block every 18 months or when
worn.
max
max
min
min
no!
max
max
min
min
max
max
min
min
5710458_S4-34 Seite 9 Freitag, 8. August 2003 9:31 09

10
Note
When cleaning under running water, small amounts of
moisture collect inside the shaver‘s cartridge chamber.
This has no effect on the shaver‘s operation and will
disappear after a while.
Changing the applicator
The applicator is subject to wear. You should exchange
it when in the course of time you feel that less Shaving
Conditioner is applied. Replacement applicators come
with Shaving Conditioner refill cartridges
(see «Accessories»).
a) Remove the foil frame.
b) Lift old applicator at the notch on one side, then the
other.
c) Remove old applicator and dispose.
d) Place new applicator on the foil frame, leaving a small
gap.
e) With both thumbs push applicator right and left until it
clicks into place.
f) Replace foil frame, ensuring both sides click audibly into
place.
Replacing the shaving parts
To maintain 100% shaving performance, replace your
foil and cutter block every 18 months or when worn.
Change both parts at the same time for a closer shave
with less skin irritation.
Accessories
Available at your dealer or Braun Service Centers:
•
Foil frame and cutter block
(FreeGlider
®)
•
Cartridge with Shaving Conditioner
(SCR)
c
max
max
min
min
f
e
max
max
min
min
max
max
min
min
old
max
max
min
min
new
max
max
min
min
click!
max
max
min
min
1
23
b
a
max
max
min
min
click!
d
FreeGlider
5710458_S4-34 Seite 10 Freitag, 8. August 2003 9:31 09

11
Environmental notice
This appliance is provided with nickel-hydride batteries.
They do not contain any harmful heavy metals.
Nevertheless, in the interest of recycling raw materials,
please do not dispose of this appliance in the household
waste at the end of its useful life. Disposal can take place
at a Braun Service Center of appropriate collection sites.
The empty cartridge of the Shaving Conditioner can be
disposed in the household waste.
Subject to change without notice
Electric specifications see printing on the housing.
5710458_S4-34 Seite 11 Freitag, 8. August 2003 9:31 09

12
What to do if ...
Problem Situation Solution
Shaving Conditioner is leaking
Foil frame replaced incorrectly Remove foil frame and attach once more,
ensuring both sides click audibly into
place. If needed, clean both foil frame and
shaver head.
or
Applicator replaced
incorrectly Place new applicator on the foil frame,
leaving a small gap. With both thumbs
push applicator right and left until it clicks
into place.
or
Shaver was switched on with
foil frame removed Do not switch on when foil frame is
removed.
or
Cartridge was removed
immediately after use Do not remove cartridge immediately after
use.
None, or too little Shaving
Conditioner dispensed with
new shaver
No cartridge inserted
or
Sealing foil not removed from
cartridge
or
Scale positioned at «min»
Insert cartridge.
Remove sealing foil.
Move scale.
None, or too little Shaving
Conditioner dispensed after
longer use
Applicator clogged
or
Cartridge empty
Replace applicator (before shaving do
not use moisturizing creme or lotion).
Insert new cartridge.
Skin is red or burns
Skin is not used to Shaving
Conditioner Conditioner contains alcohol. Sensitive
skin might require 1 to 2 weeks to get
accustomed. If your skin shows signs of
intolerance, discontinue using the Shaving
Conditioner.
Shaver is connected to the
mains, but is not charging
(green LED does not light up)
Shaver is completely
discharged Leave shaver connected to the mains,
push start/stop button once. Shaver will be
charging when green LED lights up.
Shaving head does not swivel
Head lock activated Release head lock.
Cartridge cannot be removed
Pull-out tag was accidentally
removed from cartridge Use appropriate tool (flat-nose pliers) to
pull out cartridge. When inserting a new
cartridge, only remove the silver sealing
foil. Do not remove the transparent pull-out
tag.
Water condensation inside the
cartridge compartment
Differences in temperature
when cleaning with water Condensation will disappear after a
while and has no effect on the shaver’s
operation. The electronics section is sealed
against water.
5710458_S4-34 Seite 12 Freitag, 8. August 2003 9:31 09

13
FOR USA ONLY
2-year limited warranty
(foil and cutter block excluded)
Braun warrants this Braun appliance (except foil and cutter block) to be free of
defects in material and workmanship for a period of two years from the date of
original purchase.
If the appliance exhibits such a defect, Braun will, at its option, either repair or
replace it for the consumer without charge, provided the consumer:
1. Returns the appliance, postage paid and insured, indicating the reasons for
returning it to: Shaver Service Department, Braun U.S. Div., The Gillette Co.,
400 Unicorn Park Drive, Woburn,
MA 01801-3376,
or one of its authorized
service centers.
2. Submits proof of date of original purchase.
This warranty does not cover foils, cutter blocks or damage resulting from acci-
dent, misuse, abuse, dirt, water, tampering, unreasonable use, normal wear, ser-
vicing performed or attempted by unauthorized service agencies or failure to
provide reasonable and necessary maintenance, including recharging.
ALL IMPLIED WARRANTIES, INCLUDING ANY IMPLIED WARRANTY OF
MERCHANTABILITY OR FITNESS FOR ANY PARTICULAR PURPOSE, ARE
LIMITED IN DURATION TO 2 YEARS FROM DATE OF ORIGINAL PURCHASE.
IN NO EVENT WILL BRAUN BE RESPONSIBLE FOR CONSEQUENTIAL
DAMAGES RESULTING FROM THE USE OF THIS PRODUCT.
Some states do not allow the exclusion or limitation of incidental or consequen-
tial damages, so the above limitation or exclusion may not apply to you.
This warranty gives you specific legal rights, and you may also have other legal
rights which vary from state to state.
5710458_S4-34 Seite 13 Freitag, 8. August 2003 9:31 09

14
FOR CANADA ONLY
2-year limited warranty
(foil and cutter block excluded)
In the event a Braun appliance fails to function within 2 years from date of
purchase, because of defects in material or workmanship, and the consumer
returns the unit to an authorized service center, Braun Canada, will, at its option,
either repair or replace the unit without additional charge to the consumer.
This guarantee does not cover any product, which has been damaged by drop-
ping, tampering, wrong current, servicing performed or attempted by unauthori-
zed service agencies, misuse or abuse,
kinks in the shaver foil as well as the
normal wear of the shaving parts.
Exclusion of Warranties:
The foregoing warranty is the sole warranty offered
by Braun Canada. Braun Canada hereby disclaims any implied warranty of
merchantability or fitness for any particular purpose. In no event will Braun
Canada be responsible for consequential damages resulting from the use of this
product.
5710458_S4-34 Seite 14 Freitag, 8. August 2003 9:31 09

15
Français
PRÉCAUTIONS IMPORTANTES
Lors de l’utilisation d’appareils électriques, toujours prendre les mesures de
précaution suivantes :
Lire toutes les directives avant d’utiliser cet appareil.
DANGER
Pour réduire les risques de choc électrique, suivre les directives suivantes :
1. Ne pas toucher l’appareil s’il est entréen contact avec de l’eau.
Le débrancher immédiatement.
2. Ne pas utiliser pendant le bain ou la douche lorsque l’appareil est branchésur
une prise de courant.
3. Ne pas placer ni ranger ni recharger l’appareil àun endroit d’oùil peut tomber
ou glisser dans une baignoire ou un lavabo. Ne pas immerger dans l’eau ni
aucun autre liquide.
4. Débrancher l’appareil de la prise de courant s’il n’est pas utilisépendant une
période prolongée.
5. Débrancher l’appareil avant le nettoyage.
6. Cet appareil est fourni avec un adaptateur basse tension. Utiliser seulement
l’adaptateur fourni. Ne manipuler ni échanger aucune des pièces.
POUR USAGE DOMESTIQUE
CONSERVER CES DIRECTIVES
5710458_S4-34 Seite 15 Freitag, 8. August 2003 9:31 09

16
AVERTISSEMENT
Pour réduire les risques de brûlure, d’incendie, de choc électrique ou de
blessure, suivre les directives suivantes :
1. Exercer une surveillance attentive lorsque l’appareil est utilisépar ou pour
des enfants ou des personnes invalides, ou près de ceux-ci.
2. Ne pas utiliser cet appareil àdes fins autres que celles indiquées dans ce
manuel. Ne pas employer d’accessoires non recommandés par le fabricant.
3. L’appareil ne doit en aucun cas être soumis àdes températures inférieures à
0 ºC (32 ºF) ou supérieures à40 ºC (105 ºF) pour plus de quelques heures.
S’assurer de sécher entièrement l’appareil après l’emploi. Après l’utilisation,
s’assurer que l’appareil et le cordon sont secs en tout temps. Ne pas ranger
dans un endroit humide. Pour éviter les dommages, ne pas enrouler le
cordon autour de l’appareil. Il est essentiel de vérifier périodiquement l’état du
cordon, surtout les extrémités qui entrent dans la fiche.
4. Ne jamais faire fonctionner un appareil dont la fiche ou le cordon est abîmé,
qui n’est pas en bon état de fonctionnement, est tombé, a étéendommagé
ou mis en contact avec de l’eau. Retourner l’appareil àun centre de service
pour inspection et réparation.
5. Ne pas laisser le cordon entrer en contact avec des surfaces chaudes.
6. Ne jamais laisser tomber ni insérer d’objets dans les orifices de l’appareil.
7. Ne pas utiliser àl’extérieur, dans un endroit oùdes produits en aérosol
(vaporisateurs) sont utilisés ni làoùl’on administre de l’oxygène.
8. Ne pas utiliser un appareil dont la grille est endommagée ou brisée ; cela
pourrait entraîner des blessures graves au visage.
9. Toujours relier la fiche àl’appareil avant de brancher sur la prise de courant.
Pour débrancher l’appareil, placer tous les interrupteurs à«arrêt », puis
retirer la fiche de la prise.
10. Le revitalisant de rasage fourni contient environ 90 % d’alcool et est
hautement inflammable. Garder sous clé. Garder hors de la portée des
enfants. Tenir loin des sources d’inflammation. Ne pas fumer durant
l’utilisation de cet appareil ni immédiatement après l’emploi.
5710458_S4-34 Seite 16 Freitag, 8. August 2003 9:31 09

17
Braun FreeGlider
®
est un rasoir qui applique automa-
tiquement un revitalisant de rasage pendant le rasage.
Le rasoir est lavable.
Description
1 Capot de protection de la grille
2 Bloc de grille
3 Système GlideControl
a) applicateur échangeable
b) barre d’espacement
c) échelle graduée
4 Bloc de coupe
5 Verrou de tête
6 Tondeuse pour poils longs
7 Bouton de déclenchement du bloc de grille
8 Bouton marche-arrêt
9Témoin de charge (vert)
10 Témoin de charge faible (rouge)
11 Prise du rasoir
12 Couvercle
13 Verrou de couvercle
14 Cordon d’alimentation
15 Pellicule en aluminium
16 Cartouche avec revitalisant de rasage (SCR)
17 Languette
18 Support de charge
Français
5710458_S4-34 Seite 17 Freitag, 8. August 2003 9:31 09

18
Charge du rasoir
•Première charge :Brancher le support de charge sur une
prise de courant. Placer le rasoir sur le support de charge
et le charger pendant au moins quatre heures (il se peut
que le rasoir et l’adaptateur deviennent chauds durant la
charge). Lorsque le rasoir est chargéàpleine capacité,
débrancher le support de charge.
•Utiliser le rasoir jusqu’à ce qu’il soit entièrement déchargé,
puis brancher de nouveau et recharger complètement
(les charges ultérieures se font en une heure environ).
•Lorsque le rasoir est entièrement déchargé, il n’est pas
possible de savoir s’il est sous tension ou hors tension.
Lorsque le support de charge portant le rasoir est branché
sur une prise de courant, s’assurer que le témoin de
charge vert s’allume. Si ce n’est pas le cas, appuyer
sur le bouton marche-arrêt (mise hors tension du rasoir).
La charge n’a lieu que si le témoin vert s’allume.
•Une charge complète procure jusqu’à 50 minutes de
rasage sans cordon selon la longueur de la barbe.
Toutefois, la capacitéoptimale de la pile ne sera atteinte
qu’après plusieurs cycles de charge et de décharge.
•La gamme idéale de températures ambiantes pour la
charge est de 15 ºC à35 ºC.
Témoins
Le témoin de charge vert indique que le rasoir est en
cours de charge. Le témoin de charge s’éteint lorsque la
pile rechargeable est chargée àpleine capacité. Si, plus
tard, le témoin de charge s’allume de nouveau, cela
signifie que le rasoir se recharge afin de maintenir sa
pleine capacité.
Le témoin de charge faible rouge s’illumine lorsque la
pile a moins de 20% de sa capacité, àcondition que le
rasoir soit sous tension. La capacitérestante sera alors
suffisante pour deux ou trois rasages.
Optimisation de la pile
Afin de maintenir la capacitéoptimale de la pile
rechargeable, le rasoir doit être entièrement déchargé
(par le rasage) tous les 6 mois environ. Recharger alors à
nouveau le rasoir àsa pleine capacité.
Rasage avec le cordon
Si la pile rechargeable est déchargée, le rasoir peut
également être utiliséen le branchant sur la prise de
courant àl’aide du cordon d’alimentation (si le rasoir ne
fonctionne pas immédiatement, le mettre hors tension et
le charger pendant une minute environ). Le rasage est
alors possible une fois le cordon branché.
6680
stop
6680
stop
FreegliderFreeglider
5710458_S4-34 Seite 18 Freitag, 8. August 2003 9:31 09

19
Insertion de la cartouche
a) Débrancher le cordon d’alimentation du rasoir.
b) Ouvrir le verrou et tirer sur le couvercle.
c) Au besoin, enlever la cartouche usée àl’aide de sa
languette.
d) Enlever la pellicule en aluminium de la nouvelle
cartouche.
e) Insérer la cartouche conformément àl’illustration,
puis pousser fermement.
f) Remettre le couvercle en place et fermer le verrou.
•N’utiliser que des cartouches fabriquées par Braun.
•Selon le réglage de l’échelle graduée et les habitudes de
rasage, une cartouche durera environ 15 rasages.
•Ne pas essayer de remplir des cartouches vides.
•La cartouche peut être enlevée et réinsérée ultérieure-
ment. Dans ce cas, une petite perte de revitalisant de
rasage peut se produire. En voyage, ne pas apporter de
cartouche non scellée ; ne pas laisser de cartouche dans
le rasoir.
Rasage
Le système GlideControl vous permet d’appliquer la
quantitédésirée de revitalisant de rasage («min-max ») :
Si vous déplacez la barre d’espacement vers la gradua-
tion «min », l’applicateur aura moins de contact avec
votre peau et appliquera moins de revitalisant de rasage.
Si vous déplacez la barre d’espacement vers la gradua-
tion «max », une plus grande quantitéde revitalisant de
rasage sera appliquée.
Pour optimiser la préparation de votre peau au rasage,
une quantitéde revitalisant légèrement supérieure sera
appliquée au cours des premières secondes.
Avant le rasage, il est préférable de ne pas utiliser une
crème ou une lotion hydratante, car elle pourrait altérer
l’efficacitéde l’applicateur. Néanmoins, vous pouvez
utiliser un après-rasage ou une eau de toilette après le
rasage.
Mise en marche du rasoir («marche ») :
Le système de coupe pivotant s’adapte automatique-
ment aux contours de votre visage.
ab
cd
ef
clack!
min max
start
5710458_S4-34 Seite 19 Freitag, 8. August 2003 9:31 09

20
Verrou de tête :
Le rasage aux endroits difficiles d’accès (par exemple
en-dessous du nez) sera facilitési la tête de rasage est
verrouillée.
Tondeuse :
Lorsque la tondeuse pour poils longs est activée, elle
permet de tailler avec précision la moustache et les
favoris.
Pour garder le rasoir en parfait état
Important :
•Afin d’éviter l’écoulement du revitalisant de rasage,
ne pas mettre le rasoir en marche lorsque le bloc de
grille est enlevé.
•Toujours débrancher le rasoir avant le nettoyage.
•Après le nettoyage à l’eau, démonter les pièces du
rasoir (bloc de coupe et bloc de grille) et laisser
sécher.
Nettoyage quotidien
Après chaque rasage, passez votre rasoir alluméàl’eau
chaude (bloc de grille en place), la tête de rasage vers le
bas.
Nettoyage général
De temps en temps, après avoir mis le rasoir hors
tension, il est recommandéd’enlever le bloc de grille et,
àl’aide de la brosse, de nettoyer le bloc de coupe et
Conseils pour un rasage parfait
•Prévoir une période de transition de 14 à21 jours
pour permettre àla barbe de s’adapter au nouveau
système de rasage.
•La quantitéde revitalisant de rasage àappliquer
dépend du type de peau : une peau humide peut
nécessiter plus de revitalisant de rasage. Pour
adapter l’applicateur àla peau, essayer différentes
positions de graduation.
•Tenir le rasoir àangle droit (90°) par rapport àla peau.
Étirer la peau et raser dans le sens opposéàla
repousse.
•Pour conserver 100% de la performance de votre
rasoir, remplacez votre grille et votre bloc-couteaux
tous les 18 mois, ou dès qu’ils sont usés.
max
max
min
min
no!
max
max
min
min
max
max
min
min
5710458_S4-34 Seite 20 Freitag, 8. August 2003 9:31 09
This manual suits for next models
1
Table of contents
Languages:
Other Braun Electric Shaver manuals

Braun
Braun 360S-5 User manual

Braun
Braun MGK 3025 User manual

Braun
Braun KF 150 User manual

Braun
Braun 8 Series User manual

Braun
Braun BT 3050cb User manual

Braun
Braun cruzer 6 User manual

Braun
Braun 9 SERIES User manual

Braun
Braun 170s-1 User manual

Braun
Braun CRUZER2 5734 User manual

Braun
Braun 5685 User manual

Braun
Braun 560 User manual

Braun
Braun 5761 User manual

Braun
Braun 720S-5 User manual

Braun
Braun Silk-epil LS 5100 User manual

Braun
Braun 5018s User manual

Braun
Braun 9 SERIES User manual

Braun
Braun Gillette Prosonic 720 User manual

Braun
Braun 7 series User manual

Braun
Braun Flex XP 5663 User manual

Braun
Braun SilkFinish FG 1000 User manual