Bray 54 Series User manual
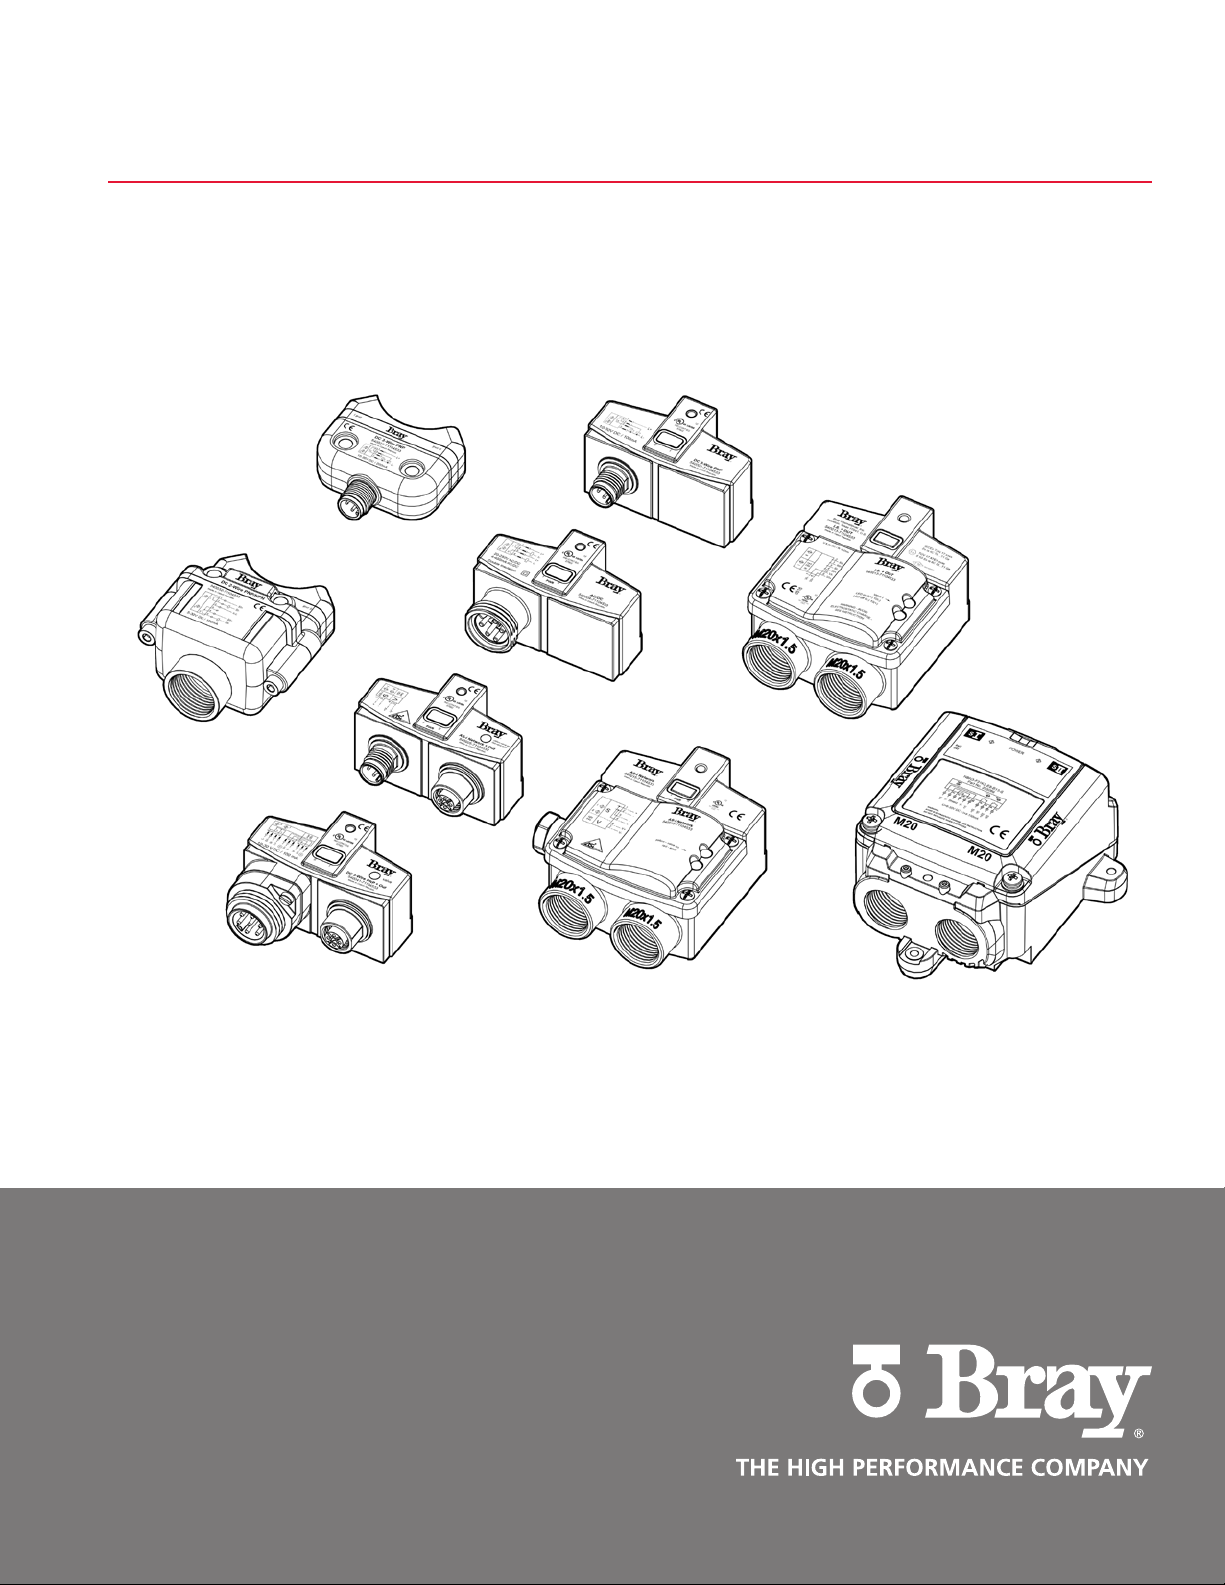
BRAY.COM
SERIES 54
PROXIMITY SENSORS
Installation, Operation and Maintenance Manual


Series 54 Proximity Sensors
Installation, Operation and Maintenance Manual
SERIES 54 PROXIMITY SENSORS | 1
Table of Contents
1.0 - Definition of Terms . . . . . . . . . . . . . . . . . . . . . . . . . . . . . . . . . . . . . . . . . . . . . . . . . 2
1.1 - Hazard-free Use . . . . . . . . . . . . . . . . . . . . . . . . . . . . . . . . . . . . . . . . . . . . . . . . .2
1.2 - Qualified Personnel . . . . . . . . . . . . . . . . . . . . . . . . . . . . . . . . . . . . . . . . . . . . . . . 2
2.0 - Introduction . . . . . . . . . . . . . . . . . . . . . . . . . . . . . . . . . . . . . . . . . . . . . . . . . . . . . 3
2.1 - Pre-installed Storage. . . . . . . . . . . . . . . . . . . . . . . . . . . . . . . . . . . . . . . . . . . . . . .3
2.2 - S54 Sensor Part Numbering . . . . . . . . . . . . . . . . . . . . . . . . . . . . . . . . . . . . . . . . . . . 3
2.3 - Activator Kit. . . . . . . . . . . . . . . . . . . . . . . . . . . . . . . . . . . . . . . . . . . . . . . . . . .4
2.4 - S54 Operation Overview . . . . . . . . . . . . . . . . . . . . . . . . . . . . . . . . . . . . . . . . . . . . 4
3.0 - Activator. . . . . . . . . . . . . . . . . . . . . . . . . . . . . . . . . . . . . . . . . . . . . . . . . . . . . . .5
3.1 - Selection . . . . . . . . . . . . . . . . . . . . . . . . . . . . . . . . . . . . . . . . . . . . . . . . . . . . 5
3.2 - Mounting . . . . . . . . . . . . . . . . . . . . . . . . . . . . . . . . . . . . . . . . . . . . . . . . . . . . 6
3.2.1 - Fixed Activator - Rack and Pinion Actuator . . . . . . . . . . . . . . . . . . . . . . . . . . . . . . . . 6
3.2.2 - Adjustable Activator - Rack and Pinion Actuator . . . . . . . . . . . . . . . . . . . . . . . . . . . . . 8
3.2.3 - Adjustable High Visibility Activator - Rack and Pinion Actuator . . . . . . . . . . . . . . . . . . . . . 10
3.2.4 - Hazardous Location Proximity Sensor Kit - Rack and Pinion Actuator . . . . . . . . . . . . . . . . . . 11
3.2.5 - Scotch Yoke Actuator . . . . . . . . . . . . . . . . . . . . . . . . . . . . . . . . . . . . . . . . . . 12
3.3 - Adjusting the Activator . . . . . . . . . . . . . . . . . . . . . . . . . . . . . . . . . . . . . . . . . . . . 14
3.4 - Adjustable High Visibility Activator . . . . . . . . . . . . . . . . . . . . . . . . . . . . . . . . . . . . . . 14
4.0 - Connections (Operation). . . . . . . . . . . . . . . . . . . . . . . . . . . . . . . . . . . . . . . . . . . . . . 15
4.1 - Sensor Only . . . . . . . . . . . . . . . . . . . . . . . . . . . . . . . . . . . . . . . . . . . . . . . . . . 15
4.2 - Sensor and Solenoid (Shared) . . . . . . . . . . . . . . . . . . . . . . . . . . . . . . . . . . . . . . . . . 15
4.3 - Sensor and Solenoid (Independent) . . . . . . . . . . . . . . . . . . . . . . . . . . . . . . . . . . . . . . 15
4.4 - Cable Gland Connections . . . . . . . . . . . . . . . . . . . . . . . . . . . . . . . . . . . . . . . . . . . 15
5.0 - Sensor Part Numbers . . . . . . . . . . . . . . . . . . . . . . . . . . . . . . . . . . . . . . . . . . . . . . . 16
6.0 - Required Tools . . . . . . . . . . . . . . . . . . . . . . . . . . . . . . . . . . . . . . . . . . . . . . . . . . . 16
Series 54 Proximity Sensors
Installation, Operation and Maintenance Manual
2 |BRAY.COM
1.1 - Hazard-free Use
This device left the factory in proper condition to be safely
installed and operated in a hazard-free manner. The notes and
warnings in this document must be observed by the user if this
safe condition is to be maintained and hazard-free operation
of the device assured.
• Take all necessary precautions to prevent damage due to rough
handling, impact, or improper storage. Do not use abrasive
compounds to clean, or scrape its surfaces with any objects.
• Configuration and calibration procedures are described in this
document. Proper configuration and calibration is required
for the safe operation of this product.
• The control system in which the unit is installed must have
proper safeguards to prevent injury to personnel, or damage
to equipment, should failure of system components occur.
• This document does not cover every detail about every version
of the product described. It cannot take into account every
potential occurrence in installation, operation, maintenance
and use.
• If situations transpire that are not documented in sufficient
detail, please request the required information from the
Bray Distributor or Representative responsible for your area.
1.2 - Qualified Personnel
A qualified person in terms of this document is one who is
familiar with the installation, commissioning and operation of
the product and who has appropriate qualifications, such as:
• Is trained in the operation and maintenance of pneumatic
pressure equipment and systems in accordance with
established safety practices.
• Is trained or authorized to energize, de-energize, ground,
tag and lock electrical circuits and equipment in accordance
with established safety practices.
• Is trained in the proper use and care of personal protective
equipment (PPE) in accordance with established safety
practices.
• Is trained in first aid.
• In cases where the device is installed in a potentially
explosive (hazardous) location – is trained in the operation,
commissioning, and maintenance of equipment in hazardous
locations.
Read and Follow These Instructions
Save These Instructions
1.0 - Definition of Terms
indicates a potentially hazardous situation which, if not avoided, could result in death
or serious injury.
indicates a potentially hazardous situation which, if not avoided, may result in minor or
moderate injury.
NOTICE used without the safety alert symbol indicates a potential situation which, if not avoided,
may result in an undesirable result or state, including property damage.

Series 54 Proximity Sensors
Installation, Operation and Maintenance Manual
SERIES 54 PROXIMITY SENSORS | 3
2.0 - Introduction
Note: The following information is intended to assist
individuals with the use and support of the Bray Series 54
Proximity Sensors.
The Series 54 Proximity Sensor has been designed to provide
valve position indication utilizing various signal types. Each
of these configurations will be covered in more detail on the
pages that follow.
All Bray S54 Proximity Sensors utilize solid state switches.
Although the solid state switch performs the same function
as a conventional mechanical switch, there are differences in
the way solid state switches operate.
NOTICE
It is very important for the user to pay close attention
to the exact specifications of their sensor in order to
avoid damaging the unit.
Solid state switches have current restrictions imposed by the
semi conducting materials used to form the sensor. These
current limitations have to be accounted for during setup.
Unlike mechanical switches, which can normally handle several
amperes of current flowing through them, solid state switches
are generally rated for half an ampere or less.
NOTICE
The electrical characteristics of the S54 must be
compatible with the application
When working with the S54, several parameters must be
considered. A few of which (with significant importance) are
listed here:
• operating voltage
• maximum switching current
• output voltage drop
• residual current.
Using an S54 outside of these parameter limits can cause
damage to the unit and void factory warranty.
Operating voltage is the amount of voltage necessary for the
sensor to operate. The maximum switching current is the largest
amount of current that the sensor’s solid state electronics can
have flowing through them in the on-state (when the target is
in proximity of the sensor). During commissioning, it is up to
the user to correctly apply the sensor to their control system in
order to limit the current flowing through the device. All the
necessary information can be found in the technical manual.
Output voltage drop is defined as the amount of voltage that will
drop across the solid state switch. This voltage drop will often
vary with the amount of current flowing through the sensor
and the load. This drop in voltage becomes paramount when
connecting several proximity sensors in series, each unit will have
a voltage drop across it – adding each subsequent drop and
subtracting from the supply voltage yields the resulting voltage
at the end of the series connection. The user needs to ensure
that the supply voltage is large enough so that the resulting
voltage after all the drops is above the minimum operating
voltage of the last S54 in the series connection. Sensors located
a great distance from the load require consideration as well, as
a general rule, every 1000 ft. of wire will have a resistance of
10Ω (see electrical code references for the resistance value of
specific wire sizes). It is important for the customer to ensure
that the distance between the S54 and the control panel is
not long enough to cause the voltage drop to fall below the
minimum operating voltage of the sensor.
Residual current is often referred to as leakage current. In the
“off” state (target is NOT in proximity of the sensor) the sensor
draws a small amount of current in order to power the device’s
electronics. This is necessary for the device to sense the target
at any point in time when the supply voltage is applied. It is
important that this residual current is below the maximum
off-state current rating of the control system.
2.1 - Pre-installed Storage
Bray Series 54 Proximity Sensors are not weatherproof until
the unit is properly installed, or all conduits and applicable
port connections are sealed off and prepared for storage. The
units may be shipped with temporary covers to prevent foreign
matter from entering through the conduit openings; however,
the user is responsible for replacing with the proper sealing
plugs to support its NEMA/IP ratings.
To prevent condensation from forming inside the unit, maintain
a near constant external temperature and store indoors in a
well ventilated, clean, dry room. The temperature shall be
between 40°F (4°C) and 85°F (29°C), with a relative humidity
less than 70%. Store units away from vibration and direct
sunlight exposure, and place units on a shelf or wooden pallet
in order to protect against dampness. Keep units covered to
protect against dust and dirt; if storing for long term, placing
the unit inside a plastic sealed bag may be preferred.
Bray cannot accept responsibility for deterioration caused on-
site once the cover is removed or due to improper storage.
2.2 - S54 Sensor Part Numbering
V
ersion
00: Plastic Base
01: Aluminum Base
Housing
0: Large Housing with Connector
1: Large Housing with Conduit Entry
2: Small Housing with Connector
3: Small Housing with Conduit Entry
4: Large Housing with Rd24 Connection
Electrical Output
1: DC 3 wire PNP
2: DC 2 wir
e Dual Function
3: Intrinsically Safe
4: AC/DC
5: AS-i

Series 54 Proximity Sensors
Installation, Operation and Maintenance Manual
4 |BRAY.COM
2.3 - Activator Kit
Smallest
Actuator Size
For S92/93
0:
Imperial
5: Metric
A: Adjustable
B: Non-Adjustable
C: High Visibility
2.4 - S54 Operation Overview
Bray’s inductive sensors use a contactless indication system
designed to monitor the position of rotary devices. An activator
is mounted on to the actuator center pinion. As the valve is
actuated the open and close positions are measured by the
rotation of the activator. The activator contains a metal insert
that activates the corresponding inductive switch in the sensor.
This activation is relayed to the end user to validate valve position.
R
IND.CONT.EQ.
57M3
12
540041-71104533
DC 3-Wire PNP + Out
10-30 V DC / 100 mA
II I
Made in Czech Republic
valve
PWR
4
L-
SII
V-
V+
V+
V-
3
2
1
5
6
4
3
5
I
II
II I
SI
L+
R
IND.CONT.EQ.
57M3
12
540041-71104533
DC 3-Wire PNP + Out
10-30 V DC / 100 mA
II I
Made in Czech Republic
valve
PWR
4
L-
SII
V-
V+
V+
V-
3
2
1
5
6
4
3
5
I
II
II I
SI
L+
R
IND.CONT.EQ.
57M3
12
540041-71104533
DC 3-Wire PNP + Out
10-30 V DC / 100 mA
II I
Made in Czech Republic
valve
PWR
4
L-
SII
V-
V+
V+
V-
3
2
1
5
6
4
3
5
I
II
II I
SI
L+
540022-71104533
5-30V DC / 100mA
DC 2-Wire PNP/NPN
3
4
L+
L-
L+
1
L-
I
II
2
I
II
I II
Made in Czech Republic
R
540022-71104533
5-30V DC / 100mA
DC 2-Wire PNP/NPN
3
4
L+
L-
L+
1
L-
I
II
2
I
II
I II
Made in Czech Republic
R
540022-71104533
5-30V DC / 100mA
DC 2-Wire PNP/NPN
3
4
L+
L-
L+
1
L-
I
II
2
I
II
I II
Made in Czech Republic
R
Operations
Bray’s S54 Sensors contain two proximity switches in a
hermetically sealed housing. Location of switches are designated
by a “+” or roman numerals Iand II.
R
IND.CONT.EQ.
57M3
12
540041-71104533
DC 3-Wire PNP + Out
10-30 V DC / 100 mA
II I
Madein Czech Republic
valve
PWR
4
L-
SII
V-
V+
V+
V-
3
2
1
5
6
4
3
5
I
II
II I
SI
L+
R
IND.CONT.EQ.
57M3
12
540041-71104533
DC 3-Wire PNP + Out
10-30 V DC / 100 mA
II I
Made in Czech Republic
valve
PWR
4
L-
SII
V-
V+
V+
V-
3
2
1
5
6
4
3
5
I
II
II I
SI
L+
540022-71104533
5-30V DC / 100mA
DC 2-Wire PNP/NPN
3
4
L+
L-
L+
1
L-
I
II
2
I
II
I II
Made in Czech Republic
R
540022-71104533
5-30V DC / 100mA
DC 2-Wire PNP/NPN
3
4
L+
L-
L+
1
L-
I
II
2
I
II
I II
Made in Czech Republic
R
540022-71104533
5-30V DC / 100mA
DC 2-Wire PNP/NPN
3
4
L+
L-
L+
1
L-
I
II
2
I
II
I II
Made in Czech Republic
R
540022-71104533
5-30V DC / 100mA
DC 2-Wire PNP/NPN
3
4
L+
L-
L+
1
L-
I
II
2
I
II
I II
Made in Czech Republic
R
540022-71104533
5-30V DC / 100mA
DC 2-Wire PNP/NPN
3
4
L+
L-
L+
1
L-
I
II
2
I
II
I II
Made in Czech Republic
R
540022-71104533
5-30V DC / 100mA
DC 2-Wire PNP/NPN
3
4
L+
L-
L+
1
L-
I
II
2
I
II
I II
Made in Czech Republic
R
R
IND.CONT.EQ.
57M3
12
540041-71104533
DC 3-Wire PNP + Out
10-30 V DC / 100 mA
II I Made in Czech Republic
valve
PWR
4
L-
SII
V-
V+
V+
V-
3
2
1
5
6
4
3
5
I
II
II I
SI
L+
R
IND.CONT.EQ.
57M3
12
540041-71104533
DC 3-Wire PNP + Out
10-30 V DC / 100 mA
II I
Made in Czech Republic
valve
PWR
4
L-
SII
V-
V+
V+
V-
3
2
1
5
6
4
3
5
I
II
II I
SI
L+
Based on the position of the pinion/activator one of the metal
inserts on the activator will be directly in front of the switch.
When the valve is open, one of the metal inserts is directly in
front of the sensor. This signals the end user of an open signal
and illuminates the corresponding LED. When the valve is
closed the other metal insert activates the second switch. This
signals the end user a closed signal and illuminates the second
LED. The function of each switch can be selected by the end
user. This can be done by adjusting the activator to match the
actuator position (see Section 3.2.4) or by configuring the PLC.
All activators can be configured to be used for clockwise or
counter-clockwise valve operation.
Series 54 Proximity Sensors
Installation, Operation and Maintenance Manual
SERIES 54 PROXIMITY SENSORS | 5
3.0 - Activator
All S54 sensors are offered with a dedicated activators. Configurations for installation vary based on the application of the
sensor and its mating components.
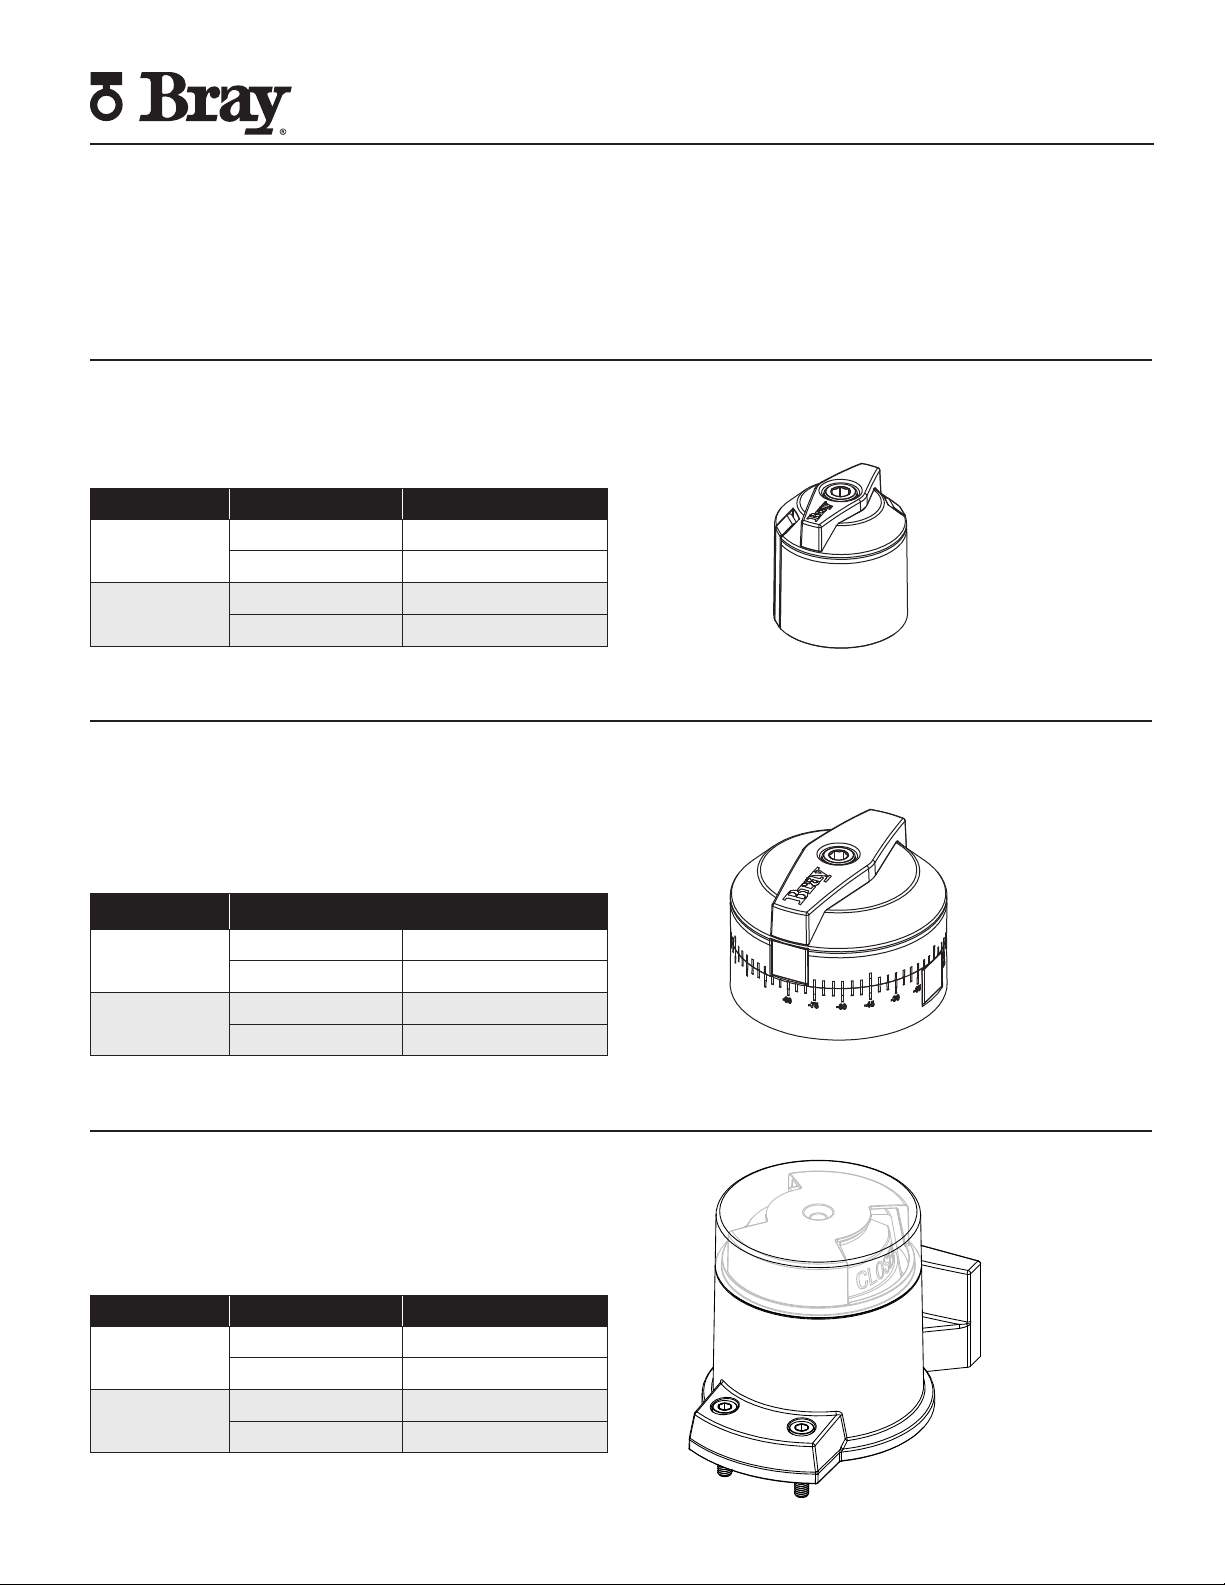
3.1 - Selection
Activator and sensor combinations reference the following charts:
High Visibility Activator
For Sensor PN: 540001-71104533 540013-71104533
540003-71104533 540015-71104533
540004-71104533 540041-71104533
540005-71104533 540043-71104533
Thread Type S92/93 Size Activator Kit PN
Imperial 63 - 128 54063C-14800536
160 - 210 54160C-14800536
Metric 63 - 128 54063C-14850536
160 - 255 54160C-14850536
Note: The Series 98 Scotch Yoke actuator will utilize activator
PN 54063C-14850536.
Adjustable Activator
For Sensors PN: 540001-71104533 540013-71104533
540003-71104533 540015-71104533
540004-71104533 540041-71104533
540005-71104533 540043-71104533
Thread Type S92/93 Size Activator Kit PN
Imperial 63 - 128 54063A-14800536
119 - 210 54160A-14800536
Metric 63 - 128 54063A-14850536
160 - 255 54160A-14850536
Note: The Series 98 Scotch Yoke actuator will utilize activator
PN 54063A-14850536.
Fixed Activator
For Sensors PN: 540021-71104533
540022-71104533
540032-71104533
Thread Type S92/93 Size Activator Kit PN
Imperial 63 - 93 54063B-14800536
119 - 210 54119B-14800536
Metric 63 - 93 54063B-14850536
119 - 255 54119B-14850536
Note: The Series 98 Scotch Yoke actuator will utilize activator
PN 54063B-14850536.
Series 54 Proximity Sensors
Installation, Operation and Maintenance Manual
6 |BRAY.COM
Size 63 to 93
NAMUR 30x80mm 1
2
Kit No. 54063B-14800536
1Capscrew M6 30mm Long
2Capscrew #10-32 1” Long
Kit No. 54063B-14850536
1Capscrew M6 30mm Long
2Capscrew M5 25mm Long
Discard unused hardware
Size 119 to 128
NAMUR 30x80mm
1
2
Kit No. 54119B-14800536
1Capscrew M6 45mm Long
2Capscrew #10-32 2.25” Long
Kit No. 54119B-14850536
1Capscrew M6 45mm Long
2Capscrew M5 55mm Long
Discard unused hardware
1
2
3
Size 160 to 255
NAMUR 30x130mm
Kit No. 54119B-14850536
1Capscrew M6 45mm Long
2Capscrew #10-32 1” Long
3Countersunk screw M5 35mm Long
Discard unused hardware
Kit No. 54119B-14800536
1Capscrew M6 45mm Long
Not
applicable for
size 255
2Capscrew #10-32 1” Long
3Countersunk screw #10-32 1.5” Long
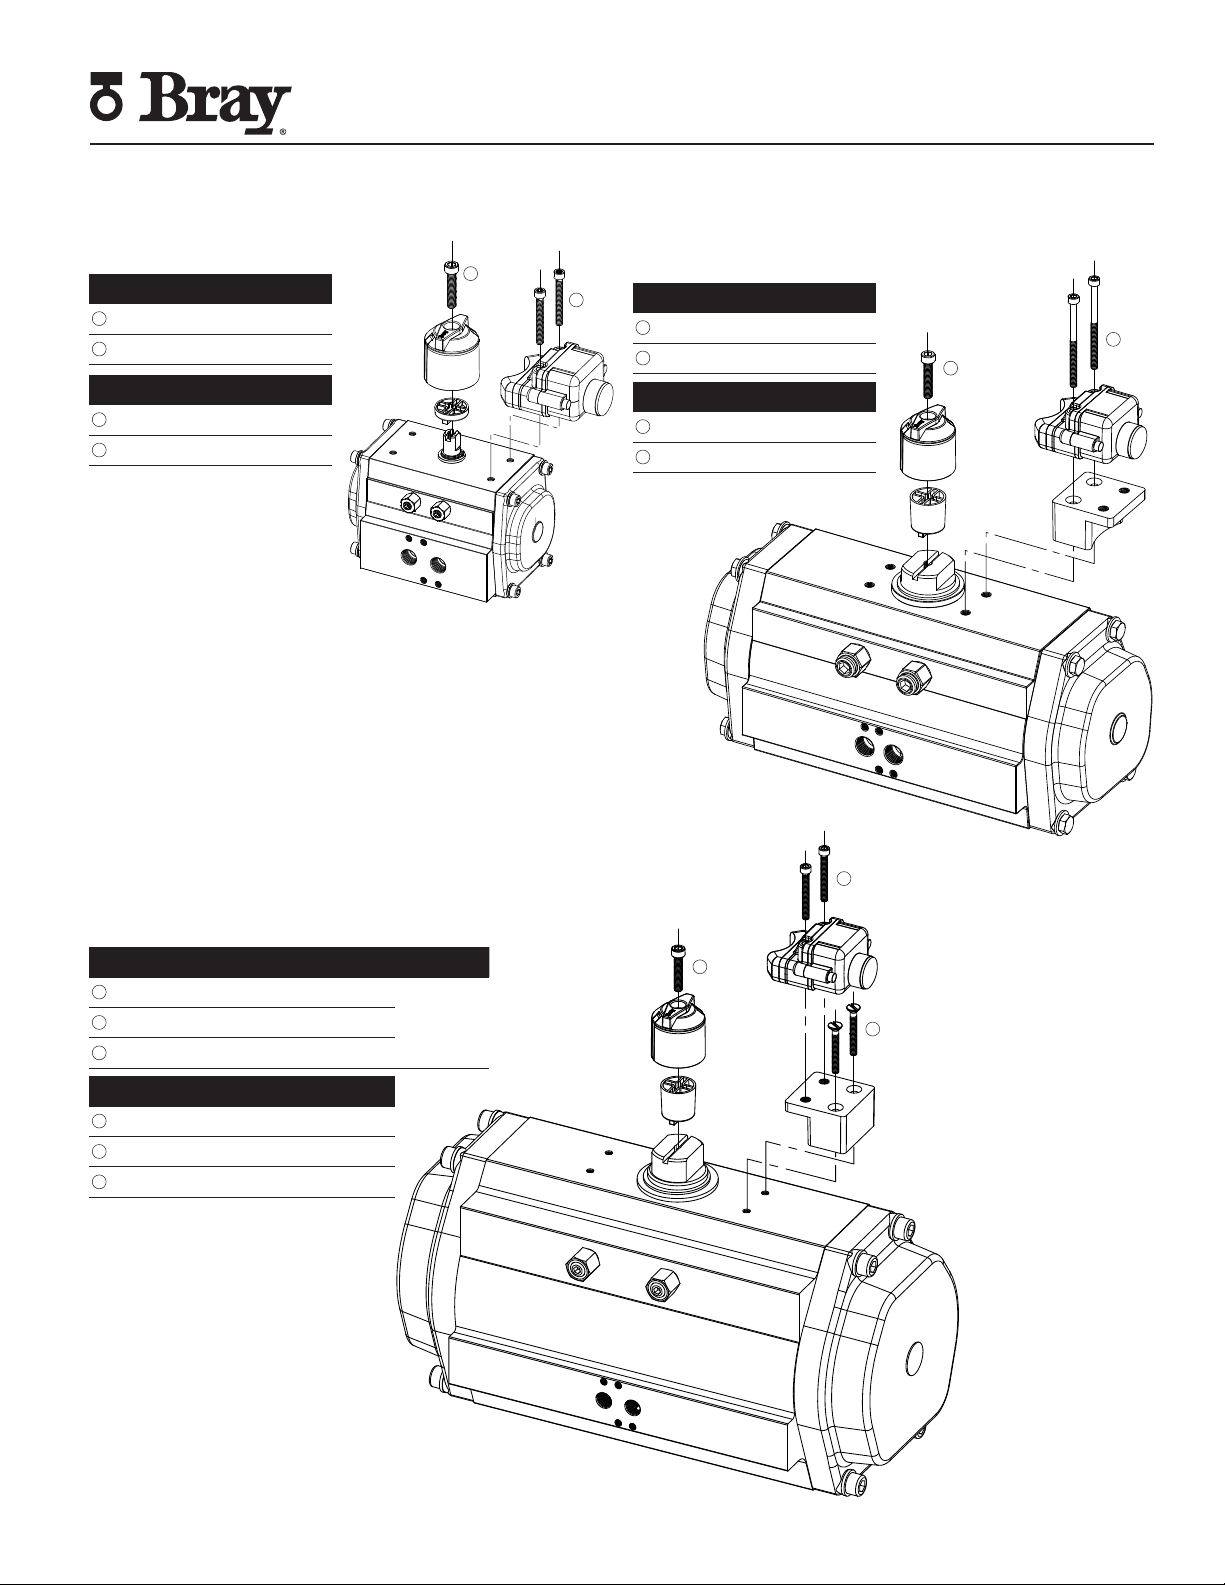
3.2 - Mounting
Mounting will vary based on the application in which it is used. All activators come with the necessary hardware for sensor
and activator mounting. Hardware kits fit multiple actuator sizes, therefore some hardware may be left over after installation.
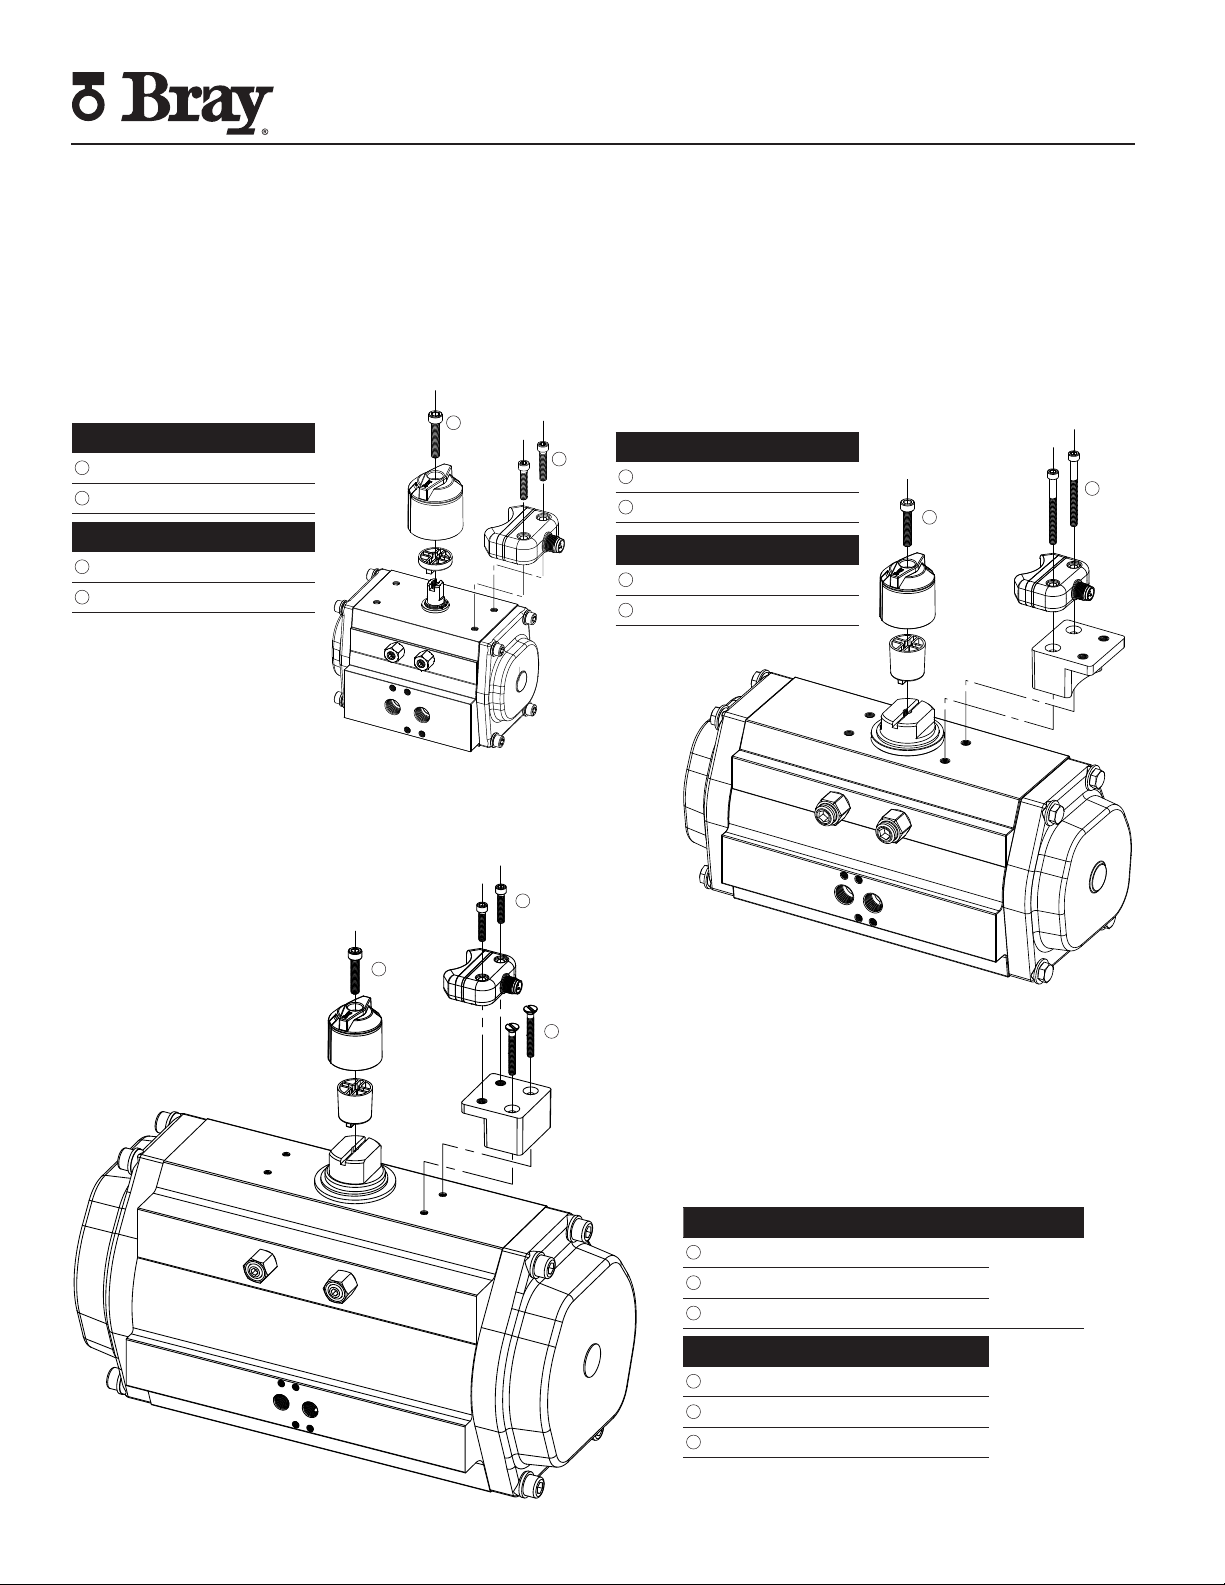
3.2.1 - Fixed Activator - Rack and Pinion Actuator
Series 54 Proximity Sensors
Installation, Operation and Maintenance Manual
SERIES 54 PROXIMITY SENSORS | 7
3.2.1 - Fixed Activator - Rack and Pinion Actuator (continued)
Size 63 to 93
NAMUR 30x80mm 1
2
Kit No. 54063B-14800536
1Capscrew M6 30mm Long
2Capscrew #10-32 1.5” Long
Kit No. 54063B-14850536
1Capscrew M6 30mm Long
2Capscrew M5 40mm Long
Discard unused hardware
Size 119 to 128
NAMUR 30x80mm
1
2
Kit No. 54119B-14800536
1Capscrew M6 45mm Long
2Capscrew #10-32 2.75” Long
Kit No. 54119B-14850536
1Capscrew M6 45mm Long
2Capscrew M5 70mm Long
Discard unused hardware
Size 160 to 255
NAMUR 30x130mm
Kit No. 54119B-14850536
1Capscrew M6 45mm Long
2Capscrew #10-32 1.5” Long
3Countersunk screw M5 35mm Long
Discard unused hardware
1
2
3
Kit No. 54119B-14800536
1Capscrew M6 45mm Long
Not
applicable for
size 255
2Capscrew #10-32 1.5” Long
3Countersunk screw #10-32 1.5” Long

Series 54 Proximity Sensors
Installation, Operation and Maintenance Manual
8 |BRAY.COM
3.2.2 - Adjustable Activator - Rack and Pinion Actuator
Size 63 to 128
NAMUR 30x80mm
Size 160 to 255
NAMUR 30x130mm
Kit No. 54063A-14800536
1Capscrew M6 30mm Long
2Capscrew #10-32 7/16” Long
1
1
2
Kit No. 54063A-14850536
1Capscrew M6 30mm Long
2Capscrew M5 12mm Long
Kit No. 54160A-14800536
1Capscrew M6 40mm Long
Not
applicable for
size 255
2Capscrew #10-32 7/16” Long
3Countersunk screw #10-32 1” Long
Kit No. 54160A-14850536
1Capscrew M6 40mm Long
2Capscrew #10-32 7/16” Long
3Countersunk screw M5 25mm Long
12
3
Series 54 Proximity Sensors
Installation, Operation and Maintenance Manual
SERIES 54 PROXIMITY SENSORS | 9
Size 63 to 128
NAMUR 30x80mm
Kit No. 54063A-14800536
1Capscrew M6 30mm Long
2Capscrew #10-32 5/8” Long
Kit No. 54063A-14850536
1Capscrew M6 30mm Long
2Capscrew M5 15mm Long
3.2.2 - Adjustable Activator - Rack and Pinion Actuator continued
1
1
2
Size 160 to 255
NAMUR 30x130mm
Kit No. 54160A-14800536
1Capscrew M6 40mm Long
Not
applicable for
size 255
2Capscrew #10-32 5/8” Long
3Countersunk screw #10-32 1” Long
Kit No. 54160A-14850536
1Capscrew M6 40mm Long
2Capscrew #10-32 5/8” Long
3Countersunk screw M5 25mm Long
12
3

Series 54 Proximity Sensors
Installation, Operation and Maintenance Manual
10 |BRAY.COM
Size 63 to 128
NAMUR 30x80mm
Kit No. 54063C-14800536
1Capscrew M6 30mm Long
2Capscrew #10-32 5/8” Long
3Capscrew #10-32 Captive
Kit No. 54063C-14850536
1Capscrew M6 30mm Long
2Capscrew M5 15mm Long
3Capscrew M5 Captive
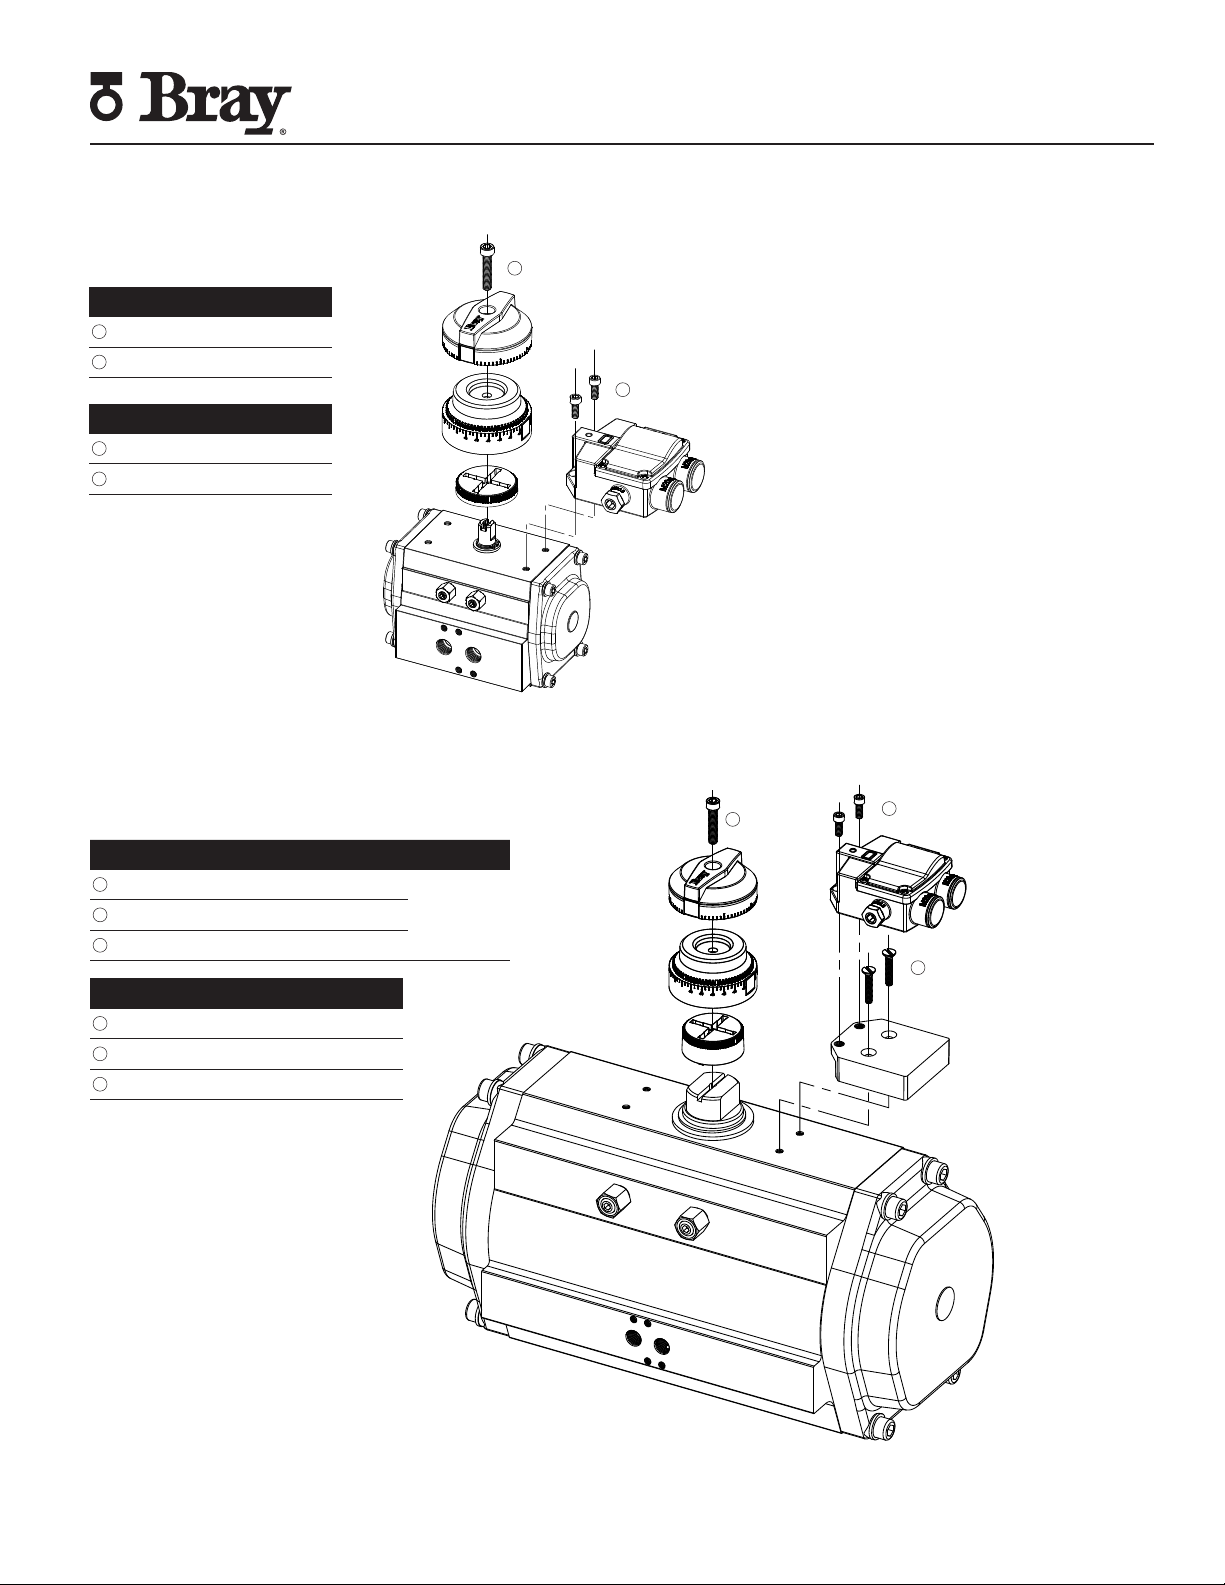
3.2.3 - Adjustable High Visibility Activator - Rack and Pinion Actuator
1
2
3
Size 160 to 255
NAMUR 30x130mm
Kit No. 54160C-14800536
1Capscrew M6 40mm Long
Not
applicable for
size 255
2Capscrew #10-32 5/8” Long
3Capscrew #10-32 Captive
4Capscrew #10-32 5/8” Long
Kit No. 54160C-14850536
1Capscrew M6 40mm Long
2Capscrew M5 15mm Long
3Capscrew M5 Captive
4Capscrew M5 16mm Long
1
2
3
4

Series 54 Proximity Sensors
Installation, Operation and Maintenance Manual
SERIES 54 PROXIMITY SENSORS | 11
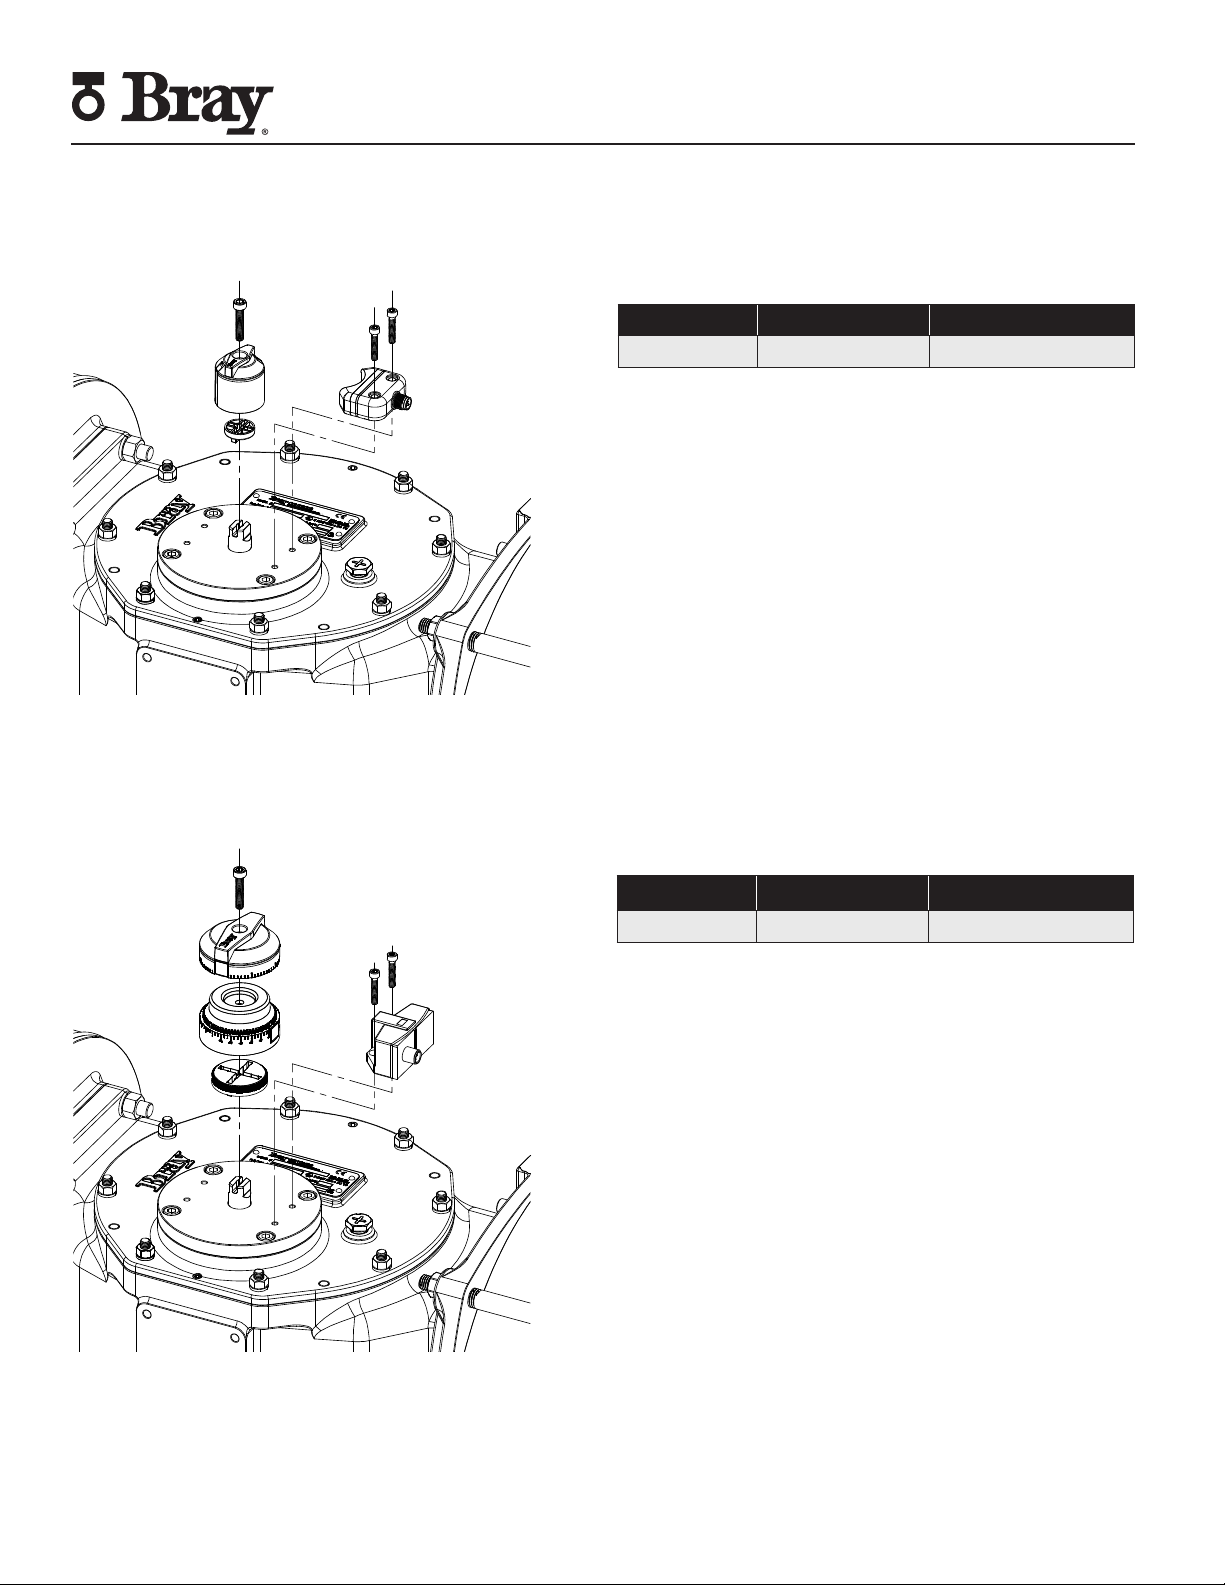
Size 63 to 128
NAMUR 30x80mm
Kit No. 540102-12600536
1Sensor 540102-71104533
2Activator assembly
3Protective cover - Zone 2/22
Socket head capscrew #10-32X1/2, SS
3.2.4 - Hazardous Location Proximity Sensor Kit - Rack and Pinion Actuator
1
2
3
Size 160 to 255
NAMUR 30x130mm
Kit No. 540102-12601536
1Sensor 540102-71104533
Not
applicable for
size 255
2Activator assembly
3Protective cover - Zone 2/22
4Mounting plate assembly
5Socket head capscrew #10-32X3/8, SS
Kit No. 540102-12651536
1Sensor 540102-71104533
2Activator assembly
3Protective cover - Zone 2/22
4Mounting plate assembly
5Socket head capscrew M5X0.8X10, SS
1
2
3
4
4
Kit No. 540102-12650536
1Sensor 540102-71104533
2Activator assembly
3Protective cover - Zone 2/22
Socket head capscrew M5X0.8X12, SS
4
4
5
Series 54 Proximity Sensors
Installation, Operation and Maintenance Manual
12 |BRAY.COM
3.2.5 - Scotch Yoke Actuator
S98 mounting pattern matches rack and pinion size 63. Reference corresponding tables for mounting.
Thread Type S98 Activator Kit PN
Metric All Sizes 54063B-14850536
Fixed Activator
Thread Type S98 Activator Kit PN
Metric All Sizes 54063A-14850536
Adjustable Activator
Series 54 Proximity Sensors
Installation, Operation and Maintenance Manual
SERIES 54 PROXIMITY SENSORS | 13
Thread Type S98 Activator Kit PN
Metric All Sizes 54063C-14850536
Adjustable High Visibility Activator
Thread Type S98 Activator Kit PN
Metric All Sizes 540102-12650536
Hazardous Location Proximity Sensor Kit

Series 54 Proximity Sensors
Installation, Operation and Maintenance Manual
14 |BRAY.COM
1
1
3.3 - Adjusting the Activator
Adjustable activators are for customers that want the flexibility
to position their indication limits outside of the standard zero
to ninety degrees. The three pieces of the adjustable activator
can be rotated in five degree increments. To adjust follow the
steps below:
1. Loosen the allen head bolt which holds the three pieces
of the activator on the pinion.
2. Rotate the relevant piece until the desired amount of travel
is achieved.
a. Use the incremental degree marks on the activator
for reference.
3. Ensure the yellow indicator is set to match the valve disc
position.
4. Tighten the allen head bolt.
3.4 - Adjustable High Visibility Activator
1. Remove the two activator cover bolts.
2. Remove activator cover by pulling up and away from the
actuator.
3. Loosen center allen head bolt holding the activator to the
pinion.
4. Rotate the relevant piece of the activator until the desired
amount of rotation is achieved.
a. Insure that the open and close activator is visible when
the cover shield is installed.
5. Re-tighten the center allen head bolt locking the activator
to the pinion.
6. Install the cover and mounting bolts.
Series 54 Proximity Sensors
Installation, Operation and Maintenance Manual
SERIES 54 PROXIMITY SENSORS | 15
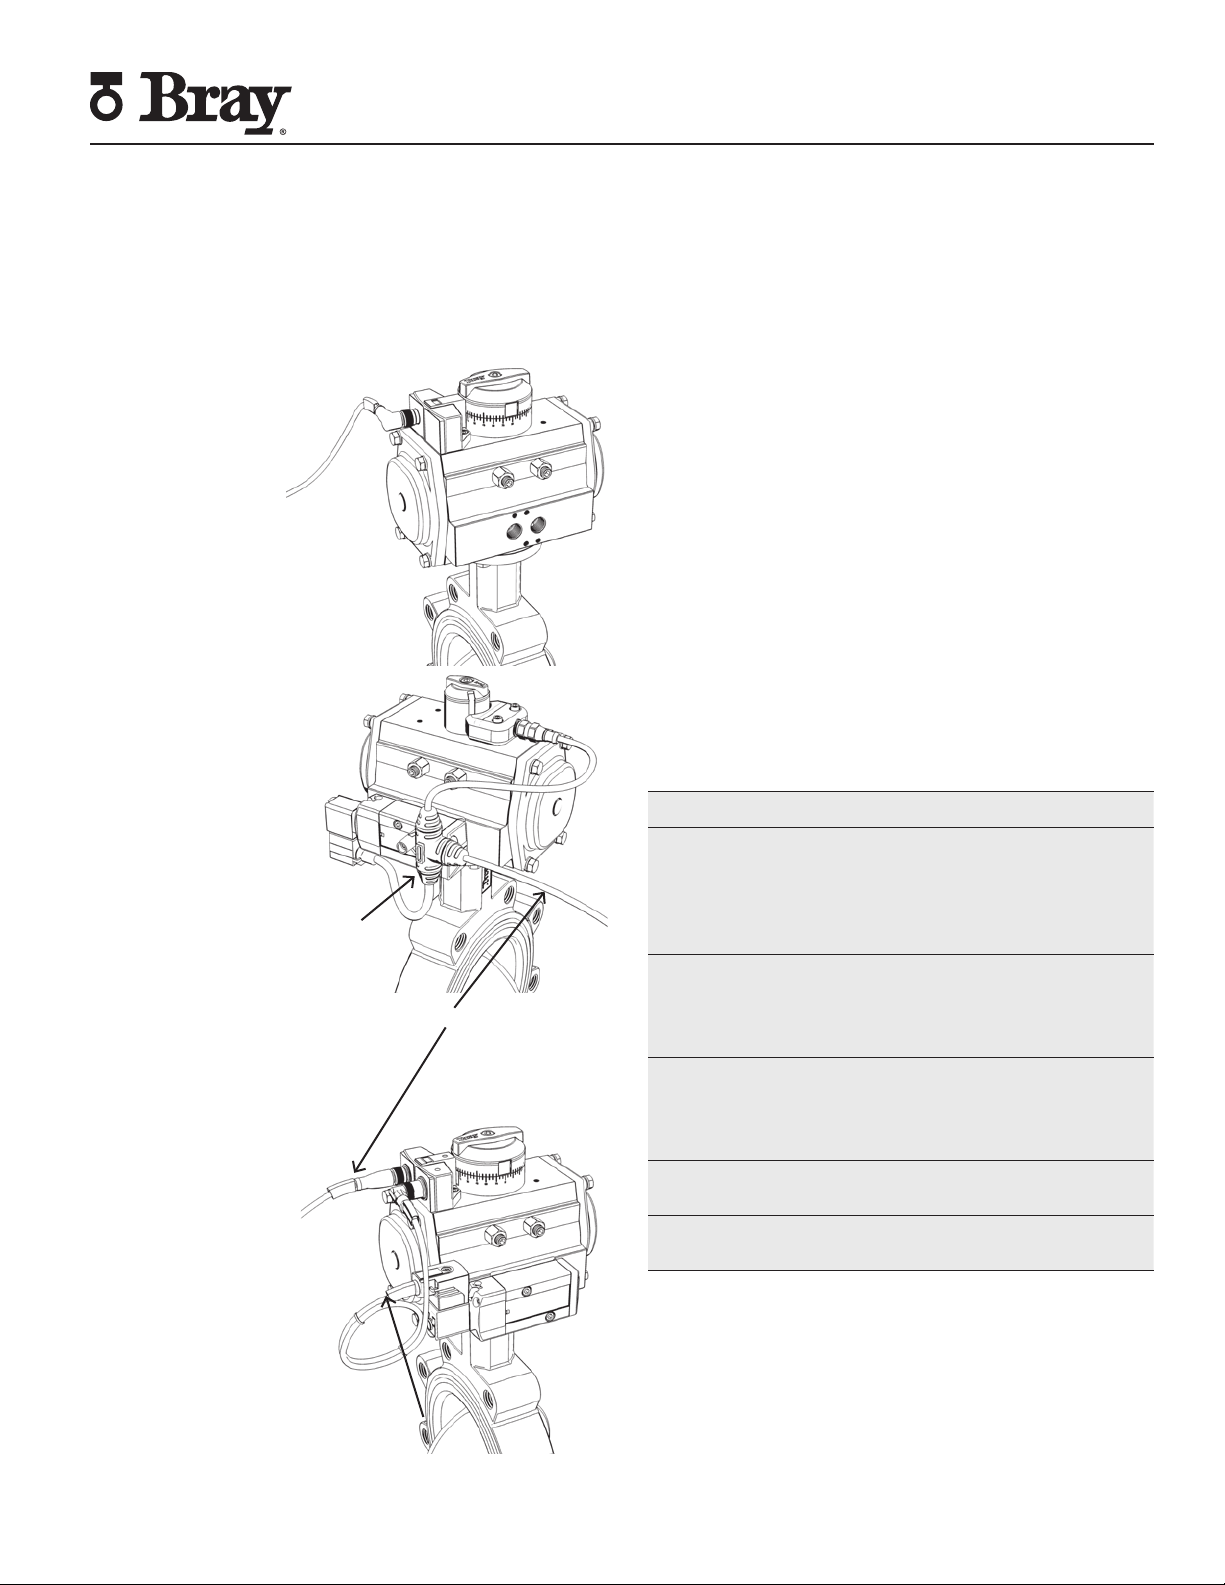
4.0 - Connections (Operation)
Bray offers three different connections to satisfy the customer’s
application requirements. Each sensor’s pin connection is
listed in its respective technical manual. Turn off all power and
lockout/tag out service panel before installing or modifying
any electrical wiring.
4.3 - Sensor
and Solenoid
(Independent)
Bray also offers sensors
with dedicated solenoid
outputs. In this set up the
sensor signaland solenoid
power are transmitted on
the main system side line.
The solenoid is activated
via power supplied from
the sensor through the
S-connector. S-connector
selection can be found
in the sensor technical
manual.
4.2 - Sensor and
Solenoid (Shared)
Y-connectors are used to
allow solenoid control on
sensors without dedicated
solenoid outputs. The
system side line carries
both the sensor and
solenoid power. The
system side line splits to
supply power and signal
to sensor and solenoid.
4.1 - Sensor Only
Sensor connection sup-
plies sensor power and
signal output.
System side
S-connector
4.4 - Cable Gland Connections
M20 cable gland connections are found on the following
sensors:
540032-71104533
540013-71104533
540015-71104533
540102-71104533 (included in Kit PN 540102-126xx536)
In order to field-wire these models, follow these guidelines.
1.Take the sensor cover off. The cover should be kept on
hand for reference.
2.Wire the sensor as per the wiring diagram on the outside
of the sensor cover or technical specification sheet.
3.Close the cover and securely tighten cover screws
Range of wire size gauge acceptable
(single conductor per terminal)
General: 16 to 28AWG
Industrial: 14 to 22AWG
Hazardous: 14 to 22AWG
NOTICE
Cable glands used must be certified in accordance
with the application. The temperature range of cable
glands must be selected according to application. The
degree of ingress protection must not be reduced by
cable glands.
The cable gland connections must be properly sealed
to maintain the Ingress Protection rating of the S54
sensor. Use a seal that meet the requirements of the
application.
If the sensor is mounted on a vertical pipe, it is
recommended that the sensor be positioned with the
cable glands on the bottom to prevent condensation
from entering the sensor through its conduits.
In all cases, the conduit should be positioned to prevent
drainage into the sensor
Ensure adequate drainage of wiring conduit to prevent
water contamination inside sensor
Y-connector

Series 54 Proximity Sensors
Installation, Operation and Maintenance Manual
5.0 - Sensor Part Numbers
Bray Part Number Electrical Output
540021-71104533 DC 3-wire PNP
540022-71104533 DC 2-wire
540032-71104533 DC 2-wire
540001-71104533 DC 3-wire PNP
540003-71104533 Intrinsically Safe
540013-71104533 Intrinsically Safe
540015-71104533 ASi-Interface + Out
540005-71104533 ASi-Interface + Out
540004-71104533 AC/DC
540041-71104533 DC 3w-wire PNP
540102-71104533* DC 2 Wire - Hazardous Location + Out
*Included in Kit PN 540102-126xx536
6.0 - Required Tools
#5 Hex key wrench
#4 Hex key wrench
5/32 Hex key wrench
Screw Driver - Philips, 3/16”
Screw Driver - Flat, 1/8”

Series 54 Proximity Sensors
Installation, Operation and Maintenance Manual
SERIES 54 PROXIMITY SENSORS | 17

Series 54 Proximity Sensors
Installation, Operation and Maintenance Manual
All statements, technical information, and recommendations in this bulletin are for general use only.
Consult Bray representatives or factory for the specific requirements and material selection for your intended
application. The right to change or modify product design or product without prior notice is reserved.
Patents issued and applied for worldwide.
Bray®is a registered trademark of Bray International, Inc.
© 2020 Bray International, Inc. All rights reserved. Series 54 IOM_8-2020
HEADQUARTERS
Bray International, Inc.
13333 Westland East Blvd.
Houston, Texas 77041
Tel: 281.894.5454
bray.com
Other manuals for 54 Series
1
Table of contents
Other Bray Accessories manuals


