BRAYER BR1608 User manual

Instruction manual
Инструкция по эксплуатации
Meat grinder BR1608
Мясорубка BR1608
brayer.ru

СОДЕРЖАНИЕ
EN......................................................................................................................................3
DE....................................................................................................................................14
RU ...................................................................................................................................26
KZ....................................................................................................................................38

3
EN
MEAT GRINDER BR1608
The electric meat grinder is intended for making minced
meat or minced sh, making homemade semi-nished
products and processing vegetables.
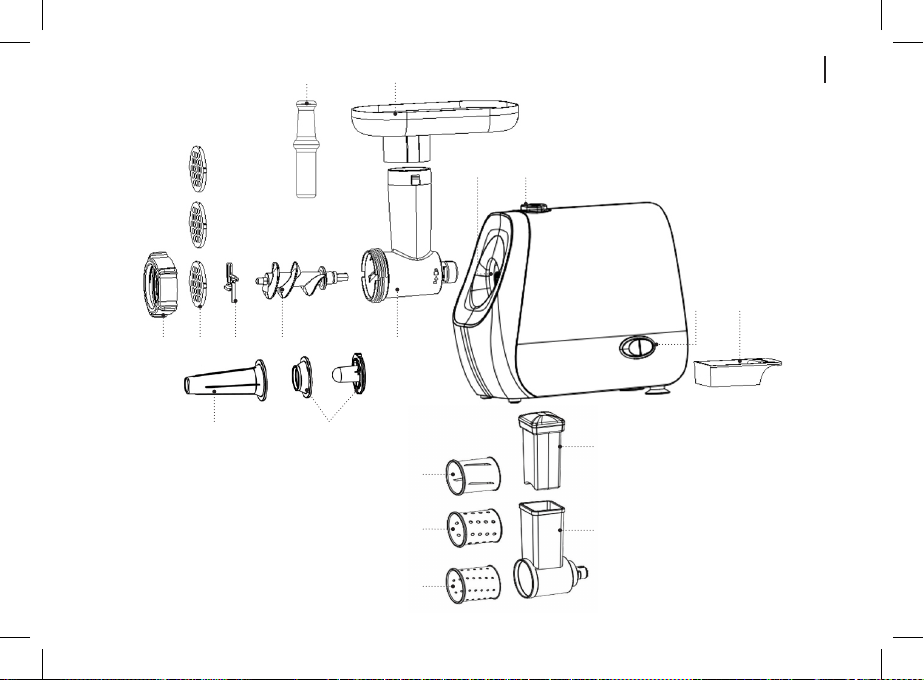
DESCRIPTION
1. Operation mode switch (ON/O/R)
2. Cutting plate tray
3. Meat grinder head lock button
4. Meat grinder head installation place
5. Pusher
6. Food tray
7. Meat grinder head body
8. Screw
9. Crossed blade
10. Coarse and ne cutting plates
11. Meat grinder head nut
12. Sausage lling attachment
13. Kebbe attachment
14. Vegetable slicing attachment
15. Coarse grater
16. Potato mud cutting attachment
17. Vegetable slicer pusher
18. Vegetable slicer
EN

4
EN
1
4
2
3
6
5
78910
1312
17
18
14
15
16
11
5
EN
Рiс. 1
Рiс. 7
Рiс. 4
Рiс. 2
Рiс. 8
Рiс. 5
Рiс. 3
Рiс. 9 Рiс. 10
Рiс. 6

6
EN
SAFETY MEASURES AND OPERATION
RECOMMENDATIONS
Read the operation manual carefully before using
the meat grinder; after reading, keep it for future
reference.
• Use the unit for its intended purpose only, as it is
stated in this manual.
• Mishandling the meat grinder can lead to its
breakage and cause harm to the user or damage to
his/her property and it is not covered by warranty.
• Make sure that the operating voltage of the unit
indicated on the label corresponds to your home
mains voltage.
ATTENTION! Continuous operation time should
not exceed 30 minutes, after that make at least 30
minutes break.
• Do not use the unit outdoors.
• It is recommended not to use the unit during lightning
storms.
• Place and use the meat grinder only on a dry at and
stable surface, away from heat sources, open ame
and direct sunlight.
• Do not use the unit near heating appliances, heat
sources or open ame.
• Do not use the meat grinder in places where aerosols
are stored, used or sprayed, and in proximity to
inammable liquids.
• Protect the unit from blows, drops, vibrations and
other mechanical stress.
• Do not block the ventilation openings on the unit
body during the meat grinder operation; this may lead
to the electric motor overheating.
• Never leave the unit connected to the mains
unattended.
• Do not immerse the meat grinder body, the power
cord or the power plug into water or any other liquids.
• Do not use the unit in proximity to the kitchen sink, in
bathrooms, near swimming pools or other containers
lled with water.
• If the unit is dropped into water, unplug it
immediately, and only then you can take the unit out
of water. Apply to the authorized service center for
testing or repairing the unit.
• Do not let the power cord touch hot surfaces and
sharp edges of furniture.
• Handle the power cord with care, avoid twisting it and
periodically straighten the cord.
• Do not use the power cord as a carrying handle for
the meat grinder.
• Do not touch the unit body, the power cord and the
power plug with wet hands.
• Unplug the unit after usage or before cleaning. When
unplugging the unit, hold the power plug and carefully
remove it from the mains socket, do not pull the
power cord, as this can lead to its damage and cause
a short circuit.

7
EN
• Before using the unit for the rst time, wash thoroughly
all the removable parts of the meat grinder that will
contact food.
• Use only the parts supplied with the meat grinder.
• Before switching the unit on, make sure that all parts of
the meat grinder are installed properly.
• Regularly clean the meat grinder body and the parts
which were used during the operation.
• For child safety reasons do not leave polyethylene
bags used as packaging unattended.
ATTENTION! Do not allow children to play with
polyethylene bags or packaging lm. Danger of
suocation!
• The unit is not intended for usage by children.
• Do not leave children unattended to prevent using the
unit as a toy.
• Do not allow children to touch the unit body, the power
cord or the power plug during operation of the unit.
• Be especially careful if children or disabled persons are
near the operating unit.
• During the unit operation and breaks between
operation cycles, place the unit out of reach of children.
• The unit is not intended for usage by physically,
sensory, psychically or mentally disabled persons
(including children) or by persons lacking experience or
knowledge if they are not under supervision of a person
who is responsible for their safety or if they are not
instructed by this person on the usage of the unit.
• Before using the meat grinder, check the power cord
integrity. If the power cord is damaged, it should be
replaced by the manufacturer, a maintenance service
or similar qualied personnel to avoid danger.
• Do not repair the unit by yourself. Do not
disassemble the unit by yourself, if any malfunction
is detected, and after the unit was dropped, unplug it
and apply to the service center.
• To avoid damages, transport the unit in the original
package.
• Keep the unit in a dry cool place out of reach of
children and disabled persons.
THE UNIT IS INTENDED FOR HOUSEHOLD USE
ONLY, DO NOT USE THE UNIT FOR COMMERCIAL
OR LABORATORY PURPOSES.
BEFORE THE FIRST USE
After the unit transportation or storage at negative
temperature, unpack it and wait for at least 3 hours
before using it.
• Unpack the unit and remove all the packaging
materials.
• Keep the original package.
• Read the safety measures and operating
recommendations.
• Check the delivery set.
• Examine the unit for damages, in case of damage do
not plug it into the mains.

8
EN
• Make sure that specied specications of power supply
voltage of the unit correspond to the specications of
your mains.
• Wash all the removable parts (2, 5, 6, 7, 8, 9, 10, 11,
12, 13, 14, 15, 16, 17, 18) with warm water and neutral
detergent, rinse and dry them.
• Wipe the meat grinder body with a slightly damp cloth,
and then wipe it dry.
BASIC TIPS FOR USING THE MEAT GRINDER
• The meat grinder is intended only for household
use, for making minced meat or minced sh, making
homemade semi-nished products and processing
vegetables.
ATTENTION! Continuous operation time should not
exceed 7 minutes, after that make at least 30 minutes
break.
• Assenble and use the meat grinder only on a dry at
and stable surface, away from heat sources, open
ame and direct sunlight.
• Make sure that the ventilation openings on the meat
grinder body are not blocked with any foreign objects.
• Before making minced meat, make sure that all bones
and excess fat are removed.
• Do not process food with hard ber (for example, ginger
or horseradish) in the meat grinder.
• Place a suitable bowl under the meat grinder head (7).
• Switch the meat grinder on and slowly feed the meat
pieces into the mouth of the grinder head (7) using the
pusher (5).
• During operation, use only the pusher (5) supplied with
the unit. Do not apply excessive eort while pushing the
meat or other products.
• Do not push meat with your hands or any other objects.
• If an obstruction appears during the unit operation,
use the reverse function (the screw reverse mode) to
remove it. To switch the reverse mode on, switch the
meat grinder O by setting the operation switch mode (1)
to the position «O», then press and hold the switch (1)
in the position «R» (reverse) for several seconds (not
longer than 5 seconds), and then release the switch (1).
• After the operation is nished, switch the meat grinder O
by setting the operation mode switch (1) to the position
«O», unplug the unit and then disassemble it.
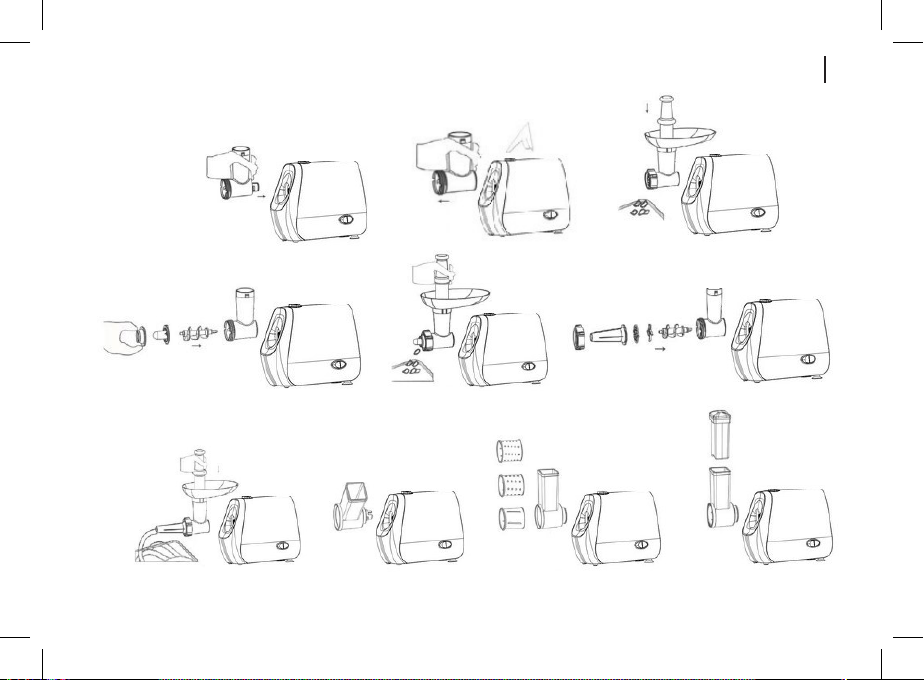
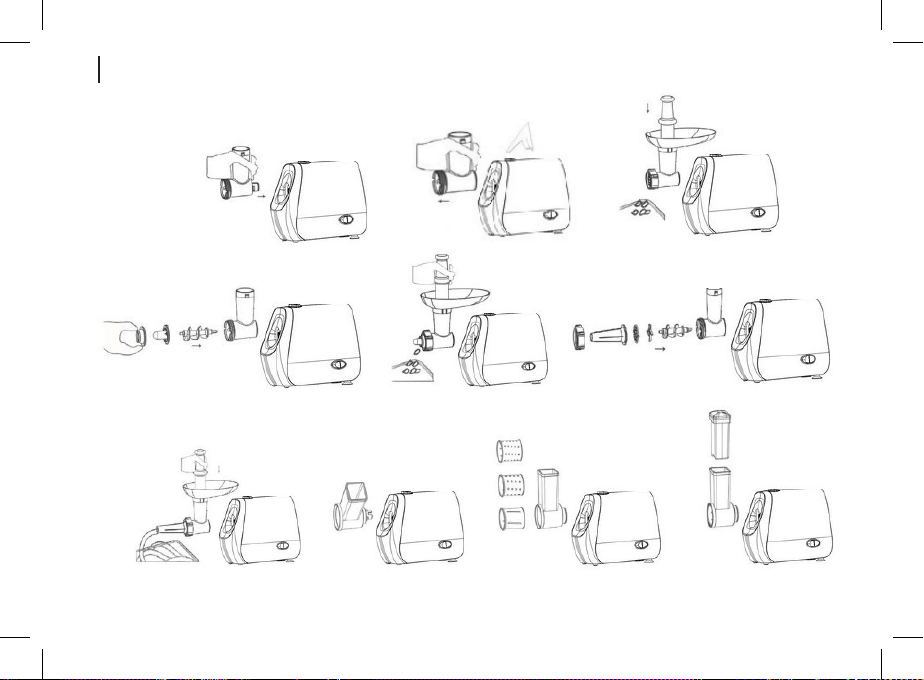
MAKING MINCED MEAT
• Insert the meat grinder head (7) to the setting place (4),
press the lock button (3) and turn the meat grinder head
(7) counterclockwise until it is xed (pic. 1).
• To remove the meat grinder head (7), press the lock
button (3), turn the meat grinder head (7) clockwise
(pic. 2).
• Install the screw (8) into the meat grinder head (7) body.
• Install the crossed blade (9).
• Select one of the plates (10) and set it over the blade,
matching the ledges on the plate with the grooves on
the meat grinder head body (7), tighten the nut (11).
• During the operation always use only the pusher (5).

9
EN
ATTENTION!
- When installing the blade (9), make sure that the
cutting edges of the blade (9) face the plate (10).
If the blade is installed improperly, it will not grind
meat.
- The ne cutting plate (10) can be used for
processing both raw and cooked meat, sh, etc.
- Use the medium plate (10) for processing raw meat,
sh, vegetables, dried fruit, cheese etc.
-Use the coarse plate (10) for more coarse minced
meat.
-Install the food tray (6) on the meat grinder head (7)
(pic. 3).
-Insert the power plug into the mains socket.
-Switch the meat grinder on by setting the operation
mode switch (1) to the position «ON».
Recommendations:
-Defrost frozen meat thoroughly. For better
processing, cut meat into strips (20x20x60 mm) or
cubes (20x20x20 mm).
- During operation, use only the pusher (5) supplied
with the unit (pic. 3). Do not apply excessive eort
while pushing the meat or other products.
-Do not push meat with your hands or any other
objects (pic. 2).
• After the operation is nished, switch the meat grinder
O by setting the operation mode switch (1) to the
position «O», unplug the unit and then disassemble it.
• To disassemble the meat grinder head (7), unscrew
the nut (11) by turning it counterclockwise, remove the
installed plate (10) from the meat grinder head (7) body,
remove the crossed blade (9) and the screw (8).
• To remove the meat grinder head (7), press the lock
button (3), turn the meat grinder head (7) clockwise and
remove it.
MAKING KEBBE
• Kebbe, kibbeh or kubba is a Mediterranean dish made of
beef or lamb meat, wheat our and spices.
• Use the kebbe attachment (13) to make hollow rolls of
the base. Rolls are lled and deep fried. Experiment with
various llings for the rolls.
• This is an approximate recipe for making kebbe, you can
nd other recipes on the Internet.
Filling
-Lamb meat 100 g
- Olive oil 1,5 table spoon
- Onion (minced) 1,5 table spoon
-Spice to taste
-Salt ¼ tea spoon
-Flour 1 table spoon or 1/2 table spoon
• Assemble the meat grinder (see the chapter «MAKING
MINCED MEAT»).
• Mince the lamb meat with the meat grinder once or twice.
• Fry the onion until golden, then add minced lamb meat,
spices, our and salt.

10
EN
Prepare the base for rolls.
- Lean meat (beef or lamb) 450-500 g
- Flour 150-200 g
-Spice 1 tea spoon (to taste)
-Nutmeg 1 pc.
-Ground chilli pepper (to taste)
-Black pepper (to taste)
• Mince the meat thrice, separately mince nutmeg, and
then mix all the ingredients.
• More meat and less our in a roll provide better
consistency and taste of the prepared dish.
Making rolls
• Install the meat grinder head (7) into the setting place
(4).
• Insert the screw (8) into the meat grinder head body (7),
install the kebbe attachments (13) on the screw; make
sure that the ledges on the attachment (13) match the
grooves on the meat grinder head (7) body (pic. 4) and
tighten the nut (11).
• Install the food tray (6).
• Put the prepared rolls base on the food tray (6).
• Insert the power plug into the mains socket.
• Switch the meat grinder on by setting the operating
mode switch (1) to the position «ON».
• Use the pusher (5) to supply the base for rolls (pic. 5).
• Cut the rolls of the required length.
• After the operation is nished, switch the meat
grinder O by setting the operating mode switch (1)
to the position «O» and unplug the unit, after that
disassemble the meat grinder.
• Unscrew the nut (11) rotating it counterclockwise and
remove the kebbe attachment (13) and the screw (8).
• To remove the meat grinder head (7), press the lock
button (3), turn the meat grinder head (7) clockwise
and remove it (pic. 2).
FILLING THE SAUSAGE CASING
• Make minced meat.
• Install the meat grinder head (7) into the setting place
(4) (pic. 6).
• Install the screw (8) into the meat grinder head (7)
body, install the coarse plate (10) on the screw (8),
install the sausage attachment (12) and tighten the
nut (11) (pic. 6).
• Install the food tray (6).
• Put natural sausage casing into a bowl with warm
water for 10-15 minutes.
• Pull softened casing on the attachment (12) and
make a knot on the tip.
• Put the minced meat on the food tray (6).
• Insert the power plug into the mains socket.
• Switch the meat grinder on by setting the operating
mode switch (1) to the position «ON».
• Use the pusher (5) (pic. 7) to push down the minced
meat; as the casing is lled, slide it O the attachment
(12), and wet it as the casing dries.
• After the operation is nished, switch the meat

11
EN
grinder O by setting the operating mode switch (1)
to the position «O» and unplug the unit, after that
disassemble the meat grinder.
• Unscrew the nut (11), remove the attachments (12)
and (13), remove the screw (8).
• To remove the meat grinder head (7), press the lock
button (3), turn the meat grinder head (7) clockwise
and remove it (pic. 2).
VEGETABLE SLICER
• • Insert the vegetable slicer (18) into the setting
place (4), press the release button (3) and turn the
vegetable slicer (18) counterclockwise until xed
(pic. 8).
• Install one of the attachments (14, 15, or 16) to the
vegetable slicer (18) (pic. 9).
• Insert the power plug into the mains socket.
• Switch the meat grinder on by setting the operating
mode switch (1) to the position «ON».
• During operation use only the pusher (17) supplied
with the unit (pic. 10). Do not make excessive eorts
to push the vegetables. Do not push the vegetables
with your hands or other objects.
• After the operation is nished, switch the meat
grinder O by setting the operating mode switch (1)
to the position «O» and unplug the unit, after that
remove the vegetable slicer (18).
• To remove the vegetable slicer (18), press the lock
button (3), turn the vegetable slicer (18) clockwise
and remove it.
• Remove the installed attachment (14, 15 or 16) from
the vegetable slicer (18).
• Wash all removable parts in warm water with a
neutral detergent. Rinse and dry.
MOTOR OVERHEATING PROTECTION
• In case of overheating of the motor, the automatic
thermal switch will be on, and the meat grinder will be
switched O.
• Switch the meat grinder O by pushing “O” button and
unplug it.
• Let the meat grinder cool down for approximately
40-60 minutes (the electric motor cooling down time
depends on the air temperature in the room).
• Insert the power plug into the mains socket and
switch the meat grinder on by pressing the «ON»
button. If the meat grinders doesn’t switch on, it may
mean that there are other damages in the unit. In
this case apply to the service center for testing or
repairing the meat grinder.
• To avoid overheating of the electric motor, do not
overload the meat grinder and do not apply excessive
eort when pushing meat or other products.
CLEANING AND CARE
• After the operation is nished, switch the meat
grinder O by setting the operation mode switch
(1) to the position «O», unplug the unit and then
disassemble it.

12
EN
• Wash all the removable parts which were used for
operation with warm water and neutral detergent,
rinse and dry.
• Wipe the meat grinder body with a slightly damp cloth
and then wipe it dry.
• Do not use any solvents or abrasives to clean the
meat grinder body.
• Provide that no liquid gets inside the meat grinder
body.
• After processing salty and sour products, rinse the
removable parts of the meat grinder with water.
• Vegetables with dyeing properties (such as carrots
or beets) can stain the meat grinder parts; wipe
the meat grinder parts with a cloth moistened
with vegetable oil, then rinse them with a neutral
detergent, rinse and dry.
STORAGE
• Before taking the meat grinder away for storage,
make sure that the meat grinder body and all
removable parts are clean and dry.
• Use the tray (2) for storing the cutting plates (10).
• Keep the unit in a dry cool place out of reach of
children and disabled persons.
DELIVERY SET
1. Meat grinder — 1 pc.
2. Pusher — 1 pc.
3. Food tray — 1 pc.
4. Plates — 3 pcs.
5. Sausage lling attachment – 1 pc.
6. «Kebbe» attachments – 2 pcs.
7. Vegetable slicer – 1 pc.
8. Vegetable slicer pusher – 1 pc.
9. Graters - 1 pc.
10. Fine grater – 1 pc.
11. Vegetable slicing attachment - 1 pc.
12. Coarse grater - 1 pc.
13. Potato mud slicer – 1 pc.
14. Instruction manual – 1 pc.
TECHNICAL SPECIFICATIONS
• Power supply: 220-240 V, ~ 50 Hz
• Rated input power: 600 W
• Maximum power: 2000 W
RECYCLING
To prevent possible damage to the
environment or harm to the health of people
by uncontrolled waste disposal, after
expiration of the service life of the unit or
the batteries (if included), do not discard
them with usual household waste, take the
unit and the batteries to specialized stations for further
recycling.
The waste generated during the disposal of products
is subject to mandatory collection and consequent
disposal in the prescribed manner.

13
EN
For further information about recycling of this product
apply to a local municipal administration, a household
waste disposal service or to the shop where you
purchased this product.
The manufacturer reserves the right to change the
design, structure and speci-cations not aecting
general operation principles of the unit, without prior
notice.
The unit operating life is 3 years
The manufacturing date is specied in the serial
number.
In case of any malfunctions, it is necessary to apply
promptly to the authorized service center.

14
DE
FLEISCHWOLF BR1608
Der elektrische Fleischwolf ist für die Zubereitung von
Hackeisch oder gehackten Fisch, die Zubereitung von
hausgemachten Halbfabrikaten und die Verarbeitung
von Gemüse bestimmt.
BESCHREIBUNG
1. Betriebsschalter (ON/O/R)
2. Lochscheibenfach
3. Verriegelungstaste des Fleischwolfkopfs
4. Aufstellplatz des Fleischwolfkopfs
5. Stopfer
6. Nahrungsmittelschale
7. Fleischwolfkopfgehäuse
8. Schnecke
9. Kreuzmesser
10. Lochscheiben für Klein- und Grobhacken
11. Mutter des Fleischwolfkopfs
12. Wurstfülleraufsatz
13. Kebbeaufsätze
14. Aufsatz zum Schneiden von Gemüse in Scheiben
15. Grobreibe
16. Reibe für KartOelpuerzubereitung
17. Stampfer des Gemüseschneideraufsatzes
18. Gemüseschneideraufsatz
DE
15
DE
1
4
2
3
6
5
78910
1312
17
18
14
15
16
11
16
DE
Abb. 1
Abb. 7
Abb. 4
Abb. 2
Abb. 8
Abb. 5
Abb. 3
Abb. 9 Abb. 10
Abb. 6

17
DE
SICHERHEITSHINWEISE UND
BEDIENUNGSANLEITUNG
Bevor Sie den Fleischwolf benutzen, lesen Sie
die Bedienungsanleitung aufmerksam durch und
bewahren Sie sie zum späteren Gebrauch auf.
• Benutzen Sie das Gerät nur bestimmungsmäßig und
laut dieser Bedienungsanleitung.
• Missbrauch des Fleischwolfs kann zu seiner
Störung führen, den Benutzer oder sein Eigentum
beschädigen und ist kein Garantiefall.
• Vergewissern Sie sich, dass die auf dem
Bezeichnungszettel angegebene Betriebsspannung
und die Netzspannung übereinstimmen.
ACHTUNG! Der Dauerbetrieb soll nicht 7 Minuten
übersteigen, dann machen Sie mindestens eine
30-Minuten-Pause.
• Es ist nicht gestattet, das Gerät draußen zu
benutzen.
• Es ist nicht empfohlen, das Gerät bei Gewitter zu
benutzen.
• Stellen Sie den Fleischwolf auf eine trockene, ebene
und standfeste Oberäche fern von Wärmequellen,
Oenem Feuer und direkten Sonnenstrahlen und
benutzen Sie ihn ebenda.
• Benutzen Sie das Gerät in direkter Nähe von
Heizgeräten, Wärmequellen oder Oenem Feuer
nicht.
• Es ist verboten, den Fleischwolf an Orten zu
verwenden, an denen Aerosole gelagert, verwendet
oder gesprüht werden, sowie in der Nähe von
leichtentzündbaren Flüssigkeiten.
• Schützen Sie das Gerät vor Stößen, Stürzen,
Vibrationen und anderen mechanischen
Einwirkungen.
• Sperren Sie keine Lüftungsönungen am
Gerätegehäuse während des Fleischwolfbetriebs ab,
das kann zur Überhitzung des Elektromotors führen.
• Lassen Sie das ans Stromnetz angeschlossene
Gerät nie unbeaufsichtigt.
• Es ist nicht gestattet, das Fleischwolfgehäuse, das
Netzkabel oder den Netzstecker ins Wasser oder
jegliche andere Flüssigkeiten einzutauchen.
• Benutzen Sie das Gerät in der Nähe von Spülbecken,
in Badezimmern und neben Wasserbecken oder
anderen mit Wasser gefüllten Behältern nicht.
• Falls das Gerät ins Wasser gefallen ist, ziehen Sie
den Netzstecker aus der Steckdose sofort heraus,
erst danach holen Sie das Gerät aus dem Wasser
heraus. Wenden Sie sich an einen autorisierten
Kundendienst, um das Gerät prüfen oder reparieren
zu lassen.
• Achten Sie darauf, dass das Netzkabel heiße
Oberächen und scharfe Möbelkanten nicht berührt.
• Behandeln Sie das Netzkabel vorsichtig, vermeiden
Sie dessen Verdrehung und richten Sie das
Netzkabel regelmäßig aus.

18
DE
• Verwenden Sie das Netzkabel als Gri zum Tragen
des Fleischwolfs nicht.
• Berühren Sie das Gerätegehäuse, das Netzkabel
und den Netzstecker mit nassen Händen nicht.
• Trennen Sie das Gerät nach dem Gebrauch oder
vor der Reinigung vom Stromnetz ab. Wenn Sie
das Gerät vom Stromnetz abtrennen, halten Sie
den Netzstecker fest und ziehen Sie ihn aus der
Steckdose vorsichtig heraus; ziehen Sie das
Netzkabel nicht, da es zu seiner Beschädigung und
einem Kurzschluss führen kann.
• Vor dem ersten Gerätebetrieb spülen Sie alle mit den
Nahrungsmitteln zu kontaktierenden abnehmbaren
Fleischwolfteile sorgfältig durch.
• Benutzen Sie nur die mitgelieferten Fleischwolfteile.
• Vergewissern Sie sich vor der Gerätenutzung, dass
alle Fleischwolfteile korrekt aufgestellt sind.
• Reinigen Sie das Fleischwolfgehäuse und die
während des Betriebs verwendeten Teile regelmäßig.
• Aus Kindersicherheitsgründen lassen Sie die als
Verpackung verwendeten Plastiktüten nie ohne
Aufsicht.
ACHTUNG! Lassen Sie Kinder mit Plastiktüten oder
Verpackungsfolien nicht spielen. Erstickungsgefahr!
• Besondere Vorsichtsmaßnahmen sind in den
Fällen angesagt, wenn sich Kinder oder behinderte
Personen während des Gerätebetriebs in der Nähe
aufhalten.
• Während des Betriebs und der Pausen zwischen
den Betriebszyklen stellen Sie das Gerät an einen für
Kinder unzugänglichen Ort auf.
• Das Gerät ist für Personen (darunter Kinder)
mit Körper-, Nerven- oder Geistesstörungen
oder Personen ohne ausreichende Erfahrung
und Kenntnisse nicht geeignet, wenn sie sich
unter Aufsicht der Person, die für ihre Sicherheit
verantwortlich ist, nicht benden oder entsprechende
Anweisungen über die Gerätenutzung nicht
bekommen haben.
• Überprüfen Sie die Unversehrtheit des Netzkabels,
bevor Sie den Fleischwolf verwenden. Wenn das
Netzkabel beschädigt ist, soll es vom Hersteller,
vom Kundendienst oder von ähnlich qualiziertem
Personal ersetzt werden, um Gefahren zu vermeiden.
• Es ist nicht gestattet, das Gerät selbständig zu
reparieren. Nehmen Sie das Gerät selbständig
nicht auseinander; bei der Feststellung jeglicher
Beschädigungen, sowie im Sturzfall, trennen Sie das
Gerät vom Stromnetz ab und wenden Sie sich an
einen Kundendienst.
• Um Beschädigungen zu vermeiden, transportieren
Sie das Gerät nur in der Fabrikverpackung.
• Bewahren Sie das Gerät an einem trockenen,
kühlen und für Kinder und behinderte Personen
unzugänglichen Ort auf.
• Das Gerät ist nicht für Kinder bestimmt.
• Beaufsichtigen Sie Kinder, damit sie das Gerät als
Spielzeug nicht benutzen.
• Lassen Sie Kinder das Gerätegehäuse, das
Netzkabel oder den Netzstecker während des
Gerätebetriebs nicht berühren.

19
DE
DAS GERÄT IST NUR FÜR DEN GEBRAUCH IM
HAUSHALT GEEIGNET, ES IST VERBOTEN, DAS
GERÄT ZU GESCHÄFTS- ODER LABORZWECKEN ZU
BENUTZEN.
VOR DER ERSTEN VERWENDUNG
Packen Sie das Gerät aus und warten Sie mindestens
3 Stunden ab, nachdem es bei einer negativen
Temperatur transportiert oder aufbewahrt worden ist.
• Packen Sie das Gerät aus und entfernen Sie alle
Verpackungsmaterialien.
• Bewahren Sie die Originalverpackung auf.
• Machen Sie sich mit den Sicherheitsmaßnahmen und
Bedienungsempfehlungen bekannt.
• Prüfen Sie die Vollständigkeit.
• Prüfen Sie das Gerät auf Beschädigungen; wenn es
beschädigt ist, schließen Sie es ans Stromnetz nicht
an.
• Vergewissern Sie sich, dass die angegebenen
Parameter der Geräteversorgungsspannung und die
Stromnetzparameter übereinstimmen.
• Waschen Sie alle abnehmbaren Teile (2, 5, 6, 7, 8, 9,
10, 11, 12, 13, 14, 15, 16, 17, 18) mit Warmwasser
und einem neutralen Reinigungsmittel ab, spülen und
trocknen Sie sie ab.
• Wischen Sie das Fleischwolfgehäuse mit einem leicht
angefeuchteten Tuch, danach trocknen Sie es ab.
GRUNDSÄTZLICHE HINWEISE ZUM
BETRIEB DES FLEISCHWOLFS
• Der elektrische Fleischwolf ist nur für den Gebrauch
im Haushalt, für die Zubereitung von Hackeisch
oder gehackten Fisch, die Zubereitung von
hausgemachten Halbfabrikaten und die Verarbeitung
von Gemüse bestimmt.
ACHTUNG! Der Dauerbetrieb soll nicht 7 Minuten
übersteigen, dann machen Sie mindestens eine
30-Minuten-Pause.
• Setzen Sie den Fleischwolf zusammen und benutzen
Sie ihn auf einer trockenen, ebenen und standfesten
Oberäche fern von Wärmequellen, Oenem Feuer
und direkten Sonnenstrahlen.
• Vergewissern Sie sich, dass die Lüftungsönungen
am Fleischwolfgehäuse mit keinen
Fremdgegenständen gesperrt sind.
• Vergewissern Sie sich vor dem Hacken, dass alle
Knochen und überschüssiges Fett entfernt sind.
• Es ist nicht gestattet, Nahrungsmittel mit harten
Fasern (z.B. Ingwer oder Meerrettich) mit dem
Fleischwolf zu hacken.
• Stellen Sie ein geeignetes Geschirr unter den
Fleischwolfkopf (7).
• Schalten Sie den Fleischwolf ein und stoßen Sie
das Fleisch mit dem Stopfer (5) langsam in den
Fleischwolfkopf (7) durch.
• Während des Betriebs benutzen Sie nur den
mitgelieferten Stopfer (5). Wenden Sie keine

20
DE
übermäßige Kraft an, um Fleisch oder andere
Nahrungsmittel durchzustoßen.
• Stoßen Sie das Fleisch mit den Händen oder anderen
Gegenständen nicht durch.
• Bei einer „Verstopfung“ während des Betriebs
verwenden Sie die Reversierfunktion
(Schneckenrückdrehung), um diese zu entfernen. Um
den Reversierbetrieb zu aktivieren, schalten Sie den
Fleischwolf aus, indem Sie den Betriebsschalter (1)
auf „O“ stellen, dann halten Sie den Schalter (1) in
der Position „R“ (Reversieren) gedrückt (nicht mehr
als 5 Sekunden) und lassen Sie den Schalter (1) nach
einigen Sekunden los.
• Schalten Sie den Fleischwolf nach dem Betrieb aus,
indem Sie den Betriebsschalter (1) auf „O“ stellen,
ziehen Sie das Netzkabel aus der Steckdose heraus
und dann nehmen Sie ihn auseinander.
ZUBEREITUNG VON HACKFLEISCH
• Setzen Sie den Fleischwolfkopf (7) auf den Aufstellplatz
(4) ein, drücken Sie die Halterungstaste (3) und drehen
Sie den Fleischwolfkopf (7) gegen den Uhrzeigersinn,
bis er einrastet (Abb. 1).
• Um den Fleischwolfkopf (7) zu entfernen, drücken
Sie die Halterungstaste (3) und drehen Sie den
Fleischwolfkopf (7) im Uhrzeigersinn (Abb. 2).
• Setzen Sie die Schnecke (8) ins
Fleischwolfkopfgehäuse (7) ein.
• Setzen Sie das Kreuzmesser (9) auf.
• Wählen Sie die nötige Lochscheibe (10) und
stellen Sie diese übers Messer auf, indem Sie
die Vorsprünge an der Lochscheibe mit den
Aussparungen im Fleischwolfkopfgehäuse (7)
zusammenfallen lassen, schrauben Sie die Mutter
(11) zu.
• Benutzen Sie immer nur den Stopfer (5) während des
Betriebs.
ACHTUNG!
-Achten Sie beim Aufsetzen des Messers (9)
darauf, dass die Schneidkanten des Messers (9)
zur Lochscheibe (10) gerichtet sind. Falls das
Messer falsch aufgesetzt ist, wird es das Fleisch
nicht hacken.
-Die Lochscheibe (10) mit kleineren Löchern ist
zum Hacken sowohl von Roheisch, als auch von
zubereitetem Fleisch, Fisch usw. geeignet.
-Die Lochscheibe (10) mit mittleren Löchern
kann zur Verarbeitung von rohem Fleisch, Fisch,
Gemüse, Trockenobst, Käse u.a. verwendet
werden.
- Verwenden Sie für größeres Hackeisch die
Lochscheibe (10) mit großen Löchern.
-Stellen Sie die Nahrungsmittelschale (6) auf den
Fleischwolfkopf (7) auf (abb. 3).
-Stecken Sie den Netzstecker in eine Steckdose
ein.
- Schalten Sie den Fleischwolf ein, indem Sie den
Betriebsschalter (1) auf „ON“ stellen.
Table of contents
Languages:
Other BRAYER Meat Grinder manuals


