manuals.online logo
Brands
  1. Home
  2. •
  3. Brands
  4. •
  5. BRC
  6. •
  7. Indoor Furnishing
  8. •
  9. BRC Mesa Standard Wall Mount Electric HA Table User manual

BRC Mesa Standard Wall Mount Electric HA Table User manual

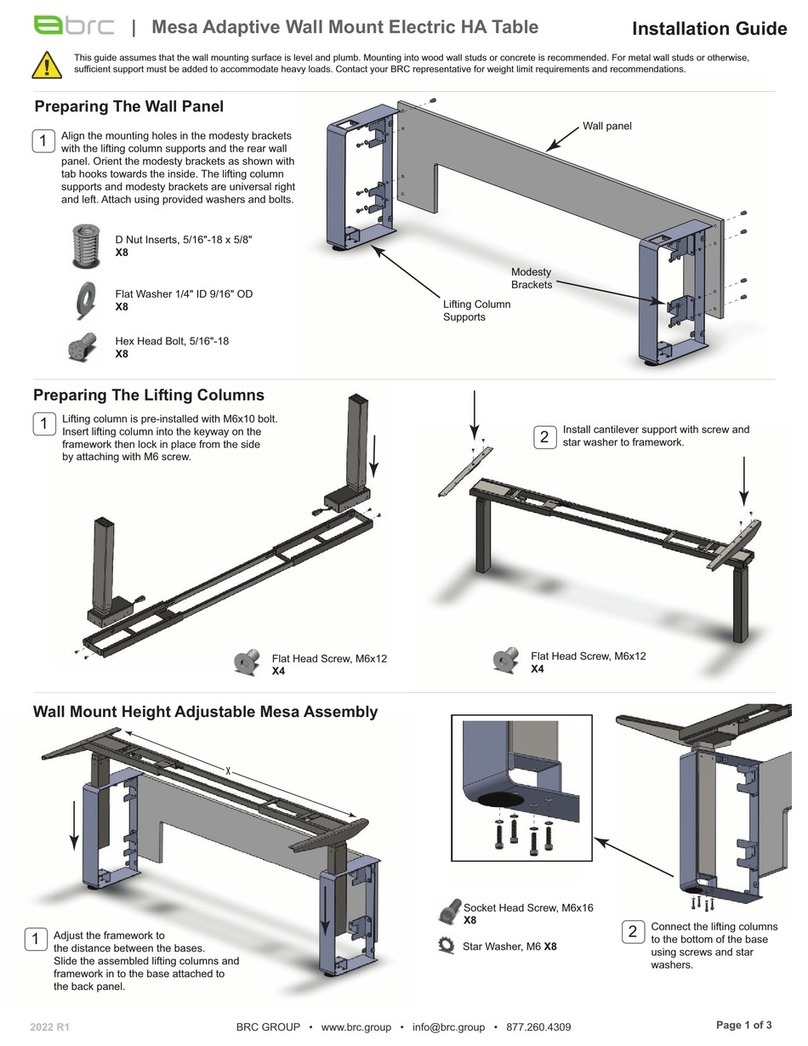
1Prepare the wall panel by connecting
the lifting column brackets with the
hardware included. Connect all four
brackets using the pre-drilled holes
in the back panel.
1
Preparing The Lifting Columns
Lifting column is pre-installed with M6 x 10 bolt.
Insert lifting column into the keyway on the
framework then lock in place from the side
by attaching with M6 screw .
2Install cantilever support with screw and
star washer to framework.
1Adjust the framework to the
distance between the lifting column brackets.
Slide the assembled lifting columns and framework in to the
assembled lifting column brackets on the back panel.
| Mesa Standard Wall Mount Electric HA Table Installation Guide
2022 R1
Wall Mount Height Adjustable Mesa Assembly
This guide assumes that the wall mounting surface is level and plumb. Mounting into wood wall studs or concrete is recommended. For metal wall studs or otherwise,
sufficient support must be added to accommodate heavy loads. Contact your BRC representative for weight limit requirements and recommendations.
Preparing The Wall Panel
2Connect the lifting columns
to the bottom bracket using
screws and star washers.
x
Flat Washer 1/4" ID 9/16" OD
X10
Hex Head Screw, 5/16"-18
X10
Flat Head Screw, M6x12
X4
Flat Head Screw, M6x12
X4
Socket Head Screw, M6x16
X8
Star Washer, M6 X8
Installation Guide
Page 1 of 3
BRC GROUP • www.brc.group • [email protected] • 877.260.4309
D Nut Inserts, 5/16"-18 x 5/8"
X8
Lifting Column Brackets
Place the entire
assembly up against
the wall and locate
as desired.
3Secure the extendable framework
tube to the specific length
with provided bolts
2022 R1
5
6Make sure the assembled unit is level.
Adjust the levelers as needed. 7Choose wall mount hardware (not included) according to wall
material. Connect the unit to wall and make sure it’s fully
secured from all sides.
4There are two set screw locations on the top lifting column bracket.
Secure the leg by tightening the set screws provided.
Button Head Screw, M6x10
X8
Plastic Flat-Tip Set Screws, 8-32,3/16"
X8
Page 2 of 3
BRC GROUP • www.brc.group • [email protected] • 877.260.4309
2022 R1
Place the work surface on top of the framework. Use the provided wood
screws to connect the top to the supports. There are pilot holes to help with
the process. Make sure the work surface is 1” apart from the wall.
8
1” Required
from wall.
No.10, 0.75in
Wood Screw
X8
9Ensure wires and wire management is complete. Install the front
fascia with flip down door on to the wall mounted assemby by
using the mortise brackets on the side gables. Lift up, in and
down to engage.
10 Close the top flip door. It will be supported with a pre-installed
magnetic latch.
Page 3 of 3
BRC GROUP • www.brc.group • [email protected] • 877.260.4309
1”
Move the lifting columns to the highest
point for the final step. Slide in the top
laminate cover with grommets into the
assembly. The top laminate cover sits
on top of the upper lifting column
brackets, no fasteners are required.
11
Step 1
Step 2

Other BRC Indoor Furnishing manuals

BRC ALTA V2 User manual

BRC

BRC ALTA V2 User manual

BRC NoLita User manual

BRC

BRC NoLita User manual

BRC Mesa User manual

BRC

BRC Mesa User manual

BRC Mesa User manual

BRC

BRC Mesa User manual

BRC NoLita User manual

BRC

BRC NoLita User manual

BRC Mesa Adaptive Wall Mount Electric HA Table User manual

BRC

BRC Mesa Adaptive Wall Mount Electric HA Table User manual

Popular Indoor Furnishing manuals by other brands

Ameriwood HOME 5945307COM Assembly instructions

Ameriwood HOME

Ameriwood HOME 5945307COM Assembly instructions

Broyhill GBO22-602-1 Assembly instructions

Broyhill

Broyhill GBO22-602-1 Assembly instructions

Hideaway Compact Series How to Maintain

Hideaway

Hideaway Compact Series How to Maintain

rst brands Vaughn OP-AWSOFR-VGHN Assembly instructions

rst brands

rst brands Vaughn OP-AWSOFR-VGHN Assembly instructions

Mocka Hudson Kids Table & Chairs Assembly instructions

Mocka

Mocka Hudson Kids Table & Chairs Assembly instructions

Furniture of America CM3457PT Assembly instructions

Furniture of America

Furniture of America CM3457PT Assembly instructions

Restoration Hardware Baby & Child RH58KBK manual

Restoration Hardware

Restoration Hardware Baby & Child RH58KBK manual

Riverside Furniture Myra 59428 Assembly instructions

Riverside Furniture

Riverside Furniture Myra 59428 Assembly instructions

Woodream M Assembly instruction

Woodream

Woodream M Assembly instruction

Rauch M2453 Assembly instructions

Rauch

Rauch M2453 Assembly instructions

BED BATH & Beyond WF307716 Assembly instructions

BED BATH & Beyond

BED BATH & Beyond WF307716 Assembly instructions

FMD Furniture ARTA 1 Assembly instruction

FMD Furniture

FMD Furniture ARTA 1 Assembly instruction

Synargy SMART COMFORT SORRENTO 281610 Assembly instructions

Synargy

Synargy SMART COMFORT SORRENTO 281610 Assembly instructions

Kiddicare Dresser Assembly manual

Kiddicare

Kiddicare Dresser Assembly manual

nbf Signature Series Assembly instructions

nbf

nbf Signature Series Assembly instructions

Henderson IMPERIAL PATIO KIT Fitting instructions

Henderson

Henderson IMPERIAL PATIO KIT Fitting instructions

Action Sports GT1020 instruction manual

Action Sports

Action Sports GT1020 instruction manual

Forte POOLE ENJH131 Assembling Instruction

Forte

Forte POOLE ENJH131 Assembling Instruction

manuals.online logo
manuals.online logoBrands
  • About & Mission
  • Contact us
  • Privacy Policy
  • Terms and Conditions

Copyright 2025 Manuals.Online. All Rights Reserved.