brel-motors DD2773 User manual
MOTORS
INSTALLATION
MANUAL
DD2773
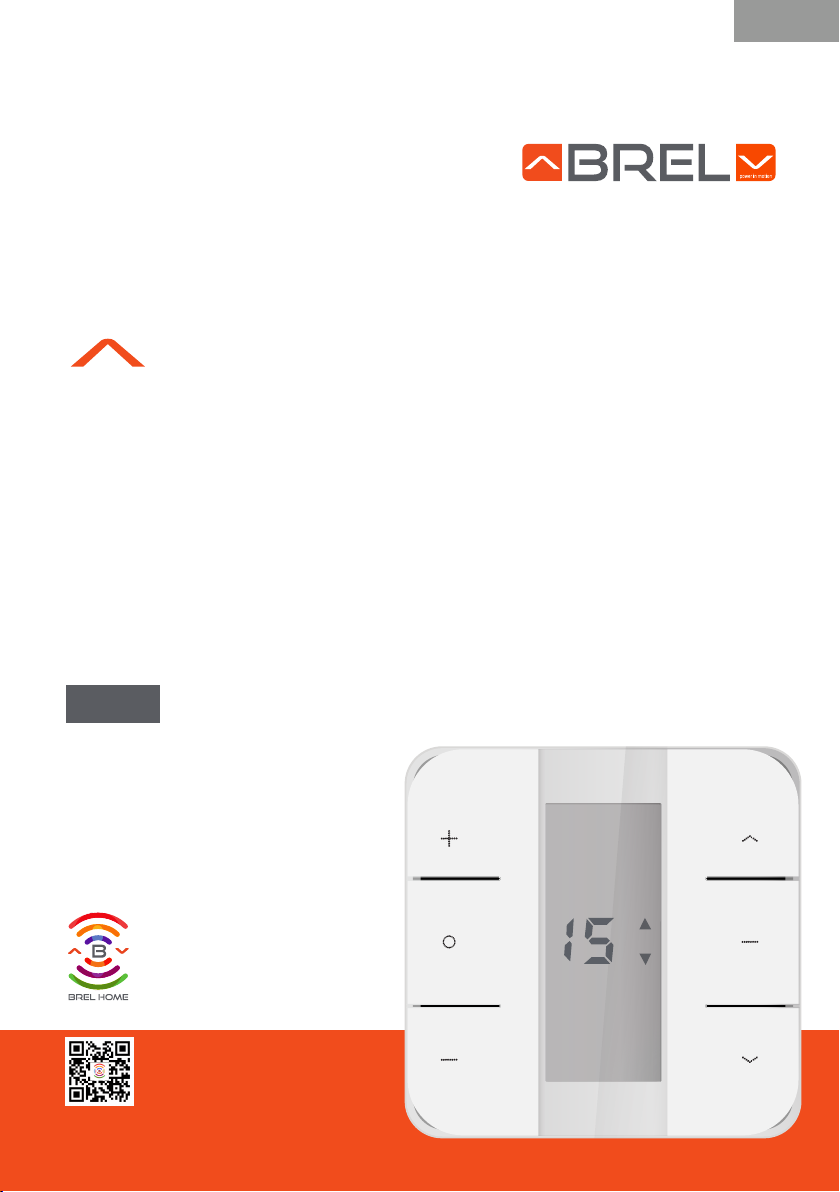
15-channel bi-directional wall transmitter
15-kanaals bi-directionele wandzender
15-Kanal bidirektionaler Wandsender
15 canal émetteur
www.brel-home.com
Visit our website or scan the QR code for more
manuals and information
Bezoek onze website of scan de QR code voor
meer handleidingen en informatie.
Besuchen Sie unse Website oder scan die QR
code für mehr Handbucher und information.
Visitez notre site Web ou scannez le code QR
pour en savoir plus manuels et informations
Scan the QR code here for the manual and to
download & view instructional videos
DD-2773
EN NL DE FR
Page 2
Warning
The motor must be
protected from direct
moisture influences.
De motor moet beschermd
worden tegen water en
andere vochtige invloeden.
Der Motor muss vor direkter
Feuchtigkeit geschützt
werden.
Le moteur doit être protégé
contre l'influence directe
de l'humidité
The motor must be
installed correctly.
De motor moet correct
worden geïnstalleerd.
Der Motor muss korrekt
installiert sein.
Le moteur doit être installé
correctement
BREL-Motors declares that this
motor has been manufactured
according to the guidelines of the
CE standard 1999/5/EC
Brel Motors verklaard dat de motor is
gefabriceerd volgens de CE standaard
1999/5/EC norm
BREL-Motors erklärt hiermit, dass
dieser Motor nach den Richtlinien der
CE-Norm 1999/5/EG hergestellt wurde
BREL-Motors déclare que ce moteur
a été fabriqué selon les directives
de la norme CE 1999/5/CE
Do not operate the motor
in humid surroundings.
Plaats de motor niet in
een vochtige omgeving.
Verwenden Sie den
Motor nicht in feuchter
Umgebung.
Ne pas travailler avec le
moteur dans des
environnements humides.
Keep the antenna in a good
condition and do not shorten. The
antenna should not come into
contact with other metal parts
otherwise it will reduce the function.
De antenne moet in goede conditie
verkeren. Kort deze niet in. Zorg
ervoor dat de antenne niet in contact
komt met andere metalen. Gebeurt dit
toch dan beïnvloed dit de functie.
Halten Sie die Antenne in gutem
Zustand und verkürzen Sie diese nicht!
Die Antenne darf nicht mit anderen
Antennen oder Metallteilen in Berührung
kommen, da ansonsten der Betrieb
eingeschränkt wird.
Maintenez l'antenne en bon état et ne
la raccourcissez pas. L'antenne ne
doit pas entrer en contact avec d'autres
pièces métalliques, sinon la performance
en sera réduite.
Do not allow children to play with the
roller blind control unit. Keep remote
controls out of reach of children.
Children cannot recognize the dangers
of electrical equipment and are
therefore not allowed to work with it
Keep these instructions for future reference
Bewaar deze handleiding zodat u in de toekomst deze kunt raadplegen
Conservez ces instructions pour référence ultérieure
Die Anleitung für zukünftiges Nachschlagen aufbewahren
Functions Remote control
Functies afstandsbediening
Fernbedienungsfunktionen
Functions de Télécommande
Page 3
Technical data of the Emitter
Battery type | Batterij type | Batterietyp | Type de batterie: 3V (CR2430)
Battery life | Batterijduur | Batterielebensdauer | Vie de la batterie: 2 years
Frequency | Frequentie | Frequenz | Fréquence: 433,925 MHz
Power | Vermogen | Leistung | Puissance: 10 mW
Radio range | Zendbereik | Übertragungsreichweite | Portée de transmission: 20-100 meter
DD2773
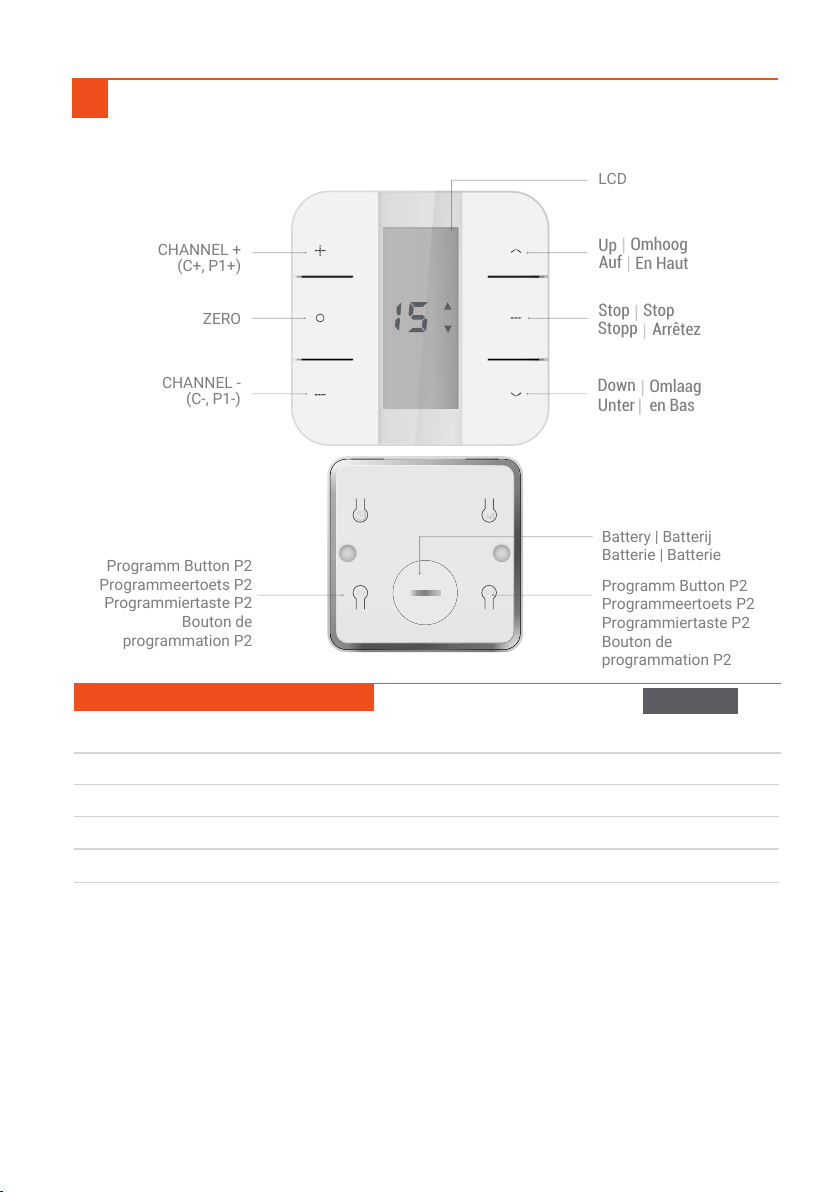
LCD
CHANNEL +
(C+, P1+)
ZERO
CHANNEL -
(C-, P1-)
Stop
Stop
Stopp
Arrêtez
Up
Omhoog
Auf
En Haut
Down
Omlaag
Unter
en Bas
Programm Button P2
Programmeertoets P2
Programmiertaste P2
Bouton de
programmation P2
Battery | Batterij
Batterie | Batterie
Programm Button P2
Programmeertoets P2
Programmiertaste P2
Bouton de
programmation P2
Brel Netherlands B.V. is registered according to the transposition of Directive 2012/19EU (the WEEE Directive) and to the transposition of Directive 2006/66EC (the Battery Directive) at
the Irish registry The Producer Register with the registration number 3408WB.
Brel Netherlands B.V. is registered according to the transposition of Directive 2012/19EU (the WEEE Directive) into the Act on Waste n.185/2001 in Czech republic with the participation
number 09281/20ECZ.
Brel Nederland B.V. is geregistreerd volgens de richtlijnen van normering 2012/19/EU inzake batterijen en accu's (de batterijrichtlijn) in het VattG van Nederland. De verplichtingen
worden gedekt door deelname aan het collectieve systeem. Brel Nederland B.V. is ingeschreven in het register van We Cycle nrCO00010881 en het Stibat nr. 40350 .Voor BelgiëBebat nr
522210 en Recupel nr 940883.
Brel Nederland B.V. ist gemäß der Umsetzung der Richtlinie 2006/66/EG über Batterien und Akkumulatoren registriert (die Batterierichtlinie) in das BattG von Deutschland. Brel
Nederland B.V. hat die Verpflichtungen durch die Teilnahme am Kollektivsystem mit GRS Nr. 87675144 und für dem ElektroG Nr. 83736951 registriert.
Brel Netherlands B.V. ist gemäß der Umsetzung der Richtlinie 2012/19EU (WEEE-Richtlinie) in das Abfallgesetz Nr. 185/2001 in der Tschechischen Republik unter der
Registrierungsnummer 09281/20ECZ registriert.
Brel Nederland B.V. est enregistrée conformément à la transposition de la Directive 2006/66/CE (la Directive Batterie). Dans le décret n° 2009-1139 du 22 septembre 2009 en France. Les obligations de
recyclage sont couvertes par 'affiliation au régime collectif Corepile sous le numéro 1033.
P2 x 1 Unlock
Status
Display
“0”
Display
“ ”
Combination
button unlock
Page 4
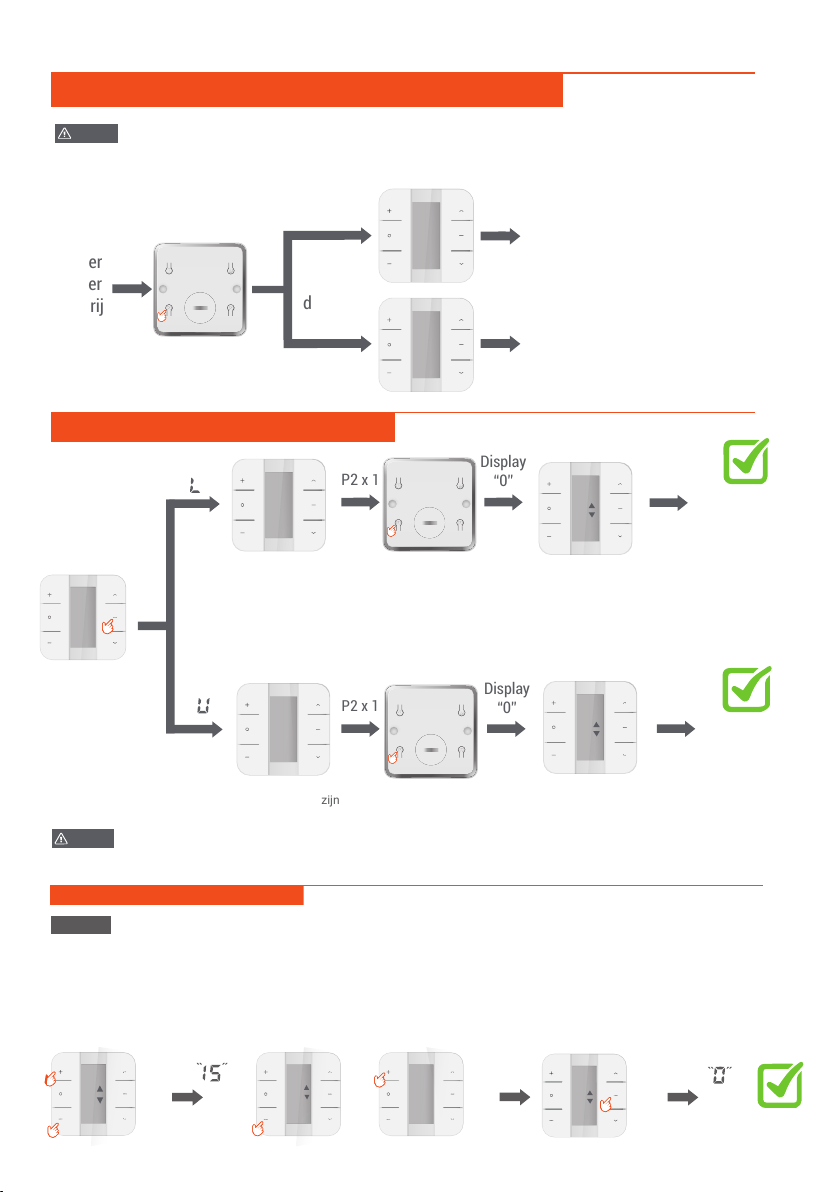
Mono-directional / bi-directional mode switching
Lock / unlock of the settings
Transmitter
without
battery
Hold down one P2 button
and put the battery in
display
“2”
Mono-directional mode
Bi-directional mode
display
“1”
NOTE The factory default mode is Bi-directional mode, repeat the same operation to switch the
mode to mono-directional.
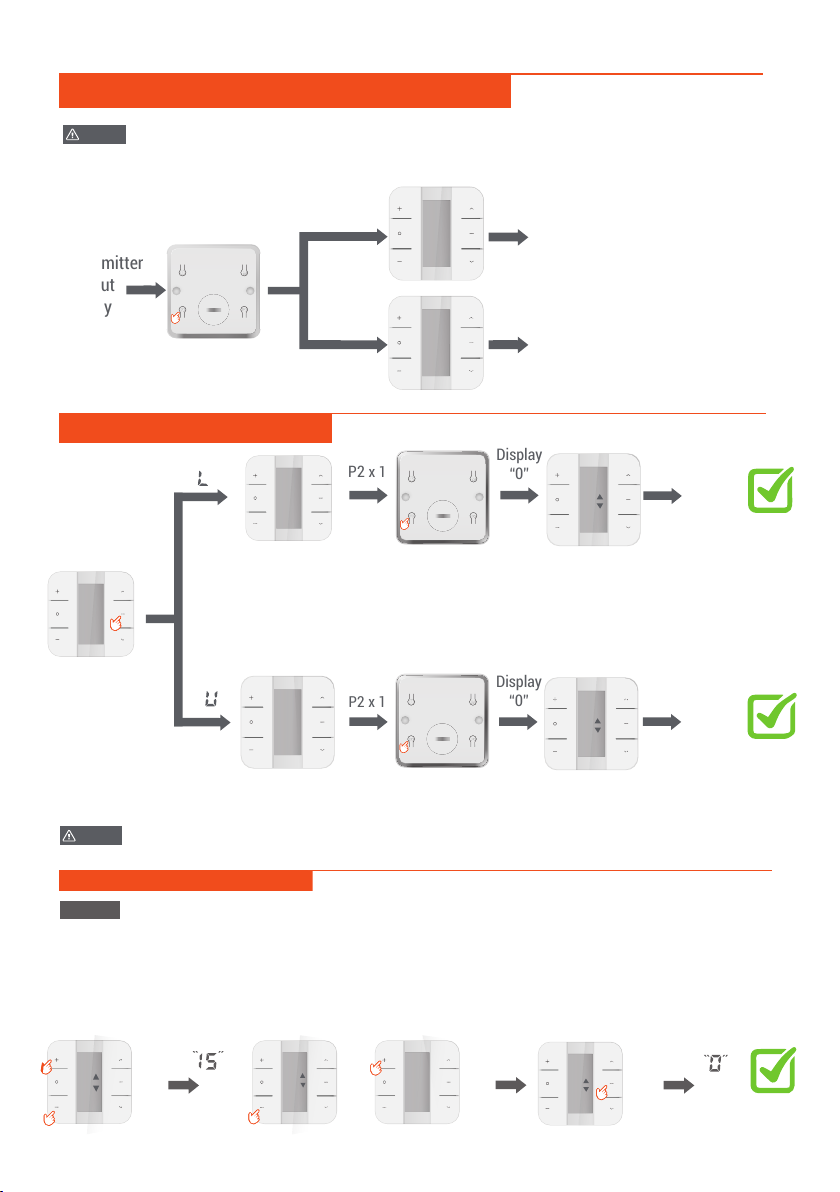
P2 x 1 Lock
Status
Display
“0”
“ ”
Display
Press and
hold STOP
button more
than 15s
Combination
button is locked
(will blink for only 1second)
(will blink for only 1second)
NOTE
1
2
o
o
1
L
U
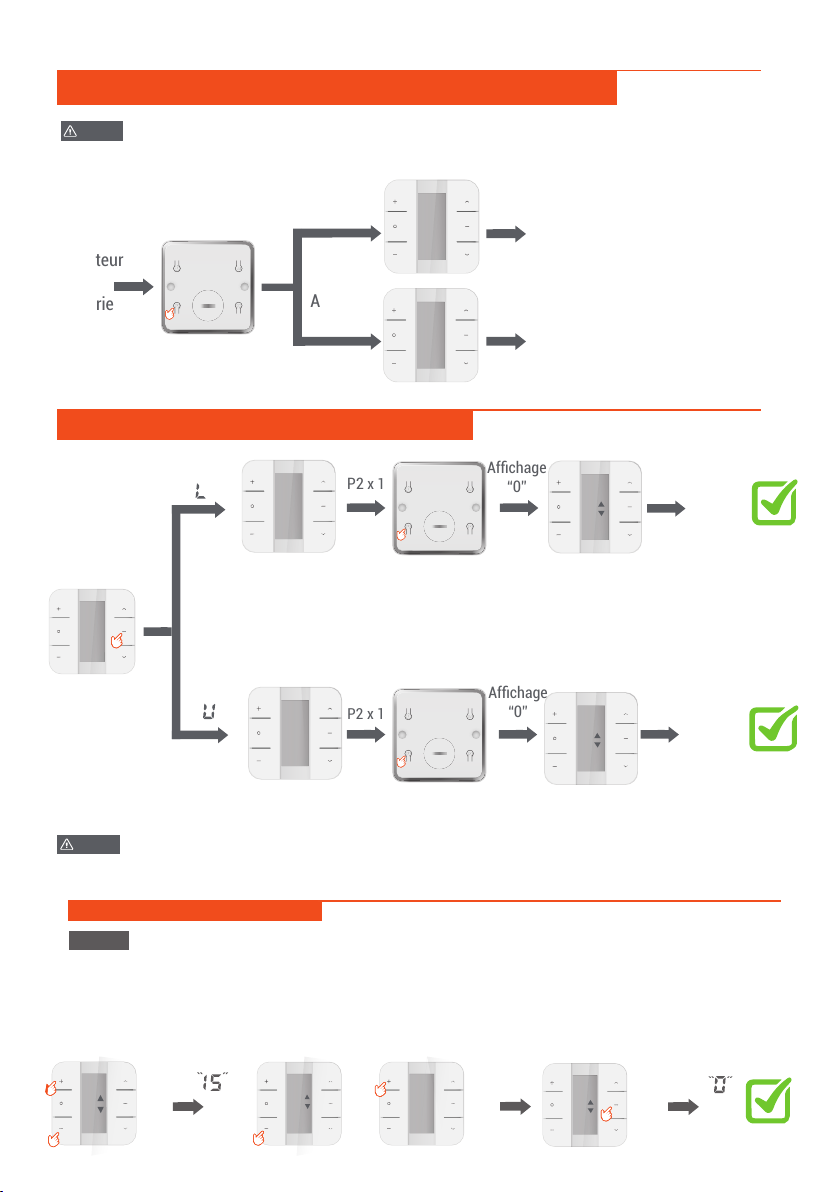
With the lock function you can not program functions in which you need two buttons
like limit settings and change direction.
Press C+ and
C- button at the
same time
Press C+ or C- button,
selecting the channels
you need STOP×1
1 In the setting state, press UP or DOWN to exit quickly.
Note 1
Set successfully
Effective Channel Selection
or
Display Display
15
15
Co
P2 x 1
Gedeblokkeerd
Display
“0”
Display
“ ”
De instellingen zijn
gedeblokkeerd
Page 5
Mono-directionele / bidirectionele modusomschakeling
Instellingen blokkeren / deblokkeren
Zender
zonder
batterij
Druk een P2 toets in en
plaats de batterij
display
“2”
Mono-directionele modus
Bi-directionele modus
display
“1”
NOTE De fabrieksstandaardmodus is bidirectionele modus, herhaal dezelfde handeling om de
modus mono-directioneel te schakelen.
P2 x 1
Geblokkeerd
Display
“0”
“ ”
Display
Druk de
STOP toets in
voor meer
dan 15s
De instellingen
zijn geblokkeerd
(Knippert voor 1 seconde)
(Knippert voor 1 seconde)
NOTE Met de vergrendelingsfunctie kun je geen functies programmeren waarbij je twee
knoppen nodig hebt, zoals limietinstellingen en verandering van richting.
o
o
1
L
U
1
2
Druk C + en C- knop
tegelijkertijd in
Druk op de C + of C-
knop om de kanalen te
selecteren STOP×1
Druk in de instellingsstatus op UP of DOWN om snel af te sluiten.
Note 1
Ingesteld
Effectieve kanaalselectie
or
Display Display
15
15
Co

P2 x 1
Entsperrt
Display
“0”
Display
“ ”
Die Einstellungen
sind entsperrt
Page 6
Mono-direktional- / Bidirektional-Modusumschaltung
Einstellungen sperren / entsperren
Sender
ohne
Batterie
Halten Sie eine P2-Taste
gedrückt und legen Sie den
Akku ein
display
“2”
Mono-direktional modus
Bidirektional modus
display
“1”
NOTE Der werkseitige Standardmodus ist der bidirektionale Modus. Wiederholen Sie alle Vorgänge
Modus mono-direktional.
P2 x 1
Gesperrt
Display
“0”
“ ”
Display
Halten Sie die
STOP-Taste
länger als 15
Sekunden
gedrückt
Die Einstellungen
sind gesperrt
(blinkt nur 1 Sekunde lang)
(blinkt nur 1 Sekunde lang)
NOTE Mit der Sperrfunktion können Sie keine Funktionen programmieren, für die Sie zwei
Tasten wie Grenzwerteinstellungen und Richtungswechsel benötigen.
o
o
1
L
U
1
2
Drücken Sie
gleichzeitig die
Tasten C + und C-
Drücken Sie die Taste C
+ oder C-, um den Kanal
auszuwählen STOP×1
Drücken Sie im Einstellungsstatus UP oder DOWN, um schnell zu beënden.
Note 1
Eingesteld
Effektive Kanalauswahl
or
Display Display
15
15
Co
P2 x 1
Débloqué
Affichage
“0”
Affichage
“ ”
Les paramètres
sont deverrouillés
Page 7
Commutation de mode mono-directionnelle / bidirectionnelle
Verrouillage / déverrouillage des paramètres
Émetteur
sans
batterie
Maintenez le bouton P2
enfoncé et insérez la batterie
Affichage
“2”
Mode mono-directionnel
Mode bidirectionnel
Affichage
“1”
NOTE Le mode par défaut d'usine est le mode bidirectionnel, répétez la même opération pour changer
le mode mono-directionnelle.
P2 x 1
Bloqué
Affichage
“0”
“ ”
Affichage
L
Appuyez sur
le bouton
STOP et
maintenez-le
enfoncé
pendant plus
de 15 s
Les paramètres
sont verrouillés
(clignotera pendant 1 seconde seulement)
NOTE Avec la fonction de verrouillage, vous ne pouvez pas programmer des fonctions dans
lesquelles vous avez besoin de deux boutons comme les réglages de limite et le
changement de direction.
(clignotera pendant 1 seconde seulement)
o
o
1
U
1
2
Appuyez simultané-
ment sur les boutons
C + et C-
Appuyez sur le bouton C
+ ou C- pour sélection-
ner les canaux STOP×1
Dans l'état de réglage, appuyez sur HAUT ou BAS pour quitter rapidement.
Note 1
or
Ensemblé
Display Display
Sélection de canal efficace
15
15
Co

Pairing an extra remote control in the memory of the motor
Page 8
P2 P2
Press 1x P2 of the existing channel.
The product makes 1x up-down
movement and/or beeps 1x.
Druk 1x P2 van het bestaande kanaal.
Het product maakt 1x op en neer
beweging en piept 1x.
Drücken Sie 1x P2 des vorhandenen
Kanals. Das Produkt bewegt sich 1x
auf und ab und piept 1x.
Appuyez 1x sur P2 du canal existant.
Le produit effectue un mouvement de
haut en bas et émet un bip 1x.
Press 1x P2 of the new channel.
The
product makes 2x up-down movement
and/or beeps 3x for confirmation.
Druk 1x P2 van het nieuwe kanaal.
Het
product maakt 2x op-neer beweging en /
of piept 3x ter bevestiging.
Drücken Sie 1x P2 des neues Kanals.
Das
Produkt bewegt sich 2x auf und ab und /
oder piept 3x zur Bestätigung.
Appuyez 1x sur P2 du canal nouveau.
Le
produit fait 2x mouvement de haut en bas
et / ou émet 3 bips pour onfirmation.
Koppelen van een extra afstandsbediening in het geheugen van de motor
Koppeln von die extra Fernbedienung im Speicher des Motors
Appairage d'une télécommande supplémentaire dans la mémoire du moteur
P2
Press 1x P2 of the existing channel.
The product makes 1x up-down
movement and/or beeps 1x.
Druk 1x P2 van het bestaande kanaal.
Het product maakt 1x op en neer
beweging en piept 1x.
Drücken Sie 1x P2 des vorhandenen
Kanals. Das Produkt bewegt sich 1x
auf und ab und piept 1x.
Appuyez 1x sur P2 du canal existant.
Le produit effectue un mouvement de
haut en bas et émet un bip 1x.
To delete a channel you have to repeat the above.
Om een kanaal te verwijderen, moet u het bovenstaande herhalen.
Um einen Kanal zu löschen, müssen Sie die obigen Schritte wiederholen.
Pour supprimer une chaîne, vous devez répéter ce qui précède.

MOTORS
INSTALLATION
MANUAL
DD2773
15-channel bi-directional wall transmitter
15-kanaals bi-directionele wandzender
15-Kanal bidirektionaler Wandsender
15 canal émetteur
www.brel-home.com
Visit our website or scan the QR code for more
manuals and information
Bezoek onze website of scan de QR code voor
meer handleidingen en informatie.
Besuchen Sie unse Website oder scan die QR
code für mehr Handbucher und information.
Visitez notre site Web ou scannez le code QR
pour en savoir plus manuels et informations
Scan the QR code here for the manual and to
download & view instructional videos
DD-2773
EN NL DE FR

Installation of the motor
Page 9
The installation of the motor is done in 4 steps. It is important that the steps first
read through before starting the installation.
Step 1: Pairing the Remote with the Motor
There are two ways to pair the remote with the motor. This is
depending on the type of motor in the product. Make sure that the first step is performed within 10
seconds, otherwise the motor will exit the programming mode.
Mode 1: BLE(Q), BPE(Q), BEQ, BG(LE) and BEK motors
Make sure you can reach the motor head. There is a button on the motor head. This is the P1 button.
Press the P1 button for approx. 3 seconds until the motor goes up and down once. Release the P1
button and press the STOP button on the remote control until the motor jogs 2 times and beeps.
Mode 2: BPE, BEQ, BG, BEK, BR, BRE and BZE motors
Make sure the motor has no voltage. Did you already install the motor? Get the tension
off then. Then wait at least 10 seconds before you start with the next step.
Apply power to the motor and the motor will jog up and down and beep. Press the STOP button on
the remote control until the motor jogs and beeps 2 times.
Step 2: Check the direction of rotation
You should check the direction of rotation immediately after pairing the remote. If you wait longer
than 1 minute, it is no longer possible in the way below.
Press the DOWN button once to see if the product is slightly
goes down. If the direction of rotation is correct, you can go to step 3.
Is the direction of rotation incorrect? Then press the UP and DOWN buttons simultaneously until the
motor jogs and beeps
Step 3: Setting the top limit
Move to the desired top position. Then press the UP and STOP button
at the same time until the motor jogs up and down twice and beeps.
Step 4: Setting the bottom limit
Go to the desired bottom position. Then press the DOWN and STOP button
at the same time until the motor jogs up and down twice and beeps.
The motor is installed and ready to use!

Tips and Tricks
Page 10
I can’t connect my motor to my remote control
Option 1: Check if the remote control is in the correct mode.
Remove the battery from the remote control. Press and hold the P2 key while re-inserting the
battery and look on the front panel to see if: a 1 or a 2 appears in the display (15-channels) or if the
LED light flashes 1 or 2 times (1 channel).
1 = Mono-directional mode 2 = Bi-directional mode (this is the standard version)
Option 2: Check whether the remote control is locked or not
Press for more than 15 sec. press the STOP button.
1 chanel: After 15 sec. the LED lights up. Press the P2 key and see if the LED light
flashes quickly (UNLOCKED) or slowly (LOCKED).
15 chanels: After 15 sec. a letter appears. U = UNLOCKED or L = LOCKED. Only press the P2 key
when a U is displayed. Then the UNLOCK is confirmed.
Add/Copy motor to New Remote/Channel
Remove the back of the remote control(s).
Go to the current channel (from the remote) that the motor is installed on.
Press the P2 button on the current channel / remote control once. The motor jogs up and down once.
Then press the P2 button of the current channel / remote control 1 more time. The motor jogs up and
down again. Go to the new channel and now press the P2 button once OR press the P2 button on the
new remote control once. The motor now jogs up and down 2 times and beeps. (Repeat this
procedure to remove a motor)
The old remote control is broken/lost. How do I pair the new remote?
Follow step 1 of the motor installation.
How can I adjust the end limits?
Press the UP and STOP buttons simultaneously until the motor jogs up and down and beeps once.
Move to the new desired top position. Then press the UP and STOP button
at the same time until the motor jogs up and down and beeps once.
Press the DOWN and STOP buttons simultaneously until the motor jogs up and down and beeps
once. Go to the desired bottom position. Then press the DOWN and STOP buttons simultaneously
until the motor jogs up and down and beeps once.
How can I reset the motor?
Make sure you can reach the motor head. There is a button on the motor head: the P1 button. Press
and hold the P1 button for about 14 seconds. The motor jogs up and down once every 3 seconds.
Release the P1 button when the product has been up and down a total of 4 times.

Installatie van de motor
Page 11
De installatie van de motor gebeurt in 4 stappen. Belangrijk is dat de stappen eerst
doorgelezen worden voordat je met de installatie begint.
Stap 1: Afstandsbediening koppelen aan de motor
Er zijn twee manieren om de afstandsbediening te koppelen aan de motor. Dit is
afhankelijk van het type motor dat in het product zit. Zorg ervoor dat de eerste stap binnen 10
seconden uitgevoerd wordt, anders gaat de motor uit de programmeermodus.
Manier 1: BLE(Q), BPE(Q), BEQ, BG(LE) en BEK motoren
Zorg ervoor dat je bij de motorkop kunt. Op de motorkop zit een knopje. Dit is de P1 toets.
Druk voor ong. 3 seconden op de P1 toets totdat de motor 1 keer op en neer gaat. Laat de P1 toets
los en druk op de STOP toets van de afstandsbediening totdat de motor 2 keer heen en weer gaat en
piept.
Manier 2: BPE, BEQ, BG, BEK, BR, BRE en BZE motoren
Zorg ervoor dat de motor geen spanning heeft. Had je de motor al aangesloten? Haal de spanning
er dan af. Wacht dan minimaal 10 seconden voordat je begint met de volgende stap.
Zet spanning op de motor en de motor gaat op en neer en piept. Druk op de STOP toets van de
afstandsbediening totdat de motor 2 keer heen en weer gaat en piept.
Stap 2: Controleer de draairichting
Je moet de draairichting meteen na het koppelen van de afstandsbediening controleren. Wacht je
langer dan 1 minuut, dan is het niet meer op de onderstaande manier mogelijk.
Druk 1 keer op de OMLAAG toets om te kijken of het product een klein stukje naar
beneden gaat. Klopt de draairichting, dan kun je naar stap 3 gaan.
Klopt de draairichting niet? Druk dan de OMHOOG en OMLAAG toets tegelijkertijd in totdat de motor
een keer heen en weer gaat en piept.
Stap 3: Instellen van de bovenste positie
Ga naar de gewenste bovenste positie. Druk vervolgens de OMHOOG en STOP toets
tegelijkertijd in totdat de motor twee keer op en neer gaat en piept.
Stap 4: Instellen van de onderste positie
Ga naar de gewenste onderste positie. Druk vervolgens de OMLAAG en STOP toets
tegelijkertijd in totdat de motor twee keer op en neer gaat en piept.
De motor is geïnstalleerd en klaar voor gebruik!

Tips en Tricks
Page 12
Ik krijg mijn afstandsbediening niet gekoppeld aan de motor.
Optie 1: Controleer of de afstandsbediening in de juiste modus staat.
Verwijder de batterij van de afstandsbediening. Druk de P2 toets in, houd deze ingedrukt terwijl je
de batterij weer terugplaatst en kijk op de voorkant of er: een 1 of een 2 in het beeldscherm komt
(15-kanalen) of dat het LED lampje 1 of 2 keer knippert (1-kanaal).
1 = Mono-directionele modus 2 = Bi-directionele modus (dit is de standaard uitvoering)
Optie 2: Controleer of de afstandsbediening geblokkeerd is of niet
Druk voor meer dan 15 sec. op de STOP toets.
1 kanaal: Na 15 sec. gaat de LED branden. Druk op de P2 toets en kijk of het LED lampje
snel (UNLOCKED) of langzaam (LOCKED) knippert.
15 kanalen: Na 15 sec. komt er een letter in beeld. U = UNLOCKED of L = LOCKED. Druk alleen op de
P2 toets als er een U in beeld komt. Dan is de UNLOCK bevestigd.
Motor toevoegen / kopieëren aan nieuwe afstandsbediening / kanaal
Verwijder de achterkant van de afstandsbediening(en).
Ga naar het huidige kanaal (van de afstandsbediening) waar de motor op geïnstalleerd is.
Druk 1 keer op de P2 toets op het huidige kanaal / afstandsbediening. De motor gaat een keer op en
neer. Druk vervolgens nog 1 keer op de P2 toets van het huidige kanaal / afstandsbediening. De
motor gaat nog een keer op en neer. Ga naar het nieuwe kanaal en druk nu 1 keer op de P2 toets OF
druk nu 1 keer op de P2 toets van de nieuwe afstandsbediening. De motor gaat nu 2 keer op en neer
en piept. (Herhaal deze procedure om een motor te verwijderen)
De oude afstandsbediening is kapot/ kwijt. Hoe koppel ik de nieuwe afstandsbediening?
Volg stap 1 van de installatie van de motor.
Hoe kan ik de eindposities aanpassen?
Druk de OMHOOG en STOP toets tegelijkertijd in totdat de motor een keer op en neer gaat en piept.
Ga naar de nieuwe gewenste bovenste positie. Druk vervolgens de OMHOOG en STOP toets
tegelijkertijd in totdat de motor een keer op en neer gaat en piept.
Druk de OMLAAG en STOP toets tegelijkertijd in totdat de motor een keer op en neer gaat en piept.
Ga naar de gewenste onderste positie. Druk vervolgens de OMLAAG en STOP toets tegelijkertijd in
totdat de motor een keer op en neer gaat en piept.
Hoe kan ik de motor resetten?
Zorg ervoor dat je bij de motorkop kunt. Op de motorkop zit een knopje: de P1 toets. Houd de P1
toets voor ongeveer 14 seconden ingedrukt. Iedere 3 seconden gaat de motor een keer op en neer.
Laat de P1 toets los als het product in totaal 4 keer op en neer is geweest.
Table of contents
Other brel-motors Transmitter manuals


