Brentwood Appliances MOKA TS-119BK Quick guide

© 2022 Brentwood Appliances, Inc.
MOKA ESPRESSO MAKER
MÁQUINA DE CAFÉ EXPRESO MOKA
MACHINE À EXPRESSO MOKA
ITEM NO.: TS-119BK (BLACK), TS-119R (RED) & TS-119S (SILVER)
Operating and Safety Instructions
FOR INDOOR HOUSEHOLD USE ONLY
Instrucciones de Operación y Seguridad
SOLO PARA USO DOMESTICO
Consignes de Sécurité et de Fonctionnement
POUR USAGE DOMESTIQUE INTÉRIEUR SEULEMENT

2

3
IMPORTANT SAFEGUARDS
When using this or any other electrical appliance, always follow these basic safety
precautions, especially when children are present.
READ ALL INSTRUCTIONS
BEFORE USE
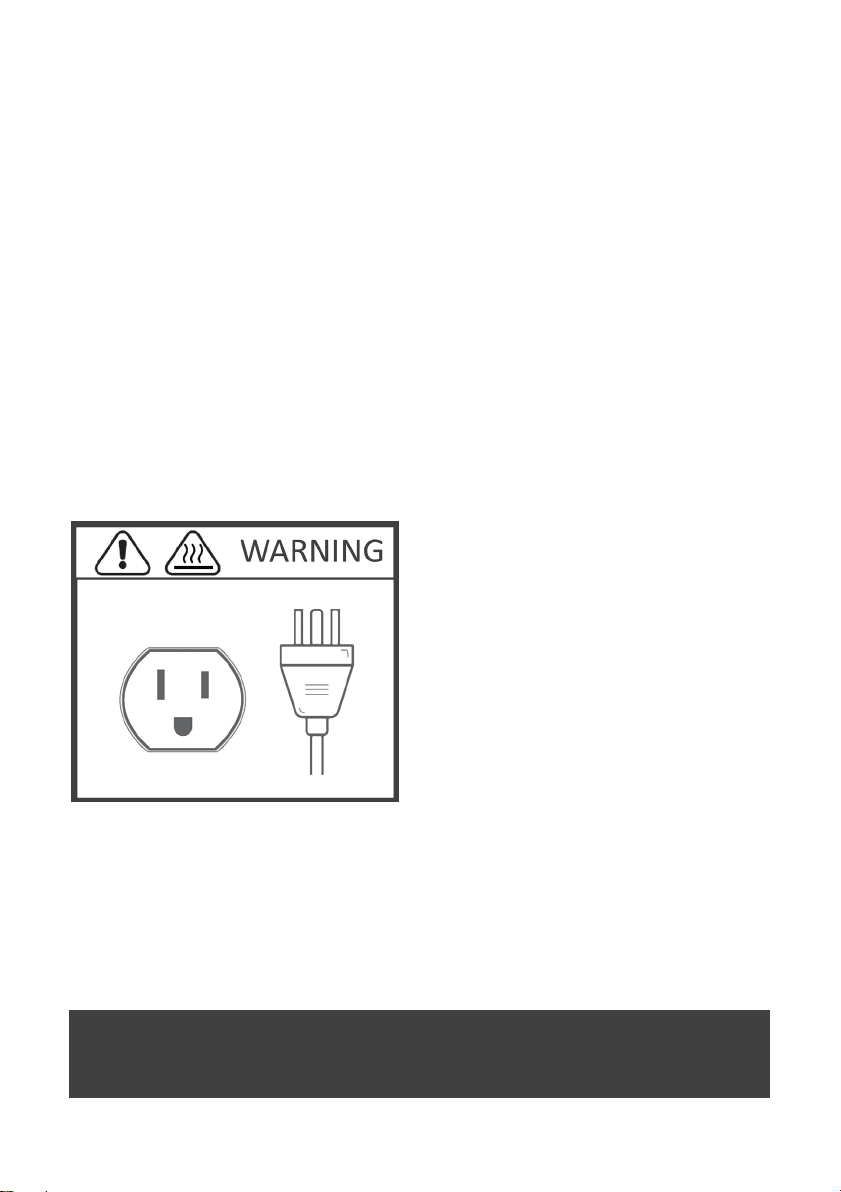
WARNING-To reduce the risk of fire, electric shock, serious personal injury, and
property damage please note the following:
•This appliance is not intended for use by children. Keep the appliance out of the reach of
children and pets. Extra caution is necessary when using this appliance near children.
•ALWAYS ensure the appliance is kept unplugged from the electrical outlet and on the OFF
POSITION, when NOT IN USE!! DO NOT OPERATE THE APPLIANCE EMPTY!!
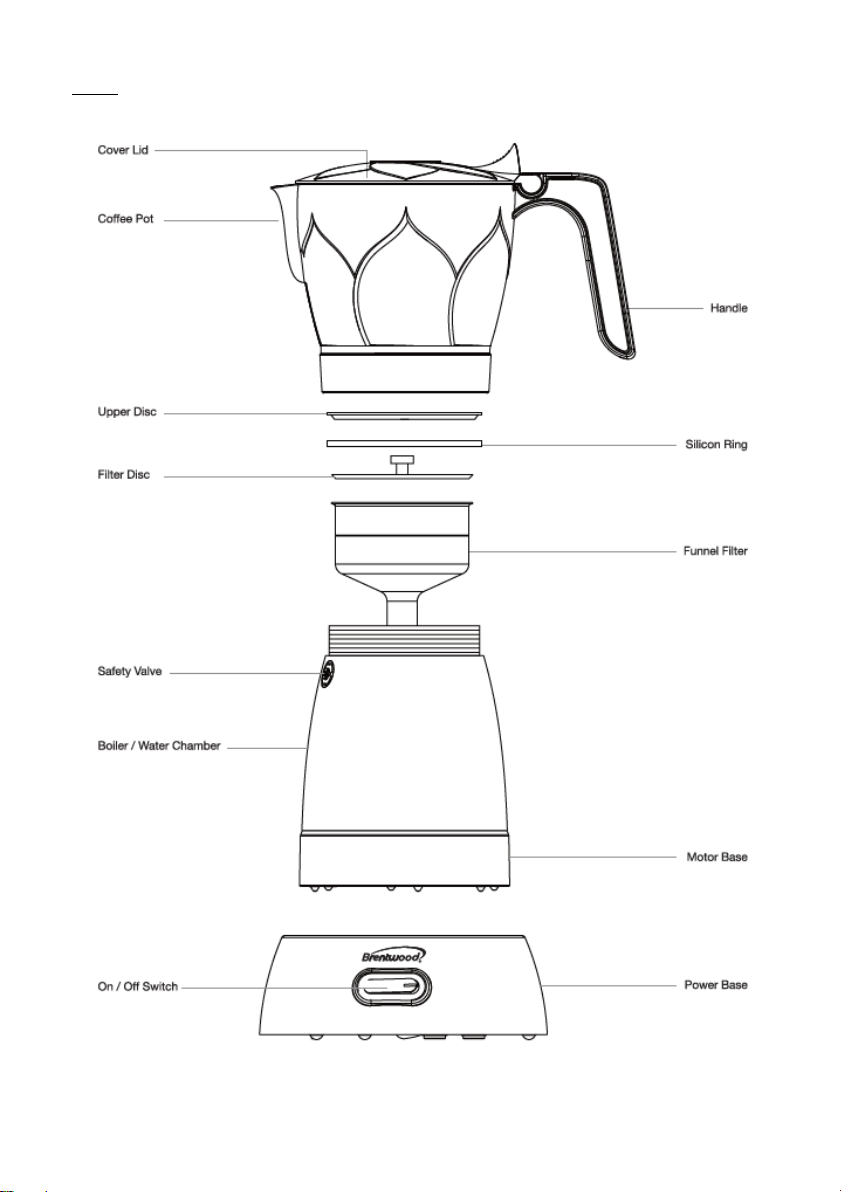
•DO NOT TOUCH BOILER/WATER CHAMBER when in operation and immediately after use.
•SURFACE IS HOT!!! Can burn. Appliance MUST be allowed to cool before assembling,
disassembling, relocating, or cleaning.ONLY use handle to pour.
•Do not leave the appliance unattended while it is in use.
•Do not overload wall outlet with other appliances or if on an extension cord, as this can
result in a fire or electric shock. This will short the appliance out and will leave the
appliance unusable and will not function at all.
•Do not immerse or expose the Base, Power Cord, or Plug of this appliance in water or
other liquids.
•Do not touch hot surfaces. Use handle when pouring.
•This appliance generates heat and steam during use. Use protective oven mitts or gloves
when removing the Lid or handling hot containers to avoid burns and personal injury.
•Do not use attachments not recommended or sold by the Manufacturer.
•Do not place appliance on or near a hot gas or electric burner, in a heated oven, or other heated
surfaces.
•Use extreme caution when moving an appliance containing food or liquids.
•Use the appliance in a well-ventilated area. Keep at least 4-6 inches of space on all sides of
the product to allow adequate air circulation.
•Keep the appliance away from curtains, wall coverings, clothing, dishtowels, or other flammable
materials.
•Do not plug or unplug the appliance from the electrical outlet with a wet hand.
•This appliance is intended solely for non-commercial, non-industrial, household use in cooking
of food for human consumption; do not use the appliance outdoors or for any other purpose.
•Do not let cord hang over edge of table or counter where it may be tripped over or pulled.
Do not allow cord to touch hot surfaces.
•Do not operate the appliance if it has a damaged power cord or plug, if wires are exposed, if it
malfunctions, if it is dropped or damaged, or if the motor housing is dropped in or exposed to
water.

4
•Do not attempt to examine or repair this appliance yourself. Please review the Warranty
Policy on Page 11.
•Do not put any stress on the power cord where it connects to the appliance, as the power
cord could fray and break.
SPECIAL INSTRUCTIONS: A short power supply cord is provided to reduce the risk of
becoming entangled in or tripping over a longer cord. An extension cord is not recommended for
use with this product, but if one must be used:
−The marked electrical rating must be at least as great as that of the appliance.
−If the appliance cord is a 3-wire grounded cord, the extension cord must also be a 3-wire
grounded cord.
−Arrange the extension cord so that it will not drape over the countertop or tabletop where it
can be tripped over or pulled.
WARNING: This product is equipped with a 3 -prong grounding type. This is a safety feature.
The plug will fit into an outlet one way ONLY. Never use the plug with an extension cord
unless you can fully insert the plug into the extension cord and the extension cord must be a
grounding-type 3 wire cord. DO NOT attempt to defeat the safety purpose of the plug.
SAVE THESE INSTRUCTIONS
FOR FUTURE REFERENCE

5
Parts:
Support
Base

6
Before First Use:
Important: Please check all packaging material
carefully before discarding as there may be
accessory parts contained within the packaging
material.
NOTE: Do not immerse motor part in water. To
clean, fill the kettle with water up to the MAX level
(Do not exceed the safety valve) turn off your
appliance when the water starts boiling and pour
the contents out. Only use handle after use to
pour. Boiler/Water Chamber is TOO HOT TO
TOUCH. Wait until it cools before handling or wear
heat resistant gloves to open and disassemble.
CAUTION:
Do not touch the body of the Boiler/Water Chamber with bare hands when in operation or
immediately after using. Surface gets HOT! Use oven mittens or heat resistant gloves to
handle and pour out water. ONLY USE HANDLE TO POUR.
Wait until the Boiler/Water Chamber cools before cleaning, emptying, refilling, and
disassembling.
Washable Parts (Dishwasher Safe - Top Shelf ONLY)
1. Coffee Pot
2. Upper Disc / Filter Disc
3. Funnel Filter
4. Silicon Ring
First Steps:
Wash the pot and lid using warm soapy water. Run the appliance with water once or twice
before brewing an actual pot.
Note:
ALWAYS keep the bottom of the ‘Boiler’ and the ‘Support Base’ dry. If this part gets
wet, your appliance will not function.
Attention:
First use may cause a slight odor or small smoking upon heating, it is normal. This is
a result of the heating element chemical reaction. It quickly goes away.
•Rinse the inside of the Boiler and Pitcher thoroughly before using.
•Dry all parts before using.
•Do not place Boiler on Support Base until it is fully assembled.
•Do not fill Boiler with water while it is on the Support Base.

7
•Place Support Base on a flat clean dry surface and make certain the
power button is on the OFF position before plugging into an outlet.
•Place dry Boiler on a flat dry clean counter and fill with water.
•DO NOT fill or refill Boiler when on the Support Base.
CAUTION: Water level must not exceed safety valve.
•Now you may place the filled Boiler on the Support Base, make sure both are dry.
•Switch appliance ON by pressing on the LEFT side of the switch. Light will illuminate
when it is ON, indicating the heat source is working. Follow Quick Start 4 Steps below.
Or for more details, go to ‘Using Your Moka Espresso Maker’(Page 8).
Notice: ALWAYS keep the appliance in the OFF position and ALWAYS unplug
from the electrical outlet when done.
CAUTION
: Parts will be HOT!! ONLY USE HANDLE TO
POUR. Do not clean immediately after use. Allow appliance to cool before handling the
‘Boiler’ to clean and dry. Always dry before reassembling the espresso maker and place
back on to the unplugged Support Base.
Fill boiler with
water.

8
Make sure power base is placed
on a clean and dry flat surface.
Remove the coffee maker from
its base to refill water.
According to the number of cups of
coffee (for 3-4 persons, max-7 oz.)
pour enough cold water in boiler.
Place filter funnel and add desired
amount of coffee. Then place disc filter
on top.
MAX
10oz.
Reattach the pot on the boiler and place
the coffee maker on the power base.
Then turn on the power switch.
Use with caution while serving espresso
as the body of the pot and boiler are
extremely hot!
Using Your Moka Espresso Maker:

9
Notice: ALWAYS keep the appliance in the OFF position and ALWAYS unplug from the
electrical outlet when done brewing.Unplug before you start to serve.
Caution
: Parts will be hot. Do not handle immediately after use. Allow appliance to cool
before handling the ‘Boiler’ to clean and dry. Always dry before reassembling the espresso
maker and place back on to the unplugged Support Base.
Using Your Moka Espresso Maker:
WARNING: Hot surfaces.
1. Filling with water: remove the Boiler/Water Chamber from its Support Base and place it
down on a clean, dry flat surface.
2. According to the number of espresso cups desired (for 3-4 persons, max-7 oz.), fill with
enough cold water. Water level must NOT exceed safety valve.
3. Replace filter back on the Boiler and fill with the desired amount of espresso or Moka.
Place disc filter on top.
4. Twist on the Pitcher to the Boiler and place it on the Support Base.
5. Your appliance is ready for use.
6. Before plugging in your appliance to an electrical outlet, make sure you have the switch
on the OFF position, opposite of the light indicator side.
7. Keep the Power Switch always on the OFF position, when not in use.
8. Plug the Espresso Maker into an electrical outlet and switch the power from OFF to ON,
the light indicator will illuminate.
9. Allow it to brew the entire amount of water you filled it with.
10. Once it stops brewing all the water, switch the power from ON to OFF and unplug from
the electrical outlet immediately.
11. Your espresso is ready to be served.
12. Use caution while serving espresso as the Broiler gets extremely hot.Use the cool touch
handle to pour. DO NOT disassemble or clean immediately after, unless you are using
heat resistant gloves. Otherwise allow the appliance to cool before handling.
CAUTION: Do not overfill the appliance or operate it when empty.
NOTE: This appliance has boil-dry protection. If this appliance is not shut OFF after
use, and there is no more water in the chamber, the appliance will cycle ON and OFF
repeatedly for several times. This feature is a safety feature and should not be used
to turn the appliance off. If the boil-dry protection feature is used too many times,
the appliance will eventually not turn on as it will eventually no longer operate
effectively.
IMPORTANT: ALWAYS switch the appliance OFF and unplug after use. If you do this
small step, you will extend the life of the appliance.
Cleaning Your Moka Espresso Maker:
WARNING: Always unplug the appliance and allow it to cool before cleaning or storing.
•Before cleaning always make sure the appliance is OFF. Unplug it from the outlet and
allow it to cool down.

10
•It is recommended to rinse parts after use to make cleaning easier once it cools.
•Empty any remaining water and espresso grounds from the appliance, rinse the Pitcher
and Boiler out with warm water, and wipe the outside off thoroughly with a dry or damp
cloth.
•NEVER immerse the Power Base unit and the Boiler into water.
Washable Parts (Dishwasher Safe - Top Shelf ONLY)
•Coffee Pot, Upper Disc / Filter Disc, Funnel Filter, Silicon Ring
•Avoid using abrasive and chemical cleaning agents (i.e., liquid bleach, hydrochloric acid,
etc.) to clean any accessory parts of the appliance. If outside gets damaged that is not
covered under Warranty.
•Store product in a cool, dry place, away from the reach of children.
Descaling Your Pot:
WARNING: Always unplug the product before any cleaning. Dry all parts after every use.
Descale your pot regularly to avoid tougher stains.
Descaling:
Descaling is the removal of mineral deposits from glass and stainless steel. All water
contains minerals including purified and filtered water. After your first use, you may see
the first signs of deposits which may be white to reddish brown in color. These stains are
not rust nor are they toxic.
Note: Reheating espresso in your pot may discolor or stain the surface at the base of the
pot.
To descale, fill the pot full of water, add a small amount of white vinegar, and boil. Unplug
as soon as the water starts boiling, if you are cleaning the Boiler, let the solution sit in the
boiler for an hour. If it is the pot, allow the solution to fill the pot and allow the solution to
sit for an hour. For darker stains leave overnight. This will remove most deposits that have
built up from normal use. Rinse out solution, add fresh water, and boil again. Allow to cool,
follow with thorough cleaning, and dry before next use.
If you air dry your boiler, please flip it upside down so any remaining water will fall out of
the boiler and into the drying rack. This will lessen the mineral deposits.
We do suggest you dry it inside and out after every use to avoid buildup.

11
ONE YEAR LIMITED WARRANTY
Write down the following information about your appliance to better help you
obtain assistance or service if you ever need it.
CUSTOMER RECORD
Date of Purchase______________ Store/Dealer___________________________
Model/Item No: _______________________________
THIS WARRANTY APPLIES TO PRODUCTS PURCHASED AND USED IN THE CONTINENTAL
U.S. AND CANADA ONLY. This is the only express warranty for this product and is in
lieu of any other warranty or condition. This product is warranted to be free from
defects in material and workmanship for a period of one (1) year from the date of
original purchase. During this period, your exclusive remedy is repair or replacement
of this product, at our option; however, you are responsible for all costs associated
with returning the product to us and our returning a product or component under this
warranty to you. If the product or component is no longer available, we will replace
with a similar one of equal or greater value. This warranty does not cover glass, filters,
wear from normal use, use not in conformity with the printed directions, or damage
to the product resulting from accident, alteration, abuse, or misuse.
THIS WARRANTY EXTENDS ONLY TO THE ORIGINAL CONSUMER PURCHASER. KEEP
THE ORIGINAL SALES RECEIPT, AS PROOF OF PURCHASE IS REQUIRED TO MAKE A
WARRANTY CLAIM.
This warranty is void if the product is used for other than single-family household use
or subjected to any voltage and waveform other than what is specified on the rating
label (E.G., 120V~60Hz). We exclude all claims for special, incidental, and
consequential damages caused by breach of express or implied warranty. All liability is
limited to the amount of the purchase price. Every implied warranty, including any
statutory warranty or condition of merchantability or fitness for a particular purpose,
is disclaimed except to the extent prohibited by law, in which case such warranty or
condition is limited to the duration of this written warranty. This warranty gives you
specific legal rights. You may have other legal rights that vary depending on where you
live. Some states do not allow limitations on implied warranties or special, incidental,
or consequential damages, so the foregoing limitations may not apply to you. To make
a warranty claim do not return this appliance to the store.
TO OBTAIN WARRANTY SERVICE AND/OR TROUBLESHOOTING INFORMATION:
Call Customer Service at 1-888-903-0060 in the U.S.
Monday through Friday: 9:00 am – 5:00 pm PT
U.S.A. Customers Please Email: warranty@brentwoodus.com
Canadian Customers Please Email: canada.warr[email protected]
Go online at www.brentwoodus.com

12
MEDIDAS DE SEGURIDAD IMPORTANTES
Al usar este o cualquier otro electrodoméstico, siga siempre las precauciones básicas de
seguridad, especialmente cuando los niños están presentes.
LEA TODAS LAS INSTRUCCIONES
ANTES DE USAR
ADVERTENCIA-Para reducir el riesgo de incendio, choque eléctrico, lesiones personales
graves y daños a la propiedad, por favor tenga en cuenta lo siguiente:
•Este aparato no está destinado al uso de los niños. Mantenga el aparato fuera del alcance de
los niños y los animales domésticos. Es necesario tener especial cuidado cuando se utiliza
este aparato cerca de los niños.
•Asegúrese SIEMPRE de que el aparato se mantenga desenchufado de la toma de corriente y
en la POSICIÓN DE APAGADO, cuando NO SE USE.
•NO TOQUE LA CALDERA/CÁMARA DE AGUA cuando esté en funcionamiento e
inmediatamente después de su uso.
•¡¡LA SUPERFICIE ESTÁ CALIENTE!! Puede quemarse. El aparato DEBE dejarse enfriar antes de
montarlo, desmontarlo, cambiarlo de sitio o limpiarlo. Utilice SOLO el asa para verter.
•No deje el aparato desatendido mientras esté en uso.
•No sobrecargue la toma de corriente con otros electrodomésticos o con un cable alargador,
ya que esto puede provocar un incendio o una descarga eléctrica. Esto provocará un
cortocircuito en el aparato y lo dejará inservible y no funcionará en absoluto.
•No sumerja ni exponga la base, el cable de alimentación o el enchufe de este aparato en agua
u otros líquidos.
•No toque las superficies calientes. Utilice el asa al verter.
•Este aparato genera calor y vapor durante su uso. Utilice guantes o manoplas de protección
cuando retire la tapa o manipule recipientes calientes para evitar quemaduras y lesiones
personales.
•No utilice accesorios no recomendados o vendidos por el fabricante.
•No coloque el aparato sobre o cerca de un quemador de gas o eléctrico caliente, en un horno
caliente o en otras superficies calientes.
•Tenga mucho cuidado al mover un aparato que contenga alimentos o líquidos.
•Utilice el aparato en un área bien ventilada. Mantenga un espacio de al menos 4-6 pulgadas
en todos los lados del producto para permitir una adecuada circulación del aire.
•Mantenga el aparato alejado de cortinas, revestimientos de pared, ropa, paños de cocina u
otros materiales inflamables.
•No enchufe o desenchufe el aparato de la toma de corriente con las manos mojadas.
•Este aparato está destinado exclusivamente al uso doméstico, no comercial y no industrial,
para la cocción de alimentos para el consumo humano; no utilice el aparato al aire libre ni
para ningún otro fin.
•No utilice el aparato vacío.

13
•No deje que el cable cuelgue del borde de la mesa o de la encimera donde pueda tropezar o
ser arrastrado. No permita que el cable entre en contacto con superficies calientes.
•No utilice el aparato si el cable o el enchufe están dañados, si los cables están expuestos, si
funciona mal, si se cae o se daña, o si la carcasa del motor se cae o se expone al agua.
•No intente examinar o reparar este aparato usted mismo. Revise la política de garantía en la
página 11.
•No ejerza ninguna presión sobre el cable de alimentación donde se conecta al aparato, ya
que el cable de alimentación podría deshilacharse y romperse.
INSTRUCCIONES ESPECIALES: Se proporciona un cable de alimentación corto para reducir
el riesgo de enredarse o tropezar con un cable más largo. No se recomienda el uso de un cable de
extensión con este producto, pero si es necesario utilizar uno:
−La capacidad eléctrica marcada debe ser al menos igual a la del aparato.
−Si el cable del aparato es un cable de 3 hilos con toma de tierra, el alargador también debe
ser un cable de 3 hilos con toma de tierra.
−Disponga el cable alargador de manera que no caiga sobre la encimera o el tablero de la
mesa donde pueda tropezar o ser arrastrado.
ADVERTENCIA: Este producto está equipado con una toma de tierra de 3 puntas. Esta es una
característica de seguridad. El enchufe encaja en una toma de corriente SÓLO en un sentido.
Nunca utilice el enchufe con un cable de extensión a menos que pueda insertar completamente el
enchufe en el cable de extensión y el cable de extensión debe ser un cable de 3 hilos con conexión
a tierra. NO intente anular el propósito de seguridad del enchufe.
GUARDE ESTAS INSTRUCCIONES COMO
REFERENCIA

14
Partes:

15
Antes del Primer Uso
Importante: Por favor, compruebe todo el material
de embalaje cuidadosamente antes de desecharlo,
ya que puede haber piezas accesorias contenidas
en el material de embalaje.
NOTA: No sumerja la parte del motor en el agua.
Para limpiarlo, llene el hervidor con agua hasta el
nivel MAX (no sobrepase la válvula de seguridad)
apague el aparato cuando el agua empiece a hervir
y vierta el contenido. Utilice el asa sólo después del
uso para verter. La caldera/cámara de agua está
DEMASIADO CALIENTE PARA TOCARLA. Espere a que se enfríe antes de manipularla o
utilice guantes resistentes al calor para abrirla y desmontarla.
PRECAUCIÓN: No toque el cuerpo de la caldera/cámara de agua con las manos desnudas
cuando esté en funcionamiento o inmediatamente después de su uso. La superficie se
calienta. Utilice manoplas o guantes resistentes al calor para manipular y verter el agua.
UTILICE SÓLO EL ASA PARA VERTER.
Espere a que la caldera/cámara de agua se enfríe antes de limpiarla, vaciarla, rellenarla y
desmontarla.
Piezas lavables (aptas para el lavavajillas - Sólo en
el estante superior)
1. Cafetera
2. Disco Superior / Disco Filtrante
3. Filtro de Embudo
4. Anillo de Silicona
Primeros Pasos:
Lave la olla y la tapa con agua tibia y jabón. Haga funcionar el aparato con agua una o dos
veces antes de preparar una olla real.
Nota: Mantenga SIEMPRE secos la parte inferior de la "Caldera" y la "Base de Apoyo". Si esta
parte se moja, su aparato no funcionará.
Atención:
El primer uso puede causar un ligero olor o una pequeña humareda al calentar, es
normal. Esto es el resultado de la reacción química del elemento calefactor. Desaparece
rápidamente.
•Enjuague bien el interior de la caldera y la jarra antes de usarla.
•Seque todas las piezas antes de usarlas.
•No coloque la caldera en la base de apoyo hasta que esté completamente montada.
•No llene la caldera con agua mientras esté en la base de apoyo.

16
•Coloque la base de apoyo sobre una superficie plana, limpia y
seca y asegúrese de que el botón de encendido esté en la
posición de apagado antes de conectarlo a una toma de
corriente.
•Coloque la caldera seca sobre una superficie plana y limpia y llénela de agua.
•NO llene o rellene la caldera cuando esté en la base de apoyo.
PRECAUCIÓN: El nivel de agua no debe sobrepasar la válvula de seguridad.
•Ahora puede colocar la caldera llena en la base de apoyo, asegúrese de que ambas
están secas.
•Encienda el aparato pulsando en el lado IZQUIERDO del botón. La luz se iluminará
cuando esté encendida, indicando que la fuente de calor está funcionando.
Uso de su Cafetera Moka Espresso:
Aviso: Mantenga SIEMPRE el aparato en posición de apagado y desenchufe SIEMPRE de la
toma de corriente cuando termine de preparar la cerveza. Desenchufe antes de empezar a
servir.
Precaución: Las piezas estarán calientes. No las manipule inmediatamente después de
usarlas. Deje que el aparato se enfríe antes de manipular la "caldera" para limpiarla y secarla.
Seque siempre antes de volver a montar la cafetera exprés y colóquela de nuevo en la base
de apoyo desenchufada.
ADVERTENCIA: Superficies calientes.
1. Llenado de agua: retire la caldera/cámara de agua de su base de apoyo y colóquela
sobre una superficie plana, limpia y seca.
2. De acuerdo con el número de tazas de espresso deseadas (para 3-4 personas, máximo 7
oz.), llene con suficiente agua fría. El nivel de agua NO debe sobrepasar la válvula de
seguridad.
3. Vuelva a colocar el filtro en la caldera y llene con la cantidad deseada de espresso o
moka. Coloque el filtro de disco en la parte superior.
4. Enrosque la Jarra a la Caldera y colóquela en la Base de Apoyo.
5. Su aparato está listo para ser utilizado.
6. Antes de enchufar su aparato a una toma de corriente, asegúrese de que tiene el
interruptor en la posición de apagado, frente al lado del indicador luminoso.
7. Mantenga el interruptor de encendido siempre en la posición OFF, cuando no esté en
uso.
8. Enchufe la Cafetera Espresso en una toma de corriente y cambie la alimentación de OFF
a ON, el indicador luminoso se iluminará.
9. Deje que prepare toda la cantidad de agua con la que la llenó.
10. Una vez que deje de percolar toda el agua, cambie la alimentación de ON a OFF y
desenchúfela de la toma de corriente inmediatamente.
11. Su espresso está listo para ser servido.

17
12. Tenga cuidado al servir el espresso, ya que la caldera se calienta mucho. Utilice el asa de
tacto frío para servir. NO desmonte ni limpie inmediatamente después, a menos que
utilice guantes resistentes al calor. De lo contrario, deje que el aparato se enfríe antes de
manipularlo.
PRECAUCIÓN: No llene demasiado el aparato ni lo haga funcionar cuando esté vacío.
NOTA: Este aparato tiene protección contra el secado por ebullición. Si este aparato
no se apaga después de su uso, y no hay más agua en la cámara, el aparato se
encenderá y apagará repetidamente durante varias veces. Esta función es de
seguridad y no debe utilizarse para apagar el aparato. Si la función de protección
contra el secado por ebullición se utiliza demasiadas veces, el aparato acabará por no
encenderse, ya que dejará de funcionar eficazmente.
IMPORTANTE: Apague SIEMPRE el aparato y desenchúfelo después de usarlo. Si
realiza este pequeño paso, prolongará la vida útil del aparato.
Limpieza de su Cafetera Moka Espresso:
ADVERTENCIA: Desenchufe siempre el aparato y deje que se enfríe antes de limpiarlo o guardarlo.
•Antes de limpiarla, asegúrese siempre de que el aparato esté apagado. Desenchúfelo
de la toma de corriente y deje que se enfríe.
•Se recomienda enjuagar las piezas después del uso para facilitar la limpieza una vez que
se enfríe.
•Vacíe los restos de agua y de posos de café expreso del aparato, enjuague la jarra y la
caldera con agua tibia y limpie bien el exterior con un paño seco o húmedo.
•NUNCA sumerja la unidad de la Base de Potencia y la Caldera en agua.
•Piezas lavables (aptas para el lavavajillas - Sólo en el estante superior)
•Cafetera, disco superior / disco filtrante, filtro del embudo, anillo de silicona
•Evite el uso de agentes de limpieza abrasivos y químicos (es decir, lejía líquida, ácido
clorhídrico, etc.) para limpiar cualquier parte accesoria del aparato. Si el exterior se daña
no está cubierto por la garantía.
•Guarde el producto en un lugar fresco y seco, lejos del alcance de los niños.
Descalcificación de la Olla:
ADVERTENCIA: Desenchufe siempre el producto antes de cualquier limpieza. Seque todas las
piezas después de cada uso. Descalcifique su olla regularmente para evitar manchas más difíciles.
Descalcificación:
La descalcificación es la eliminación de los depósitos minerales del vidrio y del acero inoxidable.
Toda el agua contiene minerales, incluso el agua purificada y filtrada. Después de su primer uso,
puede ver los primeros signos de depósitos que pueden ser de color blanco a marrón rojizo. Estas
manchas no son óxido ni son tóxicas.

18
Nota: Recalentar el café expreso en la olla puede decolorar o manchar la superficie de la base de la
olla.
Para descalcificar, llene la olla de agua, añada una pequeña cantidad de vinagre blanco y hiérvala.
Desenchufe en cuanto el agua empiece a hervir, si se trata de limpiar la caldera, deje que la
solución repose en la caldera durante una hora. Si es la olla, deje que la solución llene la olla y deje
que la solución repose durante una hora. Para las manchas más oscuras, déjela reposar toda la
noche. Esto eliminará la mayoría de los depósitos que se han acumulado por el uso normal. Aclare
la solución, añada agua fresca y vuelva a hervir. Deje que se enfríe, siga con una limpieza a fondo y
seque antes del siguiente uso.
Si seca su caldera al aire, póngala boca abajo para que el agua restante caiga fuera de la caldera y
en la rejilla de secado. Esto reducirá los depósitos minerales.
Le sugerimos que la seque por dentro y por fuera después de cada uso para evitar la acumulación.

19
IMPORTANTES MESURES DE SÉCURITÉ
Lorsque vous utilisez cet appareil ou tout autre appareil électrique, suivez toujours
ces précautions de base, surtout en présence d’enfants.
LISEZ TOUTES LES INSTRUCTIONS
AVANT USAGE
AVERTISSEMENT-Afin de réduire le risque d’incendie, d’électrocution, de blessures
graves ou de dommages matériels, veuillez respecter les mesures de sécurité suivantes:
•Ce produit n’est pas destiné à être utilisé par des enfants. Gardez-le hors de portée des enfants et
des animaux. Redoublez de prudence lorsque vous utiliserez cet appareil à proximité des enfants.
•Veillez TOUJOURS à ce que l'appareil soit débranché de la prise électrique et sur la position OFF,
lorsqu'il n'est pas utilisé !
•NE TOUCHEZ PAS LA CHAUDIÈRE/CHAMPS D'EAU lorsqu'elle fonctionne et immédiatement après
son utilisation.
•LA SURFACE EST CHAUDE ! !! Peut brûler. Il faut laisser refroidir l'appareil avant de l'assembler, de
le démonter, de le déplacer ou de le nettoyer. Utilisez UNIQUEMENT la poignée pour verser.
•Ne laissez pas l'appareil sans surveillance lorsqu'il est en cours d'utilisation.
•Ne surchargez pas la prise murale avec d'autres appareils ou si vous utilisez une rallonge, car cela
peut provoquer un incendie ou un choc électrique. Cela court-circuiterait l'appareil et le rendrait
inutilisable et ne fonctionnerait pas du tout.
•Ne pas immerger ou exposer la base, le cordon d'alimentation ou la fiche de cet appareil dans l'eau
ou d'autres liquides.
•Ne touchez pas les surfaces chaudes. Utilisez la poignée pour verser le liquide.
•Cet appareil génère de la chaleur et de la vapeur pendant son utilisation. Utilisez des gants ou des
gants de protection pour retirer le couvercle ou manipuler des récipients chauds afin d'éviter les
brûlures et les blessures.
•N'utilisez pas d'accessoires non recommandés ou vendus par le fabricant.
•Ne placez pas l'appareil sur ou près d'un brûleur électrique ou à gaz chaud, dans un four chauffé
ou sur d'autres surfaces chauffées.
•Soyez extrêmement prudent lorsque vous déplacez un appareil contenant des aliments ou des
liquides.
•Utilisez l'appareil dans un endroit bien ventilé. Laissez un espace d'au moins 4 à 6 pouces de
chaque côté de l'appareil pour permettre une circulation d'air adéquate.
•Tenez l'appareil à l'écart des rideaux, des revêtements muraux, des vêtements, des linges à
vaisselle ou de tout autre matériau inflammable.
•Ne pas brancher ou débrancher l'appareil de la prise électrique avec une main mouillée.
•Cet appareil est destiné uniquement à un usage domestique, non commercial et non industriel,
pour la cuisson d'aliments destinés àla consommation humaine ; n'utilisez pas l'appareil à
l'extérieur ou à d'autres fins.
•Ne faites pas fonctionner l'appareil à vide.

20
•Ne laissez pas le cordon pendre sur le bord d'une table ou d'un comptoir où il pourrait trébucher
ou être tiré. Ne laissez pas le cordon toucher des surfaces chaudes.
•N'utilisez pas l'appareil si le cordon d'alimentation ou la fiche sont endommagés, si les fils sont
exposés, s'il fonctionne mal, s'il est tombé ou endommagé, ou si le boîtier du moteur est tombé
dans l'eau ou exposé à celle-ci.
•N'essayez pas d'examiner ou de réparer cet appareil vous-même. Veuillez consulter la politique de
garantie à la page 11.
•Nesoumettez pas le cordon d'alimentation à des contraintes à l'endroit où il est raccordé à
l'appareil, car il pourrait s'effilocher et se rompre.
INSTRUCTIONS SPÉCIALES:Un cordon d'alimentation court est fourni pour réduire le
risque de s'emmêler ou de trébucher dans un cordon plus long. L'utilisation d'une rallonge n'est pas
recommandée avec ce produit, mais si elle est nécessaire, elle doit être utilisée :
-La puissance électrique marquée doit être au moins aussi importante que celle de l'appareil.
-Si le cordon de l'appareil est un cordon à 3 fils mis à la terre, la rallonge doit également être un
cordon à 3 fils mis à la terre.
-Disposez la rallonge de manière à ce qu'elle ne traîne pas sur le comptoir ou la table, où elle
pourrait faire trébucher ou être tirée.
AVERTISSEMENT:Ce produit est équipé d'une prise de terre à 3 broches. Il s'agit d'un dispositif de
sécurité. La fiche s'insère dans une prise de courant dans un sens SEULEMENT. N'utilisez jamais la
fiche avec une rallonge à moins que vous ne puissiez insérer complètement la fiche dans la rallonge
et que la rallonge soit un cordon à 3 fils avec mise à la terre. N'essayez PAS de contourner le dispositif
de sécurité de la fiche.
CONSERVEZ CES INSTRUCTIONS À TITRE DE
RÉFÉRENCE
This manual suits for next models
2
Table of contents
Languages:
Other Brentwood Appliances Coffee Maker manuals

Brentwood Appliances
Brentwood Appliances TS-215BK Quick guide

Brentwood Appliances
Brentwood Appliances TS-110BK Quick guide

Brentwood Appliances
Brentwood Appliances TS-113BK Quick guide

Brentwood Appliances
Brentwood Appliances TS-111BK Quick guide

Brentwood Appliances
Brentwood Appliances TS-1101BK Quick guide

Brentwood Appliances
Brentwood Appliances TS-219BK Quick guide

Brentwood Appliances
Brentwood Appliances GA-135BK Quick guide

Brentwood Appliances
Brentwood Appliances TS-213BL Quick guide

Brentwood Appliances
Brentwood Appliances TS-216 Quick guide

Brentwood Appliances
Brentwood Appliances TS-213W Quick guide