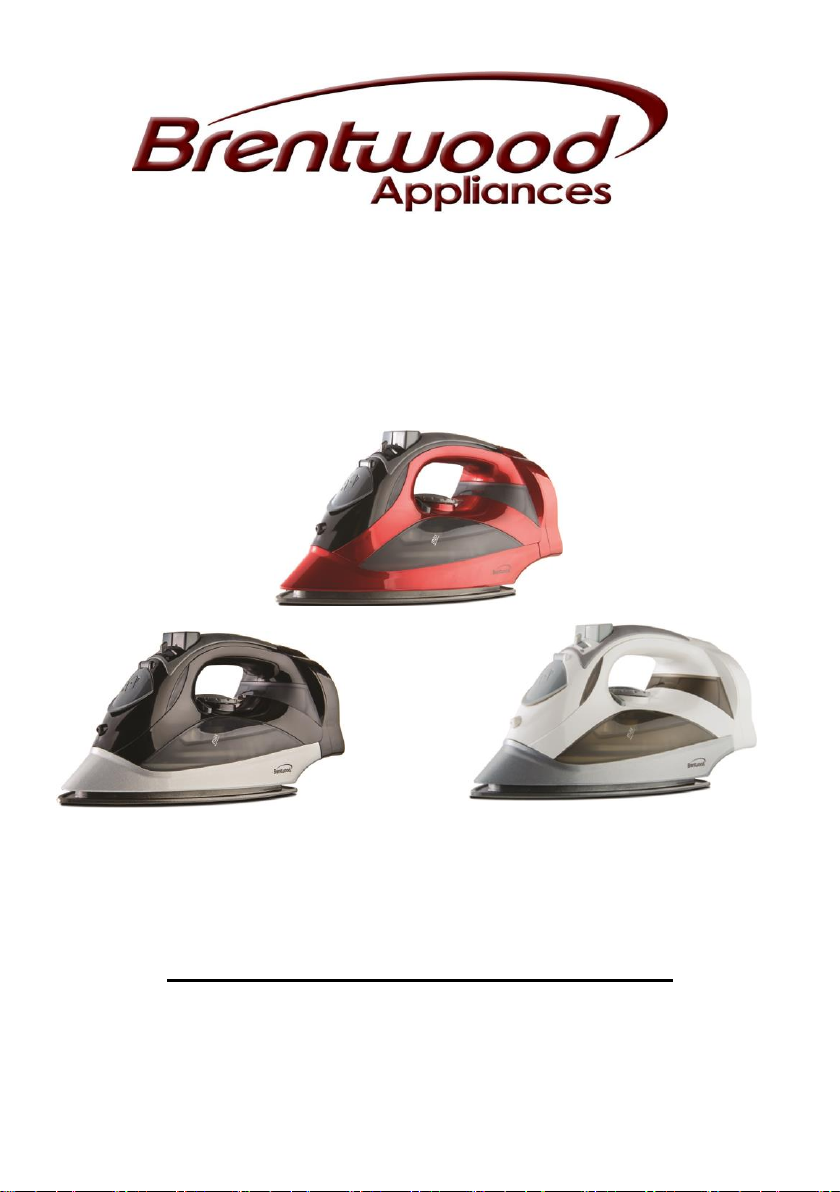
Brentwood Appliances MPI-59R Quick guide

STEAM IRON WITH
RETRACTABLE CORD
MPI-59R
MPI-59BK MPI-59W
Operating and Safety Instructions
FOR INDOOR HOUSEHOLD USE ONLY

2
IMPORTANT SAFEGUARDS
When using this or any other electrical appliance, always follow these
basic safety precautions, especially when children are present.
READ ALL INSTRUCTIONS
BEFORE USE
WARNING-- To reduce the risk of fire, electric shock, serious
personal injury and property damage please note the following:
This product is not intended for use by children. Keep the product out of the
reach of children and pets. Extra caution is necessary when using this
appliance near children.
Always ensure the product is unplugged from the electrical outlet and
allowed to cool before assembling, disassembling, relocating, or cleaning it.
Do not leave the product unattended while it is in use. Always unplug the
product from the electrical outlet when not in use.
Do not immerse the Base, Power Cord, or Plug of this product in or expose
the Power Cord or Plug to water or other liquids.
Do not touch hot surfaces. Use handles or knobs when handling product.
Use protective oven mitts or gloves when removing the Lid or handling hot
containers to avoid burns or personal injury.
Take proper precautions to prevent burns, fire, or personal or property
damage as this appliance generates heat and steam during use.
Do not use attachments not recommended or sold by the product
manufacturer. Attachments, when furnished, may become hot during use.
Allow any attachments to cool before handling them.
Do not place on or near a hot gas or electric burner, in a heated oven, or
other heated surfaces.
Use extreme caution when moving an appliance containing hot food, water,
or other liquids.
Use the product in a well-ventilated area. Keep at least 4-6 inches of space
on all sides of the product to allow adequate air circulation.
Use appliance on a table or flat surface.
Keep the product away from curtains, wall coverings, clothing, dishtowels, or
other flammable materials.
Do not plug or unplug the product from the electrical outlet with a wet hand.
This product is intended solely for non-commercial, non-industrial,
household use in cooking of food for human consumption; do not use the
product outdoors or for any other purpose.
Do not operate the product empty.
Do not let cord hang over edge of table or counter where it may be tripped
over or pulled. Do not allow cord to touch hot surfaces.

3
Do not operate the product if it has a damaged or cut Power Cord or plug, if
wires are exposed, if it malfunctions, if it is dropped or damaged, or if the
Motor Housing is dropped in or exposed to water.
This product has no user-serviceable parts.
Do not attempt to examine or repair this product yourself. Only qualified
service personnel should perform any servicing; take the product to the
appliance repair shop of your choice for inspection and repair.
Do not put any stress on the power cord where it connects to the product, as
the power cord could fray and break.
SPECIAL INSTRUCTIONS:
The Iron should always be turned to “MIN” before plugging or unplugging
from outlet.
Always disconnect Iron from electrical outlet when filling with water,
emptying or when not in use.
Burns can occur from touching hot metal parts, hot water or hot steam. Use
caution when you turn the Steam Iron upside down as there still be hot
water in the reservoir.
Never immerse the iron, cable or plug in any liquid.
A short power supply cord is provided to reduce the risk of becoming
entangled in or tripping over a longer cord. An extension cord is not
recommended for use with this product, but if one must be used:
The marked electrical rating must be at least as great as that of the
product;
If the product is of a 3-prong grounding type, the extension cord must be a
grounding-type 3-wire cord.
Arrange the extension cord so that it will not drape over the countertop or
tabletop where it can be tripped over or pulled.
WARNING: This product is equipped with a polarized
plug (one blade is wider than the other blade) to reduce
the risk of electrical shock. This is a safety feature.
The plug will fit into a polarized outlet only one way. If
you are unable to insert the plug into the electrical
outlet, try reversing the plug. If the plug still does not
fit, contact a qualified electrician. Never use the plug with an extension cord
unless you can fully insert the plug into the extension cord. Do not alter the
plug. Do not attempt to defeat the safety purpose of the polarized plug.
SAVE THESE INSTRUCTIONS
FOR FUTURE REFERENCE

4
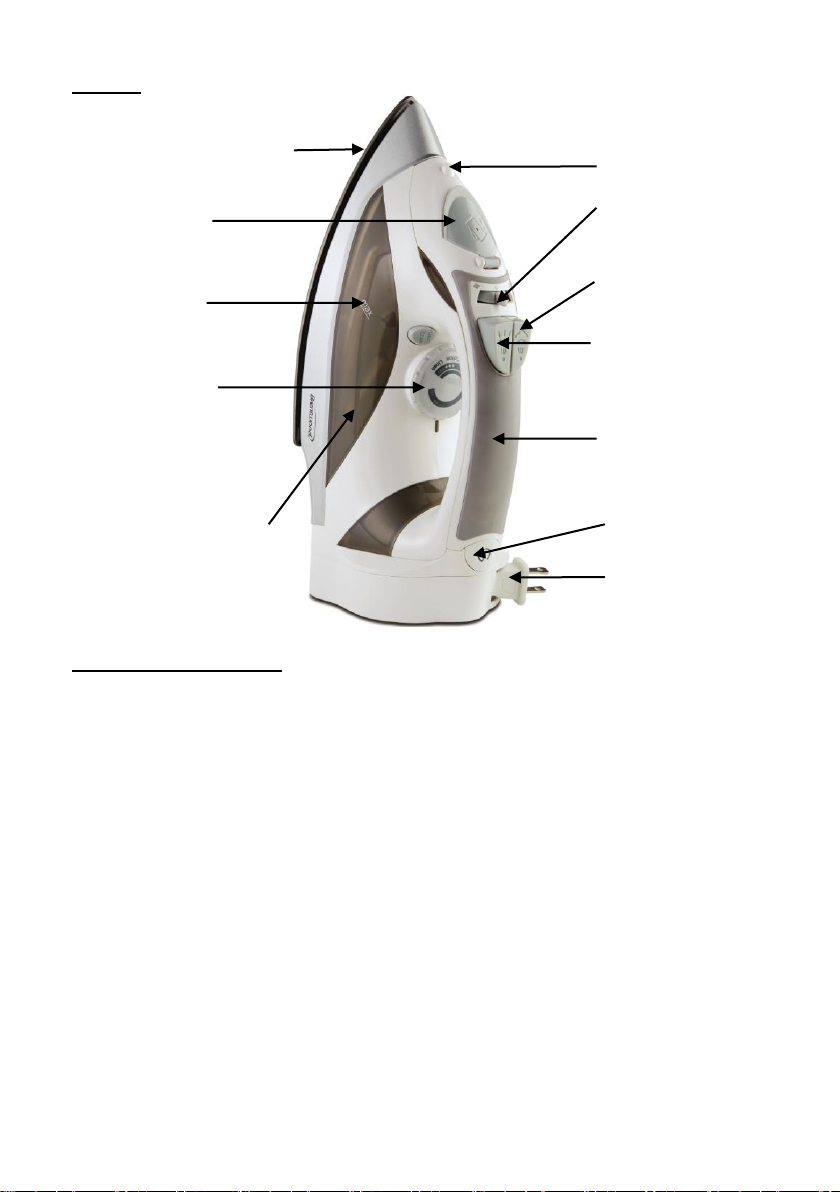
Parts:
Before First Use
IMPORTANT: Please check all packaging material carefully before discarding
as there may be accessory parts contained within the packaging material.
1.Use the lowest temperatures with fabrics that have unusual finishes such as
sequins, embroidery, flush, etc…
2.We recommend passing the iron over an ordinary cloth before using it for
the first time.
3.If the fabric is mixed, set the thermostat to the temperature of the fiber
requiring the lower temperature.
4.If you do not know the composition of the fabric, try testing on a hidden
corner of the garment. Start with a low temperature and increase it gradually
until it reaches the ideal temperature.
5.Never iron areas with traces of perspiration or other marks. The heat of the
plate fixes the stains on the fabric making them irremovable.
Attention: First use may cause a slight odor or small smoking upon
heating, it is normal. This is a result of the heating element chemical
reaction. It quickly goes away.
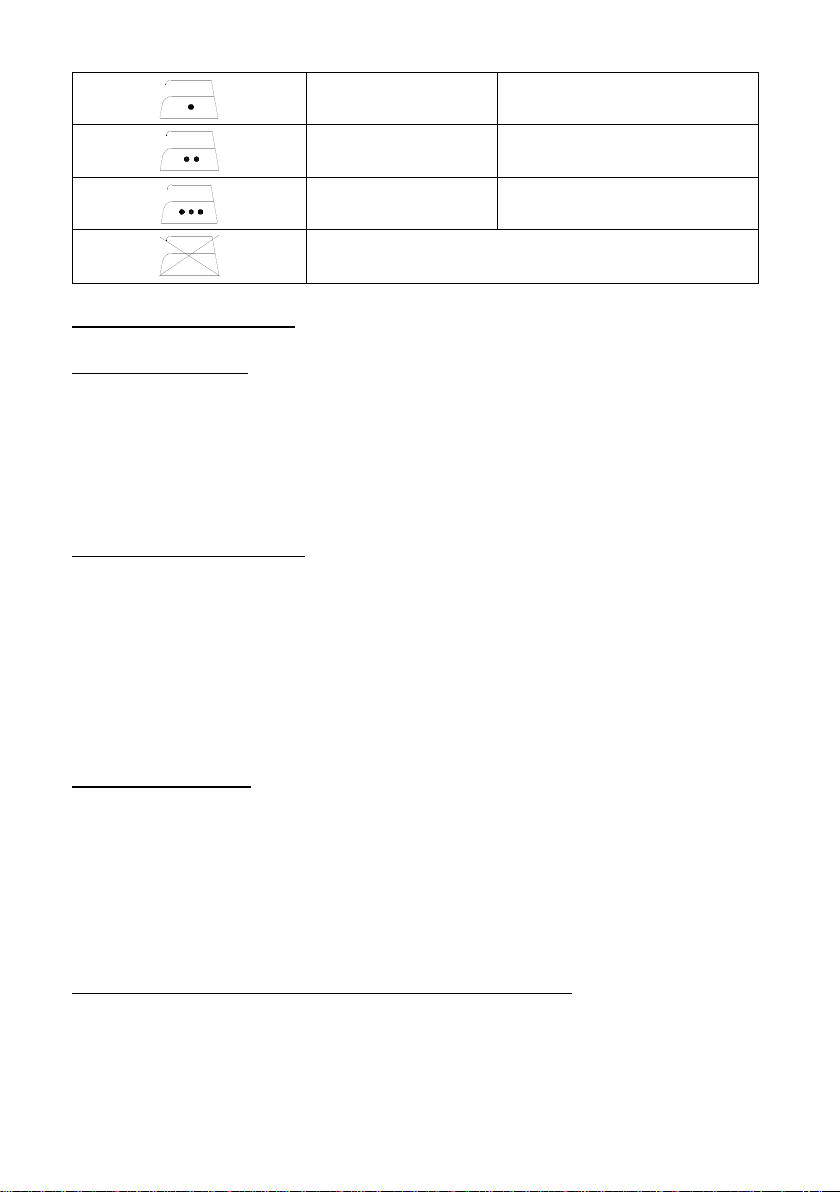
Identifying your Garment:
GARMENT LABEL
FABRIC TYPE
THERMOSTAT REGULATION
K. Non-Stick Plate
with Steam Vents
D. Spray
Button
A. Spray
Vent
G. Retractable
Cord Button
L. Filler Cap
C. Shot
Steam Button
B. Steam
Dial
H. Thermostat
Dial
I. Transparent
Water Tank
J. Max Filling
level
E. Handle
F. Supply Cord
and Plug
5
Synthetic
●
lowtemperature
Silk - Wool
●●
medium temperature
Cotton - Linen
●●●
high temperature
Fabric should not be ironed
Using Your Steam Iron:
STEAM IRONING
Filling the Reservoir:
1.Check that the plug is disconnected from the socket.
2.Move the steam knob Bto “O” [Fig. 1].
3.Raise the tip of the iron to help the water enter the opening without
overflowing.
4.Slowly pour the water into the reservoir using the special measure and
taking care not to go over the maximum level (about 170ml) indicated by
“MAX” on the reservoir.
Selecting the Temperature:
1.Put the iron in a vertical position.
2.Put the plug in the socket.
3.Adjust the temperature knob (H) according to the international symbol on the
garment label [Fig. 3]. The power light (E) indicates with a red light that the
iron is heating up. Wait until the power light turns green before ironing.
Warning: during ironing, the power light comes on at intervals, indicating that
the selected temperature is maintained. If you lower the selected temperature
after ironing at a high temperature, do not start ironing until the power light
comes on again.
Selecting the Steam:
The quantity of steam is regulated by the steam knob (B).
1.Turn the steam knob to a position between minimum and maximum
depending on the quantity of steam required and the temperature selected.
Warning: the iron gives off steam continuously only if you hold the iron
horizontally. You can stop the continuous steam by placing the iron in a vertical
position or by moving the steam knob to “O”. As indicated on the steam knob
(H) and in the initial table, you can only use steam at the highest temperatures.
If the selected temperature is too low, water may drip onto the plate.
Selecting Shot-Steam and Steam when Ironing Vertically:
1.Press the shot-steam button (C) to generate a powerful burst of steam that
can penetrate the fabrics and smooth the most difficult and tough creases.
Wait for a few seconds before pressing again [Fig. 4].
2.By pressing the shot-steam button at intervals you can also iron vertically
(curtains, hung garments, etc.) [Fig. 5].

6
Warning:the shot-steam function can only be used at high temperatures.
Stop the emission when the power light comes on, and then start ironing again
only after the light has gone off.
DRY IRONING
To iron without steam, follow the instructions in section “Steam Ironing”,
leaving the steam selector (B) on position “O”.
SPRAY FUNCTION
1.Make sure that there is water in the reservoir.
2.Press the spray button (D) slowly (for a dense spray) or quickly (for a
vaporized spray) [Fig. 6].
Warning:for delicate fabrics, we recommend moistening the fabric
beforehand using the spray function, or putting a damp cloth between the iron
and the fabric. To avoid staining, do not use the spray on silk or synthetic
fabrics.
1
MAX
MIN
3
5
7
2
4
8
6
Self-Cleaning:

7
The self-cleaning feature cleans inside the plate, removing impurities. We
recommend using it every 10 to 15 days. Directions are as follows:
1.Fill the tank up to the maximum level indicated and set the steam selector to
“O”.
2.Set the thermostat dial (H) to the maximum temperature and wait for the
Indicator Light (E) emits green light.
3.Pull the plug out of the socket and hold the iron horizontally over the sink.
4.Hold the Steam Control Knob (B) on the cleaning position for 60~90
seconds, until all the boiling water, steam, and impurities come out [Fig. 7].
5.When the soleplate has cooled down, you can clean it with a damp cloth.
Retractable Cord:
1.Grab the cord and slowly pull out to the length that you need for ironing.
2.When you need to store the iron, grab the plug with one hand and press the
Cord Rewind Button (G) with the other hand. [Fig. 8]
CAUTION :Be careful not to let the cord snap back towards your body.
Cleaning:
Note: before cleaning the iron in any way, make sure that the appliance plug is
not connected to the socket.
Any deposits, starch residue or size left on the plate can be removed using a
damp cloth or an nonabrasive liquid detergent.
Avoid scratching the plate with steel wool or metallic objects.
The plastic parts can be cleaned with a damp cloth then wiped over with a dry
cloth.
Storing your Steam Iron:
WARNING: Always unplug the product and allow it to cool before cleaning or
storing it.
When ironing is complete, turn the Steam Dial to the "O" position. When
there is no steam, turn the Temperature Dial to “MIN” point. Unplug the
product from the electrical outlet.
NOTICE: Always unplug the product from the electrical outlet when it is not in
use or will be left unattended.
Empty the reservoir by turning the Iron Upside down and gently shaking it.
Please be very careful as contents might still be hot.
Leave iron vertically to cool down completely.
Always store iron in vertical position.
Dry all part thoroughly before storing or using again.
ONE-YEAR LIMITED WARRANTY

8
FOR ONE YEAR FROM THE DATE OF PURCHASE, WHEN THIS APPLIANCE IS
OPERATED AND MAINTAINED PER INSTRUCTIONS FURNISHED WITH THE
PRODUCT, BRENTWOOD APPLIANCES, INC. WILL REPLACE THE PRODUCT WITH AN
EQUIVALENT UNIT OR A NEW UNIT, SOLEY AT OUR OPTION.
TO OBTAIN WARRANTY SERVICE AND TROUBLESHOOTING INFORMATION:
Call Customer Service at 1-888-903-0060 in the U.S.
BRENTWOOD will not pay for:
1.Service calls to correct the installation of your appliance, to instruct you how to use
your appliance, to replace house fuses or correct house wiring, or to replace light
bulbs.
2.Repairs when your appliance is used in other than normal, single-family household
use.
3.Pickup and delivery
4.Damage resulting from accident, alteration, misuse, abuse, fire, flood, improper
installation, acts of God, or use of products not approved by Brentwood Appliances.
5.Repairs to parts or systems resulting from unauthorized modifications made to the
appliance.
6.Service or warranty support for units located and/or operated outside the United
States.
NO WARRANTIES, WHETHER EXPRESS OR IMPLIED, INCLUDING BUT NOT
LIMITED TO, ANY IMPLIED WARRANTIES OF MERCHANTABILITY FOR A
PURPOSE, OTHER THAN THOSE EXPRESSLY DESCRIBED ABOVE SHALL
APPLY. MANUFACTURER FURTHER DISCLAIMS ALL WARRANTIES AFTER THE
EXPRESS WARRANTY PERIOD STATED ABOVE. NO OTHER EXPRESS
PRODUCTS SHALL BE BINDING ON BRENTWOOD APPLIANCES, INC. REPAIR
OR REPLACMENT IS THE EXCLUSIVE REMEDY OF THE CONSUMER.
BRENTWOOD APPLIANCES, INC. SHALL NOT BE LIABLE FOR ANY INCIDENTAL
OR CONSEQUENTIAL DAMAGES CAUSED BY THE USE, MISUSE OR INABILITY
TO USE THE PRODUCT. NOT WITHSTANDING THE FOREGOING CONSUMERS
RECOVERY AGAINST BRENTWOOD SHALL NOT EXCEED THE PURCHASE
PRICE OF THE PRODUCT SOLD BY BRENTWOOD. THIS WARRANTY SHALL
NOT EXTEND TO ANYONE OTHER THAN THE ORIGINAL CONSUMER WHO
PURCHASED THE PRODUCT AND IS NOT TRANSFERABLE.
Some states or provinces do not allow the exclusion or limitation of incidental or
consequential damage or allow limitations on warranties, so limitation or exclusions
may not apply to you. This warranty gives you specific legal rights, and you may have
other rights that vary from state to province. Outside the 50 United States, this
warranty does not apply. Contact you authorized Brentwood Dealer to determine
if another warranty applies.
Keep this Warranty and your sales slip together for future references. You must
provide proof of purchase for in-warranty service.
Write down the following information about your appliance to better help you obtain
assistance or service if you ever need it. You will need to know your complete model
number and serial number. You can find this information on the model and number
label / plate. CUSTOMER RECORD
Date of Purchase _ Store/Dealer
Model No: Serial No.:

9
PLANCHA DE VAPOR CON
CUERDA RETRACTABLE
MPI-59R
MPI-59B MPI-59W
Instrucciones de Operación y Seguridad
-SOLO PARA USO DOMESTICO -

10
PRECAUCIONES IMPORTANTES
Al usar este o cualquier otro electrodoméstico, siga las precauciones
básicas de seguridad, especialmente cuando niños están presentes.
LEA TODAS LAS INSTRUCTIONES
ANTES DE USAR
ADVERTENCIA-- Para reducir el riesgo de incendio, choque eléctrico,
lesiones personales graves y daños a la propiedad, por favor tenga en
cuenta lo siguiente:
Esteproducto noestá destinadopara su usopor los niños. Mantenga el producto
fuera del alcance de los niños y las mascotas. Precaución adicional es necesario
cuando seutilizaesteaparato cercadeniños.
Asegúresesiemprede que elproducto está desenchufado de latomade
corriente y sedeja enfriar antes de montar, desmontar, trasladar o limpiar.
No deje elproductodesatendido mientras está en uso. Siempredesenchufe el
productodelatomadecorrientecuandono esté en uso.
No sumerjalabase, el cablede alimentación o el enchufe de este producto ni
exponga el cableo el enchufe al agua u otros líquidos.
No toque las superficies calientes. Use las asas o las perillas al manipular el
producto. Use guantes protectores o guantes de horno al retirar latapa o el
manejo de contenedores calientes para evitar quemaduras o lesiones personales.
Tome las debidas precauciones para evitarquemaduras, incendios o daños
personales omateriales como este aparato generacalor y vapor de aguadurante
el uso.
No utilice accesorios no recomendados o vendidos por el fabricante delproducto.
Adjuntos, cuando amueblada, pueden calentarse durante el uso. Permita que los
productos s que se enfríen antes de manipularlos.
No coloque electrodomésticosobre ocerca de una hornilladegas o eléctrica, en
un horno caliente, u otras superficies calientes.
Tengamuchocuidado cuando mueva un aparato que contiene alimentos, agua u
otros líquidos.
Utilice el producto en un área bien ventilada. Mantengapor lo menos 4-6
pulgadas de espacioen todos los lados del producto para permitir lacirculación
deaire adecuada.
Utilizar aparato sobreunamesa o superficieplana.
Mantenga el producto lejos de cortinas, revestimientos de paredes, ropa, paños
decocina, u otros materiales inflamables.
No enchufenidesenchufe elproductode latoma de corriente con las manos
mojadas.
Esteproducto está destinado exclusivamentepara el usono comercial, no
industrial,hogar de cocción de los alimentos para el consumo humano, no use el
producto en exteriores o paracualquierotropropósito.
No utilice el producto vacío.

11
No permitaque el cable cuelguedel bordede lamesa omostrador dondese
puedetropezarcon él ni tirar. No permita que el cabletoque superficies calientes.
No utilice el producto si tieneun cablede alimentación dañado o cortado o el
enchufe, si los cables están expuestos, en caso demal funcionamiento, sise ha
caído odañado, o si la armaduradel motor sehacaídoo este expuesto al agua.
Esteproducto notienepiezas que elusuariopueda reparar.
No trate de examinar o reparar este producto usted mismo. Sóloel personal de
serviciocualificado realice reparaciones, lleve elproducto a latiendade
reparación de electrodomésticos de su elección para su inspección yreparación.
No pongapresión sobre el cablede alimentación quese conecta al producto, ya
queel cablede alimentación podría desgaste y se rompa.
INSTRUCCIONES ESPECIALES:
La plancha debe estar siempre en la posición " MIN" antes de enchufar o
desenchufar la toma de corriente.
Siempre desconecte la plancha del tomacorriente cuando la llene de agua,
vaciado o cuando no esté en uso.
Pueden ocurrir quemaduras al tocar partes metálicas calientes, agua
caliente o vapor caliente. Tenga cuidado al encender la plancha de vapor ya
que todavía haya agua caliente en el depósito.
Nunca sumerja la plancha, el cable o el enchufe en ningún líquido.
Un cable de suministro eléctrico corto para reducir el riesgo de enredarse o
tropezarse con un cable más largo. Un cable de extensión no se
recomienda para su uso con este producto, pero si se debe utilizar:
El voltaje eléctrico debe ser al menos tan grande como la del producto
Si el producto es de un tipo de conexión a tierra de 3 patas , el cable de
extensión debe ser un cable de toma de tierra de 3 hilos
Organice el cable de extensión de manera que no cuelgue del mostrador
o de la mesa donde alguien se pueda tropezar con él ni tirar.
ADVERTENCIA: Este producto está equipado con un
enchufe polarizado (una pata es más ancha que la otra) para
reducir el riesgo de descarga eléctrica. Esta es una
característica de seguridad . El enchufe encajará en un
tomacorriente polarizado de una sola manera. Si no puede
insertar el enchufe en la toma de corriente , intente invertir el enchufe. Si aún
así no encaja, comuníquese con un electricista calificado. No utilice nunca el
enchufe con un cable de extensión a menos que pueda insertar
completamente el enchufe en el cable de extensión. No altere el enchufe. No
intente anular la característica de seguridad del enchufe polarizado.
GUARDE ESTAS INSTRUCCIONES
COMO REFERENCIA
12
Partes:
Antes del Primer Uso:
IMPORTANTE: Compruebe por favor que todo el material de empaque con
cuidado antes de descartar ya que puede haber partes o accesorios
contenidas en el material del empaque.
1. Use las temperaturas más bajas con telas que tienen acabados poco
habituales como lentejuelas, bordado, color, etc.
2. Se recomienda pasar la plancha sobre un paño ordinario antes de usarlo
por primera vez.
3. Si el tejido se mezcla, ajuste el termostato a la temperatura de la fibra que
requiere la menor temperatura.
4. Si usted no conoce la composición del tejido, trate de planchar en un
rincón escondido de la prenda. Comience con una temperatura baja y
aumentar gradualmente hasta que alcanza la temperatura ideal.
5. Nunca planche zonas con restos de sudor u otras marcas. El calor de la
placa fija las manchas en el tejido haciéndolos inamovibles.
Atención: El primer uso puede causar un ligero olor o pequeño fumar
tras el calentamiento, es normal. Este es un resultado de la reacción
química elemento de calentamiento. Rápidamente se va.
K. Placa con
Respiraderos de Vapor
D. Boton
Pulverizador
A. Aerosol
G. Boton para
Retractar el Cable
L. Para Agua
C. Boton de Vapor
Disparo
B. Control de
Vapor
H. Control de
Temperatura
I. Tanque de Agua
J. Nivel de Agua
Maximo
E. Manejar
F. Cable de
Alimentación y Enchufe

13
Identificando su tipo de Ropa:
Etiqueta de la Prenda
Tipo de Tejido
Regulación de Termostato
Sintético
●
Bajo Temperatura
Lana - Seda
●●
Media Temperatura
Algodón - Lino
●●●
Alta Temperatura
Tela no debe ser planchada
Usando Su Plancha de Vapor:
PLANCHADO CON VAPOR
Llenando el Deposito:
1. Compruebeque el enchufe esté desconectadode la toma decorriente.
2. Mueva elmandode vaporB"O" [Fig. 1].
3. Con la puntadel hierropara ayudar aque elagua ingrese a laaperturasin
desbordarse.
4. Lentamente vierta el agua en eldepósitoutilizando lamedida especial yteniendo
cuidado de no ir por encima del nivel máximo (aproximadamente 170 ml)
indicadopor "MAX" del depósito.
Selección de la temperatura:
1. Coloque la plancha en posición vertical.
2.Enchufe el aparato a latomade corriente.
3. Ajuste el mando de la temperatura (H) de acuerdo con el símbolo internacional
sobre la etiqueta de la prenda [Fig. 3]. La luz de encendido (E) indica con una luz
roja que la plancha se está calentando. Espere hasta que el indicador de
alimentación seilumina en verde antes deplanchar.
Advertencia: durante el planchado, el indicador de alimentación se enciende a
intervalos, lo que indica que se mantiene la temperatura seleccionada. Si se baja la
temperatura seleccionada después de planchar a una temperatura alta, no
empieces tablahastaquela luz de alimentación se enciendedenuevo.
Selección del Vapor:
1.Lacantidad de vaporde agua está reguladoporelmando de vapor(B).
2.Girar elmandode vapor aunaposición entreel mínimo ymáximo en función de
la cantidad de vapor de agua requerida yla temperaturaseleccionada.
Advertencia: el hierro emite vapor de formacontinua si semantiene laplancha en
posición horizontal. Puede detener el vapor continuomediante lacolocación de la
plancha en posición vertical omoviendo el mandode vapor en "O". Comose indica
en elmandodel vapor (H) yen el cuadroinicial, sólosepuedeusar vapor alas
temperaturas más altas. Si latemperaturaseleccionada es demasiado baja, el
aguapuede goteesobre laplaca.
Selección de Disparo- Vapor y Vapor en el Planchado Vertical:

14
1.Presione el botón de disparo (C) para generar una potente ráfaga de vapor de
agua que puede penetrar en los tejidos y alisar las arrugas más difíciles y
resistente. Espereunos segundos antes de pulsar de nuevo [Fig. 4].
2.Al pulsar el botón de disparo de vapor en intervalos también se puede planchar
verticalmente (cortinas, prendas colgadas, etc.) [Fig. 5] .
Advertencia:la función de disparo Vapor sólo se puede utilizar a altas
temperaturas. Apague la fuente de energía cuando la luz se enciende, y luego
empezar a plancharde nuevosólodespués de que la luz seha apagado.
PLANCHADO EN SECO
Para planchar sin vapor, siga las instrucciones de la sección "Tabla de Vapor",
dejando el selectorde vapor(B) en laposición "O".
FUNCION SPRAY
1. Asegúresede quehaya agua en el depósito.
2. Presione la tecla de pulverización (D) poco a poco (para un aerosol denso)
orápido (paraun aerosol vaporizado)[Fig. 6].
Advertencia:para tejidos delicados, se recomienda humedecer la tela de
antemano utilizando la función de pulverización, o poniendo un paño húmedo entre
la plancha y el tejido. Para evitar manchas, no usar el spray en tejidos de seda o
sintéticos
1
MAX
MIN
3
5
7
2
4
8
6

15
Auto- Limpieza:
La función de auto-limpieza limpiaelinterior dela placa, laeliminación delas
impurezas. Se recomiendasu usocada10 a15 días. Las direcciones son las
siguientes:
1.Llene el depósito hasta elnivel máximo indicado y establecer el selector de
vapor en "O".
2.Ajuste el mando del termostato (H) a la temperatura máxima y esperar a
quelaluz indicadora(E) emiteluz verde.
3.Saque el enchufe de la toma de corriente y mantener la plancha en
posición horizontal sobreel fregadero.
4.Sostenga el regulador de vapor (B) en la posición de limpieza de 60 a 90
segundos, hasta que el agua hirviendo, vapor, y las impurezas salen [Fig.
7].
5.Cuandolasuela sehaya enfriado, sepuede limpiar con un pañohúmedo.
Cable Retráctil :
1.Coge la cuerda y tire lentamente a lalongitud queusted necesitaparaplanchar.
2.Cuando usted necesita para almacenarla plancha, tome el enchufecon una
mano ypresione el botón de rebobinadodelcable (G) con la otramano. [Fig. 8]
PRECAUCIÓN: Tenga cuidado de no dejar que el cable retraiga hacia su cuerpo.
Limpieza:
Nota: antes de limpiar el hierro de cualquier manera, asegúrese de que el enchufe
del aparato no está conectado alatomade corriente.
Los depósitos de residuos de almidón o el tamaño que quedan en la placa se
pueden eliminar con un paño húmedo o un detergente líquido no abrasivo.
Evite rayar la placa con lana de acero ni con objetos metálicos.
Las piezas de plástico se pueden limpiar con un paño húmedo y luego se limpió
con un traposeco.
Almacenamiento su Plancha de Vapor:
ADVERTENCIA: Desconecte siempre el producto ydejequese enfríe antes de
limpiarlo oguardarlo.
Cuandolatabla esté completa, gire el control de vapor en la posición "O".
Cuando no hay vapor, gire el control de temperaturaa punto de "MIN".
Desenchufe el producto dela tomade corriente.
AVISO: Siempredesenchufe elproducto de la toma decorrientecuandono esté en
uso ose dejará sin vigilancia.
Vaciar el depósitogirando el hierro hacia abajo y sacudiendosuavemente. Tenga
muchocuidado ya que los contenidos pueden estar calientes.
Dejedehierro verticalque se enfríeporcompleto.
Siempreguardeplancha en posición vertical.
Sequetodalaparte completamente antesdeguardarla yutilizarlade nuevo.
16
FER CLASSIQUE À VAPEUR / À SEC
MPI-59R
MPI-59B MPI-59W
Consignes de sécurité et de fonctionnement
-POUR USAGE DOMESTIQUE
INTÉRIEUR SEULEMENT-

17
IMPORTANTES MESURES DE SÉCURITÉ
Lorsque vous utilisez cet appareil ou tout autre appareil électrique, suivez
toujours ces précautions de base, surtout en présence d’enfants.
LISEZ TOUTES LES
INSTRUCTIONS AVANT USAGE
AVERTISSEMENT –Afin de réduire le risque d’incendie, d’électrocution, de
blessures graves oude dommagesmatériels, veuillezrespecter lesmesures
de sécurité suivantes:
Ce produit n’est pas destiné à être utilisé par des enfants. Gardez-le hors de
portée des enfants et des animaux. Redoublez deprudence lorsque vousutilisez
cet appareil à proximité d’enfants.
Assurez-vous que l’appareil est débranché delaprisemurale et laissez-le refroidir
avant de l’assembler, le démonter, le déplacer ou le nettoyer.
Ne laissez pas l’appareil sans surveillance lorsqu’il est utilisé. Débranchez-le
toujours s’il n’est pas en service.
N’immergez pas l’appareil, le cordon et la fiche de l’appareil dans l’eau et
n’exposez pas le cordon ou la fiche à l’eau ou tout autre liquide.
Ne touchez pas lessurfaces chaudes. Utilisez les poignées ou boutons lorsque
vous manipulez l’appareil. Afin d’éviter de vous brûlerou de vous blesser, utilisez
des maniques ou gants de cuisine lorsque vous retirez le couvercle ou manipulez
des récipients chauds.
Cet appareil génère de la chaleur et de la vapeur durant l’usage. Prenez les
mesures nécessaires pour prévenir lerisque de brûlures, d’incendie, de blessures
ou de dommages matériels.
N’utilisez pas d’accessoires non recommandés ou vendus par le fabricant. Les
accessoires fournis peuvent devenir très chauds durant l’utilisation. Laissez-les
refroidir avant de les manipuler.
Ne placez pas cet appareil sur ou près d’un brûleur à gaz ou électrique, dans un
fourchaud ou surtoute autresurface chaude.
Soyez extrêmement prudent lorsque vous déplacez un appareil contenant des
aliments chauds, de l’eau ou tout autre liquide chaud.
Utilisez ce produit dans un endroit bien aéré. Gardez au moins 4 à 6 pouces
d’espace tout autour de l’appareil afin de permettre une circulation d’air adéquate.
Utilisez l’appareil sur une surface plane ou une table.
Gardez l’appareil éloigné des rideaux, tentures, vêtements, torchons ou autres
matériaux inflammables.
Ne branchez ni ne débranchez le produit avec les mains mouillées.
Ce produit n’est pas destiné à un usage commercial ou industriel, mais
uniquement à un usage. N’utilisez pas l’appareil à l’extérieur ou à d’autres fins
quecelles prévues.
Ne laissez pas le cordon pendre d’une table ou d’un comptoir où l’on pourrait s’y
suspendre ou trébucher. Évitez que le cordon touche des surfaces chaudes.

18
Ne faites pas fonctionner l’appareil si le cordon d’alimentation ou la fiche sont
endommagés ou coupés, si les fils sont à découvert, s’il fonctionne mal, s’il a subi
une chute, est endommagé ou a été immergé ou exposé à l’eau.
Ce produit ne contient aucune pièce réparable par l’utilisateur.
Ne tentez pas d’examiner ou de réparer ce produit vous-même. Seul un
technicien qualifié doit effectuer les réparations; apportez l’appareil à l’atelier de
réparation de votrechoixpour inspection et réparation.
N’exercez aucune pression sur le cordon d’alimentation où ilseconnecte à
l’appareil, car il pourrait s’effilocher ou se briser.
N’exercez aucune pression sur le cordon d’alimentation où il se connecte à
l’appareil, car il pourrait s’effilocher ou se briser.
RECOMMANDATIONS ADDITIONNELLES:
Lecadran detempérature doit toujours être à la position ‘’MIN’’ avant de brancher
ou de débrancher l’appareil.
Débranchez toujours le fer avant de le remplir d’eau, le vider ou lorsqu’il n’est pas
utilisé.
Des brûlures peuvent survenir si vous touchez les pièces métalliques chaudes,
l’eau chaude ou la vapeur chaude. Soyez prudent lorsque vous tournez le fer à
l’envers, car il peut rester de l’eau chaude dans le réservoir.
N’immergez jamais le fer, le cordon d’alimentation ou la fiche dans un liquide.
Cet appareil est muni d’un court cordon d’alimentation qui réduit les risques de
trébucher ou de s’enchevêtrer dans un cordon plus long. L’utilisation d’une
rallonge n’est pas recommandée, mais si elle doit être utilisée:
Sapuissancenominaledoit être au moins aussi grande que celle de l’appareil.
Si l’appareil est muni d’un cordon relié à la terre et d’une fiche à 3 broches, la
rallonge doit être munie d’un cordon à 3 fils correctement relié à la terre.
Larallongene doit pas pendred'un comptoir ou d'unetable où l'on pourrait s'y
suspendre ou trébuche.
AVERTISSEMENT: Cet appareil est muni d'une fiche d’alimentation
polarisée (une broche est plus large que l'autre). Il s'agit là d'une
mesure de sécurité. Pour réduire le risque d’électrocution, la fiche
doit être insérée d’une seule façon dans une prise de courant
polarisée. Si le branchement n’est pas complet, inversez la fiche. Si la fiche ne
s’insère toujours pas, contactez un électricien qualifié. N'utilisez jamais la fiche avec
une rallonge, à moins de pouvoir l’insérer parfaitement dans la rallonge. Ne tentez
pas de modifier la fichepolarisée et respectez à la lettrecette mesure de sécurité.
CONSERVEZ CES INSTRUCTIONS
À TITRE DE RÉFÉRENCE

19
Pièces:
Avant la première utilisation :
IMPORTANT: Vérifiez attentivement tout le matériel d’emballage avant de le
jeter, car certains accessoires peuvent être restés à l’intérieur.
1. Utilisez une faible intensité pour des tissus à fini délicat, comme la
paillette, la broderie, etc.
2. Nous vous recommandons de repasser un chiffon lisse avant d’utiliser
votre fer pour la première fois.
3. Si le tissu est de composition mixte, réglez le cadran de température à la
fibre nécessitant la température la plus basse.
4. Si vous ignorez la composition du tissu, faites un essai sur un coin caché
du tissu. Commencez à une faible intensité et augmentez-la
graduellement pour atteindre la température idéale.
5. Ne repassez jamais de vêtements portant des marques de transpiration
ou autres. La chaleur de la semelle fixera ces taches sur le tissu de façon
permanente.
Attention: Une légère odeur ou un peu de fumée peuvent se dégager de
l’appareil lors de la première utilisation. Cela est normal et est causé par la
réaction chimique de l’élément chauffant. Le tout se résorbera rapidement.
D. bouton de
pulvérisation
A. aérosol
G. Bouton pour
rétracter le câble
bouchon de
remplissage
C. Bouton de
vapeur de tir
B. Contrôle de la
vapeur
H. Contrôle de la
température
I. Réservoir d'eau
J. Niveau
d'eau Maximo
E. manipuler
F. Cordon
d'alimentation et
Plug

20
Identification du vêtement:
ÉTIQUETTE DU VÊTEMENT
TYPE DE TISSU
RÉGLAGE DE TEMPÉRATURE
Synthétique
●
Température basse
Soie - Laine
●●
Température moyenne
Coton - Lin
●●●
Température élevée
Ne pas repasser ce vêtement
Utilisation de votre fer classique :
REPASSAGE À LA VAPEUR
Remplir le réservoir:
1.Assurez-vous d’avoir débranché l’appareil de la prise murale.
2.Déplacez le sélecteur de vapeur à la position “OFF” (arrêt).
3.Maintenez le fer à la verticale pour faciliter le remplissage d’eau et éviter
qu’elle ne déborde. Remplissez le fer au besoin.
4.Versez lentement l’eau dans le réservoir à l’aide de la mesure fournie, en
vous assurant de ne pas excéder le niveau maximal (le hublot vous
indiquera le niveau d’eau).
Sélectionner la température:
1.Mettez le fer à la verticale sur le talon d’appui.
2.Branchez l’appareil.
3.Réglez le cadran de réglage de la température selon le symbole
international indiqué sur l’étiquette. Utilisez le guide de tissu indiqué sur le
fer pour sélectionner le bon réglage de température. Le voyant lumineux
rouge indique que le fer préchauffe. Attendez qu’il change au vert avant de
repasser.
4.Une fois que vous aurez sélectionné le type de tissu, tournez le cadran de
température au réglage adéquat pour votre tissu.
5.Lorsque vous aurez terminé le repassage, tournez le cadran de température
à OFF (arrêt) et débranchez le fer.
Avertissement: Le voyant lumineux s’allumera par intermittence durant le
repassage, indiquant que la température sélectionnée est maintenue. Si vous
abaissez la température après avoir utilisé une température élevée, ne
reprenez le repassage que lorsque le voyant s’allumera à nouveau.
Sélectionner la vapeur:
La quantité de vapeur est régulée par le cadran de vapeur 1-6.
Assurez-vous qu’il y a de l’eau dans le réservoir.
Tournez le bouton de vapeur une position entre minimum et maximum,
selon la quantité de vapeur requise et la température sélectionnée.
Avertissement: Le fer laisse échapper une vapeur continue uniquement si
vous le maintenez à l’horizontale ou abaissez le bouton de vapeur. Pour
This manual suits for next models
2
Table of contents
Languages:
Other Brentwood Appliances Iron manuals


