Bresser EXPLORE SCIENTIFIC User manual


DE
Besuchen Sie unsere Website über den folgenden QR Code oder Weblink um weitere Informationen
zu diesem Produkt oder die verfügbaren Übersetzungen dieser Anleitung zu finden.
EN
Visit our website via the following QR Code or web link to find further information on this product or
the available translations of these instructions.
FR
Si vous souhaitez obtenir plus d’informations concernant ce produit ou rechercher ce mode
d’emploi en d’autres langues, rendez-vous sur notre site Internet en utilisant le code QR ou le lien
correspondant.
NL
Bezoek onze internetpagina via de volgende QR-code of weblink, voor meer informatie over dit
product of de beschikbare vertalingen van deze gebruiksaanwijzing.
ES
¿Desearía recibir unas instrucciones de uso completas sobre este producto en un idioma determinado?
Entonces visite nuestra página web utilizando el siguiente enlace (código QR) para ver las versioneAs
disponibles.
IT
Desidera ricevere informazioni esaustive su questo prodotto in una lingua specifica? Venga a
visitare il nostro sito Web al seguente link (codice QR Code) per conoscere le versioni disponibili.
www.bresser.de/P0510530
www.bresser.de/warranty_terms
GARANTIE · WARRANTY · GARANTÍA · GARANZIA


4 / 20
1 Imprint
Bresser GmbH
Gutenbergstr. 2
46414 Rhede
Germany
www.explorescientific.de
For any warranty claims or service inquiries, please refer to the information on "Warranty" and "Ser-
vice" in this documentation. We ask for your understanding that unsolicited returns cannot be pro-
cessed.
Errors and technical changes excepted.
© 2022 Bresser GmbH
All rights reserved.
The reproduction of this documentation - even in extracts - in any form (e.g. photocopy, print, etc.) as
well as the use and distribution by means of electronic systems (e.g. image file, website, etc.) without
the prior written permission of the manufacturer is prohibited.
The designations and brand names of the respective companies used in this documentation are gen-
erally protected by trade, trademark and/or patent law in Germany, the European Union and/or other
countries.
2 Validity note
This documentation is valid for the products with the following article numbers:
0510530
Manual version: 0122
Manual designation:
Manual_0510530_4K-Planetary-DeepSky-Camera_en-de_EXPSC_v012022a
Always provide information when requesting service.
3 About this Instruction Manual
NOTICE
These operating instructions are to be considered a component of the device.
Read the safety instructions and the operating manual carefully before using this device.
Keep this instruction manual in a safe place for future reference. When the device is sold or given to
someone else, the instruction manual must be provided to the new owner/user of the product.
4 Intended use
• This device is not intended for use by persons (including children) with impaired physical, sensory
or mental abilities, or for lack of experience and/or knowledge, unless they are supervised by or
have received instructions from a person responsible for their safety on how to use this device.
• This device is for personal use only.
• The device was developed as an electronic accessory and may only be used to connect and oper-
ate the devices for private use described in this manual.

5 / 20
5 General safety instructions
DANGER
Danger of suffocation!
Improper use of this product may result in suffocation, especially for children. It is therefore imperative
that you observe the following safety information.
• Keep packaging materials (plastic bags, rubber bands, etc.) away from children! There is a danger
of choking!
• Keep cables, tapes and similar materials away from children! They could accidentally strangle and
suffocate themselves with them!
NOTICE
Danger of material damage!
Improper handling may result in damage to the unit and/or accessories. Therefore, use the device only
in accordance with the following safety information.
• Do not disassemble the device! In the event of a defect, please contact your dealer. They will con-
tact the Service Center and can arrange the return of this device for repair if necessary.
• Check this device, cables and connections for damage before use.
• Never attempt to operate a damaged device, or a device with damaged electrical parts! Damaged
parts must be replaced immediately by an authorized service agent.
• For the normal operation as intended, only use the supplied cables and connect them as de-
scribed in the manual.
NOTICE
Danger of data loss!
Do not interrupt an on-going data connection to a computer before all data has been transferred. This
could lead to data loss for which the manufacturer is not liable.
NOTICE
Privacy Protection
Respect the privacy of your fellow human beings - do not look into flats with this device, for example!

6 / 20
6 Parts overview and scope of delivery
4
5
A
B
C
10
67
11
D
E
12
21
8
3
4
9
Illustration1: All parts of the Astro camera
1 Camera body 2 Mounting thread (T2/M42x0,75mm)
3 Camera connection: 4 Ventilation slits
5 Function indicator light 6 USB 3.0 port
7 ST4 port 8 Plug-in adaptor 1 ¼"
9 Connection thread 10 USB 3.0 connection cable
11 DC connection cable 12 Software CD
Scope of delivery
Astro camera (A); 1 ¼" plug-in adaptor (B); USB cable (C); ST4 cable (D); software CD (E)

7 / 20
7 Installing the software and drivers
1. Insert the CD-ROM included in the scope of delivery into the CD drive of your computer. Alternat-
ively, you can download the software package from the product page and start the installation dir-
ectly. The files are stored under the heading 'Software'. You will find the link/QR code to the
product page on the second page of these operating instructions.
2. Install the 'EXPLORE Capture' software. This will also install the camera drivers automatically.
3. Remove the rubber cover of the CMOS sensor on the camera and connect it to your telescope.
The connection can be made directly via T2 thread (M42x0.75mm) or via the plug-in adapter. Al-
ways make sure that the camera is securely mounted.
4. Connect the camera to an available USB port on your computer using the supplied USB cable.
5. Start the EXPLORE Capture software after successful installation.
6. Select the connected camera in the EXPLORE Capture software menu.
Illustration2: EXPLORE Capture: Select camera
7. The camera now continuously sends live images to the computer at the current exposure time.
8. Use the telescopes´ finder scope to focus on a bright star in the cameras` field of view. To obtain a
faster image sequence and a higher camera sensitivity during focusing, switch to binning mode if
necessary (see software menu "Digital Binning").
9. After successful focusing, you can start recording images or video sequences.
8 Camera mounting on telescope
1
2
35
6
4
Illustration3: Mounting the camera on to a telescope
1 Camera housing 2 Holding thread
3 Connection thread 4 T2 or plug-in adaptor
5 Eyepiece holder 6 Eyepiece extension

8 / 20
9 Camera mounting as an autoguider
1
3
2
4
5
6
9
8
7
10
Illustration4: Mounting of the Astro camera as an autoguider on the guide tube
1 Guide tube 2 Socket adaptor 1 ¼"
3 Camera body 4 USB 3.0 port
5 ST4 port 6 USB cable
7 USB port on PC/notebook 8 ST4 connecting cable
9 ST4 port on the mount* 10 Recording device (e.g. single lens reflex cam-
era or another deep sky camera)1
*Not included in the scope of delivery.
1Additional accessories may be required for mounting a recording device.
NOTICE!This is not a stand-alone camera. A computer running the operating system Windows®
10 or 11 is required for both, photography and autoguiding.
9 / 20
NOTICE!Autoguiding requires an appropriate software (see below).
Autoguiding Software
The following software packages, among others, can be used for autoguiding with this camera:
PHD-Guiding, GuideDog, Metaguide, Guidemaster (free of charge) or AstroArt, MaxIm DL (fee pay-
able)
DOWNLOAD PHD-Guiding: https://openphdguiding.org
DOWNLOAD GuideDog: http://barkosoftware.com/GuideDog
10 Optimizing the camera settings for long
exposures
Image 2
Image 1 Image 3 Image 4
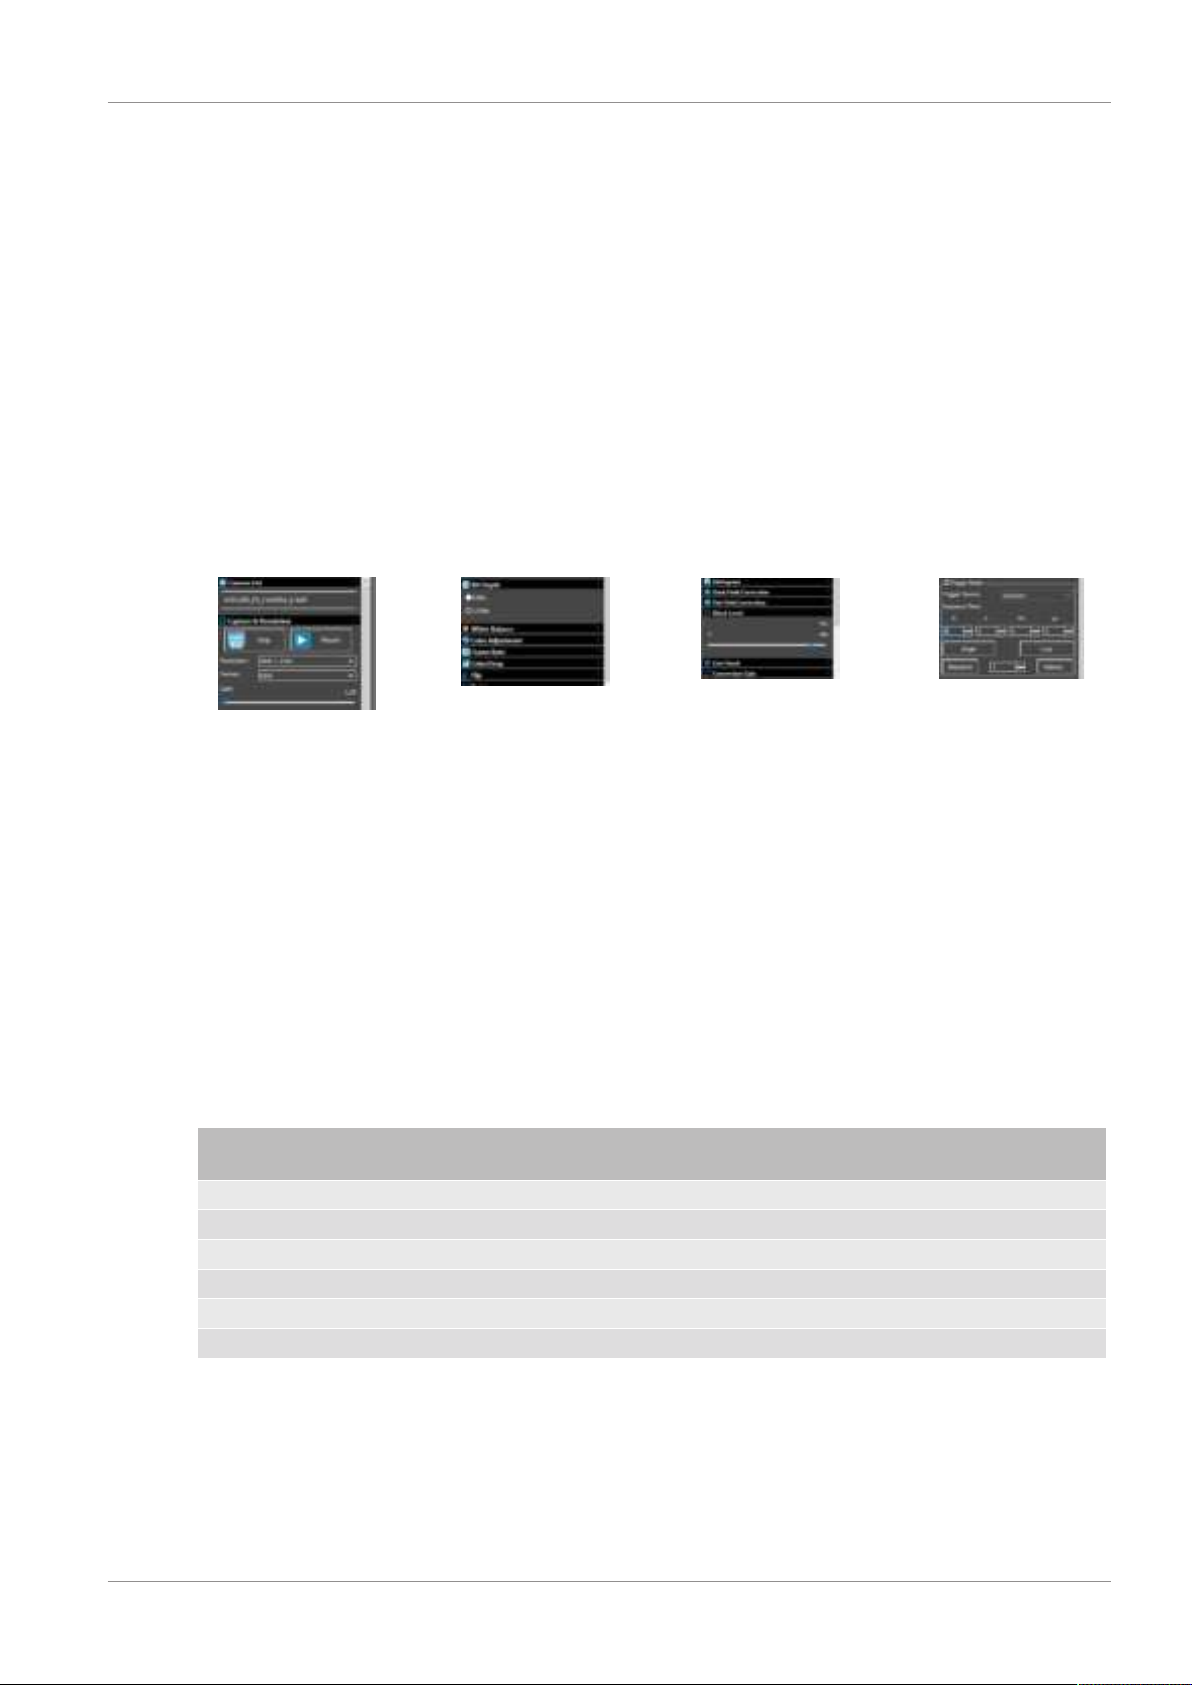
Illustration5: Menu windows relevant for optimization in the supplied software
To ensure that the camera delivers the best possible image results for long exposures over 1 minute,
you can optimally adjust the setting values for gain and black level depending on the desired exposure
time. Refer to Table 1 for help. Proceed as follows for the setting:
1. Select the desired exposure time (e.g. 6 minutes). (Image 1)
2. Open the "Acquisition & Resolution" settings menu. Click on the field with the current value for the
"Gain" and enter 158. Confirm the entry with [ENTER]. The value 1.58 is set. (Image 2)
3. Select the image format and bit depth according to Table 1. (Image 2+3)
4. Open the "Black Level" setting menu. Move the slider until you reach the appropriate value (e.g.
440). (Image 4)
5. Start the capturing images.
NOTICE!These are recommended guide values determined under real test conditions. Individual
adjustments may be necessary and depend on external factors such as ambient temperature.
Exposure
time
Gain Black level Format Bit depth e/ADU Read noise Full Well
6 minutes 1.58 440 RAW (fit) 12 2.03 1.81 8318.91
5 minutes 1.58 380 RAW (fit) 12 2.03 1.81 8318.91
4 minutes 1.58 303 RAW (fit) 12 2.03 1.81 8318.91
3 minutes 1.58 233 RAW (fit) 12 2.03 1.81 8318.91
2 minutes 1.58 172 RAW (fit) 12 2.03 1.81 8318.91
1 minute 1.58 112 RAW (fit) 12 2.03 1.81 8318.91
Table1: Table 1
11 Cleaning and maintenance
• Before cleaning the device, disconnect it from the power supply (remove plug or remove batteries)!
• Only clean the device externally using a dry cloth. Do not use cleaning solution to prevent damage
to the electronic parts.

10 / 20
12 Disposal
Dispose of the packaging materials properly, according to their type, such as paper or card-
board. Contact your local waste-disposal service or environmental authority for information
on the proper disposal.
Do not dispose of electronic devices in the household garbage!
According to the European Directive 2012/19/EU on Waste Electrical and Electronic Equip-
ment and its transposition into national law, used electrical equipment must be collected sep-
arately and recycled in an environmentally sound manner.
13 EC declaration of conformity
A "Declaration of conformity" in accordance with the applicable directives and correspond-
ing standards has been prepared by Bresser GmbH. The full text of the EC declaration of
conformity is available at the following Internet address: www.bresser.de/down-
load/0510530/CE/0510530_CE.pdf
14 UKCA Declaration of Conformity
Bresser GmbH has issued a "Declaration of Conformity" in accordance with applicable
guidelines and corresponding standards. The full text of the UKCA declaration of conform-
ity is available at the following internet address: www.bresser.de/download/0510530/
UKCA/0510530_UKCA.pdf
Bresser UK Ltd. • Suite 3G, Eden House, Enterprise Way, Edenbridge, Kent TN8 6HF,
Great Britain
Table of contents
Languages:
Other Bresser Digital Camera manuals

Bresser
Bresser 4959050 User manual

Bresser
Bresser lcd micro 5mp User manual

Bresser
Bresser 9633106 User manual

Bresser
Bresser 3310005 User manual

Bresser
Bresser 4959050 User manual

Bresser
Bresser NATIONAL GEOGRAPHIC 90-81000 Programming manual

Bresser
Bresser 33-10001 User manual

Bresser
Bresser 9630200 User manual

Bresser
Bresser 33-40000 User manual

Bresser
Bresser 9630202 User manual


