Brewmatic DIPLOMAT II Quick start guide

DIPLOMAT II
Pour-Over Coffee Brewer
Model Numbers
1030581 & 1030583
20333 S. Normandie Ave., Torrance, CA 90502
800-421-6860 •310-787-5444 •Fax 310-787-5412
FM CS120 A 5-03-04
P
Pa
ar
rt
ts
s
A
An
nd
d
S
Se
er
rv
vi
ic
ce
e

Page 2
Important Information
Read all instructions and safeguards included in the original packaging, and this service
manual, carefully and completely before installing, operating or servicing this appliance.
Additional copies of installation instructions and service manuals are available upon request.
The proper performance of service is essential for the safe and effective operation of this
appliance. Repairs should be performed by qualified service personnel only. If you are
unable to, or need help servicing this appliance, contact the nearest Brewmatic Authorized
Service Agent or you can contact Brewmatic at 800-421-6860.
Only Authorized Replacement Parts Should Be Used. Part substitutions could create a
fire hazard and the risk of personal injury. The use of replacement parts or accessory
attachments not recommended by Brewmatic may be hazardous.
Do Not By-Pass Any Safety Mechanisms Or Operate This Appliance Without Covers In
Place. Brewmatic requires that all safety devices and covers be in place and functioning at
all times to guard against a fire hazard and the risk of personal injury.
Brewmatic Does Not Recommend, And Will Not Furnish Anyone With Information For
Changing The Electrical Rating Of Any Appliance Manufactured Or Distributed By
Brewmatic. Brewmatic will not approve of any unauthorized changes to the basic design of
this appliance. Any modification or alteration to the appliance may create a fire hazard, may
create a risk of personal injury, may void the safety listings and may void the warranty.
Plumbing connections - All plumbing connections to water supply lines and drains should
be performed by a licensed plumber complying with all applicable plumbing codes having
jurisdiction.
Electrical connections - With the exception of cords with plugs already attached, all
electrical connections or alterations to the power supply should be performed by a licensed
electrician complying with all applicable electrical codes having jurisdiction.
When repairing or replacing internal electrical wiring, in part or in whole, use only terminals
and wires with the same rating, gauge and insulation covering.
When calling for information, parts or service, have the model number, serial number,
voltage, wattage, phase and date of purchase available. Electrical information may be
obtained from the electrical information nameplate located on the appliance.
All procedures, diagrams and specifications contained in this manual are based on the latest
information available at the time of publication. Information, parts and specifications are
subject to change without notice.
We assume no liability for any damage to person or property caused by the utilization of this
publication to effect maintenance or repairs.
Due to periodic reviews and changes in safety listing standards, listings and approvals may
change at any time. For current listing and approval information contact Brewmatic.

Page 3
Specifications
Diplomat II Pour-Over Coffee Brewer
Appliance Information
Model Number: 1030581
Description: Diplomat II, 2 Station Pour-Over Coffee Brewer
Volts: 120
Watts: 1480
Amps: 12.3
Hertz: 60
Phase: 1
Model: 1030583
Description: Diplomat II, 3 Station Pour-Over Coffee Brewer
Volts: 120
Watts: 1570
Amps: 13.1
Hertz: 60
Phase: 1
Power Supply Cord: 6 ft., 2 wire + ground. 15 amp, 14 awg.
Plug: NEMA 5-15P. Furnished and attached.
Power Supply Required: 120 volts, 15 amp, dedicated circuit.
Wall Receptacle Required: NEMA 5-15R. Not furnished.
Listings: UL 704J, NSF-4
Optional Accessories: 1030801, 3 Station top cover with warmer.
Note: This model is no longer in production.
Additional Information
Brewing Capacity: 60 oz. maximum.
Brewing Temperature: Approximately 190°F, maximum. Adjustable.
Temperature Adjustment: 3Increase. 4Decrease.
Hi-Limit Thermostat: Manual reset. Not adjustable.
Page 4
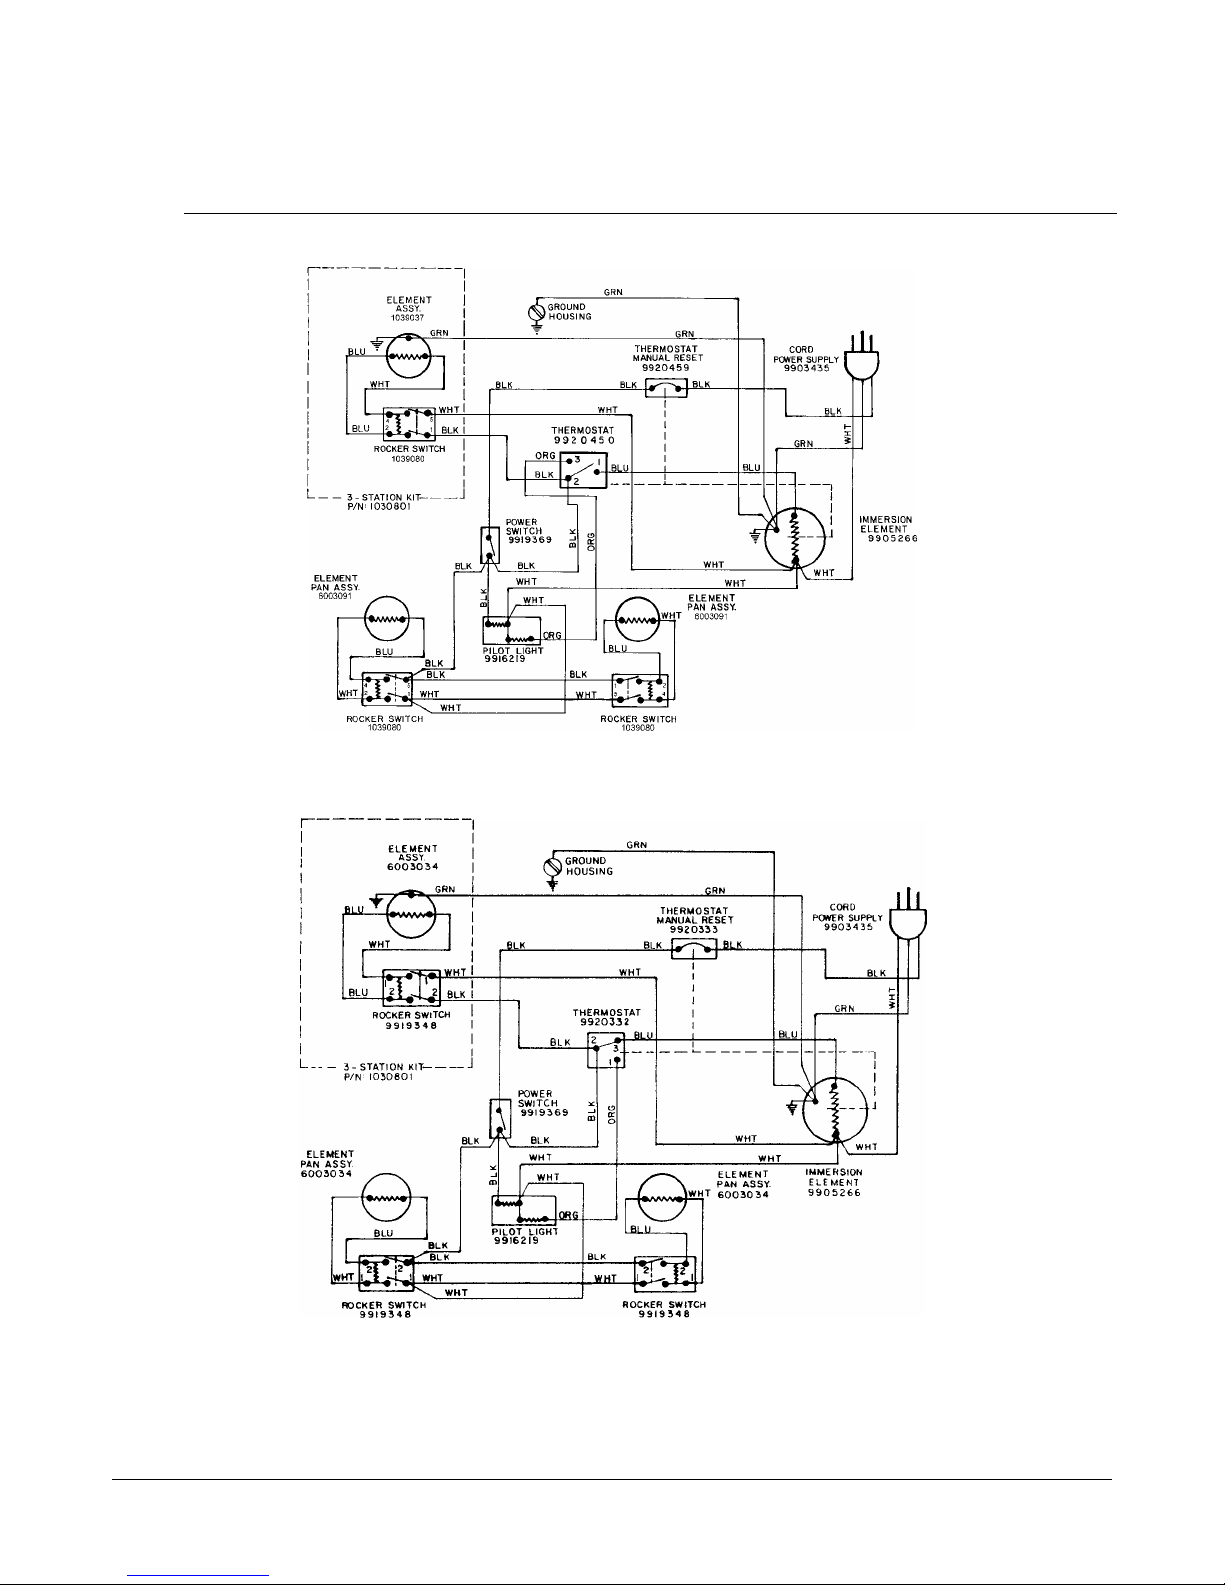
Wiring Diagram
Diplomat II Pour-Over Coffee Brewer
Models With A 9920450S Thermostat.
Models With A 9920332 Thermostat.

Page 5
Wiring Diagram
Diplomat II Pour-Over Coffee Brewer
Models With A 9920434 Thermostat
Page 6
Troubleshooting Guide
Diplomat II Pour-Over Coffee Brewer
Read and follow the cautions below before attempting to service this coffee brewer.
Caution:
Read and verify that the installation instructions have been followed before attempting to operate this
appliance. Incorrect installation or operating procedures will void the warranty and may damage this
appliance.
Unplug the power supply cord before servicing, unless electrical testing is required. Be certain
the power supply is of the correct rating and polarity before connecting the power supply cord. The
chassis must be grounded to prevent possible electric shock. Failure to heed this warning may damage
this appliance and may cause injury.
This appliance is equipped with an automatic temperature limit control designed to turn the appliance off
if it overheats. In that event, do not reset until a qualified service representative has inspected and
repaired the appliance. Under no circumstances should the temperature limit control be bypassed or an
alternate control used, as a fire risk could result.
Under no circumstance should the hi-limit thermostat be by-passed. In the event of failure the
hi-limit thermostat should be replaced. Use only original or authorized replacement parts.
Carefully inspect the internal wiring for wear or damage when servicing. Worn or damaged wiring may
cause malfunctions and premature component failures. Replace any wires that have loose
connections, damaged insulation or show evidence of overheating. When repairing or replacing internal
electrical wiring, in part or in whole, use only terminals and wires with the same rating, gauge and
insulation covering.
See the separate instruction sheet that was included with this manual for testing and cleaning the
Diplomat model coffee brewers. These instructions contain valuable information on servicing and
cleaning that may extend the service life of these brewers.
Symptoms Solutions
1. The coffee brewer will not
operate. The lights and
warmers do not work.
Make sure the power supply cord is connected to a proper,
working wall receptacle.
Make sure the power switch has been turned on.
Check the main circuit breaker in the building to see if it has
tripped.
Reset or replace the hi-limit thermostat.
Test the power switch. Replace it if necessary.
Check to make sure the internal wiring is correct. Inspect for
loose, damaged or overheating wires or terminals. Repair or
replace wiring as necessary.
Test the power supply cord. Replace it if necessary.

Page 7
Symptoms Solutions
2. The coffee brewer will not
brew coffee. The lights
and warmers work, and
the coffee brewer heats.
Water must be poured in to initiate a brew cycle. Pour in
approximately 60 oz. of water for each brew cycle. See
installation instructions for correct procedures.
Inspect and clean the spray head, siphon tube and reservoir
down-tube.
3. The coffee brewer takes
much longer than normal
to heat. The lights and
warmers work.
Test the thermostat. Replace it if necessary.
Test the voltage supply. The voltage supplied should match the
voltage requirement on the electrical nameplate.
Test the immersion element. Replace it if necessary.
Check to make sure the internal wiring is correct. Inspect for
loose, damaged or overheating wires or terminals. Repair or
replace wiring as necessary.
4. Primary or secondary hi-
limit thermostats keep
activating.
Machine power has been left on overnight or for a long period of
time without being used. Refill tank with water and wait for
machine to reach operating temperature.
Note: Turn machine off overnight or when not in use for a long
period of time.
Test the hi-limit thermostat. Replace it if necessary.
Test the thermostat. Replace it if necessary.
Inspect the wiring on the hi-limit thermostat for loose, damaged
or overheating wires or terminals. Repair or replace wiring as
necessary.
WARNING
Under no circumstance should the hi-limit thermostat be
by-passed. In the event of failure, the hi-limit thermostat
should be replaced. Use only original or authorized
replacement parts.
5. The coffee brewer trips
the buildings circuit
breaker.
Too many appliances are connected on one electrical circuit.
The electrical circuit’s amperage rating may be too low. Locate
a correctly rated circuit or call an electrician to correct this
problem.
This coffee brewer may require a dedicated wall circuit. Check
the electrical specifications.
Check to make sure the internal wiring is correct. Inspect for
loose, damaged or overheating wires or terminals. Repair or
replace wiring as necessary.
Inspect the immersion element for damage. Replace it if
necessary.
Page 8
Symptoms Solutions
6. The brewing temperature
is either too hot or too
cold.
The thermostat bulb must be in its clip and attached to the
immersion element correctly.
Inspect the thermostat bulb for excessive lime buildup. Clean if
necessary.
Adjust or replace the thermostat. Turn the adjustment screw
counter-clockwise to increase the temperature, clockwise to
decrease. Turn the adjustment screw a maximum of 1/8 turn
per adjustment. Retest and adjust again if necessary. The
recommended temperature is approximately 190°F. Test below
the brew cone with water only.
WARNING:
If the thermostat cannot be adjusted properly it should be
replaced. The thermostat is calibrated at the factory and no
attempt should be made to recalibrate it. Use only original
or authorized replacement parts.
Check to make sure the internal wiring is correct. Inspect for
loose, damaged or overheating wires or terminals. Repair or
replace wiring as necessary.
7. The brewing cycle is too
slow.
Inspect and clean the spray head, siphon tube and reservoir
down-tube.
8. The beverage level is
inconsistent.
Inspect and clean the spray head, siphon tube and reservoir
down-tube.
Make sure the pour-through lid is closed when not in use.
Make sure the top cover and element gaskets are in place
correctly and are in good condition.
Adjust or replace the thermostat. (See #6.)
9. Water drips from the
spray head for a long time
after the brew cycle is
finished.
Inspect and clean the spray head, siphon tube and reservoir
down-tube.
Inspect the o-ring on the siphon tube for leaking.
Adjust or replace the thermostat. (See #6.)
10. Parts are failing
frequently.
Check to make sure the internal wiring is correct. Inspect for
loose, damaged or overheating wires or terminals. Repair or
replace wiring as necessary.
Test the voltage supply. The voltage supplied should match the
voltage requirement on the electrical nameplate.
Test the wall receptacle for correct polarity.
Use only original, or authorized, replacement parts.

Page 9
Symptoms Solutions
11. Water leaks from the
bottom of the housing.
Inspect and clean the spray head, siphon tube and reservoir
down-tube.
Inspect the o-ring on the siphon tube for leaking.
Make sure the top cover and element gaskets are in place
correctly and are in good condition.
Inspect the housing for damage or cracks.
12. The warmers will not
heat.
Test the warmer switch. Replace it if necessary.
Check to make sure the internal wiring is correct. Inspect for
loose, damaged or overheating wires or terminals. Repair or
replace wiring as necessary.
Test the warmer element. Replace it if necessary.
13. The coffee tastes weak or
does not taste good.
Inspect and clean the spray head, siphon tube and reservoir
down-tube.
The spray head should be in place and clean for proper coffee
extraction.
Clean the area above the brew cone regularly.
Test the brewing temperature. Adjust if necessary. (See #6.)
Adjust the amount of ground coffee being used or adjust the
grind of the coffee. Too much coffee, or coffee that is ground
too fine, may affect the flow of the water through the coffee.
Make sure that the paper filter being used is correct for this type
of coffee brewer.
14. There are coffee grounds
in the brewed coffee.
Inspect the brew cone for wear or damage. Replace it if
necessary.
Adjust the amount of ground coffee being used or adjust the
grind of the coffee. Too much coffee, or coffee that is ground
too fine, may affect the flow of the water through the coffee.
Make sure that the paper filter being used is correct for this type
of coffee brewer.
Two paper filters may have been used accidentally. Use only
one filter per brew cycle.
Fine grind coffees and water softening systems may affect the
way the water flows through the coffee and brew cone, and may
cause coffee grounds to show up in the brewed coffee. There
are several option available to help solve this problem: Extended
brew spray heads, wide base brew cones or a paper filter
designed for faster water flow. Call Brewmatic for complete
details and options.

Page 10
Thermostat Change
Diplomat II Pour-Over Coffee Brewer
To Replace The 9920332 Thermostat and 9920450
Thermostat with the 9920434 Thermostat
Instructions:
NOTE: Refer to attached wiring diagram before proceeding with instructions
1. Locate pilot light (#9916219). Connect the pilot light
wires according to the wiring diagram. (Photo 1)
2. Remove thermostat capillary tube from immersion
element.
3. Remove old wires from old thermostat.
4. Discard old thermostat.
5. Mount the new thermostat and attach capillary tube to
immersion element.
6. Locate blue wire from the secondary Hi-Limit
Thermostat (# 9920393), orange wire from pilot light
(#9916219) and connect both wires to terminal #1 of the
9920434 thermostat.
7. Locate black wire that originated from power switch and
connect to terminal #2 on the 9920434 thermostat.
8. If equipped with top warmer, connect the black wire from the warmer switch to terminal #2 on the
9902434 thermostat.
Photo 1
Page 11
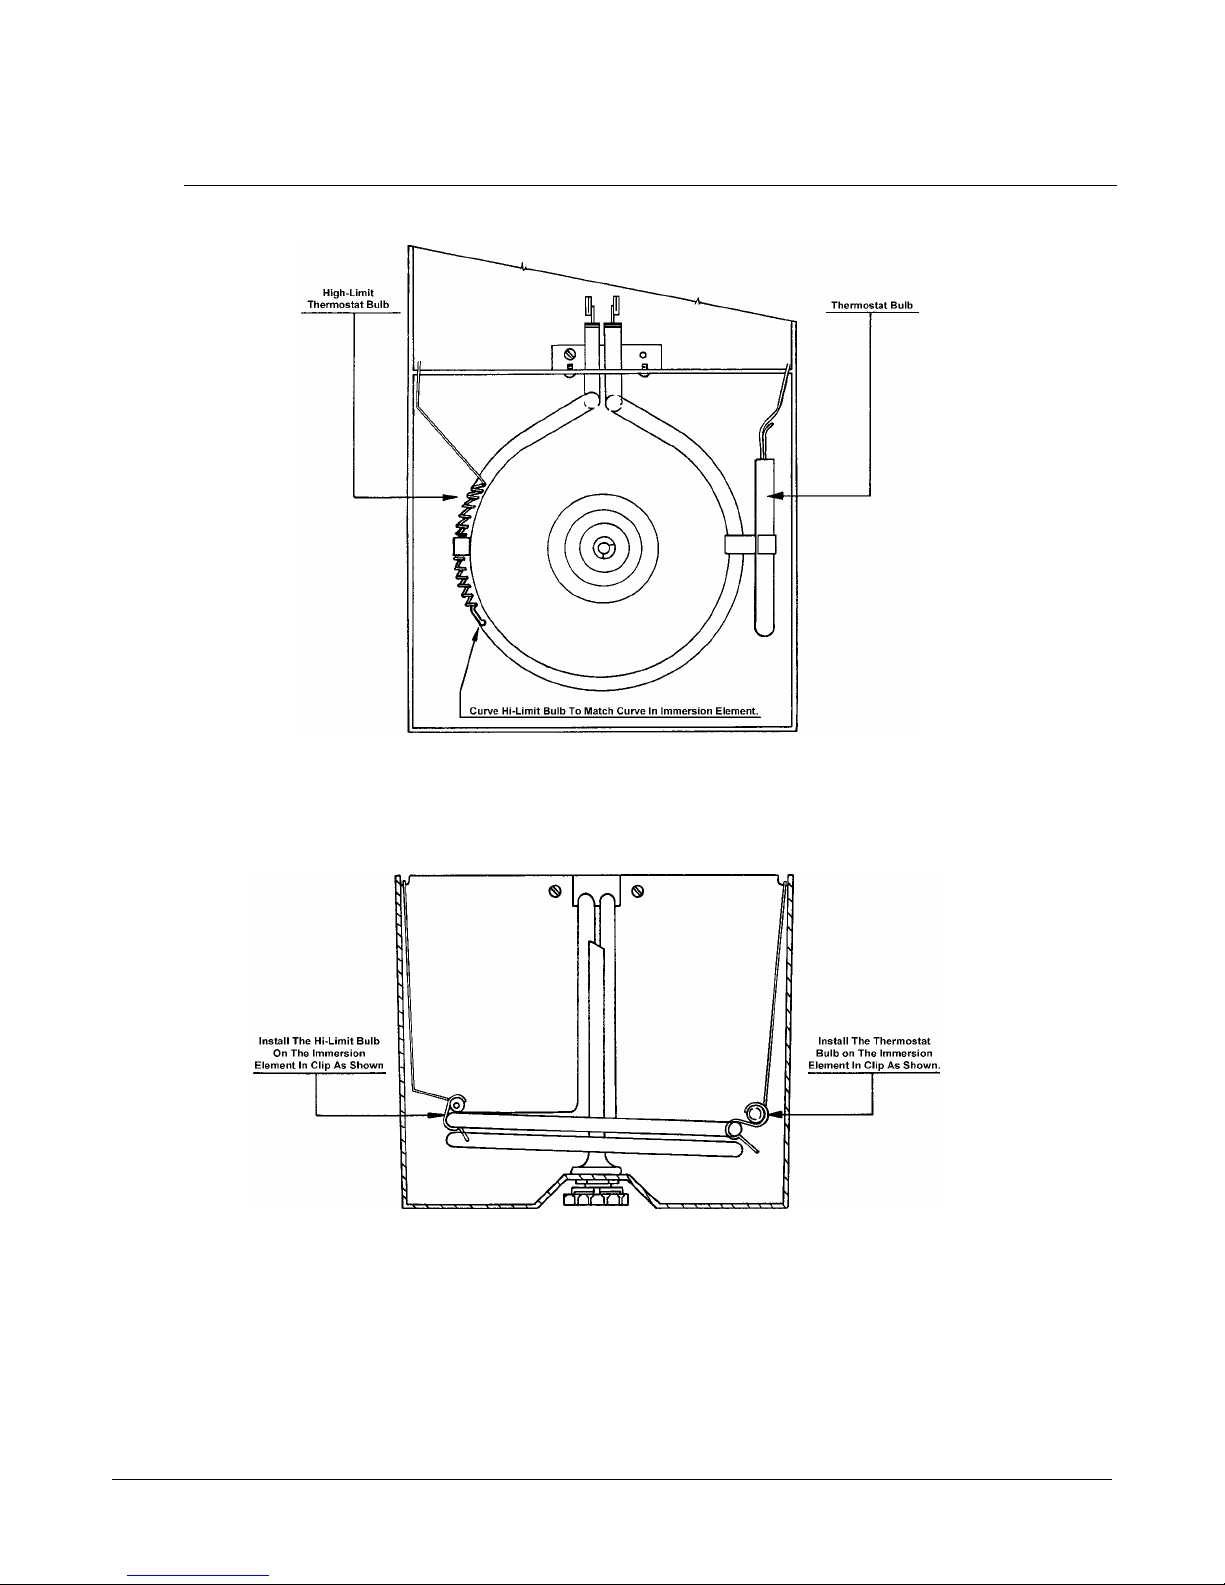
Diagram For The Proper Positioning Of
The Thermostat And High Limit Thermostat Bulbs.
Top View
Right Side View From Inside Housing
WARNING
The thermostat and high limit thermostat bulbs must be correctly positioned in their
clips and installed correctly on the element for proper operation and safety.

Page 12
Parts Diagram - Final Assembly
Diplomat II Pour-Over Coffee Brewer

Page 13
Parts List – Final Assembly
Diplomat II Pour-Over Coffee Brewer
Item Part No. Description
1. 1039027 Cover Kit, (Includes cover & 2 hinge inserts.)
2. 1040062 Hinge Insert
3. 9003131 Screw, #6-32 x 1-3/4"
4. 6000282 Gasket, Top Cover
5. 1030856 Top Cover Assy., 2 Station
(Includes cover & 2 hinge inserts.)
1030801 Top Cover Assy., 3 Station, (Complete)
(See pages 9 & 10 for additional information.)
6. 9205104 Nut, #6-32
7. 1030711 Wrap Sheet, S/S
8. 1030439 Channel, Wire
9. 6003091B Element Pan Assy. (See page 8 for parts list.)
10. 6000225 Brew Cone, Plastic
11. 6000328 Stove Shell
12. 9303119 Lock Washer, #6
13. 9001228 Screw, #6-32 x 1-1/4"
14. 9906472 Foot, Black, 1/2", (Replaces 9906407, foot, brown.)
15. 1039080 Rocker Switch Replacement Kit, (Replaces 9919348)
(See page 12 for additional information.)
Also Available:
16. 9916218 Clean Out Plug, (For O/S top covers.)
17. 9006102 Screw, #8-18 x 3/8", (For O/S housing mounting.)
18. 9919445 Clean Out Spring

Page 14
Parts Diagram - Housing Assembly
Diplomat II Pour-Over Coffee Brewer
```
Page 15
Parts List - Housing Assembly
Diplomat II Pour-Over Coffee Brewer
Item Part No. Description
1. 1030411 Housing, Diplomat II, (Housing only, no controls.)
2. 6000514 Mid-Hex Screw, #6-32 x 1/4” Hex
3. 1040045 Reservoir, (For use with plastic siphon tube.)
1030410 Reservoir, (For use with older metal siphon tube.)
4. 1039028 Siphon Tube Kit, Plastic, (Includes items 5 & 6.)
5. 9915144 "O"-Ring
6. 9202122 Hex Nut, 1/8”-27
7. 1040142 Spray Head, Plastic, (Brown)
8. 9905266 Immersion Element, 120v 1300w
9. 9001226 Screw, #6-32 x 5/16"
10. 6000274 Gasket, Immersion Element
11. 6000648 Bracket, Secondary Hi-Limit
12. 9301201 Washer #6
13. 9201113 Nut, Hex #6-32
14. 9920552 Hi-Limit Thermostat
15. 9001244 Screw, #4-40 x 1/4"
16. 9303128 Lock Washer W/Int Tooth #4
17. 9201128 Nut, Hex #4-40
18. 9920434 Thermostat, (Replaces 9920450 & 9920332)
(See Page 10 for additional information.)
19. 6000363 Clip, Thermostat Bulb
20. 9920459 Hi-Limit Thermostat, (Replaces 9920333)
(See Page 14 for additional information.)
21. 9001136 Screw, #6-32 x 1"
22. 1040010 Spacer, Hi-limit Thermostat
23. 9914285 Push-On Nut, Tinnerman, #6
24. 6000364 Clip, Hi-Limit Thermostat Bulb
27. 9902361 Bushing, Strain Relief
28. 9903435 Cord, Power Supply
29. 9001142 Screw, #6-32 x 7/8"
30. 9303118 Lock Washer, External Tooth, #8
31. 9201152 Nut, #6-32
32. 9919524 Toggle Switch, (On-Off)
33. 9303113 Lock Washer
34. 9916219 Light, (On-Brew)
35. 1030997 Grounding Plate (Not Shown - Placed under Item #32)
36. 1039091 Kit, Secondary Hi-Limit (Include Items 11, 12, 13,14,15,16 & 17)

Page 16
Parts List – Element Pan Assy.
Diplomat II Pour-Over Coffee Brewer
Item Part # Description
1. 6001007 Porcelain Pan, Brown
2. 1039032 Element Replacement Kit, PTC
(Includes items 2, 3, 5, 7, 8, 9, 10 & 11.)
3. 6000578 Spacer, Element
4. 6004021 Bracket
5. 9303115 Lock Washer, Internal Tooth, 5/16”
6. 9010115 Screw, Hex Head, 5/16” – 18 x 3/4”
7. 9001107 Screw, #8-32 x 1/2”
8. 9905350 Eyelet, Anti-Rotation
9. 9301106 Washer, #10, S/S
10. 9303118 Lock Washer, External Tooth, #8
11. 9201145 Hex Nut, #8-32

Page 17
Parts List - 1030801 - 3 Station Top Cover
Diplomat II Pour-Over Coffee Brewer
Item Part No. Description
1. 1030993 Top Cover, 3 Station,
(Without warmer element, with cover & 2 hinge inserts.)
2. 6000282 Gasket, Top Cover
3. 1039027 Cover Kit, (Includes cover & 2 hinge inserts.)
4. 1040062 Hinge Insert
5. 9003131 Screw, Flat Head, #6-32 x 1-3/4"
6. 9919461 Rocker Switch, Amber,
(To replace a switch that has 3 terminals.)
1039080 Rocker Switch Kit, Red, (Replaces 9919348)
(To replace a switch that has 4 terminals.)
7. 6001007 Porcelain Pan, (Without warmer element.)
8. 1039037 3 Station Element Kit,
(Includes items 9, 10, 11, 13, 14, 15, 16.)
9. 6000582 Spacer, Large
10. 1030445 Reflector Plate
11. 9303115 Lock Washer, Internal Tooth, 5/16"
12. 9010121 Screw, Hex Head, 5/16" - 18 x 1/2"
13. 9001107 Screw, #8-32 x 1/2"
14. 6000590 Spacer, Small, Anti-Rotation
15. 9303118 Lock Washer, #8
16. 9201145 Hex Nut, #8-32
17. 9906398 Fastener, On-Sert
18. 9005135 Screw, #6 x 3/8"

Page 18
1030801 - 3 Station Top Cover Installation Instructions
Diplomat II Pour-Over Coffee Brewer
WARNING:
Read these instructions completely before continuing. Unplug the appliance and allow it to cool
before attempting to install this top cover.
Incorrect installation or operating procedures will void the warranty and may damage this
appliance.
This appliance must be electrically grounded to prevent electric shock or injury to the operator.
1. Remove the existing top cover. If there are any wires connected to the top cover, remove them.
2. Determine the type of switch the new top cover has, and use the appropriate diagram below when
attaching the wiring from the new top cover.
3. Attach the white wire (#1 on the diagram below), from the new top cover to the group of white wires on the
immersion element.
4. Attach the black wire (#3 on the diagram below), from the new top cover to the black wires on the
thermostat terminal #2. There should be a terminal available for this connection.
5. Attach the green wire (#2 on the diagram below), from the new top cover to the ground screw on the
immersion element.
6. Place the top cover on top of the housing, making sure the channels in the top cover line up with the
housing edges. Tap firmly on each corner of the top cover to snap the cover in place. Install the top cover
screw and tighten snug only. Test thoroughly.
(See the wiring diagram on the inside of the coffee brewer for complete wiring details.)
1039080 – Switch, Red
Switch with 4 terminals.
9919461 – Switch, Amber
Switch with 3 terminals.

Page 19
Revised Housing Attachment
Diplomat II Pour-Over Coffee Brewer
See the diagram below for the revised method of attaching the housing to the wrap sheet. See the
parts diagrams for part numbers.
Switch Wiring
To Replace The 9919348 Switch With A 1039080 Switch Kit
The 9919348 warmer switch has been replaced by a new switch replacement kit. Refer to the
diagrams below for wiring this new switch kit.

20333 S. Normandie Ave., Torrance, CA 90502
800-421-6860 •310-787-5444 •Fax 310-787-5412
This manual suits for next models
2
Table of contents
Other Brewmatic Coffee Maker manuals


Popular Coffee Maker manuals by other brands


Bunn
Bunn Coffee machine Installation & operating guide

Nespresso
Nespresso inissia instructions

Bosch
Bosch CTL636ES1 Quick reference guide

Bosch
Bosch SUNY TAS 32 Series instruction manual

Clatronic
Clatronic ProfiCook ES 2968 Instruction manual & guarantee

de Jong Duke
de Jong Duke Zia 6000 series Technical manual


