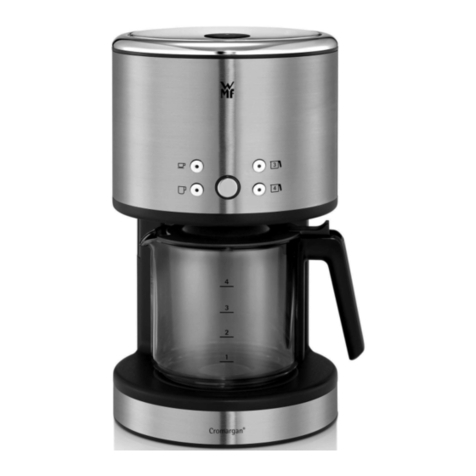
WMF LONO User manual

Kaffeemaschine Glas
Kaffeemaschine Thermo
LONO
Gebrauchsanweisung 4
Operating Manual 12
Mode d’emploi 20
Istruzioni per l’uso 26
Instrucciones de uso 32
de
en
fr
it
es
nl
da
sv
no
Gebruiksaanwijzing 38
Brugsanvisning 44
Användarguide 50
Käyttöohje 56
Bruksanvisning 62

2 1 3
4
5

Aufbau Kaffeemaschine
1 Start-/Stopptaste mit Leuchtring
2 Aroma-Taste
3 Entkalkungsprogramm
4 Schwenkfilter
5 Wassertank mit Deckel
Set-up of the coffee machine
1 Start / Stop button with LED
2 Aroma button
3 Descaling programme
4 Swing filter
5 Water tank with lid
Descriptif Machine à café
1 Touche On/Off avec anneau lumineux
2 Touche Arôme
3 Programme de détartrage
4 Filtre pivotant
5 Réservoir d’eau avec couvercle
Struttura della macchina del caffé
1 Tasto di avvio / arresto con anello luminoso
2 Tasto Aroma
3 Programma decalcificazione
4 Filtro girevole
5 Serbatoio d’acqua con coperchio
Montaje de la máquina de café
1 Tecla de inicio/parada con anillo luminoso
2 Tecla Aroma
3 Programa de descalcificación
4 Filtro girable
5 Depósito de agua con tapa
Onderdelen koffiezetapparaat
1 Start/Stop-knop met verlichte ring
2 Aroma-knop
3 Ontkalkingsprogramma
4 Draaifilter
5 Waterreservoir met deksel
Produktoversigt kaffemaskine
1 Start-/stopknap med lysende ring
2 Aroma-knap
3 Afkalkningsprogram
4 Drejefilter
5 Vandtank med låg
Kaffemaskinens konstruktion
1 Start- och stoppknapp med ljusring
2 Aromknapp
3 Avkalkningsprogram
4 Svängfilter
5 Vattenbehållare med lock
Kahvinkeittimen osat
1 Käynnistys-/sammutusnäppäin
valorenkaalla
2 Aroma-näppäin
3 Kalkinpoisto-ohjelma
4 Kääntösuodatin
5 Kannellinen vesisäiliö
Oppbygning kaffemaskin
1 Start-/stopp-knapp med belyst ring
2 Aroma-knapp
3 Avkalkingsprogram
4 Svingfilter
5 Vanntank med lokk

4
Wichtige Sicherheitshinweise
▪ Diese Geräte können von Kindern ab 8 Jahren sowie von
Personen mit reduzierten physischen, sensorischen oder
mentalen Fähigkeiten oder Mangel an Erfahrung und/
oder Wissen benutzt werden, wenn sie beaufsichtigt oder
bezüglich des sicheren Gebrauchs des Gerätes unter-
wiesen wurden und die daraus resultierenden Gefahren
verstanden haben. Kinder dürfen nicht mit dem Gerät
spielen. Reinigung und Benutzer-Wartung dürfen nicht
durch Kinder durchgeführt werden, es sei denn, sie sind
älter als 8 Jahre und beaufsichtigt.
▪ Bewahren Sie das Gerät und seine Zuleitung außerhalb
der Reichweite von Kindern unter 8 Jahren auf.
▪ Das Gerät nicht in Wasser tauchen.
▪ Wenn die Anschlussleitung dieses Gerätes beschädigt
wird, muss sie durch den zentralen Kundendienst des
Herstellers oder eine ähnlich qualifizierte Person ersetzt
werden. Durch unsachgemäße Reparaturen können
erhebliche Gefahren für den Benutzer entstehen.
▪ Dieses Gerät ist dafür bestimmt, im Haushalt und ähnli-
chen Anwendungen verwendet zu werden, wie beispiels-
weise:
⋅in Küchen für Mitarbeiter in Läden, Büros und ande-
ren gewerblichen Bereichen;
⋅in landwirtschaftlichen Anwesen;
⋅von Kunden in Hotels, Motels und anderen Wohnein-
richtungen;
⋅in Frühstückspensionen.
Das Gerät ist nicht für den rein gewerblichen
Gebrauch bestimmt.
Vor dem Benutzen
Wir gratulieren Ihnen zum Kauf der Kaffeemaschine.
Die Kaffeemaschine darf nur für den vorgesehenen Zweck gemäß dieser Gebrauchs-
anweisung verwendet werden. Lesen Sie deshalb die Gebrauchsanweisung vor der
Inbetriebnahme sorgfältig, sie gibt Anweisungen für den Gebrauch, die Reinigung
Gebrauchsanweisung

5
de
de
und die Pflege des Gerätes. Bei Nichtbeachtung übernehmen wir keine Haftung für
eventuelle Schäden. Bewahren Sie die Gebrauchsanweisung sorgfältig auf und geben
Sie diese gemeinsam mit dem Gerät an Nachbenutzer weiter. Beachten Sie auch die
Garantiehinweise am Ende der Gebrauchsanweisung.
Für Glasbruch wird keine Garantie übernommen.
Beim Gebrauch die Sicherheitshinweise beachten.
Technische Daten
Nennspannung: 220-240 V~ 50/60 Hz
Leistungsaufnahme: 900 W
Schutzklasse: I
Weitere Sicherheitshinweise
▪ Gerät nur an eine vorschriftsmäßig installierte Schutzkontaktsteckdose anschlie-
ßen. Zuleitung und Stecker müssen trocken sein.
▪ Die Anschlussleitung nicht über scharfe Kanten ziehen oder einklemmen, nicht
herunterhängen lassen sowie vor Hitze und Öl schützen.
▪ Ein Verlängerungskabel nur in einwandfreiem Zustand einsetzen.
▪ Den Netzstecker nicht an der Leitung oder mit nassen Händen aus der Steckdose
ziehen.
▪ Das Gerät nicht an der Zuleitung tragen.
▪ Den Kaffeeautomaten nicht auf heiße Oberflächen z.B. Herdplatten o.Ä. oder in
der Nähe der offenen Gasflamme abstellen, das Gehäuse könnte dabei anschmel-
zen.
▪ Das Gerät nicht auf wasserempfindliche Oberflächen abstellen. Wasserspritzer
könnten diese beschädigen.
▪ Das Gerät nicht ohne Wasser einschalten. Den Frischwasserbehälter höchstens bis
zur maximal möglichen Tassenanzahl mit kaltem Wasser füllen.
▪ Kein Wasser in das eingeschaltete oder noch heiße Gerät einfüllen. Zuvor den
Kaffeeautomaten ausschalten und 5 Minuten abkühlen lassen.
▪ Vorsicht, das Gerät wird heiß. Verbrühungsgefahr durch austretenden Dampf.
Während des Durchlaufes niemals den Filter heraus schwenken oder den Deckel
öffnen.
▪ Wenn das Gerät längere Zeit nicht benutzt wird, den Netzstecker ziehen.
▪ Das Gerät nicht in Betrieb nehmen bzw. sofort Netzstecker ziehen, wenn:
⋅Gerät oder Netzkabel beschädigt ist
⋅der Verdacht auf einen Defekt nach einem Sturz oder Ähnlichem besteht.
In diesen Fällen das Gerät zur Reparatur geben.
▪ Das Gerät nur unter Aufsicht betreiben.
▪ Das Gerät regelmäßig entkalken.
▪ Die Thermokanne ist nicht für die Mikrowelle geeignet.
▪ Die Glaskanne ist nicht für die Mikrowelle geeignet.
▪ Bei Zweckentfremdung, falscher Bedienung, Nichtbeachtung der Entkalkungs-
hinweise oder nicht fachgerechter Reparatur wird keine Haftung für eventu-
elle Schäden übernommen. Ebenso sind Garantieleistungen in solchen Fällen
ausgeschlossen.

6
Leuchtanzeigen im Überblick
Farbe Leuchtring
Start-/Stopptaste Aktion
Kaffeemaschine
leuchtet weiß Kaffeezubereitung (mit Aroma-
Funktion) läuft
blinkt weiß Aromafunktion ausgewählt
leuchtet grün
Zubereitung beendet
(nur Variante mit Thermokanne)
Zubereitung beendet, Warmhalte-
Funktion aktiv
(nur Variante mit Glaskanne)
blinkt blau/weiß Verkalkungsanzeige
blinkt blau Entkalkungsprogramm ausgewählt
leuchtet blau Entkalkungsprogramm aktiv
Inbetriebnahme
Vor der Erstbenutzung und nachdem das Gerät längere Zeit außer Betrieb war, füh-
ren Sie einen Kochvorgang mit Frischwasser ohne Kaffeemehl durch. Füllen Sie dazu
den Tank bis zur 10-Tassen-Marke (Variante mit Glaskanne) bzw. bis zur 8-Tassen-
Marke (Variante mit Thermokanne), da ansonsten die Kanne überlaufen kann.
Kaffeezubereitung
Zum einfachen Befüllen des Wassertanks (5) können sie diesen abnehmen. Öffnen
Sie den Wassertank(5) durch Abnehmen des Deckels. Gießen Sie nur kaltes Wasser
in den Tank (5). Die Wasserstandsanzeige gilt für die Frischwassermenge, die zum
Brühen der gewünschten Tassenzahl à 125 ml Kaffee notwendig ist.
Klappen Sie zum Einfüllen von Kaffeemehl den Schwenkfilter (4) heraus. Setzen Sie
einen Papierfilter der Größe 1x4 in den Filter ein, zuvor jedoch den Prägerand umfal-
ten. Der Papierfilter darf nicht über den Rand des Filters hinausragen, er ist deshalb
mit der Hand leicht anzudrücken.
Füllen Sie die erforderliche Menge Kaffeemehl ein. Pro Tasse rechnet man je nach
persönlichem Geschmack mit ca. 5-7 g mittelfein gemahlenem Kaffee. Ist er zu fein
gemahlen, kann der Filter überlaufen.
Schließen Sie den Schwenkfilter (4), dieser rastet dabei hörbar ein.
Stecken Sie den Netzstecker in die Steckdose und drücken Sie die Start-/Stopptaste
(1). Der Leuchtring leuchtet weiß und die Zubereitung beginnt.
Sie können die Zubereitung jederzeit abbrechen, indem Sie die Start-/Stopptaste (1)
drücken.
Warten Sie einige Minuten, bis der Kaffe vollständig in die Kanne gelaufen ist. Nach
dem Entnehmen der Kanne verhindert ein Tropfstopp-Ventil, dass Kaffee nachtropft.

7
de
WMF Aroma Perfection
Möchten Sie einen stärkeren, aromatischen Kaffee zubereiten, können Sie die
Aroma-Funktion WMF Aroma Perfection aktivieren. Sie empfiehlt sich besonders
für die Zubereitung geringer Mengen. Drücken Sie dazu die Aroma-Taste (2) kurz
bevor Sie den Brühvorgang mit der Start-/Stopptaste (1) beginnen, der Leuchtring
der Start-/Stopptaste (1) blinkt weiß.
Hinweis: Warten Sie länger als ca. 3 Sekunden mit dem Starten des Brühvorgangs
deaktiviert sich die Aroma-Funktion wieder, der Leuchtring der Start-/Stopptaste (1)
erlischt.
Bitte beachten Sie, dass sich die Zubereitungszeit etwas verlängert.
Warmhalte-Funktion
(nur Variante mit Glaskanne)
Um den fertig gebrühten Kaffee auf Serviertemperatur zu halten, ist Ihr Gerät mit
einer Warmhalte-Funktion ausgestattet. Nach Beendigung der Zubereitung aktiviert
sich die Warmhalte-Funktion automatisch, die Start-/Stopptaste (1) leuchtet grün.
Die Warmhaltezeit beträgt 40 Minuten, danach schaltet sich das Gerät ab, die Start-/
Stopptaste (1) erlischt.
Sie können die Warmhalte-Funktion jederzeit durch Drücken der Start-/Stopptaste
(1) deaktivieren.
Abschaltautomatik
(nur Variante mit Thermokanne)
Nach dem Einschalten sorgt eine Abschaltautomatik dafür, dass das Gerät nicht
überhitzt. Erst wenn das Wasser vollständig durchgelaufen ist, schaltet sich das Gerät
ab, die Start-/Stopptaste (1) leuchtet 2 Minuten grün. Nach weiteren ca. 2 Minuten
schaltet das Gerät ab, die Start-/Stopptaste (1) erlischt.
Ein vorzeitiges Abschalten ist durch Drücken der Start-/Stopptaste (1) möglich.
Dies könnte erforderlich werden, wenn Sie versehentlich ohne Wasser eingeschaltet
haben. Warten Sie unbedingt einige Minuten ab, bevor Sie wieder Wasser in das
heiße Gerät einfüllen. Lassen Sie die Kaffeemaschine vorher abkühlen.
Hinweise zur Cromargan® Thermokanne
(nur Variante mit Thermokanne)
Die Kanne ist als Servierkanne konzipiert und hält bei maximaler Füllung den Inhalt
am besten warm. Bei Teilfüllungen und Restmengen kann sich die Warmhaltezeit
wesentlich verringern. Am Besten ist es, wenn die Kanne vor der Zubereitung mit
heißem Wasser ausgespült wird.
Der Verschluss durch den Durchbrühdeckel ist technisch bedingt nicht 100%ig
dicht, damit er sich auch nachdem Abkühlen des Kaffees noch leicht öffnen lässt.
Den Deckel zum Verschließen nur leicht festdrehen. Die gefüllte Kanne nur aufrecht
stehend benutzen.
Zum Ausgießen die Ausgießtaste am Griff drücken.
Zum Öffnen der Kanne drehen Sie den Deckel leicht gegen den Uhrzeigersinn. Achten
Sie darauf, dass nach dem Schließen des Deckels, die Ausgießtaste wieder über dem
Griff der Kanne ist.
Der doppelwandige Cromargan® -Kanne ist absolut bruchsicher. Trotzdem sollte er
vor mechanischen Beanspruchungen geschützt werden.
Spülen Sie die Kanne regelmäßig aus. Wenn sich Eisenpartikel aus dem Wasser auf
der Cromargan®-Oberfläche festsetzen, kann es an dieser Stelle zu Lochfraß kommen.
Entfernen Sie diese Ablagerungen deshalb sofort mit einem Edelstahl-Putzmittel.
8
Reinigung und Pflege
Reinigung
Ziehen Sie den Netzstecker und lassen Sie das Gerät abkühlen.
Das Gerät nicht in Wasser tauchen, sondern außen nur mit einem feuchten Tuch,
dem etwas Spülmittel beigegeben wird, abwischen.
Keine scharfen und scheuernden Reinigungsmittel verwenden.
Filter, Glaskanne und Thermokanne werden unter fließendem Wasser gereinigt.
Verkalkungsanzeige
Kalkablagerungen führen zu einer verlängerten Brühzeit und einer niedrigeren
Qualität Ihres Kaffees. Zudem führen Kalkablagerungen zu Energieverlusten und
beeinträchtigen die Lebensdauer des Gerätes.
Die automatische Verkalkungsanzeige ermittelt den Zeitpunkt für die fällige
Entkalkung. Je nach Kaffeekonsum werden Sie schon nach 4 bis 6 Wochen durch
die blau/weiß blinkende Start-/Stopptaste (1) während des Brühens, zum Entkalken
aufgefordert.
Entkalken - Anti-Kalk Programm
Entkalkungsmittel
Verwenden Sie ein handelsübliches Entkalkungsmittel, das für Filterkaffemaschinen
geeignet ist.
Keinesfalls Essig oder Essigessenz verwenden, da Materialien im Gerät dadurch
beschädigt werden könnten.
Bei der Verwendung von Entkalkern auf Basis von Zitronensäure könnten sich
beim Entkalken Niederschläge bilden, die den Kalkbelag versiegeln oder die Leitungen
im Gerät verstopfen. Zudem läuft die Entkalkung mit Zitronensäure zu langsam ab –
eine vollständige Entkalkung kann deshalb nicht gewährleistet werden.
Für Schäden, die durch Verwendung eines ungeeigneten Entkalkungsmittels oder
Nichtbeachtung der Entkalkungsvorschrift entstehen, besteht kein Garantieanspruch.
Achten Sie durch sorgfältigen Umgang mit dem Entkalkungsmittel darauf, dass
keine Schäden an Möbeln oder Kleidung verursacht werden.

9
de
Entkalkungsprogramm
Ihre Kaffeemaschine verfügt über ein automatisches Entkalkungsprogramm.
Hinweis: Einmal gestartet, sollte das Entkalkungsprogramm nicht abgebrochen
werden. Dies dient der Sicherheit aller Benutzer. Es soll verhindern, dass in
Unkenntnis Kaffee gebrüht werden kann, solange die Entkalkerlösung noch nicht
vollständig ausgespült wurde. Im Notfall können Sie das Enkalkungsprogramm
durch drücken der Start-/Stopptaste (1) abbrechen. In diesem Fall sollten Sie
anschließend den Tank (5) ausspülen und danach bis zur 10-Tassen-Marke (Variante
mit Glaskanne) bzw. bis zur 8-Tassen-Marke (Variante mit Thermokanne) mit
frischem Leitungswasser auffüllen und dieses durchlaufen lassen.
▪ Legen Sie einen Papierfilter ein und stellen Sie die Kanne in die Maschine.
Eventuell größere Kalkreste sammeln sich im Papierfilter und verhindern so ein
Verstopfen des Auslaufventils. Füllen Sie das nach Herstellerangaben dosierte
Entkalkungsmittel für einen Entkalkungsvorgang in den leeren Wassertank.
Füllen Sie den Wassertank (5) mit kaltem Leitungswasser bis zur 10-Tassen-
Marke (Variante mit Glaskanne) bzw. bis zur 8-Tassen-Marke (Variante mit
Thermokanne) auf.
▪ Drücken Sie zum Starten der Entkalkung die Taste (3), die Start-/Stopptaste
(1)blinkt blau. Bestätigen Sie den Start des Entkalkungsprogramms durch Drücken
der blau blinkenden Start-/Stopptaste (1).
Die Start-/Stopptaste (1) leuchtet während des Entkalkungsprogramms blau.
Hinweis: Warten Sie länger als ca. 3 Sekunden mit dem Starten des Entkalkungs-
programms deaktiviert sich das Entkalkungsprogramm wieder, der Leuchtring der
Start-/Stopptaste (1) erlischt.
▪ Das Entkalkungsprogramm endet automatisch nach ca. 40 Minuten, der
Leuchtring der Start-/Stopptaste (1) erlischt.
Hinweis: Während des Entkalkungsablaufs schaltet sich das Gerät mehrmals ein
und aus.
▪ Wichtig: Füllen Sie anschließend zum Spülen den Tank (5) bis zur 10-Tassen-
Marke (Variante mit Glaskanne) bzw. bis zur 8-Tassen-Marke (Variante mit
Thermokanne) mit frischem Leitungswasser auf und lassen Sie dieses durchlau-
fen.
Garantie-Information
Für unsere Geräte übernehmen wir gegenüber dem Endkunden eine 24-monatige
Haltbarkeitsgarantie. Sie beginnt mit dem Kauf des Gerätes durch den Endkunden
und gilt im Gebiet der Bundesrepublik Deutschland.
Ansprüche aus dieser Garantie sind unter Vorlage des Kaufbelegs direkt gegenüber
unserem zentralen Kundendienst geltend zu machen.
Von der Garantie ausgeschlossen sind Schäden durch normalen Verschleiß, unsachge-
mäßen Gebrauch, Nichteinhaltung der Entkalkungsanweisung, unterbliebene Pflege
sowie Glasbruch.
Der Endkunde besitzt zusätzlich zu den Ansprüchen aus dieser Garantie gesetzliche
Ansprüche wegen Mängeln des Gerätes gegenüber seinem direkten Verkäufer/Händ-
ler, die durch diese Garantie nicht eingeschränkt werden.

10
Das Gerät entspricht den Europäischen Richtlinien 2006/95/EG, 2004/108/EG und
2009/125/EG .
Dieses Produkt darf am Ende seiner Lebensdauer nicht über den normalen Haushalts-
abfall entsorgt werden, sondern muss an einem Sammelpunkt für das Recycling von
elektrischen und elektronischen Geräten abgegeben werden.
Die Werkstoffe sind gemäß ihrer Kennzeichnung wiederverwertbar. Mit der Wieder-
verwendung, der stofflichen Verwertung oder anderen Formen der Verwertung von
Altgeräten leisten Sie einen wichtigen Beitrag zum Schutze unserer Umwelt.
Bitte erfragen Sie bei der Gemeindeverwaltung die zuständige Entsorgungsstelle.
Änderungen vorbehalten

11
de

12
Important safety information
▪ These devices can be used by children older than eight
years old as well as by persons with limited physical,
sensory or mental capabilities, persons lacking experi-
ence and/or lacking knowledge if they are supervised or
have received instructions regarding how the device is to
be used safely and have understood the resulting risks.
Children may not play with the device. Children may not
perform the cleaning and user maintenance, unless they
are older than eight years old and are supervised.
▪ Keep the device and its cable out of the reach of children
under eight years old.
▪ Do not immerse the device in water.
▪ If the appliance’s connection cable is damaged then it
must be replaced by the manufacturer’s central customer
service department or by a similarly qualified person.
Improper repairs may constitute a serious threat for users.
▪ This device is meant to be used in the household and for
similar applications, such as:
⋅in kitchens for employees in shops, offices and other
commercial areas;
⋅on agricultural property,
⋅from customers in hotels, motels and other residential
facilities;
⋅in bed and breakfast establishments.
The appliance is not designed for sole commercial use.
Prior to use
We congratulate you on the purchase of your coffee machine.
The coffee machine may only be used for its intended purpose according to these
operating instructions. Therefore, carefully read the instructions for use before
start-up. It provides instructions for the use, cleaning and care of the device. We do
not assume any liability for any damage if the instructions are not observed. Keep
the operating instructions well preserved and pass them on to the subsequent user
together with the device. Also note the warranty information at the end of the
instructions for use.
There is no guarantee for glass breakage.
Observe the safety instructions during use.
Operating Manual

13
en
en
Technical data
Rated voltage: 220-240 V~ 50/60 Hz
Power consumption: 900 W
Protection class: I
Additional safety instructions
▪ Only connect the device to properly installed earthed sockets. The wire and plug
must be dry.
▪ Do not pull the connecting cable over sharp edges or clamp it. Do not let it hang
down and protect it from heat and oil.
▪ Only use an extension cord in perfect condition.
▪ Never disconnect the mains plug from the socket by the cord or with wet hands.
▪ Do not carry the device by the cord.
▪ Do not place the automatic coffee machines on hot surfaces, such as hot plates
or similar, or near open flames. The casing could melt.
▪ Do not place the device on water-sensitive surfaces. Water spray may damage
them.
▪ Do not switch on the device without water. Fill the fresh water tank with cold
water at most to the maximum possible number of cups.
▪ Do not put water into a device that is switched on or is still hot. Before filling
with water, switch the automatic coffee machine off and allow to cool for 5
minutes.
▪ Caution, the device is hot. Risk of scalding from escaping steam. During the flow,
never swing out the filter or open the lid.
▪ If the device will not be used for a long time, pull out the mains plug.
▪ Stop using the appliance and/or disconnect it from the mains plug immediately
if:
⋅The appliance or mains cable is damaged
⋅there is suspicion of a defect or something similar after it has fallen.
In such cases, send the appliance to be repaired.
▪ Only operate the device under supervision.
▪ Descale the device regularly.
▪ The vacuum jug is not suitable for the microwave.
▪ The teapot is not suitable for the microwave.
▪ No liability is assumed for any damages in cases of misuse, improper operation,
non-observance of the descaling instructions or unprofessional repairs. Claims
under warranty are likewise excluded in such cases.

14
LED displays at a glance
Colour LED
Start / Stop button
Coffee machine
action
illuminates white Coffee preparation (with aroma
function) is running
flashes white Aroma function selected
illuminates green
Preparation completed
(only version with vacuum jug)
Preparation completed, keep-
warm function active
(only version with vacuum jug)
flashes blue / white Scaling indicator
flashes blue Descaling programme selected
illuminates blue Decalcification programme active
Start-up
Prior to the first use and after the device has not be operated for an extended period
of time, carry out a boiling process with fresh water without coffee grounds. Fill the
tank to the 10-cup mark (version with teapot) or to the 8-cup mark (version with
vacuum jug), as otherwise the pot can overflow.
To prepare coffee
You can remove this in order to easily fill the water tank (5). Open the water tank (5)
by removing the lid. Only pour cold water into the tank (5). The water level indicator
is for the amount of fresh water that is needed to brew the desired number of cups
per 125 ml coffee.
Swing out the filter (4) to fill with ground coffee. Place the paper filter of the 1 x 4
size into the filter, but fold the stamped edge before doing so. The paper filter should
not protrude over the edge of the filter, which is why it should be pushed down
slightly with your hand.
Fill with the required amount of ground coffee. Depending on personal taste, you
can figure about 5-7 g of medium-fine ground coffee per cup. If it is ground too
finely, the filter can overflow.
Then close the swing filter (4). It will audibly click into place.
Insert the mains plug into the socket and push the Start / Stop button (1). The LED
illuminates white and the preparation begins.
You can cancel the preparation at any time by pressing the Start / Stop button (1).
Wait a few minutes until all of the coffee has run into the pot. After removing the
pot, a drip-stop prevents coffee from dripping.

15
en
WMF Aroma Perfection
If you would like to prepare a strong aromatic coffee, you can activate the aroma
function WMF Aroma Perfection. It is particularly recommended for preparing
small amounts. To do so, push the Aroma button (2) just before you begin the
brew process with the Start / Stop button (1). The LED of the Start / Stop button (1)
will flash white.
Note: If you wait longer than approximately 3 seconds to start the brewing process,
then the Aroma function deactivates again. The LED of the Start / Stop button (1)
turns off.
Please note that the preparation time takes a slightly longer.
Keep-warm function
(only version with teapot)
In order to keep the finished brewed coffee at a serving temperature, your device is
equipped with a keep-warm function. After the preparation is complete, the keep-
warm function activates automatically and the Start / Stop button (1) illuminates
green. The keep-warm time is 40 minutes. Then the device automatically switches off
and the Start / Stop button (1) turns off.
You can deactivate the keep-warm function at any time by pressing the Start / Stop
button (1).
Automatic shut-off
(only version with vacuum jug)
After being switched on, the automatic shut-off ensures that the device does not
overheat. Only once the water has completely passed through does the device switch
off and the Start / Stop button (1) illuminates green for 2 minutes. The device
switches off after another 2 minutes approximately and the Start / Stop button (1)
turns off.
It is possible to shut off the coffee maker early by pressing the start / stop button (1).
This could be necessary if you accidentally start the coffee machine without water.
It is necessary to wait for a few minutes before you add more water into the hot
device. Allow the coffee machine to cool beforehand.
Information about the Cromargan® vacuum jug
(only version with vacuum jug)
The pot is designed as a serving pot and best keeps the content warm when it is
full. The keep warm time can be significantly reduced if it is only partially full or has
residual amounts. It is best if the pot is rinsed with hot water before preparation.
For technical reasons, the seal from the brewing lid is not 100% tight so that it can
be easily opened, even after the coffee cools down. To close, only slightly tighten the
lid. Only use the filled pot standing upright.
To pour, press the pour button on the handle.
To open the pot, turn the lid slightly counter-clockwise. After closing the lid, ensure
that the pour button lines up with the pot handle.
The double-walled Cromargan® pot is absolutely break-proof. Nevertheless, it should
be protected against mechanical stresses.
Rinse the pot regularly. If iron particles from water accumulate on the Cromargan®
surface, they can create pitting at those points. Therefore, remove these deposits
immediately with a stainless steel cleanser.

16
Cleaning and care
Cleaning
Unplug the mains plug and allow the appliance to cool down.
Do not immerse the device in water, but rather clean it on the outside with a damp
cloth and a little washing-up fluid.
Do not use any sharp and abrasive cleaning agents.
The filter, teapot and vacuum jug can be cleaned under running water.
Scaling indicator
Scale deposits lead to an extended brewing time and a lower quality of your coffee.
Limescale deposits also lead to losses of energy and impair the service life of the
device.
The automatic scaling indicator determines the time for the next descaling. Depend-
ing on the coffee consumption, you will be prompted to descale already after 4 to 6
weeks via the blue/white flashing Start / Stop button (1) during the brewing process.
Descaling - Anti-limescale program
Descaling agent
Use a commercially available descaling agent that is suitable for filter coffee
machines.
Do not use vinegar or vinegar concentrate, as this can damage materials in the
appliance.
When using descalers based on citric acids, precipitates could form during
descaling that seal the limescale layer or clog the lines in the device. In addition,
descaling with citric acids takes too long. A complete descaling can therefore not be
guaranteed.
Damage caused by the use of an unsuitable descaling agent or through non-
compliance with the descaling instructions is not covered by our warranty claim.
Handle the descaling agent carefully to ensure that no furniture or clothing is
damaged.

17
en
Descaling programme
Your coffee machine has an automatic descaling programme.
Note: Once started, the descaling programme should not be
interrupted. This is for the safety of all users. This is to prevent coffee
from unintentionally being brewed if the descaling solution has not yet
been completely been rinsed out. In an emergency, you can stop the descaling
programme by pressing the Start / Stop button (1). In this case, you should then rinse
out the tank (5) and afterwards fill to the 10-cup mark (version with teapot) or to
the 8-cup mark (version with vacuum jug) with fresh tap water and allow this to
run through the machine.
▪ Insert a paper filter and place the pot in the machine. Any more substantial
amounts of limescale residue collect on the filter paper and thus prevent the
spout becoming clogged. Fill the empty water tank with the descaling agent
dosed according to the manufacturer’s instructions for a descaling procedure.
Fill the water tank (5) with cold tap water up to the 10-cup mark (version with
teapot) or up to the 8-cup mark (version with vacuum jug).
▪ To start the descaling, press the button (3) and the Start/ Stop button (1) will
flash blue. Confirm the start of the descaling programme by pressing the blue
flashing Start / Stop button (1).
The Start / Stop button (1) illuminates blue during the descaling programme.
Note: If you wait longer than approximately 3 seconds to start the descaling
programme, the descaling programme deactivates again and the Led of the Start
/ Stop button (1)
▪ The descaling programme automatically ends after approximately 40 minutes and
the LED of the Start / Stop button (1) turns off.
Note: During the descaling process, the device will switch on and off several
times.
▪ Important: Then to rinse, fill the tank (5) to the 10-cup mark (version with
teapot) or to the 8-cup mark (version with vacuum jug) with fresh tap water
and allow this to run through the machine.

18
For UK use only
▪ This product is supplied with a 13 A plug conforming to BS 1363 fitted to the
mains lead. If the plug is unsuitable for your socket outlets or needs to be repla-
ced, please note the following. If the plug is a non-rewireable one, cut it from the
mains lead and immediately dispose of it. Never insert it into a socket outlet as
there is a very great risk of an electric shock.
▪ The replacement of the plug at the mains lead has to be done according to the
following instructions:
Warning - This appliance must be earthed
Important: The wires in this mains lead are coloured in accordance with the
following code:
green/yellow Earth
blue Neutral
brown Live
As the colours of the wires in the mains lead of this appliance may not correspond
with the coloured markings identifying the terminals in your plug, proceed as
follows:
⋅the wire which is coloured green and yellow must be connected to the
terminal which is marked with the letter E or by the earth symbol , or
coloured green or green and yellow,
⋅the wire which is coloured blue must be connected to the terminal which is
marked the letter N or coloured black,
⋅the wire which is coloured brown must be connected to the terminal which
is marked with the letter L or coloured red.
▪ If a 13 A (BS 1363) plug is used it must be fitted with a 13 A fuse conforming to
BS 1362 and be ASTA approved. If any other type of plug is used, the appliance
must be protected by a 10 A fuse either in the plug or adapter or at the distribu-
tion board.
If in doubt - consult a qualified electrician.
▪ Never use the plug without closing the fuse cover.
The appliance complies with European directives 2006/95/EC, 2004/108/EC and
2009/125/EC.
At the end of its life, this product must not be disposed of in normal household
waste but must instead be delivered to a collection point for recycling electric and
electronic appliances.
The materials are recyclable in accordance with their labelling. The reuse, recycling
and or other use of old appliances makes an important contribution to protecting
our environment.
Please ask your local administration for the appropriate disposal point.
Subject to alterations

19
en

20
Consignes de sécurité importantes
▪ Les enfants à partir de 8 ans ainsi des personnes ayant des
capacités physiques, sensorielles ou mentales restreintes
ou ayant un manque d’expérience et/ou de connaissance
peuvent utiliser ces appareils, s’ils sont surveillés et s’ils
ont été instruits pour utiliser cet appareil en toute sécu-
rité et s’ils ont compris les dangers pouvant résulter de
l’usage de l’appareil. Les enfants n’ont pas le droit de
jouer avec cet appareil. Les enfants n’ont pas le droit
d’effectuer le nettoyage et la maintenance sauf s’ils sont
âgés de plus de 8 ans et sous surveillance.
▪ Conservez l’appareil et son câble d’alimentation en dehors
de la portée des enfants de moins de huit ans.
▪ Ne pas plonger l’appareil dans l’eau.
▪ Si le câble d’alimentation de l’appareil est endommagé, il
doit être remplacé par le SAV central du fabricant ou par
une personne qualifiée. Des réparations non conformes
peuvent engendrer de graves dangers pour l’utilisateur.
▪ L’appareil est conçu pour un usage domestique ou pour
des applications similaires telles que :
⋅dans des cuisines pour le personnel dans des bou-
tiques, des bureaux ou d’autres secteurs profession-
nels;
⋅dans des exploitations agricoles;
⋅par des clients dans des hôtels, des motels et d’autres
établissements;
⋅dans des chambres d’hôtes.
L‘appareil n‘est pas conçu pour un usage purement
commercial.
Mode d’emploi
Other manuals for LONO
21
Table of contents
Languages:
Other WMF Coffee Maker manuals

WMF
WMF 1200F Instructions for use

WMF
WMF combiNation S Series User manual

WMF
WMF combiNation F2 8700 Series User manual

WMF
WMF CAFEMAT 3100 Series User manual

WMF
WMF PERFECTION 800L Series User manual

WMF
WMF Lumero User manual

WMF
WMF 900 User manual

WMF
WMF WMF 1000 S User manual

WMF
WMF 9450 SERIES User manual

WMF
WMF Presto 1400 Series User manual