Brewmatic LA-3 SERIES Manual

Installation & Operating
Instructions
LA-3
Automatic Coffee Brewer With Faucet
Models: 1034505 & 1034506
1034516
Brewmatic
20333 S. Normandie Ave., Torrance, CA 90502
310-787-5444 ·800-421-6860 ·Fax 310-787-5412
U.S.A. E-mail: brew@brewmaticusa.com
Int’l E-mail: brew_equip@brewmaticusa.com
Instruction Number: 9600107 3/03
COMK211

Important Information
Read all instructions and safeguards included in the packaging carefully and
completely before installing or operating this equipment. Save all instructions for
future reference.
To reduce the risk of fire or electric shock, do not remove covers. There are no user
serviceable parts inside. Repairs should be done by authorized service personnel
only. If this appliance should fail to operate properly, contact the nearest Brewmatic
Authorized Service Center or you can contact Brewmatic direct at 800-421-6860.
Only Authorized Replacement Parts Should Be Used. Part substitutions could
create a fire hazard and the risk of personal injury. The use of replacement parts or
accessory attachments not recommended by Brewmatic may be hazardous.
Do Not By-Pass Any Safety Mechanisms Or Operate This Appliance Without
Covers In Place. Brewmatic requires that all safety devices and covers be in place
and functioning at all times to guard against a fire hazard and the risk of personal
injury.
Brewmatic Does Not Recommend, And Will Not Furnish Anyone With
Information For Changing The Electrical Rating Of Any Appliance Manufactured
Or Distributed By Brewmatic. Brewmatic will not approve of any unauthorized
changes to the basic design of this appliance. Any modification or alteration to the
appliance may create a fire hazard, may create a risk of personal injury, may void the
safety listings and may void the warranty.
All procedures, diagrams and specifications contained in this manual are based on
the latest information available at the time of publication. Information, parts and
specifications are subject to change without notice.
Due to periodic reviews and changes in listing standards, listings and approvals may
change at any time. For current listing and approval information contact Brewmatic.
Plumbing connections - All plumbing connections to water supply lines and drains
should be performed by a licensed plumber complying with all applicable plumbing
codes having jurisdiction.
Electrical connections - With the exception of cords with plugs already attached, all
electrical connections or alterations to the power supply should be performed by a
licensed electrician complying with all applicable electrical codes having jurisdiction.
When calling for information, parts or service, have the following information
available:
Model Number: Serial Number:
Voltage: Wattage: Amps: Phase:
Date Of Purchase:
Electrical information may be obtained from the electrical information nameplate
located on the appliance.
Page 2
COMK211

Appliance Information
Appliance Specifications:
Model Numbers: 1034505, 1034506,
1034516,
Description: LA-3 Automatic Coffee Brewer With Faucet
Dimensions: 16-1/8"w x 17"h X 15-3/4"d
Volts: 120
Watts: 1700
Amps: 14.2
Hertz: 60
Phase: 1
Power Supply Cord: 6 Ft., 2 wire + ground, 15 amp, 14 awg.
Plug: NEMA 5-15 P. Furnished and attached.
Power Supply Required: 120 volt, 15 amp, dedicated circuit.
Wall Receptacle Required: 15 Amp. NEMA 5-15 R. Not furnished.
Water Supply Required: 30 psi minimum, 80 psi maximum water pressure.
Water Connection: 1/4" Flared fitting. Flared nut supplied.
Settings And Adjustments:
Brewing Capacity: 60 ounces. (12 cups)
Brewing Temperature: 192° to 196°F Maximum.
Tested directly under the brew cone with water only.
Temperature Adjustment: PIncrease. QDecrease
Beverage Adjustment: PIncrease. QDecrease
Timer Setting 1:50 Minutes.
Faucet Adjustment: 5 oz. in 10 to 15 seconds.
QIncrease. PDecrease
Hi-Limit Thermostat: Manual reset. Not adjustable.
Initial Heat Up Time: Approximately 20 minutes.
Recovery Time: Approximately 5 minutes.
Page 3
COMK211

Control Locations And Descriptions
Fig. 1.
1. Water Inlet Fitting.
The incoming water supply connects here.
2. Power Supply Cord.
Connect this cord to an appropriate wall receptacle.
3. Pour-In Opening.
(Except CCP models 1034525 & 1034526)
Pour water in here during installation to fill the water tank.
4. Hot Water Faucet.
Open to get hot water for tea, hot chocolate, etc..
5. Brew Cone Rails.
Slide the brew cone in here.
6. Brew Cone.
Place the paper filter and ground coffee in here.
7. Left Warmer.
Place a decanter of coffee here to keep it hot.
8. Right Warmer.
Place a decanter of coffee here to keep it hot.
9. Top Warmer.
Place a decanter of coffee here to keep it hot.
10. Power Switch.
Turns on the power to the coffee brewer.
11. Start Switch.
Press to start a brew cycle.
12. Ready Light.
Indicates that the coffee brewer is ready to brew coffee.
13. Left Warmer Switch.
Turns on the power to the left warmer.
14. Right Warmer Switch.
Turns on the power to the right warmer.
15. Top Warmer Switch.
Turns on the power to the top warmer.
Note: 1034505, left hand model is shown in all illustrations.
Installation and operation is similar for all models.
Page 4
COMK211

Installation Instructions
Warning: Read these installation instructions completely before connecting this coffee brewer
to a power supply or water supply. The water tank must be filled with water for this coffee
brewer to function properly.
Warning: Incorrect installation or operating procedures will void the warranty and may
damage this coffee brewer.
Note: Any changes to the internal plumbing or wiring of the building should be performed by a
licensed plumber or a licensed electrician. Check applicable building codes and requirements for
procedures and restrictions that may apply during this installation.
Set Up:
1. Check the contents of the package carefully. In addition to the coffee brewer and these
instructions, the following items should be present. If any item is missing, contact Brewmatic
to arrange for a replacement.
Brew cone. (Installed on Coffee Brewer.) Clean out spring. (Packed inside brew cone.)
Flared nut. (Installed on water inlet fitting.) Important Safeguard Sheet.
2. Place the coffee brewer on a sturdy, level surface. The surface should be water and heat
resistant, non-flammable, and located near water and power supplies. Do not connect the
power cord at this time.
Fig. 2. Power switch.
3. Make sure the "Power" switch (Fig. 2) is in the off (down)
position.
Plumbing Connection: (See fig. 3 on the next page for a
typical water line connection.)
Note: This coffee brewer is designed to operate on water pressure of 30 to 80 psi. If the
water pressure exceeds 80 psi, it is recommended that a water pressure regulator (not
included) be installed to reduce the water pressure to 50 psi.
For an installation of less than 25 feet, use 1/4" OD copper tubing. For an installation of more
than 25 feet, use 3/8" OD copper tubing and use an adapter fitting (not included) for the
connection.
Depending on water conditions in your area, it is recommended that an in-line water filter or
other water filtering system (not included) be installed to improve the quality of the water.
It is recommended that a shut off valve (not included) be installed on the incoming water line
to allow the water supply to be turned off for cleaning and servicing. The shut off valve
should be installed before any water filtering system that may be installed.
Page 5
COMK211

4. Form three coils of 1/4" OD copper tubing (not supplied). The coils will allow the coffee
brewer to be moved easily for cleaning or servicing.
Fig. 3. Typical water line connection.
5. After installing the desired components onto the incoming water line, flush the water line to
remove any impurities which may be present in the line, and to flush an inline water filter, if
installed. (If installed, read the in-line water filters manufacturers recommendations for
correct procedures for flushing the water filter.)
6. Connect the assembled water line onto the water inlet
fitting (Fig. 1, item 1) located on the rear of the coffee
brewer, and tighten the water line. To prevent damage
to the coffee brewers water inlet fitting, hold the inlet
fitting with a wrench when tightening the water line.
Fig. 4.
Opening the hot water faucet.
7. Turn on the water supply.
8. Pull out the hot water faucet handle (Fig. 4) to open the
faucet and flush the air from the faucet water line.
After the water flow has stabilized, check the faucet
flow. The flow rate should provide approximately five
ounces of water in 15-20 seconds. If the flow is
incorrect, adjust the flow as necessary. (See the
“Adjustment” section for adjusting the faucet.)
Fig. 5. Slide the brew cone in and put an
empty decanter on the warmer.
9. Check for water leaks at the water inlet fitting. Tighten
the fitting if necessary.
Filling The Water Tank:
10. Place the brew cone (Fig. 5) in the cone rails (Fig. 1,
item 5) and push the cone all the way in.
11. Place an empty decanter on the warmer under the brew
cone (Fig. 5).
Page 6
COMK211

Fig. 6. Filling the tank.
12. To fill the water tank, pour three decanters of water into
the pour-in opening (Fig. 6), waiting approximately 1
minute between each decanter.
Note: (For CCP models 1034525 & 1034526 only.)
Remove the top cover and pour the water directly in to
the reservoir.
13. After pouring in the third decanter of water, water will
soon begin to flow from the brew cone into the decanter.
Wait until the water stops coming out of the brew cone.
14. Empty the water from the decanter, and put the decanter
back on the warmer under the brew cone.
Electrical Connection:
Fig. 7. Power connection.
15. Connect the power supply cord (Fig. 7) into a proper power
supply as indicated on the electrical nameplate.
Warning: Be certain the power supply is of the correct rating
and polarity before connecting the power supply cord. Failure
to heed this warning will void the warranty and may cause
damage or injury.
Turning The Coffee Brewer On:
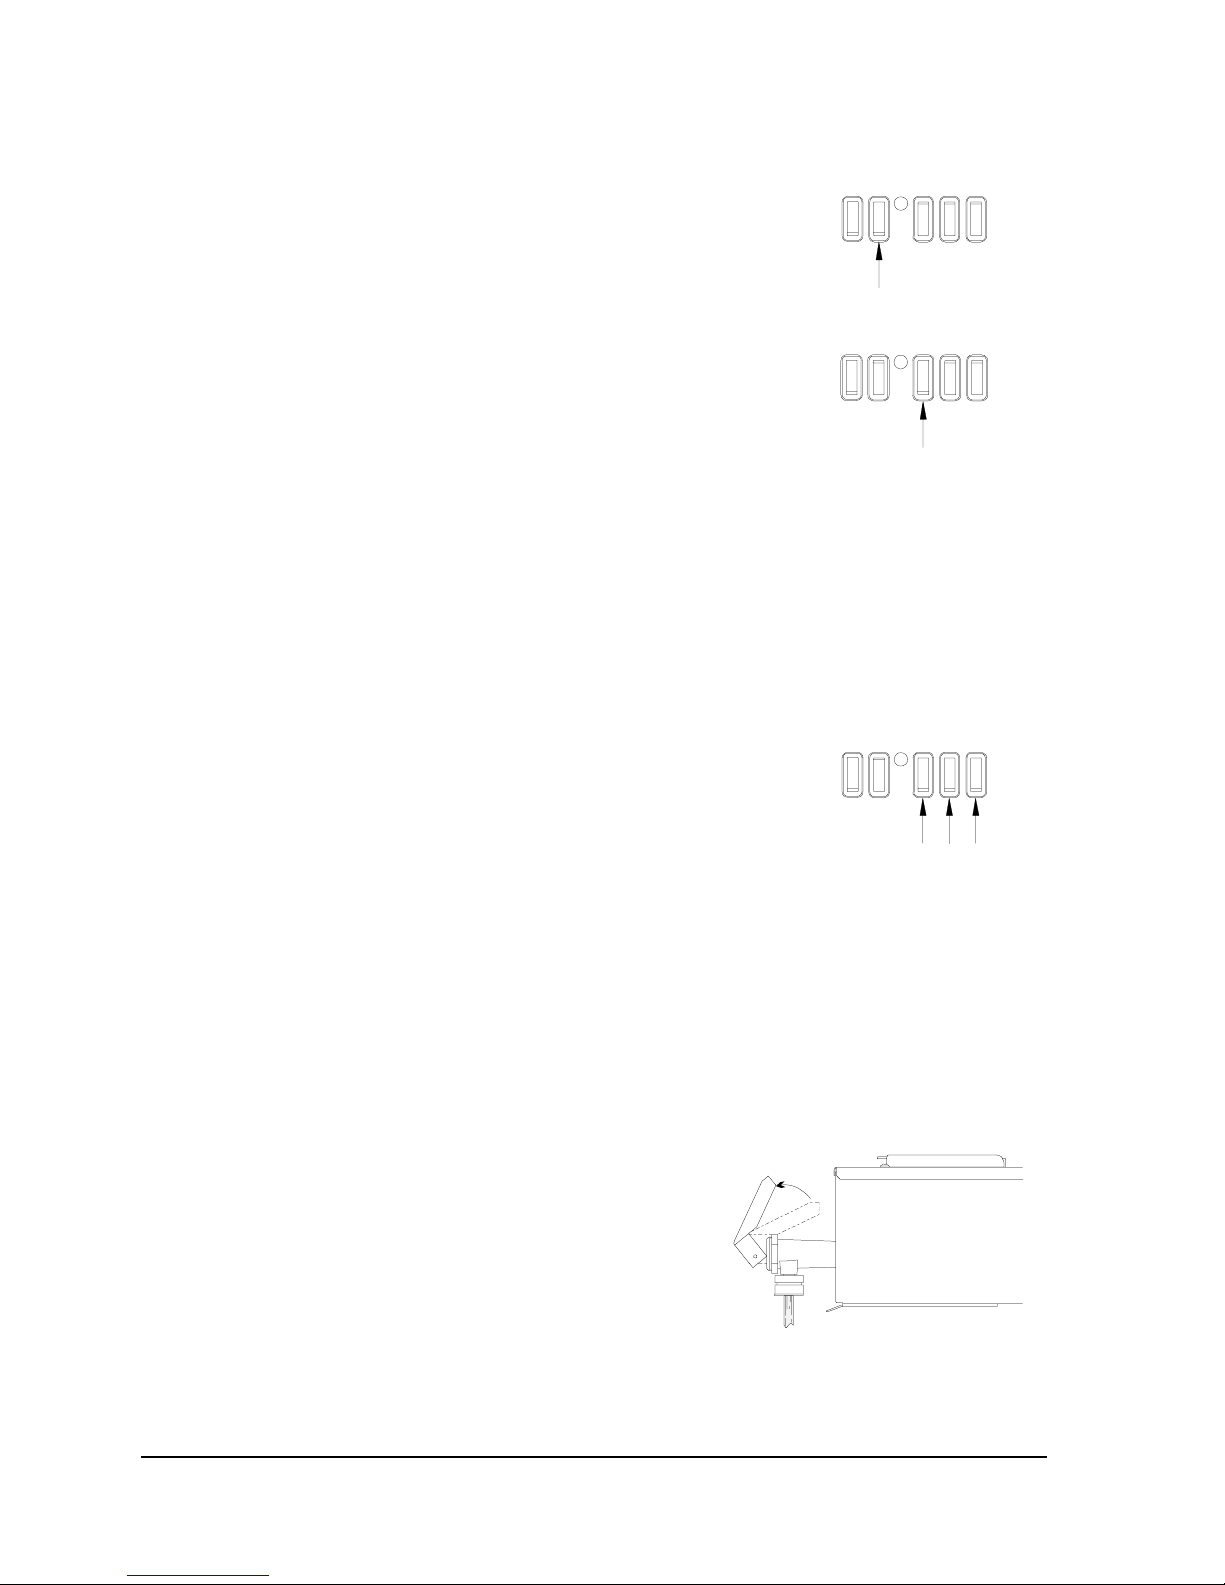
16. Push the "Power" switch (Fig. 8) to the on (up) position. The
switch will light when it is on.
Fig. 8. Power switch.
Prepare The Coffee Brewer For Testing:
17. Allow the coffee brewer to reach the proper brewing
temperature. The "Ready" light (Fig. 9) will come on when
the proper temperature has been reached. This will occur in
approximately 20 minutes.
Fig. 9. Ready light.
Caution: There will be a pressure buildup within the faucet
water line during this heat up period. To relieve this pressure,
slowly pull out the faucet handle and draw off a small amount
of water.
Fi
g
. 10. Start switch.
18. Press the “Start” switch (Fig. 10) momentarily, and release it.
Allow the coffee brewer to complete the brew cycle.
Note: Due to water expansion, there may be an overflow of
water, be prepared to contain this water.
Page 7
COMK211

19. Empty the water from the decanter, and put the decanter back on the warmer under the brew
cone.
Fig. 11. Ready light.
Testing The Brewing Temperature And Volume:
20. Wait for the "Ready" light (Fig. 11) to come on again. This
will occur in approximately 5 minutes.
21. Press the “Start” switch (Fig. 12) momentarily and release it.
Fig. 12. Start switch.
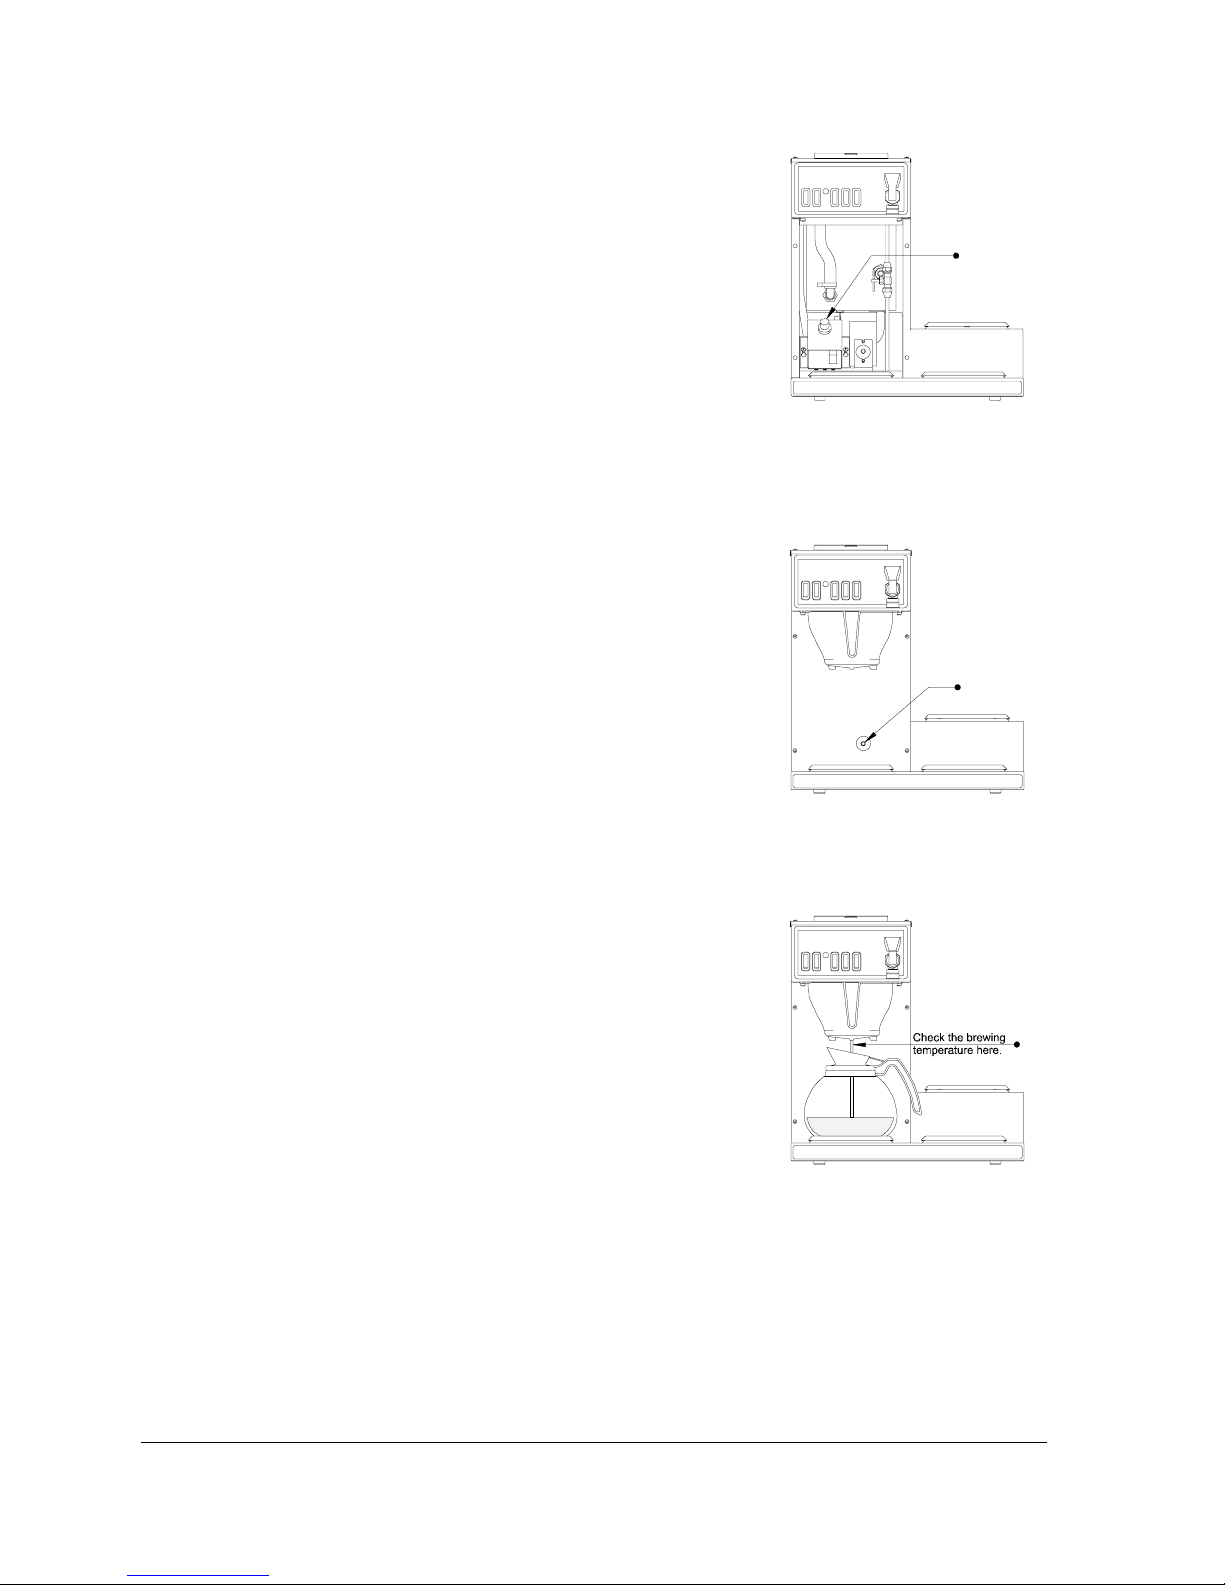
22. Check the temperature of the water as it comes out of the
bottom of the brew cone (Fig. 13). The maximum temperature
reached during the cycle should be between 192° to 196°F.
23. After the water has stopped flowing from the brew cone,
measure the water volume in the decanter. The water volume
should be approximately 60 oz.
Fig. 13. Checking the brewing
temperature.
Note: If the water temperature or water volume are not to
specifications, they will need to be adjusted. (See the
“Adjustments” section for thermostat and timer adjustments.)
Note: If any adjustments were made to the water
temperature or water volume, repeat the tests starting from
installation step #20.
24. The coffee brewer is now ready for use. Refer to the
operating instructions for complete information on how to
brew coffee in this coffee brewer.
If this coffee brewer should fail to function properly, refer to the trouble shooting guide for further
instructions.
These installation instructions are for the installers use only.
Operators should refer to the operating instructions only.
Page 8
COMK211

Operating Instructions
Caution: Read these instructions completely before operating this coffee brewer.
Caution: Make sure the installation instructions have been followed before attempting to operate
this coffee brewer. Incorrect installation or operating procedures will void the warranty and may
cause damage to this coffee brewer.
Note: Before using glass decanters, please read the warnings that are supplied with the decanter and
the warnings that are printed on the side of the decanter.
Turning The Coffee Brewer On:
Fi
g
. 14. Power switch.
1. Turn the power on by pushing the "Power" Switch (Fig. 14) to
the on (up) position. The switch will light when it is on.
Preparing To Make Coffee:
Fig. 15. Brew cone with coffee
and paper filter.
2. Place a paper coffee filter into the brew cone. Add the desired
amount of fresh ground coffee into the paper filter(Fig. 15).
Note: To provide better extraction, gently tap the side of the
brew cone to level the bed of coffee in the brew cone.
Note: Individual coffee tastes vary greatly. If you are not
sure how much ground coffee you should be using, start with
approximately 2.5 ounces and then increase or decrease this
amount to suite your own coffee tastes.
Fig. 16. Slide the brew cone in
and place an empty decanter on
the warmer below it.
3. Place the brew cone, with coffee and filter, into the cone rails
(Fig. 16) and gently push the brew cone all the way in until it
stops.
4. Place an empty decanter on the warmer under the brew cone.
(Fig. 16)
5. Wait for the “Ready” light (Fig. 17) to come on.
Note: This will usually take approximately 20 minutes after
the power switch is turned on in the morning. At other times
during the day, normal recovery time will usually be less than
5 minutes.
Fig. 17. Ready light.
Note: For proper extraction and flavor, brew only when the
"Ready" light is on.
Page 9
COMK211
Making Coffee:
6. Press the “Start” switch (Fig. 18) momentarily, and release it.
In approximately a minute, fresh hot coffee will begin to flow
from the brew cone into the decanter.
Fig. 18. Start switch.
WARNING: Hot coffee can cause serious burns. Handle hot
coffee carefully.
7. Push the warmer switch on. (Fig. 19)
Fig. 19. Left warmer switch.
8. After the brewing cycle is complete, remove the brew cone
and discard the used coffee grounds and paper filter. Rinse
the brew cone with water and place it back into the coffee
brewer.
WARNING: Hot coffee can cause serious burns. Make sure
that the coffee has stopped coming out of the brew cone
before you remove it from the coffee machine.
9. To brew another decanter of coffee, move the full decanter of coffee to another warmer and
push the appropriate warmer switch on. Repeat instruction steps 2 thru 8.
Using The Warmers: : (See fig. 20)
1. To use a warmer, place a decanter of coffee on the warmer
and push the desired warmer switch to the on (up) position.
The switch will light when it is on.
Fig. 20. Warmer switches.
WARNING: When turned on, the warmers can be very hot
and can cause serious burns. Use care when using the
warmers and do not touch the warmer surface when it is on.
WARNING: Do not place empty glass decanters on a hot warmer.
Caution: Turn the warmers off when they are not being used.
Using The Hot Water Faucet: : (See fig. 21)
The hot water faucet is only designed to deliver a small volume of hot water for a cup of tea or hot
chocolate. It is not designed or intended for use as a large volume hot water dispenser.
1. To draw hot water from the hot water faucet pull the
red faucet handle towards you. When finished, release
the handle.
Fig. 21.
Opening the hot water faucet.
WARNING: The water coming out of the hot water
faucet is very hot and can cause serious burns. Use
care when operating the hot water faucet.
Note: Hot water may be drawn from the faucet at
any time after the initial heat up, and will not affect
the brewing level.
Page 10
COMK211

Note: The hot water faucet is designed to deliver 5 ounces of hot water in approximately 15
to 20 seconds. If the volume is set too high there may be a significant drop in water
temperature. Release the handle and wait a few seconds for the temperature to recover.
Using The Pour-In Feature: (Models 1034505 & 1034506 only.)
If the automatic brewing function fails, this pour-in feature will allow you to continue to make coffee
until necessary repairs are made. Follow the steps below to brew coffee using this feature.
WARNING: If the ready light does not come on, or if this coffee brewer fails to heat, do not pour
water into the pour-in opening. Unplug the power supply cord and call for service.
1. Place a paper coffee filter into the brew cone. Add the
desired amount of fresh ground coffee into the paper filter.
Fig. 22. Ready Light.
2. Place the brew cone, with coffee and filter, into the cone rails
and gently push the brew cone all the way in until it stops.
3. Place an empty decanter on the warmer under the brew cone.
4. Wait for the “Ready” light (Fig. 22) to come on.
Fig. 23. Pour water in to start a
brew cycle.
5. Pour one decanter of water into the pour-in opening (Fig.
23). In approximately a minute, fresh hot coffee will begin
to flow from the brew cone into the decanter.
WARNING: Hot coffee can cause serious burns. Handle hot
coffee carefully.
6. Push the warmer switch on.
7. After the brewing cycle is complete, remove the brew cone
and discard the used coffee grounds and paper filter. Rinse
the brew cone with water and place back into the coffee
brewer.
WARNING: Hot coffee can cause serious burns. Make sure
that the coffee has stopped coming out of the brew cone
before you remove it from the coffee machine.
Please Note: Brewmatic recommends that when this unit is not in use overnight, or for other
prolonged periods of time, that the "Power" switch be pushed to the off (down) position.
Warning: There are no user serviceable parts inside. All adjustments should have been performed
during installation. Under no circumstance should the operator attempt to open or service this unit.
If this coffee brewer should fail to function properly, unplug it and contact your nearest Brewmatic
Representative or you can contact Brewmatic direct at 800-421-6860.
Page 11
COMK211

Maintenance And Cleaning
Caution: Only those persons trained and qualified in equipment repair should
attempt to open and clean the inside of this coffee brewer.
Caution: Turn the power switch off, unplug the power supply cord and allow
the coffee brewer to cool before cleaning.
Note: Do not use abrasive or harsh cleaners as they may damage the finish of
this coffee brewer.
Note: Failure to follow these cleaning instructions may damage this coffee
brewer and may void the warranty.
As needed, clean stainless steel surfaces with a mild, non-abrasive stainless steel
cleaner.
Other surfaces can be cleaned with a soft damp
cloth or mild liquid detergent.
Fig. 24.
The brew cone should be rinsed with water after
each brew cycle. At least once a week the brew
cone should be washed by hand with a mild
detergent. Rinse well after washing.
As necessary, the area between the brew cone
rails and above the brew cone (Fig. 24) should
be wiped clean with a damp cloth as coffee oils
will gradually collect on these surfaces.
Once a week, more often in hard water areas,
the spray head, located above the brew cone,
should be removed and cleaned. Spray head
holes should always remain open.
With the spray head removed, insert the clean
out spring (included in the packaging) into the
siphon tube opening until approximately six
inches remain visible (Fig. 25). Move the
spring in and out several times. This will help
prevent alkali buildup and help to keep hoses
and fittings clear.
Fig. 25.
Page 12
COMK211

Adjustments
Fig. 26. Covers and access.
Warning: Make sure installation instructions have been
followed before attempting to adjust this equipment.
Warning: Turn off the "Power" switch, unplug the power
supply cord and allow the coffee brewer to cool before
servicing unless electrical testing is required.
Note: Allow the coffee brewer to heat up to brewing
temperature before testing this equipment.
Adjusting the Faucet: (See fig. 27)
1. Remove the front access panel. (Fig. 26, item 2).
Fig. 28. Hi-limit location.
Fig. 27. Faucet adjustment.
2. Turn the faucet adjustment needle valve counterclockwise
to increase the water flow and clockwise to decrease the
water flow.
3. Replace the front access panel, connect the power supply
cord and turn on the "Power" switch.
4. Test thoroughly.
Note: If the water is still not to the desired flow, repeat
the adjustment until the desired flow has been reached.
Resetting The Hi-Limit Thermostat: (See fig. 28)
1. Remove the top cover (Fig. 26, item 1), locate the hi-limit
on the top of the tank (Fig. 28).and push the red reset
button.
Caution: Refer to the installation instructions step #12
before resetting the hi-limit thermostat. The tank must be
filled with water for the hi-limit thermostat to function
properly.
2. Replace the top cover, connect the power supply cord and
turn on the "Power" switch. Allow the coffee brewer to
reach brewing temperature.
3. Test thoroughly.
CAUTION: Brewing temperatures above the maximum
recommended range may cause the hi-limit to set. Adjust
the thermostat if necessary.
WARNING: Under no circumstance should the hi-limit thermostat be by-passed. In the event
of failure the hi-limit thermostat should be replaced. Use only original, or authorized,
replacement parts.
Page 13
COMK211
Adjusting The Timer: (See fig. 29)
Fig. 29. Timer adjustment.
1. Remove the front access panel. (Fig. 26, item 2).
2. Turn the timer adjustment knob clockwise to increase the
time (water volume) and counterclockwise to decrease the
time (water volume). Turn the adjustment knob 1/2
reference mark maximum per adjustment. The brew
volume should be approximately 60 oz.
3. Replace the front access panel, connect the power supply
cord and turn on the "Power" switch.
4. Test thoroughly.
Note: If the water volume is still not to the desired level,
repeat the timer adjustment steps again until the desired
volume has been reached.
Fig. 30. Thermostat adjustment.
Adjusting The Thermostat: (See fig. 30)
1. Remove the access plug from the front access panel.
(Fig. 26, item 3).
2. Turn the thermostat adjustment shaft clockwise to increase
the temperature and counterclockwise to decrease the
temperature. Turn the adjustment screw 1/8 turn maximum
per adjustment.
3. Replace the access plug, connect the power supply cord and
turn on the "Power" switch.
4. Allow the coffee brewer to reach brewing temperature
before checking the water temperature. Check the water
temperature directly under the brew cone with water only
(Fig. 31). Temperature range should be approximately
192° to 196°F.
Fig. 31. Checking the brewing
temperature.
Note: If the water temperature is still not within the proper
range, repeat the adjustment steps again until the proper
temperature has been reached.
Caution: Brewing temperatures above the maximum
recommended range may cause the hi-limit to set. Under
no circumstances should the maximum temperature exceed
196°
These adjustments should be performed during installation only.
Operators should refer to the operating instruction only.
Page 14
COMK211

Troubleshooting
Service should be performed by qualified service personnel only.
Warning: Turn off the "Power" switch, unplug the power supply cord and allow the coffee
brewer to cool before servicing unless electrical testing is required.
Warning: Make sure installation instructions have been followed before attempting to test this
coffee brewer.
Note: Allow the coffee brewer to heat up to brewing temperature BEFORE testing the
temperature, water volume or the hi-limit thermostat.
Symptom Possible Causes Remedies
1. The coffee
brewer will not
come on when
the power switch
is turned on.
The power supply cord is not
plugged in.
No power at the wall outlet.
The hi-limit thermostat has set.
Plug the power supply cord into an
appropriate wall receptacle.
Test the wall receptacle and the
circuit breaker in the building.
Reset the hi-limit thermostat. See the
Adjustment section for “Resetting The
Hi-Limit.”
2. The coffee
brewer trips the
buildings circuit
breaker.
Too many appliances are connected
on one electrical circuit.
The electrical circuits amperage
rating is too low.
Remove any other appliances from
the current circuit or call an
electrician to correct this problem.
Locate a correctly rated circuit, or
call an electrician to correct this
problem.
3. The water for
brewing is not
hot enough.
The brew cycle may have been
started before the “Ready” light was
on.
The brewing temperature has not
been adjusted correctly.
Brew only when the proper brewing
temperature has been reached. The
“Ready” light must be on.
Adjust the brewing temperature. See
the Adjustment section for “Adjusting
The Thermostat.”
4. The water for
brewing is too
hot.
The brewing temperature has not
been adjusted correctly.
Adjust the brewing temperature. See
the Adjustment section for “Adjusting
The Thermostat.”
Page 15
COMK211

Symptom Possible Causes Remedies
5. Incorrect or
inconsistent
beverage level.
Water deposits may be plugging the
spray head or internal tubing.
The brew volume may not be
adjusted correctly.
The water supply pressure may not
meet requirements.
Clean the spray head and use the
clean out spring. See the
Maintenance And Cleaning section.
Adjust the timer. See the Adjustment
section for “Adjusting The Timer.”
Test the incoming water supply
pressure. Water pressure should be
between 30 and 80 psi. If the water
pressure exceeds 80psi, install a
water pressure regulator and reduce
the water pressure to 50 psi.
6. The hi-limit
thermostat keeps
activating.
The brewing temperature is adjusted
too high.
Adjust the thermostat. See the
Adjustment section for “Adjusting
The Thermostat.”
7. The coffee
brewer is
making unusual
noises.
The water supply tube may be
touching the coffee brewer, counter
top or walls.
The water pressure may be
excessive.
Adjust the copper tubing so it does
not touch the coffee brewer, counter
top or wall.
Test the incoming water supply
pressure. Water pressure should be
between 30 and 80 psi. If the water
pressure exceeds 80psi, install a
water pressure regulator and reduce
the water pressure to 50 psi.
8. Poor tasting
coffee.
The brew cycle was started before
the “Ready” light was on.
Water deposits are plugging the
spray head or siphon tubing.
The brewing temperature has not
been adjusted correctly.
The amount of coffee being used
may not be correct.
More than one paper filter was used
when brewing.
The coffee brewer should be cleaned
regularly.
Brew only when the “Ready” light is
on.
Clean the spray head and use the
clean out spring. See the
Maintenance And Cleaning section.
Adjust the brewing temperature. See
the Adjustment section for “Adjusting
The Thermostat.”
Change the amount of coffee being
used.
Use only one paper filter for each
brew cycle.
See the Maintenance And Cleaning
section.
Page 16
COMK211

Symptom Possible Causes Remedies
9. There are coffee
grounds in the
brewed coffee.
The brew volume may not be
adjusted correctly.
Using too much coffee or coffee that
has been ground too fine.
Incorrect type of paper filter being
used.
Two paper filters may have been
used accidentally.
Adjust the timer. See the Adjustment
section for “Adjusting The Timer.”
Adjust the amount of ground coffee
being used or adjust the grind of the
coffee. Too much coffee or coffee
that is ground too fine may slow the
flow of the water through the coffee.
Make sure that the paper filter being
used is correct for this type of coffee
brewer.
Use only one paper filter per brew
cycle.
If the steps in this trouble shooting guide should fail to solve your problem, unplug the coffee brewer
and contact your nearest Brewmatic Representative or you can contact Brewmatic direct at 800-421-
6860.
This trouble shooting guide is for the installers use only.
Operator should refer to the operating instruction only.
Page 17
COMK211

Limited Warranty
Brewmatic warrants this product to be free of defects in material and
workmanship for a period of one (1) year from the original date of purchase.
Within this warranty period, Brewmatic will repair or replace, at its option, any
part providing it's defective in material or workmanship. Labor is included
within this warranty only during the first ninety (90) days of the warranty
period.
This warranty excludes defects caused by negligence, misuse, alteration,
accident, prior service by unauthorized persons, and failure to follow the
installation and operating instructions, including without limitation use of
improper voltage or wiring and improper cleaning.
This warranty applies only to new products and extends only to the original
purchaser. This warranty is valid only in the United States of America and its
possessions.
The product warranted hereby is sold only for commercial use and is not
intended for personal, family, or household purposes.
To obtain warranty service, you must notify and deliver the product at your
expense, with proof of purchase, to your local Brewmatic representative or to
the Brewmatic Customer Service Division, within the warranty period. The
repaired product will be returned to you at Brewmatic's expense.
No Brewmatic representative or other person is authorized to add to or alter
the foregoing in any respect.
THE FOREGOING WARRANTY IS IN LIEU OF ALL OTHER WARRANTIES
EXPRESSED OR IMPLIED, INCLUDING ANY IMPLIED WARRANTIES FOR
MERCHANTABILITY AND FITNESS FOR A PARTICULAR PURPOSE.
THIS WARRANTY EXCLUDES CONSEQUENTIAL DAMAGES.
Some states do not allow limitation or exclusion of implied warranties or
consequential damages. In such cases the limitations stated above may not
apply to you, and your rights will be determined by applicable law.
Page 18
COMK211

20333 S. Normandie Ave., Torrance, CA 90502
310-787-5444 ·800-421-6860 ·Fax 310-787-5412
U.S.A. E-mail: brew@brewmaticusa.com
COMK211
Other manuals for LA-3 SERIES
1
Table of contents
Other Brewmatic Coffee Maker manuals


