Brice TJ Use and care manual

Operation and Safety Manual
Model TJ/TS
Mincer Range
™

Operation and Safety Manual ™
Model TJ/TS Mincer
SAFETY ISSUES
1. NEVER touch this machine without training and
authorisation from your supervisor.
2. Machine MUST BE on solid, level support.
3. Guards MUST BE in place before plugging in and
turning on machine.
4. ALWAYS use the three-pronged power plug provided.
5. NEVER use your hand to hold food stuffs in place in the
meat chute.
6. NEVER touch the cutting blades when they are rotating.
7. KEEP hands, arms, hair and loose clothing CLEAR
of all moving parts.
8. Should the mincer jam, SWITCH OFF AND UNPLUG
before removing the obstruction.
9. SWITCH OFF AND UNPLUG the machine from its power
source before cleaning, sanitizing or servicing.
10. USE ONLY the attachments provided by the
manufacturer and designed for this machine.
YOUR SAFETY IS OUR PRIMARY CONCERN

Operation and Safety Manual ™
Model TJ/TS Mincer
Overview
This Operation and Safety Manual has been prepared to introduce you to the Brice Model
TJ/TS Mincers. It explains the operation, cleaning and maintenance of the mincers in
simple, clear terms and with an emphasis on your safety.
A word to the wise
Make sure that you read this Manual carefully so that you are familiar with the features and
procedures that are unique to the mincer that came with it.
How this Manual is arranged
This Manual is made up of four sections:
• Introduction - which explains the Manual, itself, safety issues associated with using a
mincers, gives a brief introduction to the features and components of the mincers and
steps you through the installation of the machine;
• Operation - explains the use of the mincers, including pre-operational checks;
• Cleaning - explains the procedures for keeping the mincers clean;
• Maintenance & Troubleshooting - details those procedures that you can perform to
ensure the trouble-free operation of the mincers, and some malfunctions and how to
x them.
Conventions and Symbols used in this Manual
To reduce confusion, and to highlight important points and safety matters, we have
established some standard symbols:
• The Special Note ag
This is an upside-down triangle with an exclamation mark inside it. It appears in the left
margin of the page, like this, whenever we want to draw your attention to an important
point.
• The “No Hands” warning ag
This is a circle with the outline of a hand and a black bar through the hand. It appears
wherever we want to warn you that either: you shouldn’t put your hands in or near a
particular component; or that you must wear steel mesh protective gloves to carry out
a particular procedure.
• The “Power” warning ags
There are two power warning ags. The rst, a lightning bolt inside an upside-down
triangle, is used whenever we want to remind and warn you that the mincer is con-
nected to the mains power supply. The second warning ag is a circle with the outline
of a lighting bolt and a black bar through the bolt. It appears to remind you that a
particular procedure must be carried out with the power to the mincer turned off at the
powerpoint.
Introduction
Introduction 1.1

Operation and Safety Manual
™
Operation and Safety Manual ™
Model TJ/TS Mincer
Model TJ/TS Mincer
SAFETY
WARNINGS
This is an electrical device that uses mains power. You must be careful in how you handle
the mincer at all times. The following special warnings must be complied with for your own
safety and the safety of others.
THERE ARE NO USER-SERVICEABLE ELECTRICAL COMPONENTS IN THIS MINCER.
ALL ELECTRICAL COMPONENTS ARE ELECTRICALLY ISOLATED TO EARTH AND ARE
SEALED FOR YOUR SAFETY. YOU MUST NOT ATTEMPT TO TOUCH ANY ELECTRICAL
COMPONENTS OR WIRES - YOU MAY EXPOSE YOURSELF TO THE RISK OF SERIOUS
INJURY BY ELECTROCUTION.
UNLESS OTHERWISE INDICATED, ANY CLEANING OR MAINTENANCE PROCEDURE
MUST BE PERFORMED WITH THE POWER TO THE MINCER SWITCHED OFF. FAILURE
TO TURN OFF AND DISCONNECT POWER MAY RESULT IN SERIOUS INJURY CAUSED BY
THE MINCER BEING ACCIDENTLY TURNED ON DURING CLEANING OR MAINTENANCE.
Mincers are very powerful machines that can easily cause severe crush injuries if
mishandled.
WHENEVER YOU USE THE MINCER YOU MUST NEVER PLACE YOUR HAND INSIDE THE
THROAT OF THE MACHINE.
1.2 Introduction
Operation and Safety Manual
™
Operation and Safety Manual ™
Model TJ/TS Mincer
Model TJ/TS Mincer
The Brice Model
TJ/TS Mincer
The Model TJ/TS Mincer range is built for high volumes and hard work. They are
elec tron i cal ly controlled, fast, clean and ef cient.
• Manufactured in stainless steel and anodised aluminium to resist the corrosive effects
of salts and acids;
• Gear-driven blade group and fan-cooled motor;
• Single- and three-phase motors (depending on model);
• All models feature a mincer body release lever to speed disassembly in place for
comprehensive cleaning;
• Model TS range equipped with reversing switch to help clear blockages
Introduction 1.3
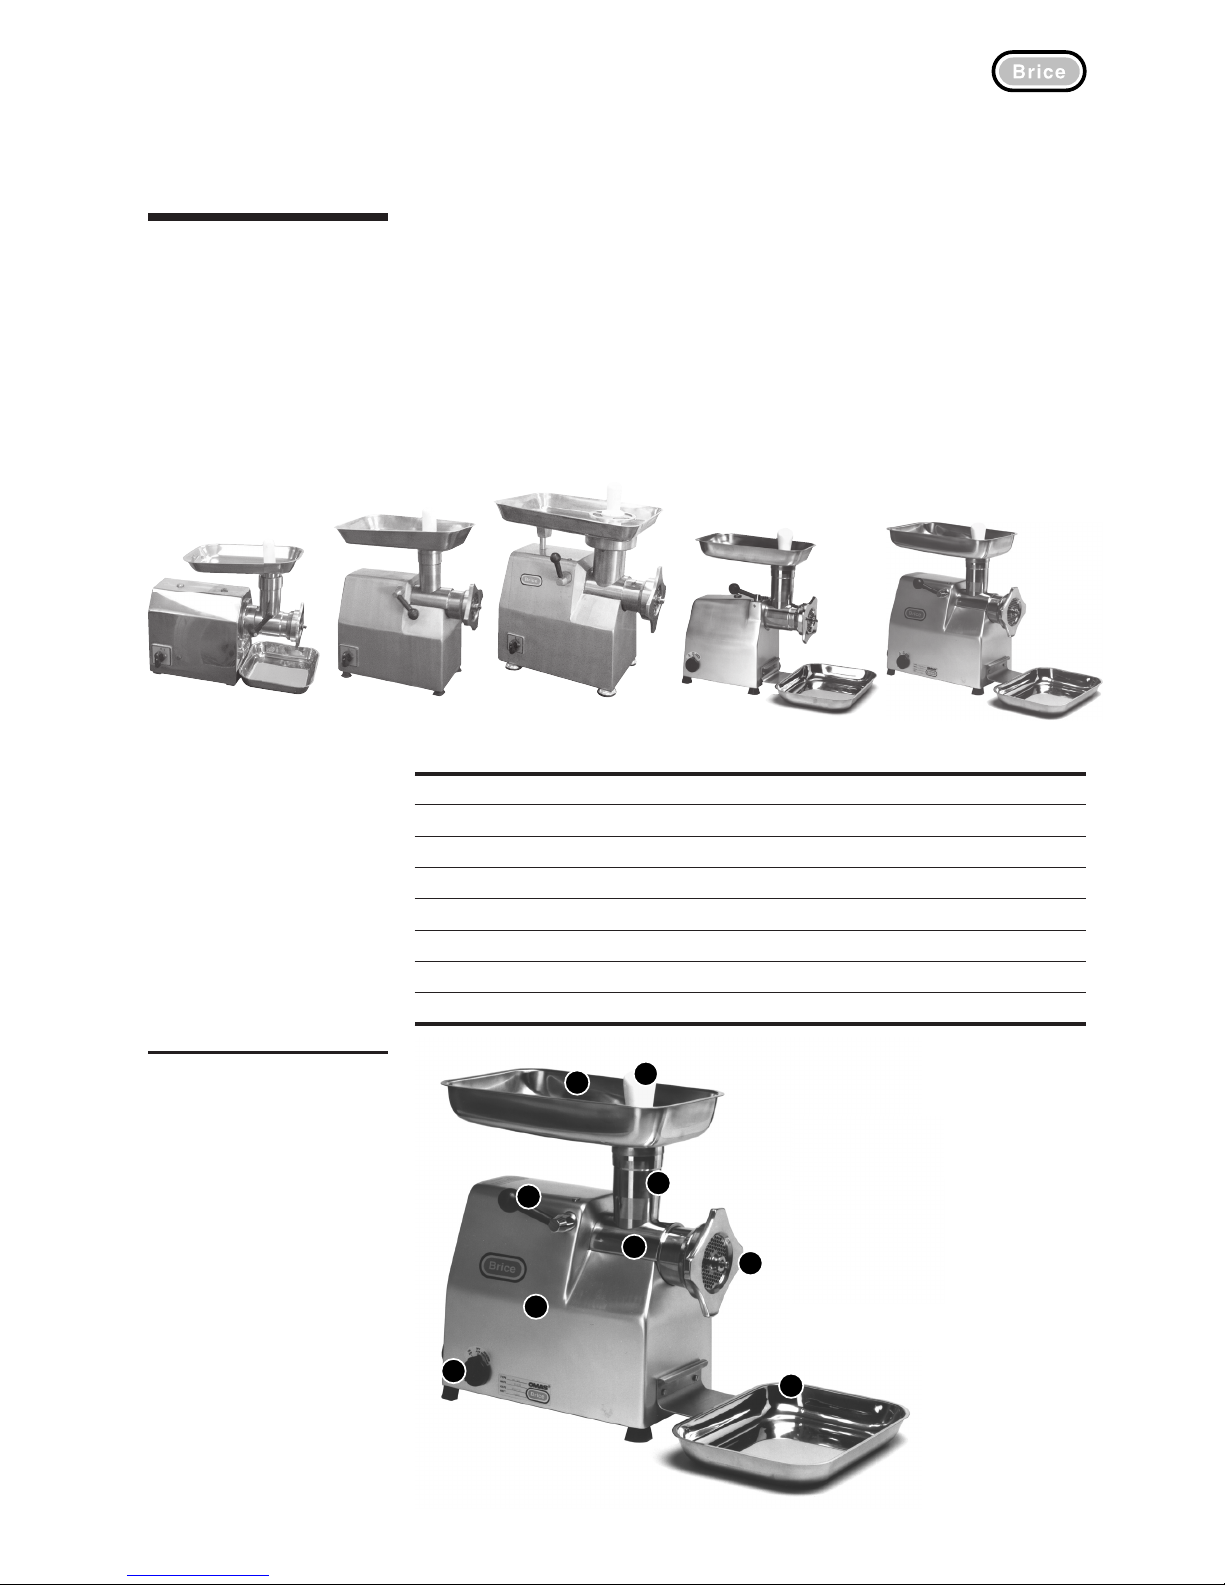
There are ve machines in the Model TJ/TS Mincer range. They are:
Speci cations
Dimensions (mm) TJ12 TS12 TJ22 TS22 TJ32
Height (inc. funnel) 365 430 410 460 530
Width 200 220 240 250 270
Depth (inc. pan) 270 490 410 670 530
Cutting Throat diameter 70 82
Weight (kg) 27 36 76
Power (Watts) 750 750 2200
Throughput (kg. per hour) 120 170 250 280 320
TJ12 TJ22 TJ32 TS12 TS22
Components of the Mincer
The following pictures illustrate the
main components of the Mincer
(TS22 shown).

Operation and Safety Manual
™
Operation and Safety Manual ™
Model TJ/TS Mincer
Model TJ/TS Mincer
1.4 Introduction
Positioning the Mincer
No matter where you put the Mincer, you must allow at least as much space as the overall
dimensions indicate. Allowing an additional minimum of 20cm either side of the Mincer will
make access for cleaning and maintenance easier.
These are very heavy pieces of machinery. Under no circumstances should you attempt
to move or lift the Mincer without assistance.
Make sure that the surface that you intend placing the Mincer on is solidly constructed to
take the weight of the Mincer. The surface must be at, level, dry and smooth.
For cleaning the mincer in-situ, make sure that the surface is also slightly concave or
convex at its centre (roughly 3mm) and has some form of run-off at the sides for collection
and drainage of water.
Electrical connections (Electrician Only)
The TJ32 Mincer requires a three-phase power connection. Proceed in the following
manner:
1. Connect machine to 410V, 3 phase, 50 cycle supply, via a 10 amp minimum, wall
mounted isolating switch.
2. Connect the wires from the power cord attached to the machine to your wall mounted
isolating switch.
CHECK THE ROTATION OF THE MACHINE WITH WORM REMOVED FROM BARREL – THE
SHAFT MUST ROTATE ANTI-CLOCKWISE.
If the rotation is incorrect change the wires over. Once the rotation is set correctly the
machine is ready for use.
IF YOU ARE NOT A QUALIFIED ELECTRICIAN, DO NOT ATTEMPT TO PERFORM THE
WIRING FOR THIS MACHINERY. ASIDE FROM BEING ILLEGAL, THE RISK OF SERIOUS
INJURY OR DEATH FROM INEXPERIENCED PEOPLE MISHANDLING HIGH VOLTAGE
POWER SUPPLIES IS VERY HIGH.
Cleaning
Before you use the Mincer, we recommend that you wipe down all exposed surfaces with a
soft cloth that has been placed in clean warm water and light detergent and squeezed dry.
This will remove any traces of machine oil, dirt or grit picked up during manufacture or
storage.
Before you wipe down the machine, make sure that the power is turned off.
Installing the
Mincer

Operation and Safety Manual
™
Operation and Safety Manual ™
Model TJ/TS Mincer
Model TJ/TS Mincer
Operation Using the Mincer for “Single Cut” Operations
1. Ensure that the mincer is switched “OFF” at the rotary power switch.
2. Place worm in barrel, twisting it slightly to align the square with that of the shaft.
3. Using the following information as a guideline, install the appropriate plate and knife
onto the worm and stud. The plate can be smeared with oil prior to installation to
increase the life of the knife and plate.
Typical Plate Sizes - Single Cut Knife (Plate)
Mince type 1st Cut Finish Cut
Sausage 13 mm 3 mm
Hamburger Mince 13 mm 5 mm
Coarse Mince 13 mm –
After the plates and knife have been installed, t the spacer ring and then the lock ring
which should be screwed on gently until just touching the plate when in its nal posi-
tion. Force is not required.
Never over-tighten the lock-ring as this will result in damage to the cutting edge of the
plate .
4. Check to see that there are no obstructions in the hopper chute and load the tray with
product.
5. Turn the mincer "ON" at the rotary power switch.
6. Begin feeding meat into chute.
The lock-ring may be released slightly or screwed on further to adjust the cutting
pressure. If sinew is jammed between the knife and plate more pressure is required. A
metallic grinding sound indicates that the lock-ring is too tight and must be loosened
to avoid damage to the plates and knife.
If excess force is required when tightening the lock-ring to gain enough pressure to cut
the meat, the knife or plates have been damaged and must be refurbished or replaced.
7. When mincing is completed, switch the mincer “OFF” at the rotary power switch.
Mincing Pointers
If the meat does not ow from the plate freely, in a continuous string; if it looks pale and
“dead”; or feels short to the touch, then the mincer is not working properly. Keep in mind
the following points to gain the best results from the machine.
1. Always put an experienced and reliable operator on the mincer.
2. Make sure your plates are level before putting on a new knife or new blades in the
holder.
3. Always keep the same knife and plate together in a matched set.
4. Never let your mincer run idle. Be sure you have plenty of meat in the cylinder during
operation and before starting the mincer. Knives and plates need the lubricating cooling
effect of the meat they were built to cut. Without it they are rapidly ruined.
5. Don’t cut chilled meat after washing chopper with hot water! Don’t wash knife and
plate with steam or hot water after cutting chilled meat!
6. Open up the mincer often and remove all bones, gristle and other foreign matter ac-
cumulated in the center of the plate and knife.
Operation 2.1

Operation and Safety Manual
™
Operation and Safety Manual ™
Model TJ/TS Mincer
Model TJ/TS Mincer
7. Never pound the plate against a hard surface to remove particles of meat. Plates for
large choppers cost a lot of money and, in spite of their size and apparent ruggedness,
they may be easily damaged. Handle them carefully!
8. If meat works back in the cylinder, investigate the wear of the plates and knives. If they
are worn too thin, replace them.
9. Be sure that your operator lets the meat ow freely from the plate into the truck. Never
let meat pile up in the truck against the plate.
10. Do not store knives and plates wet. Rust ruins their delicate cutting edges. Wipe with
mineral oil when they’re not to be used immediately.
11. For the sake of good hygiene and for increased plate life, be sure that the plates are
cleaned after each day's operation so that no meat stands overnight in the plate holes.
12. Inspect plates regularly to see that all holes are clear of bones, bits of gristle or other
foreign material. Clean all the holes with a wire at least daily.
13. Watch the bushings in the plate and the stud on the worm for wear. Get new studs and
bushings if they are worn.
14. NEVER put washers behind the worm to bring it further forward. If the plates and
knives are worn so thin that they come ush with the cylinder wall, a washer may be
placed back of the knife in front of the worm temporarily.
15. If you use knives with “insert” blades, be sure to replace all your blades at once.
IMPORTANT! USE KNIVES AND PLATES TOGETHER
Always use the same knife and plate together. If one has gradually worn away from
perfect level, the other will have worn with it. As a result they may still be used
together. If, however, one is matched with a different member which is ground true,
the set will not cut cleanly. In addition, there is the very real chance of breaking one
or both parts of the set.
2.2 Operation

Operation and Safety Manual
™
Operation and Safety Manual ™
Model TJ/TS Mincer
Model TJ/TS Mincer
Cleaning the
Mincer
This section deals with cleaning your mincer, including knife and plate set care.
We recommend that, before cleaning or maintenance tasks are undertaken, the machine
operator(s) receive some training from authorised Brice representatives, preferably during
the installation phase.
Before carrying out cleaning or maintenance tasks, it is very important that the unit is
switched “OFF” at the rotary switch AND the power point.
General Cleaning
The Mincer must be cleaned regularly and carefully to ensure hygienic operation.
Do not use water jets or high pressure water cleaners to clean the mincer.
After every use
1. Make sure that the mincer is switched OFF at the rotary switch AND the power point.
2. Disassemble the mincer components by loosening and removing the lock-ring;
removing the spacer ring and the knife and plate set; and sliding out the mincer worm.
3. Disengage the mincer body by pulling the releasing lever toward the front of the
mincer. The mincer body can be removed entirely.
4. Make sure that all plate holes are clear of bones, bits of gristle or other foreign
material. Clean all the holes with a wire, if needed.
5. Rinse the worm, knife and plate set, lock-ring and spacer ring with warm water. Make
sure that each component is dried off before putting it back on the mincer.
6. If the knife and plate set are not going to be used immediately, wash them in warm
water and mild detergent. Rinse off with warm water, dry each component and wipe
over with mineral oil.
7. Reassemble the mincer components.
After last use or at the end of the day
1. Make sure that the mincer is switched OFF at the rotary switch AND the power point.
2. Disassemble the mincer components by loosening and removing the lock-ring; removing
the spacer ring and the knife and plate set; and sliding out the mincer worm.
3. Wash down the mincer with liberal amounts of warm water and mild detergent.
4. Hand-wash the worm, knife and plate set, lock-ring and spacer ring. Make sure that
all plate holes are clear of bones, bits of gristle or other foreign material. Clean all the
holes with a wire, if needed.
5. Rinse all components with warm water and dry thoroughly.
6. If the knife and plate set are not going to be used immediately, wipe over both with
mineral oil.
7. Depending on accepted practice in the shop, either reassemble the mincer components
or leave them beside the mincer ready for use the next day.
Some Cleaning pointers
• Do not store knives and plates wet. Rust ruins their delicate cutting edges. Wipe with
mineral oil when they’re not to be used immediately.
• For the sake of good hygiene and for increased plate life, be sure that the plates are
cleaned after every operation so that no meat stands overnight in the plate holes.
• Don’t cut chilled meat after washing chopper with hot water! Don’t wash knife and
plate with steam or hot water after cutting chilled meat!
Cleaning 3.1

Operation and Safety Manual
™
Operation and Safety Manual ™
Model TJ/TS Mincer
Model TJ/TS Mincer
Maintenance
This section deals with routine maintenance for your Mincer, including knife and plate
replacement.
We recommend that, before cleaning or maintenance tasks are undertaken, the machine
operator(s) receive some training from authorised Brice representatives, preferably during
the installation phase.
Before carrying out cleaning or maintenance tasks, it is very important that power to the
Mincer is switched OFF at the isolating switch.
Routine Maintenance
The robust design of the TJ and TS Mincers means that there is very little required in
the way of routine maintenance. Generally, the only maintenance required is cleaning
(discussed in the previous section) and changing of the knife and plate sets.
Cleaning
Normal cleaning, as specied in the previous section, is all that is required to maintain the
external surfaces of the Mincer.
We recommend that you clean the machine prior to any other maintenance operation so
that all surfaces are free of and grease. This makes the machine easier and safer to handle.
Maintenance & Troubleshooting 4.1
When the meat coming from the Mincer plate doesn’t look right check:
1. The grinding action of the knife and plate set
They may be ground too thin so that the case-hardened surface has been removed,
presenting a cutting surface of soft metal. Friction between soft metals creates con-
siderable heat. Heat destroys the albumen in meat and ruins its appearance, taste and
binding qualities.
2. Replacement of Knife or Plate only
Perhaps a new knife or plate has been inserted with the old member not ground down
true and level.
3. Lock-ring too tight
If the knives and plates are not in good working order, excessive tightness of the lock-
ring only creates friction and friction produces heat, which causes cracks and breakage
of plates and knives.
Troubleshooting

Copyright Information
Copyright © 2003 Brice Australia Pty. Ltd.
This document may not be reproduced, in whole or in part, by any means without the prior express written permission of the
copyright owner.
Brice and the BRICE logotype are trademarks of Brice Australia Pty. Ltd.
Printed in Australia
23067/TJTS_man_pdf
™
This manual suits for next models
1
Table of contents


