Briggs & Stratton 2690816 Manual

1753220 (REV. B)
46˝ 2690816
2690914
2690950
2690817
2690818
2690879
2690880
2690897
2690915
2690923
2690931
2690932
2690933
2690951
2690952
2690973
2690973-01
2690974
2691092-00
2691093-00
52˝
Copyright © 2012 Briggs & Stratton Power Products Group, LLC
Milwaukee, WI, USA. All rights reserved.
BRIGGS & STRATTON POWER PRODUCTS is a registered
trademark of Briggs & Stratton Corporation
EN
EN
ES
ES
Attention Setup Personnel:
The safety warnings provided in this guide
and in the tractor's operator manual included
with the unit contain important information
that must be followed when assembling,
setting-up, operating, servicing, transporting,
or storing the unit.
Las advertencias de seguridad provistas
en estaguía y en el manual del operador del
tractor incluidas con la unidad contienen
importantes información que debe respetarse
al ensamblar, instalar, operar, realizar servicio,
transportar o almacenar la unidad.
This unit should NOT be delivered to a customer until
assembly has been completed according to these
instructions.
These warnings are highlighted by the safety alert
triangle symbol shown above, which signifies that an
important safety message is being provided.
You must read, understand, and follow these warnings
and instructions, and use safe shop and work practices
at all times while working on or around this unit and all
other outdoor power equipment.
Estas advertencias están destacadas por el símbolo
del triángulo de alerta de seguridad indicado arriba,
el que significa que se está brindando un importante
mensaje de seguridad.
Usted debe leer, comprender y seguir estas
advertencias e instrucciones, y utilizar prácticas
seguras de taller y trabajo en todo momento al trabajar
en esta unidad o alrededor de la misma y en todos los
demás equipos motorizados para exteriores.
Atención personal de instalación:
Esta unidad NO debe ser enviada a un cliente hasta
que se haya concluido el ensamblaje de acuerdo con
estas instrucciones.
EN Setup Instructions
ES Instrucciones de montaje
MODEL NO. xxxxx
SERIAL NO. xxxxxxxxxx
20xx
x.x kW
xxxx min-1
xxx
dB
xxx kg
XXXXXXXXXXXXXXXXXXXXXX
XXXXXXXXXXXXXXXXX
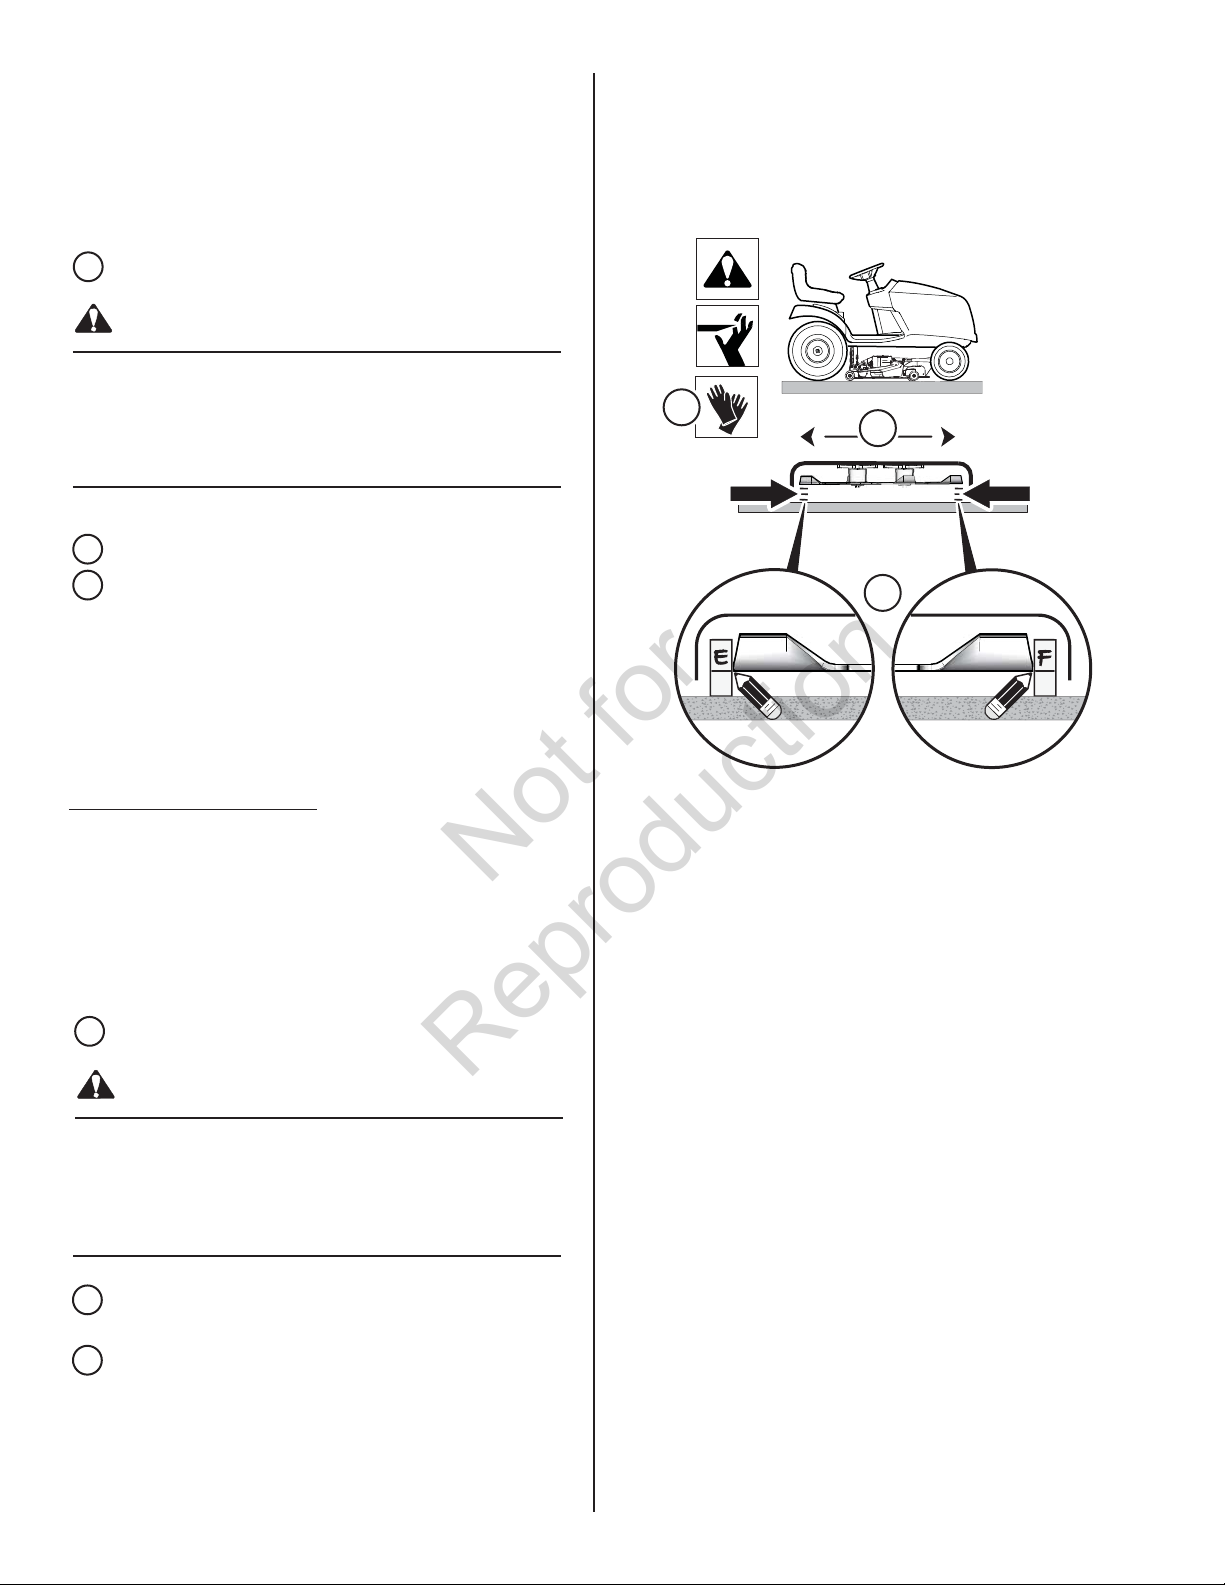
Note: Follow the procedures that apply to your model.
La nota: Siga los procedimientos que aplican a su modelo.
Not for
Reproduction

2
To protect the Electronic Fuel Management™
(EFM) System from voltage spikes:
Always remove the ignition key when
disconnecting or connecting any wire harnesses
(engine, equipment, or EFM).
Never use a battery charger to directly start the
engine. Use only a fully charged battery properly
installed.
Never charge the battery with the NEGATIVE (-)
cables attached to the battery terminal.
Electronic Fuel Management System™ (EFM)
3
EN
EN
ES
RISK OF BATTERY EXPLOSION FROM HYDROGEN
GAS MAY RESULT IN SERIOUS INJURY OR DEATH.
Battery posts, terminals, and related accessories
contain lead and lead compounds - chemicals
known to the State of California to cause cancer
and reproductive harm. Wash hands after handling.
WARNING
1Read and understand any warnings by the battery
manufacturer.
2Charge battery according to the instructions
provided by the charger manufacturer.
EFM NOTICE:
BA
Note: For shipping purposes, the steering wheel may
be located under the hood of the tractor.
Nota: Para fines de embarque, el volante puede estar
ubicado debajo el capó del tractor.
Uncrating
Desencajonamiento
Charge / Connect Battery
46˝ 2690914 2690817
2690818
2690880
2690897
2690915
2690923
2690951
2690952
2690973
2690973-01
2690974
2691092-00
2691093-00
52˝
Not for
Reproduction

3
3 Electronic Fuel Management System™ (EFM).
ES
1Lea y comprenda toda advertencia del fabricante
de la batería.
2Cargue la batería de acuerdo con las instrucciones
dadas por el fabricante del cargador.
Para proteger al Electronic Fuel
Management™ (EFM) (Sistema de Gestión
Electrónica de Combustible) contra picos de
tensión:
Siempre retire la inserción de arranque al
desconectar o conectar cualquier cableado
(motor, equipo o EFM).
Nunca use un cargador de batería para arrancar
el motor directamente. Solo use una batería
totalmente cargada e instalada correctamente.
Nunca cargue la batería con los cables
NEGATIVOS (-) sujetos al terminal de la batería.
EFM AVISO:
ADVERTENCIA
EL RIESGO DE EXPLOSIÓN DE LA BATERÍA
DEBIDO A GAS HIDRÓGENO PUEDE RESULTAR
EN LESIONES GRAVES O MUERTE.
Los bornes y terminales de baterías y los accesorios
conexos contienen plomo y compuestos de plomo, productos
químicos que en el conocimiento del Estado de California
causan cáncer y defectos de nacimiento y otras lesiones
reproductivas. Lávese las manos después del uso.
( )
WARNING
DONOT REMOVE
COVER
5
4
2
3
(EFM)
+
7/16˝
1
+
WARNING
DONOT REMOVE
COVER
Cargar / Conectar la batería
46˝ 2690914 2690817
2690818
2690880
2690897
2690915
2690923
2690951
2690952
2690973
2690973-01
2690974
2691092-00
2691093-00
52˝
Not for
Reproduction

C
1Apply anti-seize lubricant to the steering shaft.
2Straighten front wheels.
3Install steering wheel with center spoke facing
down.
4Insert a 3/16˝centering bolt (B) (for alignment
only) through the steering wheel hub (C) then
through the steering shaft (D). Install roll pin (E)
through opposite end forcing centering bolt out
(discard bolt).
5Install steering wheel cap (F).
Note: Optional hole (A) for lower steering wheel height.
EN
ES
Nota: Orificio opcional (A) para altura más baja del
volante.
1Aplicar lubricante antiagarrotamiento al eje de la
dirección.
2Enderece las ruedas delanteras.
3Instale el volante con el rayo mirando hacia abajo.
4Inserte un perno de centralización de 3/16˝
(B) (solo para alineación) a través del cubo
del volante (C) y luego a través del eje de la
dirección (D). Instale el perno de rodillo (E) a
través del extremo opuesto forzando el perno de
centralización hacia afuera (desechar el perno).
5Presione la tapa del volante.
Assemble Steering Wheel
Montar el volante
ANTI-SEIZE
1
3
2
E
C
D
A
D
EC
B
4
F
5
4
46˝ 2690816
2690914
2690950
2690817
2690880
2690915
2690931
2690951
2690974
2691092-00
52˝
Not for
Reproduction

C
1Apply anti-seize lubricant to the steering shaft.
2Straighten front wheels.
3Install steering wheel with center spoke facing
down.
4Attach nut and torque as shown.
5Install steering wheel cap.
EN
ES
1Aplicar lubricante antiagarrotamiento al eje de la
dirección.
2Enderece las ruedas delanteras.
3Instale el volante con el rayo mirando hacia abajo.
4Ate la tuerca y la torsión como mostrado.
5Presione la tapa del volante.
Assemble Steering Wheel
Montar el volante
ANTI-SEIZE
15/16
20 lb-ft
(27 Nm)
1
3
4
5
2
5
2690818
2690879
2690897
2690923
2690932
2690933
2690952
2690973-01
2691093-00
52˝
Not for
Reproduction

D
EN
ES
1Coloque una table delante de la paleta para que
sirva de rampa al descargar el tractor.
2
Coloque el cortacésped en la altura más alta de
la posición de corte.
3
Solta el freno de estacionamiento.
4
Tire de las palancas de liberación de las
transmisiones hasta que se traben en la posición
de liberación.
5Posicione la palanca de elevación del cortacésped
en su más alto nivel.
6
Tire del tractor para retirarlo del patín con una
segunda persona guiándolo
7
Después de mover el tractor, vuelva a activar
las palancas de liberación de rodamiento
(transmisiones) empujando las palancas
nuevamente hacia abajo a la posición drive.
1Place a board in front of the pallet to act as a
ramp while unloading the tractor.
2Place mower in the highest height of cut position.
3Release the parking brake.
4Pull the roll release lever until it locks in the
release position.
5Place the mower lift lever at its highest level.
6Pull the tractor offthe skid with a second person
guiding it.
7After moving the tractor, re-engage the roll
release lever by pushing the lever into the drive
position.
Removing Tractor from
Shipping Pallet
Como retirar el tractor de la paleta
de envío
6
+
1
2
3
4
5
6
1
2
4
5
6
7
3
Not for
Reproduction

E
1 Assemble seat to seat support (A).
2 Fasten seat switch to seat.
EN
ES
1
Ensamblar el asiento al soporte del asiento (A).
2
Sujete el interruptor del asiento al asiento.
Assemble Seat and Switch
Ensamblar asiento e interruptor
7
A
1
9/16˝
13 lb-ft
(15 Nm)
2
12-14 psi
(0,82-0,96 bar)
10 psi
(0,68 bar)
F
Check Tire Pressure
Verificar la presión de los
neumáticos
G
Check Oil Level
Verificar el nivel del aceite
Not for
Reproduction

H
ES
EN
1
Park tractor on a hard level surface.
2
Turn front wheels straight.
3
Place mower deck at its lowest level.
4
Place mower deck approximately in the middle
height of cut position.
5
Set parking brake.
6
Disengage mower blades.
7
Turn ignition OFF and remove key.
8
Disconnect spark plug wires and place away
from plugs.
1
Estacione el tractor sobre una superficie dura.
2
Endereza las ruedas delanteras.
3
Posicione la plataforma del cortacésped en su
nivel más bajo.
4
Coloque la plataforma del cortacésped
aproximadamente en la posición del medio de
altura de corte.
5
.Accione el freno de estacionamiento.
6
Desengrane las láminas del cortacésped
7
APAGUE la ignición y retire la llave.
8
Desconecte los cables de las bujías y sujételos
lejos de las bujías.
Mower Deck Leveling
Nivelación de la plataforma del
cortacésped
8
2
3
4
5
6
7
8
1
+
1
2
3
4
5
6
Not for
Reproduction

4 Loosen the locknut (C) then turn the eccentric nut
(D) to raise or lower left hand side of mower.
When mower is level, hold the eccentric nut while
tightening the locknut (C). Torque as shown.
3
B
AB
2
11 lb-ft
(15 Nm)
4
9/16˝
CD
1
IF AN ADJUSTMENT IS NEEDED:
SIDE-to-SIDE LEVELING
2Arrange the two rear blades so they are pointing
from side-to-side.
3Using a measuring tool, measure the distance
between the outside tips of each blade (A / B) and
the ground.
The difference should be: less than 1/8˝(3 mm).
SI SE NECESITA UN AJUSTE:
NIVELACIÓN LADO A LADO
2Disponga las dos cuchillas traseras de manera que
apunten lado a lado.
3Con una herramienta de medición, mida la
distancia entre las puntas externas de cada lámina
(A \ B) y el suelo.
La diferencia debe ser inferior a 3mm (1/8").
4 Afloje la contratuerca (C) y luego gire la tuerca
excéntrica (D) para subir o bajar el lado izquierdo
inferior del cortacésped.
Cuando el cortacésped esté nivelado, sostenga
la tuerca excéntrica mientras aprieta la tuerca
exterior (C).
EN
ES
For your personal safety, do not handle the sharp
mower blades with bare hands. Careless or
improper handling of blades may result in serious
injury.
WARNING
1
1
Para su seguridad personal, no manipule las
cuchillas filosas del cortacésped sin guantes.
La manipulación descuidada o incorrecta de las
cuchillas puede provocar lesiones graves.
ADVERTENCIA
9
Not for
Reproduction

FRONT-to-BACK LEVELING
2Arrange the blades so they face front to back.
3Using a measuring tool, measure:
(E) - the distance between the rear tip of one
of the back blades and the ground.
(F) - the distance between the front tip of the
center blade and the ground.
The difference should be: less than 1/8˝(3 mm).
Important: Side-to-side leveling must be performed
first.
1
EF
3
2
NIVELACIÓN DE ADELANTE HACIA ATRÁS
2Disponga las cuchillas de modo que enfrenten de
adelante hacia atrás.
3Con una herramienta de medición mida:
(E) - la distancia entre el extremo trasero de
una de las cuchillas posteriores y el suelo.
(F) - la distancia entre el extremo delantero de la
cuchilla central y el suelo.
La diferencia debe ser inferior a 1/8" (3mm).
Importante: Se debe realizar la nivelación lado a lado
primero.
EN
ES
For your personal safety, do not handle the sharp
mower blades with bare hands. Careless or
improper handling of blades may result in serious
injury.
WARNING
1
1
Para su seguridad personal, no manipule las
cuchillas filosas del cortacésped sin guantes.
La manipulación descuidada o incorrecta de las
cuchillas puede provocar lesiones graves.
ADVERTENCIA
10
Not for
Reproduction

4Loosen locknut (H), then turn the eccentric nut (I)
to raise or lower front side of deck until level,
according to Step 3 F.
5Hold the eccentric nut while tightening the locknut (H).
Torque as shown.
If less than 3/8˝(10 mm) of adjustment is
needed:
IF AN ADJUSTMENT IS NEEDED:
If more than 3/8˝(10 mm) of adjustment is
needed:
4Support the deck in front using two boards
5Loosen bolts (G) on the adjusting rod, then adjust
the boards until deck is level according to Step 3 F.
6Tighten bolts and torque as shown.
SI SE NECESITA UN AJUSTE:
4Afloje la tuerca de bloqueo (H), y luego gire la
tuerca excéntrica(I) para elevar o bajar el lado
delantero de la plataforma hasta que esté
nivelado, de acuerdo con el Paso 3 F.
5Sujete la tuerca excéntrica vieja mientras ajusta la
tuerca de bloqueo (H). Apriete a la torsión indicada.
Si se requiere un ajuste de más de 3/8˝(10 mm):
4Sujete la parte delantera de la plataforma con dos
tablas
5Afloje los pernos (G) en la varilla de ajuste; luego
ajuste las tablas hasta que la plataforma esté
nivelada de acuerdo con el Paso 3 F.
6Apriete los pernos al par de torsión indicado.
EN
EN
ES
ES
11
F
F
G
4
5 6
1/2˝
11 lb-ft
(15 Nm)
HI
4 5
11 lb-ft
(15 Nm)
< 3/8˝
> 3/8˝
Not for
Reproduction

ES
EN
This tractor is equipped with several safety systems
designed to keep the operator safe while using the
tractor. Check the operation of these systems using the
safety systems tests listed in the Operator's Manual.
Este tractor se encuentra equipado con varios sistemas
de seguridad diseñados para mantener al operador
seguro al utilizar el tractor. Verifique el funcionamiento
de estos sistemas utilizando las pruebas del sistema
de seguridad incluidas en el manual del operador.
I
12
Not for
Reproduction
This manual suits for next models
19
Table of contents
Other Briggs & Stratton Tractor manuals